
CSS3 Transitions and Styles

Dreamweaver CC supports a number of CSS3 styles including CSS3 Transitions, Gradients and rounded borders for upgrading the style and appearance of your site. CSS3 Transitions add a way to create basic animations using CSS properties such as background-color and size to add interactivity to your website.
What you’ll learn in this lesson:
- • The role of CSS3 in Dreamweaver CC
- • Creating a CSS Transition
- • Creating a CSS Gradient
- • Creating rounded borders
Starting up
Before you begin, reset your workspace to ensure your tools and panels are consistent. For more information, see “Resetting the Dreamweaver workspace” in the Starting up section of this book.
In this lesson, you will work with several files from the dw07lessons folder. Make sure that you have loaded the dwlessons folder onto your hard-drive from www.digitalclassroombooks.com/epub/dreamweavercc. For more information, see “Loading lesson files” in the Starting up section of this book.
Before you can proceed with the exercises in this section, you need to create site settings that point to the dw07lessons folder. Go to Site > New Site, or for details on creating a site, refer to Lesson 2, “Setting Up a New Site.”
Understanding the role of CSS3
Cascading Style Sheets is a separate language from HTML; however, both languages are constantly evolving. The original CSS1 specification was released in 1996 and included many of the basic CSS properties used today, such as background-color, font-family and so on. Over the years, new versions of CSS have emerged with revisions and additions to the original specification. CSS3 is the latest version of the language and offers a number of new CSS properties that give designers new tools for adding style to their pages.
The details of the evolution of CSS are not as important as understanding the key issue: browser support. Although CSS3 offers a number of exciting and useful features, designers and developers need to know which features the different web browsers can reliably support. There are a tremendous number of new features in CSS3, and these features have different levels of browser support. Most features you can use today very reliably, others might not yet be fully supported in all browsers. The architects of CSS3 have broken up the language into categories called modules; examples include Backgrounds, Borders and Animation, among others. In this lesson, you’ll learn how to use CSS Transitions from the Animation module, Gradients from the Backgrounds module and Border radius from the Borders module.
Adding a CSS Transition
CSS Transitions in Dreamweaver CC offer a way to create simple animations on your page using only CSS. This is in contrast to the traditional method of creating effects, such as image rollovers, using JavaScript or Flash.
The basic concept of CSS Transitions is this: an object is animated by changing a property (or properties) over time. For example, in the following exercise you will start with a box that has its height property set to 350 pixels. You will then animate the height property down to 50 pixels over a period of two seconds. The result will be a slow collapsing effect when the user places their cursor over the box.
You’ll start with a simple example file, and then in a later exercise, you will apply CSS transitions to the Organic Utopia layout.
1 Open the 07_csstransitions.html document. Currently, this page has a single style rule for the ID #box. You should take a look at these styles before proceeding.
2 In the Design view, click the edge of the box to select it. To be sure that you have the actual box selected, check for the blue outline that will appear around the box, which confirms that it is selected. In the CSS Designer panel, choose <style> from the Sources pane if necessary, and then click the #box selector. This will expose the properties currently used. (If your Properties panel does not look like our screenshot, click the Show Set check box in the Properties panel).
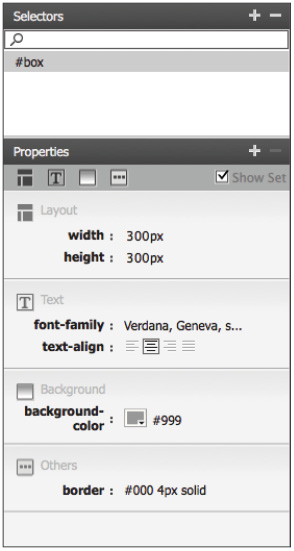
The CSS properties associated with the CSS ID #box.
The properties used here are background-color, border, height, width, font-family, and text-align. All these properties (and many more within CSS) can be animated using transitions.
Pay particular attention to the height property and the value, currently set to 300 pixels. You will now create a single transition that will animate the height of the box from the original 300 pixels to a more narrow height.
3 Choose Window > CSS Transitions to open the CSS Transitions window. This window lists all the existing transitions used in a document, and also allows you to Create, Remove, and Edit transitions.
4 Click the + sign in the upper-left of the CSS Transitions window; the New Transition window appears.

The New Transition window offers a number of options for you to create transition effects.
5 Click the Target Rule menu. The only choice available is for #box, the rule you examined in Step 2. In more complex documents, you would see all the rules used and could choose any of them. Choose #box from this drop-down menu.
6 Click the Transition On menu to see all the options available. A transition starts in one state and then moves to another, but something must trigger the transition. This menu lists the various options: active, checked, disabled, enabled, focus, hover, indeterminate, and target. You’ll learn more about these options shortly.

The options available within the Transition on menu.
7 Choose the Hover option.
8 Click inside the Duration field and type 2.
CSS Transitions provide a way to control the speed of animation changes for one or more CSS properties. In this instance, you are stating that you want this transition to last 2 seconds. You will return to the two other options—Delay and Timing Function—in the next exercise, but first you need to define which property you want to animate.
9 Click the + sign at the bottom of the Property section. A menu appears with the entire list of CSS properties you can control. Select the height property.
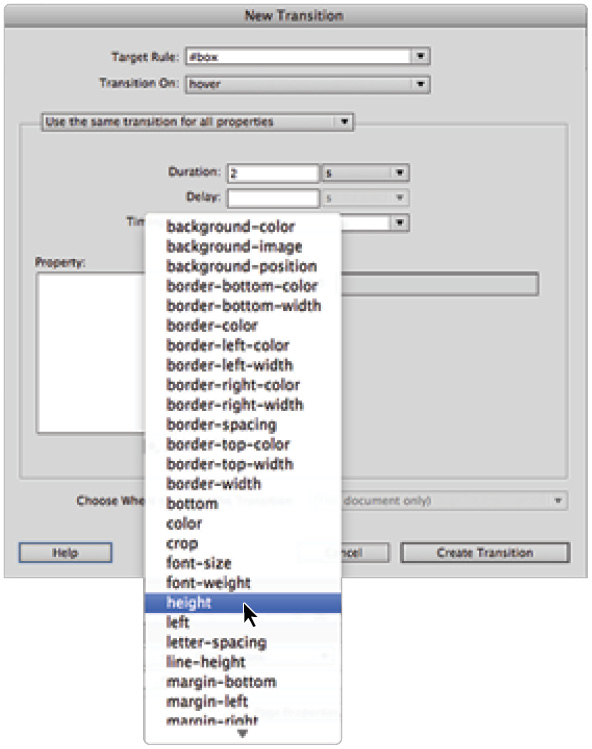
Choose the height property from the available list of CSS properties.
 As this list shows, you cannot animate every single CSS property. For the official list of available properties visit: http://www.w3.org/TR/css3-transitions/#animatable-properties-7
10 Click inside the field labeled End Value, type 50, and make sure the menu to the right remains on pixels (px). The starting height of the box is 300 pixels; using this transition, you will change it to 50 pixels over a period of two seconds when the user hovers over the box.
Click the Create Transition button to add it.
11 Choose File > Save As, type 07_csstransitions_work in the File name and click Save to save this file in the dw07lessons folder. Choose File > Preview in Browser.
Place your cursor inside the top of the box; you will see the box animate from the original height of 300 down to 50 pixels. As you move your cursor off the box, it begins to animate back to its original height.

When the user hovers over the box, it animates from a starting height of 300 pixels to an ending height of 50.
This is a very basic example of a single CSS transition. In the next exercise, you will add more transitions and learn how to edit your existing one.
12 Close both the browser window and the original 07_csstransitions.html page. Return to Dreamweaver. Keep the 07_csstransitions_work.html file open, since you’ll be working with it in the next exercise.
Modifying a CSS Transition
Now that you have seen how a CSS Transition works, you’ll now see how to modify the existing transition speed, add a delay, and adjust the timing of the animation using a feature called Easing.
Before you get started with the modifications, you’ll take a quick look at the CSS code that Dreamweaver creates in the background.
1 Click the Code View in your document and locate the <style> section at the top; specifically, the #box rule. Notice that, in this case, there are five lines of code that were created by adding the transition, starting with -webkit-transition: all 2s; and ending with transition: all 2s;
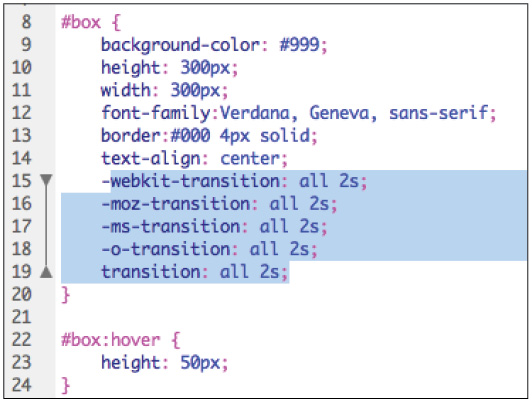
The generated transition CSS that was created by Dreamweaver.
Five lines of code might seem like a lot; however, each line is exactly the same code, and each targets a specific web browser. The code -webkit-transition: all 2s; begins with a vendor-specific prefix to target Webkit browsers such as Apple Safari and Google Chrome. The code -moz-transition: all 2s; targets Mozilla browsers (Firefox). The next two lines, -ms-transition: all 2s; and -o-transition: all 2s; target Microsoft and Opera browsers.
The last line, transition: all 2s; is the “official” CSS3 property name for transitions. The reason for having five lines of almost-identical code is that each browser has its own timeline for supporting a new CSS3 property. For example, Google Chrome might have required the prefix -webkit in version 8.0. When it becomes evident that transitions are working reliably and are well-liked by designers, Google Chrome might choose to drop the requirement for the prefix in version 10.0. The goal is for all browsers to eventually support the “official” property transition; the only reason to use the vendor-specific ones would be to provide support for older browsers.
2 Look below the code for the #box style; you will see the style #box:hover. This code represents the trigger you set for the transition in the last exercise.
3 Click the Design view to toggle back to your page. Most likely, you will not need to modify the CSS transition code by hand, but you should understand where you can find it within the CSS, and understand some of the underlying concepts.
4 In your CSS Transitions window, click hover and then click the Pencil icon to edit the transition.

Select hover and then click the Pencil icon to edit a transition.
The Edit Transition window opens, allowing you to modify the values you created in the last exercise.
 You can also double-click hover or div#box to open this window.
5 Select the value 2 inside the Duration field and type 0.5. This will change the duration from two seconds to half a second.
6 Click inside the Delay field, type 1, and make sure the menu to the right is set to s (for second). Delaying a transition simply means the transition will not begin until one second after the user hovers over the box.
7 Notice that there is a value in the Timing Function field set to ease. This is the default setting, so while you didn’t set this in the last exercise, Dreamweaver fills it in as though you had.
8 Click the Timing Function menu and choose ease-out. The ease-out timing will cause the animation to start off quickly and then slow down. (Note that this effect will be difficult to see with the new half second duration.)

Choose ease-out from the menu of Timing Functions.
9 Click the + sign at the bottom of the Property section. You will now animate a second property to go with the height transition.
10 Choose background-color from the list, and then click the End-Value swatch; the color picker appears. Choose a dark pink color, such as #C36.
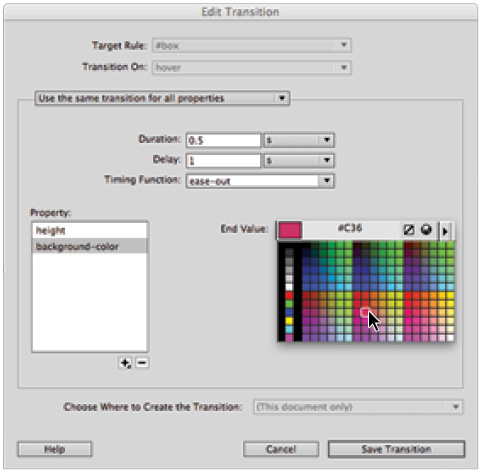
Choose a dark pink color for the background-color property.
Notice that the values for Duration, Delay, and Timing Function are the same. If you want to create separate values for the background-color animation, you would need to click the menu at the top of the Edit Transition window and change it to Use a different transition for each property.
11 Click Save Transition, and then choose File > Save. Preview the page in your browser and place your cursor at the top of the box. Remember that there is a one-second delay that you added in Step 5; after this delay, the box will change height rapidly and simultaneously fade from gray to pink.
 CSS3 Transitions are supported in all major browsers, including Internet Explorer. The current release of Internet Explorer is version 10 (as of this writing), however most users are using version 9 or earlier without support for CSS3 Transitions. For a detailed look at browser support visit: http://caniuse.com/#feat=css-transitions.
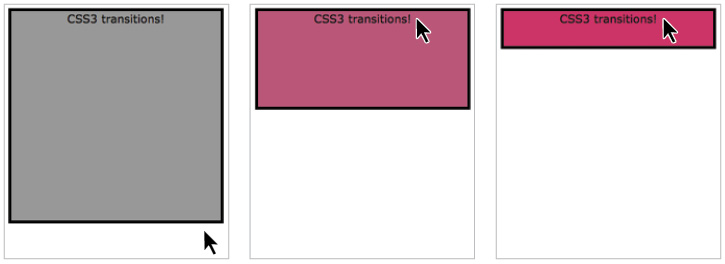
After a delay of one second, the box quickly reduces its height and animates its background color.
12 Close the browser as well as the 07_csstransitions_work.html file.
In these two exercises, you learned the fundamentals of CSS Transitions on a sample file. Now you’ll apply what you’ve learned to a more realistic layout.
Adding CSS Transitions to a navigation menu
User interface elements such as navigation bars, menus, or buttons are great to use with CSS Transitions. Subtle animation can add an extra bit of sophistication and style to your pages.
1 Open the 07_nav_transition.html document by double-clicking it in the Files panel.
2 Choose File > Preview in Browser to view this page in a browser. Hover over the navigation to see the default styles. The effect you are seeing is a traditional CSS2 hover effect; the background color of a list item changes to a lighter green when the cursor hovers over it. However, the change is instant in CSS2 syntax; you have no control over how long it takes for the background color to go from the darker green to the lighter green. In CSS3 syntax you have control using transitions. We will add a transition to make the hover effect more interesting.

The current hover effect is either on or off.
Close the browser and return to Dreamweaver.
3 If your CSS Transitions window is not currently open, do so now by choosing Window > CSS Transitions.
4 Click the + sign to open the New Transition window, and then click the Target Rule. Choose the #navigation ul li a style. (This is currently the style for list items that are also hyperlinks inside the navigation div.)

Choose the #navigation ul li a style from the menu.
5 Click the Transition On menu and choose hover.
6 Click the + sign in the Property section and choose background-color from the list. For Duration, type 400; click the menu to the right and change it from s to ms (milliseconds). Leave the delay set to 0. For the Timing Function, choose ease-in-out and for the End Value, type #9FCC41. (This color matches the one currently used.)
You’ll now combine another effect by changing the foreground color of the text inside the navigation.
7 Click the + sign in the Property section and choose color from the list. By default, this second property is inheriting all the values added for the first value. You want more control, so you’ll have to define separate rules for this color property.
8 At the top of your New Transition window, click the menu and change it to Use a different transition for each property.

You must specify whether you want to set different transitions for each property.
9 Make sure the color property is selected. In the Duration field, type 500; click the menu to the right and choose ms if it is not already selected. In the Delay field, type 100; click the menu to the right and choose ms. Leave the Timing Function set to ease-in-out. Lastly, click the End Value swatch and choose the dark green value #060.
Click Create Transition. Notice that your CSS Transitions panel now reads [5 instances] for hover. This automatically reflects the number of list items in your navigation.
10 Choose File > Save All, and then preview your page in the browser. Hover over the navigation and you will see the navigation background color fade up and down slightly. The text also fades, but because you added the 100ms delay in the last step, it creates a subtle fading effect every time the user moves to another navigation.

Adding two separate transitions for the navigation: one for the background color, the other for the color of the text.
11 Close your browser. Choose File > Close All. Close the CSS Transitions window. You are done with this lesson file.
Adding a CSS Gradient
CSS Gradients in Dreamweaver CC offer a way to apply gradient backgrounds to your layout using only CSS. This is in contrast to the traditional method of creating tiled or repeating gradient background images. Using CSS instead of background images will make your sites quicker and more efficient by eliminating the need for extra images, and saving both bandwidth and download time for users; both of which are at a premium on mobile devices. An additional benefit of CSS Gradients is that they allow you to more easily change colors and apply different gradient effects without having to modify image files.
In this exercise, you will apply a CSS3 gradient to the sample document. Later, you will apply the same effect to the Organic Utopia layout.
1 Open the 07_cssgradients.html document. The box background has been added using a traditional CSS2 single-pixel width gradient image set to repeat horizontally using repeat-x. A background color matching the bottom of the gradient has been added to allow the box to be resized vertically to maintain the gradient effect.
The properties used to achieve the gradient are background-url, background-repeat, and background-color. It is helpful to take a look at these styles before proceeding.
2 In the Design view, click the edge of the box to select it. In the CSS Designer panel, click the #box selector in the Selectors pane. This will expose the properties currently used. (If your Properties panel does not look like the screenshot, you might have to first click <style> in the Sources pane and then click the Show Set check box in the Properties panel.)

The CSS properties associated with the CSS ID #box.
The problem with using this method to add a gradient background is that you would have to create a new image if the color scheme of the site were to change. You will now replace these properties with a CSS3 Gradient, allowing you to apply and modify the gradient effect without an image.
3 In the Properties pane, locate the background-color property and click the Remove CSS Property icon to the right of the value #00000. This will remove the background color. Repeat this step to remove the background-image and background-repeat properties.
4 Clear the Show Set check box to display all of the available properties. Next, click the Background button in the Properties panel to display the background properties. Locate the gradient property in the background-image category. This will bring up the Gradient control. Choose Hex from the tabs at the bottom of the control to add a color using the hexadecimal color code.

The Gradient control allows you to set the color stops to create gradients using RGB, Hex or HSLa values.
5 Click the top color stop in the left pane of the Gradient control and type #993399 in the text box to set the top color stop value. Click the bottom color stop and type #000000 to set the bottom value. Press Enter (Windows) or Return (Mac OS) to apply the gradient color. This will recreate the same effect of the gradient image used previously.
 CSS3 Gradients are supported in all major browsers though each implementation may need browser-specific prefixes to enable the effect. Dreamweaver CC will insert these vendor-specific syntaxes. You can choose the vendors in Preferences > CSS Styles > Use Vendor Prefix For. For a detailed look at browser support visit: http://caniuse.com/#feat=css-gradients.
6 Choose File > Save As, type 07_cssgradients_work in the File name and click Save to save this file in the dw07lessons folder. Choose File > Preview in Browser.
The box background is now created in the browser using CSS3 rather than using an image. This technique can be used to create complex gradient backgrounds that scale with the page elements in a responsive layout.

The gradient background is created using the CSS3 gradient property.
7 Close both the browser window and the original 07_cssgradients.html page. Return to the 07_csstransitions_work.html file in Dreamweaver.
8 Click <style> in the Sources pane, then click the #box selector in the Selectors pane and change the height to 600px. Click the Live view button in the document toolbar and notice how the gradient now stretches the entire length of the box.
9 Turn off Live view, then Choose Edit > Undo to return the box to the original height of 300px. Save your file again by pressing Ctrl+S (Windows) or Command+S (Mac OS).
Applying a CSS Gradient to the page background
Now that you have seen how a CSS Gradient works, you’ll add a gradient to the body of the Organic Utopia home page.
1 Open the 07_page_gradient.html document by double-clicking it in the Files panel.
2 Choose File > Preview in Browser to view this page in the browser. Notice that the background of the page uses a solid color, in this case #739112. You will modify the styles of the body element so that the background displays using a CSS3 gradient. Close the browser window and return to Dreamweaver.

The body of the Organic Utopia home page uses a solid green background color.
3 In the CSS Designer panel, click the body selector in the Selectors pane. This will expose the properties currently used.
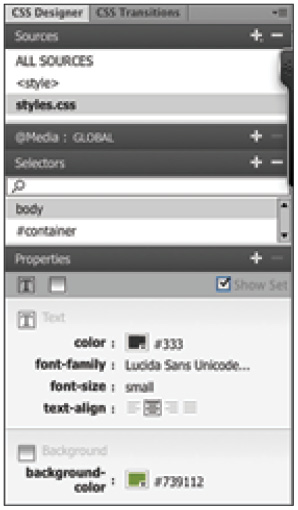
The CSS Designer panel displays the style properties for the body element.
If your Properties panel does not look like our screenshot, you might have to first click <style> in the Sources pane then click body in the Selectors pane, and set the Show Set check box in the Properties panel.
4 In the Properties pane, locate the background-color property and click the Remove CSS Property icon (![]() ) to the right of the value #739912. This will remove the background color.
) to the right of the value #739912. This will remove the background color.
5 Clear the Show Set check box to display all of the available properties then click the Background button to display the background properties. Locate the gradient property in the background-image category. This will bring up the Gradient control. Choose Hex from the tabs at the bottom of the control to add a color using the hexadecimal color code.
6 Type #739112 in the text box to set the top color stop value, then click the bottom color stop and type #739112 to set the bottom value to the same color. Next, click in the middle of the color stops control to create a new color stop and type #EEEEEE to set the value of this color stop. Press Enter (Windows) or Return (Mac OS) to apply the gradient color. This will create a gradient that gradually shifts from the original background color to a light grey and back to the original background color.

Using the Gradient control to create a gradient from #739112 to #EEEEE and back to #739112.
7 Choose File > Save As, type 07_page_gradient_work in the File name and click Save to save this file in the dw07lessons folder. Choose File > Preview in Browser.
The page background is now displayed as a gradient rather than a solid background image. This technique can be used to create multi-color gradient backgrounds that scale with the page elements in a responsive layout.
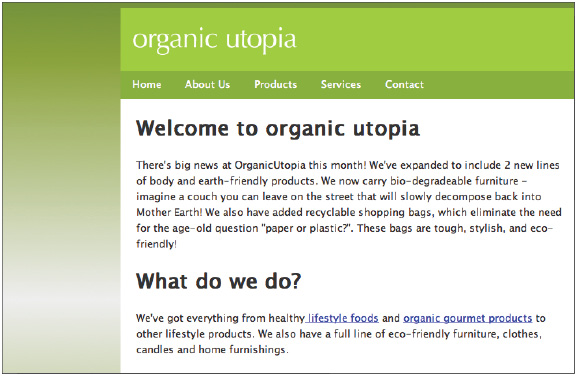
The body of the Organic Utopia home page using our newly created CSS3 Gradient.
8 Choose File > Close All to close all the open files.
Creating rounded borders
Dreamweaver CC adds support for the CSS3 border-radius property to add rounded corners to HTML elements. Previously, creating rounded corners required visual trickery including using images of rounded corners to create the desired effect. The advent of the CSS3 border-radius property renders these techniques obsolete and simplifies the process.
1 Open the 07_rounded_borders.html document by double-clicking it in the Files panel.
2 Choose File > Preview in Browser to view this page in the browser. There are two boxes on the page identified as #box1 and #box2. Currently, there is a border visible on the box on the left and a background-color applied to the box on the right. You will modify the styles of these two elements by applying the border-radius property to round off the corners of the boxes. Close the browser window and return to Dreamweaver.

Before CSS3, there was no easy way to create softer, rounder edges for page elements.
3 You will first apply rounded corners to the borders of #box1. In the CSS Designer panel, choose <style> from the Sources pane if necessary, and then click the #box1 selector. This will expose the properties currently used.
4 Click the Border button in the Properties panel to display the border properties and scroll down to the border-radius control. Click the chain link icon in the center of the border-radius control to link the four radius values together allowing you to apply one value to all four settings. Click the 0 in one of the four corners of the border-radius control and type 15 to set the radius to 15 pixels. Press Enter (Windows) or Return (Mac OS) to apply the settings.
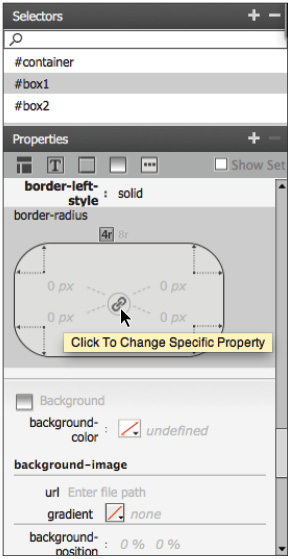
The border-radius control allows you to set the radius of one or more corners of an element.
5 Choose File > Save As, type 07_rounded_borders_work in the File name and click Save to save this file in the dw07lessons folder. Choose File > Preview in Browser.
The corners of the borders of #box1 are now curved producing a rounded-rectangle effect. You can also round the corners of elements without a border style applied to them and you will do this next.

The box1 div rendered using rounded borders with the CSS3 border-radius style.
6 Close both the browser window and the original 07_rounded_borders.html page. Return to the 07_rounded_borders_work.html file in Dreamweaver.
7 In the CSS Designer panel, choose <style> from the Sources pane if necessary, then click the #box2 selector and click the Border button in the Properties panel. Scroll down to the border-radius control.
8 Click the chain link icon in the center of the border-radius control to link the four radius values. Click the 0 in one of the four corners of the border-radius control and type 15 to set the radius to 15 pixels. Press Enter (Windows) or Return (Mac OS) to apply the settings.

Setting the border-radius property of all four corners to 15px using the border radius control.
9 Save your file again by pressing Ctrl+S (Windows) or Command+S (Mac OS) then choose File > Preview in Browser.
The corners of #box2 are now rounded producing a rounded-rectangle effect even though there is no actual border style applied.

Both #box1 and #box2 rendered using border-radius with and without border styles.
Self study
Using your new knowledge of creating CSS3 Transitions and Styles in Dreamweaver, try some of the following tasks to build your experience.
To practice CSS transitions, build a web button labeled Subscribe Now! and give it transition effects such as background color and border effects. You can make a copy of the 07_csstransitions.html document and base your button upon the original #box style. You will have to set the starting width and height to a number more appropriate for a button, such as 25 pixels high and 100 pixels wide.
The transition effects that you created for the 07_nav_transition.html exercise were designed for educational purposes to show you how the effects work; however, they might be too slow for real-world use. Try experimenting with the Duration and Delay values; specifically, try lowering the values. Also try experimenting with different Timing Functions, such as Ease, Linear, Ease-in, and Ease-out.
To practice CSS Gradients, open 07_page_gradient_work.html and apply a background gradient to the #sidebar div. Experiment with setting multiple color stops and angles in the Gradient tool.
To practice using the CSS3 border-radius property, modify the 07_rounded_borders.html file by using different values for each corner and applying various border styles to #box1 and #box2.
Review
Questions
1 How would you add a CSS Transition to a document in Dreamweaver CC?
2 Where can you find the available list of properties that can be animated using CSS properties?
3 What are the benefits of using a CSS3 Gradient over using a gradient image file?
4 What CSS property is used to create a rounded corner effect on an element?
Answers
1 CSS Transitions can be added by going to the menu bar and choosing Window > CSS Transitions.
2 You can find the list of CSS properties that can be animated by clicking the + sign located below the Property section in the CSS Transitions window.
3 The benefits of using CSS Gradients over using a gradient image file are that they can make your sites quicker and more efficient by eliminating the need for extra images, saving both bandwidth and download time for users (both of which are at a premium on mobile devices) and they allow you to more easily change colors and apply different gradient effects without having to modify image files.
4 The CSS property used to create rounded corners is the border-radius property.