
Lesson 3: Adding Text and Images

Text and images are the building blocks of most websites. In this lesson, you’ll learn how to add text and images to web pages to create an immersive and interactive experience for your visitors.
What you’ll learn in this lesson:
- • Previewing pages
- • Adding text
- • Understanding styles
- • Creating hyperlinks
- • Creating Lists
- • Inserting and editing images
Starting up
Before starting, make sure that your tools and panels are consistent by resetting your workspace. See “Resetting the Dreamweaver workspace” in the Starting up section of this book.
You will work with several files from the dw03lessons folder in this lesson. Make sure that you have loaded the dwlessons folder onto your hard drive from the www.digitalclassroombooks.com/epub/dreamweavercc. See “Loading lesson files” in the Starting up section of this book.
Before you begin, you need to create site settings that point to the dw03lessons folder that contains resources you need for this lesson. Go to Site > New Site, and name the site dw03lessons, or, for details on creating a site, refer to Lesson 2, “Setting Up a New Site.”
Typography and images on the Web
Dreamweaver CC offers some convenient features for placing images and formatting text. In this lesson, you’ll be working with a few pages within a site and adding some photos and text to a simple page for a fictional store.
Adding text
You should already have created a new site, using the dw03lessons folder as your root. In this section, you’ll be adding a headline and formatting the text on the events.html page.
1 If it’s not already open, launch Dreamweaver CC.
2 Make sure your dw03lessons site is open in the Files panel. If not, open it now.
3 Double-click the events.html file in your Files panel to open it in the Design view. Without any formatting, the text seems random and lacks purpose. First, you’ll add a headline to give the first paragraph some context.
4 Click to place your cursor in front of the word There’s in the first paragraph. Type OrganicUtopia Events and press Enter (Windows) or Return (Mac OS) to create a line break.

Type the words OrganicUtopia Events and then put them on their own line.
5 Click and drag to highlight the phrase you just typed. You will now format your text using the Property Inspector. Located at the bottom of the screen, the Property Inspector allows you to format your text using HTML, an acronym for Hypertext Markup Language. You will learn much more about the use of HTML in the next lesson; however, you will need to have a basic understanding of this language in order to use the Property Inspector to format your text.
6 Locate the Property Inspector at the bottom of your screen. When you are in Design View and working with text, you will see your HTML formatting options. Choose Heading 1 from the Format drop-down menu. The text increases in size and becomes bold. By default, the style of any HTML text formatted as Heading 1 is generic: the color is black and the font-family is Times New Roman.

Use the Format drop-down menu in the Property Inspector to make the selected text a level-1 heading.
Although you are working in Dreamweaver’s Design view, you have actually changed the HTML code for this page. Page content such as text is wrapped in opening and closing tags, and everything between these two tags is formatted according to the rules of these tags. The text OrganicUtopia Events originally had an opening and closing tag defining it as a paragraph. The code looked like this:
<p>OrganicUtopia Events</p>
The first <p> is the opening tag for a paragraph, and the second </p> is the closing tag for a paragraph. A pair of opening and closing tags in HTML is called an element. So in the previous step, you changed the formatting of the text from a paragraph element to a Heading 1 element, and the HTML code changed to this:
<h1>OrganicUtopia Events</h1>
Headings are important structural elements in HTML. The largest heading is H1, and the subsequent headings become smaller with H2, H3, and so on. For the next step, you will format this text in order to change the font style of this heading to Helvetica; however, you will not be using HTML to accomplish this, but rather CSS.
7 Click anywhere inside the heading OrganicUtopia Events; you do not need to have it selected. You will find the CSS Designer panel on the bottom-right side of your screen. You will use this panel to create CSS styles to change the appearance of your h1 heading.

The CSS Designer panel, located in the bottom-right corner of the workspace, is where you will create and edit all of your CSS styles.
8 Click the Add CSS Source button in the Sources menu bar and select Define in Page from the menu. This will allow you to create a new rule for this page.

The Sources menu of the CSS Designer will allow you to create or attach an external style sheet or create an embedded one.
9 Click the Add Selector button in the Selectors menu to create a new CSS style for our h1 heading element. This will create a new text box in the Selectors list where you can add a new selector.
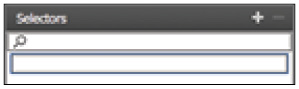
The Selectors menu of the CSS Designer allows you to define new selectors such as tags, classes or IDs.
10 Type h1 to create a selector for Heading 1 headers and press Enter (Windows) or Return (Mac OS) twice to commit the change.

The Properties menu of the CSS Designer panel allows you to specify individual CSS properties for your selectors.
11 Click the Text button in the Properties menu to only show the text-related properties.

Click the Text button to show the text-related properties.
12 Locate the font-family property and click default font to the right of font-family to view the font selection menu. Choose Gotham, Helvetica Neue, Helvetica, Arial, sans-serif from the list. Your heading is now styled in Gotham.
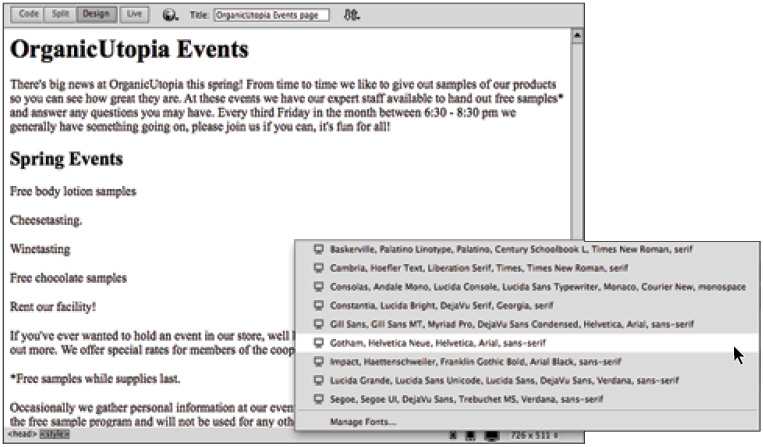
The font-family property allows you to choose a font list from the font selection menu.
Dreamweaver allows you to format text in a way that is similar to desktop publishing and word processing applications, but there are important differences to keep in mind. When you chose the styling, Gotham, Helvetica Neue, Helvetica, Arial, sans-serif, they were listed together as one option in the Font drop-down menu. When a web page is rendered in a browser, it typically uses the fonts installed on the user’s computer. However, Dreamweaver CC allows users to also use free web fonts made available through Creative Cloud and powered by TypeKit.
Using web fonts means that anyone viewing your web page will see the page using the fonts you intended. Dreamweaver still provides a font list in the event the user’s computer cannot access the web fonts. Assigning multiple fonts allows you to control which font is used if the person viewing your page doesn’t have a specific font installed. In this case, if the user doesn’t have Gotham, Helvetica Neue, or Helvetica, then Arial displays instead. Sans serif is included as the last option in case the user doesn’t have any of the preceding fonts. A generic font family (either sans-serif or serif) is listed at the end of all the options in the Font drop-down menu.
You will now change the text color using the CSS Designer Panel.
13 Locate the color property in the Properties pane of the CSS Designer panel and click the color picker next to the font color. When the Swatches panel appears, hover over the color swatches. At the top of the Swatches panel, a different hexadecimal color value appears for each color. When you locate the value labeled #99CC33 (an olive green), click once to apply the color.

Click the Text Color swatch and choose the #99CC33 color from the swatches.
14 Choose File > Save. Keep this file open for the next part of this lesson.
An introduction to styles
You have styled the first element on your page by first formatting the text as a Heading 1 in HTML, and then you changed the font and color using CSS. It’s important to realize that every change you make in the Design view creates or modifies the code. In the next exercise, you’ll begin to explore the HTML and CSS code behind the Design view. To help put this exercise in context, a little background on HTML and CSS is in order.
The HTML language has been around since the dawn of the Web. It’s easiest to think of HTML as the structure behind the pages that are rendered in your web browser. An HTML page at its most basic is a collection of text, images, and sometimes multimedia such as Flash or video files. The different sections of a web page, such as a paragraph, a heading, or a list, are all elements.
CSS is also a language, but it has not been around as long as HTML. In many ways, CSS was created in order to allow HTML to do what it does best: create the structure of a page, but not style. CSS is a simple language that works in combination with HTML to apply style to the content in web pages, such as text, images, tables, and form elements. CSS uses rules, or style instructions, that the HTML elements on your page follow. The most important thing to remember is that HTML and CSS are two separate languages, but they are very closely aligned and work together very well.
In the last exercise, you were introduced to this interplay between HTML and CSS. There was an HTML element for the Heading 1 formatting. In the code it looks like this:
<h1>OrganicUtopia Events</h1>
That was the HTML element. The CSS rule that defines the appearance of the <h1> element looks like this:
h1 {
font-family: Gotham, "Helvetica Neue", Helvetica, Arial, sans-serif;
color: #99CC33;
}
CSS has a different syntax than HTML. In HTML, tags are defined by angled brackets, and you have opening tags, <h1>, and closing tags, </h1>. In CSS code, you are not working with tags at all, instead you use selectors. In the CSS code above, the h1 is referred to as the selector because it is selecting the HTML element and then declaring some rules for its appearance. Because you’ve established that HTML and CSS are two separate languages and have different syntax, it’s important that you see where this code lives in your web page. You will do this by changing Dreamweaver’s workspace.
This exercise is intended to help you understand the relationship between HTML and CSS code that is created in Dreamweaver, and is not necessarily the way you will always work in the program. Many people will work in the Design view most of the time, but the Split view you are about to use is very helpful for learning the languages of HTML and CSS.
1 Click the Split button in the Document toolbar at the top of your page to open up the Split view. The Split view allows you to see your code and the design of your page simultaneously.
2 Click quickly three times in the paragraph beneath OrganicUtopia Events in the Design view. In the Code view the text is highlighted between the opening and closing paragraph tags. As noted above, this is referred to as the paragraph element.
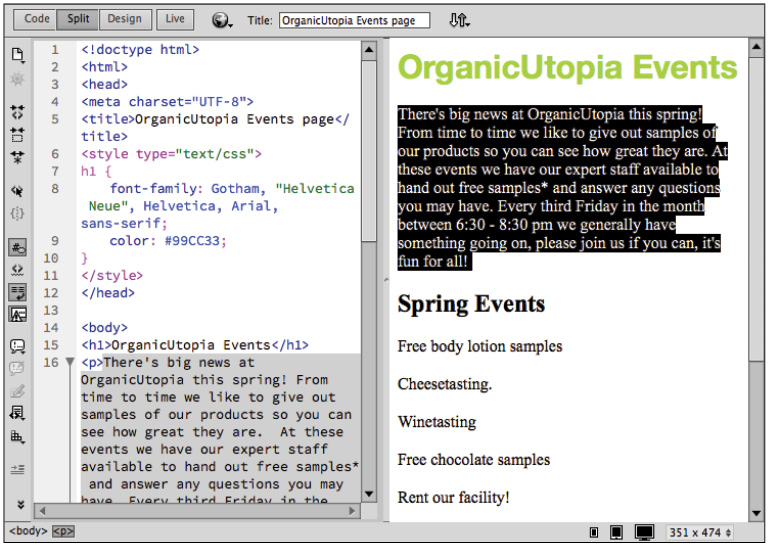
A paragraph highlighted in the Split view.
You will now change the font size of your paragraphs.
3 Click <style> in the Sources pane to alert Dreamweaver that you want to add another embedded style. Click the Add Selector button in the Selectors menu to create a new CSS style for our p element.
4 In this case, Dreamweaver has recognized that you have selected text in a paragraph within the body tag of your page so it prefills the text box with body p. Select body and delete it leaving the letter p to create a selector for our paragraph. Then press Enter (Windows) or Return (Mac OS). You may need to press this key twice to commit the change.
5 If necessary, clear the Show Set check box in the Properties pane of the CSS Designer panel to show all the available CSS properties. Click the Text button in the Properties menu to limit the choices and only show the text-related properties.
In this case, you will set the font size to 18 pixels.
6 Locate the font-size property in the Properties pane of the CSS Designer panel and click medium to the right of the property label. Select px from the menu and type the number 18 in the text box that appears. Press Enter (Windows) or Return (Mac OS) to apply the change.
7 Within the Code view of the split screen is all the HTML and CSS code that defines the appearance of this page. On the right side of the Code view, scroll up by clicking the up arrow or by clicking the scroll bar and dragging upward. Toward the top of the page, you are looking for a few lines of code that look like this:
<style type="text/css">
h1 {
font-family: Gotham, "Helvetica Neue", Helvetica, Arial, sans-serif;
color: #99CC33;
}
p {
font-size:18px;
}
</style>
Between the two <style> tags are all the CSS rules you have created up to this point. Previously, you learned that CSS has a different syntax than HTML: because all the CSS rules are actually contained within an opening <style> tag and a closing </style> tag, they are allowed to have a different syntax. Additionally, the style tag itself is nested inside an opening and closing <head> tag. In the world of HTML, nothing contained within head tags is rendered on a web browser’s screen. You will explore this further in the next lesson, but this is referred to as an internal style sheet.
You will now see that changes made in Dreamweaver’s Code view apply to the Design view as well.
8 In the Code view, locate the line font-size:18px in the rule for p, and select the value 18 by clicking and dragging over it. Type 14 to change the value. Although you made a change in the Code view, it has not yet been automatically updated in your Design view. You need to refresh your page in order to see the changes occur in the Design view.
9 In the Property Inspector at the bottom of your screen, click the Refresh button to apply the changes; your paragraph text becomes smaller.

Changes made in the Code view are reflected in the Design view after clicking the Refresh button.
 You can also click once inside the Design view for the page to refresh automatically.
On the Web, font sizes are specified differently than they are in print. The numerical choices in the Size drop-down menu refer to pixels instead of points. Also, the xx-small through larger options could seem oddly generic if you are accustomed to the precision of print layout. Because web pages are displayed on a variety of monitors and browsers, relative measurements can be a useful way for designers to plan ahead for inevitable discrepancies in the rendering of pages.
10 Click inside the first paragraph in the Design view. You will now change the color of the paragraph slightly to a dark gray rather than the default pure black. Click the p selector in the Selectors pane of the CSS Designer panel so that we can modify the properties for our paragraph element.
11 If necessary, clear the Show Set check box in the Properties pane of the CSS Designer panel to show all the available CSS properties. Click the Text button in the Properties menu to only show the text-related properties.
12 Locate the color property in the Properties pane of the CSS Designer panel and click the Set color button to the right of the label color. When the Swatches panel appears, locate the dark gray swatch in the top-left corner of the palette, which is hexadecimal color #666666. Click the swatch to apply the color. Notice that not only does the appearance in the Design view change, but in your Code view a new line of CSS has also been created (color: #666666).
Working in the Split view can be a great way to learn about hand-coding without diving in completely. Even if you’re not quite comfortable editing code, keeping an eye on the code that Dreamweaver writes for you can give you a better understanding of how things like CSS affect your web pages.
13 Click the Design view button to return to Design view.
14 Choose File > Save. Keep this file open for the next part of this lesson.
 For more information about Cascading Style Sheets, see the Web Design with HTML and CSS Digital Classroom book available in electronic and print formats.
Previewing pages in a web browser
Viewing your pages in the Design view is helpful, but visitors to your site will be using a web browser to access your site. In Lesson 1, “Dreamweaver CC Jumpstart,” you learned how browsers use HTML code to render a page. Unfortunately, not every browser renders HTML code in exactly the same way, so it’s important to test-drive your pages in a number of different browsers to check for inconsistencies and basic functionality.
Next, you’ll use Dreamweaver’s Preview in Browser feature to see how the OrganicUtopia site looks in a web browser.
1 With events.html open in Dreamweaver, choose File > Preview in Browser and select a browser from the available options. This list varies, depending on the browsers you have installed on your hard drive.

Preview in Browser allows you to see how a selected browser would render your page.
 The options found under File > Preview in Browser can be customized by choosing File > Preview in Browser > Edit Browser List.
2 When events.html opens in the browser of your choice, look for differences between the Design view preview and the version rendered by your browser. At this stage, there shouldn’t be anything too surprising, but there could be subtle differences in spacing and font style. Close your web browser.
There is another method to preview your pages: the Live View feature. Live View allows you to preview your page without having to leave the Dreamweaver workspace. You can think of Live View as a browser within Dreamweaver (in fact, it is the same WebKit rendering engine found in browsers such as Apple’s Safari and Google’s Chrome, among others).
3 Click the Live button located in the Document toolbar at the top of your page. You will not see a dramatic difference, but your text could shift slightly. Select the first heading in the window and try to delete it; you will be unable to, because Live View is a non-editable workspace. However, Live View does allow you to edit your page when you are in Split view. You are allowed to edit in the Code view and changes will be reflected in real time. An additional advantage is that your document does not have to be saved in order to see the changes.

When Live View is enabled, Dreamweaver simulates a web browser.
4 Click the Live button again to deactivate this view. While Live View is a useful addition to Dreamweaver, it does not replace the need to preview your page in a browser. Web pages might be rendered differently depending on your visitor’s browser, and so it is a good habit to check your page occasionally as you make changes to your design.
Understanding hyperlinks
When people visit a website, they usually expect to see more than one page. Imagine trying to shop for a new book by your favorite author on a site that consisted of nothing more than a single order form with every book offered by a retailer like Amazon.com. This might seem absurd, but without hyperlinks you wouldn’t have much choice.
Hyperlinks make the Web a truly interactive environment. They allow the user to freely navigate throughout a website, or jump from one site to another. There are a number of ways to create links in Dreamweaver, but before you get started, you should be aware of some fundamental facts.
Links rely on directory paths to locate files. A directory path is simply a description of a file’s location that can be understood by a computer. A classic, real-world example is an address. If you wanted to send a letter to your friend Sally in Florida, you would have to specify the state, city, street, and house number where Sally can be found. If Sally lived at 123 Palm Street in Orlando, the path would be:
Florida/Orlando/123 Palm Street/Sally
This simply means that inside Florida, inside Orlando, in the house numbered 123 on a street named Palm Street, you can find a person named Sally. Hyperlinks follow the same logic:
www.somewebsitesomewhere.com/photos/mydog.jpg
This URL address is a link to a JPEG image named mydog.jpg, which is inside a folder named photos on a website named somewebsitesomewhere.com.
Creating hyperlinks
Later in this lesson, you’ll be creating a gallery page to showcase some of the sample products mentioned in the main paragraph. Before you work on that page, you’ll link it to the home page by creating a hyperlink.
1 If you are not already in Design view, select Design view now. In the Property Inspector, click the HTML button to access the HTML properties.
2 In the first paragraph, highlight the word products in the second sentence.
3 In the Property Inspector, type products.html in the Link text field. Press Enter (Windows) or Return (Mac OS). The highlighted word automatically becomes underlined. It is important to note that we have created this page for you and it is currently inside your site folder, you are simply linking to it.

Type products.html into the Link text field in the Property Inspector.
4 Choose File > Save and then File > Preview in Browser and choose a browser.
5 Click the new products link. The products page appears in your browser window. This is because a previously existing page named products.html was located in this folder.
Now visitors can easily navigate to the products page, but what happens when they want to go back to the events page? It looks like you’ll need another link.
6 Return to Dreamweaver and double-click products.html in the Files panel. Click to the right of the word Produce and press Enter (Windows) or Return (Mac OS) to create a new line. Choose Insert > Hyperlink to open the Hyperlink dialog box.
The Hyperlink dialog box is one of the many ways to create a link in Dreamweaver. It offers all the options found in the Property Inspector, with a few additions.
7 Type Events in the Text field.

The Hyperlink dialog box is one of the many ways to create links in Dreamweaver.
8 Click the Browse button to the right of the Link text field to open the Select File dialog box. The dw03lessons folder you defined as the root for this site should be selected for you by default. If not, click the Site Root button. Select events.html and click OK (Windows) or Open (Mac OS).
9 Click inside the Title field and type Organic Utopia events page. Titles are strictly optional for hyperlinks, but they improve accessibility for users with assistive technologies, such as Screen Readers. Additionally, adding titles to your hyperlinks can also improve your site’s search engine rankings. Click OK to commit the changes; notice that a link to events.html has been created for you using the text entered into the Text field in the Hyperlink dialog box.
10 Choose File > Save and keep this file open for the next part of this lesson.
Relative versus absolute hyperlinks
After reading about the fundamentals of hyperlinks and directory paths a few pages ago, you might be surprised by the simplicity of linking events.html and products.html. Instead of entering a long directory path in the Link text fields, you merely typed the name of the file. This kind of link is called a relative link. Let’s go back to the address example to see how this works.
Remember Sally from Orlando? Imagine you were already standing on Palm Street, where she lives. If you called her for directions to her house, she probably wouldn’t begin by telling you how to get to Florida. At this point, all you need is a house number. Relative links work the same way. Because events.html and products.html both reside in the dw03lessons folder, you don’t need to tell the browser where to find this folder.
Now you’ll create an absolute link that will allow visitors to access the Adobe website to learn more about Dreamweaver CC.
1 Click the events.html tab above the Document toolbar to bring the page forward. Scroll down to the bottom of the page if necessary. Using the Design view window, create a new line at the bottom of the page after the text that reads “Occasionally we gather...”, and type This page was created with Adobe Dreamweaver.
2 Highlight the words Adobe Dreamweaver and in the Common section of the Insert panel on the right side of the screen, click the Hyperlink icon to open the Hyperlink dialog box.

The Hyperlink icon in the Insert panel is another convenient way to create links.
3 The Hyperlink dialog box opens. Notice that Adobe Dreamweaver has been entered into the Text field for you. In the Link text field, type http://www.adobe.com/products/dreamweaver.html. Make sure to include the colon and the appropriate number of forward slashes.
The absolute link http://www.adobe.com/products/dreamweaver.html instructs the browser to find a website named adobe.com on the World Wide Web. Then the browser looks for a file named dreamweaver.html located inside a folder named products.
 You do not have to type the absolute hyperlinks if you have the website open in your browser. In your web browser, select the address in the address bar, copy it, and then paste it into the Link field in Dreamweaver.
4 Choose _blank from the Target drop-down menu. Choosing the _blank option will cause the hyperlink to the Adobe website to open in a new, blank browser window or tab (depending on the browser).

Set the target window for the hyperlink to open in a blank browser window or tab.
5 Click OK to close the Hyperlink dialog box. Choose File > Save, then File > Preview in Browser, or click the Preview/Debug in Browser button (![]() ) in the Document toolbar and choose a browser.
) in the Document toolbar and choose a browser.
6 Click the Adobe Dreamweaver text. Unlike the Events and Products links you created earlier, this link causes your browser to open a new tab or window, and it is pointing to an external web page on the Internet.
7 Close your browser and keep this file open; you will be adding to it in the next exercise.
Linking to an e-mail address
Absolute and relative links can be used to access web pages, but it’s also possible to link to an e-mail address. Instead of opening a new web page, an e-mail link opens up the default mail program on a visitor’s computer and populates the address field with the address you specify when creating the link. As you can imagine, this kind of link can work differently depending on how your visitors have configured their computers.
In the previous part of this lesson, you gave the visitor a link to some information on Dreamweaver. Now you’ll link them to an e-mail address where they can get some information on learning Dreamweaver from the folks who wrote this book.
1 Place your cursor at the end of the last line, then press and hold your Shift key and press Enter (Windows) or Return (Mac OS). Instead of creating a new paragraph, this creates a line break, or a soft return, and the text begins immediately below the previous line. Type Contact [email protected] for information on Dreamweaver classes.
2 Highlight the text [email protected] and click the Email Link button in the Insert panel.
3 The Email Link dialog box opens with both fields automatically populated. Click OK. You can preview this page in your browser. Remember that if you click the link, your e-mail client will begin to launch.
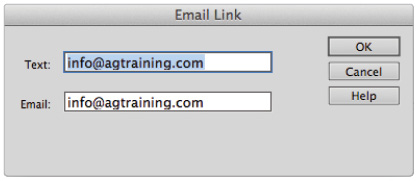
The Email Link dialog box allows you to link to an e-mail address.
Creating lists
Bulleted lists might be familiar to you if you have worked with word processing or desktop publishing applications. Lists are a helpful way to present information to a reader without the formal constraints of a paragraph. They are especially important on the Web. Studies indicate that people typically skim web pages instead of reading them from beginning to end. Creating lists will make it easier for your visitors to get the most from your website without sifting through several paragraphs of text.
1 On the events.html page, click and drag to highlight the four lines below Spring Events.
2 Make sure you have the HTML button selected in the Property Inspector at the bottom of your page, and click the Unordered List button. The highlighted text becomes indented, and a bullet point is placed at the beginning of each line.

Use the Unordered List button in the Property Inspector to create a bulleted list.
3 Click the Ordered List button to the right of the Unordered List button. The bullets change to sequential numbers.
4 Choose Format > List > Properties to open the List Properties dialog box. Choose Bulleted List from the List type drop-down menu to return to your first style of list. The Numbered List and Bulleted List options in the List type drop-down menu also allow you to switch between ordered and unordered lists.
5 From the Style drop-down menu, choose Square. This changes the default circular bullets to square bullets. Click OK to exit the List Properties dialog box.

Change the bullet style to square in the List Properties dialog box.
You might have noticed that the four lines of text in your list have lost their style. They are slightly larger than your paragraphs and they are black, not dark gray. This is because a style has been defined for paragraphs, but not an unordered list. You will now create a new CSS rule for the appearance of all unordered lists in the document. After you define the properties, all text formatted as an unordered list will appear the same.
6 With all four lines still highlighted, click <style> in the Sources menu of the CSS Designer panel.
7 Click the Add Selector button in the Selectors menu to create a new CSS style for the ul element.
8 In this case, Dreamweaver has recognized that you have selected text in an unordered list within the body tag of your page so it prefills the text box with body ul li; ul is the tag for unordered list. Replace this text by typing ul to create a selector for our unordered list. Then press Enter (Windows) or Return (Mac OS). You may have to press this key twice to commit the change.
9 Click the Text button and locate the font-size property in the Properties pane of the CSS Designer panel and click medium to the right of the property label. Select px from the menu and enter the number 14 in the text box that appears. Press Enter (Windows) or Return (Mac OS) to apply the change.
Now you need to change the color of the unordered list to match the color of your paragraph.
10 Locate the color property in the Properties pane of the CSS Designer panel and click the Set Color button to the right of the label color. When the Swatches panel appears, locate the same dark gray swatch, hexadecimal color #666666. Click the swatch to apply the color.
11 Choose File > Save. Leave this file open for the next part of this lesson.
Using the Text Insert panel
There are a number of ways to format text in Dreamweaver. One method you haven’t explored yet is the Text Insert panel. Because most of the options available in the Text Insert panel are also available in the Property Inspector, you might find it more convenient to use the Property Inspector for common tasks. However, you should be aware of the Characters menu located in the Text Insert panel. One of the most common items in the Characters menu used on the Web is the copyright symbol, ©. You will now insert a copyright notification at the bottom of your Events page.
1 Click to the left of the sentence This page was created with Adobe Dreamweaver and type 2013 and then add a space.
2 Click before the text 2013 to insert your cursor.
3 Click the menu at the top of the Insert panel on the right side of your page and choose Common. Scroll all the way to the bottom of the resulting list and choose Copyright from the Character menu to insert the Copyright symbol to the beginning of the line.

The copyright symbol can be inserted from the Insert menu.
4 Highlight the last two lines on your page, beginning with the newly inserted copyright symbol and ending with Dreamweaver classes. You are going to set these two lines apart from the rest of the page by italicizing them. Layout considerations such as headers and footers will be discussed throughout the following lessons in this book, but for now you can use the Property Inspector to italicize these two lines.
5 Click the Italic button in the Property Inspector to apply an inline italic style to your text.
6 Choose File > Save.
Inserting images
Images are an essential part of most web pages. Just as lists make content friendlier and more accessible, images help to give your visitors the rich, visual experience that they’ve come to expect on the Web. However, before you learn to insert images, you will briefly learn about web graphics.
Image resolution
While it is possible to resize images with Dreamweaver, it’s generally not a good idea. Specifying the width and height of an image in the Property Inspector changes the display size of the image, but it does not resample the image the way a graphic processing application like Photoshop does. For example, a JPEG image that is 150 pixels by 150 pixels might have a file size of 30k. You could resize this image in Dreamweaver by 50% and the result would be a thumbnail image displayed at 75 pixels by 75 pixels. However, even though the image is visually smaller, the file size remains the same. A visitor to your website still must download the 30k file which translates to slower loading time for the image (and possibly the page) and a potentially poor user experience, especially if they have low bandwidth.
Image formats
The three most common image formats on the Web are JPEG, GIF, and PNG. While an exhaustive description of how each of these formats compresses data is beyond the scope of this book, a general overview can help you avoid some common pitfalls.
The JPEG format was created by a committee named the Joint Photographic Experts Group. Its sole purpose is to compress photographic images. Specifically, it uses lossy compression, which means that it selectively discards information, to reduce the size of a file. When you save a JPEG, you decide how much information you are willing to sacrifice by selecting a quality level. A high-quality image preserves more information and results in a larger file size. A low-quality image discards more information, but produces a smaller file size. The goal is to reduce file size as much as possible without creating distortion and artifacts.
Because JPEGs were designed to handle photographic images, they can significantly reduce the size of images containing gradients and soft edges, without producing noticeable degradation. However, reproducing sharp edges and solid areas of color often requires a higher quality setting.
The GIF format was created by CompuServe. GIF is an acronym for Graphics Interchange Format. Unlike the JPEG format, GIFs do not use lossy compression. Instead, GIFs rely on a maximum of 256 colors to reduce the size of images. This means that images with a limited number of colors can be reproduced without degradation. Logos, illustrations, and line drawings are well-suited to this format. Unlike JPEGs, GIFs excel at reproducing sharp edges and solid areas of color. However, because photographic elements such as gradients and soft edges require a large number of colors to appear convincing, GIF images containing these elements look choppy and posterized.
The PNG format has become increasingly popular on the Web in recent years because it incorporates many of the best features of JPEGs and GIFs. The PNG format is closer to GIFs in that it offers lossless compression and comes in two categories: 8 bit and 24 bit. This means it can be used quite effectively for simple graphics as well as continuous tone photographic images. A PNG also offers better transparency features than a GIF, most significantly the support of alpha channels. For many years the adoption of PNGs (especially the use of the transparency) was held back because Internet Explorer 6 ignored the transparency. As the number of people using this browser continues to decline, the PNG format is being used more frequently. For more information on web graphics see the Web Design with HTML and CSS Digital Classroom book, which is available in both print and electronic formats.
Creating a simple gallery page
Now that you have a better understanding of the types of images that are appropriate for use on your website, it’s time to build the products.html page that you linked to earlier in this lesson.
1 Double-click products.html in the Files panel or click the tab, as it’s still open. Place your cursor after the word Produce and press Enter (Windows) or Return (Mac OS) to create a new line.
2 Choose Insert > Image > Image. The Select Image Source dialog box appears. If your site folder does not open automatically, click the Site Root button, and then double-click the images folder. Select beets.jpg and click OK (Windows) or Open (Mac OS).
3 In the Property Inspector, locate the Alt field and type Beets in the text box. Press Tab to apply the change.
 In previous versions of Dreamweaver, the Image Tag Accessibility Attributes dialog box would open upon inserting an image. Dreamweaver CC instead inserts an empty value for the Alt attribute of the <img> tag. Including a description of the inserted image recommended by the Web Content Accessibility Guidelines (WCAG) published by the W3C. For more information on the WCAG, visit http://www.w3.org/TR/WCAG10/. It provides information about the images to visually impaired visitors using screen readers. Also, Alt text is displayed in place of images on some handheld devices, and browsers where images are disabled.
4 Click the Split button in the Document toolbar to view the code that was written by Dreamweaver when you inserted beets.jpg. An <img> tag was created, with four attributes. The src attribute is a relative link to the .jpg file in your images folder. The alt attribute is the alternate text string created in the last step. The width and height attributes are simply the width and height of the image, which have automatically been added by Dreamweaver. Click the Design button to return to this view.

Dreamweaver creates an <img> tag with a number of attributes when you insert an image.
5 Double-click the images folder in the Files panel to reveal its contents. In the document window, click to the right of the beets image and press Enter (Windows) or Return (Mac OS) to create a new line. Click and drag cucumbers.jpg from your Files panel directly below the beets image in the Design view.
6 In the Properties panel, locate the Alt field and type Cucumbers in the text box. Press the Tab key to commit the change.
7 Click to the right of the cucumber image to place your cursor, and press Enter (Windows) or Return (Mac OS) to create a new line. To add the last image, you’ll use the Insert panel on the right side of your page. Click the menu at the top of the Insert panel and choose Common from the list. Click the Images:Image option, and the Select Image Source dialog box appears.

Choose Image from the Images drop-down menu in the Common section of the Insert panel.
8 Navigate to the images folder if necessary, select the eggplants.jpg image, and click OK (Windows) or Open (Mac OS).
9 Type Eggplants in the Alt field of the Properties panel. Press Tab to commit the change.
10 Choose File > Save and leave products.html open for the next part of this lesson.
Linking images
Often, gallery pages on the Web contain small thumbnail images that are linked to larger, high-resolution images. Like many web conventions, there are practical reasons for this format. Because all the images on a gallery page must be downloaded by visitors in order to view the page, small images are necessary to keep the page from taking too long to load. Additionally, a user’s screen isn’t large enough to accommodate multiple large pictures at one time. Giving your visitor a way to preview which pictures they would like to see on a larger scale makes the page more user friendly and interactive.
1 In products.html, click the image of the beets to select it. In the Property Inspector, type images/beets_large.jpg into the Link text field. Press Enter (Windows) or Return (Mac OS).
Manually typing in the link is one way to link to the image, but can introduce errors. Here is a second method using Dreamweaver’s Point to File feature.
2 Click the Files panel to open it and then click the image of the cucumbers to select it. In the Property Inspector, locate the Point to File icon (![]() ) next to the Link text field. Click and drag this icon into the Files panel. An arrow with a target at the end follows your cursor. As you hover over items in the Files panel, they become highlighted. Release the mouse while hovering over the cucumbers_large.jpg file.
) next to the Link text field. Click and drag this icon into the Files panel. An arrow with a target at the end follows your cursor. As you hover over items in the Files panel, they become highlighted. Release the mouse while hovering over the cucumbers_large.jpg file.

With the Point to File feature, you can click and drag to create a link.
3 Select the image of the eggplants and use the Point to File icon to link it to eggplants_large.jpg.
4 Choose File > Save, and then File > Preview in Browser and choose a browser. Click the thumbnails to see the large versions of each image. You’ll have to use your browser’s back button to get back to the products page.
Editing images
Although it’s best to make adjustments to your images using a professional graphics-editing program like Adobe Photoshop, sometimes that’s not an option. Dreamweaver offers a number of editing options, including an Edit link that allows you to quickly open a selected image in the graphics editor of your choice.
 The Edit button can be customized in the File Types/Editors section of the Preferences dialog box, found under the Dreamweaver drop-down menu. You can use this section to add or subtract programs from the list of available editors, and set programs as the primary choice for handling specific file extensions.
Adjusting brightness and contrast
Now you’ll use Dreamweaver’s Brightness and Contrast button to lighten up the eggplants image on your products page.
1 Click the eggplants image in products.html to select it, then click the Brightness and Contrast button in the Property Inspector.

Select the Brightness and Contrast button in the Property Inspector.
A warning dialog box appears, indicating that you are about to make permanent changes to the selected image. Click OK.
2 When the Brightness/Contrast dialog box appears, drag the Brightness slider to 20 or type 20 in the text field to the right of the slider.
3 Drag the Contrast slider to 10 or type 10 in the text field to the right of the slider.
4 Click the Preview check box in the lower-right corner to see the original photo. Click the Preview check box again to see the changes. Click OK to commit the changes.
 While changing the brightness and contrast is very convenient in Dreamweaver, you should be sure you are not performing the corrections on the original, as these changes are destructive.
Optimizing images
In most cases, if you need to have fine control over the appearance of your graphics, you should open an image editor designed for that purpose. Both Dreamweaver and Photoshop are made by Adobe, and you’ll see some of the integration between the two in this exercise. However, sometimes you will just want to make a quick-and-easy change to a graphic. In this scenario, you can use the Edit Image Settings option in the Property Inspector.
You’ll use this feature to change the optimization of the belgianchocolate.jpg image, but before you make any permanent changes, you’ll duplicate this image in the Files panel. It’s good practice to save copies of your image files before making permanent changes. Later, you’ll use this backup copy to undo your changes.
1 Place your cursor after the image of the eggplants and press Enter/Return. In the Files panel, click the belgianchocolate.jpg file to select it. Drag it to your document window to place it beneath the eggplants image inside your web page.
2 Go back to the Files panel and click the belgianchocolate.jpg file to select it again. From the Files panel menu (![]() ), select Edit > Duplicate. A new file named belgianchocolate - Copy.jpg appears in the list of files inside the images folder.
), select Edit > Duplicate. A new file named belgianchocolate - Copy.jpg appears in the list of files inside the images folder.
3 Click on the belgianchocolate.jpg image in the document window to make sure it is selected, then click the Edit Image Settings button (![]() ) in the Property Inspector at the bottom of your page. The Image Optimization window appears. This window allows you to either choose from a number of compression presets, or to create your own. Currently, the format is set to JPEG because Dreamweaver recognizes the type of file you have selected. Notice in the bottom-left corner that the file size is listed; in this case, 31k. Pay attention to this number as it plays a role in the rest of this exercise.
) in the Property Inspector at the bottom of your page. The Image Optimization window appears. This window allows you to either choose from a number of compression presets, or to create your own. Currently, the format is set to JPEG because Dreamweaver recognizes the type of file you have selected. Notice in the bottom-left corner that the file size is listed; in this case, 31k. Pay attention to this number as it plays a role in the rest of this exercise.

The Image Optimization window appears when you click the Edit Image Settings button.
4 Click the preset menu and choose GIF for Background Images. The optimization settings appear. Click the Color menu and choose 4. The image of the chocolate changes to a preview of these settings, and the image has become flat with most of the detail removed. Notice that the file size has changed to 3K.
This tells you that you would achieve a tremendous reduction in file size, but it would occur at the expense of image quality. In fact, the GIF file format is not generally suited for photographic images. You will now try a custom setting.
5 Click the Format menu and choose JPEG from the list. You now have a slider for quality, the default value is 80 and you can see the file size has changed to 9K. Drag the slider to the left to a quality of 10 and notice that the image quality changes instantly. Again, this is too drastic a trade-off. Drag the quality slider to 90. The image looks slightly better than it did at a quality of 80, and you have a file size of around 14K (which is approximately 50% of the original image).
Click OK to commit the change. Note that this method of optimization is risky if you do not have a backup. (Recall the backup created in step 1.)
6 You can also choose to do your optimization in Photoshop. Click the cucumbers image, and then in the Property Inspector, click the Photoshop icon if available. Note that you must have Photoshop installed for this icon to be visible. As noted earlier, you can always change the photo editor that Dreamweaver uses by opening Edit > Preferences > File Types/Editors (PC) or Dreamweaver > Preferences > File Types/Editors (Mac), and then changing the application associated with images.

Click the Photoshop icon to launch Photoshop.
7 The image will open in Photoshop, and then you can make any changes you want, as well as use the more in-depth controls of the Save for Web feature. We will not walk through that process now, so you can close this image and return to Dreamweaver.
Updating images
Assuming you have a backup copy of an image, it is possible to swap one image for another. To swap out the image, you’ll simply change the Src attribute using the Property Inspector. But first, it’s a good idea to rename the duplicate image.
1 Right-click (Windows) or Ctrl+click (Mac OS) the file named belgianchocolate - Copy.jpg in the Files panel and choose Edit > Rename. Type belgianchocolate_original.jpg and press Enter (Windows) or Return (Mac OS).
2 Click the chocolate image in the Design view to select it. In the Property Inspector at the bottom of your page, highlight the text that reads images/belgianchocolate.jpg in the Src text field.
3 Click and drag the Point to File icon to the belgianchocolate_original.jpg image you just renamed. The compressed image is replaced with the copy you made earlier.
4 Choose File > Save.
Self study
To practice styling text with the CSS Designer Panel, create styles for the text in events.html. If you’re feeling bold, try copying the CSS styles from the Code view.
To make the thumbnail links in products.html open in a new window, set their target attributes to _blank in the Property Inspector.
Try adding your own photos to the products page. Remember to be careful when resizing them!
Review
Questions
1 Of the two most common image formats used on the Web, which is better suited for saving a logo?
2 If an inserted image is too small, can you make it larger by increasing its size in the Property Inspector?
3 How do you insert a copyright symbol (©) in Dreamweaver?
Answers
1 Because logos usually contain a lot of hard edges and solid areas of color, the GIF format is the most appropriate choice.
2 Yes, it is possible to increase the display size of an image; however, doing so reduces image quality.
3 Use the Characters drop-down menu in the Text tab of the Insert bar to insert a copyright symbol.