
Lesson 12: Maximizing Site Design
Dreamweaver site definitions allow you to take advantage of extensive management and maintenance tools, including the ability to reuse, repeat, and maintain common items such as menus, logos, code, and even entire page layouts. Dreamweaver’s unique snippets, library items, and page templates are indispensable for maintaining a consistent appearance and making sitewide updates a snap.
What you’ll learn in this lesson:
- • Using snippets
- • Working with library items
- • Creating and modifying templates
- • Creating a repeating region in a template
Starting up
Before starting, make sure that your tools and panels are consistent by resetting your workspace. See “Resetting the Dreamweaver workspace” in the Starting up section of this book.
You will work with several files from the dw12lessons folder in this lesson. Make sure that you have loaded the dwlessons folder onto your hard drive from www.digitalclassroombooks.com/epub/dreamweavercc. See “Loading lesson files” in the Starting up section of this book.
Before you begin, you need to create a site definition that points to the dw12lessons folder. Go to Site > New Site, or, for details on creating a site definition, refer to Lesson 2, “Setting Up a New Site.”
Creating modular page elements
You might have heard the term modular before; whether referring to a prebuilt house that you can cart away and place on your property, or a well-built, scalable website. Modular refers to anything you can break down into standardized, reusable components.
Most websites contain common elements such as headers, footers, and menus that appear consistently across each page. The ability to convert these elements into reusable items is essential for maintaining a consistent look and feel across your pages. Add the ability to make components manageable from a single place and to make sitewide updates, and editing becomes a breeze.
Dreamweaver provides three modular features: snippets, library items, and templates. Each feature offers a different level of reusability, from simple code tidbits to entire pages, complete with navigation, content, and styling.
Introducing snippets
As you build pages and websites, you’ll find yourself creating many similar items several times over. Whether you’re creating a two-column layout table or a contact form, snippets make it possible to add any piece of code to a common library, where you can reuse it by simply dragging and dropping it into the page. You can store virtually any item on a page as a snippet.
The Snippets panel is like a super clipboard, and using a snippet is similar to copying and pasting an element onto your page. Changes to a snippet in the Snippets panel do not update snippets you’ve already used in your pages. For this reason, snippets are a great way to store and place any common page elements that you don’t need to manage globally.
Examples of snippets might include common navigation bars, form elements, and even JavaScripts. Snippets are stored as part of the Dreamweaver application, and they are not specific to any Dreamweaver site. You can add your own snippets directly within Dreamweaver, and they will be available for you to use at any time on any site.
The Snippets panel
The Snippets panel displays all available Dreamweaver snippets, broken down by category. You can add and edit snippets and categories directly from the Snippets panel. Using a snippet from the Snippets panel is as simple as locating it and dragging it from the panel to the page.
Dreamweaver provides many ready-to-use snippets that serve as great starting points for forms, lists, and navigation bars (to name a few); many of these require little more than text changes and some basic styling. In the following lesson, you will use some of these snippets to quickly build existing pages for the product display component of the Organic Utopia site.
1 Double-click the home.html file in the Files panel to open it. Choose Window > Snippets to launch the Snippets panel. In the category list, locate the Text folder and click the plus sign (+) (Windows) or arrow (Mac OS) to the left to expand it. You’ll use the Service Mark snippet to add a service mark to this page.

The Snippets panel contains many categories of pre-built snippets for your use.
2 Click to the right of the heading, Welcome to organic utopia. Inside the Text folder, double-click the service mark snippet, and a superscripted sm appears in the heading.
3 At the top of the Snippets panel is a preview of the code that was inserted. In the Snippets panel, click the panel menu (![]() ) in the upper-right corner and choose Edit. The Snippets dialog box appears with a name, a description, the snippet type, and then the actual code. This snippet is using the <sup>, or superscript, HTML element.
) in the upper-right corner and choose Edit. The Snippets dialog box appears with a name, a description, the snippet type, and then the actual code. This snippet is using the <sup>, or superscript, HTML element.
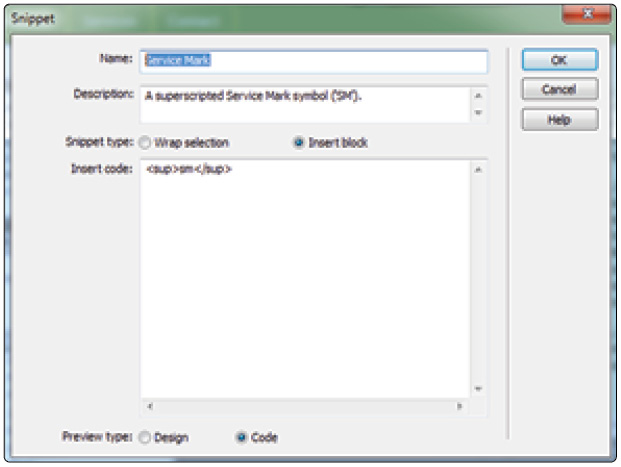
The Snippet dialog box.
4 Click Cancel, as you won’t be making any changes at this time.
5 Choose File > Save.
Creating new snippets
Whenever you have something on a page that you’d like to reuse, creating a new snippet is a good option. You can create new snippets directly from the Snippets panel, and from any selected element(s) on a page.
In this section, you’ll convert a pre-existing table to a snippet.
1 Choose File > Open, and open the gardentips.html page. This page has a pre-styled table. Converting this table to a snippet will allow you to place it anywhere you like.
2 Click anywhere inside the table, and then choose Modify > Table > Select Table. You could also click the edge of the table to select it.
3 At the bottom of the Snippets panel, click on the New Snippet icon (![]() ). The Snippet dialog box opens, and all the code within the table is automatically copied into the Insert before window.
). The Snippet dialog box opens, and all the code within the table is automatically copied into the Insert before window.
4 In the Name field, type Vege_table. In the Description field, type A three column styled table listing the Latin and family names of common vegetables. For the Snippet type, select the Insert block option. For Preview type, select the Design option and click OK.
Choosing the Insert Block option ensures that the table is inserted as a stand-alone element. Setting the Preview type to Design allows you to see a preview of the table in the Snippets panel, rather than the code.
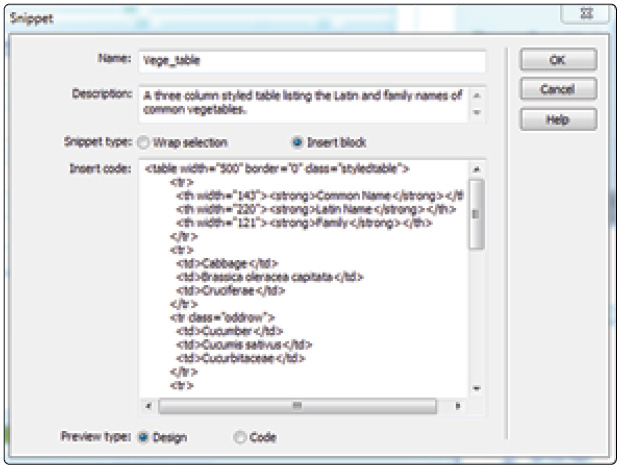
Setting options in the Snippet dialog box.
In the Snippets panel, you see the new snippet listed. However, it may not have been placed in an ideal location. If the Service Mark snippet in the Text snippet folder was still selected, the new snippet may appear in the Text folder. Before you do anything else, you’ll organize your Snippets panel.
5 In the bottom of the Snippets panel, click the New Snippet Folder icon (![]() ). A new folder appears; rename this folder ou snippets, then press Enter (Windows) or Return (Mac OS). Click the Vege_table snippet and drag it on top of this new folder.Additionally, you should drag and drop the ou_snippets folder below the ~Legacy folder to move it to the top level of folders.
). A new folder appears; rename this folder ou snippets, then press Enter (Windows) or Return (Mac OS). Click the Vege_table snippet and drag it on top of this new folder.Additionally, you should drag and drop the ou_snippets folder below the ~Legacy folder to move it to the top level of folders.
Snippets are actually external files with the extension .csn and are stored deep within your operating system. If someone else has used your current computer to do this lesson, you might see this snippet already present. If this is the case, you can remove it by clicking the snippet and then clicking the Remove icon (![]() ) at the bottom of the Snippets panel.
) at the bottom of the Snippets panel.
6 Click once on the Vege_table snippet, if necessary. In the top half of the panel, there is a design preview of the table. It is most likely cropped. Depending on how much space you have, it might not be possible to view the entire table; however, you can expand this window by clicking the dividing line of the panel, and dragging up or down.
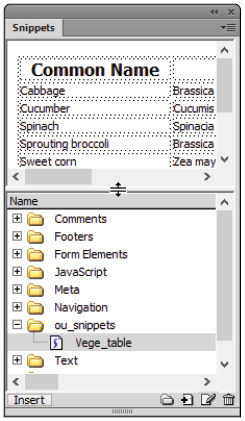
Click and drag the dividing line in the Snippets panel to expand or contract the view.
7 Choose File > Open, and open the latin_names.html file. Click once below the heading, Latin and Family names for common vegetables. In the Snippets panel, double-click the Vege_table snippet, and it is inserted into the new page.
In many ways, a snippet is just a faster way to copy and paste. However, there are a few things to be aware of. Snippets only copy the HTML code and none of the associated CSS. If you look at the preview of the table snippet in the Snippets panel, you will see that it is unstyled. However, when you inserted it into the latin_names page, it appeared styled. This is because the Snippets panel only previews the raw HTML in the Design view. The CSS rules for the table are being saved in an external stylesheet and all the pages in this site are already linked to this stylesheet. If you inserted this table into a blank page, it would appear unstyled until you attached the style sheet to the page.
8 In the Snippets panel, click the panel menu in the upper-right corner and choose Edit. The Snippet dialog box appears. In the first line of code, change the table width value to 350 and click OK. This has no effect on the current table because there is no link between the code in the Snippets panel and the code on your page. However, all future tables will use the new value.
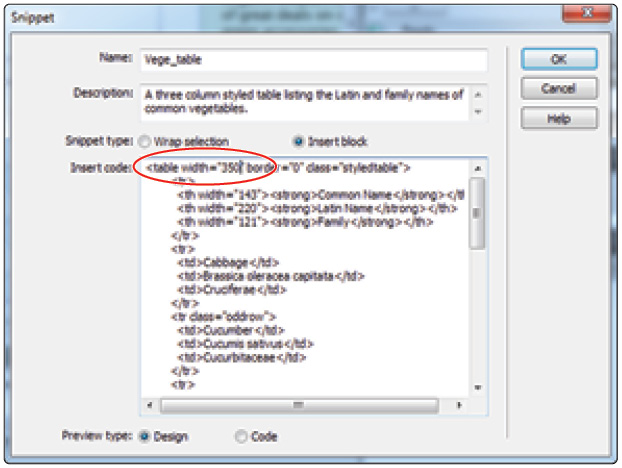
Changing the table width when editing a snippet.
9 Choose File > Save All. Keep this document open for the next exercise.
 The Snippets panel lets you modify a snippet only through its HTML code. Here’s a shortcut: if you make a change in the Design view, you can recreate the snippet by selecting it and then choosing New Snippet from the Snippets panel. If you select the folder containing the original snippet and save it under the same name, you will be prompted to replace it.
Introducing library items
While snippets are useful, they are perhaps most useful for items that will never change, like a person’s name or a logo. However, a more powerful concept is an item that you can add to multiple pages and have linked to an original master item. This is where Dreamweaver library items come in.
With Dreamweaver library items, you can save any common element and manage it from a master copy in your site folder. When you place a library item on a page, the item remains attached to its master; any changes you make to the master automatically update any instances of the item placed throughout your site. Dreamweaver makes sure that any instances of a library item are synchronized.
Library items (unlike snippets) are specific to each Dreamweaver site, and they are stored as separate .lbi files in your site’s Library folder.
1 Library items are located in the Assets panel. Choose Window > Assets and then click the Library icon (![]() ) at the very bottom. The panel is empty because there are no library items in your site yet.
) at the very bottom. The panel is empty because there are no library items in your site yet.

The Library Items category of the Assets panel.
You can add, edit, and manage all library items in your site directly from this panel. You will now convert the Global Navigation menu in your header to a library item.
2 Click the home.html tab in the top of your document window to open this page. Scrolling as needed, click the border of the GlobalNav <div> element in the upper-right corner to select it. (This is the small box that contains the Site Map | Login text.)
3 In the Assets panel, click the New Library Item button (![]() ). You will see a dialog box appear, warning you that this style sheet information will not be copied with this item. Click OK. The selected menu is added as a new library item; name it GlobalNav and press Enter (Windows) or Return (Mac OS). If you’re prompted to update links, choose Update. This ensures that any hyperlinks or references to image files are preserved. The GlobalNav div is now linked to the new library item you created. Note that your GlobaNav div is now highlighted in yellow; this is the visual indicator Dreamweaver uses for library items. Now you’re ready to add this library item to other pages.
). You will see a dialog box appear, warning you that this style sheet information will not be copied with this item. Click OK. The selected menu is added as a new library item; name it GlobalNav and press Enter (Windows) or Return (Mac OS). If you’re prompted to update links, choose Update. This ensures that any hyperlinks or references to image files are preserved. The GlobalNav div is now linked to the new library item you created. Note that your GlobaNav div is now highlighted in yellow; this is the visual indicator Dreamweaver uses for library items. Now you’re ready to add this library item to other pages.

The GlobalNav <div> element is highlighted in yellow because it is now a library item.
4 Click the gardentips.html tab at the top of your document window to view this page (or open the file it if it is closed). Locate the GlobalNav library item in the Assets panel, and drag it onto the header of the page. An instance of the GlobalNav <div> elemement is placed.
5 Click the latin_names.html tab at the top of your document window to view this page. If the file is closed, open it now. As you did in step 4, drag a copy of the GlobalNav library item from the Assets panel to the header section. Just as before, an instance of the GlobalNav <div> element is placed.
The GlobalNav is now set in the exact location across three pages of your site. You will now modify your library item and all three pages will change.
Modifying and updating library items
The convenience and power of library items are apparent when you need to update a common item across several pages. Because all instances of a library item remain attached to a master copy, when the master item is edited from the library item list, every instance mirrors these changes.
You can edit library items from the Assets panel or by choosing the Open button from the Property Inspector when a library item instance is selected on the page.
1 From the Library Items list in the Assets panel, double-click the GlobalNav library item to open it for editing. A new tab opens because the library item is actually a new file: GlobalNav.lbi.

The GlobalNav library item opens as a separate document and has no style associated with it.
It’s important to realize that there is no style information associated with this file, as Dreamweaver warned you when you created the item. However, this is actually a good thing; it simply takes getting used to the idea that you are modifying the HTML content—all the style information resides in the style sheet.
2 Where it currently reads Login, select the text, then type Your Account. You will now link the text within the GlobalNav menu to the appropriate HTML pages. Select the text Your Account, then in the Property Inspector, click the HTML button, if necessary. Next, click the Browse for File folder icon (![]() ) to the right of the Link box. In the Select File window, choose login.html. Click OK (Windows) or Open (Mac OS).
) to the right of the Link box. In the Select File window, choose login.html. Click OK (Windows) or Open (Mac OS).
3 Select the Site Map text. In the Property Inspector, click the HTML tab if necessary, and click the Browse for File icon (![]() ) to the right of the Link field. In the Select File dialog box, choose sitemap.html, then click OK (Windows) or Open (Mac OS).
) to the right of the Link field. In the Select File dialog box, choose sitemap.html, then click OK (Windows) or Open (Mac OS).
4 Choose File > Save. The Update Library Items dialog box appears with a list of the three files. Whenever you modify a library item and save it, a list of all files using the item appears, and you are given the choice to update or not.
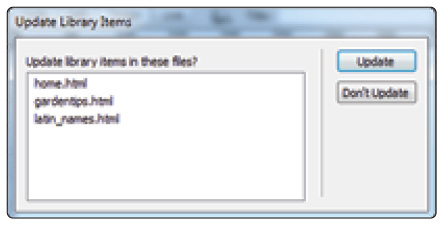
When saving library items, any pages affected will appear in the Update Library Items dialog box.
5 Click Update. The files update and the Update Pages dialog box appears.
6 Click the Show Log option in the Update Pages dialog box. A list of the files that were updated appears; this is where you can check to see if there were any problems and how many files were updated. Click Close.
7 Open home.html, gardentips.html, and latin_names.html if they were not already open, and you see that all instances of the menu have been updated in all three pages. Library items are tremendously powerful; the larger the site, the more useful they become. They are tremendously useful with hyperlinked navigation, where they can help prevent broken hyperlinks.
For example, currently you have three documents all using a library item that is linked to the login.html and sitemap.html pages. But what happens if you move those two pages into a new folder? You will do this now so you can see how Dreamweaver keeps track of the move and prompts you to update the links.
8 Click the Files tab, if necessary, to view the list of files in your site. Click the root folder at the top of the panel (Site – dw12lessons), and then right-click (Windows) or Ctrl+click (Mac OS) to open a context menu. Choose New Folder. Rename the new folder GlobalNav and press Enter (Windows) or Return (Mac OS).

Right-clicking the root folder allows you to create a new folder.
9 In the Files panel, click and drag the login.html file into this new GlobalNav folder. As soon as you do, the Update Files dialog box appears with the list of all the files that need to be updated. This is a huge time-saver if you need to restructure your site. Traditionally, you would have to go to each page and relink everything that pointed to this page. Now click Update, and the links on each page are all updated behind the scenes.
10 Click and drag the sitemap.html file to the GlobalNav folder; click Update, and all the files are updated.
11 Choose File > Save All, update your pages if prompted, and then close all your open files.
Introducing templates
If you are creating several pages that need to share the same look and layout, Dreamweaver templates are for you. A Dreamweaver template is a master document from which other pages can be created; these pages inherit all the elements from the original template, but you can modify each page to include unique content and elements. As with library items, when you edit a template all pages based on that template update to reflect your changes.
When you create a template, you specify editable regions, or areas of the page that you can modify. By default, all elements of a page created from a template are locked to prevent editing. You can make changes only from the original master template. You can set sections of a page as editable so that you can add or modify content without accidentally (or intentionally) disturbing the original layout.
Templates are also a great mechanism for controlling access to pages on a site. If you need to provide editing ability to others, you can lock out important page elements and give users access to only certain sections of the page.
Templates are site-specific and are stored in a Templates folder under your site’s root folder. You open, edit, or create templates from the Templates list in the Assets panel.
 Dreamweaver templates work with Contribute, a basic but powerful web content management tool. You can design and manage templates that can be modified and published by Contribute users.
Creating a new template
For the Organic Utopia site, imagine that you need to create many different category and product detail pages for the products in the store. To do this, you’ll set up templates for each page so that new pages can be easily created but will remain visually consistent with the master layout.
1 In the Files panel (Window > Files), locate and double-click the product_detail.html page to open it for editing. This page has generic text and a placeholder image that will serve as your template.
2 Click your Assets panel, and then click the Library category. As you did with the other pages, click and drag the GlobalNav item onto the header. This page will shortly serve as a template, and by including a library item, you are maximizing automation.
3 Save the product_detail.html page as a template by choosing File > Save as Template. The Save As Template dialog box appears.
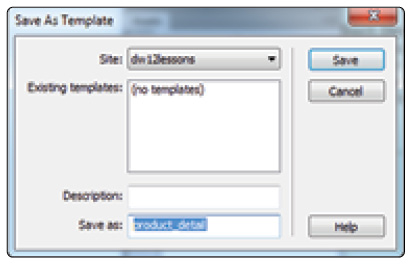
Naming a new template.
4 Choose Save to save the template. If prompted, allow Dreamweaver to update any links by choosing Yes from the dialog box.
Working with editable regions
Next, you will need to define editable regions that you can modify on any pages created from this template. When new HTML pages are generated from templates, there might be certain sections you would like to be editable and other areas that should remain uneditable.
1 Select the placeholder text in the product_detail template that reads Product Category. Choose Insert > Template > Editable Region. The New Editable Region dialog box appears.
2 Name the new editable region ProductCategory and click OK. The placeholder text now appears inside a black box with a blue tab at the top. This portion of the page and the content within it will now be editable in any pages created from this template.
 Each editable region should have a unique name on your template files. Also, avoid using spaces or special characters when naming your editable regions.
3 Select the placeholder text in the product_detail template that reads Product Name. Choose Insert > Template > Editable Region. The New Editable Region dialog box appears. Name this ProductName and click OK.
4 Select the image placeholder, then choose Insert > Template > Editable Region. The New Editable Region window appears. Name this ProductImage and click OK.

Naming the Editable Region of the image placeholder.
5 Finally, select all the text in the sidebar. Choose Insert > Template > Editable Region. The New Editable Region dialog box appears. Name this ProductDescription and click OK.
6 Choose File > Save to save the template. You might see a warning about putting the editable region within a block tag; click OK.
At this point, you can create any number of pages and manage them from this template. The editable regions you created will allow you to add content to any new pages based on this template, but will protect the main layout and page elements from unintended changes.
Creating new pages from templates
Now you’re ready to create multiple product pages that will be based on the new template you have built. You’ll create two pages, enough to give you a sense of how templates work.
1 Choose File > New. In the New Document dialog box, click the Site Templates option. The Site column lists all the sites you have defined; click the dw12lessons site. In the second column, the product_detail template should be selected. Click Create. This opens a new, untitled document based on the template. Choose File > Save. When prompted, navigate to the products folder in the dw12lessons folder. Name this file eggplants.html and click Save.
2 Click inside the header of your page and notice that you are unable to select or move anything. This section is uneditable. Notice, in the upper-right corner, the yellow highlighted box that reads Template:product_detail. In a similar fashion to library items, this yellow highlight indicates that the page is based on a template.
Dividing a page into editable and non-editable regions can be useful for any situation where the designer of the site would like some control over how the site is modified. Someone not familiar with Dreamweaver could easily learn to update the editable regions, and at the same time, there would be little risk that they click something by accident and modify it.
3 Select the text inside the ProductCategory editable area and type Vegetables. Select the text in the ProductName area and type Eggplants. Select the Product_image placeholder, and in the Property Inspector, click the Browse for File button (![]() ) to the right of the Src text field.
) to the right of the Src text field.

Click the Browse for File icon to locate the eggplant image.
Navigate through your dw12lessons folder and locate the images folder. Select the eggplant.jpg image and click OK (Windows) or Open (Mac OS).
4 Double-click the products folder in the Files panel to open it, and then double-click the eggplants.txt file to open it in Dreamweaver. Select all the text, choose Edit > Copy, and then close the text file.
5 Select the text in the Product Description area of the sidebar, then choose Edit > Paste. Place your cursor after the word Eggplant in the first line, and then press Enter/Return to add a new line and separate the heading from the paragraph. Choose File > Save.
Now you’ll base another new page on your template using the File > New command.
6 Choose File > New. In the New Document dialog box, click the Site Templates option. The Site column lists all the sites you have defined; click the dw12lessons folder. In the second column, the product_detail template should be selected. Click Create; the new page is created.

Choose File > New, and then click the Site Templates option.
7 Choose File > Save, and save this file as beets.html in your Products folder. Select the text inside the ProductCategory editable area and type Vegetables. Select the text in the ProductName area and type Beets. Select the Product_image placeholder, and in the Property Inspector, click the Browse for File button (![]() ) to the right of the Src text field.
) to the right of the Src text field.
Navigate through your dw12lessons folder and locate the images folder. Select the beets.jpg image and click OK (Windows) or Open (Mac OS).
8 In the Files panel, double-click the Products folder to open it, if it is not already open, and double-click the beets.txt file to open it in Dreamweaver. Select all the text, choose Edit > Copy, and then close the text file.
9 Select the text in the Product Description area of the sidebar, and choose Edit > Paste. Place your cursor after the word Beets in the first line, and then press Enter/Return to add a new line and separate the description from the heading. Choose File > Save.
Modifying templates
In a similar fashion to library items, when you make changes to the original template, all linked pages are updated.
1 In the Assets panel, click the Templates button (![]() ) and then double-click the product_detail template to open it for editing. If you do not see your template in the Templates section of the Assets panel, click on the Refresh Site List button at the bottom of the panel.
) and then double-click the product_detail template to open it for editing. If you do not see your template in the Templates section of the Assets panel, click on the Refresh Site List button at the bottom of the panel.
2 Place your cursor after the image placeholder, and press Enter (Windows) or Return (Mac OS) twice; then type This vegetable is in season and press Enter or Return again.

Insert text after the placeholder image.
3 If you were to save right now, your text would be updated on your two linked pages; however, you need to convert it to an editable item unless you want the text to be locked on those pages.
4 Select the text and choose Insert > Template > Editable Region. Name this region inseason and click OK. Choose File > Save. (If you see the block tag warning, click OK.) The Update Files dialog box appears; any files linked to this template will now be changed. Click Update, then close the Update Pages dialog box.
5 Click the beets.html file; notice that it has automatically been updated. In the inseason editable region, update the text to read This vegetable is not in season.

Updating your new editable region on the beets.html page.
6 Choose File > Save All, and then choose File > Close All to close all your open documents.
Repeating regions
A single region might not be the best way to display the content you add to a template-based page. You might require a template that can handle a number of items, such as a table that displays products in a category. If you need to build a flexible template that can hold any number of uniform items, you can add a repeating region to it.
Repeating regions allow you to define an element on a template as repeatable. When you create a page based on that template, you can increase, or repeat, the number of regions to accommodate the information. You’ll also be able to reorder these repeated regions at any time without having to move the content. For example, you could set elements such as a table row, paragraph, or small display table as a repeating region, and then duplicate as many as you need to fit the content at hand.
A repeating region is not automatically editable. You need to set editable regions inside any repeating element in order to add to or edit its content.
In the following steps, you’ll add a repeating region to your category.html page and convert it to a template so that you can use it to display any number of products in a specific category.
1 Open the category.html page from the Files panel.
2 The table in the center contains one row with two columns, each containing a placeholder image and product title placeholder. Click anywhere in the table and then click the <table.styledtable> tag in the tag selector at the bottom of the document window to select it.

Click Tag Selector to choose <table.styledtable>.
3 Choose Insert > Template > Repeating Region. Because you haven’t saved this page as a template yet, a dialog box appears, letting you know that you need to convert the page to a template before you add regions. Click OK.
4 When the New Repeating Region dialog box appears, assign the new region the name Products, and click OK.

The row is now a repeating region, which you can duplicate in any page created from this template.
5 Choose File > Save As Template, and save the new template as category_display. Click Save and Update Links if asked.
6 In the left cell, highlight the Product text. Choose Insert > Template > Editable Region. Name the new region ProductName, and click OK.
7 Select the placeholder image below the new editable region, and choose Insert > Template > Editable Region. Name the new region ProductImage, and click OK.
8 In the right cell, highlight the Product text. Choose Insert >Template > Editable Region. Name the new region ProductName2, and click OK.
9 Select the placeholder image below the new editable region, and choose Insert > Template > Editable Region. Name the new region ProductImage2, and click OK.
10 Choose File > Save to save this template. If you see the block tag warning, click OK.
 Templates can’t contain duplicate region names. If you try to set two editable regions with the same name, Dreamweaver gives you an error message.
Putting repeating regions into action
You’re now ready to create a page from the new category_display template and see how repeating regions work.
1 Open the Assets panel if necessary, then select the category_display template, and choose New from Template from the Assets panel menu. You might need to click the Refresh Site List button in the Assets panel to see your templates.
2 Save the new document as chocolate.html in your site’s root folder. Notice the new repeating region in the middle of the page—its tab features four buttons that allow you to add, remove, and shift repeating regions up or down in the stacking order.

A repeating region has four buttons you can use to modify it.
3 Click the plus sign button (+) on the top of the repeating region; a new table row with two more product display tables appears. Click the plus sign button two more times to see how it will automatically add new rows. Click the minus sign button to see how to remove a row. In the next step, you’ll fill in the first four products with information to complete your page.
4 In the first row, type Belgian Chocolate in the ProductName text field and French Chocolate in the ProductName2 text field. In the second row, type German Chocolate in the ProductName text field and Swiss Chocolate in the ProductName2 text field.
The four products now appear in the category page, and as an added benefit, if you wanted to reorder the rows you could do so using the repeating region toolbar.
5 Click the up arrow in the repeating region toolbar to push the second row to the top. This feature is especially useful for repeating regions with many rows.

A repeating region has four buttons you can use.
6 Choose File > Save All and then File > Close All.
Detach from Template command
If you want to modify a template-based page beyond what the editable regions allow, you can use the Modify > Templates > Detach from Template command, which breaks the current page away from the master template, allowing you to edit it freely. Keep in mind that a page detached from a template will no longer be updated if you make any changes to the original template.
Self study
Create a new template based on home.html and then create new pages based on the the template for the following pages: about_us.html, products.html, services.html, and contact.html. Then return to the template and create links to these pages from the navigation bar. Which sections need to be editable and which do not?
Open the eggplants.html page you created, and use Detach from Template to break it away from the template. You’ll then be able to freely edit other elements on the page that you did not include in the original editable regions. Create some variations on the newly detached page by trying a new layout, modifying product and picture positioning, or applying a new style to the product title, price, or description. Use the Templates section of the Assets panel to create a new template from the page.
Review
Questions
1 What are two key differences between snippets and library items?
2 How do you add a new snippet to a page in Dreamweaver?
3 Where are library items and page templates stored? Which panel do you use to manage them?
4 What happens to pages based on a template when you modify the original template?
5 True or False: Repeating regions are automatically editable in pages that use them.
Answers
1 Snippets are stored as part of the Dreamweaver application, and are available, regardless of which site or document you’re working on; library items are specific to a site definition. Copies of a snippet never update when the original snippet is edited; a library item updates all instances of itself throughout a local site when a change is applied to it.
2 You can drag a snippet from the Snippets panel onto the page, or position your cursor in the page and double-click the snippet in the Snippets panel.
3 Library items and page templates are stored in the Library and Templates folders (respectively) under your local site. You can manage both, using their specific categories on the Assets panel.
4 Dreamweaver updates all pages based on that template to reflect any changes made to the original template.
5 False. You must first set editable regions within a repeating region to add content.