
5. Including Images and Media
Image and media files convey much of the message of your Web site. You may even get most of your message across with video and animation, although most sites use images to supplement the text.
Some Web sites suffer from graphic overkill. There’s a balancing act between using graphics to enhance the message and using images to bludgeon visitors into submission. Think of sites that use images of green text on a red background, for instance, or sites that are so proud of their “fabulous” graphic look that they relegate text to microscopic type.
Dreamweaver has many ways to place and modify images, as well as to control how text wraps around images. The program does a great job of adding dynamic media to your pages, such as Flash animations and movies, and also other formats such as QuickTime and Windows Media. In this chapter, we’ll cover how you can use Dreamweaver to add graphics and media files to your Web pages. You’ll get to use your talents to add images to express and enhance your site’s message.
Adding Images
Dreamweaver can place images on your Web page that come from your local hard disk or that are already on your Web site. By default, Dreamweaver prompts you to add alternate text to the image, which is text that is read aloud by screen reader software used by the visually disabled. If you have existing images on your pages that don’t have alternate text, it’s easy to add. You can, of course, easily delete images from your page.
To add an image to your page
1. Click to place the insertion point in the document where you want the image to appear.
2. In the Common category of the Insert panel, click the Images button ![]() .
.

![]() Begin inserting an image by clicking the Images button in the Insert panel.
Begin inserting an image by clicking the Images button in the Insert panel.
The Images button is actually a pop-up menu that allows you to add a variety of image types. We’ll be talking about these different types later in this chapter.
or
Choose Insert > Image, or press Ctrl-Alt-I (Cmd-Opt-I).
or
Drag the icon of an image file from the Windows or Macintosh desktop into your document. If you choose this method, skip to step 5.
The Select Image Source dialog appears ![]() .
.

![]() Navigate to the image you want in the Select Image Source dialog.
Navigate to the image you want in the Select Image Source dialog.
By default, the dialog will be set to the images folder of your local site folder.
3. In the dialog, navigate to and select the file that you want to insert.
A preview of the image appears in the Select Image Source dialog, with information below the image including the image’s size in pixels, its graphic format, its file size, and the estimated time for the file to download (based on the Connection Speed pop-up menu in the Status Bar category of Dreamweaver’s Preferences).
4. Click OK (Choose).
If you have not already saved the document, Dreamweaver displays an alert letting you know that it can’t use a document-relative path, and that it will use an absolute file reference until you save the file ![]() .
.

![]() Dreamweaver lets you know that it will use an absolute file reference rather than a relative reference to the image file until you save the document.
Dreamweaver lets you know that it will use an absolute file reference rather than a relative reference to the image file until you save the document.
5. Click OK to dismiss the alert.
The Image Tag Accessibility Attributes dialog appears ![]() . This is the dialog you use to add alternate text.
. This is the dialog you use to add alternate text.

![]() Enter alternate text for use by screen reader software used by the visually disabled.
Enter alternate text for use by screen reader software used by the visually disabled.
6. In the Alternate text text box, type the alternate text you want to use for the image.
7. (Optional) In the Long description text box, add a URL that leads to a page with a detailed description of the image.
8. Click OK.
The image appears on your page ![]() .
.

![]() The image appears in the document.
The image appears in the document.
Tip
In some browsers, an image’s alternate text appears when you hover the mouse pointer over the image on the page.
Tip
The Image Tag Accessibility Attributes dialog only appears if the option for images has been set in the Accessibility category of the Preferences dialog ![]() . Because using alternate text is one of the commonly accepted Web best practices, the option is turned on by default. If you don’t want Dreamweaver to prompt you for alternate text every time you insert an image, clear the Images check box in Preferences.
. Because using alternate text is one of the commonly accepted Web best practices, the option is turned on by default. If you don’t want Dreamweaver to prompt you for alternate text every time you insert an image, clear the Images check box in Preferences.
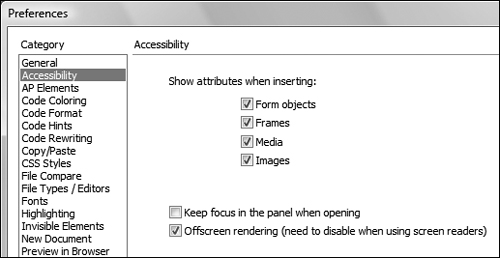
![]() You can set Accessibility settings in Dreamweaver’s Preferences dialog.
You can set Accessibility settings in Dreamweaver’s Preferences dialog.
Tip
If you click Cancel in the Image Tag Accessibility Attributes dialog, the image appears on your page without alternate text. You can always add alternate text later using the Property Inspector.
To add alternate text to an existing image on your page
1. Click on an image to select it.
2. In the Alt text box in the Property Inspector ![]() , type the alternate text, and then press Enter (Return).
, type the alternate text, and then press Enter (Return).

![]() You can also add alternate text in the Alt field of the Property Inspector.
You can also add alternate text in the Alt field of the Property Inspector.
Dreamweaver adds the alternate text to the image.
To delete an image
1. Click on an image to select it.
2. Press Backspace (Delete).
The image disappears from the page.
Tip
You can cut, copy, or paste images as you would with text.
Inserting Images from the Assets Panel
Any images that you’ve used on your site will be listed in the Assets panel, which is a tab in the same panel group as the Files panel. The Assets panel has buttons running down its left side that show you different asset categories ![]() . The first of these categories is Images. When you click the Images button in the panel, you get a list of all of the images in your site. Clicking an item in the list shows you a preview of the image in the Assets panel’s preview pane, allowing you to easily browse through the images. You can browse any of the other asset categories in the same fashion.
. The first of these categories is Images. When you click the Images button in the panel, you get a list of all of the images in your site. Clicking an item in the list shows you a preview of the image in the Assets panel’s preview pane, allowing you to easily browse through the images. You can browse any of the other asset categories in the same fashion.

![]() Choose the image that you want to work with in the Assets panel.
Choose the image that you want to work with in the Assets panel.
To insert an image from the Assets panel
1. Click in your document to set the insertion point where you want the image to appear.
2. If it’s not already showing, click the tab for the Assets panel, or choose Window > Assets, or press F11 (Opt-F11).
3. Click the Site radio button at the top of the Assets panel.
The images in your site appear in the asset list.
4. Click on the image you want to insert.
A preview of the image appears in the Assets panel’s preview pane.
5. Click the Insert button at the bottom of the Assets panel.
or
Drag the image from the asset list into the document.
or
Right-click the image you want in the asset list, and then choose Insert from the context menu.
The image appears in your document.
Adding Image Placeholders
When you first work on a page, you’ll often be creating pages without all of the finished elements, such as the text and images. That shouldn’t stop you from working on the page’s design, of course. You can always copy and paste “The quick brown fox...” or similar text as a placeholder for the text that’s to come, and Dreamweaver gives you the ability to insert image placeholders, as well. The placeholder lets you allot the space on the page for a future image, allowing you to position and size the placeholder and finish your design before you have all the content. When you are ready to turn the placeholder into the final image, all you have to do is double-click the placeholder.
To insert an image placeholder
1. Click in your document to set the insertion point where you want the image placeholder to appear.
2. Choose Insert > Image Objects > Image Placeholder.
or
In the Common category of the Insert panel, choose Image Placeholder from the Images pop-up menu ![]() .
.

![]() Use the Images pop-up menu in the Insert panel to insert an image placeholder.
Use the Images pop-up menu in the Insert panel to insert an image placeholder.
The Image Placeholder dialog appears ![]() .
.

![]() Use the Image Placeholder dialog to specify the placeholder’s parameters.
Use the Image Placeholder dialog to specify the placeholder’s parameters.
3. Fill out the Width and Height fields for the image placeholder (the units are pixels).
The Name and Alternate text fields are optional; if you fill them out, the text will appear in the Property Inspector in the Name and Alt text boxes. You cannot use spaces in the Name field.
The default color for an image placeholder is a light gray; if you want to change that color, click in the color well and choose a new color from the resulting color picker.
4. Click OK.
The new image placeholder appears in your document ![]() .
.

![]() The image placeholder appears in the document, with its name and size (these are cut off if the image isn’t big enough, as shown here).
The image placeholder appears in the document, with its name and size (these are cut off if the image isn’t big enough, as shown here).
To replace the placeholder with an image
1. Double-click the image placeholder.
The Select Image Source dialog appears (see figure ![]() in “Adding Images”).
in “Adding Images”).
2. Select the file that you want to insert.
3. Click OK (Choose).
The image appears on your page.
Tip
If you own Adobe Fireworks, when you select an image placeholder you’ll see a button in the Property Inspector that has the Fireworks logo and the word Create ![]() . Clicking this button launches Fireworks and creates a new image with the same dimensions as the placeholder. After you finish making the image in Fireworks, save the image in your site’s images folder. You are then returned to Dreamweaver. The new image is inserted automatically in your document, replacing the image placeholder.
. Clicking this button launches Fireworks and creates a new image with the same dimensions as the placeholder. After you finish making the image in Fireworks, save the image in your site’s images folder. You are then returned to Dreamweaver. The new image is inserted automatically in your document, replacing the image placeholder.

![]() Click the Create button in the Property Inspector when an image placeholder is selected to launch Adobe Fireworks so that you can replace the placeholder with a finished graphic.
Click the Create button in the Property Inspector when an image placeholder is selected to launch Adobe Fireworks so that you can replace the placeholder with a finished graphic.
Aligning Images
As with text, images can be aligned to the left, middle, or right side of a page. You also have some control over how text wraps around images.
Unless you’ve explicitly set up some way of laying out pictures and text (such as using CSS to position page elements, or using an invisible table), images appear inline, that is, in the flow of the text on the page. Because images are usually larger than the accompanying text, inline image settings can cause text to wrap in ways you might not expect.
There are four settings in the Property Inspector that you can use for vertical alignment: Default, Bottom, Middle, and Top ![]() . Two settings control horizontal alignment: Left and Right
. Two settings control horizontal alignment: Left and Right ![]() .
.
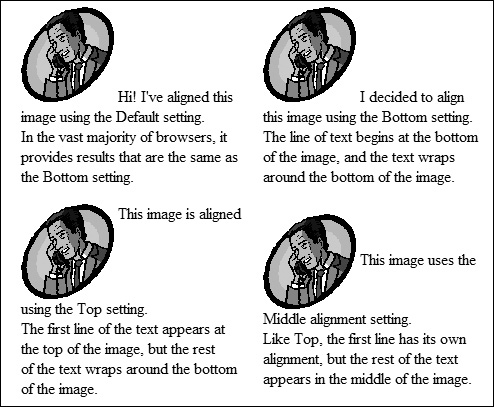
![]() Clockwise from upper left, this shows the effects of the Default, Bottom, Middle, and Top vertical alignments.
Clockwise from upper left, this shows the effects of the Default, Bottom, Middle, and Top vertical alignments.
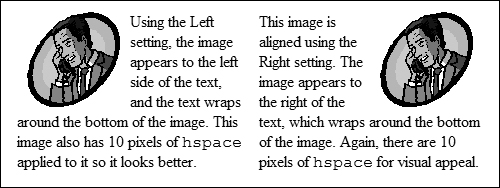
![]() The horizontal alignments are Left alignment (left) and Right alignment (right).
The horizontal alignments are Left alignment (left) and Right alignment (right).
To set image alignment
1. Click to select the image you want to align.
2. In the Property Inspector, choose the alignment option you want from the Align pop-up menu ![]() .
.
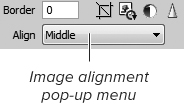
![]() Align images with the image alignment settings in the Property Inspector.
Align images with the image alignment settings in the Property Inspector.
The image aligns as you command.
Tip
The Property Inspector offers you four other alignment options: Baseline, TextTop, Absolute Middle, and Absolute Bottom. These are obsolete properties that don’t work in all browsers. Don’t use them.
Tip
When you use the Property Inspector to align images, Dreamweaver applies an alignment property to the <img> tag. While that’s acceptable, it’s not an example of best practices; instead consider using CSS to align images, as described in Chapter 7.
Tip
Make sure that you don’t confuse the image alignment settings and the paragraph alignment settings (Left, Middle, and Right) that are in the CSS tab of the Property Inspector. The former apply to just images, and the latter apply to entire paragraphs.
Setting Image Properties
Besides alignment, there are several other properties that you can set for images using the Property Inspector ![]() :
:
• ID lets you name the image. This name is used to refer to the image in scripts, and you must enter a name for scripts to be able to manipulate the image, as you might want to do for a rollover. You cannot use spaces or punctuation in an image name.
• W (for Width) is the width of the image in pixels.
• H (for Height) is the height of the image in pixels.
• Src (for Source) shows the path to the image file on your site.
• Link shows the destination if the image has a link to a URL.
• Alt shows the alternate text for the image.
• Class shows the CSS class, if any, that has been applied to the image.
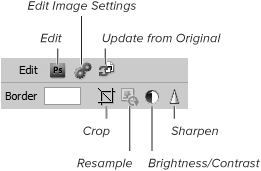
• Edit includes buttons that allow you to edit the image in an external editor; change image setting, including image file format; and update SmartObjects (more about SmartObjects later in this chapter).
• Map is a field and four tools that allow you to name and add an image map to the image. See “Creating Image Maps” in Chapter 6 for more information.
• V Space allows you to put vertical margins, in pixels, above and below the image.
• H Space allows you to put horizontal margins, in pixels, to the right and left of the image.
• Target specifies the frame or window in which the destination of a link should load. The pop-up menu next to the Target field shows the names of all the frames in the current frameset. There are also five other target possibilities. The _blank target loads the linked file into a new browser window. The _new target acts like _blank the first time it’s used, but after that, each time a link using the _new target is clicked, it will reuse the same “new” window. We think that _new is confusing, and we don’t recommend its use. The _parent target loads the linked file into the parent frameset, the window of the frame that contains the link, or the full browser window. The _self target loads the linked file into the same frame or window as the link. This is the default choice. The _top target loads the linked file into the full browser window and removes all frames.
• Original shows the location of the original file (usually a Photoshop file) that is the basis of the selected image. This field shows the path to the source of a SmartObject.
• Border allows you to add a colored border, in pixels, around the entire image.
• Crop, Resample, Brightness and Contrast, and Sharpen are a group of tools that allows you to make adjustments to the image.

![]() You can make a variety of adjustments to an image in the Property Inspector.
You can make a variety of adjustments to an image in the Property Inspector.
To set image properties
1. Click to select the image to which you want to apply one or more properties.
2. In the Property Inspector, apply the property you want.
The property is immediately applied.
Tip
If you don’t want to apply an interactive effect (like a rollover) to an image, you can leave its ID field blank.
Tip
The pop-up menu next to the Alt field has one choice, <empty>. You can use this attribute for images, such as spacer GIFs, that don’t need to be read by screen readers for the visually disabled. Because accessibility guidelines state that all images should have alternate text, it’s a good idea to apply this attribute to any images that are literally just taking up space.
Tip
Though you can add whitespace around images using the V space and H space properties, you’ll have more control (and have valid HTML pages) if you use CSS to provide margins for images.
Tip
You should also use the CSS border properties rather than the Border option in the Property Inspector. You’ll have more control over the kind and color of the border.
Editing Images
When you’re working with images on your site, you’ll often want to tweak them to improve their looks. You could use an external image editing program, such as Adobe Photoshop or Adobe Fireworks, to do the job, but it’s more convenient to work right in Dreamweaver for simple changes. For extensive modifications, you’ll still need an external image editor, however.
The Property Inspector gives you seven buttons that allow you to edit an image ![]() . Two of the buttons, Edit and Update from Original, hand the image off to Photoshop for editing and update the Dreamweaver image when the original Photoshop image changes. We cover using these buttons in “Working with Photoshop,” later in this chapter.
. Two of the buttons, Edit and Update from Original, hand the image off to Photoshop for editing and update the Dreamweaver image when the original Photoshop image changes. We cover using these buttons in “Working with Photoshop,” later in this chapter.
![]() The Property Inspector gives you access to a variety of image editing tools.
The Property Inspector gives you access to a variety of image editing tools.
Edit Image Settings lets you change the file format and optimization of the image. We’ll cover this in more detail in “Optimizing Images,” later in this chapter.
The other four buttons let you make quick image adjustments right in Dreamweaver. They are Crop, which lets you trim away portions of an image; Resample, which adds or subtracts pixels from an image that has been resized (this reduces the image size for better download performance); Brightness and Contrast, which allows you to correct images that are too dark or too light; and Sharpen, which changes the contrast of the edges inside an image, making it appear to be more in focus.
Tip
If you select an image and the image editing tools are grayed out, it’s probably because you enabled Check In/Check Out for your site, and you need to check out the file for editing. For more about Check In/Check Out, see Chapter 18.
Tip
To halt the editing process after you begin it and leave the image unchanged, press the Esc key.
To crop an image
1. Select the image that you want to crop.
2. In the Property Inspector, click the Crop button.
or
Choose Modify > Image > Crop.
3. Dreamweaver puts up an alert dialog letting you know that the changes you will be making to the image are permanent, but that you can still use Undo to back away from the changes. Click OK.
A crop selection box with eight resize handles appears within the image. Parts of the image outside of the crop selection box are dimmed ![]() .
.

![]() The part of the image outside the selection rectangle will be cropped out.
The part of the image outside the selection rectangle will be cropped out.
4. Click and drag the crop selection box to move it around the image, and resize the box by dragging any of its selection handles, until you have the portion of the image you want to keep inside the box.
5. To complete the crop, press Enter (Return).
or
Double-click inside the crop selection box.
Dreamweaver trims the image.
To resize and resample an image
1. Select the image that you want to change.
2. Using the image’s resize handles, make the image larger or smaller.
or
Use the W and H text boxes in the Property Inspector to resize the image numerically.
The image resizes, and the Resample button in the Property Inspector becomes available for use.
3. In the Property Inspector, click the Resample button.
or
Choose Modify > Image > Resample.
Dreamweaver resamples the image. On many images, the effect is quite subtle.
To adjust the brightness and contrast of an image
1. Select the image that you want to adjust.
2. In the Property Inspector, click the Brightness and Contrast button.
or
Choose Modify > Image > Brightness/Contrast.
The Brightness/Contrast dialog appears ![]() .
.

![]() Drag the sliders in the Brightness/Contrast dialog to change the intensity of the image.
Drag the sliders in the Brightness/Contrast dialog to change the intensity of the image.
3. If it isn’t already checked, select the Preview check box.
This makes adjusting the image a little slower, but it allows you to see the effects of your changes on the image as you make them.
4. Move the Brightness and the Contrast sliders until the picture looks the way you want it.
or
Enter a numeric value in the text boxes next to Brightness and Contrast. The sliders begin in the middle of the range, and the acceptable range for each slider is from -100 to 100.
5. Click OK.
To sharpen an image
1. Select the image that you want to sharpen.
2. In the Property Inspector, click the Sharpen button.
or
Choose Modify > Image > Sharpen.
The Sharpen dialog appears ![]() .
.
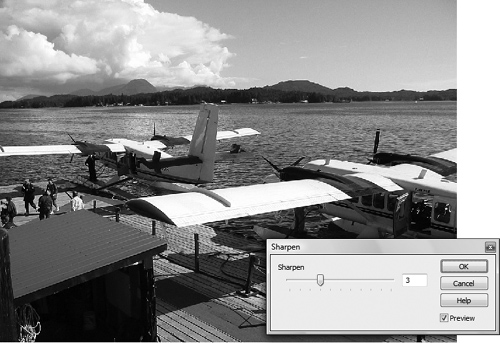
![]() Sharpening an image often brings out important detail that isn’t as noticeable in the unsharpened image.
Sharpening an image often brings out important detail that isn’t as noticeable in the unsharpened image.
3. If it isn’t already checked, select the Preview check box.
This makes sharpening the image a bit slower, but it allows you to see the effects of your changes on the image as you make them.
4. Move the Sharpness slider until the picture looks the way you want it.
or
Enter a numeric value in the text box next to Sharpness. The slider begins at zero and goes to 10.
5. Click OK.
Tip
Use a light hand when using the Sharpen tool. Oversharpening an image often makes it look unnatural, with edges in the picture that look too prominent, or even oddly outlined ![]() .
.
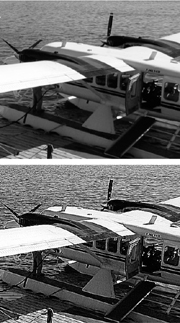
![]() Over-sharpening an image (bottom) can make items in the image look weird.
Over-sharpening an image (bottom) can make items in the image look weird.
Optimizing Images
You can optimize images that are in a Dreamweaver document. Optimization means that you can change the image from one format to another (for example, from PNG to JPEG), change the JPEG quality setting, crop the image, and more.
To optimize an image
1. Select the image you want to optimize.
2. In the Property Inspector, click the Edit Image Settings button (see figure ![]() in “Editing Images”).
in “Editing Images”).
or
Choose Modify > Image > Optimize.
The Image Preview dialog appears, with your image displayed ![]() . The dialog has two tabs on the left (Options and File) and a preview area on the right.
. The dialog has two tabs on the left (Options and File) and a preview area on the right.

![]() You can make a variety of changes in the Image Preview dialog, including changing the graphics format.
You can make a variety of changes in the Image Preview dialog, including changing the graphics format.
On the Options tab, you can use the Format pop-up menu to change the file format to GIF, JPEG, or PNG. Depending on the format you choose, the tab will change to show the appropriate settings used to modify the parameters of the selected format.
The File tab ![]() allows you to scale the image and select an export area, which changes the shape of the placed image (it’s like cropping the image).
allows you to scale the image and select an export area, which changes the shape of the placed image (it’s like cropping the image).

![]() Use the File tab of the Image Preview dialog to scale the image.
Use the File tab of the Image Preview dialog to scale the image.
The preview area ![]() has information on the current format at the top, with a pop-up menu that lets you pick from six different GIF and JPEG presets. In the middle is the image preview, and at the bottom are Selection, Crop, and Zoom tools.
has information on the current format at the top, with a pop-up menu that lets you pick from six different GIF and JPEG presets. In the middle is the image preview, and at the bottom are Selection, Crop, and Zoom tools.

![]() The preview area of the Image Preview dialog tells you the image’s file format and gives you tools to make further adjustments and edits.
The preview area of the Image Preview dialog tells you the image’s file format and gives you tools to make further adjustments and edits.
3. Make your adjustments to the image in the Image Preview dialog.
4. Click OK.
The image is saved and updated.
Working with Photoshop
Dreamweaver has built-in integration with Adobe Photoshop CS3 or later. There are two methods of moving Photoshop images into your Dreamweaver document. In the first, you begin in Photoshop by opening an image and copying all or a portion of the image (a portion can be a selected part of the image, or one or more image layers). Then you switch to Dreamweaver and paste. Dreamweaver asks you how you want to save your image, and then places it on your Web page. Dreamweaver remembers the path to the Photoshop source file and allows you to reopen it for modifications in Photoshop.
In the second method, introduced with Dreamweaver CS4, you can choose a Photoshop file in the Select Image Source dialog, and then place it into Dreamweaver. It is copied and placed into Dreamweaver in JPEG, GIF, or PNG format as a SmartObject, which maintains a link to the original Photoshop .psd file. When the .psd file is updated, Dreamweaver recognizes the changes and offers to update the copy in the Dreamweaver document.
The benefit of the SmartObject approach is that you can have a single .psd file that is used in many different pages of your site. When you update the Photoshop file, you can update any SmartObjects based on that file throughout your site at once.
To copy and paste Photoshop images into Dreamweaver
1. In Photoshop, open the image you want to bring into Dreamweaver.
2. Select the image or part of the image you want to copy.
You can select one or more layers in your document, or use one of Photoshop’s many other selection tools ![]() .
.

![]() In Photoshop, the background layer and the text layer have been selected in the Layers panel.
In Photoshop, the background layer and the text layer have been selected in the Layers panel.
3. If you made a selection from a single layer, choose Edit > Copy.
or
If you selected multiple layers, choose Edit > Copy Merged.
4. Switch to Dreamweaver.
The Image Preview dialog appears ![]() .
.

![]() In Dreamweaver’s Image Preview dialog, you can see that the image contains both the text and background layers from the Photoshop image. You can also make adjustments to the image optimization settings.
In Dreamweaver’s Image Preview dialog, you can see that the image contains both the text and background layers from the Photoshop image. You can also make adjustments to the image optimization settings.
6. Make any adjustments you want in the Image Preview dialog:
• On the Options tab, you can change the format of the saved image to GIF, JPEG, or PNG, and make adjustments specific to each file type. For example, if you choose GIF format, you can set one of the colors in the image to be transparent.
• On the File tab, you can scale the image by percentage or by absolute size in pixels.
• The Saved Settings pop-up menu above the image has several common options for GIF and JPEG formats.
• The toolbar below the image allows you to magnify or crop the image.
The Save Web Image dialog appears ![]() .
.
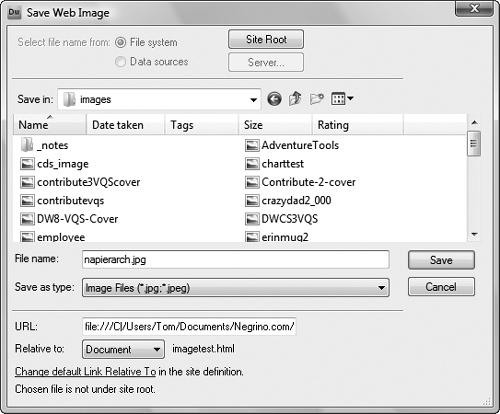
![]() Give the image a name, and save it in your
Give the image a name, and save it in your images directory.
8. Give the image a name, and navigate to where you want to save it (usually inside your site’s images folder).
Remember that you can’t use spaces in names for images for the Web, and that the only other characters you should use besides letters and numbers are the hyphen and underscore.
On Windows, you need to type the file extension, such as .jpg, .gif, or .png. The Mac adds these for you automatically as part of the name.
9. Click Save.
The Image Description (Alt Text) dialog appears ![]() . Alternate text is used by screen reading programs utilized by the disabled.
. Alternate text is used by screen reading programs utilized by the disabled.

![]() Enter a description of the file for screen readers used by the disabled.
Enter a description of the file for screen readers used by the disabled.
10. Enter the description for the image, and then click OK.
The image from Photoshop appears on your Web page.
Tip
This copy-and-paste integration process also works with Fireworks.
Tip
When images are placed and saved in Dreamweaver, they are flattened and lose their layers. If you want to maintain layers, use the SmartObject method to maintain a link to the original .psd.
Tip
Information about the image, such as the optimization settings and the location of the original .psd source file, is saved in a Design Note regardless of whether you have enabled Design Notes for your site.
To edit copy and pasted images using Photoshop
1. Select the image in Dreamweaver.
2. Ctrl-double-click (Cmd-double-click) the image.
or
Click the Edit button in the Property Inspector (see figure ![]() in “Editing Images”).
in “Editing Images”).
Dreamweaver opens the source .psd file in Photoshop.
3. Make your changes to the image in Photoshop and save the file.
4. Select all or part of the image and choose Edit > Copy, or if you selected multiple layers, choose Edit > Copy Merged.
5. Switch to Dreamweaver.
6. Paste the image over the image in the Web page. Dreamweaver optimizes the .psd image on the clipboard using the original optimization settings and then replaces the image on the page with the updated version.
To place a Photoshop image as a SmartObject
1. Click to place the insertion point in the document where you want the image to appear.
2. In the Common category of the Insert panel, click the Images button (see figure ![]() in “Adding Images”).
in “Adding Images”).
or
Choose Insert > Image, or press Ctrl-Alt-I (Cmd-Opt-I).
The Select Image Source dialog appears (see figure ![]() in “Adding Images”).
in “Adding Images”).
3. In the dialog, navigate to and select the Photoshop file that you want to insert.
With Photoshop files, you don’t get the usual preview of the image in the Select Image Source dialog.
4. Click OK (Choose).
5. The Image Preview dialog appears ![]() .
.
6. Select the file format you want to use, and make any other changes you prefer.
7. Click OK.
The Save Web Image dialog appears ![]() .
.
8. Give the image a name, and navigate to where you want to save it.
9. Click Save.
The Image Tag Accessibility Attributes dialog appears (see figure ![]() in “Adding Images”)
in “Adding Images”)
10. Enter the description for the image, and then click OK.
The image from Photoshop appears on your Web page, with a difference; it has a badge in the upper-left corner showing that it is a SmartObject ![]() .
.

![]() The road sign has the SmartObject badge in its upper-left corner.
The road sign has the SmartObject badge in its upper-left corner.
To update a SmartObject
1. Click to select the image that you want to change.
If the SmartObject needs updating, the badge will change, with the bottom arrow turning red, indicating that the copy of the image in the Dreamweaver document is out of sync with the original Photoshop file ![]() .
.

![]() It’s kind of difficult to tell in black and white, but the bottom arrow in this SmartObject badge has turned red, indicating that the image is out of sync with the original Photoshop file.
It’s kind of difficult to tell in black and white, but the bottom arrow in this SmartObject badge has turned red, indicating that the image is out of sync with the original Photoshop file.
2. Click the Update from Original button in the Property Inspector (see figure ![]() in “Editing Images”).
in “Editing Images”).
or
Right-click the image and choose Update from Original from the context menu.
The image updates to show the changes in the Photoshop document ![]() and the SmartObject badge shows that it is in sync.
and the SmartObject badge shows that it is in sync.

![]() After updating, the image shows the changes that had been made to the Photoshop file.
After updating, the image shows the changes that had been made to the Photoshop file.
Tip
The SmartObject badge only appears in Dreamweaver, not on your published Web pages.
Tip
You can have multiple SmartObjects on a single page (perhaps in different sizes, or cropped differently) that all link to the same Photoshop file. You can update each SmartObject independently.
Tip
You can update SmartObjects in the Assets panel by right-clicking them and choosing Update from Original from the context menu. The great thing about this method is that if you have used the SmartObject on multiple Web pages, the image is updated on all pages without you needing to open them.
Adding a Background Image
Most pages use a solid color or no color as their background, but sometimes you may want to use an image as the background of your page. This image will underlie all of the text and other images on your page. Though background images are a bit of a dated look, they can still be used on modern pages, if you use them well.
Dreamweaver creates background images by creating a CSS rule to redefine the <body> tag. You can do this by creating the rule manually (see Chapter 7 for details on how to do that), but it’s easier to use the Page Properties dialog.
To add a background image to your page
1. Open the page to which you want to add the background image.
2. In the Property Inspector, click the Page Properties button.
or
Choose Modify > Page Properties, or press Ctrl-J (Cmd-J).
The Page Properties dialog appears ![]() .
.

![]() Use the Page Properties dialog to insert a background image.
Use the Page Properties dialog to insert a background image.
3. In the Appearance (CSS) category of the dialog, click the Browse button next to “Background image.”
The Select Image Source dialog appears.
4. Navigate to and select the image you want to use as the background image, and then click OK (Choose).
5. From the Repeat pop-up menu in the Page Properties dialog, choose how you want the image to be repeated on the page (if it is smaller than the page):
• no-repeat places the image on the page just once, in the upper-left corner of the page.
• repeat tiles the image across and down the page, filling the page.
• repeat-x tiles the image across the top of the page.
• repeat-y tiles the image down the left edge of the page.
6. To see how the image will appear on the page, click Apply.
The background image appears on the page ![]() .
.

![]() The background image of our cat was repeated endlessly on this page by setting the Repeat field to “repeat.”
The background image of our cat was repeated endlessly on this page by setting the Repeat field to “repeat.”
7. Click OK.
Tip
Before CSS, designers set background images by adding a background attribute to the <body> tag. If you are asked to work on older sites, one of the renovations you should make is to remove this old attribute and replace it with a CSS rule.
Tip
Be careful when using tiled background images. As you can see from the figure that showcases our cat, it can make the page very hard to read.
Adding a Favicon
One of the little touches that will finish up your Web site is if you add a favicon, that little icon that appears in the address bar of a browser when your site loads ![]() . A favicon is another way to underscore your site’s brand identification, and often represents the logo of the organization that runs the site. Favicons are only 16 by 16 pixels large, and all modern Web browsers support them.
. A favicon is another way to underscore your site’s brand identification, and often represents the logo of the organization that runs the site. Favicons are only 16 by 16 pixels large, and all modern Web browsers support them.

![]() Here are the favicons for four different sites, as seen in Mozilla Firefox.
Here are the favicons for four different sites, as seen in Mozilla Firefox.
Before you can add a favicon to the index page of your site, you’ll need to create one. There are dedicated favicon editing programs available for purchase, but we prefer to use one of the free online tools that convert graphic files into favicons, such as the ones at www.chami.com/html-kit/services/favicon/ or tools.dynamicdrive.com/favicon/.
Once you have your favicon file, which must be named favicon.ico, you’ll add it to your site’s pages in Dreamweaver. You’ll do that with the <link> tag, which, while more often used for linking CSS style sheets, works fine for this purpose, too.
To add a favicon to your page
1. Obtain your favicon.ico file, and move it into your local site folder.
Because it’s an image, it makes sense to us to put the favicon file into the images folder, but you can put it anywhere you want in the local site folder.
2. Open the page to which you want to add the link to the favicon.
3. Choose Insert > HTML > Head Tags > Link.
The Link dialog appears ![]() .
.

![]() The Link dialog allows you to add the path to the favicon file.
The Link dialog allows you to add the path to the favicon file.
4. In the Href text box, enter the path to the favicon.ico file.
or
Click the Browse button to open the Select File dialog. Navigate to the favicon.ico file and click OK (Choose).
5. In the Rel text box, type shortcut icon.
6. Click OK, and then save the page by choosing File > Save.
After you next synchronize your local site to the remote site, the favicon will show up when you load the page in a Web browser.
Tip
You must repeat the process of adding the link to the favicon on every page in your site. If your site uses templates, adding the link to a template file automatically adds it to all the pages based on that template. For more about using templates, see Chapter 16.
Adding Flash and Shockwave
Because Adobe is the maker of the Flash multimedia format, it should come as no surprise that Dreamweaver makes it easy to add many different varieties of Flash objects to your pages. The two kinds we’ll discuss here are Flash animations and Shockwave animations. A Flash animation is a Flash file that has been optimized for playback on the Web. This kind of file has the .swf extension. You can play this animation in Dreamweaver or in a Web browser. A Shockwave file is an animation format very similar to a Flash file, but it’s created by Adobe Director rather than Adobe Flash. A Flash file can be displayed by any Web browser that has the free Flash Player; Adobe claims that more than 98 percent of Internet users have the Flash Player.
Tip
Files with the .fla extension are Flash document files that can only be opened in the Flash program. These sorts of files can’t be played in Dreamweaver or Web browsers.
To insert a Flash or Shockwave animation
1. Click to set the insertion point where you want the Flash or Shockwave animation to appear.
2. Choose Insert > Media > SWF, or press Ctrl-Alt-F (Cmd-Opt-F).
or
Choose Insert > Media > Shockwave.
The Select File dialog appears.
3. Navigate to the file you want, select it, and click OK (Choose).
The Object Tag Accessibility Attributes dialog appears ![]() .
.
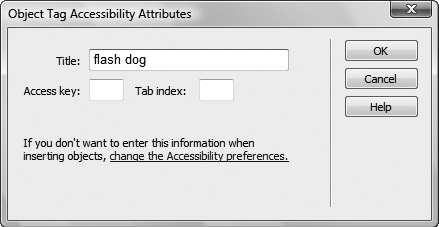
![]() Add alternate text for the Flash or Shockwave file in the Object Tag Accessibility Attributes dialog.
Add alternate text for the Flash or Shockwave file in the Object Tag Accessibility Attributes dialog.
4. Enter alternate text in the Title field of the dialog.
5. Click OK.
Dreamweaver inserts the animation file into your document as a placeholder.
Tip
The Access key and Tab index fields in the Object Tag Accessibility Attributes dialog are used with forms. See the “Labeling Your Fields” sidebar in Chapter 11 for more information.
To play the animation placeholder in Dreamweaver
1. Select the placeholder.
Selection handles appear at the edges of the placeholder.
2. Click the Live View button at the top of the document window.
or
Click the Play button in the Property Inspector ![]() .
.

![]() Use the Play button in the Property Inspector to preview your animation.
Use the Play button in the Property Inspector to preview your animation.
Dreamweaver plays the animation file in the document window.
Adding Flash Video
Flash video is a way of showing video on your Web site. Like other video formats, such as QuickTime, Windows Media, Silverlight, and RealVideo, Flash video can show full-motion video in context on your Web page. But one of the big advantages of Flash video is that most browsers already have the Flash plug-in installed, so your video is likely to be viewable by more people.
Before you can put a Flash video file on your Web page, you must, of course, convert your video to the Flash video format, which has the .flv extension. Adobe Flash Professional CS5 includes the Adobe Media Encoder, which can convert QuickTime, DV, MPEG, AVI, and Windows Media files into Flash video.
To insert a Flash video file
1. Click to place the insertion point where you want the Flash video file to appear.
2. Choose Insert > Media > FLV.
or
In the Common category of the Insert panel, choose FLV from the Media pop-up menu.
The Insert FLV dialog appears ![]() .
.
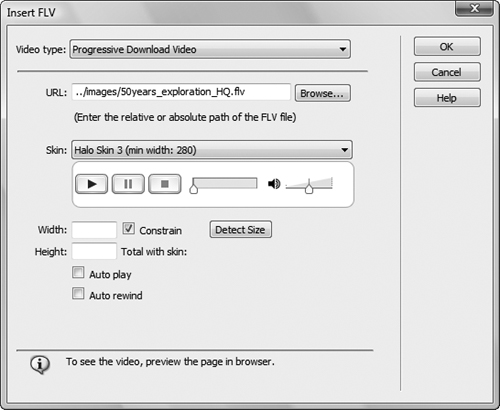
![]() You get a preview of the different media controllers available to you for Flash video directly below the Skin pop-up menu.
You get a preview of the different media controllers available to you for Flash video directly below the Skin pop-up menu.
3. From the Video type pop-up menu, choose either Progressive Download Video or Streaming Video.
You will most often choose Progressive Download Video, which downloads the Flash video file to the user’s hard disk and then plays it. The Streaming Video choice requires extra server-side software (Adobe Flash Media Server).
4. In the URL field, enter the path to the Flash video file. You could also click the Browse button, which brings up the Select File dialog and allows you to navigate to select the video file.
If the media file is not inside your site folder, Dreamweaver will, as usual, offer to copy it there for you.
5. From the Skin pop-up menu, choose the kind of video controller you want to appear with the video.
As you choose the skin, the dialog shows you a preview of what the video controls look like for that skin.
6. Enter the Width and Height (in pixels) that you want to use to display the video.
or
Click the Detect Size button, which attempts to read the Flash video file and figure out what size it is. Depending on your video, this option sometimes may not work, but it is always worth trying.
7. If you want the video to automatically begin playing when the Web page is loaded, select the Auto play check box.
8. If you want playback control to automatically return to the starting position after the video finishes playing, select the Auto rewind check box.
9. Click OK.
A placeholder for the Flash video file appears on your page ![]() . To play the Flash video file inside Dreamweaver, click the Live View button at the top of the document window
. To play the Flash video file inside Dreamweaver, click the Live View button at the top of the document window ![]() .
.

![]() When you’ve set all the options in the Insert FLV dialog, a placeholder appears in the document window.
When you’ve set all the options in the Insert FLV dialog, a placeholder appears in the document window.

![]() When you preview the Flash video in Live View, you can see and hear the video playing.
When you preview the Flash video in Live View, you can see and hear the video playing.
To edit a Flash video file’s properties
1. Click to select the Flash video file.
2. In the Property Inspector, make the changes you want ![]() .
.

![]() Adjust the settings for a Flash video file in the Property Inspector.
Adjust the settings for a Flash video file in the Property Inspector.
Tip
There are many variables involved in converting one kind of video file to another, and a complete discussion is way beyond the scope of this book. Instead, we suggest that you begin learning more about Flash video on the Adobe Web site at www.adobe.com/devnet/video/.
Tip
Dreamweaver, when purchased as a stand-alone product, doesn’t come with Adobe Media Encoder. However, all the Creative Suite 5 bundles that include Dreamweaver include Adobe Media Encoder.
Adding QuickTime and Other Media
Video and audio files, with the exception of the various flavors of Flash media, are handled by Dreamweaver as plug-in media. That’s because these files need plug-in software to be installed in a Web browser to be played. The most common plug-in media are QuickTime, Windows Media, Silverlight, and MP3 audio files.
To add plug-in media files
1. Click to place the insertion point where you want the media file to appear.
2. Choose Insert > Media > Plugin.
or
In the Common category of the Insert panel, choose Plugin from the Media pop-up menu.
The Select File dialog appears.
3. Navigate to and select the media file you want, and then click OK (Choose).
A placeholder for the plug-in file appears on your page ![]() .
.

![]() Dreamweaver puts a placeholder for the plug-in media file in the document window.
Dreamweaver puts a placeholder for the plug-in media file in the document window.
To preview your media file
1. Select the placeholder for the media file.
2. In the Property Inspector, click the Play button.
This may not work if Dreamweaver can’t find the appropriate plug-in on your system. In that case, save the page and preview the file in a Web browser ![]() .
.

![]() You usually need to preview media that uses plug-ins, like this QuickTime movie, in a Web browser.
You usually need to preview media that uses plug-ins, like this QuickTime movie, in a Web browser.
Tip
Dreamweaver creates the placeholder file as a small square icon on the page. When you preview the file, that icon will be replaced by the media file controller, which has the playback controls. The small size of the icon won’t allow you to use the media controller, so before you preview the file, click the placeholder icon and use its selection handles to make it wide enough so that you can see the entire media controller.
To edit a plug-in file’s properties
1. Click to select the plug-in file.
2. In the Property Inspector, make the changes you want ![]() .
.

![]() You can adjust the settings for a plug-in media file in the Property Inspector.
You can adjust the settings for a plug-in media file in the Property Inspector.
Putting It All Together
1. Add an image to your page, including setting its alternate text.
2. Add alternate text to an existing image on your page.
3. Insert an image from the Assets panel.
4. Insert image placeholders to allot space on the page for future images. Then replace the placeholders with your images.
5. Align an image.
6. Use the Property Inspector to edit (crop, resize, or resample) your images.
7. Adjust the brightness and contrast of your images, and then sharpen them.
8. If you have Photoshop, copy and paste a Photoshop image into Dreamweaver.
9. If you have Photoshop, place a Photoshop image as a SmartObject.
10. Add a background image to your page.
11. Add a favicon to your page.
12. Add a .swf or .flv file to your page.
13. Add a plug-in media file to your page.