
17. Editing Code
Dreamweaver is a WYSIWYG (What You See Is What You Get) application. Given Dreamweaver’s design strengths, why would you ever bother looking at code, much less editing it?
Believe it or not, there are people who purchase Dreamweaver who then spend most of their time in Code view. There are a number of reasons why; some of the more common we hear are:
• “It’s perfect for control freaks like me who just want to change that one character or move things one pixel.”
• “I learned tags before good WYSIWYG editors existed, so it’s faster for me to make changes this way.”
• “There are things I can do this way that can’t be done any other way in Dreamweaver.”
These are all perfectly valid reasons to want to use Code view (and there are plenty of other reasons). If you haven’t before, check it out. You might find that Code view works best for you, or that it’s useful when you simply want to tweak one small thing on your page.
Using the Coding Toolbar
Yes, it’s another toolbar in Dreamweaver, but the Coding toolbar is a little different: it only shows up when you’re in Code view, and it only acts on those things that you would deal with when you’re in Code view.
To use the Coding toolbar
1. If you’re in Design view, click the Code button in the Document toolbar. This switches you into Code view, so you’ll now see the tags (instead of the WYSIWYG appearance of your page) and the Coding toolbar. For instance, ![]() shows a page in Design view, whereas
shows a page in Design view, whereas ![]() shows the same page in Code view.
shows the same page in Code view.

![]() Here’s the familiar Design view that you’ve grown to know and love.
Here’s the familiar Design view that you’ve grown to know and love.

![]() The Code view shows the exact same page but in a whole new light.
The Code view shows the exact same page but in a whole new light.
2. On the left side of the document window, you’ll see the Coding toolbar ![]() . Let’s review its buttons, from top to bottom:
. Let’s review its buttons, from top to bottom:
• Open Documents: The name of this button might make you think that it’s a way to open documents, but that’s incorrect; it actually offers a pop-up menu of all the items that are currently open.
• Show Code Navigator: Displays the Code Navigator window. Code Navigator is covered in Chapter 7.
• Collapse Full Tag: Collapsing code (and why you’d want to do it) is covered later in this chapter. For now, it’s enough to know that this button will do it. Holding the Alt (Option) key while clicking this button collapses everything outside the current tag.
• Collapse Selection: This button collapses the current selection of code, and holding down the Alt (Option) key while clicking this button collapses everything outside the selection.
• Expand All: If any code on the page is collapsed, clicking this button expands it again.
• Select Parent Tag: This button causes the selection area to change to include the parent tag, based on the current cursor position.
• Balance Braces: If your current cursor position is inside a <script> or <style> container, clicking this button causes the innermost set of braces ( ), { }, or [ ] to be selected. This also works inside external JavaScript and CSS files.
• Line Numbers: Toggles the display of line numbers in the current document. If they’re currently displayed, they’ll be hidden, and if they’re currently hidden, they’ll display.
• Highlight Invalid Code: If you enter tags that Dreamweaver doesn’t like and you’ve chosen this option, your mistake will be highlighted in yellow. If you click in the highlighted area, the Property Inspector will tell you more about the error ![]() .
.
• Word Wrap: Toggles between wrapping code to the window (on) and allowing long lines to scroll horizontally off the screen (off).
• Syntax Error Alerts in Info Bar: Turns on or off an information bar that appears at the top of the page if Dreamweaver detects a code syntax error. The program also highlights the line of code containing the error.
• Apply Comment: The pop-up menu on this button gives several choices, each of which wraps comments around the selected text:
• Apply HTML Comment: Inserts <!-- and --!> before and after the selection (respectively).
• Apply /* */ Comment: Wraps this type of comment around the selected CSS or JavaScript.
• Apply // Comment: Inserts this type of comment at the beginning of each selected line of CSS and/or JavaScript.
• Apply ' Comment: Inserts this type of comment at the beginning of each selected line of VBScript.
• Apply Server Comment: If you’re working on a server-side file such as PHP, JSP, or ColdFusion, Dreamweaver automatically detects the file type and inserts the correct type of comment.
• Remove Comment: Removes comment tags from the selected code.
• Wrap Tag: Opens the Quick Tag Editor (described later in this chapter) allowing you to wrap a tag around the selection.
• Recent Snippets: Allows you to insert a recently used snippet. Snippets are covered in Chapter 16, “Making Life Easier: Using Templates, Libraries, and Snippets.”
• Move or Convert CSS: Here you can either convert inline CSS to a rule or move CSS rules. CSS is covered in Chapters 7–9.
• Indent Code: Takes the selection and moves it to the right, based on your chosen indentation preference in the Code Format settings (covered in the sidebar “Text Editing Tips,” later in this chapter).
• Outdent Code: Takes the selection and moves it to the left.
• Format Source Code: From this pop-up menu, you can choose whether to apply formatting to the file as a whole or to just the current selection. Whichever you choose will be formatted as set in the Code Format settings, which can also be accessed via this pop-up menu.
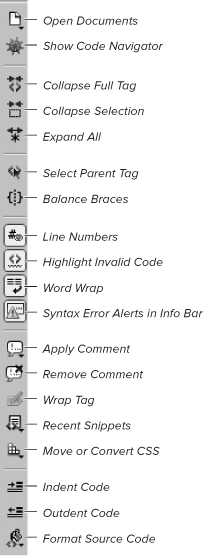
![]() The Coding toolbar provides everything you need to manage text and tags.
The Coding toolbar provides everything you need to manage text and tags.

![]() It’s always a good idea to tell Dreamweaver to highlight invalid code, so you can see problems at a glance.
It’s always a good idea to tell Dreamweaver to highlight invalid code, so you can see problems at a glance.
Tip
Some of these options can also be set from View > Code View Options ![]() . There are a few extra ones there, also: Hidden Characters, Syntax Coloring, and Auto Indent. In earlier versions of Dreamweaver you could get to this from the View Options button in the Document toolbar, but that’s gone away in CS5.
. There are a few extra ones there, also: Hidden Characters, Syntax Coloring, and Auto Indent. In earlier versions of Dreamweaver you could get to this from the View Options button in the Document toolbar, but that’s gone away in CS5.
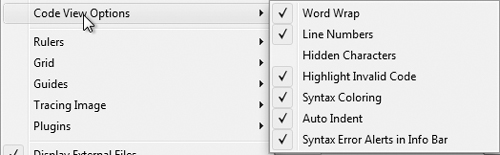
![]() The Code View Options choice in the View menu contains some very useful settings.
The Code View Options choice in the View menu contains some very useful settings.
Tip
If you appear to be missing a button or two, don’t fret—your document window may just be smaller than the Coding toolbar. If that’s the case, you’ll see a couple of downward-facing arrows at the bottom of the toolbar. Click on those arrows and the missing buttons appear off to the side ![]() .
.
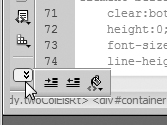
![]() If you have too many buttons for your screen size, you’ll find they’re still accessible once you learn where they’re hiding.
If you have too many buttons for your screen size, you’ll find they’re still accessible once you learn where they’re hiding.
Tip
If for some reason you don’t like this toolbar and just want it to go away, you can do that just as you would with other Dreamweaver toolbars: choose View > Toolbars > Coding. And if you change your mind, that same command brings it back.
Tip
Dreamweaver opens files in Design view by default. If you want all your HTML files to open in Code view instead, open Preferences and choose the File Types/Editors category. In the “Open in Code View” text box, add a space followed by .html. You can add any other file types where you want to use Code view by default by adding those file extensions, too.
Layout for Coders
In previous versions of Dreamweaver, you could choose between Designer layout and Coder layout the first time you launched the application. If you chose the latter, your screen looks a little different than our screenshots. It’s also possible that after using Code view for a bit, you decide that that’s the way you want to work in the future, so you check out Coder layout. ![]() shows you what
shows you what ![]() looks like if you change the Workspace Switcher menu to Coder layout
looks like if you change the Workspace Switcher menu to Coder layout ![]() .
.
![]() Coder layout is for those who want to see lots of code with as few distractions as possible.
Coder layout is for those who want to see lots of code with as few distractions as possible.

![]() It’s simple to switch between the different layouts with the Workspace Switcher menu.
It’s simple to switch between the different layouts with the Workspace Switcher menu.
Other preset workspaces of interest to codeheads include Coder Plus, which adds an icon bar to the right of the document window, providing easy access to the Insert, CSS Styles, and AP Elements panels; and App Developer and App Developer Plus, which are useful for people setting up database-backed Web sites ![]() . The latter two workspaces display the document window in Split View and show the Databases, Bindings, and Server Behaviors panels.
. The latter two workspaces display the document window in Split View and show the Databases, Bindings, and Server Behaviors panels.

![]() If you’re setting up a database-backed Web site, check out the App Developer workspace.
If you’re setting up a database-backed Web site, check out the App Developer workspace.
Text Editing Tips
When you start using Code view and see tags and markup for the first time, you’ll find that there are a lot of things that Dreamweaver assumes you already know. In case you don’t, here are a few handy tips:
• Word Wrap: You may want all of your paragraphs to be one long string of text, but if you have Word Wrap turned off, all your long lines will go off the right side of the document. You can turn Word Wrap on in the Coding toolbar (see figure ![]() ).
).
When you’re entering code, be careful about putting in hard returns (where you press Enter/Return) versus the soft returns that Dreamweaver displays even though you didn’t type anything in. If you want soft returns, just keep typing and Dreamweaver will handle it for you. If you want hard returns, you might as well turn off Word Wrap.
• Syntax coloring: At first, you might wonder why the text in the code editor is so many different colors. If all the colors confuse you and make you think about turning off syntax coloring, give it a try with colors first. Syntax coloring is one of the best ways to learn what’s what in code, because similar elements will have identical coloring.
Wish there were fewer colors all at once? In the Code Coloring category in Preferences, you can change any color to any other color. And if for some reason you want to make things even more tasteless, you can add unique background colors to each different foreground color. But you shouldn’t.
• Line numbers: These are another matter of personal preference. Some people love them, whereas other people find them terribly annoying. What you’ll want to note is how they work in conjunction with Word Wrap: soft-wrapped lines only get a single line number (see figure ![]() ).
).
• Indentation: If you haven’t worked with code before, you might not immediately get why indentation is so useful. But if you’re trying to figure out where your divs begin and end, you’ll get it quickly when you can see them lined up with each other, with their contents indented.
There’s no single “right” way to indent code. What we’ve found works best is to find one style that works for you, and then stick to it. It’s the consistency that matters most, especially when you have multiple people working on a site.
If you want to manually indent/outdent your code, you can (with the Indent Code/Outdent Code buttons on the Coding toolbar; see figure ![]() )—but we recommend instead turning on Auto Indent by choosing View > Code View Options (see figure
)—but we recommend instead turning on Auto Indent by choosing View > Code View Options (see figure ![]() ).
).
• Code formatting: The last button on the Coding toolbar (actually a pop-up menu) lets you format your source code (see figure ![]() ). If your tags are all over the place because your code came from here and there (as happens to all of us), the Apply Source Formatting option can be found in that pop-up menu. If you don’t like the way Dreamweaver formats your code by default, you can choose the Code Format Settings option from the pop-up menu, and you’ll be presented with the Code Format category of the Preferences. Even if you don’t know much about tags, it’s easy to use this to put your text just where you want it
). If your tags are all over the place because your code came from here and there (as happens to all of us), the Apply Source Formatting option can be found in that pop-up menu. If you don’t like the way Dreamweaver formats your code by default, you can choose the Code Format Settings option from the pop-up menu, and you’ll be presented with the Code Format category of the Preferences. Even if you don’t know much about tags, it’s easy to use this to put your text just where you want it ![]() .
.

![]() Dreamweaver lets you format your code precisely the way that you want it.
Dreamweaver lets you format your code precisely the way that you want it.
Using Split View
Does losing your WYSIWYG view freak you out a little? Wish you had a way to see both Code and Design views at once? Well, that’s exactly what the Split view is about. It splits the document window into two separate panes, so you can see both code and WYSIWYG simultaneously.
Dreamweaver CS4 added two enhancements:
• A split code view where both panes show code. This is very useful when you want to copy and paste code from one section of your page to another part of the same page.
• An option to split the pane vertically (versus the long-time ability to split it horizontally). In both horizontal and vertical split modes, you can choose which panes contain the Code and Design views.
To use Split view
1. Whether you’re in Design view or Code view, click the Split button in the Document toolbar. Your document window splits into two: one part for Design view and one for Code view. By default the split is vertical ![]() .
.

![]() Split view is like training wheels for code—it lets you see how changing the design changes the code, and vice versa.
Split view is like training wheels for code—it lets you see how changing the design changes the code, and vice versa.
2. If you want to reverse the two (you prefer Code on the right instead of Design or vice versa), use the Layout button pop-up menu on the Application Bar ![]() . When you’re in Split view, you can choose whether Design view should go on the top (when split horizontally) or left (when split vertically).
. When you’re in Split view, you can choose whether Design view should go on the top (when split horizontally) or left (when split vertically).

![]() The Layout button pop-up menu on the Application Bar lets you split your view horizontally or vertically, and then pick which view goes on the top or left.
The Layout button pop-up menu on the Application Bar lets you split your view horizontally or vertically, and then pick which view goes on the top or left.
3. (Optional) If you want to use the horizontal Split view, toggle Split Vertically from the View menu or the Layout button. The display changes from the vertical split to reflect the horizontal choice ![]() .
.

![]() Depending on your working style, you may prefer the horizontal Split view instead of the vertical Split view.
Depending on your working style, you may prefer the horizontal Split view instead of the vertical Split view.
4. (Optional) If you want the Code view in both panes, so that you can look at different parts of the same page in each pane, choose Split Code from the View menu or the Layout button. Your display changes to reflect your choice.
Tip
If you update your page in Design view, Code view automatically updates in response. But if you update in Code view, the Property Inspector displays the message, “You have made changes to the code. To edit selection properties, click Refresh or press F5.”
Tip
When you’re in vertical Split view, the Coding toolbar only extends down the left side of the code pane, not down the full document window.
Tip
If you select anything in one view, the document automatically scrolls to show and highlight the same selection in the other view.
Tip
If you’ve never looked at HTML tags before, Split view can be a great way to familiarize yourself with which tags go with which elements of your design.
Tip
You can change the size of the panes by pointing at the border between them. When the cursor changes into a two-headed arrow, you can click and drag the border to resize the panes.
Using Live Code View
Live Code view is a version of Split view that complements Live View (see Chapter 1 for more about using Live View). Normally, when you’re in Split view, you see the Design view in one pane and the Code view in the other. If you then click the Live View button, Dreamweaver changes the rendering in the Design view pane to show how the contents of that pane would look in a Web browser. The underlying code in the Code view pane remains the same. But what if your Web page uses JavaScript for visual effects such as rollovers? As the script executes, it’s actually changing the HTML on the page, rewriting it under script control. Live Code view allows you to see how the HTML in the Code view pane changes as you interact with the page in the Design view pane. This is especially useful if you’re trying to debug a script because it is not producing the effect that you want.
To turn on Live Code view
1. In any view, click the Live View button on the Document toolbar.
The page rendering changes to show what the Web page would look like in a Web browser ![]() .
.

![]() In Design view, Dreamweaver shows you the usual view (top). In Live View (bottom), you can see the application of the CSS styles and the highlighting of the row under the cursor thanks to JavaScript.
In Design view, Dreamweaver shows you the usual view (top). In Live View (bottom), you can see the application of the CSS styles and the highlighting of the row under the cursor thanks to JavaScript.
2. Click the Live Code button on the Document toolbar.
The document changes to Split view, with the code in the Code view pane highlighted to indicate that it is live ![]() . As you interact with the page in the Design view pane, the code in the Code view pane is updated.
. As you interact with the page in the Design view pane, the code in the Code view pane is updated.


![]() In Live Code view, the HTML code changes as you interact with the page in the Design pane (bottom).
In Live Code view, the HTML code changes as you interact with the page in the Design pane (bottom).
Tip
There are useful options for Live Code, found in the Live View Options menu in the Browser Navigation toolbar. We discuss these options in more detail in Chapter 14, “Building Pages with Dynamic Elements.”
Using the Quick Tag Editor
If you prefer Design view (as do most people who’ve bought a WYSIWYG editor, after all) but wish you could type a little bit of HTML now and then without switching back and forth between modes, there’s an answer: the Quick Tag Editor.
To use the Quick Tag Editor
1. With your page in Design view, put the cursor in the place where you want to add a tag, or select the tag you want to change, or select the element you want to wrap a tag around.
2. Press Ctrl-T (Cmd-T).
or
Click the Quick Tag Editor button at the right edge of the Property Inspector.
3. The Quick Tag Editor appears, in one of its three modes: Insert, Edit, or Wrap. In any of these modes, start typing, and the possible options appear in the code hints menu below.
• Insert HTML: This mode allows you to place a new tag on the page ![]() .
.

![]() With the Quick Tag Editor, you can easily insert a new tag on the page.
With the Quick Tag Editor, you can easily insert a new tag on the page.
• Edit tag: This allows you to modify an existing tag, either to change it or to add attributes to it ![]() .
.

![]() The Quick Tag Editor also lets you edit existing tags.
The Quick Tag Editor also lets you edit existing tags.
• Wrap tag: In this mode, you can wrap a new tag around an existing element ![]() .
.

![]() And lastly, you can tell the Quick Tag Editor that you want to wrap a tag around existing page elements.
And lastly, you can tell the Quick Tag Editor that you want to wrap a tag around existing page elements.
4. To accept your changes and leave the Quick Tag Editor, press Enter. To leave the Quick Tag Editor without making any changes, press Escape.
Tip
Dreamweaver tries to guess which Quick Tag mode you want to be in. If it guesses incorrectly, you can cycle through the three modes by pressing Ctrl-T (Cmd-T) again. Be careful about what’s actually chosen when you do that, though—sometimes, the selected area can expand. For instance, if you’ve selected the text of a link with the goal of modifying that link, but you’ve also (accidentally) selected something outside the <a> (link) tag, you can find that you’re modifying the <p> (paragraph) around the text instead of the link itself.
Tip
If the Quick Tag Editor appears but it’s covering an area you want to see, you can move it. Just click and drag in the area that displays the mode name to put it in the location you want.
Using the Tag Editor
You’ve seen the Quick Tag Editor; now here’s the Tag Editor itself. It’s not really slower than the Quick version, and it’s handy for when you want more control than you can get in, say, the Property Inspector, but you don’t want to deal with actual HTML tags.
To use the Tag Editor
1. With your page in Design view, select an element where you want to edit an existing tag. For instance, you can select an image or the text of a link.
2. Right-click, and choose Edit Tag.
or
Press Shift-F5.
or
From Dreamweaver’s menu, choose Modify > Edit Tag.
3. The Tag Editor dialog for that particular tag appears. Every tag has a custom dialog of its own with a variety of categories in the left column. ![]() shows the Tag Editor dialog for an
shows the Tag Editor dialog for an <img> tag, and ![]() shows the Tag Editor dialog for an
shows the Tag Editor dialog for an <a> tag. Make any desired changes.
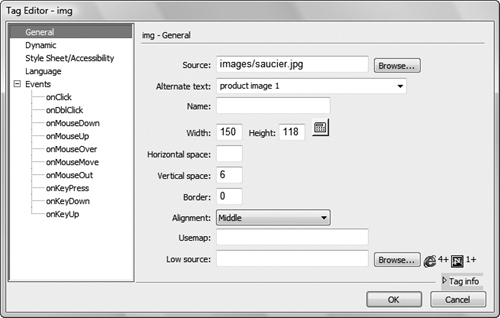
![]() The Tag Editor for images lets you modify every possible image attribute and event.
The Tag Editor for images lets you modify every possible image attribute and event.

![]() The Tag Editor for the
The Tag Editor for the a tag allows you to change attributes and events for links.
4. Click OK when complete.
Tip
Near the bottom right of the Tag Editor dialog is the Tag info disclosure arrow. Click it, and the dialog size increases to include a description of the tag you’re modifying. For more information about this description, see “Using the Tag Chooser” and “Using the Code Reference,” later in this chapter.
Tip
You can also access the Tag Editor from Code view by right-clicking on a tag ![]() .
.
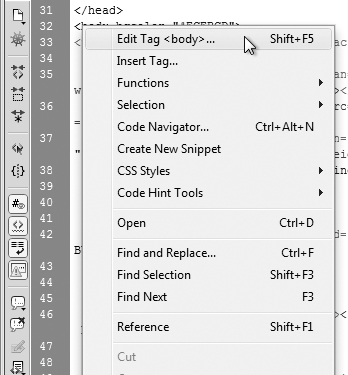
![]() Right-click and this menu appears with the available options.
Right-click and this menu appears with the available options.
Using the Tag Chooser
If you’re beginning to think that there are a lot of different ways to insert elements into a Dreamweaver page, you’re right—except that you haven’t even seen many of them yet. Here’s a tool you might not have run across yet—Dreamweaver’s Tag Chooser.
To use the Tag Chooser to insert tags
1. With your page in Code view, put the cursor into the section of the document that you want to add to or edit.
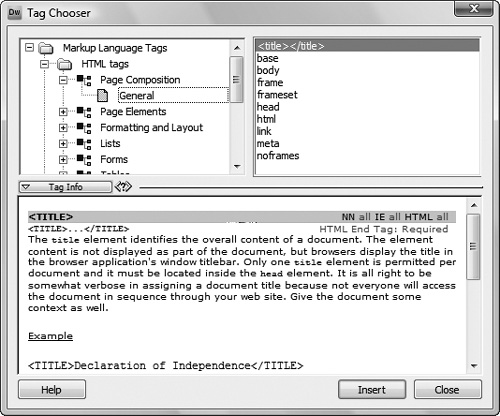
2. Right-click and a menu of the available options appears. Choose Insert Tag (see figure ![]() in “Using the Tag Editor”). The Tag Chooser dialog appears
in “Using the Tag Editor”). The Tag Chooser dialog appears ![]() .
.

![]() The Tag Chooser lets you insert tags.
The Tag Chooser lets you insert tags.
3. Click any of the icons or tag categories on the left side, and the matching tags will appear on the right.
4. Select one of the tags on the right, and click Insert. If the tag you chose contains angle brackets (< and >), it will be inserted into the page. Otherwise, a Tag Editor dialog appears, allowing you to enter the required information. For more about the Tag Editor dialog, see “Using the Tag Editor.”
5. When you are done with the Tag Chooser dialog, click Close.
To use the Tag Chooser to get tag information
1. With the Tag Chooser open ![]() , select a tag on the right side.
, select a tag on the right side.
2. Click the Tag Info button that’s just above the Help button on the bottom left. The Tag Info reference area appears, along with useful information about the tag you selected ![]() .
.
![]() Select a tag, click the Tag Info button, and Dreamweaver displays a reference guide to that tag.
Select a tag, click the Tag Info button, and Dreamweaver displays a reference guide to that tag.
or
Click the <?> button directly to the right of the Tag Info button. The same information appears, but in the Code Reference panel. For more information about the Code Reference panel, see “Using the Code Reference,” later in this chapter.
Tip
You can also open the Tag Chooser by clicking the bottommost icon in the Insert panel when you’re in the Common category. If you do this in Design view, Dreamweaver automatically switches to Split view.
Collapsing Code
If you’ve spent much time working with tags and code, you’ll often find yourself in a situation where you wish you could hide just some of it. Thankfully, that’s something you can do with Dreamweaver.
To collapse code
1. In Code view, select the code that you want to collapse ![]() . The simplest way to do this is to click somewhere inside the area, and then click the Select Parent Tag button on the Coding toolbar (see figure
. The simplest way to do this is to click somewhere inside the area, and then click the Select Parent Tag button on the Coding toolbar (see figure ![]() in “Using the Coding Toolbar”).
in “Using the Coding Toolbar”).

![]() Select the code to collapse and then look for the vertical line on the left.
Select the code to collapse and then look for the vertical line on the left.
2. Just to the left of the code, you’ll see a vertical line that goes from the beginning of the selected area to the end. Windows users will see a white box with a minus sign on each end, and Mac users will see two gray triangles, the top one facing down and the bottom one facing up. Click one of these endpoints, and the selected code collapses ![]() . You’ll now see the first part of the first line inside a highlighted box, plus a white box with a plus sign (Windows) or a right-facing gray arrow (Mac).
. You’ll now see the first part of the first line inside a highlighted box, plus a white box with a plus sign (Windows) or a right-facing gray arrow (Mac).
![]() Click one of the icons on the endpoints of the line, and the selected text collapses to a single line.
Click one of the icons on the endpoints of the line, and the selected text collapses to a single line.
or
Click anywhere inside the tag you want to collapse, and click the Collapse Full Tag button on the Coding toolbar.
or
Select the code you want to collapse, and click the Collapse Selection button on the Coding toolbar.
or
Click in a particular location on the page, and press the Alt (Option) key while clicking the Collapse Full Tag button on the Coding toolbar. This collapses everything but the full tag around your particular cursor position.
or
Select a segment of code, and press the Alt (Option) key while clicking the Collapse Selection button on the Coding toolbar. This collapses everything but the current selection.
or
Right-click inside a tag on the page, and choose Selection ![]() . From there you can choose to Collapse Selection, Collapse Outside Selection, Collapse Full Tag, or Collapse Outside Full Tag.
. From there you can choose to Collapse Selection, Collapse Outside Selection, Collapse Full Tag, or Collapse Outside Full Tag.

![]() You can also collapse code by right-clicking on the selection and choosing one of the collapse options.
You can also collapse code by right-clicking on the selection and choosing one of the collapse options.
To work with collapsed code
• Put your cursor over the highlighted box and a tip appears displaying all of the collapsed code ![]() .
.

![]() If you want to know what’s collapsed, this tool tip gives you the info without actually expanding the code.
If you want to know what’s collapsed, this tool tip gives you the info without actually expanding the code.
• Collapse a section of code if you need to move it from one area of the page to another. You’ll know that you’re moving exactly what you want to move and no more.
• If you collapse a section of code and then save and close the page, the next time you open the page that section will still show as collapsed.
To expand code
• Click the collapsed code symbol (the white box with a plus sign (Windows) or the right-facing gray arrow (Mac)) to the left of the code you want to expand.
or
Double-click the highlighted box.
or
Click the Expand All button on the Coding toolbar, which expands all the collapsed code on the page.
or
Right-click on the page, and choose Selection ![]() . From there you can choose to Expand Selection or Expand All.
. From there you can choose to Expand Selection or Expand All.
Using Code Hints
When it comes to working with HTML, not all text editors are created equally—and Dreamweaver’s code hints are one reason why text editor fans will use its Code view rather than someone else’s garden variety notepad-like application.
To use code hints
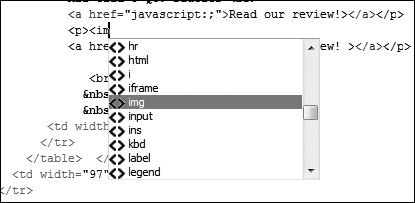
1. In Code view, click anywhere on the page that you want to add a tag. Start a new tag by typing <, and the code hints appear in a pop-up menu ![]() .
.

![]() Start typing and the code hints pop-up menu appears.
Start typing and the code hints pop-up menu appears.
2. Type in the first character or two of the tag, and the code hints menu should change to reflect your typing ![]() . When the hinted value is the tag you want, press Tab.
. When the hinted value is the tag you want, press Tab.
![]() As you continue to type, the code hints narrow down your choices.
As you continue to type, the code hints narrow down your choices.
3. To add an attribute to your new tag, press the spacebar and continue to type. The code hints pop-up menu will appear again, this time displaying just the valid attributes for that tag ![]() . Again, choose the one you want and press Tab to get the full attribute added to your tag.
. Again, choose the one you want and press Tab to get the full attribute added to your tag.

![]() Code hints work for attributes as well as tags.
Code hints work for attributes as well as tags.
4. If you select an attribute that needs to link to a file, the code hint changes to a Browse button ![]() . Click the button to browse to the file on your disk.
. Click the button to browse to the file on your disk.

![]() Code hints can tell you when the attribute needs a URL as its value.
Code hints can tell you when the attribute needs a URL as its value.
5. If you want to add an attribute to an existing tag, click immediately after the tag name (for instance, right after the g in <img), press the spacebar, and the attributes available will display ![]() .
.

![]() You can add an attribute to an existing tag—just click inside the tag and start typing.
You can add an attribute to an existing tag—just click inside the tag and start typing.
6. To end a tag, type </, and the most recently opened tag will automatically be closed.
Tip
If the code hints pop-up menu doesn’t appear, press Ctrl-spacebar (Cmd-spacebar) to make it display.
Tip
You can use the arrow keys on your keyboard to move up and down through code hints to choose the tag or attribute you want.
Tip
If you’re using XHTML and you end a tag with > rather than />, code hints will automatically change it to the proper format.
Tip
You can’t modify an attribute with code hints; instead, delete the attribute and re-create it.
Tip
If you want a special character but can’t remember the exact name of it (such as for non-breaking space), just type in the first ampersand & and you’ll get a code hint that lists all the possible characters you can enter.
Tip
If there’s anything you don’t like about how code hints work, you can change them to suit your taste by modifying the values in the Code Hints category of Dreamweaver’s Preferences ![]() .
.

![]() Dreamweaver lets you make code hints work just the way you choose.
Dreamweaver lets you make code hints work just the way you choose.
Tip
Newly added in CS5 is improved code hinting for PHP, including custom class hinting, integrated documentation, and site-specific code hinting for CMS and application frameworks. To control the site-specific code hinting, choose Site > Site-Specific Code Hints. The resulting dialog has presets for the three CMS platforms that Dreamweaver CS5 supports, allowing you to control how code hints are provided for WordPress, Joomla! and Drupal sites.
Using the Tag Inspector
If you prefer to stay in Design view but every so often you just want to tweak something, the Tag Inspector panel is one of the simplest ways to do so. Along with the Tag Editor and Quick Tag Editor (covered earlier), it’s a great way to modify existing tags, and it’s an easy way to get used to the attributes that exist for each tag.
To use the Tag Inspector
1. If the Tag Inspector currently isn’t displaying, choose Window > Tag Inspector.
2. If you’re in Design view, click on an element on the page, or choose a tag from the tag selector. If you’re in Code view, click anywhere inside a tag. The tag and its attributes appear in the Tag Inspector ![]() . Be sure the Attributes tab is selected.
. Be sure the Attributes tab is selected.

![]() The Tag Inspector can be found in the Attributes tab of the Tag Inspector panel. Here’s the Category view.
The Tag Inspector can be found in the Attributes tab of the Tag Inspector panel. Here’s the Category view.
3. There are two ways to view the attributes in the Tag Inspector: by category or as a list.
• To view by category, click the Show Category view button. Categories can be open or closed; to open a closed category, click the + button (Windows) or the right-facing triangle (Mac). To close an open category, click the - button (Windows) or the downward-facing triangle (Mac). When open, the list of attributes that fall into that category are displayed.
• To view as a list, click the Show List view button. This choice displays all the tag’s attributes in an alphabetical list ![]() .
.

![]() Or optionally, there’s also the List view, which shows all that tag’s attributes in alphabetical order.
Or optionally, there’s also the List view, which shows all that tag’s attributes in alphabetical order.
4. You can now modify, add, or delete attributes. There are different ways to edit different types of attributes:
• If you’re adding or modifying an attribute whose value is a URL ![]() , you’ll see the Point to File icon and a browse icon to the right of the entry field. Alternatively, you can type into the entry box, which is also the case for most attributes.
, you’ll see the Point to File icon and a browse icon to the right of the entry field. Alternatively, you can type into the entry box, which is also the case for most attributes.

![]() The standard Point to File and browse icons work the same way here as they do everywhere else in Dreamweaver.
The standard Point to File and browse icons work the same way here as they do everywhere else in Dreamweaver.
• If your attribute has particular defined values, clicking in the value column displays a pop-up menu containing the valid values ![]() .
.
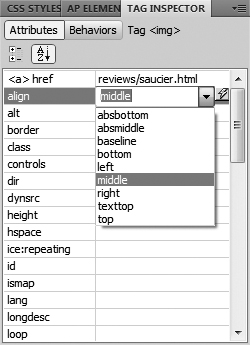
![]() For those attributes that can only have certain values, Dreamweaver lets you know what those possibilities are.
For those attributes that can only have certain values, Dreamweaver lets you know what those possibilities are.
• If the attribute contains a color, clicking on the small box in the value column brings up the standard color picker ![]() .
.
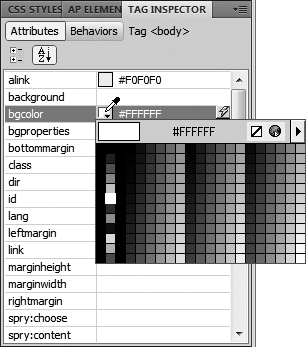
![]() Instead of having to remember odd codes for colors, the color picker lets you choose the color you want.
Instead of having to remember odd codes for colors, the color picker lets you choose the color you want.
5. There’s no OK or Accept changes button on the panel; simply clicking away from the attributes or off the panel implements your changes on your page.
Tip
As you might remember from Chapter 1, it’s also possible to change tag attributes in the Property Inspector. Because the Property Inspector only shows the most commonly used attributes, you’ll want to use the Tag Inspector those times when you need to get at the others.
Using the JavaScript Extractor
Best practices for Web pages call for content to be separated from structure and behavior, so you should have separate HTML, CSS, and JavaScript documents. Separating the functions like this makes it easier to make changes in any of the documents without accidentally breaking your site. And since CSS and JavaScript documents can apply to many HTML pages on your site, changes you make in them are automatically applied to all the pages that reference those files.
Many older pages, and even pages that are created in Dreamweaver, can have JavaScript that is embedded in the HTML page. This can be within the document’s <head> tag or can be in the <body>. The JavaScript extractor automates moving embedded JavaScript code into an external .js file.
To extract embedded JavaScript
1. Open a page containing JavaScript code.
2. Choose Commands > Externalize JavaScript.
Dreamweaver will analyze the page, and the Externalize JavaScript dialog will appear ![]() .
.

![]() Choose which JavaScript you want to be extracted from the page.
Choose which JavaScript you want to be extracted from the page.
3. In the dialog, choose “Externalize JavaScript and attach unobtrusively.”
This option will move the JavaScript from the HTML page to a new external JavaScript file and add a link to the external file to the head section of the HTML page.
4. Select or deselect any of the proposed JavaScript edits in the dialog.
5. Click OK.
Dreamweaver displays a dialog that gives you a rundown of what the Externalize JavaScript command did ![]() .
.
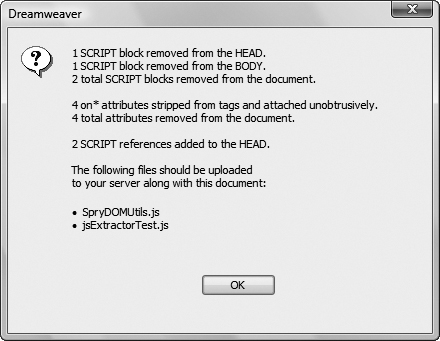
![]() When the JavaScript Extractor is done, it reports on what it accomplished.
When the JavaScript Extractor is done, it reports on what it accomplished.
Tip
Once you externalize Dreamweaver behaviors, you can’t reedit them in the Behaviors panel, because Dreamweaver doesn’t have a way to read in JavaScript code from external files.
Using the Code Reference
It’s often very handy to have a book close by when you’re first starting to work with code (we recommend HTML, XHTML, and CSS, Sixth Edition, Visual QuickStart Guide by Elizabeth Castro [Peachpit, 2006] by the way). If you don’t happen to have a book nearby, don’t fret—Dreamweaver has several built-in reference books.
To open the Code Reference tab
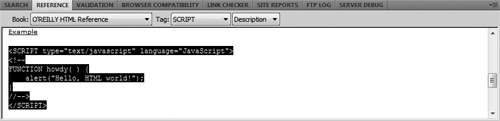
• Right-click the element on the page that you have questions about, and select Reference ![]() . The Reference tab of the Results panel appears
. The Reference tab of the Results panel appears ![]() .
.

![]() Picking Reference from this menu displays the Reference tab of the Results panel.
Picking Reference from this menu displays the Reference tab of the Results panel.

![]() The Reference tab can display material about HTML, CSS, JavaScript, and more.
The Reference tab can display material about HTML, CSS, JavaScript, and more.
or
Follow the directions in “Using the Tag Chooser,” earlier in this chapter.
or
From Dreamweaver’s menu, choose Window > Reference.
To insert code from the reference into your document
1. In the Reference tab, find the code fragment you want, click it once, and the entire fragment will be selected ![]() .
.
![]() Click the code sample once, and it will be selected.
Click the code sample once, and it will be selected.
2. Right-click the selected text and choose Copy.
3. Paste the copied code into your document wherever you want it.
Tip
If you don’t like the size of the text in the Code Reference tab, you can change it. Right-click anywhere inside the panel and you’ll have your choice of small, medium, or large text.
Tip
The HTML, CSS, and JavaScript reference material included in Dreamweaver is excerpted from Danny Goodman’s book, Dynamic HTML, The Definitive Reference (O’Reilly Media, 1998). It’s a darn good book, but a little out of date, so for learning HTML, we still recommend the Visual QuickStart Guide. Want to learn CSS or JavaScript? We’re required to recommend Styling Web Pages with CSS: Visual QuickProject Guide (2009) and JavaScript & Ajax for the Web: Visual QuickStart Guide (2009), both from Peachpit Press by, well, us (so you can guess who required it).
Tip
Besides the reference material, the Code Reference tab also includes information on ColdFusion, ASP, JSP, PHP, SQL, XML, and XSLT (and probably a few other three-letter acronyms, too). There’s also the UsableNet Accessibility Reference, a great resource for learning how to make your sites more accessible.
Using an External Editor
No matter how much you love Dreamweaver, there may be times when you want to use a different text editor. There are many possible editors you might use, and which one you pick is just a matter of personal preference.
To use an external editor
1. In Dreamweaver’s Preferences, go to the File Types/Editors category. You’ll see a dialog that looks like either ![]() (Windows) or
(Windows) or ![]() (Mac).
(Mac).

![]() With Windows, you can pick any text editor by browsing to it and selecting it.
With Windows, you can pick any text editor by browsing to it and selecting it.

![]() You can do the same on the Mac, but it’s easier to just choose BBEdit.
You can do the same on the Mac, but it’s easier to just choose BBEdit.
2. If you’re on a Mac and you want to use BBEdit as your external editor, click the Enable BBEdit Integration button, and you’re done. Otherwise (on either platform), click the Browse button next to the External Code Editor text field, navigate to your application of choice, and click Open. Next, decide when you want to reload modified files and when you want to save on launch. The choices for both are Always, Never, or Prompt.
3. Click OK to accept your changes.
4. To switch to your chosen editor, select Edit > Edit with application name ![]() .
.
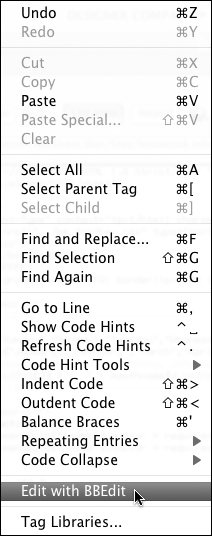
![]() There’s a new entry on this menu that lets you edit with your text editor of choice—in this case, BBEdit.
There’s a new entry on this menu that lets you edit with your text editor of choice—in this case, BBEdit.
If the application was closed, it will now launch, and the current page will open in the text editor and come to the front ![]() .
.

![]() With both applications open on the Mac, you can see the code and the design.
With both applications open on the Mac, you can see the code and the design.
5. If you’re in BBEdit and you want to switch back to Dreamweaver, choose Markup > Misc > Dreamweaver.
Tip
The best part of using an external editor is being able to open your Dreamweaver window in Design view while you have the text visible in the external editor. You can then edit with either application, and the other application’s window updates to match. In some ways, this is more powerful than Dreamweaver’s Split view, where any time you make a change to the code, you have to manually refresh Design view. Yes, this does mean that you’ll need either a very large monitor or multiple monitors, but take our word for it—there’s no such thing as too much screen real estate.
Tip
If you haven’t set an external editor, ![]() instead displays Edit with External Editor. Choose that item, and Dreamweaver opens the File Type/Editors Preferences, as in step 1.
instead displays Edit with External Editor. Choose that item, and Dreamweaver opens the File Type/Editors Preferences, as in step 1.
About Roundtrip HTML and Automatic Code Correction
Dreamweaver features Roundtrip HTML, meaning that you can modify your file in Dreamweaver, then in a third-party text editor, and then in Dreamweaver again without Dreamweaver changing what you’ve done in the other application. However, there are some times when you do want Dreamweaver to change what you’ve done, and here’s how.
The Code Rewriting category of the Preferences ![]() allows you to set what you do and do not want fixed. For instance, it can be handy to have Dreamweaver fix any badly nested or unclosed tags. Or maybe you want it to fix some types of files but not others (depending on their extension). That’s all customizable here. We recommend turning on “Warn when fixing or removing tags” so that you’re told what’s being changed and when.
allows you to set what you do and do not want fixed. For instance, it can be handy to have Dreamweaver fix any badly nested or unclosed tags. Or maybe you want it to fix some types of files but not others (depending on their extension). That’s all customizable here. We recommend turning on “Warn when fixing or removing tags” so that you’re told what’s being changed and when.

![]() Use the Code Rewriting preference to tell Dreamweaver exactly what it can and cannot change.
Use the Code Rewriting preference to tell Dreamweaver exactly what it can and cannot change.
Putting It All Together
1. Explore each button in the Coding toolbar.
2. Split the document screen horizontally and then vertically to see Design view in one pane and Code view in the other.
3. Use Live Code view to see how your HTML in the Code view pane changes as you interact with the page in the Design view pane.
4. In Design view, use the Quick Tag Editor’s three modes: Insert, Edit, and Wrap.
5. Make changes to a tag using the Tag Editor dialog.
6. Collapse and expand parts of your code.
7. Add tags and change their attributes using code hints.
8. Use the Tag Inspector panel to modify, add, or delete tag attributes.
9. Extract any embedded JavaScript from a page.
10. Use the Code Reference tab to answer questions you might have about an element.
11. Insert code from the reference into your document.