
Chapter 19. Subscribing to Reports
In This Chapter
• Overview of Subscriptions
• Overview of Delivery Extensions
• Creating a Simple Subscription
• Creating a Data-Driven Subscription
• Managing Subscriptions
One of the most convenient things about SSRS is its capability to deliver reports right to the end user without ever having to navigate to the Report Server through subscriptions.
If you have the Enterprise Edition of SSRS, the reports can even be customized based on data from queries. Another nice thing is that the end user, if they have the appropriate permissions, can set subscriptions up for themselves. This chapter explores the ins and outs of subscribing to reports and managing subscriptions to reports.
Overview of Subscriptions
A subscription is akin to setting up a job on the Report Server to deliver a report to a user at a specified point in time. This provides a nice alternative to actively going to the Report Server and running the report.
Parts of Subscriptions
Subscriptions all have some common components/requirements. In addition to the following, you must also have access to view the report, and have a role assignment that includes the task “Manage individual subscriptions” before you can subscribe to it. Common components/requirements of report subscriptions include the following:
• The report has to be able to run independently, that is, the data sources must use either stored credentials or no credentials.
• The report must have a configured delivery method. The built-in ones include email and file sharing.
• You must specify a rendering extension for the subscribed report.
• Some trigger or event is required to run the subscription. Usually, this is a scheduled event, based on either a custom or shared schedule.
• The parameter values for any parameter in a report must be specified or defaulted.
Uses of Subscriptions
Subscriptions have a number of possible uses that can be used to meet a number of requirements:
• Deliver reports to end users (the most common use of subscriptions).
• Save reports for offline viewing. This is usually done using PDF or web archive formats.
• Send long-running reports or large reports directly to disk.
• Preload the Report Server’s cache.
Standard Versus Data-Driven Subscriptions
SSRS has two different kinds of subscription options. The first kind is called the standard subscriptions. Users can create and manage standard subscriptions for themselves. All the information for the subscription is static, which means that the information has to be specified when the subscription is created, and cannot be modified at runtime.
Data-driven subscriptions are similar to the standard subscription with one important difference. The data used for the subscription must come from a query. This makes data-driven subscriptions incredibly powerful. The list of recipients is derived via a query, which makes it ideal for recipient lists that can change frequently. Users can use data-driven subscriptions to create customized reports for recipients based on preferences of that recipient or that recipient’s role within the organization. Even the delivery style and location can be customized. Data-driven subscriptions are usually kept in the domain of report administrators, and are typically not administered by end users.
Note
Data-driven subscriptions are only available in SQL Server 2005 Enterprise and Developer Editions.
Delivery Options
Reports are delivered using delivery extensions. Two delivery extensions come preloaded into SSRS and can be used by end users, although they cannot be configured. These are an email delivery extension and a file share delivery extension. Like many other parts of SSRS, end users can create their own delivery extensions if the existing ones are not sufficient. One kind of delivery extension an administrator can use that an end user cannot use is called the null delivery extension. As the name implies, it doesn’t actually deliver a report anywhere. Instead, it is typically used to preload the Report Server cache or generate snapshots.
Subscription Processing
If you are familiar with SQL Server Notification Services, you might find the model that SSRS uses to process subscriptions familiar. SSRS responds to events. As events occur, SSRS matches these events to subscriptions that should be triggered by one or more of these events. When a subscription is triggered, the Report Server uses the information stored along with the subscription to process the report. When the report is done processing, the Report Server passes it along with the delivery information stored with the subscription to the appropriate delivery extension.
When processing a standard subscription, the Report Server’s job is relatively simple. Because standard subscriptions contain only one report that does not vary by user, it simply processes the report and sends it on its merry way.
The processing of a data-driven subscription is considerably more complex. For a data-driven subscription, the number of reports, deliveries, and even parameters to pass to those reports depends on the data passed in. The Report Server must generate a report and deliver it based on every record returned from the data set generated by the query.
Overview of Delivery Extensions
SSRS comes bundled with two main delivery extensions: email and file share. Although skilled developers can implement their only delivery extensions, the prepackaged ones should suffice for most people.
Email can be used to deliver reports, or it can be used to deliver a hyperlink to the generated report; the contents of the message are based on the data included with the subscription.
The Subject line contains, by default, the Report Name (@ReportName) and the time it was run (@ExecutionTime). Of course, the user can modify this to suit her needs.
The body text can contain an embedded report or the report can come as an attachment. This depends on the rendering extension used. The HTML and MHTML extensions embed the report in the email body. All other extensions generate an attachment to the message.
The email extension is not available if the Report Server has not been set up for email. To set up email, use the Reporting Services Configuration Tool.
From the RS Configuration Manager, select Email Settings and then enter the sender address and name of the SMTP server.
The size limitations of email apply to subscribed reports as well. If the report is delivered as an attachment and the size of the attachment is too large, the report might not get delivered. Second, the Report Server does not validate the email addresses entered when creating the subscription or during runtime in the case of data-driven subscriptions.
Delivering to a File Share
The file share delivery extension drops rendered reports to a specified file share. The extension does not create a folder; however, it does drop files into any standard UNC share. As with any file share, the account that the Report Server service is running under must have access to the share to write to it successfully. The naming format for a UNC share is as follows:
\<servername><sharename>
Remember not to include a trailing backslash.
After the report is rendered, a file is created using the specified delivery extension. For example, if the delivery extension specified is PDF, a PDF file is created on the file share.
Because a file is fairly static, an interactive feature in the rendered reports is made static. Hence, things like matrixes and charts will retain the default views.
Creating a Simple Subscription
Report Manager and SQL Server Management Studio can both be used to create a standard subscription, which use both email and file share delivery. Complete the following steps to make an email-based subscription using Report Manager:
1. From Report Manager, open the report to be subscribed to, and select the Subscriptions tab.
2. On the Subscriptions tab, click New Subscription.
3. If necessary, select Report Server Email in the Delivered By drop-down list.
4. Enter the recipient list in the To text box. If you have multiple recipients in the list, the entries need to be separated by semicolons (;).
5. If the user has permissions to manage all subscriptions, the Cc and the Bcc text boxes as well as the Reply to text box appear. The same rules apply to these as to the To text box in regard to the formatting of email addresses.
6. Modify the Subject line as required.
7. To embed a copy or to attach a copy of the report, check the Include Report check box. Depending on the rendering format, the server will decide if it can embed the report or include it as an attachment.
8. To send a link to the only version of the report, check the Include Link check box.
9. Pick the rendering format from the Render Format drop-down list. Remember that WebArchive embeds results in the report; everything else is an attachment.
10. Modify the priority and add a comment if desired.
11. If dealing with a parameterized report, set the parameters for the report.
12. Select a time to process the subscription. To set a new schedule, select the When the Scheduled Report Run Is Complete option and click the Select Schedule check box. If the report is executed from a scheduled snapshot, the subscription fires after the snapshot has been executed by clicking on the When the Report Content Is Refreshed option.
After you have completed entering the necessary information, the window should look similar to Figure 19.1.
Figure 19.1. Email delivery subscription.

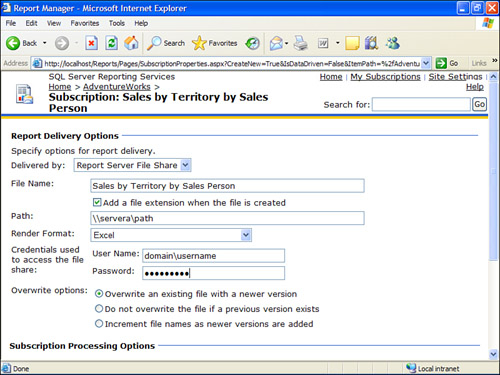
File Share Delivery
As previously mentioned, another way to deliver reports is directly to a file share. This can also be done through both SQL Server Management Studio and Report Manager. Complete the following steps to complete the task through Report Manager:
1. From Report Manager, open the report to be subscribed to, and select the Subscriptions tab.
2. On the Subscriptions tab, click New Subscription.
3. Select Report Server File Share in the Delivered By drop-down list.
4. 4. Enter the desired filename in the File Name text box. The Add a File Extension when the File Is Created check box tells the server to add the extension when the file gets created. As long as it is checked, the end user should not add the extension to the file.
5. Enter the path to drop the report in the Path text box.
6. Select a render format from the Render Format drop-down list. Because the files are static, it is not recommended to pick a format that can be used interactively or might include multiple files. In other words, stay away from HTML.
7. Enter the credentials for a user with permission to access the share in the Username and Password text box. Use the <domain><username> format.
8. Specify file overwriting options. Choosing the Do Not Overwrite the File if a Previous Version Exists option keeps delivery from occurring if a similarly named file exists. It is recommended to use one of the other two to keep such issues from becoming problematic.
9. If dealing with a parameterized report, set the parameters for the report.
10. Set the schedule as you did earlier when setting up Email Delivery.
When complete, the screen should look similar to Figure 19.2.
Figure 19.2. File share delivery subscription.
Recall from earlier, SQL Server Management Studio can be used to create subscriptions to reports. To demonstrate how to use SQL Server Management Studio to produce subscriptions, we will rebuild the subscriptions you just created using Report Manager.
To start, let’s rebuild the subscription using email delivery using SQL Server Management Studio:
1. Navigate to the Subscriptions folder under the report to which you want to subscribe.
2. Right-click and select New Subscription. The Report Subscriptions properties page should open.
3. From here, the options are the same as in Report Manager.
4. Select Report Server Email in the Notify By text box.
5. Fill in the To field and, if visible, the CC and BCC fields.
6. Choose Delivery Options and a Render format.
7. Optionally, modify the priority and add a comment.
8. If the report has parameters, fill in the parameter values.
9. Click the Scheduling tab and enter information regarding when to process the subscription. The screen should look similar to Figure 19.3.
Figure 19.3. Email delivery subscription through SQL Server Management Studio.

10. Click OK.
Now let’s rebuild the file share subscription using SQL Server Management Studio:
1. Navigate to the Subscriptions folder under the report to which you want to subscribe.
2. Right-click and select New Subscription. The Report Subscriptions properties page should open.
3. From here, the options are the same as in Report Manager.
4. Select Report Server File Share in the Notify By text box.
5. Enter a filename, and if the Add File Extension when File Gets Created check box is not checked, you have to enter a file extension.
6. Choose a path.
7. Choose a render format.
8. Enter a username and password with access to the file share directory.
9. Choose one of the overwrite options.
10. If the report has parameters, fill in the parameter values.
11. Click the Scheduling tab and enter information regarding when to process the subscription. The screen should look similar to Figure 19.4.
Figure 19.4. File share delivery through SQL Server Management Studio.

12. Click OK.
Creating a Data-Driven Subscription
The steps to create a new data-driven subscription are not too terribly different than the steps needed to create a standard subscription. The large difference in the data-driven subscription model is that the parameters for the recipient list and the rendering extension ET are all derived from a query. To aid end users in creating a data-driven subscription, both SQL Server Management Studio and Report Manager have wizards to set up all the information. Remember that to use a subscription, the report’s data sources must have stored credentials or no credentials.
Creating a Subscriptions Database
Before creating a data-driven subscription, the end user must create a data set that can be used to hold the information for the subscription. To create a Subscriptions database, open the SQL Management Studio and run the following script:
use master
go
if exists(select name from master.dbo.sysdatabases where name = 'Subscriptions')
begin
drop database [Subscriptions]
end
create database [Subscriptions]
go
use [Subscriptions]
go
create table [SubcriptionInfo]
([To] nvarchar(50),
[Format] nvarchar(50),
[EmailAddress] nvarchar(50),
[EmployeeId] nvarchar(50),
[Linked] nvarchar(50),
[IncludeReport] nvarchar(50))
go
insert into [SubcriptionInfo] (
[To],[Format],[EmailAddress],[EmployeeId],[Linked],[IncludeReport])
select FirstName + ' ' + LastName [To],
Format = case (EmployeeId%2) when 0 then 'MHTML' else 'PDF' end,
EmailAddress,
b.EmployeeId,
Linked = case (EmployeeId%2) when 0 then 'True' else 'False' end,
IncludeReport = case (EmployeeId%2) when 0 then 'True' else 'False' end
from AdventureWorks.Sales.SalesPerson a, AdventureWorks.HumanResources.Employee b,
AdventureWorks.Person.Contact c
where a.SalesPersonId = b.EmployeeId
and c.ContactId = b.ContactID
The preceding script creates a new database called Subscriptions. When setting up the data-driven subscription, a custom data source is created to connect to the table and pull the subscription information. It also pulls in the salespeople information from the AdventureWorks catalog, and sets some preferences.
Report Manager
Like everything else thus far, you can use both SQL Server Management Studio and Report Manager to create data-driven subscriptions. As always, we start with Report Manager, and later show you how to create data-driven subscriptions with SQL Server Management Studio. The following steps show how to create a data-driven subscription using Report Manager:
1. Navigate to the Employee Sales Summary report from the Sample Reports included with SSRS, click the Subscriptions tab, and select New Data Driven Subscription.
2. Enter a description, and choose Report Server Email for the delivery method. Select Specify for This Subscription Only under the prompt for the data source for the recipient information.
3. Enter the information needed to log in to the Subscriptions database.
4. Enter the following query to select information for the recipient list:
select *, datepart(m,getdate()) [month],
datepart(yyyy,dateadd(yyyy,-1,getdate())) [year]
from [SubcriptionInfo]
5. You can click the Validate button to execute the query on the Report Server and check to see if it is valid.
6. Change the following values on the delivery settings from the defaults:
• To gets its value from EmailAddress.
• IncludeReport gets its value from the Include Report field.
• Renderformat gets its value from Format.
• IncludeLink gets its value from Linked.
7. Next enter the parameters from the database query:
• Month comes from the Month.
• Year comes from the Year.
• Employee comes from the EmployeeId.
8. Finally, create a custom schedule for the subscription or choose if it should be run on a shared schedule or after a new snapshot has been created. More information on creating shared schedules is in Chapter 20, “Report Execution and Processing.”
SQL Server Management Studio
As previously mentioned, data-driven subscriptions can be created using SQL Server Management Studio as well as Report Manager. The following steps show how to re-create the data-driven subscription created earlier through Report Manager using SQL Server Management Studio:
1. Using Object Explorer, navigate to the Subscriptions folder under the Employee Sales Summary report, right-click on the Subscriptions folder, and select New Data Driven Subscription. This should start the Data Driven Subscription Wizard.
2. Click Next on the Welcome screen of the wizard. Enter a description, and choose Report Server Email for the delivery method.
3. Select Custom Data Source and enter the information needed to log in to the Subscriptions database.
4. Enter the query from step 4 in the preceding set of steps, and click Validate to confirm the data source and query run.
5. Change the following values on the delivery settings from the defaults:
• To gets its value from EmailAddress.
• IncludeReport gets its value from IncludeReport.
• Renderformat gets its value from Format.
• IncludeLink gets its value from Linked.
6. Next enter the parameters from the database query:
• Month comes from the Month field.
• Year comes from the Year field.
• Employee comes from the EmployeeId field.
7. Finally, create a custom schedule for the subscription or choose if it should be run on a shared schedule or after a new snapshot has been created.
Managing Subscriptions
Like most things in SSRS, subscriptions can be managed with either Report Manager or SQL Server Management Studio. Report subscriptions are managed just like any other property of a report.
To view, modify, or delete subscriptions from Report Manager, navigate to the report, open it, and select the Subscriptions tab. From here, the Report Manager shows all the subscriptions for a particular report, including the description, how it is triggered, what the current status is, and when it was last run. Users can sort on any one of these fields to help find the subscription they are looking for. If a subscription does not exist, it gives you the option to create one. To modify any particular subscription, click the Edit button on the data grid. To delete a subscription, check the check box on that row of the data grid and click the Delete button. Click OK on the confirmation prompt.
All of these actions can be accomplished through SQL Server Management Studio as well. The concept is the same as usual. Using the SQL Server Management Studio’s Object Browser, navigate to the report. Underneath the report is a Subscriptions folder. From here, the rest of the steps are pretty much the same as for Report Manager. Right-click on the Subscriptions folder to create a new subscription. Right-click on a subscription to modify or delete it.
My Subscriptions
One feature that is unique in Report Manager is the My Subscriptions link next to the Site Settings. This link consolidates all the subscriptions a user has created across the entire catalog.
This provided end users and administrators a single place to manage all of their subscriptions. The My Subscription page allows users to sort by Report, Description, Folder, Trigger, Last Run, and Status. Just like the subscriptions page for any other report, the Edit button allows users to modify the subscription. To delete the subscription, check the check boxes on the rows corresponding to the subscription to be deleted and click the Delete button. Click OK on the confirmation prompt. Unlike the subscriptions page for any report, you cannot create a subscription. The My Subscriptions page is shown in Figure 19.5.
Figure 19.5. My Subscriptions page.

Monitoring Subscriptions
As mentioned previously, the individual subscription pages for a report, as well as the My Subscriptions page, have a Status column on them.
The Status column is crucial for monitoring the execution of a subscription in case the subscription runs into a processing error. If the Report Server detected a delivery error, the error is reported in the server’s trace log. One case in which an exception might not be logged is if the trigger fails to occur, such as when a snapshot fails, or a scheduled event does not run.
The Report Server service logs (located in C:Program FilesMicrosoft SQL ServerMSSQL.3Reporting ServicesLogFiles) include any information about delivery statuses. For example, if the delivery extension is email, these logs should include records from processing and delivery. The log does not tell you if the email was opened.
Deleting/Inactivating Subscriptions
When a subscription fails to process, it is referred to as “inactive.” These subscriptions should be taken care of or fixed immediately. The following are some common causes of inactive subscriptions:
• Changing the data source a report uses from having stored credentials or having no credentials to using integrated security or prompting the user for a username or password
• The removal or disabling of a delivery extension
• Changing the name or type of a report parameter after the subscription has already been created
• Changing how a report runs from being on demand, to executing a cached copy
When an event occurs that causes a subscription to later be inactive, the effect might not be immediately known. For example, if a scheduled subscription were to run on Sunday night, and the data source was changed to the next Friday, it would not be until the following Sunday that the subscription would become inactive. When the subscription does become inactive, a message is attached to the subscription to explain why and possibly what steps can be taken to resolve the issue.
Summary
Subscriptions are a powerful way to deliver reports directly to end users. There are two types of subscriptions—standard and data driven. The standard subscription uses static, hard-coded information to process the reports. The data-driven subscription retrieves all of the information for processing the subscription—recipient list, report parameters, and so on—from a database query.
End users can manage their subscriptions from the My Subscriptions page. Administrators can monitor the status of the subscription processing through the Report Server log.