

ITDS installation and basic configuration - Windows
This section describes the installation and basic configuration of ITDS 5.2 on Microsoft Windows NT, Windows 2000, and Windows 2003. For the latest information and updates, as well as code downloads, please check the IBM site at:
ITDS 5.2 has several installation options. You can install using an InstallShield graphical user interface (GUI) or use platform-specific installation methods such as the command line or installation tools for the operating system. This chapter focuses on the GUI installation. For more information on the other types of installation options, please refer to the ITDS product documentation at:
Before installing, see the IBM Tivoli Directory Server Version 5.2 Server Readme, GI11-4151, for any updated information about supported versions of the Microsoft Windows operating system. The readme file is in the root directory of the installation CD or the directory where you unzipped the server package. After installing, the readme file is located in the installpathdoclang directory in files server.txt, server.pdf, and server.htm, where:
•installpath is the location where the IBM Tivoli Directory Server is installed.
•lang is the locale you chose when you installed IBM Tivoli Directory Server. For example, for United States English the locale is en_US.
Also see the IBM Tivoli Directory Server Version 5.2 Readme Addendum, which contains the latest information. The latest version of the Readme Addendum can be found online with the ITDS product documentation:
5.1 Installable components
When you install IBM Tivoli Directory Server, you can install either the client or the server. The server component requires the client.
In addition, you can install the Web Administration Tool on an application server, with or without the server or the client. You can use the Web Administration Tool to administer multiple ITDS servers either locally or remotely. You can install a single Web administration console to manage multiple IBM Tivoli Directory Server servers. You can also manage servers from previous releases, including SecureWay Directory 3.2.x and IBM Directory Server Versions 4.1 and 5.1. See Requirements for the Web Administration Tool in “Web Administration Tool” on page 101 for a complete list of servers that can be managed.
•Client: (Required) Includes a number of key libraries and command utilities required by the server. The client also includes a “C” Development SDK. This component can be installed standalone and requires no other components to be installed. GSKit must be installed if you require SSL for stronger security.
•Server: (Required) The core LDAP server component. You must install at least the client and DB2 in conjunction with the server.
•GSKit: (Optional) Global Security Kit (GSKit) Version 7a is a software package that is required only if Secure Sockets Layer (SSL) Security or Transport Layer Security (TLS) is required.
•IBM WebSphere Express Application Server: (Optional) To use the Web Administration Tool, an application server is required. The embedded version is IBM WebSphere Application Server - Express V5.0.2 is provided with ITDS as an application server.
•Web Administration Tool: (Optional) A Web-based tool used to manage any number of distributed IBM Tivoli Directory Servers as well as prior versions of IBM’s Directory Server product line. In order to install the Web Administration tool, you need to have a supported Application Server already installed or the bundled IBM WebSphere Express Application Server is required.
•IBM DB2: (Required) DB2 Universal Database is used as the underling data storage mechanism for the Server.
In order to install the server, at a bare minimum you must install Client, Server, and IBM DB2. If you want to require secure access over SSL to the LDAP Server or Web Administration Tool, you also need to install GSKIT. Finally, if you have not yet installed the Web Administration Tool anywhere else, you will need to install it along with a supported Application Server.
5.2 Installation and configuration checklist
Below you will find an abbreviated checklist that contains a high level summary of the steps required to install and configure ITDS to the point where you can add your own data. Many of these steps are optional but all are recommended to provide a well-tuned, high-performance, and secure directory environment.
|
ITDS 5.2 installation checklist:
1. Verify that the hardware and operating system meet minimum requirements. See “System and software requirements” on page 99.
2. Obtain products including the latest relevant Fixpacks.
3. Operating system configuration and tuning.
4. Basic product installation. See “Installing the server” on page 102.
5. Add Administrator DN and password. See “Configuring the Administrator DN and password” on page 106.
6. Configure database. See “Configuring the database” on page 108.
7. Add suffix. See “Adding a suffix” on page 115.
8. Tune DB2. See “DB2 tuning” on page 491.
9. Tune slapd parameters in ibmslapd.conf. See “Additional slapd and ibmslapd settings” on page 488.
10. Schema customization. See “Modifying the schema” on page 292.
11. Configure ITDS.
a. TCP/IP Ports ITDS uses.
b. Password encryption. See “Password encryption” on page 451
c. Password policy enforcement. See “Password policy enforcement” on page 437.
d. SSL/TLS, Kerberos, and Digest-MD5. See “SSL/TLS support” on page 455.
e. Log locations and settings. See “Enabling and disabling the change log” on page 118.
12. Add data.
|
5.3 System and software requirements
To install the IBM Tivoli Directory Server client and server packages, administer the server, and use the Global Security Kit (GSKit), your computer must meet the minimum system requirements as outlined in this section.
5.3.1 ITDS Client
The IBM Tivoli Directory Server Client SDK provides the tools required to develop LDAP applications as well as a number of the most commonly used command line utilities for manipulating LDAP data within the directory. The following are provided:
•Client libraries that provide a set of C-language APIs
•C header files for building and compiling LDAP applications
•Documentation that describes the programming interface and the sample programs
•Sample programs in source form
•Executable versions of the sample programs:
– ldapmodrdn.exe: LDAP modify relative distinguished name
– ldapdelete.exe: LDAP delete
– ldapmodify.exe: LDAP modify
– ldapsearch.exe: LDAP search
– ldapadd.exe: LDAP add (a renamed version of ldapmodify)
– ldapchangepwd.exe: LDAP change password
– ldapexop.exe: LDAP extended operations
The following are the system and software requirements for the ITDS client on Microsoft Windows.
•Operating system requirements
– Microsoft Windows 2000
– Microsoft Windows XP
– Microsoft Windows Server 2003 Standard or Enterprise
– Microsoft Windows NT 4.0 with Service Pack 6 or later
•Memory requirements
A minimum of 128 MB RAM is required. For better results, use 256 MB or more.
•Disk space requirements
You need at least 100 MB of free space on the disk where you will be installing the client.
5.3.2 ITDS Server (including client)
The Server consists of the following components:
•The server executable: ibmslapd
•Command line import/export utilities
•Web-based GUI for administering the directory: Web Administration Tool
•Server configuration and database utilities GUI for configuring the directory: Configuration Tool (ldapxcfg)
•Online Web Administration Tool and Configuration Tool helps
•The ITDS Client (see previous section)
The following are the system and software requirements for the ITDS Server on Microsoft Windows. By default, the ITDS Server requires the ITDS client.
•Operating system requirements
– Microsoft Windows 2000.
– Microsoft Windows Server 2003 Standard or Enterprise.
– Microsoft Windows NT 4.0 with Service Pack 6 or later. A Microsoft Windows NT file system (NTFS) is required for security support.
•Memory requirements
A minimum of 256 MB RAM is required. For better results, use 512 MB or more.
•Disk space requirements
– You must have at least 100 MB of free space in the directory specified by the TEMP environment variable.
– You will need 410–610 MB of disk space for the ITDS software on the device you choose to install onto. If IBM DB2 is already installed, then you will need 150 MB to install the other ITDS components.
– Disk space required for data storage is dependent upon the number and size of database entries. Allow a minimum of 80 MB for your database on Windows systems. Also allow another 2 to 3 MB of disk space when creating the DB2 instance.
•Other software requirements
The minimum supported level of IBM DB2 is IBM DB2 Version 7.2 with FixPak 5 or later. DB2 Version 8.1 Enterprise Server Edition with FixPak 2 is included with IBM Tivoli Directory Server and is installed if a supported version of DB2 is not detected on your system. If you have a version of DB2 earlier than Version 7.2 with FixPak 5 installed on your system, you must remove it or upgrade it before installing ITDS. For more information on migrating from previous versions of ITDS, please refer to the Tivoli Software Information Center ITDS 5.2 page at:
5.3.3 Web Administration Tool
You can install the Web Administration Tool on a computer with or without the client or the server. The Web Administration Tool can be used to administer LDAP servers of the following types:
•IBM Tivoli Directory Server 5.2
•IBM Directory Server 5.1
•IBM Directory Server 4.1
•IBM SecureWay Directory 3.2.2
•OS/400 V5R3
•z/OS R4
Note that for z/OS R4, only the following configurations are supported:
•A single TDBM backend
•A single SDBM backend
•One TDBM and SDBM backend
The Web Administration Tool is supported on the following Microsoft Windows platforms:
•Microsoft Windows NT 4.0
•Microsoft Windows 2000
•Microsoft Windows XP
•Microsoft Windows Server 2003 Standard, Enterprise
To use the Web Administration Tool, you also need the following:
•One of the following application servers:
– The embedded version of IBM WebSphere Application Server - Express V5.0 or later. Version 5.0.2 is provided with IBM Tivoli Directory Server 5.2. (iSeries Linux, pSeries Linux, and HP-UX require version 5.0.2.) If you have version 5.0, which was provided with IBM Directory Server, installed, see the section titled “Migrating the Web Administration Tool and upgrading the embedded version of WebSphere Application Server - Express” in the IBM Tivoli Directory Server Installation and Configuration Guide version 5.2, SC32-1338.
– IBM WebSphere 5.0 or later. (iSeries Linux, pSeries Linux, and HP-UX require version 5.0.2.)
•One of the following Web browsers on the computer from which you will use the Web Administration Tool. (This might or might not be the computer where the Web Administration Tool is installed.)
– On Microsoft Windows platforms
Microsoft Internet Explorer Version 6.0
– On AIX
Mozilla 1.3 or 1.4
– On xSeries® Linux
Mozilla 1.3 or 1.4
– On iSeries, pSeries, zSeries Linux
No browser support available
– On Solaris 7, 8, or 9
Mozilla 1.3 or 1.4
– On HP-UX
Mozilla 1.3 or 1.4
5.4 Installing the server
Use the information in the following sections to install ITDS 5.2 on a Windows platform using the Installshield GUI.
|
Note: The following installation instructions do not cover migration scenarios. For information on how to migrate previous versions of the Directory Server to ITDS 5.2, please refer to the IBM Tivoli Directory Server Installation and Configuration Guide version 5.2, SC32-1338.
|
5.4.1 Create a user ID for ITDS
Before you install, create or be sure that you have created the user ID that will own ITDS’s IBM DB2 database used to store the directory data. You will be asked to provide this user ID and its password during configuration, which runs automatically after installation and system restart. The user ID must be 8 characters or less, and it must be a member of the Administrators group. If you are creating a new database, a DB2 instance with the same name as the user ID will be created to hold the database.
The method used to create the user varies from one Microsoft Windows operating system to another. Please refer to the operating system documentation for more details on this process.
|
Tip: A simple way to create the type of user account that ITDS requires on a Microsoft Windows 2000 Server is with the following two commands. This example uses a username of ldapdb2 and a password of somepassword. Enter these two commands at a Microsoft Windows command prompt window (as an Administrator).
NET USER ldapdb2 somepassword /ADD /ACTIVE:yes /expires:never /comment:"ITDS Account"
NET LOCALGROUP Administrators /add ldapdb2
The account ldapdb2 now exists on the Windows Server, is active, and has the proper privileges. You can now move into the actual setup of ITDS.
|
5.4.2 Installing ITDS with the Installshield GUI
To install:
1. On the computer where you are installing the IBM Tivoli Directory Server, stop any programs that are running and close all windows. If you have open windows, the initial IBM Tivoli Directory Server installation window might be hidden behind other windows.
2. If you are installing from a CD, insert the CD in your CD-ROM drive.
3. If you are installing locally from a CD or remotely from the network, go to the drive for your CD-ROM or for the appropriate network path. If you downloaded a zipped file, go to the directory where you unzipped the file.
4. In the ismp folder, double-click the setup.exe icon. The language window is displayed.
|
Note: When installing on Windows, if the installation program exits without displaying the language window, it might be caused by one of the following:
•Backlevel video drivers. Update your video drivers to the most recent levels to correct this.
•Not enough space in the directory specified by the TEMP environment variable. Be sure that you have at least 100 MB of free space in this directory.
|
5. Select the language you want to use during IBM Tivoli Directory Server installation. Click OK.
|
Note: This is the language used in the installation program, not in IBM Tivoli Directory Server. You choose the language used in IBM Tivoli Directory Server in step 10.
|
6. On the Welcome window, click Next.
7. After reading the Software license agreement, select I accept the terms in the license agreement. Click Next.
8. Any preinstalled components and corresponding version levels are displayed. Click Next.
9. To install to the default directory, click Next. You can specify a different directory by clicking Browse.
|
Note: Do not use special characters, such as hyphen (-) and period (.) in the name of the installation directory. If you do not use the default location, use a name such as ldap or ldapdir. Do not use a name such as ldap-dir or ldap.dir.
|
10. Select the language you want to use in IBM Tivoli Directory Server 5.2. Click Next.
11. A window showing the following components for installation is displayed, as shown in Figure 5-1 on page 105:
– Client SDK 5.2
– Web Administration Tool 5.2
– Server 5.2
– IBM WebSphere Application Server - Express 5.0.2
– DB2 V8.1
– GSKit
The components that are not yet installed are preselected. You can choose to reinstall the server, the client, or the Web Administration Tool if they were previously installed.
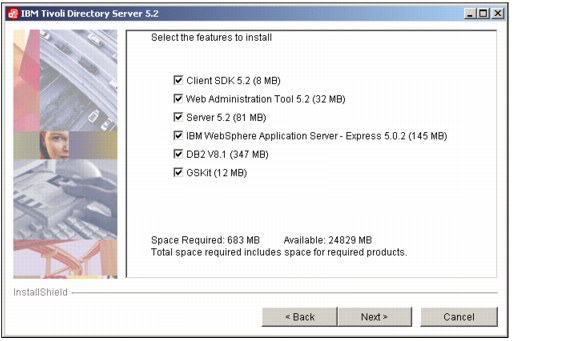
Figure 5-1 Install component selection window
Figure 5-1 also indicates the amount of disk space required and available on the selected drive.
Be sure the components you want to install are selected, and click Next.
12. If you selected DB2 V8.1 in step 12, a window is displayed prompting you to enter a Windows user ID and password for the DB2 system ID. The default user ID is db2admin. On the window:
a. Type the user ID or accept the default.
b. Type the password, and then type the password again for verification.
c. Click Next.
|
Note: Note the following:
•This user ID must not be the one you created in Creating the DB2 database owner.
•If you are using an existing Microsoft Windows user ID, be sure that your password is correct. Otherwise, DB2 does not install correctly.
•If you are using an existing Windows user ID, it must be a member of the Administrators group.
•If you are not using an existing user ID, DB2 creates the user ID you specify with the password you type.
|
13. The installation program now has enough information to begin installing. A summary window displays the components you selected and the locations where the selected components will be installed. Click Back to change any of your selections. Click Next to begin installation.
14. After the files are installed:
– If you installed the client, the Client Readme file is displayed. Read the file and click Next.
– If you installed the server, the server Readme file is also displayed. Read the file and click Next.
– If you installed the Web Administration Tool, the Web Administration Tool Readme file is also displayed. Read the file and click Next.
15. Select to restart your computer now or later. Click Finish.
|
Note: If you installed the server, you must restart your system to complete IBM Tivoli Directory Server configuration. You are unable to use IBM Tivoli Directory Server until this is completed.
|
After your computer is restarted, if you installed the server, log in using the same user ID that you used to install IBM Tivoli Directory Server. The Configuration Tool automatically runs so that you can complete the server configuration. Before you can use the server, you must set the administrator DN and password and configure the database that will store the directory data.
5.4.3 Configuring the Administrator DN and password
Each ITDS Server has a special “super-user” account associated with it that provides maximum privileges within ITDS. You will need to create this account before you can administer ITDS.
To set the administrator DN and password, refer to Figure 5-2 on page 108, and perform these steps:
1. In the IBM Tivoli Directory Server Configuration Tool window, click Administrator DN/password in the task list on the left.
2. In the Administrator DN/password window on the right, type a valid DN (or accept the default DN, cn=root) in the Administrator DN field.
The IBM Directory Server administrator DN is the DN used by the administrator of the directory. This administrator is the one user who has full access to all data in the directory.
The default DN is cn=root. DNs are not case sensitive. If you are unfamiliar with X.500 format, or if for any other reason you do not want to define a new DN, accept the default DN.
3. Type the password for the Administrator DN in the Administrator Password field. You must define a password. Passwords are case-sensitive.
Record the password for future reference.
|
Note: Double byte character set (DBCS) characters in the password are not supported.
|
4. Retype the password in the Confirm password field.
5. Click OK.

Figure 5-2 Setting the administrator DN and password
5.4.4 Configuring the database
Since ITDS uses IBM DB2 as the storage repository for all data, prior to adding data to your directory, you will need to configure a database instance that will be associated with ITDS.
To configure the directory database:
1. Before you configure the database that ITDS will use, create or be sure that you have previously created a valid user ID that will own the DB2 database used to store the directory data. You will be asked to provide this user ID and its password during configuration, which runs automatically after installation and system restart. The user ID must be 8 characters or less, and it must be a member of the Administrators group. If you are creating a new database, a DB2 instance with the same name as the user ID will be created to hold the database.
|
Note: Verify that the user ID you have created or assigned can successfully log into the system. Check to ensure the password does not expire on first login. Check to see if the account is enabled.
|
2. In the Configuration Tool, click Configure database in the task list on the left. Select Configure new database and click Next as shown in Figure 5-3 on page 109.
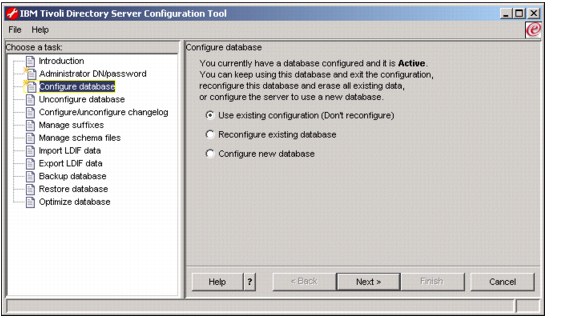
Figure 5-3 Database configuration
3. A user ID and password is requested, as shown in Figure 5-4 on page 110:
a. Type a user ID in the User ID field. This user ID must already exist before you can configure the database. This is the user ID you created in step 1. Type a password for the user in the Password field. Passwords are case-sensitive.
b. Click Next.

Figure 5-4 Database configuration - Setting the user ID and password for the database
4. Next you will be prompted for a name for the database, as shown in Figure 5-5 on page 111:
a. Type the name you want to give the DB2 database. The name can be from 1 to 8 characters long. The database will be created in an instance with the same name as the user ID.
b. Click Next.

Figure 5-5 Database configuration - Choose DB2 database name
5. If the database location is requested, as shown in Figure 5-6 on page 112:
a. Type the location for the database in the Database location field. For Windows platforms, this must be a drive letter.
Be sure that you have at least 80 MB of free hard disk space in the location you specify and that additional disk space is available to accommodate growth as new entries are added to the directory.
b. Click Next.
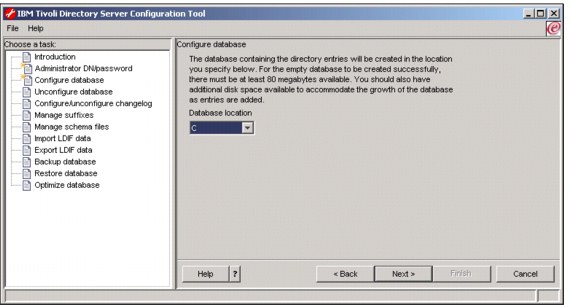
Figure 5-6 Database configuration - Choosing an install location (Windows)
6. If a character set selection is requested, as shown in Figure 5-7 on page 113:
a. Click the type of database you want to create. You can create a UCS Transformation Format (UTF-8) database, in which LDAP clients can store UTF-8 character data, or a local code page database, which is a database in the local code page.
|
Note: IBM Tivoli Directory Server supports a wide variety of national language characters through the UTF-8 (UCS Transformation Format) character set. As specified for the LDAP Version 3 protocol, all character data that is passed between an LDAP client and a server is in UTF-8. Consequently, the directory server can be configured to store any national language characters that can be represented in UTF-8. The limitations on what types of characters can be stored and searched for are determined by how the database is created. The database character set can be specified as UTF-8 or it can be set to use the server system's local character set (based on the locale, language, and code page environment).
If you specify UTF-8, you can store any UTF-8 character data in the directory. LDAP clients running anywhere in the world (in any UTF-8 supported language) can access and search the directory. In many cases, however, the client has limited ability to properly display the results retrieved from the directory in a particular language/character set. There is also a performance advantage to using a UTF-8 database because no data conversion is required when storing data to or retrieving data from the database.
|
b. Click Next.

Figure 5-7 Database configuration - Codepage selection
7. In the verification window, shown in Figure 5-8, information is displayed about the configuration options you specified. To return to an earlier window and change information, click Back. To begin configuration, click Finish.
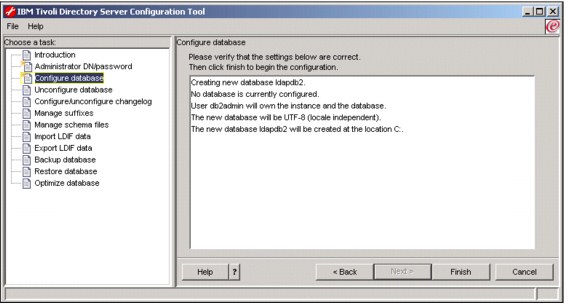
Figure 5-8 Configuration final confirmation

Figure 5-9 Database configuration - Results window
5.4.5 Adding a suffix
A suffix (also known as a naming context) is a distinguished name (DN) that identifies the top entry in a locally held directory hierarchy. Because of the relative naming scheme used in LDAP, this DN is also the suffix of every other entry within that directory hierarchy. A directory server can have multiple suffixes, each identifying a locally held directory hierarchy, for example, o=ibm,c=us.
Entries to be added to the directory must have a suffix that matches the DN value, such as ou=Marketing,o=ibm,c=us. If a query contains a suffix that does not match any suffix configured for the local database, the query is referred to the LDAP server that is identified by the default referral. If no LDAP default referral is specified, an Object does not exist result is returned. The server must be stopped before you add or remove suffixes.
Add a suffix
To add a suffix:
1. In the Configuration Tool, click Manage suffixes in the task list on the left, as shown in Figure 5-10.
2. In the Manage suffixes window, type the suffix you want to add in the SuffixDN field, and click Add.
3. When you have added all the suffixes you want, click OK. When you click Add, the suffix is added to the list in the current suffix DNs box; however, the suffix is not actually added to the directory until you click OK.

Figure 5-10 Adding a suffix
Removing a suffix
To remove a suffix:
1. In the Configuration Tool, click Manage suffixes in the task list on the left.
2. In the Manage suffixes window, click the suffix you want to remove in the Current suffix DNs box, and click Remove.
3. When you have selected all the suffixes you want to remove, click OK. When you click Remove, the suffix is removed from the list in the current suffix DNs box; however, the suffix is not actually removed until you click OK.
5.4.6 Removing or reconfiguring a database
At some point you may need to remove the IBM DB2 database instance that is associated with ITDS. The ITDS ldapxcfg tool allows you to unconfigure the database instance, unconifgure and destroy the database instance, and unconfigure, destroy, and delete the database instance.
To unconfigure the database:
1. In the Configuration Tool, click Unconfigure database in the task list on the left.
2. In the Unconfigure database window, click of the following:
– Unconfigure only
Does not destroy any existing LDAP DB2 data. However, the configuration information for the database will be removed from the configuration file (ibmslapd.conf), and the database will be inaccessible to the directory server.
– Unconfigure and destroy database
Removes the existing database and its contents, and removes the configuration information for the database from the configuration file.
– Unconfigure and destroy database and delete instance
Removes the existing database and its contents, removes the configuration information for the database from the configuration file, and deletes the instance in which the database is located.
3. Click Unconfigure.

Figure 5-11 Unconfiguring the DB2 database associated with ITDS
Once you have completed these steps, you may now configure or re-configure a new database instance for use with ITDS. See “Configuring the database” on page 108 for more information.
5.4.7 Enabling and disabling the change log
The change log database is used to record changes to the schema or directory entries in the typical LDAP entry structure that can be retrieved through the LDAP API. The change log records all update operations: Add, delete, modify, and modrdn. The change log enables LDAP client applications to retrieve a set of changes that have been made to an IBM Tivoli Directory Server database. The client might then update its own replicated or cached copy of the data.
The change log function causes all updates to LDAP to be recorded in a separate change log DB2 database (that is, a different database from the one used to hold the LDAP server Directory Information Tree). The change log database can be used by other applications to query and track LDAP updates. The change log function is disabled by default.
Unlike some other directory servers on the market, the change log is not required by ITDS to setup replication. Typically, the change log is enabled so meta-directory sychronization products such as IBM Tivoli Directory Integrator (ITDI) can detect changes occurring within ITDS and then push those changes to other non-ITDS data repositories.
There are some performance considerations when you enable the change log since all changes within ITDS are now logged to a separate a database instance. You should evaluate the impact of enabling the change log during in the pre-deployment phases of your ITDS deployment.
You can use the ldapxcfg Configuration Tool to enable or disable the change log. The server must be stopped before you enable or disable the change log.
To enable the change log, refer to Figure 5-12 on page 120 and perform the following steps:
1. In the Configuration Tool, click Configure/unconfigure changelog in the task list on the left.
2. In the Configure/unconfigure changelog window, select the Enable change log database check box.
3. In the Maximum number of log entries box, click Unlimited if you want an unlimited number of entries in the change log. If you want to limit the number of entries, click Entries and type the maximum number of entries you want recorded. The default is 1,000,000 entries.
4. In the Maximum age box, accept the default of Unlimited if you want entries to remain in the change log indefinitely, or click Age and type the number of days and hours for which you want each entry to be kept.
5. Click Update.

Figure 5-12 Enabling the change log
To disable the change log:
1. In the Configuration Tool, click Configure/unconfigure changelog in the task list on the left.
2. In the Configure/unconfigure changelog window, clear the Enable change log database check box.
3. Click Update.
5.5 Starting ITDS
There are a number of other optional tasks you can perform within the Directory Configuration tool at this point such as adding custom schema and importing data. Those tasks do not have to be completed before you initially start the server. Those topics are covered in subsequent chapters.
The easiest way to start the server is by typing ibmslapd in a windows command prompt, as shown in Example 5-1.
Example 5-1 Starting the Directory Server
C:>ibmslapd
Dec 13 16:01:43 2003 Server starting.
Dec 13 16:01:44 2003 Plugin of type EXTENDEDOP is successfully loaded from libevent.dll.
Dec 13 16:01:44 2003 Plugin of type EXTENDEDOP is successfully loaded from libtranext.dll.
Dec 13 16:01:45 2003 Plugin of type EXTENDEDOP is successfully loaded from libldaprepl.dll.
Dec 13 16:01:45 2003 Plugin of type PREOPERATION is successfully loaded from libDSP.dll.
Dec 13 16:01:45 2003 Plugin of type PREOPERATION is successfully loaded from libDigest.dll.
Dec 13 16:01:45 2003 Plugin of type EXTENDEDOP is successfully loaded from libevent.dll.
Dec 13 16:01:45 2003 Plugin of type EXTENDEDOP is successfully loaded from libtranext.dll.
Dec 13 16:01:45 2003 Plugin of type AUDIT is successfully loaded from C:/Program Files/IBM/LDAP/bin/libldapaudit.dll.
Dec 13 16:01:45 2003 Plugin of type PREOPERATION is successfully loaded from C:/Program Files/IBM/LDAP/bin/libcl.dll.
Dec 13 16:01:45 2003 Plugin of type EXTENDEDOP is successfully loaded from libevent.dll.
Dec 13 16:01:45 2003 Plugin of type EXTENDEDOP is successfully loaded from libtranext.dll.
Dec 13 16:01:45 2003 Plugin of type DATABASE is successfully loaded from C:/Program Files/IBM/LDAP/bin/libback-rdbm.dll.
Dec 13 16:01:45 2003 Plugin of type REPLICATION is successfully loaded from C:/Program Files/IBM/LDAP/bin/libldaprepl.dll.
Dec 13 16:01:45 2003 Plugin of type EXTENDEDOP is successfully loaded from C:/Program Files/IBM/LDAP/bin/libback-rdbm.dll.
Dec 13 16:01:45 2003 Plugin of type PREOPERATION is successfully loaded from C:/Program Files/IBM/LDAP/bin/libcl.dll.
Dec 13 16:01:45 2003 Plugin of type EXTENDEDOP is successfully loaded from libevent.dll.
Dec 13 16:01:45 2003 Plugin of type DATABASE is successfully loaded from C:/Program Files/IBM/LDAP/bin/libback-rdbm.dll.
Dec 13 16:01:45 2003 Plugin of type PREOPERATION is successfully loaded from C:/Program Files/IBM/LDAP/bin/libcl.dll.
Dec 13 16:01:45 2003 Plugin of type EXTENDEDOP is successfully loaded from libevent.dll.
Dec 13 16:01:45 2003 Plugin of type DATABASE is successfully loaded from C:/Program Files/IBM/LDAP/bin/libback-config.dll.
Dec 13 16:01:50 2003 Plugin of type EXTENDEDOP is successfully loaded from libloga.dll.
Dec 13 16:01:50 2003 Non-SSL port initialized to 389.
Dec 13 16:01:54 2003 IBM Tivoli Directory (SSL), Version 5.2 Server started.
Dec 13 16:01:54 2003 Started 15 worker threads to handle client requests.
C:>
After you type ibmslapd at the command prompt, a number of messages will be logged to the screen. One of them should say IBM Tivoli Directory (SSL) Version 5.2 Server started.
|
Note: There are a number of other ways to start ITDS. Please refer to Chapter 9, “IBM Tivoli Directory Server Distributed Administration” on page 193, for more information.
|
To verify ITDS is indeed running, configured properly, and responding to queries, you can type the following command at the Windows command prompt:
ldapsearch -s base -b ““ objectclass=*
The output of this command is shown in Example 5-2.
Example 5-2 Querying the root DSE
C:>ldapsearch -s base -b "" objectclass=*
namingcontexts=CN=SCHEMA
namingcontexts=CN=LOCALHOST
namingcontexts=CN=PWDPOLICY
namingcontexts=CN=IBMPOLICIES
namingcontexts=O=IBM,C=US
namingcontexts=CN=CHANGELOG
subschemasubentry=cn=schema
supportedextension=1.3.18.0.2.12.1
supportedextension=1.3.18.0.2.12.3
supportedextension=1.3.18.0.2.12.5
supportedextension=1.3.18.0.2.12.6
supportedextension=1.3.18.0.2.12.15
supportedextension=1.3.18.0.2.12.16
supportedextension=1.3.18.0.2.12.17
supportedextension=1.3.18.0.2.12.19
supportedextension=1.3.18.0.2.12.44
supportedextension=1.3.18.0.2.12.24
supportedextension=1.3.18.0.2.12.22
supportedextension=1.3.18.0.2.12.20
supportedextension=1.3.18.0.2.12.28
supportedextension=1.3.18.0.2.12.30
supportedextension=1.3.18.0.2.12.26
supportedextension=1.3.6.1.4.1.1466.20037
supportedextension=1.3.18.0.2.12.35
supportedextension=1.3.18.0.2.12.40
supportedextension=1.3.18.0.2.12.46
supportedextension=1.3.18.0.2.12.37
supportedcontrol=2.16.840.1.113730.3.4.2
supportedcontrol=1.3.18.0.2.10.5
supportedcontrol=1.2.840.113556.1.4.473
supportedcontrol=1.2.840.113556.1.4.319
supportedcontrol=1.3.6.1.4.1.42.2.27.8.5.1
supportedcontrol=1.2.840.113556.1.4.805
supportedcontrol=2.16.840.1.113730.3.4.18
supportedcontrol=1.3.18.0.2.10.15
supportedcontrol=1.3.18.0.2.10.18
security=none
port=389
supportedsaslmechanisms=CRAM-MD5
supportedsaslmechanisms=DIGEST-MD5
supportedldapversion=2
supportedldapversion=3
ibmdirectoryversion=5.2
changelog=cn=changelog
firstchangenumber=1
lastchangenumber=1
ibm-ldapservicename=TEST-WIN2K
ibm-serverId=718b8a13-a75f-4e2e-acb7-e8aa69095157
ibm-supportedacimechanisms=1.3.18.0.2.26.3
ibm-supportedacimechanisms=1.3.18.0.2.26.4
ibm-supportedacimechanisms=1.3.18.0.2.26.2
vendorname=International Business Machines (IBM)
vendorversion=5.2
ibm-sslciphers=N/A
ibm-slapdisconfigurationmode=FALSE
ibm-slapdSizeLimit=500
ibm-slapdTimeLimit=900
ibm-slapdDerefAliases=always
ibm-supportedAuditVersion=2
ibm-sasldigestrealmname=TEST-WIN2K
C:>
If the suffix you added in “Adding a suffix” on page 115 is displayed in the output of your ldapsearch command in the format namingcontexts=O=IBM,C=US (o=ibm,c=us is the suffix added in this example), then ITDS’s slapd LDAP listener is configured properly and open for business.
..................Content has been hidden....................
You can't read the all page of ebook, please click here login for view all page.