
Working with Slide Masters
PowerPoint is designed to help you achieve a consistent look in your slide presentations. You want your audience to focus on the message and not be distracted by poor and inconsistent design from one slide to the next.
You achieve this consistency by using design templates, or predesigned slide presentations that coordinate background colors and designs, font styles and placement, and other graphic design elements.
When you apply a design template to your presentation, PowerPoint also applies a related slide master. If you apply a new design template, a new slide master will also be applied. The slide master contains details about the fonts, placeholders, background, and color scheme of the related design template. If you want, you can customize the slide master to suit your needs. For example, you could change the default fonts, placeholders, background design, color scheme, or bullets; reposition placeholders; or add a logo.
→ For information on using design templates or how to change slide backgrounds and color schemes, see Chapter 6, “Formatting Slides and Presentations.”
Modifying the Slide Master
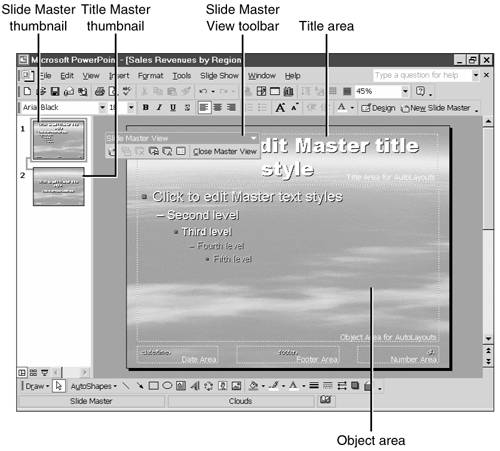
To modify your slide master, choose View, Master, Slide Master. PowerPoint displays the Slide Master layout and editing screen (see Figure 21.39).
Figure 21.39. The Slide Master editing screen helps you change the overall look and layout of your custom design templates.
You can modify either the slide master itself, which affects the design of the entire presentation, or the title master, which affects the design of the title slide only.
Note
All changes to the title or other text while in the slide master editing screen apply to all slides in your slide presentation except those based on the title master, thus helping you achieve consistency from slide to slide.
Place the mouse pointer over the thumbnails to the left side of the screen to display which thumbnail is for the overall slide master and which is for the title master. If the thumbnails don't display, close the slide master, choose View, Normal (Restore Panes) from the main menu, and then choose View, Master, Slide Master. Select the thumbnail to make formatting changes to the desired master.
The master includes several areas you can modify:
Title Area
Subtitle Area
Object Area
Date Area
Footer Area
Number Area
Note
In the Date, Footer, and Number areas, you normally don't add text, but instead format the <date/time>, <footer>, and <#> placeholders. This information is added when you edit the Header and Footer (View, Header and Footer). An exception might be the page numbering where you could add and format “Page” before the <#> placeholder.
To modify an area, click in it and apply the desired formatting changes either from the Slide Master View toolbar, another toolbar, or the menu.
If you modify the slide master first, perhaps little needs to be changed for the title slide. However, you might make the title font larger, position it differently, or add a graphic object to the screen. Furthermore, you can delete the Date, Footer, or Number area boxes and create a different date or footer for the title slide.
You don't need to delete the date, footer, or page number placeholders if you don't want them on the title slide. Instead, when you choose View, Header and Footer to display footers for your slideshow, simply check the Don't Show on Title Slide check box.
Note
Be sure you have modified the Slide Master before changing the Title Master. Initially the Title Master uses the same fonts and other attributes as the Slide Master.
Table 21.1 lists all the buttons on the Slide Master View toolbar.


Modifying the Handout and Notes Masters
In addition to the presentation itself, PowerPoint enables you to modify the handout and notes masters.
To modify the handout master, choose View, Master, Handout Master. PowerPoint displays the Handout Master editing screen and Handout Master View toolbar (see Figure 21.40).
Figure 21.40. The handout master defines the default layout for your template's printed handouts.
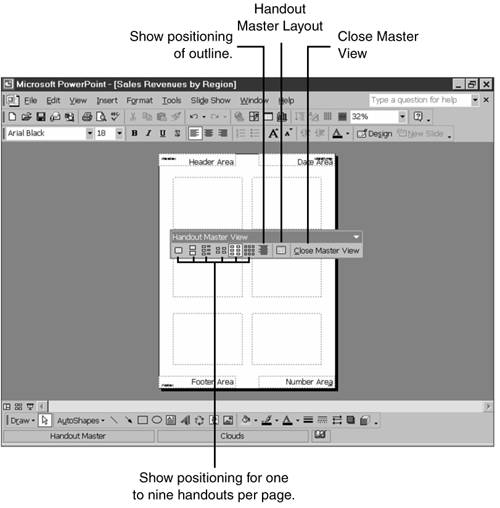
On the handout master you can
Choose the number of slides you intend to include on each handout page by clicking a slide-positioning button (such as the Show Positioning of 6-per-Page Handouts button) on the Handout Master View toolbar. Choices include one, two, three, four, six, or nine handouts per page.
Show the positioning of the outline by clicking the Show Positioning of the Outline button on the Handout Master View toolbar.
Modify, reposition, or delete the Header, Footer, Date, and Page Area text boxes.
Note
You can easily change the number of slides to be included in the handouts in the Print dialog box when you actually print the handouts.
To modify the notes master, choose View, Master, Notes Master. PowerPoint displays the Notes Master editing screen (see Figure 21.41).
Figure 21.41. The notes master defines the default layout for your template's printed notes.
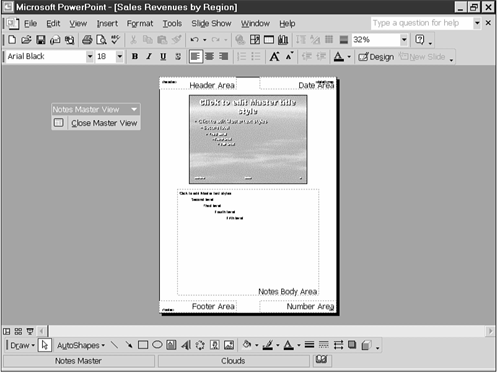
On the notes master you can
Reposition or resize the slide area, depending on how much area you want for the text (notes).
Reposition or resize the notes area.
Modify, reposition, or delete the Header, Footer, Date, and Page Area text boxes.
Note
Although you can change the background colors and color schemes for the handout and notes masters, you probably won't want do so. Handouts and notes are usually printed, and background colors aren't necessary or desired. You can, however, add a graphic element, such as a company logo, which then appears on each printed page.