Specifying Colors
You can apply color to objects, text, and lines using three different Drawing toolbar buttons. The Fill Color, Font Color, and Line Color buttons all operate in basically the same way, with slight differences based on the object they are coloring. To select the default color, click the button directly. To select another color, click the arrow to the right of the button to display a palette with additional options. You can also specify color in the Format dialog box.
→ To learn more about formatting options, see “Using the Format Dialog Box” in this chapter.
Specifying Fill Color
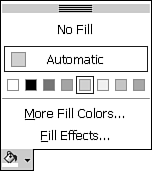
![]() To set an object's fill color, select it, and click the arrow next to the Fill Color button. The Fill Color palette displays, shown in Figure 14.7.
To set an object's fill color, select it, and click the arrow next to the Fill Color button. The Fill Color palette displays, shown in Figure 14.7.
Figure 14.7. You can add colors or patterns to fill an object.

You can do one of the following in this palette:
Click No Fill to remove the existing fill color. The object becomes transparent and displays the color of the existing slide background.
Choose one of the compatible colors under the Automatic color box option.
Click More Fill Colors to open the Colors dialog box in which you can select from many other colors or even create your own custom color.
Click Fill Effects to open the Fill Effects dialog box in which you can apply gradient, texture, pattern, and picture effects.
Using the Colors Dialog Box
Click More Fill Colors on the palette to open the Colors dialog box, illustrated in Figure 14.8.
Figure 14.8. The Colors dialog box provides numerous options for color selection.

Select a new color from the palette on the Standard tab. It displays in the New section of the preview box to contrast with the Current color.
Note
You can set transparency (making the color appear transparent) by dragging the Transparency scrollbar or by entering a specific transparency percentage.
Click the Preview button to preview what the color will look like in your presentation. Click OK to return to the presentation or Cancel if you do not want to apply the color changes.
Using a Custom Color
To create and add a custom color, click the Custom tab on the Colors dialog box, shown in Figure 14.9.
On the Custom tab, you can create a custom color by adjusting its hue, saturation, and luminance, or by specifying the level of red, green, and blue. Click the Preview button to preview your suggested changes and then click OK to save.
Note
If you're not familiar with color theory, hue refers to the actual color, saturation refers to the intensity of the color, and luminance refers to the brightness of the color. In general, the lower the number, the lighter or less intense it is.
Figure 14.9. Create a custom color to suit your exact needs.

→ For more information about color theory, see “Using Color” in Chapter 23, “The Media—Designing Visual Support.”
Specifying Fill Effects
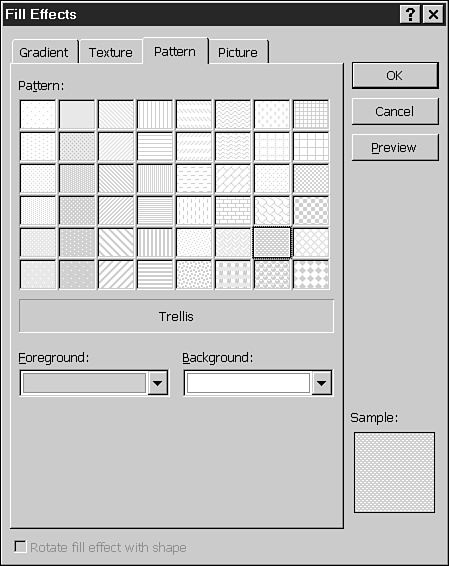
![]() To specify fill effects, select the object you want to format and click the arrow next to the Fill Color button. From the palette that displays, choose Fill Effects to open the Fill Effects dialog box. Figure 14.10 illustrates this dialog box, in which you can choose from a variety of special fill effects.
To specify fill effects, select the object you want to format and click the arrow next to the Fill Color button. From the palette that displays, choose Fill Effects to open the Fill Effects dialog box. Figure 14.10 illustrates this dialog box, in which you can choose from a variety of special fill effects.
This dialog box includes four different tabs—Gradient, Texture, Pattern, and Picture—that guide you in selecting special effects fills.
Applying a Gradient Fill To apply a gradient (shading) effect, select the Gradient tab on the Fill Effects dialog box. In the Colors group box, choose one of the following:
One Color Applies a gradient effect with just one color. You choose the base color from the Color 1 drop-down list and specify how dark or light to make the contrast.
Two Colors Choose the two colors you want to use from the Color 1 and Color 2 drop-down lists.
Preset Displays a drop-down list of preset color combination options such as Daybreak, Peacock, and Rainbow.
Figure 14.10. Choose from gradient, texture, pattern, and picture effects.

Next, you can set the transparency by dragging the Transparency scrollbar or by entering a specific transparency percentage.
Finally, you can choose how to apply the gradient in the Shading Styles group box. Options include Horizontal, Vertical, Diagonal Up, Diagonal Down, From Corner, and From Center. Pick the option you prefer in the Variants group box; it displays in the Sample box. Click Preview to view the selection in your actual presentation and then click OK to apply.
Applying a Textured Fill To apply a texture, select the Texture tab on the Fill Effects dialog box and scroll down the available textures until you find one you like. Select it and click OK. Figure 14.11 illustrates the Texture tab.
To choose an external texture graphic file that you have on your computer, click the Other Texture button to open the Select Texture dialog box. In this dialog box, you can choose the texture you would like to use and click the Insert button to display it in your selected object. You can choose to search among all pictures or specify a particular graphic format, such as a Windows metafile or bitmap image.
Applying a Patterned Fill To apply a pattern, select the Pattern tab on the Fill Effects dialog box (see Figure 14.12).
Figure 14.11. Textures can provide variety and visual depth to a presentation.

Figure 14.12. PowerPoint provides many different pattern effects.

Choose Foreground and Background colors and then select from the many available patterns.
Caution
If you plan to print your presentation, be sure to verify how the pattern you choose looks when printed. Some patterns are too dense to print well with certain printers.
Note
The default foreground and background colors coordinate with your existing object color.
Click Preview to preview the fill effect, and then click OK to apply the fill.
Applying a Picture Fill To insert a picture fill inside the selected object, select the Picture tab on the Fill Effects dialog box. Figure 14.13 illustrates this tab.
Figure 14.13. Use your own image, such as a logo, as a fill.

Click the Select Picture button to open the Select Picture dialog box, shown in Figure 14.14.
Locate and select the graphic image you want to use and click Insert to return to the Fill Effects dialog box. Click OK to close.
Figure 14.14. Choose a picture of your own to apply as a fill.

Caution
Although selecting a picture or graphic file of your own can definitely personalize and customize your presentation, be sure that it works as an effective fill.
Specifying Line Color
![]() To add color to a selected line, choose the arrow to the right of the Line Color button on the Drawing toolbar. The Line Color palette displays, shown in Figure 14.15.
To add color to a selected line, choose the arrow to the right of the Line Color button on the Drawing toolbar. The Line Color palette displays, shown in Figure 14.15.
Figure 14.15. Format or remove lines in the Line Color palette.

Choose from the following options:
Click No Line to hide the existing line.
Choose one of the compatible colors under the Automatic color box.
Click More Line Colors to open the Colors dialog box in which you can select from a variety of other colors or even create your own custom color.
→ To learn more about color options, see “Using the Colors Dialog Box” in this chapter.
→ For details on expanding your color options, see “Using a Custom Color” in this chapter.
Click Patterned Lines to open the Patterned Lines dialog box. This dialog box is almost identical to the Pattern tab on the Fill Effects dialog box.
Note
Unless you create a very thick line, patterns in a line probably won't be visible.
→ To learn how patterns work as fill colors, see “Applying a Patterned Fill” in this chapter.
Specifying Font Color
![]() To add color to selected text, choose the arrow to the right of the Font Color button on the Drawing toolbar. The Font Color palette displays, shown in Figure 14.16.
To add color to selected text, choose the arrow to the right of the Font Color button on the Drawing toolbar. The Font Color palette displays, shown in Figure 14.16.
Figure 14.16. Specify the color of your text here.

You can either choose one of the compatible colors under the Automatic color box or click More Colors to open the Colors dialog box in which you can select from a variety of other colors. If you don't want to use one of the compatible colors coordinated to work with the current design template, be sure that the color you do select is clear and readable on your slide.
→ To learn more about what's available in the Colors dialog box, see “Using the Colors Dialog Box” in this chapter.
→ To learn how to insert a custom color, see “Using a Custom Color” in this chapter.
