
Using the PowerPoint Viewer
The PowerPoint Viewer (PPVIEW32.EXE) is an application that enables people who don't have PowerPoint installed on their computers to view a PowerPoint presentation. You can freely distribute the Viewer without any license fee. Using the Pack and Go Wizard, you have the option of including the Viewer in your presentation package.
→ To learn more about how to use this wizard and how it works with the PowerPoint Viewer, see “Using the Pack and Go Wizard,” the previous section in this chapter.
Note
PPVIEW32.EXE is also compressed when you use the Pack and Go Wizard and is extracted to the folder you indicate when you run PNGSETUP.EXE to decompress your presentation.
To run the Viewer, follow these steps:
Double-click PPVIEW32.EXE from within Windows Explorer. Figure 9.29 illustrates the Microsoft PowerPoint Viewer dialog box.
Figure 9.29. The PowerPoint Viewer enables you to deliver slideshows on computers without PowerPoint.

Navigate to the presentation you want to view or enter its name in the File Name field.
Specify whether you want to advance slides Manually or Using Timings, If Present.
Click the Print button if you want to print this presentation. The standard Print dialog box appears, in which you can set print options.
Click the Options button to set presentation and viewer settings, shown in Figure 9.30.
In the Options dialog box, you can select Use Settings Saved with File or Override Saved Settings. These are the settings you specified in the Set Up Show dialog box.
→ For more information on the Set Up Show dialog box, see “Setting Up a Show” earlier in this chapter.
Figure 9.30. Specify settings in this dialog box.
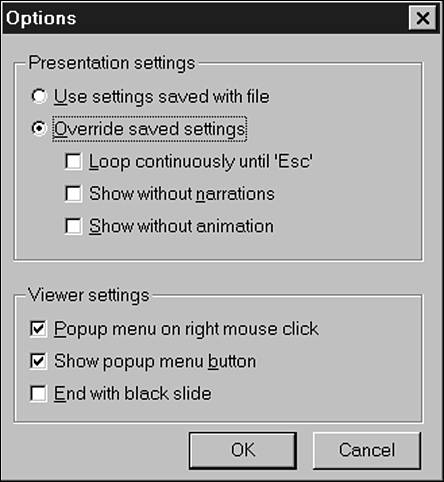
If you want to override saved settings, you have the following options:
→ To learn how to use these options, see “Viewing Your Show” earlier in this chapter.
After making your selections, click OK to return to the main dialog box.
Click the Show button to run the show with the parameters you set.
Click Exit to close the PowerPoint Viewer dialog box.
You can also play multiple shows with the Viewer by creating a playlist file with Notepad. To do this, follow these steps:
Enter each presentation and its path on a single line in Notepad, avoiding any spaces between lines. Figure 9.31 provides an example.
Choose File, Save to open the Save As dialog box, shown in Figure 9.32.
Figure 9.31. Enter multiple presentation files in Notepad.

Figure 9.32. Save your playlist.

Enter a name for the file in the File Name text box and click Save. You can't use long filenames or folder names in a playlist—stick to eight characters.
Next, you have to rename the playlist with the extension .LST. The playlist must have this extension or it won't run. You can then return to the PowerPoint Viewer and run the playlist. Be sure to select Playlist in the Files of Type field.
Tip from
For more information about the parameters you can use in setting up a playlist, click the About button in the Microsoft PowerPoint Viewer dialog box.