
12
Introduction to SharePoint Development
HOW TO…
Like SharePoint administration, SharePoint development is a huge topic in itself. This chapter will give you a taste of the various SharePoint development options. If you are not familiar with Visual Studio or .NET programming, you might want to try a few introductory .NET lessons before working through this chapter. A good place to start is http://msdn.microsoft.com. For example, for Visual Studio basics, you could read Getting Started with Visual Studio (http://msdn.microsoft.com/library/vstudio/ms165079.aspx).
The first thing to learn about SharePoint development is that there are a number of different programming interfaces for SharePoint. One reason for this is that Microsoft wants to give SharePoint developers as much flexibility as possible. Another reason is simply that SharePoint has been around long enough to see some coding options come and go. For example, when SharePoint was first released, native web services were in their infancy. More than ten years later, that interface has been deprecated in SharePoint 2013. In other words, this interface will work in SharePoint 2013, but support could be removed in the future, so it’s best to avoid using it.
SharePoint Programming Interfaces
In SharePoint 2013, the main programming interfaces are the server-side API, the Client-Side Object Model, and the brand-new SharePoint App model.
 | As you saw in Chapter 11, it’s also possible to code against SharePoint with PowerShell. However, PowerShell is generally used by administrators rather than by SharePoint developers. |
The SharePoint Server-Side API
The server-side API is certainly the most powerful option for SharePoint developers. In terms of functionality, it’s clearly the programming interface that provides the best breadth of coverage.
The clear disadvantage of the server-side API is that this type of code must actually run on the SharePoint server—there is no remote option. In practice, this limits when the server-side API can be used. For example, it cannot be used with Office 365, since SharePoint developers do not have the ability to run their own code on Office 365 servers.
The SharePoint Client-Side Object Model
The SharePoint Client-Side Object Model (CSOM) is a relatively new addition to the SharePoint platform. In early versions of SharePoint, the only remote interface for SharePoint developers was the native web services. The CSOM is a more modern version of that interface, and thanks to the CSOM, the native web services are no longer recommended.
SharePoint App Model
The new SharePoint App model is not so much a method of programming against SharePoint as it is a method of deploying code to SharePoint.
The SharePoint App model uses the CSOM under the hood, so it’s limited to what is provided in the CSOM interface. However, it’s important to include the App model in this conversation, because it does use a specific framework, which needs to be considered during the planning stage of a development project. In other words, you can save yourself a lot of time if you consider whether you’re going to use the SharePoint App model when you are deciding which programming interface to use.
For more information about the different methods for programming in SharePoint, refer to the MSDN article, “Choose the right API set in SharePoint 2013” (http://msdn.microsoft.com/en-us/library/jj164060.aspx).
Setting Up a SharePoint Development Environment
The good news about setting up a SharePoint development environment is that you’ll be able to find free (or trial) versions of all the software you need. However, it will take some time to get up and running. Don’t expect the following examples and setup to be quick.
| If you’ve never done any development, it will take some time, and you’ll likely have some questions along the way. Just remember that you can get help from the community 24/7 via the MSDN forums (http://social.msdn.microsoft.com/Forums). |
The first step is to install Visual Studio with the SharePoint development tools (see Figure 12-1). Run Windows Update to see if there are any updates for Visual Studio. You can go to Tools | Extensions and Updates to check for updates to the add-ins for Visual Studio.

FIGURE 12-1 Installing Visual Studio 2012
| At the time of writing, the Office Developer Tools were in Preview 2 (available from www.microsoft.com/web/handlers/WebPI.ashx?command=GetInstallerRedirect&app id=OfficeToolsForVS2012GA). |
For more information about getting your machine ready for SharePoint development, refer to the MSDN article, “Set up the development environment for SharePoint 2013” (http://msdn.microsoft.com/en-us/library/ee554869.aspx).
Creating Visual Web Parts
One of the SharePoint 2010 features that I was most excited about is the ease with which developers can create web parts, which were introduced in Chapter 8. To distinguish the old from the shiny new, SharePoint now provides the Visual Web Part project type. In this section, I’ll quickly cover the basics of getting a new web part working in debug mode.
Setting Up a Visual Studio Project
Obviously, you’ll need a working SharePoint 2013 development machine. Once you have everything set up, the first step is to create a new project in Visual Studio 2012 (see Figure 12-2). To create a new SharePoint 2013 Visual Web Part project, launch Visual Studio 2012 as Administrator, and then choose the File | New Project option from the main menu.

FIGURE 12-2 Creating a new SharePoint 2013 Visual Web Part project
The New Project dialog gives you the ability to choose a myriad of project types. For this example, choose Visual C# | SharePoint 2013 | Visual Web Part. As usual, you also have the option of choosing a project name, the path for the project files, and a solution name.
Visual Studio will also ask which SharePoint site you would like to use to debug your web part (see Figure 12-3) and which type of solution you want to create. The two choices for the trust level are Farm Solution and Sandboxed Solution. Farm Solutions are the most powerful since they provide the complete power of the server-side API. Sandboxed solutions are more secure because they are restricted to a lower level of trust.
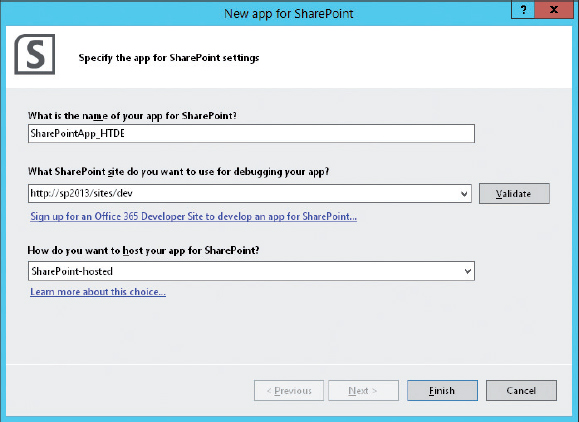
FIGURE 12-3 Choosing the debugging and trust level settings
| SharePoint sandboxed solutions are deprecated in SharePoint 2013. This means that they may not be supported at all in the next major release. For this reason, I recommend developing a SharePoint app rather than using sandboxed solutions. |
When the project is created, you will see that the plumbing of your new web part is provided in the project template (see Figure 12-4).
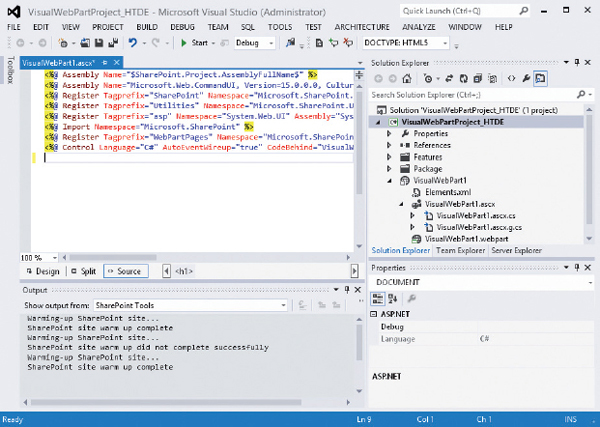
FIGURE 12-4 Your blank template for web part creations
Running the Visual Web Part
Rather than dive into the code, we’re just going to get this blank web part running. Add a simple <H1>Hello World</H1> line below the content on the web part page, and then run the project in debug mode. To start the debugger, press F5 or click the green start arrow on the main menu.
The first time you try to debug the project, you’ll be told that the web.config file is not set to allow debugging. When you see that message, choose the option to enable debugging. After you enable debugging, the home page for the site you chose will open. If you close this browser window, you’ll be returned to Visual Studio.
To add your custom web part to another page, you can choose Insert | Web Part from the ribbon. Your new web part will appear in the Custom category. After you choose to add it, you’ll see the name appear on your web part page (see Figure 12-5).
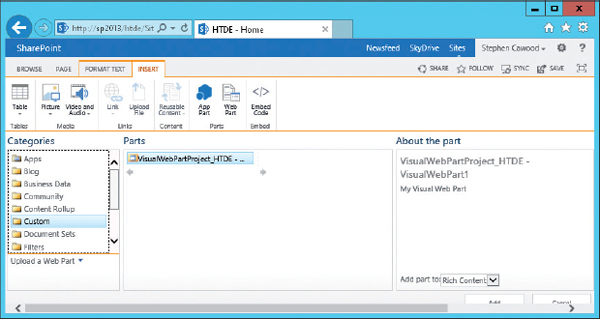
FIGURE 12-5 Choosing the new custom web part from the available web parts
And that’s it—your new custom web part will be visible on the page (see Figure 12-6). You now have a blank web part project that you can use to build what you want. Sure, it doesn’t actually do anything, but just enjoy how simple it is to get a working web part running in debug mode on your SharePoint server. Now you can drag-and-drop controls from the Toolbox, just as with any other ASP.NET page, and start your creation.

FIGURE 12-6 The new web part has been deployed
Debugging and Adding Breakpoints
One of the great advances in web part coding is ease of debugging. To see how easy it is to debug and step through your code, simply insert a breakpoint in your visual web part (see Figure 12-7). In this example, a breakpoint has been added to the .ascx.cs page.
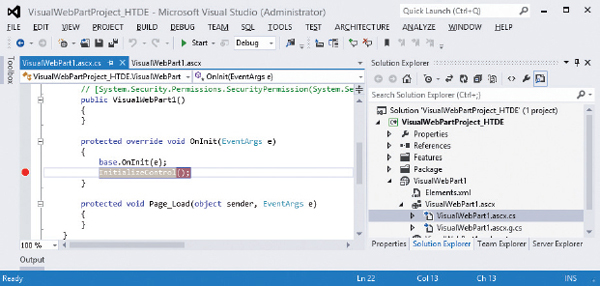
FIGURE 12-7 A breakpoint set in the SharePoint web part
When you now run the debugger, code execution will stop at your breakpoint and let you step into or over, or do whatever you desire in debug mode (see Figure 12-8).
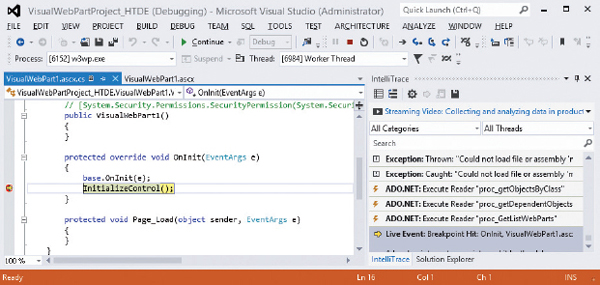
FIGURE 12-8 The debugger has hit the breakpoint.
Visual web parts make it fairly easy to build and deploy custom functionality to SharePoint. Now the trick is to figure out what you want to do, but isn’t that better than worrying about the plumbing?
Developing a SharePoint App
The new SharePoint App model is an exciting option for SharePoint developers. While it’s true that the server-side object model offers more power, SharePoint apps can be developed both publicly and privately. SharePoint apps can be sold in the SharePoint App Store, in much the same way as apps for cell phones and Windows apps are sold.
Creating a Developer Site
If you would like to try developing a SharePoint app, you should first create a new site collection using the Developer Site template. Note that you must create this site collection from SharePoint Central Administration (discussed in Chapter 11). You will not find the Developer Site template in the regular site templates list.
Once you have your Developer Site collection created, the next step is to create a new SharePoint App project in Visual Studio 2012. To create the new project, choose File | New Project | C# | Office/SharePoint | Apps | App for SharePoint 2013 (see Figure 12-9).

FIGURE 12-9 Creating a new SharePoint app project
Choose the name and the site to use for debugging your app. For this example, choose the SharePoint-hosted option (see Figure 12-10). Three options are available:

FIGURE 12-10 Choosing the settings for your new app
• SharePoint-hosted means that your app will run on the SharePoint machine.
• The Autohosted option will deploy the app to the Windows Azure cloud development platform, which is run by Microsoft.
• The Provider-hosted option allows you to host the app on any web-accessible server you choose. For example, you might want to use a cloud-based development environment, but not Windows Azure, or you might have your own server that you would like to use to host your SharePoint app.
SharePoint-hosted is the simplest choice, as everything can stay within your local development environment. Once you have made your choices, your new app project will open in Visual Studio (see Figure 12-11).
FIGURE 12-11 A new app project in Visual Studio
| If you want to develop on a remote machine, you’ll need to download and install the SharePoint Server 2013 Client Components SDK from www.microsoft.com/en-us/download/details.aspx?id=30355 (at the time of writing, this is still the preview link). The SharePoint Server 2013 Client Components SDK can be used to enable remote and local development with SharePoint Server 2013. |
Creating an App Domain
To enable app development on your SharePoint development server, you’ll need to do some setup. You’ve already completed the first step, which is to create a Developer Site to test your apps. The next step is to create an isolated app domain for your apps to use.
Creating this domain is a required step, but the good news is that you can get a PowerShell script to make this task a lot easier. (It is possible to create the domain without this particular script, but I suggest you use the script.) First, download the PowerShell script to create an isolated app domain from http://tomvangaever.be/blogv2/2012/08/prepare-sharepoint-2013-server-for-app-development-create-an-isolated-app-domain/. (See Chapter 11 for details about running a PowerShell script for SharePoint.)
First, the script asks for your app domain name. If you’re using dev.com as your domain name, then your app domain name will be contosoapps.com, and your app prefix will be added—for example, apps.contosoapps.com.
The next step is to create a managed account. You’ll first need to create a new account using the AD Users and Computers interface. Then you’ll need to set this new user as a SharePoint managed account. To do this, open a new PowerShell window as Administrator and run the command
New-SPManagedAccount. You’ll be asked to supply the username and password that you want to use for this account.Next, return to your original PowerShell window and enter the login name of the new managed account you created. At this point, the PowerShell script will run through six steps, providing feedback when each has been completed.
Once you choose to debug your app, the system will create a feature for the app, and your new app will launch (see Figure 12-12).

FIGURE 12-12 The default SharePoint app content
Note that under the hood, SharePoint will create an entry in your development machine’s hosts file (C:WindowsSystem32Driversetc). It will look something like this:

The hosts file entry allows your dev machine to find the app at the domain you specified when you ran the PowerShell script. When you stop debugging, the entry is removed.
To read more about developing apps for SharePoint, refer to Apps for Office and SharePoint (http://msdn.microsoft.com/en-us/library/fp161507.aspx) on MSDN.
Summary
This chapter is meant to give you a small taste of SharePoint development. There are many topics within the umbrella of “SharePoint dev,” and most SharePoint developers don’t even have to deal with all the topics. If you’re taking on your first SharePoint development project, I highly recommend that you scope out a small project at first and only move on to tackling something complicated after you have your first project working.
If you would like to learn more about SharePoint 2013 development, I strongly suggest you start with the training videos available on MSDN. An example is “SharePoint 2013 training for developers” (http://msdn.microsoft.com/en-US/sharepoint/fp123633).
..................Content has been hidden....................
You can't read the all page of ebook, please click here login for view all page.