
Chapter 10 Designing Vector Shapes

I found I could say things with color and shapes that I couldn’t say any other way—things I had no words for.
—Georgia O’Keeffe
Throughout this book, we’ve talked about putting together the ultimate motion graphics toolbox. If you think about it, vector shapes are like a Swiss Army knife, versatile and essential. You have tools for just about every task in one small, lightweight package.
Vectors can be used in everything from masks to motion paths. They are flexible, yet precise; rarely does a project get completed without one. In this chapter we’ll share the techniques we use most often when using vector shapes to create motion graphics.
Many Paths Lead to Vector Art
Neither art nor production is known for its predictability. Fortunately, the Adobe Creative Suite is designed to help make it easier to deal with changes as they arise. The Edit Original command in Adobe After Effects makes it effortless to jump back to Adobe Photoshop or Adobe Illustrator to quickly update a file.
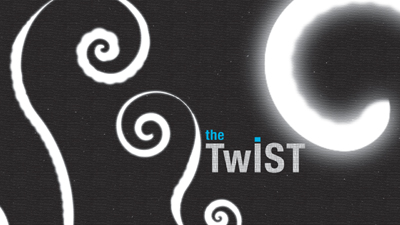
We find that the versatility of tools like the Pen tool (as well as vector paths) make Illustrator and Photoshop worth visiting frequently. So when you create that perfect mask in Photoshop, you can paste it directly into Illustrator to apply some vector effects or import it into After Effects for animation. Throughout this chapter we’ll discuss some of the finer points of working with vectors across Illustrator, Photoshop, and After Effects for creating motion graphics (Figure 10.1).
Figure 10.1 This design was completed using tools from Illustrator, Photoshop, and After Effects.
You’ll find valuable, effective vector tools in all four graphics applications in the Creative Suite. How do you know which one to use? Here are some tips to help you choose:
• Illustrator. The words vector and Illustrator are practically interchangeable. Vectors are to Illustrator what photos are to Photoshop. With precise control over strokes, fills, and vector filters, Illustrator is the answer for anything vector. It’s really the king of vectors. We use it most often to create graphic eye candy, flowing swooshes, dashed strokes, or any kind of repeating pattern (Figure 10.2).
Figure 10.2 These lines were originally only two paths, accented with different brushes. This group of flowing lines was created using a blend between the two paths.

• Photoshop. Photoshop is the best application to create, edit, and save selections from bitmap files. We usually convert selections to paths and save them for use in After Effects. Its tight integration with After Effects means that any vector shapes in Photoshop will import as layer masks in After Effects. This is quite a time-saver when you’re moving a project from storyboards in Photoshop to animation in After Effects.
 Tip
Tip
If you’d like to learn more about Flash and After Effects integration, you can read a free excerpt called “Flash Essentials for After Effects Users” from Adobe Press at www.peachpit.com/store/product.aspx?isbn=0321606078.
• Flash. Flash is a popular tool among character animators due to its vector drawing and Timeline capabilities. Options like the Bones tool also offer Inverse Kinematics animation tools, which allow for animating items with parenting-type controls (although the interactions use a different model than After Effects). For experienced After Effects users, the Flash Timeline takes a little getting used to.
• After Effects. Many designers fall into the trap of trying to do everything in After Effects. Just remember that After Effects is also known for its capability of easily working with a variety of sources. We’ll often copy and paste paths into position keyframes to create perfectly smooth camera moves. But of course, we create plenty of graphics directly in After Effects with Shape Layers, as well as create and modify paths or masks with the Pen and Point tools.
 Notes
Notes
If you need to create Flash animation, remember that After Effects can export a vector SWF file. Just be sure to use only vector sources and avoid rasterizing layers. This means no filters or motion blur. Following all of these guidelines will keep your files nice and tiny for the Web.
The Pen and Point Tools
With all the different Pen and Point tools, creating and editing paths can appear more complicated than they really are. In this section, we’ll provide essential keyboard shortcuts to all but eliminate the temptation to switch to other tools. These shortcuts function the same in Illustrator, Photoshop, and After Effects. Master these and you’ll gain confidence and speed across the Creative Suite.
Creating Anchor Points
To break down vector paths and shapes to their core, they store position information in two dimensions. Whether it’s the precise edges of a shape or points along a path, you can store that data within a vector path. And with an infinite number of lines and shapes possible, paths only use two kinds of points: smooth points and corner points (Figure 10.3).
Figure 10.3 Other than using the Shift key to keep the handles straight, only the corner point in the middle of the second path required a keyboard shortcut to break the handles and redirect the curve.

The difference between smooth points versus corner points is that smooth points have straight direction lines, often referred to as handles. When you adjust direction lines attached to a smooth point, the curved segments on both sides of the point are affected simultaneously. On the other hand, if you change a direction line attached to a corner point, only the curve on the same side of the point as the direction line is affected.
The positions of the direction lines and points will affect the size and shape of a curved segment between the points. To adjust the direction handles after a point has been set, use the Convert Anchor Point tool (pressing Option [Alt] while using the Pen tool will toggle to the Convert Anchor Point tool). As you draw paths, you can leave them open (such as a curved line or spiral). This works well for motion paths you want to create for the Position property. You can also make closed shapes (such as circles, ellipses, or custom shapes). These work well as design elements or for masks applied to layers in the After Effects Timeline.
Selecting Paths and Points
When you create paths, you’ll undoubtedly want to move the paths and points around the scene for final placement. There are primarily two tools you can use to select paths and points: the Selection tool and the Direct Selection tool. What makes them different is exactly what is selected by default:
Tip
As you create a path with the Pen tool, if you want to stop without closing the path, press Command (Ctrl) on the keyboard to quickly switch to the Selection tool. Click anywhere in an empty part of the canvas to deactivate the last point and set the path.
![]() The Selection tool selects an entire path and its points with one click, so it’s the tool to use for repositioning an entire path.
The Selection tool selects an entire path and its points with one click, so it’s the tool to use for repositioning an entire path.
![]() The Direct Selection tool selects individual points and sections of paths. When using this tool, you must click directly on points or drag a selection around the anchor points to select them.
The Direct Selection tool selects individual points and sections of paths. When using this tool, you must click directly on points or drag a selection around the anchor points to select them.
Using Smooth Points
Smooth points are a drag, literally. To create a smooth point as you’re creating a path, just drag as you set your points. If you hold down the Shift key right after you start to drag, the direction handles will snap every 45 degrees (Figure 10.4).
Figure 10.4 These two lines were created using the Shift-drag technique. Drag the handles in the same direction for each point to create the tight waves or in the opposite direction for the large curve shapes.

Creating Corner Points
Creating a corner point as you create a path is a two-click process. Click once to set the position of the path point. Then, before you click that point again, in Photoshop and Illustrator hold down the Option (Alt) key, in After Effects hold down the Command (Ctrl) key, and then drag to determine the direction of the path after the corner point (Figure 10.5).
Figure 10.5 Changing direction of the control handles across a path point creates a corner point.

Tip
As you’re dragging out handles in Illustrator and After Effects, you can reposition the anchor point. Hold down the spacebar and drag around the canvas to relocate it.
Pen Tool Auto Switching
When you’re working with the Pen tool, pay close attention to the lower-right corner of the icon. The tool will dynamically update and change functions to try to anticipate your next intended action (Figure 10.6).
Figure 10.6 The Pen tool displays its function in the lower-right corner.

1 The tool is ready to create a new path.
2 An icon does not appear because new points are being added to the path. The closed anchor point will be attached to the next anchor point set.
3 When you set a point, move away, and hover back over the active point. The tool anticipates a drag to create handles for a smooth curve point.
4 Over the open point, the tool switches to delete path points.
5 Over any other section of the path, the tool changes to add anchor points.
6 Over the original anchor point, the circle indicates that the tool will close the path.
7 With the path closed, the Pen reloads. The x indicates that the tool is ready to create another separate path.
Some find this Auto Switching useful (unless it’s offering the wrong choice). If you don’t like the Auto Switching behavior, you can disable it. Each tool treats Auto slightly differently:
• In Illustrator, you can disable switching completely. Choose Preferences < General, and then select Disable Auto Add/Delete.
• In Photoshop, deselect Auto Add/Delete in the Options bar to disable switching.
• Although there is no option to disable Auto Switching in After Effects, the RotoBezier option automatically sets the direction handles for you. This can make creating paths easier and faster to draw (although it’s a matter of personal taste).
Tip
If you want After Effects to automatically create and adjust direction handles for you, you can convert any manual path or shape into a RotoBezier path after it’s already been created. Simply select the path and choose Layer < Mask And Shape Path < RotoBezier.
While you’re in Illustrator, if you’re more comfortable with the layout of the interface in Photoshop, use a new workspace setup. Choose Window < Workspace < Like Photoshop and Illustrator will look surprisingly similar to Photoshop.
Setting Up Vector Documents for Motion Graphics
Although it’s easy to think of artwork as artwork, it’s important to remember that Illustrator serves several design communities. Print designers use it for CMYK artwork and illustrations. Web designers use it for user interface design. Motion graphics designers tend to use it to make art elements and fluid shapes.
Of course, when three different camps get together, the potential for problems is high. If you don’t set up your AI files correctly, they may be difficult (if not impossible) to effectively use with After Effects.
Notes
It’s important to remember that many vector files are designed for professional printing (especially logos). As such, they’ll use the CMYK color space. You need to convert these files before bringing them into After Effects. Open the file and choose File < Document Color Mode < RGB.
Creating Illustrator Files
Illustrator has several features to help designers create elements for video, but it all starts with the document settings. Even though Illustrator is vector based, it’s important to set up your documents using one of the Video and Film presets in the New Document Profile.
Yes, you can create vector elements any size you want, and then scale them in After Effects; however, this requires selecting the Continuously Rasterize switch. Although this may not be a big deal for a few elements, once you start duplicating those elements and animating them, render times can start to increase.
In Illustrator CS5 there are more options for video in the Advanced settings at the bottom of the New Document dialog box (Figure 10.7). Here are a few we find essential:
Figure 10.7 When you use one of the new document video presets, the technically important settings are already configured for you.

• We recommend selecting Align New Objects to Pixel Grid to help keep hard edges sharp.
• Change Transparency Grid to Off if you want Illustrator to use its traditional white background.
• If you want to see how your Illustrator files will look when rasterized, change the Preview Mode to Pixels.
Designing with Multiple Artboards
You can use multiple artboards to make Illustrator function like a big table. Instead of pieces of paper on a desk, it’s your designs virtually living in one Illustrator document. This approach will seem familiar because it’s much like having multiple compositions in an After Effects file.
If you are designing artwork such as a title treatment or anything that benefits from the spatial reference to its environment, artboards make it a breeze to create multiple versions within one document. Instead of creating one huge document with a bunch of different versions strewn all over the place, use multiple artboards to add some organization to an otherwise rather unorganized process. Artboards can be created at anytime, so of course, there’s more than one way to create them (Figure 10.8).
Figure 10.8 You can create new artboards in three different ways.

A When you start a project under the New Document Profile.
B When you press Shift+O to select the Artboard tool; in the tool options menu click the New Artboard button.
C When you click the Move/Copy Artboard button in the Artboard tool options menu. By default it moves the artboards around. Hold down Option (Alt) on your keyboard and drag to make a copy (the same command you use to copy elements in the canvas).
In addition to their functions as an organizer, artboards are quite functional as well. It’s convenient to have all the designs and elements in one document, ready to save out at any time. This kind of workflow works well for graphics waiting for approval as well as for a toolkit of elements.
To import each of these elements for animation in After Effects, you’ll need to create separate files for each. Simply choose File < Save As. Make sure the Use Artboards option is selected at the bottom of the window. You can then choose to use All or specify a range.
Illustrator’s Vector Tools
Building shapes for motion graphics can be a lot like making tile for a mosaic. You have to take care of the little things in order to create the big picture. Illustrator is the perfect place to start building elements.
Tip
When you need to create multiple variations of a graphic, create one version of the graphic and copy it to the clipboard. With that copied, choose Edit < Paste On All Artboards. You can then modify each graphic independently.
Using multiple artboards is an easy way to create frame-by-frame animation. Create an element to animate and position it in the frame. Duplicate the artboard and its contained artwork by Option (Alt) dragging on the artboard to create a duplicate of the board. Repeat the process for each frame, and be sure to save each to a separate file.
Illustrator is the best application for creating complex shapes, patterns, and brush strokes. With new tools like the Width tool and refined Dashed Line controls, Illustrator CS5 gives you more precise control over the details. Add new paint features like the Bristle brush, and you can add highly stylized looks to your graphics without the extra render times sometimes caused by heavy effects filters.
Importing these elements into After Effects is a straightforward process. However, there are some tips and tricks that can help extract the best information from the projects for use in After Effects.
Creating Fluid Shapes
One hallmark of modern motion graphics design is the use of flowing vector shapes. When you need these, look no further than Illustrator. Let’s create a fluid shape from scratch. We’ll use a two-step process. We’ll first create the base shape with the Spiral tool (Illustrator offers many other Shape tools as well, such as the Arc tool and the Polygon tool). We’ll then use the Width tool to add the finishing accents to the curves.
1. Select the Spiral tool from the Tools panel. It can be found in the same well as the Line tool. Drag anywhere in the canvas to create the shape (Figure 10.9).
Figure 10.9 Use the arrow keys as you drag to add or subtract segments from the Spiral tool.

2. As you’re dragging out the shape, there are two sets of keys you can use to affect the shape of the spiral:
• Use the up and down arrows to add or subtract segments.
• Hold down Command (Ctrl) as you drag to control the decay of the spiral.
3. To complete the shape, create another spiral that’s slightly different. Rotate and position it so the two pieces are tail to tail.
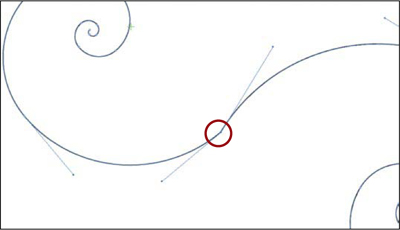
4. Combine the two tails by executing both the Average and Join commands in one step with a handy keyboard shortcut. Select both end points with the Direct Selection tool and press Command+Option+Shift+J (Ctrl+Alt+Shift+J) to move (Average) and combine both end points (Join) in one action (Figure 10.10).
Figure 10.10 The two end points are moved and joined together, creating one continuous shape.
5. Use the Convert Point tool (Shift+C) to smooth out the anchor point.
With the two spirals joined together, you’ve created an initial shape. Let’s use the Width tool to take things a step further and accent the curves with precision (Figure 10.11).
Figure 10.11 Press Shift+W to select the Width tool and drag on any path to change its width. Press Option (Alt) and drag to add width to one side only.
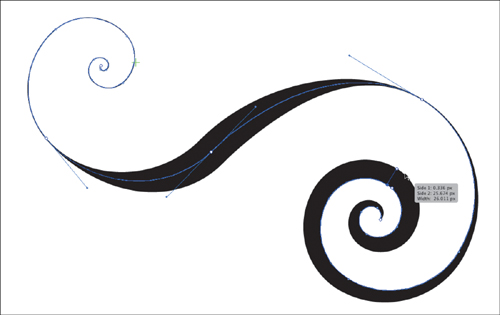
1. Select the Width tool (Shift+W). Drag anywhere on a path to pull out the width.
2. Press Option (Alt) as you drag to bring the shape out of one side of the path only.
You can save the profiles created by the Width tool to reuse on any path. Select the path and view the profile either in the Control panel or the bottom of the Stroke panel. Click on the profile and click the disc icon in the lower-left corner to save the profile.
Tip
If you’ve used Illustrator for a while, you might be used to opening different panels to modify things like Stroke and Fill. With the new Appearance panel (Shift+F6), you can access controls for fill, stroke, and effects in just one panel.
Creating Flowing Lines with the Blend Tool
Let’s continue our journey to create smooth lines and flowing shapes. We like to use the Blend tool for creating flowing lines that can add depth to just about any project. The key to working with this tool is really in After Effects. All you need to do in Illustrator is to create the paths in the artboard. Once the lines are created, you can select the paths and copy them in Illustrator. Then, in After Effects, you can paste only the raw path data of the strokes. Paths can be pasted into either a shape layer or onto a layer solid to then apply effects to the paths.
So, let’s create our flowing lines in Illustrator, understanding that only the path will be imported into After Effects.
1. Draw two smooth paths across the screen with the Pen tool. For a slightly busier look, have them overlap at some point in their curves (Figure 10.12).
Figure 10.12 Two basic lines drawn in the canvas set the outer boundaries for a ribbon of lines you’ll create using the Blend tool.

2. Press W to select the Blend tool, click on the first path, Option-click (Alt-click) on the second path to create the blend, and open the Blend Tool dialog box. With the dialog box open, you can change the default settings for the Blend tool and specify your own options. To see the strokes, change the spacing to Specified Steps and choose the number of steps in between the two strokes you created (Figure 10.13). We’ll set this example project to eight specified steps.
Figure 10.13 Use the Blend tool between two different shapes to create copies that will blend from one shape to the other.

Notes
If you’re pasting paths from Illustrator into After Effects, in Illustrator choose Preferences < File Handling and Clipboard and make sure AICB Preserve Paths is selected. This will ensure that the path data will be properly interpreted through the clipboard.
Creating Grids
Let’s take a creative break from flowing lines to create a graphic that is precise. An unsung hero in many designers’ toolkits, the Grid tool creates pixel-perfect grids. Found under the Line tool in the Tools panel, the Grid tool can create even divisions or weighted divisions where each row or column is a different size (Figure 10.14).
Figure 10.14 You’re able to create and color a grid quickly using the Grid tool and the Live Paint Bucket tool.

Make a grid to cover the entire artboard, and then drag from one corner diagonally across to the other. To dynamically modify the appearance of the grid as you’re dragging, press X, C, F, or V to skew the grid off center. Think of those keys like the direction arrows on a keyboard: X is left, C is right, F is up, and V is down. While still dragging out the grid, using the arrow keys will increase or decrease the overall number of divisions (Figure 10.15).
Figure 10.15 The same shortcut keys for the Grid tool also work with the Polar Grid tool.

After creating the grid, add color to the different squares using the Live Paint Bucket tool. With the grid still selected, select the Live Paint Bucket tool (K).
Select a swatch from the Swatches panel to choose a color. Use the arrow keys to choose different colors. Notice that the colors are being chosen directly from the Swatches panel (Figure 10.16). You can fill with any swatch in the Swatches panel, even gradients and patterns.
Figure 10.16 Selected closed shapes can be filled using the Live Paint Bucket tool.

Outlining Type with Offset Path
The Offset Path effect is the best way to create an outline for any path created in Illustrator. We use it most often to create a thick border around type. Let’s use Offset Path to create a border around some type we’ll continue to stylize later with the Blob brush (Figure 10.17).
Figure 10.17 Duplicate the entire type layer so the offset and the type layer will be ready for animation; that is, they will already be on two separate layers.

Notes
Effects in Illustrator are divided into two sections, Photoshop and Illustrator. Illustrator effects are vector and should be applied to vector graphics. Photoshop effects can be applied to bitmap and vector graphics. Their effect will generate bitmap results. You can specify the resolution of the raster effect by choosing Effect < Document Effect Raster Settings.
1. Create a duplicate of the type layer, and choose a different color for the fill of the type on the upper layer so you can clearly see the results of the effect.
2. Select the type on the lower layer and choose Effect < Path < Offset Path. Select preview and change Offset to 15. Once a filter is applied, it can always be edited in the Appearance panel (Shift+F6).
It’s easiest to create variations on a shape by using Effects. As effects are applied, they remain fully editable in the Appearance panel. Although this makes it easier to go back and make changes, it makes it harder to use that new shape as a starting point for more changes without rendering the effect into actual geometry. The function used to render effects into actual geometry is Expand (Figure 10.18).
Figure 10.18 Expanding an object will render effects or blends, or even convert strokes to fills. The Pathfinder is the tool to use when you want to combine multiple overlapping shapes into one object.

To properly prepare this offset path graphic, you need to use the Expand function. Choose Object < Expand. Since we’re not planning on animating each letter individually, we should fix the overlapping paths and merge all the letters into one final shape. Choose Window < Pathfinder, and then choose Unite to merge all the overlapping paths together into one object.
Adding Texture with Brushes in Illustrator
Brushes in Illustrator are slightly different from brushes in Photoshop in that each stroke is recorded as a vector path. This is useful because it means that you can go back and edit the stroke. However, it’s not useful when you end up with a lot of strokes in a project because they can bog down Illustrator’s performance as you work on a project. Fortunately, creating motion graphics doesn’t normally require extensive use of vector brush strokes in Illustrator.
In this section we’ll add some texture behind a graphic using the new Bristle brushes. We’ll also paint directly within some text using the Blob brush and the new Draw Inside drawing mode.
Using Bristle Brushes
The Bristle brush is a new feature in CS5 that is designed to simulate the true characteristics of an actual paintbrush. With the Bristle brush you can create natural-media brush strokes with precise control over the bristle settings. To achieve the full effect of the Bristle brush, we recommend using a Wacom tablet. The tablet works with the Bristle brush to determine the angle and the pressure of the brush. Without the tablet, painting with the Bristle brush will draw a continuous even stroke (Figure 10.19).
Figure 10.19 The brush stroke drawn using a mouse lacks the varying qualities that are created by using a Wacom tablet.

To load a Bristle brush, choose the Brush tool, and in the Control panel open the brush definition menu by choosing New Brush < Bristle Brush. Or, you can open the Bristle Brush Library from the Brushes panel menu by choosing Open Brush Library < Bristle Brush < Bristle Brush Library. Any traditionally trained artist will appreciate these preset brushes and custom options because each tip is modeled after specific real-world brushes (Figure 10.20). Here are some tips for choosing and working with the Bristle brush:
Figure 10.20 There are 14 Bristle brushes to choose from.

Tip
If you’re using a graphics tablet, look for the icon at the tip of the brush depicting exact position and rotation of the tip of the brush. Try the Wacom 6D Art Brush with the Bristle brush for six dimensions of Pen control including a full 360 degrees of barrel roll.
• Angled brushes are great for accenting dimension and calligraphic styles. Use straight brushes to paint a constant, even stroke. Tips with points are good for general use; hold them more vertically for sharp lines, and angle your pen on its side for thicker strokes.
• When painting, use the [ key to make the brush tip radius smaller and the ] key to make the brush tip larger.
• Use the number keys across the top of your keyboard to change the brush opacity in 10 percent increments (1 = 10%; 10 = 100%).
Each Bristle brush can be customized. Double-click the brush in the Brushes panel to open its options. The different settings are literally named after each characteristic associated with actual paintbrushes. Here are some tips for customizing a Bristle brush (Figure 10.21):
Figure 10.21 Customize a Bristle brush to create variations within each brush and make it unique.

• Set a low Bristle Density to create a stroke with more variance in the stroke.
• Longer bristles create softer brush strokes.
• Combine adjustments to the width of the bristles with the length of the bristles to intensify the adjustments. For example, choose very thin bristles with long bristles to create very soft strokes.
Using the Blob Brush
Using the Blob brush is another way to paint in Illustrator. But instead of painting individual strokes, the final result is always outlined, creating a solid shape or “blob.” Combine the Blob brush with the new drawing modes in CS5, Draw Behind and Draw Inside, and you’ll have countless ways to treat type or any shape in Illustrator (Figure 10.22).
Figure 10.22 The Blob brush makes it simple to create any organic shape like dripping paint without the headache of multiple brush strokes because it creates a filled shape as its result. Combine the Blob brush with the new drawing modes to paint organically within rigid structures like these letters.

1. To paint inside each letter, you need to activate the new Draw Inside mode found at the bottom of the Tools panel. Select an individual letter using the Direct Selection tool. Click the Drawing Mode button at the bottom of the Tools panel and choose Draw Inside. Dotted-line corner brackets appear around the letter to indicate you’re using Draw Inside mode.
2. Be sure to deselect the letter before you continue so you don’t accidentally change the letter’s fill or stroke. Press Shift+B to choose the Blob brush, and paint inside the top part of the letter.
3. Choosing Draw Inside with a letter selected automatically creates a clipping mask for that letter, which is visible in the Layers panel.
4. Select the shape made by the Blob brush in the Layers panel and apply an inner glow to discolor the edge of the blob. In this example we used a dark brown color and chose Multiply to darken the edge of the shape and add some dimension to the paint.
Building Complex Shapes
There are primarily three techniques we use regularly to create more complicated shapes. When you combine these techniques with all the tools available in Illustrator, there really isn’t much that can’t be created.
Tip
When performing transforms on a rotation, rotate the shape by a number that divides evenly into 360 to avoid any irregularities in the created pattern.
Copy, Repeat Transform
One of the easiest ways to build complex shapes in Illustrator is by repeating a transform function. Whenever you transform vector shapes in Illustrator, you can always repeat the transformation by pressing Command+D (Ctrl+D). The key is to specify the anchor point before completing the transformations (Figure 10.23).
Figure 10.23 Pressing Option (Alt) as you set an anchor point for the rotation allows you to choose a specific value for each rotation. As you create copies of your shape, the flower in steps 1-4 fills out. This Option (Alt) technique works with many more tools than just Rotation.

1. To create a flower pattern from the single oval in Figure 10.23, select the oval and the Rotate tool.
2. To specify the anchor point for the rotation and open the Rotate dialog box, Option-click (Alt-click) at the bottom of the oval.
3. Choose a number that divides evenly into 360 (for example 20 or 30) and click the Copy button.
4. Because you created a copy of the shape and transformed its rotation when you clicked the copy button, Illustrator will automatically repeat the same functions again when you press Command+D (Ctrl+D). That key command will repeat the previous function each time it is used, so repeat the command multiple times until the shape is completed.
Pathfinder
Using the Pathfinder is a way to create new shapes by using overlapping shapes. For example, you might want to cut a circular shape out of a square. With the overlapping shapes selected, choose Window < Pathfinder and look closely at the buttons in the upper row to see the function each button will perform. Click a button to apply that function; undo and try another to see how each function is applied (Figure 10.24).
Figure 10.24 When using the Pathfinder functions, the object in the foreground is what determines the color of the resulting shape. The illustrations on each button in the Pathfinder clearly depict each function.

The Shape Builder tool performs the same functions as the Pathfinder in a more visual and interactive manner (Figure 10.25). To use the Shape Builder tool, the shapes must first be selected. Drag through any of the shapes to combine them. Then hold down Option (Alt) and drag to subtract any geometry away from the shape.
Figure 10.25 The Shape Builder tool performs the same basic functions as the Pathfinder in a more direct, interactive manner. Unlike the Pathfinder, you can specify a revised shape color from the fill in the Tool Panel.

Tip
When you’re using the Shape Builder tool, you can specify the fill and stroke of the new shapes with the colors loaded into the Fill and Stroke in the Tools panel.
Creating Libraries of Shapes
If there is a vector graphic you need to use on a regular basis, you should consider saving it as a symbol. To save a graphic, simply drag it directly into the Symbols panel (Figure 10.26). Here are some of the finer points to consider as you create your own symbols:
Figure 10.26 The Symbol Options panel for saving a symbol. The Type setting has no effect on a symbol being saved in Illustrator. It only pertains to symbols in Flash.

• When saving a symbol, the Type setting is ignored in Illustrator. That option is used when saving graphics for use in Flash.
• Name the symbol, set the registration point, and click OK. The registration point is like setting the anchor point of a symbol.
• To save a symbol permanently, save a library. In the Symbols panel menu choose Save Symbol Library. Any symbol in the panel will be saved into that library.
• All saved libraries will appear in the User Defined section of Symbol Libraries.
 Close-Up: Using Symbols for Quick Designs
As you design in Illustrator, there’s a secret source of vector artwork you need to know about: Symbols. To view Symbols, choose Window < Symbols. Use the Symbols panel menu to load the different libraries. To use a symbol, simply drag it to your artboard.
Symbols are vector graphics that are stored in a library within Illustrator. They can be used with the Symbol Sprayer tool to spread them around, much like particles. The interesting thing about Symbols is how they are linked back to their library. When you drag a symbol into an artboard, it’s just an instance of that symbol. So if you apply a change to the symbol, you’ll have the option of spreading that adjustment across all the different instances of that symbol used in your Illustrator file.
To be able to edit a symbol and break it apart for animation, right-click and choose Break Link to Symbol. Once the link is broken, you can separate any elements onto their own layers.
If you want more symbols, check out the Adobe Exchange website for Illustrator to find many more symbols and a bunch of other presets and goodies.
Organizing Layers for Animation
When you’re working with flattened vector files, you’ll need to separate the elements into layers so they can be independently animated in After Effects. If you need a refresher, we covered multiple ways to release artwork to layers in Chapter 4. Here are some of the key commands we’ve found useful in Illustrator for selecting, grouping, and ungrouping objects:
• Select all objects on a layer. Option-click (Alt-click) on the layer name
• Switch between the Selection and Direct Selection tools. Command+Option+Tab (Ctrl+Alt+Tab)
• Toggle between Direct and Group Select tools. Option (Alt)
• Ungroup. Command+Shift+G (Ctrl+Shift+G)
• Group. Command+G (Ctrl+G)
• Create a new layer. Command+L (Ctrl+L)
Expanding Objects
Some elements in Illustrator need to be expanded before they can be separated into layers for animation. When you’re working with blended shapes, there is an option to expand the blend. This will preserve the strokes and any brushes applied as individually editable. Usually, to prepare these elements for animation, we’ll follow expanding the blend with the Release To Layers command and move the group of layers out of their parent layer so each element resides on its own layer (Figure 10.27).
Figure 10.27 Once this blend of rings was expanded into individual objects, each ring was assigned a different brush and color. They were then released to layers and moved out of their parent layer, so each element would be on its own layer in After Effects.

To Expand a blend, choose Object < Blend < Expand. Use Release to Layers, Sequence to move each ring onto its own layer. Then select all the new layers and drag them to the top of the layer hierarchy so they can be imported into After Effects as separate elements.
Combine Expand with Simplify to create the shape and control the number of vertices required to trace a shape in After Effects (Figure 10.28). Sometimes just using Expand will create many unnecessary vertices, which is why it’s so important to use Simplify to reduce those numbers and keep things simple.
Figure 10.28 Use Expand to convert the variable width stroke into a filled shape. Use the Path < Simply function to trim down the number of path points required to recreate the shape.

Notes
You can save a layered Photoshop file directly from Illustrator by choosing File < Export < Photoshop psd. This is helpful when creating graphics that will be further treated and composited with other graphic elements in Photoshop.
Use the following two steps to create the actual outline of the shape (step 1) and limit the number of vertices used to create that shape (step 2).
1. Use Expand to trace the outer edges of the shape and notice the high number of vertices generated. To apply Expand, choose Object < Expand.
2. With the new path selected, choose Object < Path < Simplify, select Preview, and drag the sliders to make adjustments. Use a high number for Curve Precision to stay true to the original shape.
Designing Vectors with Photoshop
Photoshop’s vector capabilities have continued to grow exponentially with the release of each new version. Many artists, editors, and photographers unfamiliar with Illustrator have found this very helpful. They can take advantage of vector graphics’ scalability and flexibility without having to learn a slightly different interface and a number of new tools.
There are three different modes for using and creating vector paths in Photoshop: Shape Layers, Paths, and Fill Pixels (Figure 10.29).
Figure 10.29 Shape Layers and Paths use the same basic paths to create vectors; they are just saved in different places.

• Shape Layers. Creating vectors using this mode automatically creates a solid-color filled layer and applies the path as a vector mask to that solid color layer. The opacity and color of the fill can be adjusted in the Layers panel using the Fill option.
• Paths. Paths mode creates a path without a fill or stroke that is not visible in the Layers panel but is shown in the Paths panel as a Work Path.
• Fill Pixels. The Fill Pixels mode can only be selected when a nonvector layer is selected in the Layers panel. It creates bitmap fills and strokes using vector paths like the Custom Shape tool.
Using the Custom Shape Tool
To quickly view all the vector tools available in Photoshop, press U to select the Custom Shape tool and look in the Control panel. You should recognize most of the usual suspects: the Pen tool, the Direct Selection tool, and some Shape tools (Line, Rectangle, Ellipse, etc.). The shape farthest to the right that looks like a blob is called the Custom Shape tool. When a Custom Shape tool is used in a Photoshop document, by default it creates a shape layer with a solid color fill. Here are some things to consider when working with the Custom Shape tool:
Notes
When you’re using any vector Shape tool, click on the arrow just to the right of the Custom Shape tool to view its options. You can create a star in the Polygon shape options and add arrow heads to the Line tool.
• With the Custom Shape tool selected, click the Shape thumbnail to the right to open the Custom Shape Picker.
• To add more shapes into the picker, click the arrow in the upper-right corner and scroll down to choose a library.
• When you choose a library, add the new shapes to your current selection by choosing Append, or replace the current library with the new library.
• To use a custom shape, drag it directly onto the canvas. Hold down the Shift key to keep its original proportions. Its color is determined by the foreground color in the Tools panel.
• To change colors, select the layer, load a new color into the foreground color, and press Option+Delete (Alt+Delete) to fill from the foreground color.
• Because custom shapes create a vector shape layer, they can be edited just like any other vector shape with the standard Pen and Point tools.
Any vector shape in Photoshop can be saved as a custom shape. Select the vector path and choose Edit < Define Custom Shape. Add a name and click OK to save the shape.
Tip
If you move from computer system to computer system, you should save your custom shapes as an external preset .csh file. Click the arrow button in the upper-right corner of the picker and choose Save Shapes to save any shapes currently in the picker. To load this file into another system, open the picker, click the same arrow button, and choose Load Shapes.
Understanding Work Paths
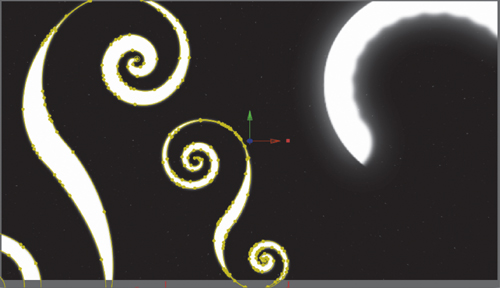
Whenever a path is created in Photoshop, it is either a Work Path or a shape layer. Work Paths are special in that they can be created from a selection. This can come in handy when you need to create a vector shape from an object in footage or a picture. Use the superior selection tools in Photoshop to create a selection, and then convert the selection to a path. Then import that path into After Effects to use as a source to generate an animated graphic effect (Figure 10.30). Follow these three steps to create and save any path in Photoshop from a selection.
Figure 10.30 Work Paths can be created from selections, converted to selections, and permanently saved through the different commands in the Paths panel menu.

1. Load any selection you want to use as a source to create a new path.
2. Create a new blank layer in the Layers panel, select that layer, and open the Paths panel.
3. In the Paths panel menu, choose < Make Work Path.
When you’re saving a Work Path, consider these factors:
• The smaller the tolerance number, the more closely the path will match the selection. Don’t choose a number that’s too small, or the path will be very jagged.
• When the path is listed in the Paths panel as Work Path in italic type, that means it is temporary and will not be saved permanently in the file.
• To permanently save a Work Path, double-click its layer in the Paths panel and name the newly saved path.
• Paths can also be converted to selections in the Paths panel menu by choosing Make Selection with the source path layer selected.
Using Vector Elements in After Effects
Vectors are very useful in After Effects and can be used in many different graphic elements from shape layers to layer masks. There are a variety of effects that can be used with paths to create elements like brush strokes and strobing lights. Although vectors can be created directly in After Effects, it’s often easiest to create complicated shapes and paths using other applications like Illustrator.
Notes
Just because an element is vector doesn’t mean it’s ready to animate. We recommend opening all EPS and SVG graphics in Illustrator. Be sure to check that the color mode is set to RGB. You can also convert the vector file into layers (using the Release to Layers command in the Layers panel). Be sure to save the file as a native AI file for maximum flexibility upon import.
Vector paths are unique in how they can be imported into After Effects because a path can create a stroke and a fill, and because each application treats paths slightly differently. Sometimes, to ensure the best translation and flexibility between applications, it’s best to copy and paste vector paths directly to specific parameters within an After Effects project.
Shape Layers
Shape Layers is a great tool to use to generate repeating graphic shapes and elements. We discussed Shape Layers pretty extensively in Chapter 7, “Designing Backgrounds.” What’s important to grasp in this chapter is the ability to use an external path as a source for a shape layer. To paste a path from anywhere, Photoshop, Illustrator, or even from a layer mask in After Effects, just copy the Path property (Figure 10.31).
Figure 10.31 Specifically selecting the Mask Path to copy or paste a path makes moving masks to different parameters relatively painless.

Notes
When you’re creating a shape layer using the vector tools in After Effects, there are two buttons to watch out for just to the left of the fill options: Tool Creates Shape and Tool Creates Mask. Tool Creates Shape creates a typical shape layer where you have control over every parameter of the fill and stroke. The Tool Creates Mask option creates a layer mask applied to the shape layer. That way, you can apply effects that only interact with layer masks, like Vegas and Stroke.
To create a new shape layer, choose Path from the Add menu in the shape layer. Twirl open the Path disclosure triangle and select the word Path next to the stopwatch. Then paste the path, and it will be added to the shape layer as a new shape.
Custom Animation Paths
Vector paths can be created and pasted directly into the Position property of a shape (or any layer) as a motion path to control an object’s position with precision (Figure 10.32).
Figure 10.32 The keyframes created from the path shape are roving keyframes in between the first and last keyframes. This way, you can change the duration of the move by dragging only the first or last keyframes; the middle keyframes will slide around accordingly to ensure a smooth animation.
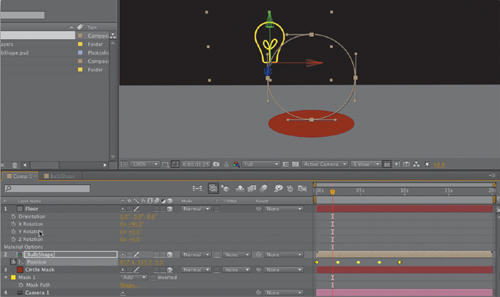
It doesn’t matter if the path shape is a mask inside an After Effects project or simply a path directly copied from Illustrator. The example in Figure 10.32 shows a circle path shape that happens to be a mask applied to layer 3. To make the lightbulb graphic element move in an exact circle, you can literally copy the path from layer 3 and paste it into the position parameter for the lightbulb element. Follow these steps to do just that:
1. Select the Mask Path on the Circle Mask layer 3 and choose Edit < Copy.
2. To make the bulb travel in a perfect circle, twirl down the Position parameter for the BulbShape layer and click on the word Position to make sure it’s selected.
3. With the Position selected, choose Edit < Paste.
Now the bulb will move in a perfect circle, mimicking the same shape as the mask.
Morphing Shapes
In After Effects, you can actually paste different path shapes into the same mask and create a morph between the two shapes. The layer named Morph already has a layer mask applied with the stroke effect. That’s the layer we’ll use to create our morph animation. The key is to select the actual mask shape by clicking directly on the text named Mask Path that appears under the Mask layer.
1. Open the masks on all three layers. Be sure to twirl open the Mask 1 layer to select the mask layer for each layer. Select the mask layer from layer 3 and copy it.
2. On the layer named Morph, select the Mask Path under Mask 1 and paste the new shape. Be sure to click the stopwatch to add a keyframe to the new mask shape (Figure 10.33).
Figure 10.33 As long as you continue to paste new mask shapes to the same mask layer, you’ll continue to add more keyframes and variations to your morphing shape.

3. Move the current time indicator down the Timeline to around the one second mark.
4. Select the Mask Path in layer 2 and copy it. Then select the Mask Path on the Morph layer and paste.
There should be one mask and two keyframes on the mask in layer 1. If you load a RAM preview, you’ll see the animation and morph between the two shapes. Now each shape is represented by a keyframe in the Timeline. If you want the shape to cut back and forth between the different shapes, paste more keyframes to build the repetition, and change the keyframes to Hold keyframes by right-clicking and choosing (toggle) Hold keyframe to make the shape cut instead of morph.
Importing Artboards
To work with Illustrator files that contain multiple designs in multiple artboards, they need to be saved out as individual files using the “Save each artboard to a separate file” option found in the Save As options. In this project we saved out three artboards from one Illustrator file and imported each as a composition into After Effects. Even though the files imported properly, you still need to be aware of one detail—layer management:
Notes
When you use the Video and Film presets, even when you specify one artboard for the project, the file created will automatically contain two artboards. One artboard will be the appropriate size, and a second larger artboard will be created to ensure that the larger artwork is not cropped upon import into After Effects.
• Regardless of the graphic that exists within the specific borders of an artboard, all the layers will be created and saved across all artboards. For example, you might have a graphic element that exists on layer 5 in artboard number one but not in artboards two or three. When they are saved out as separate files, both artboards for two and three will still contain layer 5; it will just be an empty layer.
• To avoid having unnecessary layers, open the Illustrator document and delete any extra layers. Even if there are multiple empty layers above sublayers, move the graphics up in the layer hierarchy and delete any extra unnecessary empty layers before trying to import into After Effects.
Importing Vector Shapes and Paths
Layered Illustrator files can be imported into After Effects as compositions. Any vector shapes or strokes are always imported as vector graphics without any specific path information. Half the fun of working with vector information in After Effects is the flexibility of working with actual vector path data. To import vector files with flexibility in After Effects, we recommend importing the Illustrator file as a composition and any path information that might be useful when animating.
To launch Illustrator while in After Effects, select a layer from the Illustrator document in the Project panel and press Command+E (Ctrl+E) to use Edit Original.
1. To import shapes from Illustrator, select the shapes and copy them.
2. In After Effects, create a new solid by pressing Command+Y (Ctrl+Y). With the new solid selected, paste.
3. After Effects automatically outlines any shapes with variable widths in Illustrator (Figure 10.34).
Figure 10.34 After Effects will trace a path around any generated effects in Illustrator, like the Offset Path effect.
4. If After Effects creates too many vertices on the new outline path, use the Expand and Simplify technique covered earlier in the section “Expanding Objects” to lessen the number. Then recopy and paste the new path.
5. Any strokes with a normal profile in Illustrator will just paste as a path without any shape waiting for an effect to be applied (Figure 10.35).
Figure 10.35 A mask or path without an effect applied appears as a path when the layer is selected. When you apply the Stroke effect, you can specify properties like stroke width and color.

After Effects automatically imports paths from Photoshop documents that contain either shape layers or vector masks. Any paths saved in the Paths panel in Photoshop can be copied directly into After Effects. To copy a path for use in After Effects, select the layer containing the path in the Paths panel and just press Command+C (Ctrl+C) to copy it. Once it’s copied, you can paste it to shape layers or masks as described in the preceding steps.
Generating Path Effects
Once a path is applied to a layer in After Effects, it’s ready to animate. There are four different effects that we use most often: Stroke, Vegas, Beam, and Scribble. They all function in a similar fashion in how they’re applied and in their general stroke settings, but each has its own benefits. Below each effect’s description in the following list we’ve added some key options and features to consider when using each effect.
Stroke. Stroke is a very reliable, simple solution to animating paint along a path (Figure 10.36).
Figure 10.36 Stroke is a good overall effect to start with when you’re not quite sure which mask effect is called for. Its ability to stroke multiple paths sequentially is very handy for creating animated line elements.

• To have a stroke draw across the path, keyframe the Start and End percentages.
• Spacing changes the solid lines to dots as the value is increased.
• Adjust the Paint Style to have the stroke draw on the current layer, reveal its layer, or draw over a transparent background.
• The Hardness setting adjusts how soft the path appears.
• The Stroke effect supports the stroke of multiple masks in sequence, which is a great way to generate flowing graphic shapes in a background.
• The Stroke effect can do much more than just create flowing graphic lines. It is the perfect effect to use for map animations when you need to draw an illustrative path depicting movement through a map down a specific road, trail, river, and so forth.
Vegas. Surprisingly different than Stroke, Vegas has controls geared to flowing shapes along a path, very much like lights popping on and off around a sign in Las Vegas (Figure 10.37).
Figure 10.37 Anytime you need a strobing flow of light moving around the scene, try the Vegas filter first.
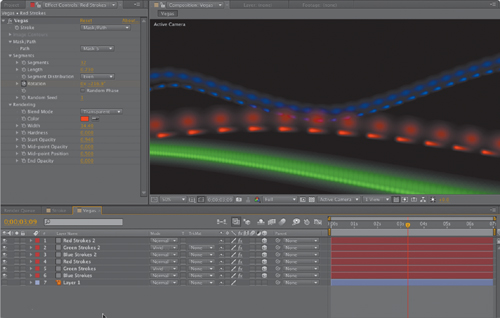
• To use this effect quickly, only keyframe the Rotate parameter to control the speed of the shapes around the path.
• All the parameter adjustments in Vegas are straightforward; adjust the Segments, Length, and Width to impact the shape of the effect the most.
Beam. Most often, Beam is used for creating light sabers and laser blasts in a scene. We think it’s an unsung hero in motion graphics because of its precise controls for the Start point and End point of the effect (Figure 10.38).
Figure 10.38 With a few expressions created with the pick whip, the Beam filter is perfect to draw a line between two animated graphics.
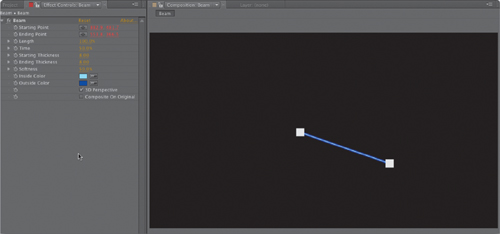
• Apply expressions to the Start and End points of the Beam effect, tying them to the position parameters of different graphic elements in a project for Beam to dynamically draw a line connecting the two graphics.
• Use the Time parameter to adjust the offset of the beam along the path.
Scribble. Scribble is used to create highly stylized animations that look like someone creating a graphic element by scratching back and forth with a pen or crayon (Figure 10.39).
Figure 10.39 Scribble is an effect that works best when you have a keen eye for detail. You can very quickly go over the top with this effect.

• Changing the Fill Type will control exactly where the Scribble will occur, inside, outside, or directly along a path shape.
• Control the speed and feel of the animation by adjusting the Wiggle Type and Wiggles/Second.
• Use the Stroke options to control everything from the curviness to the overlap and variation along the stroke.