
Chapter 7 Designing Backgrounds

I hardly ever stretch the canvas before painting.
—Jackson Pollock
As a motion graphics designer, you often have to work harder than other types of designers. Unlike those in the print world who can usually get by with a white background for the printed page, you must put more thought into your projects.
Motion backgrounds have become a staple of broadcast and motion graphics design. In fact, entire companies exist just to create and sell backdrops. The use of backgrounds (whether static or dynamic) is essential to good motion graphics design. Fortunately, certain features in After Effects and Photoshop can be combined to create some fantastic “wallpaper.”
Approaching Background Design

When creating backgrounds for a motion graphics project, you might be surprised at how much thought can go into the process. It’s important to realize that you are creating the foundation for the completed project. Just as you can’t build an architectural masterpiece on a swamp, you’ll need to find a solid base for the rest of the animated layers to come.
Role of Backgrounds
The greatest challenge when it comes to creating and using backgrounds is that you need to show proper restraint. A background is just that—a background. Would you expect to see a gaudy patterned print at an art museum? You need to find the proper balance between an interesting background and preserving the visual hierarchy of information.
We understand why the challenge exists. As the stock animation industry has grown, competition has led to more and more companies trying to “stand out.” This means that designs have become busier, louder, and generally obnoxious.
In contrast, let’s look at the print industry. Sure, a designer might use a patterned paper or a colored backdrop but never in a way that negatively impacts the readability of text or diminishes the value of a photograph. Creating a background is truly an invisible art. The goal is to make something that adds to the overall design but does not stand out.
Gathering Sources
Creating backgrounds is a varied process. We find that the best backgrounds use source ingredients (as opposed to just combining effects). We recommend you consider the following options when designing them:
• Footage plates. Footage is one of the easiest sources to use, because it’s already moving. Often, abstract or soft-focused footage works best (Figure 7.1).
Figure 7.1 We’ll explore footage creation strategies in Chapter 13, “DVD and Blu-ray Design.”

• Patterns and textures. The use of patterns or textures is an easy way to create complex blending (Figure 7.2). These can include photos of natural items, scanned images, or generated textures.
Figure 7.2 You’ll find an assortment of pattern layers in the Chapter_07_Media folder and can experiment with creating more in Photoshop.
 Tip
Tip
Need an instant background? Just take a video clip and apply a very heavy blur to it. If you need to unify it a little, try using the CC Tint or Colorama effect.
• Vector shapes. Many backgrounds are created with repeating geometric patterns (Figure 7.3). These can be made using Adobe Illustrator, but you’ll find the Shape Layer feature in After Effects to be robust as well.
Figure 7.3 Shape layers are easy to use and very versatile. You can create complex geometric shapes in just a few minutes.

• Photos. A well-composed photo can also serve as a background (Figure 7.4). If you’re shooting your own photos, be sure to think of balancing negative space with the subject of the photo.
Figure 7.4 A well-composed photo creates a natural frame. Here a skyline photo blends with a background texture and some color to create a pleasing background.

Importance of Looping
When creating an animated background, it’s considered necessary that motion repeat seamlessly (called a loop). Looping ensures that a background can repeat infinitely, which can be highly desirable because it gives you design flexibility. Some uses for looping backgrounds include the following:
• DVD and Blu-ray Discs typically use motion menus. These often feature animated backgrounds. A seamless loop ensures a pleasant viewing experience.
• Digital signage (such as signs at airports or retail stores) is designed to be viewed in passing. The viewer often joins an animation “in progress.” Ensuring that the animation repeats smoothly creates a less jarring moment for the audience.
• Broadcast and live events often depend on backgrounds. Unfortunately, the required duration may be unknown. Having a background loop means that it won’t run out on you when it’s playing back live. Animations can be repeated many times over to create any duration (or even an infinite one).
Using Generate and Noise Effects
One of the easiest ways to create seamless backgrounds is to use effects within After Effects. Although After Effects includes several effects, we’ve handpicked our four favorite that are flexible and easy to use: 4-Color Gradient, Cell Pattern, Radio Waves, and Fractal Noise.
Tip
Backgrounds can also be enhanced with a bloom effect or vignette. Use the techniques you learned in Chapter 5, “Stylizing Footage.”
4-Color Gradient
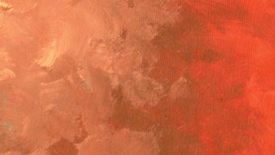
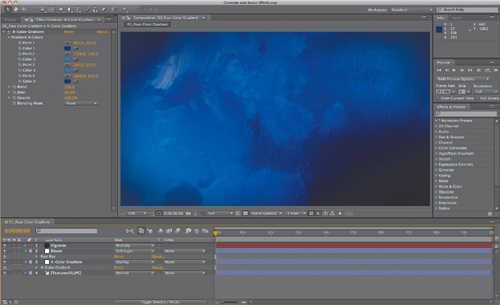
The 4-Color Gradient effect (Effect < Generate < 4-Color Gradient) is an easy way to generate gradients within After Effects (Figure 7.5). The gradient is created using four control points. You can assign a color to each point and specify its position. In fact, both color and position can be keyframed to create an animation. After Effects uses four solid-color circles blended together for the effect.
Figure 7.5 Try combining an organic texture with the 4-Color Gradient effect. A great source for free texture layers is www.TextureKing.com.
1. For best results, apply the 4-Color Gradient effect to an adjustment layer. You can use it in an 8-bpc or 16-bpc color project.
2. Assign the desired colors to the Color 1–Color 4 wells.
3. Increase the Blend Value to create a more gradual transition between colors. To reduce any further banding, increase the Jitter setting.
4. Adjust the Opacity and Blending Mode of the effect. Although you’ll find sliders for both in the effect, you’ll have better control blending and fading the adjustment layer instead.
Cell Pattern
The Cell Pattern effect generates a loopable pattern based on cellular noise algorithms. With 12 patterns to choose from and several controls for size, contrast, and speed, you’ll find the effect very versatile.
1. Choose a method from the Cell Pattern menu. Some patterns are sharp and angular, whereas others are more organic. Experiment to your heart’s content, because you can change methods at any time (Figure 7.6).
Figure 7.6 Here are three of the 12 cell patterns. From left to right, Plates, Pillow, and Tubular.

2. Adjust the contrast of the effect to create the desired pattern. You can use the Invert check box to swap values of luminance. The Contrast/Sharpness slider modifies the overall detail level of the cells.
3. Modify the randomness of the cells with the Disperse slider. The lower the number, the more uniform the pattern (Figure 7.7). If you increase Disperse above 1.0, be sure to set the layer to Best Quality.
Figure 7.7 Different Disperse values were used to modify the Cell Pattern. A value of 0 creates a uniform shape. Increasing the value to 0.50 adds more randomness. A greater value of 1.50 starts to create very irregular shapes.

4. Adjust the size and position with the Size and Disperse sliders.
The key to making an animated background is the Evolution option. As you animate evolution, the pattern will change over time. By default, revolutions are progressive, which means each cycle is an entirely unique value. However, there is a way to create a seamless loop point.
5. Under Evolution Options, select the Cycle Evolution check box to ensure that a revolution for the Evolution slider makes the pattern repeat.
6. Add a keyframe near the start of the composition for Evolution for 0x and one at the end for a full number (such as 2x). By using full rotations, you’ll create a loopable pattern (Figure 7.8).
Figure 7.8 Using full rotations with the Cycle Evolution option enabled creates a loopable pattern.
![]()
Tip
You can produce a different pattern by changing the Random Seed slider. Do not keyframe this value; rather, drag to choose a different starting pattern. You can also adjust the Size or Offset settings.
7. To create a richly layered background, blend multiple layers with the Cell Pattern effect applied. You can stylize the background with the Colorama effect and a vignette as well (Figure 7.9).
Figure 7.9 Stacking multiple instances of the Cell Pattern effect can create depth and visual interest.

Radio Waves
The Radio Waves effect creates a radiating wave pattern from an effect control point. The effect is quite versatile and can make a variety of wave shapes. You can also bounce the waves back from the edges of the composition with the Reflection control (Figure 7.10).
Figure 7.10 Reflected waves bounce back from the composition edges to create a fuller pattern.
The effect offers several controls and just screams to be played with. Here are a few of the most relevant controls that will give you immediate results:
• Wave Type. You can use a polygon, the edge of an image, or a mask. A cool effect can be had by using a shape layer and then animating that shape while using the edge method.
• Frequency. Experiment with high frequency settings to create several waves. Be sure to use smooth contours to create a gentle stroke.
• Image Contour. You can trace the edges of an object (even a moving object). Try using a stroke on a keyed object or an animated graphic.
• Parameters Are Set At. If you’d like the wave to evolve over time, choose the Each Frame option. This option is best if you’ve animated the object creating the Image Contours for the wave.
Tip
If you’d like to create a seamless wave, be sure to set the Lifespan of your waves to match the duration of your composition. This trick works if your Producer Point and Source Layer match at the start and end of the composition as well.
• Wave Motion. The Frequency option offers great controls over how frequently waves are generated. The greater the frequency, the more waves. You can also have additional movement with Expansion, Orientation, Velocity, and Spin. The Lifespan of a wave can be adjusted. The longer the life span, the more strokes onscreen at once.
• Stroke. Use the Fade-in Time and Fade-out Time to create smooth transitions between the stroke’s entrance and exit.
Fractal Noise
The Fractal Noise effect creates results using Perlin noise. It can be used to create organic-looking backgrounds and textures (as well as to simulate natural effects like fog, water, fire, and lava). The effect is quite useful because it works even in 32-bpc color.
This effect is possibly the most flexible effect you’ll find for generating patterns (Figure 7.11). It’s literally a one-stop-shop and can save you time and money. On the surface it looks like a simple cloud generator, but dig a little deeper and you’ll find much more.
Figure 7.11 These three patterns were all created with the Fractal Noise effect. Different Fractal Type and Noise Type settings were used.

 Notes
Notes
If you’d like the pattern to be up and running on the first frame of your composition, set the In point for the layer to –5:00. This pre-roll will ensure that the stroke has sufficiently built up.
Here are a few of the most significant controls:
• Fractal Type. Choose different effects from the Fractal Type menu. Each type generates different random values.
• Noise Type. There are four different types of interpolation to use between the random values in the noise grid. These methods further modify the fractal type and can produce dramatically different results. Together, Fractal Type and Noise Type create 68 different possible combinations.
 Close-Up: The Origins of Perlin Noise
Perlin noise is named for Ken Perlin, a visual effects creator who worked on the film Tron as the synthavision technologist. The effect creates noise that is based on a procedural texture primitive. It appears random but in fact uses multiple copies of the same particle scaled to different sizes.
• Transform. Twirl open the Transform properties to find a collection of controls that dramatically affect shapes. Be sure to try the Perspective Offset option, which simulates different depths for the noise.
• Complexity. This slider determines the number of noise layers that are used to create the fractal noise. Increasing the number adds more depth, but also increases render time. You can also experiment with the Size and Contrast sliders to get various results as well.
• Evolution. The Evolution controls are where the animation is easiest to control. As you learned earlier, be sure to select the Cycle Evolution option. You can then keyframe full rotations of the Evolution property to create a seamless looping background.
Tip
In the Transform controls, you can deselect Uniform Scaling. This is a great way to create water or wood-like textures.
Notes
Although the Turbulent Noise effect provides several advanced controls, it lacks the Cycle Evolution option needed for a looping texture. If you just need to make an animated texture that renders quickly, give it a shot. But if you want that texture to loop, stick with Fractal Noise.
Be sure to colorize the grayscale textures using one of the many colorizing effects at your disposal. CC Toner (Figure 7.12) and Colorama both work well to remap the grayscale values to a vibrant color. Also, experiment with edges; both blurs and emboss effects work well.
Figure 7.12 Two Fractal Noise layers are blended together to create a more complex pattern. The color tint comes from the CC Toner effect, which uses three colors to tint the image based on tonal values.

Close-Up: Browsing Backgrounds with Adobe Bridge
After Effects comes with several animation presets. A preset contains a combination of effects and keyframe values to create an animation. Presets can be easily accessed by choosing Animation < Browse Presets (Figure 7.13). By default, you’ll find 13 categories to choose from, including Behaviors, Transitions, and Sound Effects. You’ll also find Backgrounds tucked in a few places:
Figure 7.13 After Effects includes 24 built-in backgrounds that showcase the many options available through effects.

• Backgrounds. Contains 24 different backgrounds to choose from.
• Shapes < Backgrounds. Five backgrounds created using the After Effects Shape Layer feature.
• Synthetics. Eleven textures and background elements generated by effects.
Adobe also offers a secret set of additional presets. How secret? Well, they’re made by Adobe, but they don’t ship with the program. You’ll find them on the Adobe Exchange community site, which offers additional downloads and resources for Adobe applications (www.Adobe.com/exchange). A direct link to download them is http://tinyurl.com/aepresets:
• Backgrounds 2. Seven additional background textures.
• Elements 2. A series of textures and shapes that can be layered or modified to work as backgrounds.
To apply a preset, simply double-click it in Adobe Bridge.
Animating Graphic Textures
You’ve already learned how to create looping backgrounds using After Effects; however, things are going to get better with a little teamwork. By combining the power of Photoshop and After Effects, you can create even more customized looping backgrounds. Because Photoshop is a rich graphics tool, much more variety can be had in the final result.
Let’s explore two very different techniques that both produce excellent results:
• Seamless patterns. By using seamless patterns and the Offset command, looping backgrounds are a snap.
• Gentle fade. Knowing how to bury a transition can make looping a texture easy.
The Offset Technique
You’ll first use seamless patterns and the Offset command to create a background. This underused technique wraps an image around your document. In other words, pixels push from one side and reappear on the opposite side. Depending on the desired movement of your background, you can offset horizontally, vertically, or both.
The technique is fairly straightforward and is easy to use. To begin, let’s create two seamless patterns in Photoshop.
Building the First Pattern
The use of seamless patterns is a great way to make a repeating texture. There are many ways to go about creating a specialized texture; we prefer the simplest route. It is best to offset several simple layers than one complex layer. This will introduce more motion into the animated background.
Notes
When designing seamless patterns, be sure to size the canvas to be an even width and height. When you use the Offset command, you’ll want to move the image an even value to create the smoothest motion.
1. Launch Photoshop and create a new document sized for video. For this example, choose the Film & Video < HDV/HDTV 720p preset (Figure 7.14).
Figure 7.14 Stick with the Photoshop document presets to ensure properly sized video files.

2. Load the Default colors of black and white by pressing the D key, and then run the Clouds filter (Filter < Render < Clouds).
Now the cloud pattern needs to be offset. This filter pushes an image off the screen and rewraps the pixel data to the other side of the image.
3. Offset the image 600 pixels horizontally (Filter < Other < Offset). Be sure to specify that you want the pixels to wrap around the edge. If you want to move the background vertically, you must offset vertically. If you want to move the background diagonally, offset horizontally and vertically.
4. If visible, blend away the seams. Use the Spot Healing Brush (J) with soft edges. If needed, you can follow up with the Clone Stamp tool.
5. Repeat the Offset filter by pressing Command+F (Ctrl+F) to check for seams. Clone or heal as needed. Repeat until the seams are invisible (Figure 7.15).
Figure 7.15 Check the pattern with the Offset filter to look for any seams.

6. Save the layer as a TIFF file that After Effects will recognize.
Building the Second Pattern
To create a sense of movement, two textures must be moved across each other. You now have a simple background that can be looped. To complement this simple element, you can build additional textures or objects. Here is one additional recipe for another layer:
1. Create another new document sized with the Film & Video < HDV/HDTV 720p preset.
2. Make a radial gradient fill layer from black to white (Figure 7.16) or draw a radial gradient (flatten the image if necessary).
Figure 7.16 Be sure the gradient stays centered on the screen (an easy way to do this is to use the Gradient fill layer).

3. Run the following filters (in this order).
• Run the Twirl filter set to 400 pixels eight times (Filter < Distort < Twirl).
• Run the Motion Blur (Filter < Blur < Motion Blur) at a –90˚ angle and a distance of approximately 350 pixels.
• Run the Maximum filter set to 30 pixels to smooth out the texture (Filter < Other < Maximum) (Figure 7.17).
Figure 7.17 This pattern is designed to be offset horizontally because both edges fade to black.
4. Save the layer as a TIFF file that After Effects will recognize.
Notes
The animating in After Effects technique in this section can be used for simple backgrounds, or you can combine several independent layers moving at different speeds for more elaborate backgrounds.
Animating in After Effects
Once the textures are built, you can animate them in After Effects. By employing a few simple technologies (blending modes, scaling, the Offset filter, and color mapping) natural, organic motion can be achieved.
To start, create a new project and import the two graphics you just created. Drag both graphics on the new composition icon located at the bottom of the Project panel. A dialog box appears asking you for specifics on the new comp. Choose to create a Single Composition and use a duration between 15:00 and 30:00. Set the composition size to match your source graphics (in this case you’ll use HDTV 720p and a frame rate of 24p).
1. Select both layers in the Timeline and press Command+D (Ctrl+D) to duplicate them. Working with multiple copies of the same layer will create the illusion of depth (similar to the Perlin noise you read about earlier).
2. Rearrange your Timeline so you have a 1/2/1/2 stack (Figure 7.18). Then turn off the visibility icon for the top three layers.
Figure 7.18 Using multiple copies creates the illusion of depth without a big increase in render time.

3. Select the bottom layer and apply the Offset effect (Effect < Distort < Offset).
The Offset effect is very simple to use once you understand it. You choose to keyframe how much the center of a layer is offset (using the Shift Center To property). Add a keyframe at the start of the layer for the default position; you can leave this keyframe unmodified.
4. Go to the end of the layer and add a second keyframe for the Shift Center To property.
Double-click on the keyframe to adjust its value. Change its measurement Units to % of composition. The keyframe currently reads 50% for both the X- and Y-axis. By adding a full 100%, the image will complete one full offset cycle. For this example, enter a value of 250% in the X-axis field to move two full cycles (Figure 7.19). Activate RAM preview to see your results. You should now have two full rotations.
Figure 7.19 By choosing the % of composition method, you can avoid doing math in your head. Just add a whole number for each rotation. In other words, 50% + 1 rotation = 150%; 2 rotations = 250%.

5. Activate Layer #3 and repeat the offset technique described in steps 3 and 4. Add a keyframe at the start of the layer for the default position and then at the end of the layer for three reverse rotations (–350%, 50%).
6. Adjust the blending mode and/or opacity of Layer #3 to achieve a soft look. In the example project, we used Overlay mode.
7. Activate Layer #2 and scale to 200% (it’s okay in this case to scale up, because we just have a soft texture.)
8. Select Layer #4 and press U to see all the keyframes.
Move your playhead to the start of the composition, and then click the word Offset for Layer #4. Copy the keyframes by pressing Command+C (Ctrl+C). Select Layer #2 and paste the offset keyframes.
9. Adjust the blending mode and/or opacity of Layer #2 to achieve a soft look. In the example project, we used Multiply mode.
10. Activate Layer #1 and scale to 200%.
11. Select Layer #3 and press U to see all the keyframes.
Move your playhead to the start of the composition, and then click the word Offset for Layer #3. Copy the keyframes by pressing Command+C (Ctrl+C). Select Layer #1 and paste the offset keyframes.
12. Adjust the blending mode and/or opacity of Layer #1 (remember Shift++ and Shift+- also work in After Effects to cycle blending/transfer modes). In the example project, we used Soft Light mode at 70% opacity.
13. Add an adjustment layer at the top of your stack (Layer < New < Adjustment Layer).
Apply a colorization effect, such as Colorama, CC Toner, or Tint. In the example, we chose Colorama with the Output Cycle set to the Ramp Red preset (Figure 7.20). You can also experiment with other effects on the adjustment layer, such as glows, blurs, or third-party effects.
Figure 7.20 You can use a Levels effect to clamp the Output Black or White points to keep the backdrop from becoming too bright.

14. Make sure all your quality switches are set to Best Quality, and render at the proper settings for your nonlinear editing or motion graphics application.
The Stitch in Time Technique
The second animating technique we’ll show you is deceptively simple but produces great results. By using blending modes and a well-placed dissolve, it’s possible to create a looping background. This technique is very versatile and will work with virtually any source layers. For this technique, you’ll take three or more gradients made in Photoshop and blend them together using After Effects. These gradients can be grayscale photos, filtered layers, or preexisting files.
Preparing Textures with Photoshop
For this technique to work, you’ll want to use a group of oversized grayscale textures (Figure 7.21). You could scale and filter in After Effects, but that is the slower method. Instead of scaling up and manipulating color and tone across time, you can process the images once they are in Photoshop and speed up rendering times.
Figure 7.21 Build up your own texture library so you can experiment with creating different animated patterns. These and additional textures are available from www.thepluginsite.com.

Here’s a few ways to put Photoshop to use:
• Take advantage of Photoshop’s excellent scaling abilities. By enlarging the gradients in Photoshop, you’ll only need to scale down in After Effects.
• Use Photoshop’s Nearest Neighbor scaling method to resize your images. You can access it in the Image Size dialog box (Image < Image Size) from the Resample Image menu.
• Soften any artifacts using the Median filter (Filter < Noise < Median). A low value of 5–10 pixels should be sufficient.
• Defocus textures with the Lens Blur filter (Filter < Blur < Lens Blur). Adjust the filter to taste, but favor an out-of-focus image. Click OK when you’re satisfied.
• Remove any color from the texture using a Black & White adjustment layer. Be sure to flatten your final results.
Creating Motion with After Effects
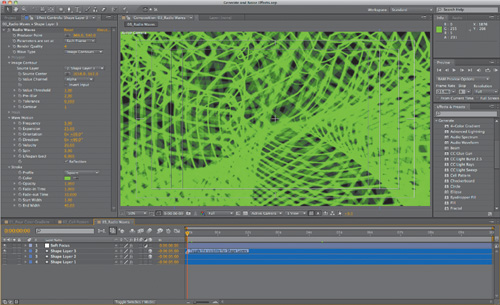
Now that your assets are ready, you can animate the layers in After Effects to create movement. The process is very easy; you’ll just use basic Transform properties like Anchor Point, Scale, and Rotation. The technique demonstrated can be used to create simple or complex flowing grayscale images. The goal is to combine multiple images in one composition and then map color to them to achieve a finished background.
Building the Composition
Start by creating a new project or adding the newly created textures to an existing project. Drag three or four graphics on the new composition icon located at the bottom of the Composition panel. A dialog box appears asking you for specifics on the new composition. Choose to create a Single Composition and a duration between 18:00 and 33:00. Set the composition size to match your source graphics (in this case you’ll use HDTV 720p and a frame rate of 24p). The extra 3:00 will be used to create the overlap zone, so be sure to pad your initial duration.
Disable the visibility for all but the bottom layer. Select the bottom layer and press S for scale. Then hold down the Shift key and press R for Rotation and A for Anchor Point. By using Anchor Point instead of Position you’ll get better results (especially when rotation is involved). Turn on the stopwatch icons for all three properties. Choose random values for the start keyframes. Move the current time indicator to the end of the composition and set different values. All you’re trying to accomplish is movement (just be sure that the image always fills the entire screen with no visible gaps at the edges) (Figure 7.22). The goal is to create varied motion with keyframes and then blend the layers together. Be sure to keep experimenting as you design.
Figure 7.22 By zooming your canvas to a lower magnification, it’s easier to see the edges for each layer. You can also change the label colors to make it easier to see each layer.

Invoke a RAM preview to see your results. The image looks pretty simple so far; it’s just a sliding and scaling gray texture. But add a few more of these textures and motion will really start to take shape.
Activate the next layer and repeat the animation technique. Try to achieve a different motion path (thus creating “visual interference”). Try moving the texture in a different direction and at a different speed than the first layer. When you’re satisfied, adjust the blending mode and/or opacity of the second layer to achieve a soft look. We favor modes like Overlay, Multiply, Soft Light, and Add.
Continue to animate your remaining layers:
• Keep the movement speed relatively slow. Most backgrounds should appear soft and flowing.
• Feel free to duplicate an existing layer and apply slightly different keyframe values. This often creates a natural drift.
• You can reverse the keyframes on a layer by using the reverse keyframe assistant (Animation < Keyframe Assistant < Time-Reverse Keyframes).
• Be sure to try different blending modes. You can select a layer and use the shortcut Shift+= to cycle through modes. Try out several options because different layers blend to produce dramatic variations.
• Use your RAM preview to see your results as you build the composition.
• Do not add color or blur effects yet.
Creating the Loop
Once you have a flowing background, its time to make it loop. To do this, you’ll need to create a split and a fade. Highlight all your layers and create a precomposition by choosing Layer < Pre-compose and name it Pattern Pre-comp (Figure 7.23). This nests all the layers into an intermediate composition.
Figure 7.23 The Pre-compose command nests multiple layers into a new composition. This makes them easier to work with as a group.

Next, you need to shorten the main composition by 3:00 (the overlap you created earlier). Access your composition settings by pressing Command+K (Ctrl+K) and shorten the composition by 3:00. In other words, change the duration from 33:00 to 30:00.
Drag to the center duration of the composition. There’s no need to be precise; just move about halfway down the Timeline. You can now split the layer in half, thus creating a loop point.
1. Select the layer and press Shift+Command+D (Shift+Ctrl+D) to split the layer (Figure 7.24).
Figure 7.24 Splitting a layer allows for overlapping (which creates the loop).

2. Now you must overlap the layers. With Layer #1 active, jump to the start of the composition by pressing the Home key. Press the left bracket key ([) to move the layer’s In point.
3. Select Layer #2, and then press the End key. Press the right bracket key (]) to move the layer’s In point.
4. Activate Layer #1 and press O to jump to the layer’s Out point. Press T for opacity, activate the stopwatch, and set a keyframe for 0% opacity.
5. Drag backwards three seconds and set a key frame for 100% opacity. This creates a gentle dissolve at the overlap point (Figure 7.25).
Figure 7.25 Carefully place your opacity keyframes to create a fade between the two layers.

Tip
You can press the corresponding number key on the numeric keypad to select a layer (such as 2 for Layer 2).
To finish the background, try blending a grayscale photo. A simple image works best and can add subtle details, especially if the background is designed for a specific subject or project.
Notes
We’ll explore the process of shooting background plates and creating looping backgrounds in Chapter 13.
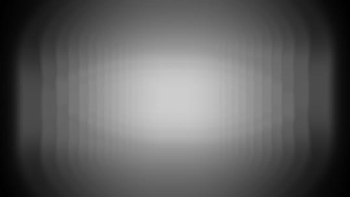
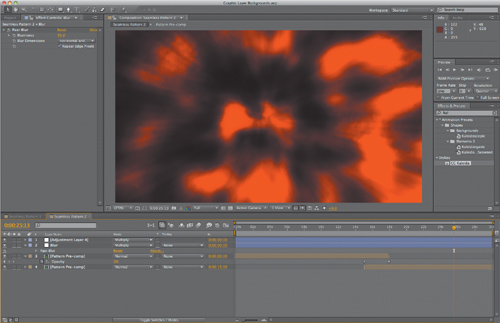
RAM preview the composition to see the seamless animation. Now that you have a loop, you can further stylize it. We recommend the use of adjustment layers and any of the techniques you’ve learned so far. We usually start with a blur effect (such as Fast Blur or CC Radial Fast Blur). We then apply a colorization effect, such as Colorama, Tint, or CC Toner (Figure 7.26). Once you’ve stylized the composition, you can render it at the proper settings for your nonlinear editing, multimedia, or motion graphics application.
Figure 7.26 Stylize the background to add color and de-focus.
Designing with Brainstorm
Background design is often an art of subtle experimentation. Although you can certainly leave this task up to your own brain, After Effects contains an artificial intelligence solution called Brainstorm, which can create multiple temporary variants of your composition. These choices are presented to you and can be applied or selected for further modification.
The whole process relies on genetic algorithms that mutate selected properties. Simply make the properties you want to modify visible in the Timeline panel. You can select multiple items by holding down the Command (Ctrl) key and clicking. Brainstorm works on keyframes, numeric values, or options in a menu. Brainstorm can quickly modify multiple properties to create all new animations.
1. Set the work area and region of interest for the area you’d like to preview. Use a shorter area to speed up the process.
2. Select one or more properties or property groups you want to randomize in the Timeline panel. Then click the Brainstorm button at the top of the Timeline panel (Figure 7.27).
Figure 7.27 Although it’s often overlooked, Brainstorm is a quick way to jumpstart the creative process.

3. Brainstorm creates multiple variant compositions, which play inside the Brainstorm dialog box simultaneously. You can control playback with the buttons at the bottom of the Brainstorm dialog box (play, pause, or rewind).
4. Move your mouse pointer over each preview to see controls for each variant (Figure 7.28):

A Maximize Tile
B Save As New Composition
C Apply To Composition
D Include In Next Brainstorm
• Click a variant’s Maximize Tile button to see a larger size. Click the Restore Tile Size button to return to the grid.
• If you want to save a variant as a possibility, click the Save As New Composition button for that variant (the disk icon).
• To apply a variant, click the Apply to Composition button (the check mark icon).
• To include a variant in the next Brainstorm operation, click the Include In Next Brainstorm button for that variant (the thought bubble icon).
The beauty of Brainstorm is that you can continue to evolve your options. At the bottom of the window is a Brainstorm button. Click it to generate even more options. Any variants marked with the Include In Next Brainstorm button will carry forward and new ones will join them. If you’d like to increase the amount of randomness with each iteration, increase the Randomness or Spread slider. You can also move backward or forward through your variations by clicking the arrow buttons on either side of the Brainstorm button at the bottom of the Brainstorm dialog box.
Keep in mind that you have three choices with Brainstorm. You can save multiple variants as compositions (click the Save As New Composition button). You can apply a single variant to the selected composition (click the Apply to Composition button). Or, you can exit Brainstorm without applying changes (press the Esc key).
Animating Shape Layers
After Effects offers a deceptively robust system for creating shapes with Shape Layer. Each layer can hold one or more shapes, and the shape can be heavily modified with custom operations. By animating and layering shapes, you can create geometric motion backgrounds.
Creating Shapes
There are several ways to create shapes in After Effects. The methods vary to offer you the most choices as you design. There is no right or wrong here; just use the method that suits you best:
• You can create a new shape layer by choosing Layer < New < Shape Layer. Then click the Add button in the toolbar. You can add a Rectangle, an Ellipse, or a Polystar.
• If you choose a shape tool from the toolbar, you can also create a shape by hand. You can draw on a shape layer (just make sure the Tool Creates Shape option is marked in the toolbar). Be sure to hold down the Option (Alt) key if you want to create a path-based shape.
• If no layer is highlighted in the Timeline, just pick the shape you want from the toolbar. Double-click its icon, and a new shape is added to the window.
• You can also copy and paste shapes from Adobe Illustrator as paths into After Effects. See the article at http://tinyurl.com/aepaths for more details.
Tip
Do you have a shape you like? You can store any shape as an animation preset (Animation < Save Animation Preset). This can speed up future uses by putting your shapes within quick reach. These presets can also be moved from machine to machine. If you’d like to see some samples, look in the Effects & Presets panel and locate the Shapes folder (it’s inside the Animation Presets folder).
Modifying Shapes
On the surface, shapes seem pretty simple, but the Polystar is very flexible. The shape can either be a polygon or a star (depending on whether it is concave or convex). You can assign as many sides or points as you want.
When you’re happy with the shape, remember that you have precise control over fill and stroke. By default, a shape has a fill and a stroke, but you can choose to use one or both. If you’re designing shapes to use as a background, we recommend removing or reducing the stroke and setting the fill to a lower opacity. Multiple shapes can then be better blended.
To further modify a shape layer, you can apply multiple path operations. These can be used individually or combined. The multiple path operations options will be fully explored in Chapter 10, “Designing with Vectors.”
For purposes of creating a background, three of the path operations stand out:
• Pucker & Bloat. This option pulls the vertices of a path inward or outward (Figure 7.29). It can be used to create dramatically varied shapes from your stars or polygons shapes.
Figure 7.29 The Pucker & Bloat operator works on all shape types to create dramatically different variations.

• Wiggle. You can add organic wiggle to the edges of a shape (Figure 7.30). Be sure to adjust the Wiggles/Second property to slow down the effect so it’s not too distracting.
Figure 7.30 To create natural, organic motion, use the Wiggle operator.

• Twist. This operator rotates a path sharply around the center of an object (Figure 7.31).
Figure 7.31 The Twist operator creates rough patterns.

Notes
Shape layers are purely created by After Effects and are not based on footage. This type of layer is called synthetic, and it does have limitations. You cannot open a shape layer in the Layers panel. You also cannot open a shape layer in another application like Illustrator for further editing. Synthetic layers exist only in After Effects.
Repeating Shapes
The Repeater operation seems to have been made for animation. With it, you can easily create multiple copies of a shape and even apply a transformation to each copy. Better yet, those transformations can be keyframed for animation or offset to create cycling copies.
As you work with a repeater, you’ll quickly see that it is very efficient. You can create hundreds of copies of an object in your composition yet only one in the Timeline. This speeds up rendering and certainly gives you a leg up on project organization.
1. Apply the Repeater operator to a shape layer. By default three copies are added.
2. Twirl down the Repeater and Transform Repeater controls in the Timeline.
3. Adjust the Scale and Position values to create a cascade effect. Each change you make is applied to each copy. For example, an 80% scale is applied to the first copy and the second copy is 80% the size of the last. In this manner the operations compound with one another.
Try adding multiple copies and experimenting with options like Blend Modes and Rotation when creating backgrounds (Figure 7.32).
Figure 7.32 The Repeater operator contains several controls. Be sure to test them out to see the results you can generate. The Repeater provides intuitive feedback and is a control worth exploring.

4. Use the Composite option to control the stacking order. If you’re making objects larger, we recommend the Above option; for smaller objects, choose Behind.
Notes
You can use multiple instances of a repeater. For example, you could apply the first repeater to create a horizontal row. You could then apply a second repeater to expand the row vertically or along the Z-axis. The Repeater operator makes building grids and columns a snap.
5. Keyframe the Offset value to slide the repeated objects along their path (Figure 7.33). This creates an animation that is very simple and elegant. This is a great way to create a repeating pattern.
Figure 7.33 Multiple instances of the Pi symbol are blended into a geometric pattern. By reducing the opacity of the shape and adjusting blending modes, an overlap occurs.

Notes
The Repeater action can be added at any point within the property group. If you place it below the fill and stroke, each copy is filled and stroked independently before repeated. On the other hand, if you move the repeater up, shapes will compound and be filled and stroked uniformly.
Tip
Working with the Shape Layers feature is a very organic experience. You’ll definitely want to try out different values, especially when using blending modes and stylizing filters. Remember to also give Brainstorm a try if you’d like to mix things up a bit.
Be sure to experiment with effects as well. The CC Kaleida effect (Figure 7.34) can create elaborate patterns. Other effects like Blurs and Glows (Figure 7.35) also can liven up your patterned background.
Figure 7.34 Multiple shapes animate past each other to create the initial pattern. Then two instances of the CC Kaleida are used to create a kaleidoscope effect.
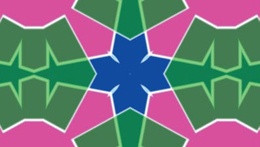
Figure 7.35 The Offset operator pushes a five-petaled flower through the scene. The shape is combined with a looping background created with the Fractal Noise effect. The background is finished with the CC Radial Fast blur on a blended adjustment layer and a 4-Color Gradient effect for color.
