
Chapter 11 Motion Control 2D and 3D
Everything we hear is an opinion, not a fact. Everything we see is a perspective, not the truth.
—Marcus Aurelius
Documentary-style motion control photography is becoming increasingly popular for use in all styles of video production. Of course, photos are a mainstay for narrative pieces, but we’ve seen them become a key part in advertising, editorial, and entertainment projects as well. Why just show photos statically and full screen? Putting elements into motion helps guide the viewers’ eyes and can engage them.
Traditionally, photos have been animated in three ways:
• The first method involves sending the images to a motion control camera operator. This is an expensive process and must be adequately budgeted for both time and money. A robotic camera is controlled by joysticks and moves are programmed in. The signal is then recorded to videotape or captured to a digital file. Images cannot be color corrected or enhanced unless new prints are made.
• The second method involves setting up a camera and a card stand. An operator can then use a video camera and a tripod to shoot the photos. This method is prone to keystoning (due to the tilting to avoid light reflections) and does not allow for photo restoration or precise movement.
• The third method involves importing the photos into a nonlinear edit system and enlarging (zooming) them. This method tends to produce softening and has very limited results. Moves tend to be stiff and rigid. Many plug-ins have recently been developed that work within edit systems that improve upon this technique, but there is still a better way.
 Close-Up
In this lesson, we look at several shots that were built for a feature-length documentary. The film is called Bedford: The Town They Left Behind. It’s a documentary about a town that lost more people per capita in World War II than any other. The film was directed by Joe Fab and Elliot Berlin of the Johnson Group (www.bedfordthemovie.com). Our challenge was to bring photos, documents, and maps to life to engage the audience in a rich history.

The Approach
We love the challenge of creating graphics that engage a viewer. To truly bring your photos to life, we can think of no better solution than Adobe Photoshop and Adobe After Effects. These two applications seamlessly interact and offer several benefits over traditional methods (Figure 11.1).
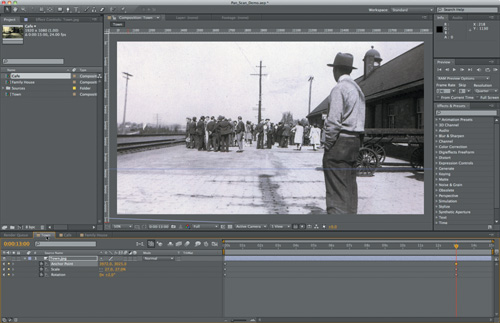
Figure 11.1 The following stills are excerpted from the opening title sequence for the feature film Bedford: The Town They Left Behind. The shot relies on Photoshop and After Effects entirely. All the 3D work was completed using only these two tools.

Photoshop allows for photos to be restored; damage caused by age or wear can be removed. Additionally, you can enhance color, improve tone, and even stylize images to a desired look. Photoshop makes easy work of combining images into larger panoramic photos, which is particularly useful for both wide-angle views and large images that need to be scanned in parts.
By combining Photoshop with After Effects, extremely high-quality motion control is possible. You can achieve results that outperform those done on expensive motion control rigs. You can achieve natural, realistic camera moves that engage the viewer. But why stop there?
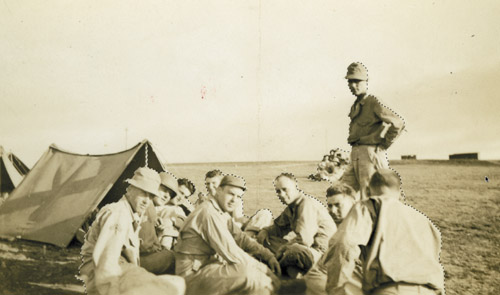
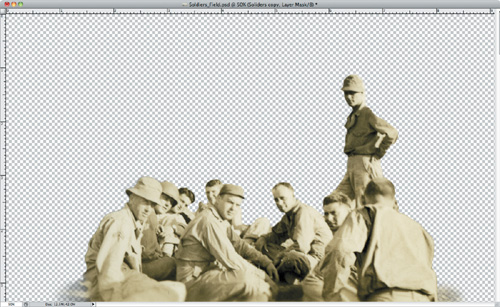
Imagine if you could introduce the illusion of motion in the third dimension into a static image. Harnessing the power of Photoshop and After Effects makes this possible. You can add subtle motion and bring your photos to life, making your audience do a double take to determine if the images are really moving (Figure 11.2).
Figure 11.2 Through the use of the z-axis and a phenomenon known as parallax, subtle movement is created. Compare the position of the window and awning over the group’s shoulders as the 3D camera moves through the scene.

By splitting up the image in virtual space, each element comes to exist on its own layer. Shift the layers in conjunction with one another or rack focus from foreground to background. The delicate movement created within the frame creates an unusual and attention-grabbing effect.
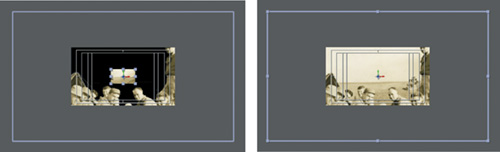
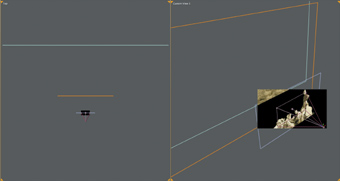
Go further and really work in a 3D space. You can add perspective by creating virtual worlds with Vanishing Point Exchange (Figure 11.3), integrate 3D models (Figure 11.4), or extrude your own shapes with Repoussé. You can even create particle effects in 3D space (Figure 11.5).
Figure 11.3 Vanishing Point Exchange lets you build three-dimensional scenes by using a perspective grid. After Effects then reassembles the photo as 3D planes.

Figure 11.4 True 3D models were resurfaced with textures from the original photographs in Photoshop Extended. The models were then imported into the After Effects scene.

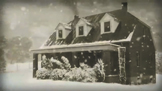
Figure 11.5 Trapcode’s Particular plug-in lets you create realistic particles that take on true dimensionality. The plug-in works well for smoke, rain, snow, and haze.
These techniques are not for the meek. They build upon several skills that take time and practice to master. However, the rewards are bountiful. You’ll master 3D cameras, learn how to use 3D lights, and discover techniques that are as adaptable as your imagination.
Preparing Photos for Motion Control
Not every photo is ready for movement or the television or cinema screen. Problems can range from composition to resolution to damage (Figure 11.6). In some cases, you won’t have a choice as to whether an image should be used (that’s why clients were invented). You’ll need to prep whatever photos your clients want to use.
Figure 11.6 The contrast of this image needed to be enhanced. The sky was replaced with a stronger image. The water was rerendered to create actual waves using the Psunami plug-in from Magic Bullet. The two boats were isolated so they could be brought closer together and “bob” on the waves.

But since you’ve likely been hired because of your good judgment, sophisticated taste, and artistic abilities, you should speak up and have some input. The sections that follow provide some general guidelines to consider and problem areas to avoid.
Close-Up: Essential Skills
Creating two-dimensional motion control is far easier than its three-dimensional cousin. However, doing either well is not for “newbies.” To do these techniques properly, you must have a solid foundation in these areas:
• Photo restoration
• Color correction
• Advanced selections
• Layer masking
• Cloning and healing
• Content-Aware Scale and Fill
• Organizing and importing layered comps
• Using 3D cameras
• Using 3D lights
• Keyframe interpolation
• Cinematography
Resolution Requirements
Your first concern to balance is adequate resolution. This holds true whether you are scanning photos or working with digital images. You’ll need enough pixels if you intend to do a zoom or a pan. Dots per inch bog down many artists, but that measurement is useless when it comes to screen graphics. The simplest way to understand resolution is to think of a zoom ratio. Here’s a simple formula:
Screen size x Zoom ratio = Pixel count
For example, let’s say you are creating files for a program being produced in 1080p. This equals a screen dimension of 1920 pixels by 1080 pixels. If you wanted to do a zoom or pan with a four times magnification, you would need an image that is 7680 pixels wide and 4320 tall.
 Notes
Notes
Images that have very high-pixel counts can get a little cumbersome in After Effects. Be sure your computer has enough RAM as you work with high-resolution sources. You may also need to lower the image quality and scale your images a bit.
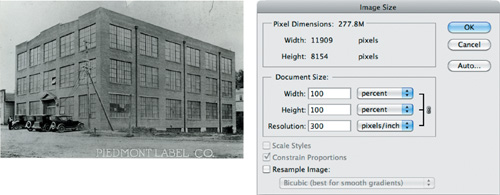
With 7680 pixels, you can perform a pan across four screens. Don’t worry about cropping or sizing for the screen; just make sure that you have enough pixels for additional movement. The goal is to have extra pixels when you shrink the image. In other words, you scale down the image to zoom out (or see more of the viewable area) and restore it to 100% to zoom in. These extra pixels also come in handy when you work in 3D space and want to pan or zoom with an After Effects camera (Figure 11.7).
Figure 11.7 With a width of nearly 12,000 pixels, After Effects has plenty of resolution for camera zooming. The shot can be framed very tight with no pixelation, allowing for a dramatic camera move.
A Need for Focus
Out-of-focus pictures lower the quality of the final shot. We recommend a few basic approaches to prevent soft focus from ruining a shot. The method you choose will depend on your working scenario.
Close-Up: Scan It Right
Whenever possible, we prefer to do our own scanning, not because it’s fun, but because it’s the best way to ensure that we have what we need. Several problems can be introduced by those with a distinct lack of skill using antiquated scanners. Here are a few scanning tips:
• Ensure that the scanner is lying flat, or you may get misregistered scans.
• Use a gentle glass cleaner whenever smudges appear. Spray the cleaner on the soft cloth, and then wipe down the scanner bed. Make sure your photos are also clean before scanning; if they’re not, wipe them with a soft cloth.
• Place your photos on the scanner straight. Use the edges of the scanner to help you maintain parallel edges on your photos. If you get crooked photos, choose File < Automate < Crop and Straighten Photos in Photoshop.
• If you are scanning in previously printed items such as newspapers, magazines, or books, you will likely get a moiré pattern. Scanning the small spaces between the previously printed dots causes this. Most scanners have a Descreen filter in their software.
• Save to uncompressed or lossless compressed formats such as TIFF or PSD for maximum image quality.
If you’re dealing with digital files, be sure to zoom the images to 100% and check focus. This is easy to do in Adobe Bridge when browsing. If you select a photo, a thumbnail will appear in the Preview pane. Click in the pane and a loupe appears. You can then drag and look at areas at 100% magnification (Figure 11.8).
Figure 11.8 Drag the loupe through the thumbnail to see areas at 100% magnification. You can also press the spacebar to zoom an image full screen. Click when zoomed to magnify the image to 100%; you can then drag to pan. Press Esc when you’re finished.

If you’re working with traditional photos, such as prints, slides, or negatives, be sure to magnify the image by using projection, a light box, or a traditional optical loupe. The smaller an image, the more likely it will appear sharp because out-of-focus details will be minimized.
If you have no choice and must work with an image, be sure to sharpen it. Apply a filter such as Smart Sharpen in Photoshop. You can enhance soft details and enhance edges. Just be careful not to overdo it.
 Tip
Tip
Remember that not every area in a photo will be in focus. But we recommend looking at details like people’s eyes as well as tiny patterns or architectural details.
Aspect Ratio and Composition Concerns
Rarely do photos line up with a television or cinema screen. Still cameras have different aspect ratios, so even if the picture is in a landscape orientation, you’ll still have gaps in the image. Of course, there’s also portrait images and photos that will be cropped too tight or lack headroom. Mostly likely, you’ll need to manipulate a photo to get it to work for the screen.
There are three primary ways of accomplishing this task:
Notes
Although After Effects offers sharpening effects, you are better off using filters in Photoshop. It’s much faster to process an image that is not being scaled or animated over time.
• Use the Clone Stamp tool
• Use Content-Aware Fill
• Use Content-Aware Scale
Clone Stamp Tool
The Clone Stamp tool (S) is an old favorite of Photoshop users. It’s been a part of Photoshop since the first version, but it’s still quite relevant and can produce predictable and accurate results. The Clone Stamp tool works by sampling pixels from one area and painting them to another. This technique goes beyond copy and paste, however, because it uses the flexibility of the Photoshop Brush panel.
Tip
The Clone Stamp tool works very well, especially if a lower-opacity brush is combined with multiple sample points. Using multiple strokes helps you avoid too much repetition in the pixels (creating an obvious pattern).
Experiment with the Aligned option when cloning. If Aligned is selected, the sample point and painting point move parallel as you move. If you click and start over, the sample point picks up at the same distance and angle from the painting point. If Aligned is deselected, the initial sample point is used (even after you stop and resume cloning). The second method ensures that you’re always sampling from the same area.
We’ll often clone to an empty area for more flexibility. Just select the Use All Layers option to clone from any visible layer. You can then make an empty layer at the top of your Layers panel and select it before cloning (Figure 11.9). Isolating your strokes to a new layer makes it easier to see the before and after versions (just toggle the visibility of the layer). You can also change your mind and erase parts of the cloned layer.
Figure 11.9 Cloning to an empty layer is the best option when patching a scene. Here we added more headroom so the camera could point up into the sky during the camera move.

Content-Aware Fill
The Content-Aware Fill option is a new addition to Photoshop CS5. It works by automatically generating new textures to fill in a selected area. The new textures are created through a computer-assisted synthesis that works by analyzing surrounding pixels.
Start by making a selection. This can be done using a Marquee or Lasso tool, the Magic Wand or Quick Selection tool, or the Color Range command. Press Shift+Delete to bring up the Fill dialog box and choose Content-Aware Fill from the Use menu. Click OK and Photoshop generates similar content to fill the area based on the source image. The new image content is based on the surrounding image content, with a little bit of randomness added to prevent the new pixels from looking like obvious copies of the surrounding area. This is a great way to remove an object or blemish from a scene. It’s also an essential technique when you cut out an object to make a layered file for three-dimensional motion control (Figure 11.10).
Figure 11.10 Several tools were used to remove an object from a layer. A rough selection was made initially with the Quick Selection tool (W). The selection was then examined and refined using a Quick Mask (Q). The Content-Aware Fill command was then used to create a new texture; the area was very large, so the texture needed refinement. Smaller selections were made and the Content-Aware Fill command was applied again. To finish the image, the Spot Healing Brush (J) was used to remove minor blemishes and damage.

In many cases, the Content-Aware Fill command completes a job in one step. Even if the results aren’t perfect, you’re still much further along. Think of it as a great jump start that can be touched up with a little use of the Clone Stamp or Spot Healing Brush tool.
Notes
Each time you use the Content-Aware Fill command, it generates a new texture. If you don’t like the first attempt that Content-Aware Fill generates, just choose Edit < Undo. Then re-run the Content-Aware Fill command to create a new pattern.
Content-Aware Scale
The Content-Aware Scale (Edit < Content-Aware Scale) command was introduced in Photoshop CS4. It attempts to combine scaling with a feature that allows images to automatically be recomposed. When used correctly, the image will automatically adapt to preserve vital areas during the scale (Figure 11.11).
Figure 11.11 We first double-clicked on the Background layer to make it a floating layer and then extended the canvas to the desired width (left). Next, an alpha channel was added, in which white defines the area to be masked and gray is a gradual transition (center). The Content-Aware Scale command was set to protect the alpha (lower) and then was stretched to fill the canvas (right).

The Content-Aware Scale command is different than Free Transform because it attempts to leave certain parts of an image as they are while selectively scaling others. There are two ways you can tell Photoshop which areas to ignore:
• Click the Protect Skin Tones button to tell Photoshop to attempt to preserve regions that contain skin tones. This works well if you’re dealing with a color photo that has people in it.
• You can also create an alpha channel if needed to protect a selected area. Simply add a new channel and paint over the areas you’d like to define as the frozen area. Then choose the alpha channel from the Protect menu in the Options bar.
Captured Action
The final characteristic we look for is a sense of captured action. We look for photos that tell a story—those in which there appears to be something happening in the frame. We evaluate which way people are looking or where activity is taking place in the frame.
By studying the image, you’ll find the story within:
• Look for areas where your eye is drawn. These are great starting points or landing points for camera moves.
• Are there distractions in the frame? You may need to remove or defocus certain elements so the viewer’s experience is uninterrupted.
• Is there “captured movement” within the shot? If so, go with it (Figure 11.12).
Figure 11.12 The parade of soldiers is moving from left to right. The corresponding pan of the camera should move in the opposite direction to create a sense of the group passing.

• What angles exist in the frame? Try to remember where the real camera was in the frame when the photo was shot. Let the reality of the photo influence the new reality you’re creating.
Panning and Scanning Photos
Before we explore working in three dimensions, we need to quickly set the stage and get the regular pan and scan variety moves covered. The bulk of the moves you’ll do will be traditional ones that involve flattened images and keyframes. This is the case for two reasons: First and foremost is budget. We’ve never seen a documentary or program that had enough cash to bring every photo into a 3D world. The second reason is overkill. Not all photos benefit from a three-dimensional effect (Figure 11.13).
Figure 11.13 Using a few keyframes, you can create an animation to guide the viewer through a photo.
Before you skip this section, answer this question. Which three animation properties should you use with photos to create a sense of movement? Easy right? Scale, Rotation, and Position.
Wrong.
Notes
If you’re working with several files that are numbered, be careful not to import them as an image sequence.
The secret is Anchor Point. This is the default center point of a layer, and when you animate it, a new phenomenon occurs. You’ll see much smoother moves and avoid gaps at the edges as you’re changing the point of interest. When working in two dimensions, keyframing the Anchor Point is much more realistic. Keep reading for more practical tips.
Moving to After Effects
After your images are prepped, you’ll need to import them into After Effects. We recommend organizing your images into folders using Adobe Bridge. Create folders by scene or script block to make navigation easier.
Once you have the images in After Effects, you’ll need to create compositions for each image. An easy method is to select multiple photos and drag them onto the new composition icon at the bottom of the Project panel (Figure 11.14).
Figure 11.14 When you drag, you have a choice of putting photos into one composition or creating a unique composition per photo.

After Effects provides you with the Multiple Compositions option, which will place each photo into its own composition. You’ll need to set the duration and dimensions for the composition by choosing Composition < Composition Settings. Stick with the composition presets offered by After Effects unless you’re dealing with a unique playback screen.
Animating Your Images
Although After Effects offers five animation properties, you’ll need only three of them. Stick with Anchor Point (A), Rotation (R), and Scale (S). Using an Anchor Point is like moving the camera; using Position is like locking down the camera and moving the picture instead.
Here’s the approach simplified:
1. Open a composition and highlight the first photo layer.
2. Press S to call up the Scale properties. Then hold down the Shift key and press A for Anchor Point and R for Rotation.
3. Turn on all three stopwatches to add keyframes (Figure 11.15).
Figure 11.15 The use of Anchor Point and Scale is essential. Rotation is an optional property that works on certain images.

4. Adjust the composition window so you can see the entire image. If needed, use the , (comma) key to zoom out or the . (period) key to zoom in.
5. Adjust Anchor Point, Scale, and Rotation to set a starting position for the image. Remember that you can drag the number values to change them.
Notes
If your image is an odd number of pixels wide or tall, you’ll get an Anchor Point value with a .5 decimal. Change the number to remove the decimal; otherwise, you’ll get subpixel resampling and unneeded softening.
6. Move toward the end of the composition by dragging the playhead until you get to a desired duration for the camera move. You may need to adjust the duration of the composition.
7. Adjust the ending values for the animation (Figure 11.16).
Figure 11.16 You can use guides to help you check alignment. Turn rulers on by pressing Command+R (Ctrl+R) and then dragging them out from the side or the top.
Tip
If you’re working with high-resolution images, you can change the Resolution menu to a lower quality to speed up RAM previews.
8. Preview the animation by clicking the RAM Preview button. The animation caches to disk and then plays back in realtime when it’s ready.
Enhancing the Animation
Although your initial animation looks good, After Effects offers advanced controls to improve it. The biggest change is to modify the velocity curves for the keyframes. This can create a more natural start and stop movement. The goal is to make the moves look like they were shot with a real camera, not done on a computer.
Close-Up: Flicker Fix
When animating photos, you’ll likely see flicker (which is generally caused by thin lines). The truth is that it may or may not be real. Be sure to preview the animation at full quality (you may even need to render a short portion). Then watch the clip back in realtime on a broadcast-quality monitor.
If flicker is still present, we recommend a trip back through Photoshop. Open the Actions panel and click the submenu (the triangle in the upper-right corner). Load the set of actions called Video Actions in the Actions panel Preset menu. Run the Interlace Flicker Removal action on your pictures. If needed, you can run the action a few times or try running the Motion Blur filter (Filter < Blur < Motion Blur) at a value of 1–4 pixels at an angle of 90 degrees.
Notes
If you don’t like the effects of Exponential Scale, just choose Edit < Undo. In some cases the effect is very pleasant (especially when creating a gradual scale). In others it may be too dramatic.
1. Right-click on the first Anchor Point keyframe and choose Keyframe Assistant < Easy Ease Out.
2. Repeat step 1 for the first Rotation keyframe. You’ve now created a more natural “drag” or resistance as the animation moves out from the first keyframe.
3. Repeat the keyframe assistant for the last Anchor Point and Rotation keyframes, but this time choose Easy Ease In.
Now let’s try modifying the Scale property so it behaves more like a true camera zoom.
4. Click on the word Scale to highlight both keyframes. Choose Animation < Keyframe Assistants < Exponential Scale.
This powerful assistant will accurately simulate the ballistics of a camera zoom.
5. Click the Graph Editor button to see selected keyframes in greater detail.
The Graph Editor shows a natural curve for the Scale keyframes, which indicates a more natural speed change that simulates a camera zoom (Figure 11.17).
Figure 11.17 The Exponential Scale keyframe assistant makes it easier to simulate a natural zoom.

6. Preview the animation by clicking the RAM Preview button.
7. You can adjust the keyframes with the Graph Editor to smooth out keyframes and animation (Figure 11.18).
Figure 11.18 Adjust the handles to remove any bobbles in the motion path. After each adjustment, preview the animation to check its effect.

Expanding Photos into the Third Dimension
Now that you’ve explored the use of simulated zooms and pans, it’s time to graduate to a real 3D camera. In this section we’ll build on your existing knowledge as well as the material covered in Chapter 8, “Designing and Working in 3D.” Here we’ll explore specific techniques that relate to motion control 3D projects.
Determining Captured Perspective
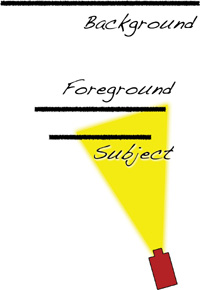
Take a close look at your photo and try to identify different areas of depth. Be sure to identify a minimum of two planes in your photo. For the best results, however, you’ll want to look for three planes: foreground, subject, and background (Figure 11.19).
Figure 11.19 Depending on your shot, the foreground or the subject may be closest to the camera. Don’t worry, both will work well.

These planes will get isolated to their own unique layer (Figure 11.20). Once the layered file is expanded in 3D space, you’ll essentially end up with a “shoebox diorama” (Figure 11.21). As you animate your camera, the different distances between objects will create a parallax effect.
Figure 11.20 Splitting the shot into three layers required multiple techniques that we’ll explore later in this section.
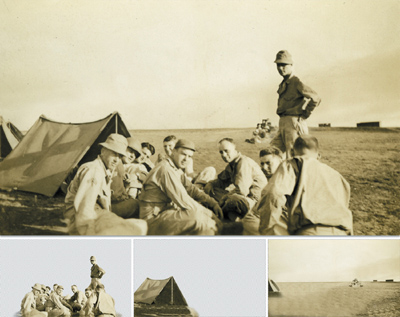
Figure 11.21 By positioning layers in 3D space, you can create entire scenes.
Planning the Shot
Just as directors storyboard their shots, you may want to block out your moves before moving into After Effects. On a piece of paper or blank canvas, create a staging diagram (Figure 11.22). Try to roughly determine how much separation there is between your foreground, subject, and background. The more distance (within believable reason), the better depth of field and ability to harness parallax to create a sense of movement. Parallax is the concept of “apparent motion” of a nearby object against a distant background. By increasing the distance between subject and background, and then moving the 3D camera, you get a greater sense of photorealistic motion.
Figure 11.22 A quick sketch or diagram can help you plan your camera moves. You can easily experiment in a composition by adding more than one camera.
Making Accurate Selections
To extract an object in Photoshop, it must be selected with one of the many available selection commands or tools. You have to tell Photoshop what you want selected and what should happen to those selected pixels.
When you have a selection, you can isolate individual pieces of a composition to their own layer. It’s possible to place only what you want on an isolated layer. Transparency is the foundation of compositing, and since there are many different situations, there are many approaches to selecting and extracting images.
Quick Selection Tool
The Quick Selection tool (W) is a major improvement on the Magic Wand tool. It’s similar in that you can click on a region of color to make a selection. But there’s a reason the Quick Selection tool takes priority over the Magic Wand in the Tools panel.
The Quick Selection tool allows you to create a selection quickly based on color and contrast. You can press the right bracket key (]) to make the selection brush larger, and press the left bracket key ([) to make it smaller.
Simply click and drag in the image to make an initial selection (Figure 11.23). If you want to add to the selection, click and drag again. If too much of a selection is made, hold down the Option (Alt) key to subtract from the selection.
Figure 11.23 The Quick Selection tool does an excellent job of detecting edges, even on a sepia-toned image.

Close-Up: Better Selections—Now Faster!
Here are a few important commands and modifier keys related to selections. Three standard modifier key combos are used when building selections:
• Holding down the Shift key before making a second selection adds to the initial selection.
• Pressing the Option (Alt) key lets you subtract from an item.
• Holding down Shift+Option (Shift+Alt) creates the intersection of the two selections.
• By employing these three modifier keys, you can use the basic tools and build up a selection. But don’t try to build your selection all at once.
• You can add the Shift key after you’ve begun drawing with the Marquee tool to constrain the selection to a perfect square or circle.
• Holding down the Option (Alt) key enables you to draw from the center with the Selection tool. This is particularly useful when selecting a circular area.
• You can combine the two key combinations above to both constrain and draw from the center simultaneously.
Color Range Command
Another command that is frequently overlooked is the Color Range command. You’ll find it in the Select menu (Select < Color Range). The Color Range command makes it easy to select large areas of color or color ranges (Figure 11.24). To begin, use the eyedropper on the desired color or area.
Figure 11.24 The Localized Color Clusters option makes it effortless to isolate a selection.

• To add to the selection, hold down the Shift key or use the plus eyedropper.
• To subtract from the selection, hold down the Option (Alt) key or use the minus eyedropper.
• The Localized Color Clusters option adds a tolerance option to constrain the command near where you click.
• The Fuzziness control softens your selection by increasing tolerance for stray pixels.
• You can preview the selection as a mask by using the Selection Preview menu.
Tip
The Color Range command can also be accessed with the context menu when a selection tool is active.
Refine Edge Command
With the Refine Edge command, Photoshop offers a great option for controlling a selection. The Refine Edge command can be accessed two ways. It’s available in the Options bar for all selection tools, or you can choose Select < Refine Edge. This command is very intuitive, and its sliders provide quick feedback as you refine a selection (Figure 11.25). This command is similar to the Refine Mask command covered earlier in the book.
Figure 11.25 Although it offers many sliders, you should work your way from top to bottom in the Refine Edge dialog box.

You can click the View button to change the viewing mode for how the selection is displayed (or use the corresponding keyboard shortcut). Try the different modes to see the results. We favor the following options when working on transparency:
• On Black (B). Previews the layer over black, which is good for light edges.
• On White (W). Shows the selected region over a white background, which works best for dark edges.
• On Layers (L). Composites the image over any other layers (or transparency if it’s a single-layer image).
The Edge Detection option can be used to clean up the edges further. These controls work best for areas of partial transparency. Experiment with Edge Detection to improve the selection. Use the Radius slider to refine the edge. The Smart Radius option automatically evaluates contrast in the edges and attempts to correct for better transitions. If your object lacks uniform hardness and softness, use this option (which is the case for most photographs). You can also use the Refine Radius tool to paint over any edges that need additional refinement. In addition, you can hold the Option (Alt) key to switch to an erase mode to undo any unwanted refinements.
Tip
You can select the Show Radius and Show Original check boxes to make it easier to see the changes created with the Edge Detection options.
The next group of sliders allows you to adjust the edge globally. You can remove jagged edges, feather a selection, or improve contrast. If you have a uniform fringe around the edges, use the Shift edge commands.
The last category, Output, determines how the processed selection is treated. If you’re working with strong background colors that are being removed, use the Decontaminate Colors option. This will apply color correction to remove any color spill from the background onto the selected object. You can also choose what Photoshop will do with the new selection. You can have Photoshop exit to a standard selection, apply a layer mask, make a new layer from the selected pixels, and more (Figure 11.26).
Figure 11.26 After applying the selection as a layer mask, we took a brush with 25% opacity and painted in a soft area at the edges for the ground. When there’s a contact zone between the subject and the ground, you need to make a transition zone to avoid having the subject appear to float.
Masking Layers
To perform motion control 3D, you’ll need to mask your images. This nondestructive technique is the best way to extract parts of an image to their own layers. These layers will then be reassembled in 3D space to create a “shoebox diorama.”
Layer masking is an extremely flexible technique that supports multiple levels of transparency (via shades of gray or blurring). Most important, you can continue to touch up your mask throughout the postproduction process. If you’re working in After Effects and you’re not happy with an edge, you can choose to Edit Original by pressing Command+E (Ctrl+E) to switch back to Photoshop. With a little bit of paintwork, you can refine problems in the layer’s transparency. When you’re done, just close and save the PSD file and it will update in After Effects.
To add a mask, make sure the photo you want to mask is a layer (as opposed to a locked Background). You cannot mask the background of an image, because it is not a layer. You must convert it to a layer by double-clicking and naming the layer. You will likely want to duplicate the layer two to four times so you have enough copies for foreground, subject(s), and background. Disable the visibility of the other copied layers as you’re working on a specific layer.
Start by making a rough selection, much like an initial cutout with a pair of scissors. Try tools like the Polygonal or Magnetic Lasso, the Color Range command (Select < Color Range), or the Quick Selection tool. If you need to add or subtract, you can always jump into Quick Mask mode by pressing Q and painting with your brush (Figure 11.27). With the selection active, click the Add Layer Mask button at the bottom of the Layers panel or use the Refine Selection command first and then add a layer mask.
Figure 11.27 The Quick Mask command is very useful for refining edges. If you double-click the Quick Mask icon (the last on the Photoshop Tools panel), you can access the Quick Mask options window. You can change the color and opacity of the Quick Mask to make it easier to work with.

Here are a few practical tips when it comes to masks:
• Use the Brush tool with a soft edge to touch up the layer mask. Be sure to load the default colors by pressing the D key. White will be used for areas that are opaque (solid), and black will be used for areas that are transparent. You can then toggle between black and white by pressing the X key. A good mnemonic for this shortcut is Devil’s Xylophone.
• Zoom in so you can better see your pixels. Use the Navigator panel to keep a “global” view and move around your canvas.
• Press [ for a smaller brush and ] for a larger brush. To create a harder or softer brush, use the Shift key. Pressing Shift+[ will make the brush softer; pressing Shift+] will form harder edges.
• We suggest placing a high-contrast, solid color directly behind the masked layer. This is a temporary step, but it makes it easier to see stray pixels.
• Use the Smudge tool with Lighten or Darken mode to touch up the layer mask. This is a great way to move the mask in only one direction while pushing. Adjust the Strength to taste; a lower value usually works best.
• You can also use the Blur tool or a filter to slightly soften the edges for a believable feather.
• If you need to “choke” a mask, try applying a Levels adjustment directly to the layer mask. By adjusting the midpoint, you can expand or contract the mask as needed.
• The Refine Mask command and the Masks panel give you very flexible controls. The interface is nearly identical to the Refine Selection command, but you can use it to touch up masks in significant ways.
• Leave the layer masks live for import into After Effects (don’t merge or flatten). This way you can easily switch back via Edit Original for quick tweaks.
• As you create masks, remember that you can load them by Command-clicking (Ctrl-clicking) on the thumbnail. Once you’ve masked a layer, loading it and then inversing it (Select < Inverse) can be a quick way to mask your remaining layers.
• You can also use the loaded selections to remove objects in the background plate. We suggest expanding the selection a few pixels (Select < Modify < Expand) and then running the Content-Aware Fill option (Figure 11.28).
Figure 11.28 Getting a clean background plate is much faster with the Content-Aware Fill command.

Notes
When working with layer masks, be sure you click on the mask’s thumbnail in the Layers panel so your strokes are modifying the layer mask, not the pixels of the original layer.
Prepping the Layers for After Effects
Before sending your layered document to After Effects, you need to do a little organization work. Be sure that every layer has a unique and descriptive name that clearly identifies what the layer is. Background copy 2 isn’t as meaningful as, say, Tent or Soldiers. While you’re looking at layers, be sure to reduce the total number to only the essentials. We find that three to five cutout layers are usually plenty for this effect.
Close-Up: Background Removal
Although the foreground and subject will use masks, your background layer does not. Rather, you must “remove” all the elements you extracted to their own layers (the foreground and subject). To do this, you have several options:
• Clone Stamp tool
• Healing Brush tool
• Spot Healing Brush
• Patch tool
• Content-Aware Fill
You also may need to downsample your image and save a new copy. Once we’ve determined how much zooming will occur or how wide we’ll pan, we reevaluate the size of the image. Although extra resolution is good, there’s no need to bog down After Effects. Simply choose Image < Image Size and resize with the Constrain Proportions option selected. Then choose File < Save As to make a new copy and to preserve the original resolution in another file.
When your layers are prepped, we recommend placing a merged copy on the topmost layer. In the Layers panel add a new, empty layer and place it at the top. Make sure all the layers you want to use are visible. Then hold down the Option (Alt) key and choose Layer < Merge Visible to make a flattened copy. This new layer should contain no masks; it will be used to check composition later (Figure 11.29).
Figure 11.29 These three layers plus the Reference layer are ready for the move to After Effects. The masks are easy to modify throughout the workflow, and the layers have simple, yet descriptive names.

Animating in 3D Space with After Effects
Now that your files are prepped, it’s time for the fun part: creating the 3D scene. Truth be told, you’ve done all the hard work. Your workflow gets much easier going forward. We’ll continue with the same image from the previous section for illustrative purposes (but you’ll find several more examples on the DVD). We’ll also explore advanced techniques at the end of the chapter.
Converting a Photoshop File to 3D Space
You’re now ready to bring in your Photoshop file. The process we recommend is simple but specific. Choose to import the PSD file as a composition (do not choose the Composition – Retain Layer Sizes option). In the next dialog box, just click OK to accept the default import values. Go ahead and keep the Composition panel set to Quarter quality to reduce your overhead.
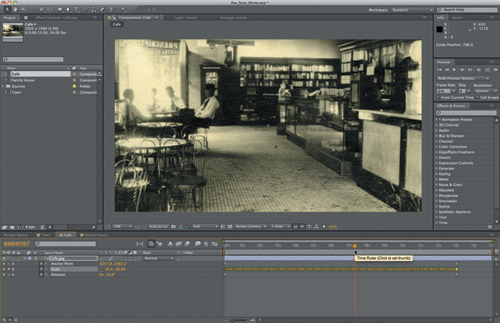
Open the layered composition you just imported and change its settings to match the shot duration and delivery standard you are using for the project. You can press Command+K (Ctrl+K) to call up the Composition Settings (Figure 11.30).
Figure 11.30 Discuss delivery standards with the project’s editor or producer. You don’t want to waste time having to rerender because of the wrong frame rate or frame size.

Now you’re ready to promote all the layers (except the Reference layer) to 3D space. Click the 3D layer switch for each layer (Figure 11.31). Add a 3D camera by choosing Layer < New < Camera. Knowing which setting to choose can be tricky (unless you happen to have metadata information about the actual photo). For historical photos, we tend to use the 35mm or 50mm preset cameras (Figure 11.32).
Figure 11.31 If you can’t see the 3D switches, click the Toggle Switches/Modes button at the bottom of the Timeline.

Figure 11.32 The 3D camera dialog box offers several controls (and the ability to create your own presets). For more on 3D cameras, be sure to see Chapter 8.

Tip
For a great script that can automate some of this expansion process, check out pt_Multiplane. Paul Tuersley sells it for $20 at http://aescripts.com/pt_multiplane.
Blocking the Scene
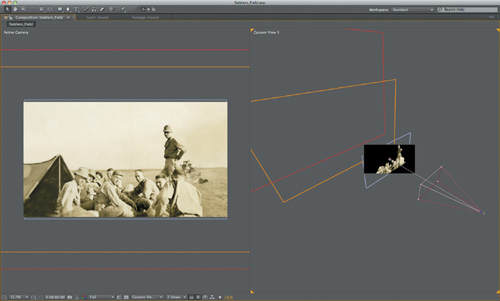
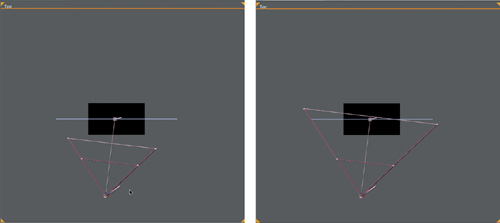
Now you’ll expand your objects along the z-axis. Start by turning off the visibility of the Reference layer. You’ll toggle this layer off and on in the future to check your composition. Switch your view in After Effects so it’s easier to design in three dimensions. Choose the 2 Views – Horizontal from the menu at the bottom of the canvas (Figure 11.33). Set the Left Viewer to Active Camera and the second to either Top or Custom View 1 (whichever you find easier) (Figure 11.34).
Figure 11.33 If you have a very large monitor, you may want to try the 4 Views options for more control.

Figure 11.34 We find that Custom View 1 provides a nice view of the “set.” Your view is 45 degrees to the left and 45 degrees off the floor.

Select your bottommost layer, which you’ll position first. Press P for position, and then adjust the Z slider (the third number) to move the image away from the camera. Try a positive number between 1,000 and 25,000 to simulate the apparent distance in the original image.
You now need to scale the layer back up so its apparent size matches the original. Press S for Scale and scale the layer up so it matches the other layers (when the edges match the edge of the others). You may need to zoom your canvas window to see your edges (Figure 11.35). Toggling the visibility for the reference image off and on, or leaving it set to a low opacity for onion-skinning, makes this task easier.
Figure 11.35 The scaled layer should line up with the others. You can change the label colors of the layers to make them easier to see.
Repeat the scaling and positioning for the next layer. Depending on the image, you may move this object farther away or closer to the camera. You’re just trying to create a sense of depth. Remember that you can switch views to make it easier to see the arrangement of layers in Z space (Figure 11.36). Don’t put as much distance between the foreground and subject layers as you would between the foreground and background layers. This effect should be subtler. Remember to use your reference image (layer 2) for checking alignment.
Figure 11.36 The Top and Custom View 1 show the relationship between Z-positions differently. Try using both for an accurate assessment of the scene.
Tip
Setting the Reference layer to the Difference blending mode is a quick way to see what’s changed as you scale and reposition layers.
Using 3D Cameras
Animating the 3D cameras is pretty straightforward. In fact, compared to other motion graphics projects motion control 3D is much less abstract. You have a clear subject and a reference source, which makes framing and composition much more clear-cut.
Here are a few suggestions for getting the best results:
Tip
You may need to press the , (comma) or . (period) keys to zoom out and see all. Hold down the spacebar to move around the window by dragging.
• Creating moves is much simpler when you’re using two composition views. In one viewer you can see through the viewfinder; the other lets you see your physical camera. You can choose to use 2 Views - Vertical or 2 Views - Horizontal depending on your monitors.
• When you select the camera layer in the Timeline panel, you can see it in the second viewer. You can drag and manipulate the camera right in the viewer.
• Set your starting frame first. Use the Camera Position and Zoom controls. To move the camera, use a combination of sliders and camera control handles. In the canvas, you can grab the green arrow to move the camera on the y-axis. Use the red arrow to move along the x-axis and the blue arrow to move along the z-axis (Figure 11.37).
Figure 11.37 The camera handles offer smooth control over camera position and point of interest.

• You’ll notice a line with a small crosshair circle. This is the point of interest. Adjust this to affect where the camera is pointed.
• Under the Camera Options category, you can keyframe Zoom and Focus Distance (for zoom or rack focus effects). You can also adjust the aperture and blur level to affect the depth of field. Be sure Depth of Field is turned on for the most photorealistic results (Figure 11.38).
Figure 11.38 Once Depth of Field is enabled, you’ll need to adjust the Focus Distance property. This will likely need to be keyframed to compensate for a moving camera. You can see an actual box in the composition window that indicates where it is set.
Notes
You may want to lock your layers to avoid accidently moving them when manipulating the camera.
• Avoid more than a 45 degree move, or the scene will likely fall apart. In fact, only subtle moves are needed to get the most from this effect.
• RAM preview from time to time to see your results and get a sense of timing and composition. To expedite the experimental process, the initial preview should be done at Quarter quality (Resolution setting in the Preview panel or the Auto setting to match the resolution set in the Composition panel).
• Create traditional camera moves like dollies and pans to take advantage of the depth of field. To really achieve parallax, be sure to introduce a slight angle to the movement (which is caused by differences between the camera position and the point of interest).
• You can add multiple cameras to a scene to try different moves. Only the topmost camera will be used, or you can control which one is active with visibility switches.
Tip
To create arced camera moves, select a keyframe in the Timeline. Then in the canvas, you can click with the Convert Vertex tool (nested with the Pen tool) to create Bezier handles. Adjust the curve to taste.
Advanced Techniques
The journey of creating motion control 3D is a bit of a never-ending wormhole. As soon as you master one technique, you’ll discover new ones. The key to your sanity and budget is to combine techniques. Keep some shots simple and push others to new heights. Here are three key technologies that you can further explore to create fantastic effects.
Vanishing Point
Vanishing Point is truly a partnership feature (you’ll need both Photoshop Extended and After Effects to pull off this technique). It allows you to draw perspective planes in Photoshop. Those planes should define major surfaces or fields of view. You invoke Vanishing Point by choosing Filter < Vanishing Point. Normally, you’d use it for perspective cloning, but with After Effects a cooler option exists.
The Vanishing Point Exchange feature relies on a visual effects technique called photogrammetry, which is commonly used to simplify 3D scenes. It assists in that not every object has to be modeled. This significantly reduces the complexity and time needed to create, render, and output a 3D animation (Figure 11.39).
Figure 11.39 The ground and train station were turned into a simple 3D scene. The people were then inserted into the scene at appropriate distances. Notice as the camera moves how elements interact differently due to their distance. The people are perpendicular to the ground and can cast shadows.

Open a photo that you want to work with in Photoshop, and then choose Filter < Vanishing Point. The Vanishing Point interface opens. Start by drawing your first grid inside the image. This should be the largest surface of the object. Define the four corner nodes of the first plane surface. The Create Plane tool is selected by default. Click the preview image to define the four corner nodes.
Tip
We’ve found that Vanishing Point Exchange works best when a photo has an angle of about 45 degrees with the subject. You should also try to keep the frame as unobstructed as possible. You can open the files created by Vanishing Point Exchange (VPE) into Photoshop to clone or erase unwanted details.
Here are some general pointers for using Vanishing Point:
• Look for a straight line to use as a reference.
• Extend a bit beyond the boundaries to deal with peaks or extruding objects.
• You can tweak the first plane as much as needed.
• Try to use a rectangular object in the image as a guide when creating the plane. You can zoom in with the zoom controls in the bottom-left corner. Be sure to line up each edge of the plane with the perspective of the photo. Take your time on this step, because it’s the most crucial part.
Tip
You can also use this technique to create surfaces for the floor and sky when you’re dealing with a horizon.
Once the first plane is created, you’ll need to generate the second for the other surfaces. You can create a new plane by holding down Command (Ctrl) and dragging from the center of a plane’s edge. It’s critical that you “tear off” planes rather than creating new ones so the model can stay attached. Drag the handle so the plane extends beyond the edge of the object. You’ll likely need to adjust the angle so the second plane lines up. You can change the angle with the controls in the top bar.
You can tear off planes for the floor or ground. If you’re using multiple ground planes, be sure to adjust them so they overlap. For this task, you’ll find it easiest to zoom out and see some of the gray canvas space. Drag the handles and resize the planes as needed (Figure 11.40).
Figure 11.40 Once created, the planes can be exported to After Effects through Vanishing Point Exchange.

When you’re finished, click the submenu in the upper-left corner, and then choose Export for After Effects (.vpe). Create a new folder, which will serve as a destination for the PNG files and 3D data that Photoshop will generate. After the export is completed, click OK to store the Vanishing Point information. You can then close and save the Photoshop file. If you need to revisit the planes for tweaking, just open the PSD filter and run the Vanishing Point filter again; your previous planes will be there for editing.
Switch to After Effects and create a new project. Then choose File < Import < Vanishing Point (.vpe). Navigate to the folder you created, select the VPE file, and click Open. After Effects creates a new composition, reassembles the 3D objects based on the VPE data, and arranges all the planes (each an individual layer in the PNG format) in 3D space (Figure 11.41).
Figure 11.41 Vanishing Point Exchange was used to create a plane for the ground and the sky. The soldiers and tents were then added back into the scene. Because they are perpendicular to the ground, the camera feels like it is moving across a surface as it dollies.

You can use the Orbit Camera tool (C) to rotate around your scene:
• You can rotate about 40 degrees left or right before a scene looks too fake.
• Be careful not to pull the camera too high in the frame, or the object will look like a cutout doll.
• The individual PNG files can be cleaned up easily in Photoshop. Select them one at a time and press Command+E (Ctrl+E) to edit them. In Photoshop, use cloning and erasing to clean up unwanted pixels or blank areas. After fixing the files, close and save them to return to After Effects.
• When you’re ready to animate, change the After Effects composition settings to match your needs. Animate the camera or null object to create the desired animation.
• Use the different views in After Effects to place multiple elements correctly in the scene (Figure 11.42).
Figure 11.42 Changing the 3D view makes it simpler to see your scene. Use multiple views as you position cameras, lights, and objects.

Notes
Don’t change the canvas size when touching up your PNG files. Instead, if you want to extend the photo’s edges, you should do that prior to creating the Vanishing Point plane in Photoshop.
Puppet Tools
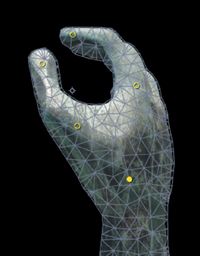
The Puppet tools can be used to quickly add natural motion to photos or vector artwork. The tools use an effect (called the Puppet effect), which will automatically be applied when you use the tools. The Puppet effect warps the image based on the positions of pins that you place (Figure 11.43). You can use pins to define which parts of an image should move (or shouldn’t) and which parts should be in front when other parts overlap.
Figure 11.43 The Puppet effect warps the position of the hands and allows the fingers of the statue to bend over time.

• Puppet Pin tool. Use this tool to place and move Deform pins.
• Puppet Overlap tool. Use this tool to place Overlap pins, which indicate which parts of an image should appear in front of others when a distortion causes parts to overlap.
• Puppet Starch tool. Use this tool to place Starch pins. These stiffen parts of the image so they are distorted less by the warp.
Placing Pins
When you place the first pin, it applies the Puppet effect. After Effects will automatically attempt to break the image into a triangular mesh. You can see this mesh when a Puppet tool pointer is over the area that the outline defines (Figure 11.44).
Figure 11.44 Place pins at logical points. In this image a vise was made using five pins. A pin was placed at each fingertip, each joint where the fingers connect to the hand, and one in the bend of the wrist.
The mesh and the image pixels are interconnected, so moving the mesh will move the pixels. Here’s how the controls work:
• If you move a Deform pin, the mesh changes shape. After Effects attempts to keep the overall mesh as rigid as possible to produce natural, lifelike movement.
• A layer can have multiple meshes. Add meshes if you want to control distortion independently.
• The meshes do not recognize moving footage (such as video) and will not update.
Puppet Overlap Controls
You can use the Puppet Overlap tool to apply Overlap pins. This is a simple way to control apparent depth. You must apply Puppet Overlap pins to the original outline. You have two controls:
• In Front. Shows the apparent proximity to the viewer. In Front values are added together for places for the mesh where extents overlap. You can also use negative In Front values.
• Extent. Specifies how far from the Overlap pin its influence extends. The fill is dark if In Front is negative; the fill is light if In Front is positive.
Notes
To show the Puppet mesh, select Show in the Tools panel.
Puppet Starch Controls
When you’re distorting one part of an image, you may want to prevent other parts from being distorted. The Puppet Starch tool is used to apply Starch pins to keep parts rigid. You must apply Puppet Starch pins to the original outline (Figure 11.45). You have two controls:
Figure 11.45 The use of Starch pins keeps the wrist from bending as the fingers move. Be sure to adjust the Amount and Extent settings to control rigidity.

• Amount. Specifies the strength of the stiffening. The Amount values are added together for places on the mesh where extents overlap. You can use negative Amount values. Small Amount values are best for preventing image tearing without introducing much rigidity.
• Extent. Specifies how far from the Starch pin its influence extends. The Extent is indicated by a pale fill in the affected parts of the mesh.
Sketching Motion with the Puppet Pin Tool
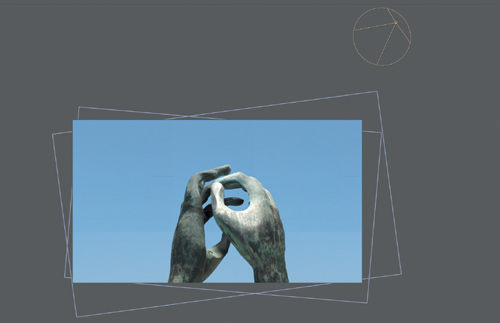
With Sketch, you can animate the motion path of one or more Deform pins in realtime (or a specified speed). This makes it effortless to create natural movement and to sync it with audio or other elements. A quick way to invoke Sketch is to hold down the Command (Ctrl) key and sketch in realtime when you click and drag on a pin (Figure 11.46).
Figure 11.46 The Sketch option takes a little practice but is very organic.

Be sure to click Record Options in the Tools panel to access the following options:
• Speed. This is the ratio of the speed of recorded motion compared to playback speed. If Speed is 100%, the motion is played back at the same speed at which it was recorded. If Speed is less than 100%, the motion plays back faster than it was recorded. This is a useful way to draw elaborate paths.
• Smoothness. Try using a higher value to remove extraneous keyframes from the motion path. It is in fact better to have fewer keyframes if you want smoother motion.
• Use Draft Deformation. If your system is lagging, try this option. It will ignore Starch pins when sketching, which improves system performance.
Enhancing the Scene
Would you like to take the techniques discussed in this chapter further? There’s no end to the possible refinements. Just remember to balance reality with created reality. Here are a few modifications we make to truly make the shots engaging.
Adding Lights
The use of lights in a scene can really add to the 3D nature. You can use lights to enhance your scene and draw the viewer’s eye to the area of interest. It’s important to remember that lights add significantly to the render time. We generally add them after the first draft renders have been cut in by the editor and the timings are locked down. Try introducing these types of light:
• Ambient light. Be sure to lower the overall lighting of the scene before you add other lights. We typically set an ambient light to around 80% to create a slightly “darkened studio” effect that we can build on.
• Directional light. You can add other directional lights to the scene that are motivated by existing lights. Think about where the sun is, and then put a point or a spot light there. Are there windows in a scene? Put a light on the outside and have it shine through. Do you need to cast shadows? Do so with lights (Figure 11.47).
Figure 11.47 As the hands bend and cross each other, the light causes realistic shadows. Be sure to adjust the Cast Shadows and Accepts Shadows properties to avoid unwanted shadows on your background.
• Volumetric light. If you want to create lights that you actually see (such as sunbeams) as opposed to lights whose results you see (like shadows), check out Trapcode Lux. This advanced plug-in works with the After Effects lighting system and creates light that you can point and see its beams.
Using Footage Plates
If you want to put a little more reality into your motion control 3D, you’ll want to build up your footage library. Be sure to build a healthy library of stock clips, especially skies. We’ve also found that wide shots or urban areas work well. The key here is to get some subtle motion into the background that complements rather than distracts (Figure 11.48).
Figure 11.48 Shooting time-lapse shots is a great way to make your own background plates for skies. Time-lapse motion offers a subtle animation that complements motion control.

Creating your own time-lapse shots is pretty simple. You can pick up an intervalometer to attach to a DSLR camera for about $125 (Figure 11.49). This lets you set timings for how often the camera records a shot. By locking down a camera and shooting in manual mode, you can record a new still. Typically, these stills are shot every 2–30 seconds and can then be imported into After Effects as an image sequence. These stills create gentle time-lapse shots that work well for the background. You can stretch layers and apply frame blending to smooth out the slowdown effect.
Figure 11.49 Intervalometers are often made for specific camera models. Be sure to check for compatibility before ordering one.

Tip
You can visit http://tinyurl.com/aetimelapse for a video tutorial on using After Effects to assemble time-lapse movies. The technique is explored in depth in the book From Still to Motion: A Photographer’s Guide to Creating Video with Your DSLR (Peachpit Press, 2010).
Creating Depth with Particles
A subtle element that we love to add to motion control shots is particles (Figure 11.50). Although After Effects offers several particle effects, we find the investment in Particular from Trapcode to be worthwhile. We use the effect to add smoke, atmosphere, haze, and clouds. These effects should be added after you’ve finished all other elements in the shot because they take a while to render. The addition is slight but often well worth it.
Figure 11.50 Columns of smoke were added to this scene for the smoke stacks and the burning buildings after a bomb attack. The smoke has actual dimensionality, so as you rotate past it the clouds have depth.

Notes
We’ve included several of the shots in this chapter on the book’s DVD. You’ll find both project files and rendered movies. You’re also welcome to check out the finished movie. See the website www.bedfordthemovie.com for screening and ordering information. The film is available on Amazon.com as well.