
Importing and Viewing Video Clips
The iPad is such a great picture viewer that its capabilities as a video viewer are sometimes overlooked. You can use it to buy TV shows and movies through the iTunes Store and download them to your iPad. You can also use the iPad 2 to create video clips, and you can use either kind of iPad to import video clips by syncing with iTunes and to send video clips to YouTube or back to your personal computer.
![]() For information about buying videos through iTunes and managing them, see Chapter 12, “Managing Music on Your iPad”. For information about creating video clips using the iPad 2, see Chapter 14. “Taking Photos and Creating Videos.”
For information about buying videos through iTunes and managing them, see Chapter 12, “Managing Music on Your iPad”. For information about creating video clips using the iPad 2, see Chapter 14. “Taking Photos and Creating Videos.”
Although the iPad is a great photo frame, it’s also a great “video frame”—a device for playing back and showing off video clips. Having so much video power in your hands is a real pleasure. You may see video in a whole new way—no pun intended.
The iPad displays video clips stored in H.264 and MPEG-4 video formats with AAC audio—formats used by many camcorders and video editing programs. Unfortunately there are, at this writing, some relatively common formats for camcorders and so on that just don’t work with the iPad. If you have a video clip in such a format, you may convert it in a video editing program or find a free or inexpensive converter program online that can convert the video clip into an iPad-friendly format.
As with photos, you can also show video clips stored on your iPad on all sorts of external displays. With an optional external connector, you can display your pictures on different types of TVs and monitors. You can also import video clips, just like pictures, from a digital camera directly onto an iPad using an optional connector.
However, you can first import the video clips onto your personal computer, possibly edit and compress them, and then sync the best of them onto the iPad.
This chapter describes getting video clips onto your iPad 2 by synchronizing it with your personal computer via iTunes. You can’t send video clips to your iPad by downloading a video sent as an email attachment.
 TELL ME MORE Media 16.1—The Advantages of the iPad for Showing Video Clips
Access this audio recording through your registered Web Edition at my.safaribooksonline.com/9780132709590/media or on the DVD for print books.
Synchronizing Video Clips
As with photos, you can easily keep your latest and greatest video clips on your iPad, watch them, and show them to others. Simply include them with the photos that you sync to your iPad, as described in the previous chapter.
Keep an overall folder on your computer of photos and video clips that you intend to synchronize with your iPad. Keep photos in one overall subfolder at the top level and keep video clips in another. That way you don’t intermix video clips—which don’t work with slideshows and the Picture Frame functionality—with photos, which work great for both those purposes.
When you show people what you have on your iPad, you’re also more likely to want to deal with photos and videos separately. You want to flick through photos quickly, whereas with videos, you may want to take a little more time. Having them separated helps this.
Do as much movie editing as possible on your computer rather than the iPad. Apple is so enthusiastic about video editing on the iPad that it ported its iMovie software to an app, available for the iPad 2 only, as shown in Figure 16.1.

Figure 16.1. iMovie for iPad 2 enables you edit video clips by hand.
 SHOW ME Media 16.2—Synchronizing Videos
Access this video file through your registered Web Edition at my.safaribooksonline.com/9780132709590/media or on the DVD for print books.
The iPad 2 is somewhat more powerful than its predecessor and can capture video, so iMovie is recommended only for the iPad 2, not the original iPad. It’s cool that iMovie is available for the iPad, but it’s also cool to have multiple overlapping windows handy on a big screen while you’re editing video. And it’s really cool to have the much larger storage space of your computer available for different versions of a video clip, for an unedited master copy, and so on.
Consider buying and using iMovie for “quick and dirty” video editing on your iPad 2 and do as much video editing and storage as possible on your personal computer instead. Use your iPad as a kind of video photo frame for video clips that you love and want to share with others.
Also as with photos, you don’t want any highly personal, embarrassing, or dodgy video clips on your iPad. People who would never touch your laptop somehow feel quite comfortable picking up your iPad and messing around with it, or looking over your shoulder as you putter around on it. Also it’s easy to forget just what’s in a given video clip. So it can be good practice to keep it clean and upbeat.
Also as with photos, keep only copies of previously edited video clips on your iPad and in your iPad synchronization folder on your personal computer. The originals are too precious to risk losing in the blur of synchronizing and deleting video clips that may take up too much space on your iPad.
And finally, notice that most of the instructions for video clips in this chapter are quite similar to the steps for photos in the previous chapter. This reflects that iTunes and the iPad manage them right alongside each other. Some different considerations for photos and video clips, though, make it worth spelling out the steps separately.
Follow these steps to synchronize video clips from your computer to your iPad.
![]() LET ME TRY IT
LET ME TRY IT
Synchronizing Video Clips from Your Computer to Your iPad
1. On your computer, arrange the photos and video clips that you want on your iPad into a specific folder.
Put video clips in a separate folder of their own at the top level of the synchronization folder. This folder should contain only copies of video clips that you keep elsewhere, not originals. The copies can include favorites that you like to share and new video clips that will look great on the iPad.
2. Connect your iPad to your Windows PC or Macintosh. iTunes starts. If the AutoPlay window appears on your Windows PC, use it to upload video clips from your iPad to your computer, as described in the next section, or close it.
3. In the iTunes sidebar, click your iPad in the Devices tab. iTunes displays the Summary tab.
4. Click the Photos tab, which is also used for video clips. The Photos tab appears, as shown in Figure 16.2.

Figure 16.2. iTunes makes it easy to sync just the photos and video clips you want with your iPad.
5. Click the Sync Photos From check box to activate it.
6. To synchronize photos and videos from the iPhoto application or Aperture (on a Macintosh only), select iPhoto in the Sync Photos From pop-up menu. Then select the All Photos, Albums, Events, and Faces option, or select the Selected Photos, Albums, Events, and Faces option, and choose just the items you want. Skip to step 8.
7. To synchronize from a folder on a Windows PC or Macintosh, choose the folder that you want from the Sync Photos From menu. If the folder you want doesn’t appear in the list, click Choose Folder; then select it. Then leave the All Folders option selected, or choose Selected Folders, and choose just the folders you want.
8. To include video clips in the folders that you synchronize with, click the Include videos check box to activate it.
Video clips will be included. Check the size of video clips to see how much space they take up. A high-quality video clip can take up to 10MB of storage per minute of video, which means 100 minutes of video takes up a gigabyte—a big share of your iPad’s available flash memory. But low-resolution video clips can use more like 1MB per minute of video, about the same as an MP3 music file, so check the file size to see what to expect.
9. Click Apply. iTunes synchronizes photos and, if included, video clips between your iPad and your computer.
10. To end the synchronization session after syncing is complete, click the Eject icon next to your iPad’s name in the iTunes Devices list.
![]() Unlike photos, you can’t download a video clip attached to an email message. For information about downloading a photo attached to an email message, see Chapter 7, “Handling Notifications and Email Messages.”
Unlike photos, you can’t download a video clip attached to an email message. For information about downloading a photo attached to an email message, see Chapter 7, “Handling Notifications and Email Messages.”
Follow these steps to synchronize photos and videos from your iPad to your Windows PC.
![]() LET ME TRY IT
LET ME TRY IT
Synchronizing Videos from Your iPad to Windows
1. On your iPad, delete any videos that you don’t want. This way you don’t have to delete unwanted videos from both devices after you synchronize. Be careful because there are no Undo options.
2. Connect your iPad to your Windows PC. The AutoPlay window appears.
3. Click Import Pictures and Videos. Windows displays the Import Pictures and Videos dialog, as shown in Figure 16.3.
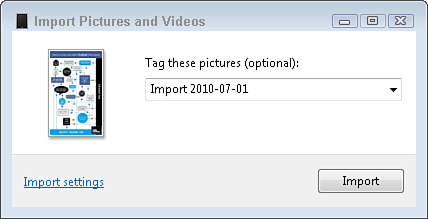
Figure 16.3. Use the Import Pictures and Videos dialog to do what it says on the tin.
4. Optionally, type a tag for the photos and videos.
5. If you want to delete the photos and videos from your iPad after the import is complete, click the Erase After Importing check box to activate it.
6. Click Import. Your Windows PC imports the photos and videos.
7. After importing is complete, disconnect your iPad from your Windows PC. Windows displays the Import Pictures and Videos dialog.
Follow these steps to synchronize videos from your iPad to your Macintosh.
Synchronizing Videos from Your iPad to Macintosh
1. On your iPad, delete any videos that you don’t want. This way you don’t have to delete unwanted videos from both devices after you synchronize. Be careful because there is no way to undo this.
2. Connect your iPad to your Macintosh. The iPhoto application opens.
3. In the iPhoto sidebar, click your iPad in the Devices branch. iPhoto displays your iPad’s photos and videos as thumbnail icons.
4. Optionally, in the Event Name text box, type a name for the group of photos and videos you import. In the Description text box, type a description of the event or other occasion.
5. Optionally, click the Autosplit Events After Importing check box to activate it and keep events separate.
6. Optionally, click the Hide Photos Already Imported check box to remove previously imported photos and videos from the ones you’re viewing, and from the synchronization process.
7. To import only some photos and videos, click the ones you want to highlight; then click Import Selected. To import all photos and videos, click Select All.
8. When the import is complete, to delete the imported photos and videos from your iPad, click Delete Photos. To leave them there, click Keep Photos.
9. In the iPhoto sidebar, click the Eject icon next to your iPad’s name in the Devices list.
Viewing Photos and Videos
When you have videos on your iPad, you can do several things with them. Some capabilities for viewing and organizing your videos depend on your platform:
• Individually: You can work with all your photos and video clips in one large group. Just look at photo and video thumbnails, and tap to look at a photo or video.
• In a slideshow: For any group of photos, you can start a slideshow. The slideshow can include all the pictures in the group. However, video clips don’t work in slideshows.
• By album: This works on any platform. On Windows, albums are simply folders.
• By event: This works if you have a Macintosh with iPhoto or Aperture. Photos and videos are organized by event.
• By face: You can’t organize videos by face, only photos, and only if you have a Macintosh with iPhoto or Aperture.
• By place: Your iPad uses the location of videos taken with a GPS-equipped camera that adds GPS information to videos, which is relatively rare. You can also add the location using certain editing programs (called geotagging the video). Your iPad then organizes geotagged videos by location.
SHOW ME Media 16.3—Showing Collections
Access this video file through your registered Web Edition at my.safaribooksonline.com/9780132709590/media or on the DVD for print books.
Using a Collection
Your iPad’s photos and video clips are arranged in as many as five different collections: Photos, Albums, Events, Faces (not for video clips), and Places. For the Events and Faces categories, you must use iPhoto or Aperture on a Macintosh. (Faces doesn’t work with video clips, only photos.) Places requires that you create your video clips with a GPS-capable camera or use a suitable application to assign a location.
All the collections work the same way—you simply open the collection and then view the photos and videos in it—except for Places. With Places, you look for a location that has photos or videos associated with it.
Follow these steps to view photos and videos on your iPad.
![]() LET ME TRY IT
LET ME TRY IT
Viewing Photos and Videos
1. On your iPad, open the Photos app. The Photos app opens, showing the category that you most recently had open and your photos and videos arranged in collections, as shown in Figure 16.4.

Figure 16.4. You can see key frames above a video.
For Places only, collections are tied to pins on a map.
2. Tap a collection to open it. Use two fingers to spread a collection to preview its pictures and moving pictures (video clips); release to leave the collection open, or pinch again to close it.
3. Tap a video to view it full-screen. Rotate your iPad if needed to best view videos taken in landscape (horizontal) or portrait (vertical) mode.
4. To zoom in on a photo, spread two fingers on the photo. Pinch to zoom back out. Drag to pan. Twist with two fingers on the video to rotate it onscreen. Tap in the row of key frames above a video to view it.
5. Swipe to the left or right to see the next or previous photo or video. Or drag the selection in the row of thumbnails at the bottom of the screen. It takes a bit of practice to drag smoothly in the thumbnails, which are small.
6. To delete a photo or video, tap the photo to see controls; then look to see if there’s a trash can. (Only videos created on an iPad 2 have a trash can.) If there is, tap the trash can to start the process of deleting the photo; then tap Delete Video to confirm. To tap photos for which the trash can doesn’t appear, delete the video from the appropriate folder on your computer; then sync the iPad again, as described earlier in this chapter.
Sending Videos to Email and YouTube
The Photos app enables you to email a video, send it to YouTube, or copy and paste it into an app, such as a video editing app.
Follow these steps to email a video.
![]() LET ME TRY IT
LET ME TRY IT
Emailing a Video
1. Open the video and tap the Video Options button. Video options appear, as shown in Figure 16.5.
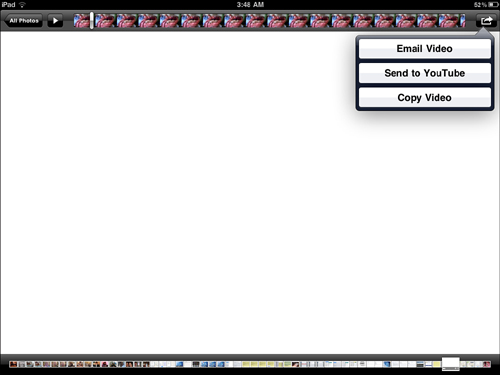
Figure 16.5. Video options enable you to do several things with videos.
2. Tap Email Video. An email message opens up with the video pasted in, as shown in Figure 16.6. You may have a problem with the video size because some recipients have limits on the size of file attachments (though the limit may be quite high, 2MB or more); others aren’t allowed to receive messages with attachments at all. However, there’s no way to get the file size of a single video from your iPad.
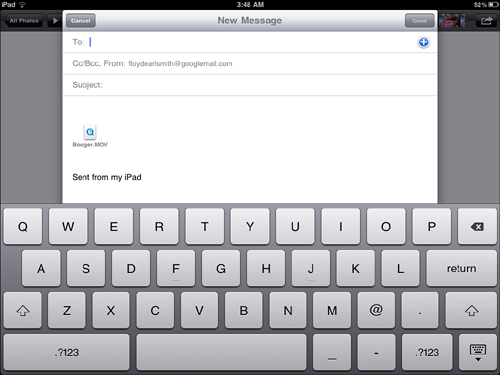
Figure 16.6. Videos show up as attachments to your email message.
3. Fill in the To field, the Subject, and the message body. Tap the Send button. The email message with the video attached to it is sent. A copy is also sent to your email address.
You need a YouTube account to send a video to YouTube. If you have a Gmail address, you can use your email address and password to sign in to YouTube. If you don’t have a YouTube account or a Google account, you can get one by using the YouTube app on your iPad or visiting the YouTube site with a web browser on your iPad or a personal computer.
Follow these steps to send a video to YouTube.
![]() LET ME TRY IT
LET ME TRY IT
Sending a Video to YouTube
1. Open the video and tap the Video options button. Video options appear.
2. Tap Send to YouTube. A screen appears asking for your YouTube username and password.
3. Enter your username and password, or your Gmail address and password, and press Sign In.
The sign-in pane clears, leaving the Publish Video pane available, as shown in Figure 16.7.
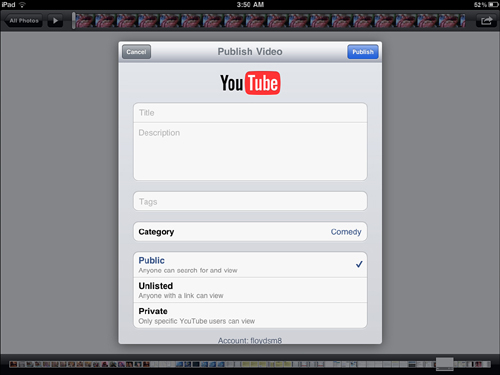
Figure 16.7. You can easily upload a video to YouTube.
4. Enter the title and description for the video (both required). The title appears in lists of videos on YouTube. The description appears beneath the video when it’s selected to be played.
5. Enter tags for the video (at least one tag is required). The tags are used in searching for the video, so enter tags that describe what’s in the video to make searching easier. If your video fits in more than one category (see the next step), you can choose only one, but you can enter the words from one or more others as tags.
6. Tap and choose a category from the rotating wheel. (A choice is required.) Options are Autos & Vehicles; Comedy; Education; Entertainment; Film & Animation; Gaming; How to & Style; Music; News & Politics; Nonprofits & Activism; People & Blogs; Pets & Animals; Science & Technology; Sports; and Travel & Events.
7. Tap to choose the privacy category: Public, Unlisted, or Private. Public videos show up for everyone and can be searched. Unlisted videos are available to anyone with a link but don’t show up with search. Private videos are only available to people you specify; you specify who can see the video in your YouTube account on your personal computer.
8. Tap Publish. The video uploads. This can take several minutes. After the video uploads, additional options appear.
9. Tap View on YouTube to open the YouTube app and see the video. Tap Tell a Friend to open an email message with a link to the video on YouTube. Tap Close to close the video and return to the Camera Roll.
If you choose Tell a Friend, you then need to enter the recipient(s) for the message. The message subject is set to the title of the video; edit the subject if needed. The message content is just a link to the video; add to the message content. Tap Send when done.