
11. Adding Tables to Word Documents
Prepare yourself to learn about one of Word’s most versatile features—tables. At the outset, tables might seem like just a bunch of simple columns and rows, but in truth, they are so much more than that. Tables are structural beauty in the midst of a page. They are vehicles for the presentation of data, they create graphic interest (particularly with the borders turned on), and are designed to help you bring order and organization to ungainly text.
Tables in their simplest form are a grid of interconnecting rows and columns. The areas made by this interconnectivity are called cells. You can fill cells with text, numbers, artwork and pictures, or even with other tables. You can choose to create tables with or without borders, or add borders around certain cells, add background shading, and a gazillion other options.
You can use tables to present data in an easy-to-read fashion. For example, you might need to present side-by-side lists in a document, or type up a household budget, create a form, or even design a web page. Because a table’s columns and rows are so easy to resize the way you want, there’s no limit to the things you can do with tables. Tables are ideal for making invoices, catalogs, newsletters, or any kind of situation in which text requires defined structure. If this is your first time using tables, don’t be intimidated by their power, and whatever you do, don’t let Word’s Table tools go under-utilized in your document-building tasks. Let’s start by learning the various ways to insert tables into a Word document.
Inserting a Basic Table
Word makes inserting a table so incredibly easy, you’ll wonder why you don’t start every document with one. Okay, maybe not every document, but you certainly can’t deny how easy it is. Located conveniently on the Insert tab, you can click the Table drop-down palette and specify how many columns and rows you want simply by dragging the mouse across the grid, as shown in Figure 11.1. As soon as you release the mouse button, your new table instantly appears in the document at the current cursor location, as shown in Figure 11.2.

FIGURE 11.1 For an instant table, look for the Table tool on the Insert tab.
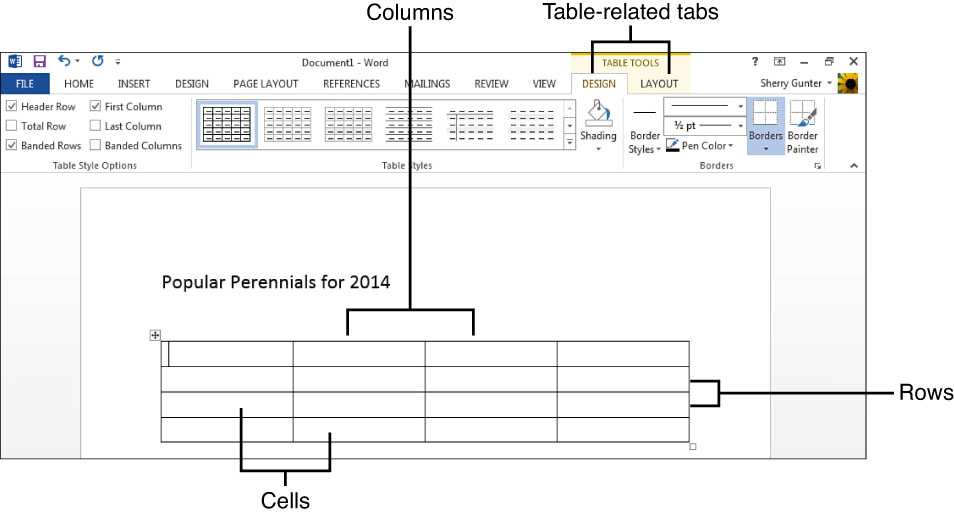
FIGURE 11.2 A newly inserted Word table, measuring 4 × 4 (rows and columns).
Anytime you add a table or click anywhere in one, the Ribbon immediately displays the Table Tools group of tabs, which include the Design tab filled with various table style options and design features, and the Layout tab, which includes tools for changing the table’s columns, rows, cell size, alignment, and so on.
Microsoft Word assumes you want to begin filling your table starting with the first cell, so the cursor sits in the first table cell ready for you to type in text. At this point, you might be wondering how to navigate your tables. Here are a few methods to help you move around in them:
• You can press the Tab key on your keyboard to navigate from cell to cell.
• Press Shift+Tab to move back to the previous cell.
• You can use the arrow buttons on your keyboard to navigate up and down, right and left in a table. Each click of the button moves the cursor to the next cell.
• Press Ctrl+Home to move to the first cell in the table.
• Press Alt+Page Up to move to the top cell in the current column.
• Press Alt+Page Down to move to the last cell in the current column.
Of course, you can always use the mouse to navigate between cells, clicking which cell you want to work in. Take a look at Figure 11.3 to see the table with text added.
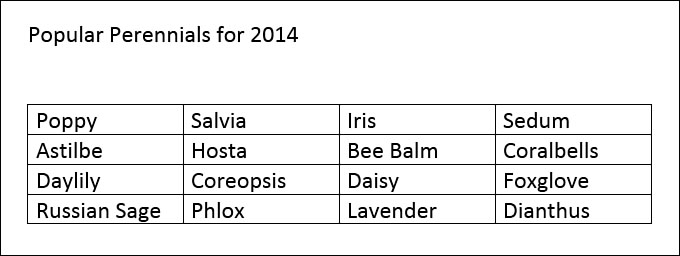
FIGURE 11.3 Here’s a table filled with text.
If you want to control not only columns and rows, but also how text behaves within the table cells, you can create a table using the Insert Table dialog box, shown in Figure 11.4, and choose from the AutoFit options available. To do so, follow these steps:

FIGURE 11.4 You can also use the Insert Table dialog box to insert tables.
1. Click the Insert tab.
2. Click the Table button.
3. Click Insert Table.
4. Specify the number of columns and rows (see Figure 11.4); click the spinner arrows or just type in a value in the appropriate box.
5. Select an AutoFit behavior; you can choose a particular column width, fit the contents to the table (which means the columns expand to fit whatever you type), or fit the table to the window (which means the table fits the size of your document).
6. Click OK, and Word creates your table.
![]() Tip
Tip
You can convert existing text into a table using Word’s Convert Text to Table command. First select the text you want to turn into a table, click the Table button, and then choose Convert Text to Table from the menu. You can then specify the number of columns you want or let Word determine the amount for you, and instruct Word how you want the text separated (such as paragraphs or commas). Click OK, and Word carries out your instructions.
Inserting and Creating Quick Tables
Although design-it-yourself tables are fun, you might prefer to speed up your table creation using one of Word’s built-in Quick Tables. Part of Word’s library collection of Quick Parts and built-in building blocks, you can use the Quick Tables gallery to insert calendars, tabular lists, and preformatted tables with preset subheadings. Basically, building blocks are tiny templates you can reuse to base new content on. To access the gallery, click the Table button on the Insert tab, and click the Quick Tables command to view the gallery, shown in Figure 11.5.

FIGURE 11.5 You can choose from several preset tables to insert into your document.
When you see a Quick Table you like, click it in the gallery to insert it into your document. You can add your own text to make the table your own. All the built-in tables include placeholder text for things such as column headings or calendar months. Figure 11.6 shows an example of a Quick Table with subheadings. Notice everything is preformatted, so I don’t have to change anything unless I really want to. All I need to do is fill in the table with my own text.

FIGURE 11.6 Here’s one of Word’s Quick Tables.
When you customize a Quick Table, or any table for that matter, you can turn it into a Quick Part and use it again. To do so, click the finished table’s upper-left corner icon to select the table, click the Table button and choose the Quick Tables command, then click Save Selection to Quick Tables Gallery. This opens the Create New Building Block dialog box (see Figure 11.7) where you can name the table and add a description. By default, the table you save becomes part of the building blocks library and appears in the Quick Tables gallery along with the other table templates.
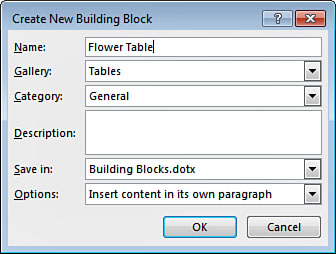
FIGURE 11.7 Save a table to the Quick Table gallery to reuse it.
Drawing a Custom Table
There’s one more way to insert a table into your document—you can draw it yourself. Sounds like a strange thing to do, doesn’t it? It’s actually rather handy, especially if your table is a bit more complex in its layout and content. For example, you might have a plan for a particular layout for your table that includes one really wide column and several smaller ones, or perhaps your content needs both small and large cells in the same table. Rather than try to move column and row borders to adjust cells, why not draw them just the way you want them? With Word’s Draw Table feature, you can control how big the table is, how many columns and rows it contains, and the size and spacing of those columns and rows.
To draw a table, follow these steps:
1. Click the Insert tab.
2. Click Table.
3. Click Draw Table. The mouse pointer turns into a pencil icon.
4. Click and drag the size of the table you want to create, as shown in Figure 11.8.

FIGURE 11.8 When drawing a table, start by establishing the outer perimeters.
5. Click and drag each row and column you want to appear inside the table, as shown in Figure 11.9.

FIGURE 11.9 Customize the table by drawing in the columns and rows.
6. When the table is finished, click the Draw Table button on the Table Tools Layout tab to turn off drawing mode.
You can edit your table by drawing new lines, erasing existing lines, or dragging lines to resize cell borders. Try some of these techniques to fine-tune your newly drawn table:
• To erase a line, click the Eraser tool on the Layout tab and drag across the line you want to erase.
• To add a new line to create a new column or row, click the Draw Table button on the Layout tab and draw the line. The button toggles the drawing mode on or off.
• To reposition a row or column border, drag the border line.
You can learn more table formatting skills in the next chapter.
Inserting Excel Spreadsheets as Tables
What if you need a table that acts more like a spreadsheet, rather than Word content? Word has a tool for that—the Excel Spreadsheet command inserts a spreadsheet right into your document. Best of all, when you activate this feature, you can tap into tools for adding formulas and functions, sorting and filtering, and more, thus putting powerful spreadsheet features at your fingertips.
When you insert a spreadsheet, you might suddenly think you’ve opened the Excel program window. As you can see in Figure 11.10, Word’s Ribbon immediately switches over to reveal Excel tabs and tools. Don’t worry; as soon as you click outside the Excel spreadsheet table, you’re back in the familiar Word environment again.
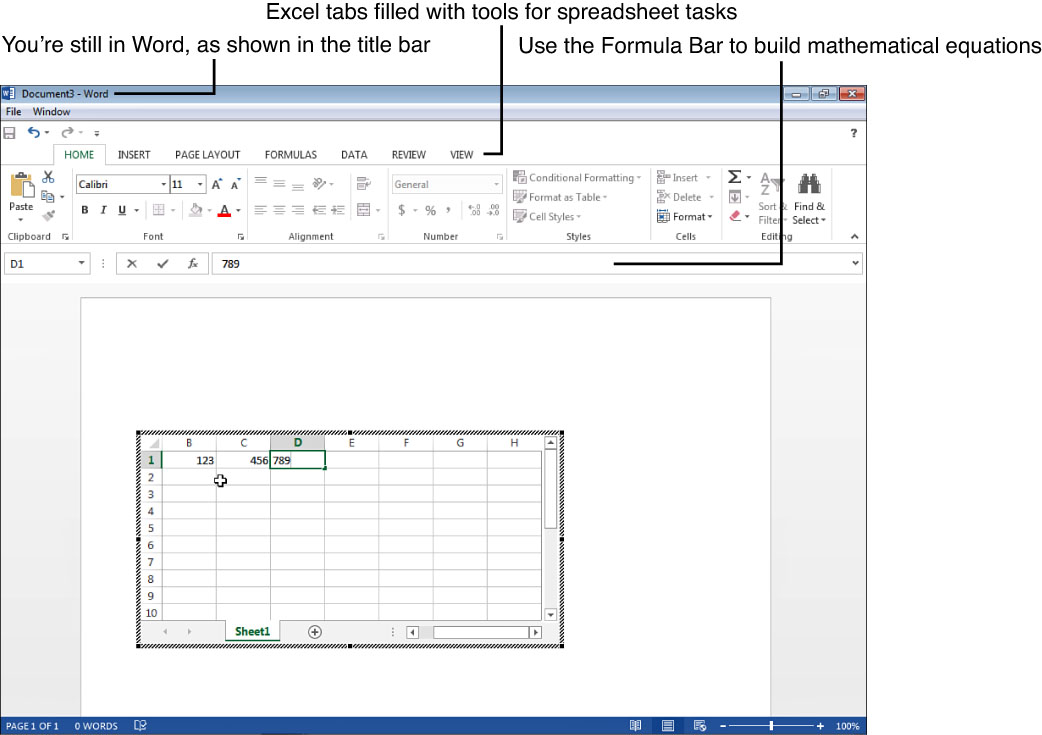
FIGURE 11.10 You can insert an Excel-style table into Word and use Excel tools to populate the table.
Microsoft Excel is a powerful spreadsheet program designed to help users juggle all kinds of data, particularly numbers.
To insert an Excel spreadsheet as a table, follow these steps:
1. Click the Insert tab.
2. Click Table.
3. Click Excel Spreadsheet.
Word opens a blank spreadsheet for you, as shown in Figure 11.10. Excel spreadsheets act a lot like a regular Word table; you can type in text or numbers, resize columns and rows, add pictures, and so on. The row and column labels (numbers for rows and letters for columns) don’t print with your table; rather, they are used with formulas and functions you might add to the table. The table gridlines appear in printouts, but you can format them to your liking.