Chapter 2. Investigation and Exploration
In this chapter, we’re going to layer on some fundamentals about how the language of media creation developed into the lexicon of shots we use to construct our projects. You have to know where you came from to know where you are and get to where you want to go.
Once we cover that, we’ll present the process you will follow as you investigate and research whatever will make your project leap off the page because of its technical, historical, and emotional authenticity.
This chapter also explains how to draft the technical, yet sublimely artistic, documents that serve as the blueprints for the structure you are about to build: your project.
Screenwriting and teleplay writing are the keys to the kingdom, and the most successful producers, actors, and directors agree that whatever the medium or scope of project—public service announcement (PSA), commercial, corporate training video, or feature film—it all starts with the script. A project comes into being because its message excites a variety of financiers, producers, and artists who have the ability to bring it to fruition.

The History of Motion Pictures
There is no way to cover the entire history of motion pictures and all other forms of media across all platforms and all genres, mentioning every innovation over the past century plus of filmmaking in a single book, let alone in this one chapter. In fact, trying to do so would only gum up the works and slow things down.
Here, then, are a few things you should know. We encourage you to dig deeper over time as a lifelong learner and critical thinker to constantly expand the depth and breadth of what you’ve seen, mulled over, and been inspired by.
The New ABCs
Media creation is based on a language that has been constantly evolving over the last 100 years across every developed nation on the planet. At different times, the most remarkable innovations in method or style have come from the United States, France, Russia, Germany, India, Mexico, China, and many other countries as well.
Filmmaking is both one language and a thousand languages. It is extremely personal, and it is global. The language of visual communication is an ongoing dialogue that re-engages every time someone releases a media project. Every time a new one goes out into the world, it has an effect. Sometimes the effect is a ripple; other times it is a giant wave.
When we begin to visualize and develop a media project, we naturally use a lot of the innovations that have gone before. Every once in a while, an artist comes up with a new way to communicate something that has never been done before and they change the way we see.
One example is the “bullet time” shot in The Matrix (1999), which moved 360 degrees around a character during a freeze frame, suggesting the slowing of time except for the camera and one other element in the shot, a bullet.
That shot and the concept behind it were not invented for The Matrix, but that film popularized it for a worldwide audience. The filmmakers used something they had seen in an innovative and visually exciting way, and as a result it was quickly adopted and overused in other projects, turning into a visual cliché in family films and commercials.
The following are just a few of the highlights of the history of media creation over the last 125 years. We strongly recommend you read up on and view the projects described and try to watch them critically in the context of what it was like to see them when they first came out.
First Steps and Early Breakthroughs
As early as 3200 BCE, Sumerians, Egyptians, and Mayans employed a series of visual characters, or hieroglyphs, to communicate stories pictographically (see FIGURE 2.1). Pictures stood in for letters and told a story.

Photography, which means “writing with light,” developed over many years, from the pinhole camera concept invented by Aristotle in the fifth-century BCE to early heliographic engravings, the earliest known photographic process, which began in the 1820s. The invention of the camera obscura, a sealed box with a hole in one side to allow light to reflect from outside into a flipped image inside the box, led to the invention of the first camera by Frenchman Joseph Niepce in 1826 (see FIGURE 2.2).

Refrigeration, the internal combustion engine, and the personal computer are frequently listed among the greatest inventions of all time, but the camera and, later, the motion-picture camera are perhaps the greatest cultural breakthroughs in history. Before the first cameras came into use, painting, drawing, and sculpture had served as our primary media for representing people, stories, and the world around us for thousands of years. Practically overnight, the process of interpretation changed, and a much more realistic alternative to all of these was available. No longer did we need to paint or draw our surroundings. For the first time, we could create a much more exact reproduction of the image our eyes transmitted to our brain.
It’s no coincidence that new, less representational styles of painting such as impressionism and expressionism flourished in the wake of the invention of photography to represent the world in ways that the eye and hand could do (at least at that time) better than a camera.
Before long, every other art form from the novel to the play needed to retrench or find a new identity in the wake of the new guy, photography, and its flashy cousin, motion-picture photography.
Action! Advent of the Motion Picture
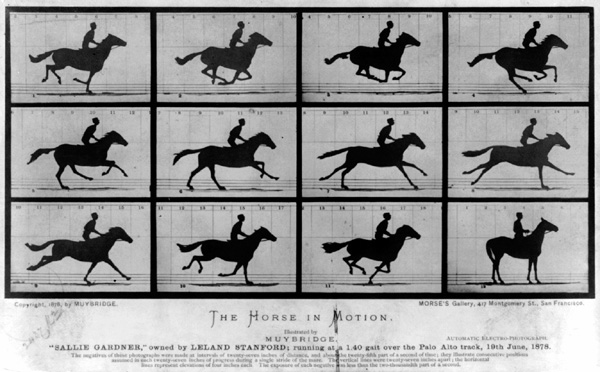
The development of photography into motion photography came about as a result of a bet. In 1872, California governor Leland Stanford hired photographer Eadweard Muybridge to take a series of photos of a horse running on a racetrack to determine whether the horse ever had all four hoofs off the ground at the same time.
To settle the bet, Muybridge set up a series of cameras along the track and had each attached to a wire that would break and develop an image when the horse raced by. The still photos were viewed in sequence, and the process is considered the primary leap from photography to motion pictures (see FIGURE 2.3). (By the way, if you were wondering, horses do have all four hooves off the track at the same time.)
The next major innovations in motion pictures came from the great American inventor Thomas Edison and his collaborator W. K. L. Dickson with the Kinetograph camera in 1893 and across the Atlantic in France where the Lumiére brothers (yes, their name means light in French and, yes, that’s who the candle in Beauty and the Beast was named after) developed their own camera, the Cinematogaph, in 1895 (see FIGURE 2.4).
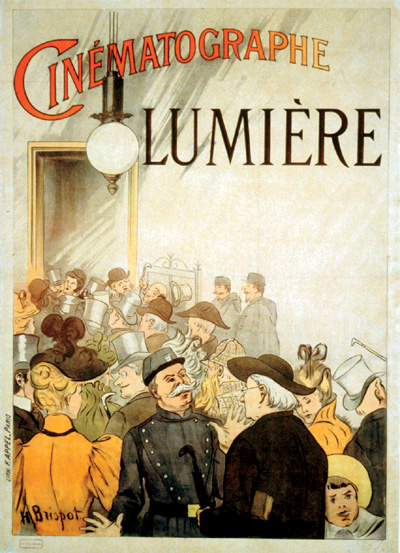
These cameras ran a continuous roll of film into a dark chamber, exposing one frame of film to light and then stopping, advancing the film another frame, and exposing it again so that the series of still images, when played back at the same speed at which they were recorded, would create the illusion of a moving picture by fooling our brains.
Life in Two Dimensions
These pioneering artists are generally credited as the first filmmakers. Their movies were from a few seconds to around a minute long, and they documented everyday events such as workers leaving a factory or a round of a boxing match. They had no synchronized sound of any kind and were typically accompanied in theaters by a live organ. They were more like documentaries than fiction films, and their appeal sprang from their magical representation of real life as a two-dimensional moving image projected against the screen or wall.
We say “two dimensions” because the film frame and the screen have real width and height but only the illusion of depth. Of course, this illusion has challenged filmmakers to conquer it ever since the dawn of filmmaking. Only recently, after more than 100 years, has three-dimensional (3D) filmmaking become a significant aspect of the film-going experience.
Before 3D, filmmakers had to rely on z-axis movement, which is when a person or object moves toward or away from the screen, creating the illusion of depth (the x- and y- axes are the length and height of the image).
A funny story about z-axis movement at the dawn of the motion-picture era comes from an urban legend about the first screening of the Lumiére’s film Arrival of a Train at La Ciotat Station (1896). This film, as advertised, showed a train arriving at a station at a time when audiences were not quite sure what they were seeing (see FIGURE 2.5). As the train got closer, the story goes, the audience was not quite sure that they were safe in their seats. They jumped out of their seats so the “train” would not plow into them!

A Step Toward the Stage
As audiences became familiar with motion pictures and the novelty of merely seeing any moving image wore off, the focus of produced films came from the dominant visual storytelling form of the day, which was theater. The shooting of a play was typically in a static or still wide shot. The actors would walk into frame, deliver their lines, and walk out.
During this time, filmmakers used the camera simply as a recording device, and dialogue was delivered via the use of written title cards between the scenes. This allowed audiences across the country to see the finest stage actors of their day, but visually it didn’t make use of all the power the camera had and was not at all as interesting as what was to come.
Méliès the Magician
Georges Méliès was arguably the most imaginative and innovative filmmaker during this first decade of film, pioneering many special-effects shots, using the power of film editing to make characters appear and disappear, and using multiple exposures and time-lapse photography, as in his most famous film A Trip to the Moon (1902); see FIGURE 2.6.
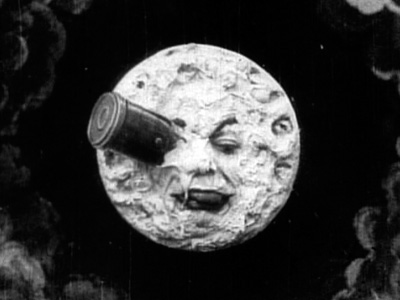
According to legend, Méliès’ delight in trick photography began when his camera jammed while a car was passing in front of it and restarted when a hearse was passing, so when he watched it back, it appeared that the car simply became a hearse. This magical transformation was very exciting to Méliès.
A Giant Step Forward
The next artist to truly revolutionize the young art form was Edwin S. Porter, whose groundbreaking work The Great Train Robbery (1903) had so many new tricks, it must’ve seemed like it traveled back to audiences from the future. Its innovations included the following:
![]() First film to pan (turn) the camera from left to right or right to left
First film to pan (turn) the camera from left to right or right to left
![]() First film to crosscut between two storylines occurring at the same time
First film to crosscut between two storylines occurring at the same time
![]() One of the first attempts to color a film frame by frame by hand
One of the first attempts to color a film frame by frame by hand
One could argue that cutting from scene to scene and expecting the audience to follow the logic of the narrative is the single greatest leap in the history of media production. Porter’s film really jump-started the grammar of visual communication that was to take hold and set the stage for what was to come over the next 100 years.
The Controversial Pioneer
D.W. Griffith was one of the first filmmakers to attempt the production of longer, feature-length films and to embrace the use of the close-up in films. He was the first blockbuster film producer. Though he was the preeminent director of his time, Griffith may be best known for the racism in his magnum opus The Birth of a Nation (1915); see FIGURE 2.7.

This film, based on the novel and play The Clansman, depicted the origin of the Ku Klux Klan in a heroic light and sparked massive protests everywhere it was shown. No one disputed Griffith’s mastery of cinema, but 100 years later, it remains one of the most hated films in history.
Birth of the Studios
For its first 20 years, the motion-picture industry steadily grew up on the East Coast, primarily in New York and New Jersey.
By 1910, the movers and shakers of the American film business left the East Coast for sunny Los Angeles where they could shoot almost every day, and entrepreneurs from other industries such as Samuel Goldwyn (MGM Studios), William Fox (20th Century Fox), Adolf Zukor (Paramount Pictures), Louis B. Mayer (MGM Studios), Carl Laemmle (Universal Pictures), Harry Cohn (Columbia Pictures), Jack and Harry Warner (Warner Bros.), and Walt Disney (Walt Disney Studios) developed the first movie studios, empires that continue to dominate the industry to this day.
And What of Europe?
European countries were busy developing their own media cultures and master storytellers, whose styles were sometimes crafted to contrast with the “Hollywood” style.
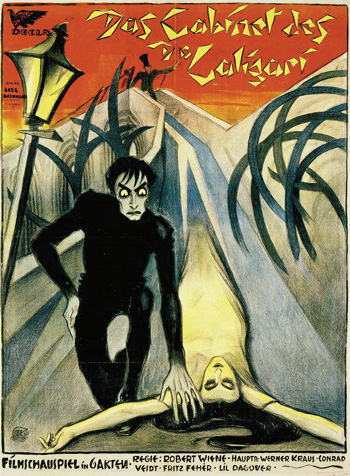
Chief among these many movements was the expressionism of German cinema, best represented by Fritz Lang in films like The Cabinet of Dr. Caligari (1920), the Soviet montage theory seen in the editing experiments of Lev Kuleshov and Sergei Eisenstein’s Battleship Potemkin (1925), and the impressionistic French cinema of Jacques Feyder and Able Gance (see FIGURE 2.8).
Studios, Sync Sound, and Color
By the end of World War I, Hollywood became the dominant worldwide force in motion pictures and popular culture. The most significant technological development of this time was the invention of a synchronized sound system, which began in 1927 in films like The Jazz Singer.
For the first time, audiences could hear characters speak on film! Performers had to rely on their voices. Careers were made and lost in a day during a transformative period documented expertly in three great Hollywood classics: Sunset Boulevard (1950), Singin’ in the Rain (1952), and The Artist (2011).
The other most significant technical step forward was the development of color film processes, which started with filmmakers hand-painting individual frames of their movies and evolved into the two- and three-strip Technicolor process that eventually provided rich combinations leading to the production of some of the greatest color films ever made including The Wizard of Oz (1939) and Gone with the Wind (1939).
Rise of the Studio System
The emergence of the studio system refers to the industrialization of the top movie studios during the 1920s.
The major studios, in collusion, exerted maximum control over the production and eventual commercial success of their films by doing the following:
![]() Building huge soundstages where most filming would take place.
Building huge soundstages where most filming would take place.
![]() Developing the star system. The studio bosses realized the success of their business depended on the audience identifying with certain performers that they would then look for in movie after movie. They groomed actors, transforming them into stars and signing them to long-term contracts that took away their right to make films for other studios without their bosses’ approval.
Developing the star system. The studio bosses realized the success of their business depended on the audience identifying with certain performers that they would then look for in movie after movie. They groomed actors, transforming them into stars and signing them to long-term contracts that took away their right to make films for other studios without their bosses’ approval.
![]() Developing the means of distribution and exhibition of their product, creating a vertical monopoly and limiting competition from newcomers. By 1939, there were 15,000 theaters in the United States, all showing the product of a handful of studios.
Developing the means of distribution and exhibition of their product, creating a vertical monopoly and limiting competition from newcomers. By 1939, there were 15,000 theaters in the United States, all showing the product of a handful of studios.
This arrangement lasted into the 1950s until decisions in a series of court cases (beginning with United States v. Paramount Pictures, Inc. in 1948; see FIGURE 2.9) required distribution and exhibition companies to be separate entities. During this time, however, several genres or categories of entertainment became the specialty of one studio or another: gangster films at Warner Bros., musicals at MGM, horror and monster movies at Universal, and animated films at Walt Disney Studios.

PHOTO “PARAMOUNT STUDIOS” BY LOREN JAVIER / CC BY-ND 2.0
FIGURE 2.9 The original front gate at Paramount Studios in Hollywood
The Europeans Strike Back!
As international distribution picked up after World War II, more European films were finding international audiences after screening at festivals such as the Cannes Film Festival in France. Though Hollywood films and American movie culture had dominated world cinema for decades, other countries were gaining increased access to the worldwide audience and forcing Hollywood to take notice.
The most significant of these was the French nouvelle vague, or “new wave,” in which crews used lighter cameras and gear for quicker production to make more vital, less formal films that challenged sensibilities and were shot like low-budget documentaries.
Filmmakers such as Francois Truffaut and Jean-Luc Godard, who were inspired by Hollywood films, inspired in turn a new generation of American mavericks to explore more sophisticated and complex stories with less simplistic heroes.
The Screen Gets Wide
Every time the audience started to get bored with the clichés of visual communication, Hollywood came up with some technical improvement to bring them back. When television became popular in the 1950s and brought moving pictures into American households free of charge (yes, TV was free...once), Hollywood changed the shape of the screen from squarish (like TV) to the Cinemascope widescreen 2.35:1 aspect ratio and then later introduced the U.S. widescreen cinema-standard 1.85:1 ratio, both of which we have retained to this day (see FIGURE 2.10). This wider space emphasized the epic nature of films and gave directors a new space dimension to visualize in.

Before the Beginning: The Agenda of the Creator
“I do not want to achieve immortality through my work. I want to achieve it by not dying.”
—Woody Allen
You have a reason for everything you do. It reflects some need you have. You eat when you’re hungry. You sleep when you’re tired. You play when you’re bored.
Media creation fulfills a need, too: the need to express yourself, to perform, to be heard, to improve the world, to be part of a larger dialogue.
To be immortal.
There are two main ways to have an effect on the world: by having kids and by doing relevant work that impacts generations. Both of these ways can be a source of great pride and cost you a considerable amount of sleep.
Seriously, though, do you think when William Shakespeare wrote Romeo & Juliet in 1595 (or thereabouts), he knew that ninth-grader Arthur Xanthos of Taft High School in Woodland Hills, California, would be contemplating his first kiss, onstage, while performing the role of Romeo? Probably not. And what about the hapless fellow who wrote the third best play of 1595? You remember his name, don’t you? (No, it’s not Marlowe.)
The point is, we generally have little idea when we are making something if it might catch on, transcend its origins like a Molière play or a Seinfeld episode, and stake a claim to relevance far beyond what its creators might have originally imagined.
You, as a creator, should be clear at least with yourself about what you want your work to do once it is out in the world. One of the most inspirational stories about a writer and his work concerns Sylvester Stallone and the script for Rocky (1976). Stallone had kicked around as an actor and was nearing 30 without anyone giving him the chance to do what he knew in his heart he could do as an actor.
So, he wrote a script for himself and, against tremendous odds, found a studio that wanted to buy the script and make his film—only not with him in it. Not a rich man at that time, Stallone responded with an act of great character. He demanded that he play the lead role as a condition of selling the script. Eventually, the studio agreed to his terms, and the results validated everything Stallone had ever thought about himself. The film won three Academy Awards, including Best Picture of 1976.
Research Equals Validity
Every project that ever landed successfully has its own process, and the key to its completion and its success is that its creators knew what they needed to know and learned what they needed to learn before they went into production.
You are responsible for the “validity” of your project. That means if you’re making a statement in your PSA that 15,000 dogs are left homeless every year in Los Angeles County, you should thoughtfully consider this problem from several angles and ask the following questions:
![]() Why does this happen?
Why does this happen?
![]() Is there a way to improve the situation?
Is there a way to improve the situation?
![]() What appears to be the best way?
What appears to be the best way?
![]() Where am I getting my facts from?
Where am I getting my facts from?
![]() Why do I consider this source to be trustworthy?
Why do I consider this source to be trustworthy?
Most media creators, when they’re starting out, don’t have a lot of money or a lot of connections. But they all have one thing that may be worth millions of dollars and peace of mind over the course of a career: their reputation.
How does a writer, producer, or media artist develop a solid reputation? Sometimes it’s by having a clear vision, a way of seeing things that opens up other people’s eyes. Vision is a key component of all types of leadership, and media creation is a type of leadership.
Key strides against racism were made over the past century by the song “Strange Fruit,” written by Abel Meeropol and sung by Billie Holliday; by the career of baseball player Jackie Robinson and the progressive leadership of Dodgers owner Branch Rickey; and, most impactfully, by the life, writing, and leadership of Rev. Dr. Martin Luther King.
Each of these transformative leaders engaged an audience through the use of media, and each of them changed the world. Their style and their venue may have been different, but they are comparable in the integrity of their vision.
What gives work integrity? Passion, for one thing. Your audience should understand without a doubt that you care about what you’re doing. The Shakers are a sect who believe they should work as if they are going to live for a thousand years and also as if they are going to die tomorrow. What we say matters. It reflects us. It tells the world who we are. That’s why it has to be right.
The questions listed previously are designed to help you begin to develop a methodology or process by which you can be sure that anything you put into your media project is based on correct information. Let us be the first ones to say that this crucial step in your process may be more difficult now than at any time in history.
In the 12th century, you probably learned about anything happening more than 1,000 feet from you no more than twice a year. Today, we have the Internet, Google, Wikipedia, and Call of Duty: Modern Warfare 2, so we have a pretty good sense of what’s going on in the world from minute to minute.
Even for those who try to keep up, it’s getting harder and harder to know what’s what. News programs are all owned by the same five super-conglomerates who are more interested in ratings than illuminating news that is truly relevant to people’s lives.
The point is that whatever research or investigation you do for your project, you need to consider the source and whether it would stand up to the scrutiny of others. If you’re working on a project celebrating the career of Bill Gates, remember that his Wikipedia page once referred to him as the devil and, even worse, gave him a funny mustache. Yes, Wikipedia can be publicly edited and so, like your uncle’s toupee choices, it’s not to be trusted.
So, what can you trust? Here are a few sources that have passed the test for objectivity:
![]() NPR
NPR
![]() PBS
PBS
![]() C-SPAN
C-SPAN
![]() BBC
BBC
![]() Reuters
Reuters
![]() The New York Times
The New York Times
Giving Them the Treatment
Many writers first develop an outline of their screenplay or script, known as a treatment. A treatment consists of a list of scenes and a short summary of what happens in each scene. Once the treatment is complete, they write each scene in more detail with the visuals and the characters’ dialogue included in the final screenplay.
In the Beginning
There are as many ways to begin a story as there are stories to tell. Writers generally have some sense of the protagonist or main character, the goal they are going after, and the obstacles that will get in their way. You may want to introduce the main character in their environment first or introduce the villain doing the very thing that will force the hero to chase him down. Remember, every time you go to (or cut to) a new place and time in your screenplay, you are actually beginning a new scene.
A scene is a unit of action in one location and time—for instance, breakfast at the Aguilar house, a graveyard at midnight where the vampires rise up, or a car chase along the railroad tracks. Think of a scene as a “unit” in your story like a penny is a unit of a dollar. It usually takes about 30 scenes to make up a feature-length screenplay or movie.
Developing Your Main Character
Remember that character (personality type) determines action. The things that your main character does tells us what kind of person they are better than anything they could say about themselves.
For example, if Luke Skywalker in Star Wars had been a better soldier, he would have left on his tracking computer during the climactic scene. Had he left on his tracking computer, he probably would have missed getting his shot at the Death Star. Had he missed his shot, the Rebel Planet would have been destroyed. Don’t you think the rebels are glad Luke is such a terrible soldier?
The main personality trait of the main character (lazy, brave, generous, selfish) should become clear to viewers quickly in the beginning of the story. The next time you watch a movie, look and see. The writer usually demonstrates it during the first scene the character is in.
The character arc is the overall change in the main character from the beginning to the end of the story as a result of the action in the story. This is also called the “hero’s journey.” Here are a few examples:
![]() Michael Corleone in The Godfather (1972): From Ivy League college boy to mafia don
Michael Corleone in The Godfather (1972): From Ivy League college boy to mafia don
![]() El Mariachi in El Mariachi (1990): From singer to mercenary
El Mariachi in El Mariachi (1990): From singer to mercenary
![]() Neo in The Matrix (1999): From geeky hacker to cyber superhero
Neo in The Matrix (1999): From geeky hacker to cyber superhero
![]() Austin Powers in Austin Powers (1996): From swinger to husband
Austin Powers in Austin Powers (1996): From swinger to husband
What’s the Big Idea?
The theme is the idea behind the story or lesson of a movie or written work, such as “to thine own self be true” (Hamlet/Star Wars) or “slow and steady wins the race” (“The Tortoise and The Hare”). Like your main character and your goal, the theme should be one of the first things you determine for yourself as you start to write your story.
Unlike stories, themes don’t need to be original. Any important lesson you want to get across has probably been around since the beginning of storytelling in one form or another. The theme shows what you, the writer, think is important. Is it more important to take care of our families or friends, or is our main responsibility actually to ourselves? Is it all right to lie to get out of a tight spot?
Your story will tell the audience your opinions about the world you live in, so make sure it reflects your real feelings.
Often, a physical change (Michael Corleone’s broken jaw, El Mariachi’s busted hand) reflects the spiritual/emotional change in the main character.
Other times, a physical journey (Austin Powers to Las Vegas, Neo to see the Oracle) will reflect the emotional/spiritual journey of the main character.
Your goal when you sit down to write is to create the most interesting and entertaining story you can. Many scripts, including those written by experienced and talented writers, have the same problems, and these are things you can think about when you write your story.
Troubleshooting
Probably the most common problem in screenplays is the use of clichéd scenes or characters, which seem so familiar and unoriginal that they bore the audience or, worse, take them out of the story and make them think about the writing. The challenge of writing or any art is to be original yet relatable.
Another problem we see often is an unlikable or uninteresting main character. It’s not that the main character has to be nice. Tony Montana in Scarface (1983), Michael Corleone in The Godfather (1972), and Walter White in Breaking Bad (2008) are not always nice people. Yet they’re interesting not just because of what they do but why they do it.
A common type of “bad” main character is the passive main character, who neither does anything nor seems to care much one way or another about what happens. Ask yourself as a writer, “Why is an audience going to care enough about this character to stay and watch what happens to them?”
Finally, scenes—particularly endings—that seem to come out of nowhere are big problems. Writer/director M. Night Shyamalan had a massive success with The Sixth Sense (1999), which relied on a wonderful twist that surprised most viewers but nonetheless made perfect sense within the context of the story. He followed up with a twist-a-thon of films—Unbreakable (2000), Signs (2002), The Village (2004), and Lady in the Water (2006)—that, while occasionally scoring box-office success, often left audiences scratching their heads because of the implausibility of their endings.
Remember, as a writer, that you’re building a story like an architect and engineers build a house. If you start to build a two-story house and then put a 70-story apartment building on top of it, it’ll collapse just like a story will if it isn’t built all of one piece.
Occasionally, there’s a difference between what the main character wants and what the audience feels they need. For example, we never believe that Lloyd Christmas should wind up with Mary in Dumb and Dumber (1994). However, this does not make us lose empathy for the main character.
Remember, the special kind of empathy that exists between the main character and the audience is based on our hope for the main character, so in this situation we hope Lloyd will come to understand what he needs is to be honest with Harry and appreciate his good friend.
Screenplay and Format
A screenplay (or teleplay) is a written-out version of a show, indicating specifically what the audience is seeing (what is onscreen) and hearing (on the audio track). Because of this, a screenplay reads like the combination of a novel and a technical document like the blueprint of a house.
Screenplays will differ from writer to writer depending on their style, what kind or genre of film it is, and how many descriptive words the writer chooses to use. The rule of thumb nowadays is to be succinct and to the point in your descriptions so that the reader can breeze through your script in approximately the amount of time it might take them to watch your final project. On the other hand, the script for The African Princess (1951) by James Agee and John Huston, based on C.S. Forester’s novel, is super-wordy and magnificently clear and helped produce a masterpiece.
The Four Components of a Screenplay
Although screenplays may differ based on the style of the writers, if you look at them as technical documents, they can usually be broken down into four main parts.
Sluglines
Every scene must start with a slugline, a capitalized heading telling when and where the scene takes place. You skip a line before and after each slugline to designate a new scene starting.
Sluglines are designed to give important instructions to the key personnel: director, producer, cinematographer, production designer, sound designer, and so on. Here’s an example:
INT. CROWDED SCHOOL HALLWAY – DAY
Let’s break this part into three parts.
![]()
INT. or EXT.: Indicates whether the scene occurs inside (INT./interior) or outside (EXT./exterior). The producer adds up the number of pages that take place inside (on stages or locations) and outside (backlots or locations) and budgets for the correct equipment and personnel for each.
![]()
CROWDED SCHOOL HALLWAY: Describes where the scene takes place in a few words. Save any longer visual clues for the scene description in your screenplay.
![]()
DAY or NIGHT: Indicates when the scene takes place. You can also use DAWN, DUSK, or NOON. However, anything more specific (11:38 p.m.) likewise goes in the scene description.
Remember, skip a line before and after the slugline so it stands out from the rest of your screenplay.
A couple other notes about sluglines: Some scenes start inside and go outside, or vice versa. Try not to do this. It can be confusing to your audience and might make them squint. Just kidding. Just write INT./EXT. or EXT./INT. to indicate both.
You might want to intercut between two locations in one scene, which you would write in by placing these words along the left margin of your page, skipping a line before and after this description:
INTERCUT WITH (PREVIOUS SCENE)
You may have noticed that all this skipping of lines creates a lot more blank space in the script or teleplay you were planning to write than in that novel or essay you just wrote. That’s one of the reasons everyone thinks screenwriting is easy. Welcome to Hollywood.
Scene descriptions describe the scene exactly the way the camera shows it to us. Unlike novels, which can take us inside the mind of their characters, it’s important in scripts to describe the picture on the screen visually and avoid phrases like “Luis and Marco have been best friends for years,” using instead, for example, “Luis and Marco give each other a secret handshake,” which is something we can see or hear on film.
Your screenplay is really just a list of images that need to be recorded and sounds that will accompany them. It may sound like an episode of Jerry Springer—“Things That Need to Be Recorded” and the “Sounds That Go with Them”—but that’s what it is. Often, the challenge for the writer is coming up with a visual way to translate an idea that may be complicated or at least nonvisual.
In the (mostly) nondialogue film City Lights (1931), Charlie Chaplin wanted to communicate something visually but couldn’t figure out how. In the film, a blind girl selling flowers on a corner must misunderstand that Chaplin’s penniless Little Tramp is really a rich man. He shut down production for months trying to find a satisfactory answer.
After a long break and 342 takes, Chaplin finally solved it. He had a Rolls Royce enter the shot and blow its distinctive horn, immediately after which the Tramp addresses the girl, who clearly associates his voice with the sound of the expensive car.
Some writers write as if they're composing operas, others jazz, as in the following example:
"THREE BLACK BUTTONS"
FADE IN:
INT. CORRUGATED METAL SHACK - DAY
SHADOWS. TINY STREAKS of DUSTY LIGHT
PIERCING THROUGH.
SFX: A low and menacing MOAN.
A finger-thin flashlight BEAM illuminates
the far wall.
Hanging on the wall we see C-CLAMPS, a
HACKSAW. A BELT SANDER.
Spattered and dripping BLOOD.
Another thing you’ll notice about screenplay description is that it doesn’t always follow traditional sentence structure and may involve things such as sentence fragments that would get redlined in any serious English literature class. It comes back to style.
I’m strumming an upright bass, snapping my fingers, and wearing a turtleneck already. These “sentences” would get these guys’ knuckles rulered in Sr. Grace Agnes’ sixth-grade language arts class, but in a screenplay, they work.
Here’s a more traditional example:
The THIEF climbs into the expensively
furnished living room – full–length
mirrors, a terrace with a view of
Central Park. He listens for any SOUND
and, hearing none, puts on NIGHT VISION
GOGGLES.
You probably noticed that whenever we switch over to writing in “screenplay mode,” we use a different font. This is Courier 12 pt., which is the standard font for screenplays and teleplays. Also notice that, in this example, we capitalize certain words within the scene description:
![]() The first time we meet a character: “
The first time we meet a character: “The THIEF”
![]() Sound effects: “
Sound effects: “A car BACKFIRES”
![]() An indication of what the camera should do: “
An indication of what the camera should do: “We PULL BACK TO REVEAL Sam standing behind a lamppost in an MCU.”
![]() Some important prop: “
Some important prop: “NIGHT VISION GOGGLES”
The trick to writing screen descriptions is keeping them brief and clear, telling us just what we need to know to get across the necessary information in the scene.
Finally, screenplays, unlike novels and short stories, are written in the present tense to replicate the sensation that what you are reading is happening right in front of you in the moment because, if the writer did their job and wrote everything visually, ideally it is.
Transitions
Transitions tell the reader how you want to go from scene to scene. As with sluglines, you skip a line before and after each transition.
Except for FADE IN: at the front of a script, you place transitions flush right along the right margin of the page. Transitions stand out to our eye as we read. They look like this on the page:
FADE IN:
CUT TO:
DISSOLVE TO:
FADE TO BLACK.
Here are some descriptions of the major transitions and what they are used for:
![]() Just like between shots, most scenes cut from one to the next.
Just like between shots, most scenes cut from one to the next. CUT TO: means one shot begins exactly where the previous one ends with no overlap of the visuals. (In the “It’s Time to Split” section, we will compare different kinds of cuts in Chapter 4; all involve a cut from Shot A to Shot B.)
![]()
FADE IN: means a fade from a black screen into the first shot of the movie. FADE OUT: or FADE TO BLACK. is usually the last shot of a film, where the image gradually disappears into the blackness. Fade-ins and outs take us into the world of the story as if we were transporting across dimensions to another world where this narrative is beginning, which involves someone who seems like us. They may also feel as if we are falling asleep into the dream of the show. Occasionally, a show might fade to black and then leave the screen black for a moment before fading up into the EXT. scene. This (along with other elements) may suggest a passage of time, though it would be up to the writer/director to then clarify how much time has passed.
![]()
DISSOLVE TO is when a shot disappears (fades out) as another shot appears (fades in) and the two shots overlap and occupy the screen together for a moment. This is typically used to connect two images in some way, such as when a singer on the left side of the screen singing a duet dissolves into their lover singing along with them on the other side of the screen and the two characters, apart in “space,” are united graphically onscreen and seem to be looking at each other.
Another example is the famous (spoiler alert) horse-head scene in The Godfather (1972) where the end of this horrifying and very PETA-unfriendly scene slowly dissolves into a medium shot of Vito Corleone (aka the Godfather) sitting in his chair across the country, seemingly tired from the effort of enforcing his will from so far away.
A dissolve can be used for many purposes. Its main attribute is that it is not a cut; it has a different feeling, particularly based on the length of the dissolve, and may require the audience to wonder why the show is going from shot to shot or scene to scene in a different way.
Wipes
WIPE TO: is when a line moves across the screen, usually either horizontally, vertically, or diagonally, and it lays one shot down on top of another as it goes. We don’t want to spend too much time on wipes because, honestly, we hate them. They are the screaming toddlers of transitions, shrieking “Look at me, look at me!” They really make you want to cringe. They have been almost universally dismissed, and there are only a couple places you’re likely to run across them.
![]() Local television, if such a thing even exists anymore.
Local television, if such a thing even exists anymore.
![]() Star Wars movies. George Lucas is a genius of world-building and classic myth-based storytelling, but he also likes Jar Jar Binks and wipes. In his defense, Star Wars is a paean or homage to old-timey serials of the 1940s where they typically did use wipes. So there. If you love radio serials and Buck Rogers and are making your version, use wipes. Otherwise, stay away.
Star Wars movies. George Lucas is a genius of world-building and classic myth-based storytelling, but he also likes Jar Jar Binks and wipes. In his defense, Star Wars is a paean or homage to old-timey serials of the 1940s where they typically did use wipes. So there. If you love radio serials and Buck Rogers and are making your version, use wipes. Otherwise, stay away.
Communication
The three main types of communication in a screenplay are as follows:
![]() Dialogue: One character speaks to another, several characters speak to each other, or a character addresses a group. Unless your characters can read minds, this will involve synchronization between their words and the image of their mouths.
Dialogue: One character speaks to another, several characters speak to each other, or a character addresses a group. Unless your characters can read minds, this will involve synchronization between their words and the image of their mouths.
![]() Narration or voiceover: Either a character from the piece or the omniscient (all-knowing) narrator who is not part of the story speaks directly to the audience without being seen. This is written as follows:
Narration or voiceover: Either a character from the piece or the omniscient (all-knowing) narrator who is not part of the story speaks directly to the audience without being seen. This is written as follows: JENNY (VO) or JENNY (OC) or JENNY (NARRATION), where OC means off-camera.
![]() Interior monologue: The characters “speak” to themselves. Usually, we hear their thoughts over an image of their face. This is written as follows:
Interior monologue: The characters “speak” to themselves. Usually, we hear their thoughts over an image of their face. This is written as follows:
DAVID
(thinking)
Oh God, it’s the first day of
school! What am I doing here?
They’re all gonna laugh at me!
Where’s my first class?
When writing communication, the character’s name should be 3.5" from the left edge of the sheet, any parenthetical descriptions of how they say their dialogue should be 3″ from the edge, and you should indent the dialogue on the left and right sides. Industry standard is 2.5″ from the left and right edges of the sheet. You math club types have probably figured out that a column of dialogue goes only 3″ across the page as follows:
JOHNNY
(bored)
I’m bored! I’m getting the heck
out of here! Don’t tell me what
to do! You’re not my mom!
Note that in this example, we don’t really need the parenthetical since Johnny is telling us he’s bored. Use parentheticals only when the meaning of the dialogue might be unclear.
When you put it all together, it looks something like FIGURE 2.11.

Know Your Rights: Copyright
“I find much in this that is good and much that is new; but that which is good is not new, and that which is new is not good.”
—Dr. Samuel Johnson, responding to a hopeful author about his book
You see that little © symbol to the right of the image for Figure 2.11? In reality, it has as much power as the S on Superman’s chest. Copyright is one of the single most important concepts for the novice media creator to grasp. It actually refers to a series of rights that the creator of any piece of media automatically has in regard to that media, including the following:
![]() The right to produce or reproduce the copyrighted work
The right to produce or reproduce the copyrighted work
![]() The right to prepare derivative works based upon the work
The right to prepare derivative works based upon the work
![]() The right to distribute copies of the work to the public
The right to distribute copies of the work to the public
![]() The right to perform a copyrighted work publicly
The right to perform a copyrighted work publicly
![]() The right to display the copyrighted work publicly
The right to display the copyrighted work publicly
This means that if you write, compose, or design something, you are the one who has the right to exploit that work commercially and to make money from its reproduction. Naturally, if someone disputed your copyright claim and it came down to a lawsuit, the hearing board would try to determine which parts of your work are both original and yours.
The U.S. Copyright Act of 1976 (and a few pieces of legislation since) clarifies the protections that are guaranteed to the owner of a copyrighted work. Technically, you own the copyright to anything you create from the moment you write it, as long as you’re not infringing the copyright of someone else.
However, to protect your copyright or to simply to clarify that you are the one who created your work, it may be worthwhile for you to register your work with the U.S. Copyright Office. You simply send them a copy of your completed work along with their fee, which depends on what type of work it is, and they will protect it. FIGURE 2.12 shows an example of a copyright form.
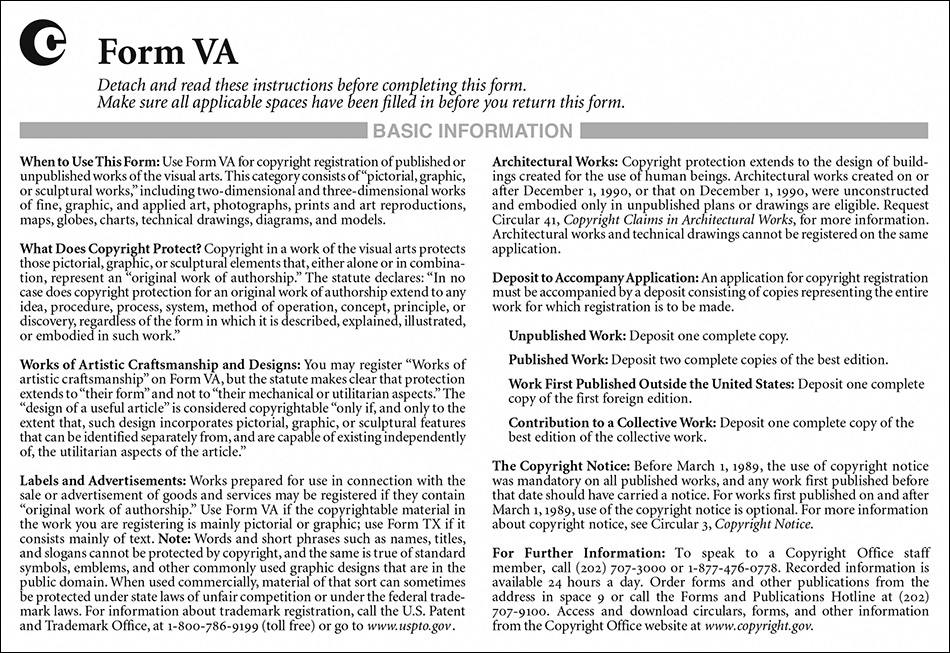
It would naturally help, of course, if you were ever to bring a lawsuit for infringement against another party for violating your copyright in your work, to have a copy of your work on file with the U.S. Copyright Office.
Additionally, the Writers’ Guild of America (WGA), an organization that protects the rights of writers, will register your script as a sort of protective backup to the copyright office. As a professional writer, when you “go out” with your script (try to sell it), a lot of potential buyers may see it over a short period of time, so you may want it to be as protected as it can be.
Certain types of work like TV shows, films, screenplays, songs, paintings, and computer software are protected by copyright. Certain designs would be considered trademarks rather than original artwork but would then be protected by trademark law. A trademark is another type of intellectual property—a symbol, sign, or expression that is associated with a commercial product or a corporate entity.
Other original work like fashion designs can be copyright-protected; however, the original aspects of certain types of work sometimes need to be challenged in a court for some larger determination to be made about what is truly original. Apparently, the government got around to extending copyright protections to the hull design of ships in 1998. So, y’know, if you’ve got a great hull design you’re not doing anything with, feel free to get it out there. It’s protected.
Certain types of creative work, like names of songs, books, and band names, are not protected by copyright law. So, legally, you might be able to call your work The More Hurt Locker: Even Hurtier and get away with it, so long as you don’t mind your house getting egged. Every night. Forever.
But don’t try calling it Star Wars, Episode Four: An Even Newer Hope, because that’s trademark infringement of a corporate entity. And this particular corporate entity has light sabers.
Soundtrack and Score
“The best soundtrack music bypasses your mind and goes straight to your soul. It sort of trips something in your brain; you know you’re being transported.”
—Cameron Crowe
Music, in and of itself, is a complex medium that libraries’ worth of books have been, and continue to be, written about. Like the motion picture, it is a temporal medium, one that requires time to be perceived by an audience member (see FIGURE 2.13).

You can’t just start a video and look at it for a few seconds and say, “Yep, watched it.”
You may be able to walk quickly through a museum, glance at every painting and sculpture you’ve passed by, and say you’ve seen it, but you can’t listen to a song or watch a video the way Neo learned kung fu in The Matrix (1999).
As mentioned in the introduction to this book, a defining aspect of the motion-picture medium is its inclusion of other media, music being one of them. Unfortunately, instruction on the specific methods of writing and recording a piece of music goes beyond the scope of this book.
Rather, this section will focus on the understanding of how musical soundtrack and score can be used to enhance and strengthen the delivery of your message. You’ll learn how to identify the right kind of music for your video and how to communicate and work with musicians to create the score. We’ll also explain how to ethically and legally use music that was not originally created for your video.
It’s Time to Settle the Score
Note
Albums of music from a motion picture are also called original soundtrack (OST).
The terms soundtrack and score are frequently used interchangeably. Originally, the term sound track was used to define the entire completed mix of audio that accompanies the motion picture. As record albums of music used in films began to be sold to the public as a separate product from the film in the early 20th century, the entertainment industry began to use the contraction soundtrack to describe the music in a film’s sound track. Today, the most common use of the term soundtrack refers to songs in a motion picture, as opposed to a musical score.
A score is music that is intended to play in the background of a motion picture’s sound mix, usually recorded by an orchestra specifically for that film (see FIGURE 2.14). Its purpose is to support and enhance the mood, tone, and emotional impact of a scene. A score guides an audience’s emotional understanding of what is happening onscreen. The music can set a specific mood, like suspense and anticipation in a horror film, excitement and energy in an action scene, or melancholy in a scene where there is loss or death.

PHOTO “SCORING SESSION” BY JOSH TIDSBURY / CC BY-ND 2.0
FIGURE 2.14 A full orchestra at work in a scoring session
Music in motion pictures is not just limited to instrumental compositions; songs also serve an important purpose. For scenes in which there is no dialogue, a song with lyrics that reflect the action or emotion of a particular scene can be effective. Songs bring an element of poetry to the collection of media that is integrated into a motion picture. Filmmakers can use a song in its entirety as the foundation of an entire sequence or montage.
There are some films whose soundtrack is made up entirely of songs or prerecorded music, with little or no original score. The soundtrack for the Mike Nichols film The Graduate (1967) is made up entirely of popular songs written and performed by Simon & Garfunkel. Director Martin Scorsese frequently uses this approach to film music, most notably in Goodfellas (1990), Casino (1995), and The Wolf of Wall Street (2013). Even in Shutter Island (2010), Scorsese used prerecorded music that sounds like original score, mostly because a large chunk of the music was used in other films.
Directors often choose songs that locate the story or segments of it at a specific point in time. Two examples of this are Forrest Gump (1994) and Almost Famous (2000). Directors don’t fill their films’ soundtracks with songs just because they like them; Zach Braff’s Garden State (2004) may be an exception to that rule.
On the other side of this spectrum, you can choose to not use any music at all in your video. Master of suspense Sir Alfred Hitchcock was able to prove that a thrilling suspense film could be made with the complete absence of music. He tested this theory most notably in The Birds (1963). Instead, composer and longtime collaborator Bernard Herrmann designed the sound of the film using sound effects of birds instead of music only three years after creating one of the most memorable horror movie scores in Psycho (1960).
I’m Detecting a Theme Here
The most popular film scores contain a memorable theme or leitmotif. A theme is a musical phrase that repeats and is usually attached to a character, a place, or a time in a story. What music comes to mind when you read the name Darth Vader? How about when you think about sharks? Or dinosaurs? See what we mean? The composer of the memorable themes used in the Star Wars, Jaws, and Jurassic Park series is John Williams, who is considered the master of the film score theme. If a musical theme pops in your head, odds are pretty high that Williams wrote it.
The videos you create, especially if you are creating a series, might have an opening theme and a closing or end credit theme. The number of musical themes you have in your video depends on the structure and themes of your story. You might choose to have a single theme that repeats but varies in style to support the mood of each scene. The Jean-Luc Godard film Contempt (1963) uses a single two-and-a-half-minute theme, composed by Georges Delerue, repeated throughout the film.
Spotting Cues
Tip
Remember that there is no rule forcing you to put wall-to-wall music throughout your video. Sometimes just the sound of the environment is enough to create the appropriate mood for the scene. If you want your project to play like a Puccini opera, feel free to “through-compose” your music.
The first step in the process of adding music to your video is spotting the cues. A cue is the term used to describe both a piece of musical score and the moment in the video at which that piece of music begins. Spotting describes the process of identifying where those cues go, listing how many cues are needed, and writing a description and purpose for each cue. The document created to organize the music in a production is called a cue sheet (see FIGURE 2.15).
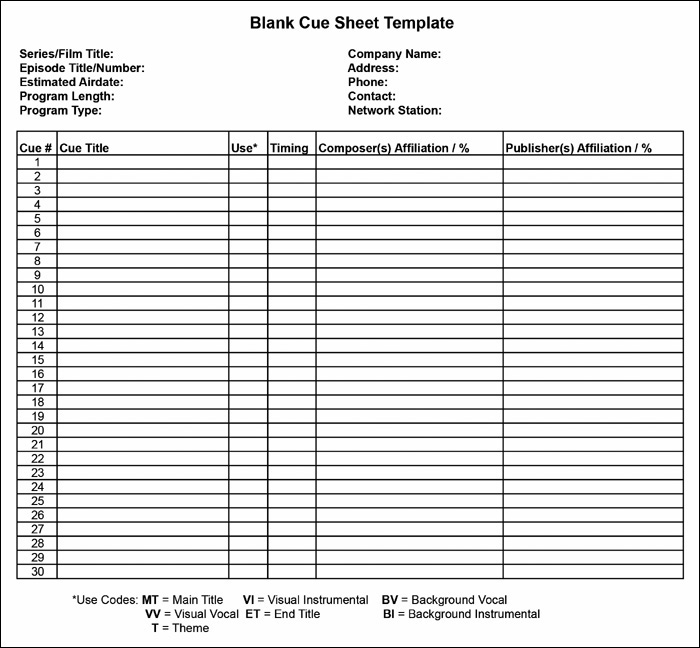
COURTESY OF THE AMERICAN SOCIETY OF COMPOSERS, AUTHORS AND PUBLISHERS (ASCAP.COM)
FIGURE 2.15 Blank cue sheet template
A director works with a music editor and composer to create a cue sheet, which is then used by the postproduction team to keep track (no pun intended) of the music in a show. The document evolves when multiple sources of music are used and the management of rights and ownership require additional information to be added to the sheet.
Please Compose Yourself
As a videomaker, you will find yourself collaborating with a variety of people with expertise in different crafts. Some of the folks you’ll work with are working primarily at a technical level, such as the camera department or lighting technicians.
Others you may work with, like your actors or talent, work mostly on an emotional level. How you communicate with either type of collaborator requires a bit of code-switching. You don’t speak to your friends the same way you do to your parents.
When you’re working with a composer, you have a unique hybrid of both qualities because music can be very technical but is mainly concerned with what Stanley Kubrick called “a progression of moods and feelings.”
When collaborating with a composer who is providing an original score for your motion picture, remember that even though they might be entering the process late in the production, they are an integral part of your team. When beginning work with the composer, share your passion for the project. Enthusiastically express in detail your intentions in making the video. Discuss the meanings, subtext, symbology, language, rhythms, visual design, challenges, triumphs, what you had for breakfast, and so on.
The more the composer understands what went into the project, what it means, and what it is intended to deliver to an audience, the better equipped they’ll be to create music that is, at the least, appropriate. Ideally, they’ll create a new element of the project that enhances the story and message beyond what you imagined was possible. It’s a tall order for sure, but don’t be surprised when you catch yourself smiling upon hearing this new part of your project blended into what you thought was the best it could be.
Tip
When sharing an export of your project to a composer, make sure to have a timecode (TC) burn-in window for reference. To do this, drop a timecode reader or generator filter or effect on your sequence.
It doesn’t hurt to share with your composer examples of other sources of music you like to give them a better sense of what you’re hoping to have in the project. It’s not uncommon for a director and editor to use temporary music they intend on replacing later during postproduction process. Such guide music is called a temp track. There is a danger in falling in love with your temp track. This happened with Scorsese’s use of prerecorded music in Shutter Island (2010), as mentioned previously; a more famous example happened four decades earlier.
For the 1968 sci-fi masterpiece 2001: A Space Odyssey, director Stanley Kubrick employed a well-known Hollywood composer named Alex North, with whom Kubrick had worked with before. While attending the New York City premiere of the film, North became aware that not a single note of his score was used in the finished film. Whoops. Kubrick had decided that the classical music he had become so familiar with throughout the editing process—in particular, Richard Strauss’ Also Sprach Zarathustra—worked better in his finished film than Alex North’s score.
Copyright and Fair Use
With these two big-budget films, the filmmakers had the means to afford the rights for the temp tracks. As a beginning or student videomaker, you might not have that kind of bankroll to allow for the use of any piece of music you want. That, however, should not discourage you from using prerecorded music for your project. An understanding and familiarity with copyright law and fair use will help you identify more options available to you.
A common occurrence with student films is the use of popular songs without proper legal permission. Frequently students will justify the use of these songs by using arguments such as “But I paid for the download, so it’s my copy” or “No one’s gonna see it; it’s just a school project.”
The problems with these arguments are as follows: First, if you bought a copy of the song, what you own is just that, a copy. That $1.29 you paid only grants you the right to play the song for personal use. It will cost more for the rights to reproduce the song in your video for public viewings. Second, if no one’s going to see it and it’s just a school project, then you might be right; it won’t matter. We just have to urge you to ask yourself this question: Why would you bother making the video in the first place, if no one is going to see it?
The logic behind the unethical act of using another artist’s work without permission because no one is going to see it is like what comedian George Carlin once said, “Cop didn’t see it; I didn’t do it.”
You insist that you are an upstanding and ethical student videomaker, but you really, really want to use that popular song in your video. It just won’t work without it. So, what do you do? For starters, remember that the work of the musical artist, just like the work you are creating, is intellectual property. Intellectual properties are creations that were formed through the work of the mind such as written work, art, music, designs, or inventions. This work is protected by copyright law, which grants the creator of the copyrighted work the exclusive right to control how the work is seen, listened to, used, or delivered to the world.
So, you use a copyrighted song in your video. What’s the big deal? At best, your video is removed from online video-hosting sites because of its use of copyrighted music. At worst, you can find yourself being named in a copyright infringement lawsuit, which will ruin the flow of your whole day.
Does this mean we should always avoid the use of copyrighted material in the videos we create? The answer is no. Follow these guidelines to legally and responsibly use copyrighted material:
1. Find out who owns the work.
2. Receive permission from the content owner in the form of a licensing agreement.
3. Pay for the work, if payment is part of the agreement.
4. Credit the creator and owner of the work.
Licensing Agreements
There are a few different licensing agreements you can make with the owner or creator of copyrighted work you want to add to your project. You can ask for master use synchronization rights (or sync rights), broadcast rights, or a limited option such as festival rights.
Master use or synchronization rights agreements allow you full use of the copyrighted work to be synchronized with your project and part of your soundtrack. The licensing agreement you sign could be for perpetuity (until the end of time and existence) or limited for a specific period of time, as in FIGURE 2.16.

Broadcast rights are similar to master use, except they limit the use of the licensed material for broadcast use only. An option is even more limiting. For instance, if there is a song you want to use but you can’t afford the full sync rights, you can arrange an agreement like festival rights, which will allow you to use the music in your project as it goes to festivals or contests. Once your project is purchased for distribution, you must make a new agreement to pay the full amount for master use synchronization rights.
Fair Use
Perhaps you are not able to get in touch with the creator or owner of copyrighted music you want to use, or, worse, you just don’t want to ask for permission. There are legal, ethical, and appropriate reasons for the use of copyrighted material in other creations without permission. This is called fair use in the United States and fair dealing in other countries.
Fair use is not law the way copyright is. Instead, think of fair use as an argument or defense, one that has been structured and defined for you. To make sure your use of someone else’s intellectual property without permission is defined as fair use, you need to assess four factors in your use of the copyrighted work.
![]() The purpose of your creation must be for noncommercial use such as educational or school projects, news or journalism, criticism or social commentary, or comedy or parody.
The purpose of your creation must be for noncommercial use such as educational or school projects, news or journalism, criticism or social commentary, or comedy or parody.
![]() The work you are copying must be relevant to what you are creating.
The work you are copying must be relevant to what you are creating.
![]() The amount of the copied work should be minimal and not make up a major percentage of the new work.
The amount of the copied work should be minimal and not make up a major percentage of the new work.
![]() What you create must not have a damaging effect on the value of the original work.
What you create must not have a damaging effect on the value of the original work.
It’s also important to make sure that what you are using from someone else’s creation is changed in some way. It is fair use to incorporate a small part of a copyrighted song in a new song that is remixed and has a different style and form from the original, but it is copyright infringement if you use a large portion of the song and it’s not changed in any way.
Royalty-Free and Public Domain
No one will argue that creating an original score solely to fit the needs of your video project is ideal. With some projects, especially starting out as a student, you just don’t have the time or the budget to commission or compose and then record an original score. That is when you must rely on music and images that are either royalty-free or in the public domain.
Royalty-free work is creative work designed to be used freely without concern of paying for licensing fees. Responsible use of royalty-free work requires crediting the creator. There are many royalty-free libraries available online that have affordable, and even free, music, images, and photos for you to use in your video projects.
Tip
Take a look at the appendix of this book for our favorite places to find royalty-free music.
Intellectual property in the public domain includes works whose copyrights have expired. The amount of time a property right lasts depends on the copyright laws of the country of origin. For example, in the United States, copyrighted works created after January 1, 1978, do not go into the public domain until 70 years after the author’s death. If the work was produced for hire or created by a corporation, copyright protection lasts for 95 years after its publication or 120 years from the year of its creation, whichever comes first.
Say, for instance, you create something that you want to share and make available to others for viewing, reuse, or redistribution. The work can be given a Creative Commons license. There are six different Creative Commons licenses that you can use on work you want to share. They differ depending on whether all that is asked of its use is attribution, or crediting the creator, or if the creator wants to keep its use noncommercial or unchanged (or a combination of the three). Another option is to mark the work as public domain.
Postproduction: Making It Better
In Chapter 1, we got you started with your first editing project. Now you should be a little more comfortable and familiar with the interface of your editing software of choice. You should also know the basic postproduction workflow that allowed you to get a simple project based on visuals from footage on a camera to a finished video online. It’s time to make the most of the soundtrack elements used in your project by taking the next step in making your project better through the use of audio.
Layering Audio
There was a time when nonlinear editing systems (NLEs) limited the number of layers of audio that an editor could add to a sequence. Today, the limits still exist, but they depend on the power of your hardware rather than the functionality of your NLE. Without any practical limits, there’s no reason to not take advantage of being able to add overlapping elements of audio to your project, even when editing on a mobile device.
Organizing the layers of audio is usually done by the following categories:
![]() Dialogue (or production audio)
Dialogue (or production audio)
![]() Sound effects
Sound effects
![]() Music
Music
![]() Voiceover or narration
Voiceover or narration
In track-based editing software like Avid Media Composer or Adobe Premiere Pro, to add layers of audio, you have to add audio tracks before attempting to add audio clips (see FIGURE 2.17, next page). Audio tracks or channels are pathways for audio clips to travel on. Audio clips that are synchronized (or synced) with video clips live in these audio tracks, separate from video tracks.

Audio that is recorded with picture simultaneously is called production sound. The purpose of this track-based approach is to keep all the elements organized. The organization is useful so that you can toggle elements on and off or so you can deliver your edit to a different audio editing and mixing application that needs to follow the same organization.
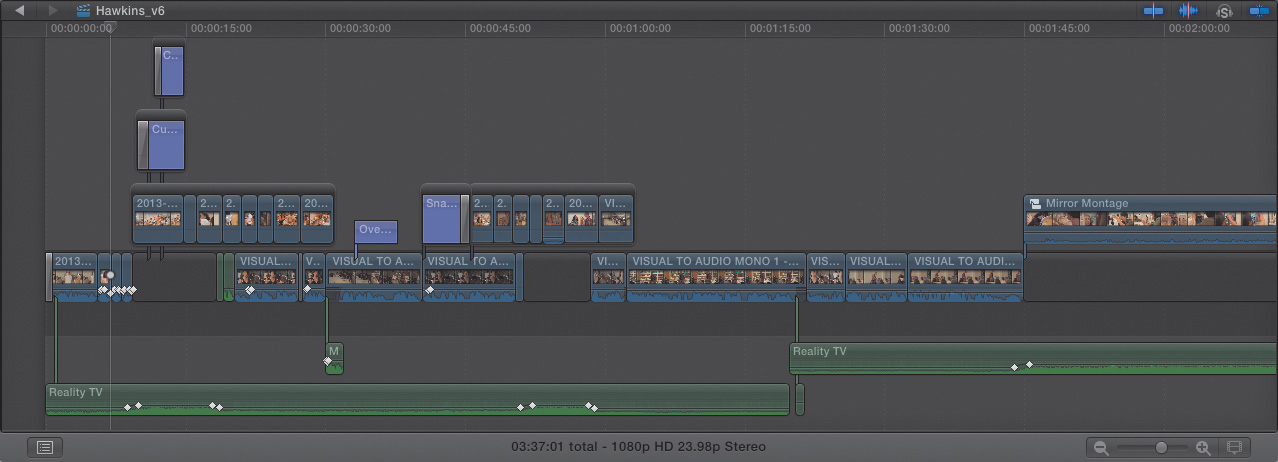
In non-track-based editing software, such as Apple Final Cut Pro X, your timeline is a free-floating workspace where audio clips can be layered and connected to any other clip above or below them (see FIGURE 2.18, next page). Production sound is embedded in the video clip segment to avoid potential problems of throwing the audio out of sync with the picture that was recorded at the same time. Audio clips connected or layered in a project can still be organized by labeling which role the audio clip serves. The relationship between production sound and the video can be changed so that manipulation of the timing or length of production audio can differ from the synced picture.
The number of tracks assigned for dialogue or production audio depends on how many microphones were simultaneously used to record the audio. It would be safe to dedicate at least four tracks to allow for checkerboarding and room tone, explained in the “Mixing” section later in this chapter.
Sound effects and music are usually created in two-track stereo, so the number of tracks will depend on how many layers of each you plan to use, times two.
Voiceover or narration can be included in the dialogue tracks or can have dedicated tracks assigned for it.
Sound Design
The number of tracks you’ll need for your project is based on how complex your sound design will be. Stop and listen to the sounds in the area you’re in right at this moment. Try listing everything you hear. Your brain has the capability of focusing on different sounds individually, even if they are around the same volume or coming from the same direction. Here’s a list of what you might hear in a classroom of students quietly reading that you can individually pinpoint:
![]() Fluorescent lights buzzing
Fluorescent lights buzzing
![]() Air-conditioning vents humming
Air-conditioning vents humming
![]() A classmate coughing
A classmate coughing
![]() Pages of a book turning
Pages of a book turning
![]() Feet shuffling
Feet shuffling
![]() Someone sighing heavily
Someone sighing heavily
![]() Another class laughing in the room next door
Another class laughing in the room next door
![]() Someone else holding back laughter near you
Someone else holding back laughter near you
![]() Paper being crumpled
Paper being crumpled
![]() Someone whispering
Someone whispering
Those are just some of the sounds you might hear in a quiet classroom. Each one of these things could be considered a sound effect. Sounds such as the fluorescent lights or air-conditioning vents are what we call atmospheric or ambient sounds. If that was a scene in a video, those two pieces of audio would take up at least four tracks, two for each stereo clip. The other sounds on the list are specific isolated sounds, also called hard sound effects.
Where you place, how you use, and what volume level each sound in your project has is determined by your sound design. If a scene like the one described is focused on one student increasingly unable to focus on her work, you might start the scene with the isolated sound effects playing at a realistic volume level but have the sound repeat.
As each sound on the list is heard, you might increase the level of the effect so it’s slightly louder than the sound before it. Each additional sound added can progressively increase in volume and in repeating frequency until it becomes an unbearable, hyper-real cacophony, letting the audience experience for themselves just why your character is having so much trouble focusing on her classwork.
A scene like the one just described could take about 24 tracks of sound to design for the desired result. Imagine how many tracks an action movie must have, where each character’s weapon has two tracks each! In the film Good Will Hunting (1997), director Gus Van Sant used 100 tracks of audio for a fight scene on a playground basketball court that lasted less than two minutes.
As the brawl begins with the protagonist, Will, throwing the first punch, the song “Baker Street” starts playing; the sound of bird chirping gets clear and loud; each punch, kick, and hit is bright; voices from all over the playground are heard. Other sounds that start to be layered in include church bells, feet shuffling, wind blowing, basketballs hitting the ground, bystanders yelling, bodies moving, a body hitting a fence or being dragged, cars driving up, even bagpipes! The visuals have speed changes where certain moments are in smooth slow motion, while others are sped up and frantic.
Note
Follow the same rules and guidelines for using sound effects recorded by others as you would for music, as mentioned in the “Copyright and Fair Use” section.
The music and most of the sound effects have an echo to them that we call reverberance, or reverb for short. That is a lot of layering, a lot of elements, but all of those layered sounds represent the appropriate amount of effort and attention to detail needed to get the results the scene has, which is to make the audience experience the fight from Will’s perspective.
Finding all the sound effects you need for your project can be time-consuming. Ideally, during production you have a list of the ambient and isolated sound effects you need prepared so that you can record them at the same time and in the same place as you shot the scene. Time and budget don’t always allow for such luxury, so recording these sounds later during postproduction is completely acceptable.
When searching for sounds that are difficult to record or when crunched for time, you can use prerecorded sound effects from a sound effects library. Some editing software includes a sound effects library with commonly used sound effects for your convenience.
Tip
Take a look at the appendix in of this book for some online sources of free sound effects.
Mixing and Sweetening
The word sweetening, according to the late comedian Mitch Hedberg, is “the showbiz term for add[ing] sugar to.” Essentially, that’s all the term means, but what it refers to in video production is to add a small number of sound effects that enhance the project and clean up anything distracting about the sound.
The process of mixing and sweetening can occur as you edit picture and can continue as you add other audio elements. Once all the audio you think you’ll need is edited in, you can officially start the process of mixing and sweetening.
While editing and adding essential audio elements, you might have already taken the time to change the volume levels of clips that conflicted with sounds that need to be heard. Perhaps you’ve invested time in making sure the levels of your dialogue clips sounded consistent from one clip to the next. This will save you a bunch of time when you start mixing and sweetening.
Ideally, with some understanding of the audio level meters and the delivery standards of audio mixes, you won’t have to redo much of the work you’ve already done.
The audio levels meter in your editing software has some important numbers to understand. Digital audio level meters top out at 0 decibels (dB). Decibels are how audio levels are measured.
Depending on the type of program you’re creating, the average level your program should have could be either -20dB (pronounced “minus twenty”) for professional television and broadcast or -14dB for web video and other video productions. Audio level meters have green, yellow, and red indicators to highlight the safety of a sound’s volume (see FIGURE 2.19).

Simply put, if the audio is in red and it’s supposed to be a whisper, the level is too hot, or loud. That red area should be reserved for the louder sounds in life such as explosions, gunshots, crashes, or your mother telling you to take out the garbage. Dialogue, music, and voiceover should stay in the green, only slightly visiting the yellow zone.
Once you understand the audio level meter, the first official step in the mixing and sweetening process is to start what is usually called a dialogue edit. It is best to do this process with headphones.
The first step is to mute all your tracks that don’t have dialogue or voiceover in them. If you’ve organized your tracks or labeled your roles correctly, this should be easy to do. An alternative to muting tracks, especially if there are a lot you have to mute, is to solo the tracks you want to monitor.
Tip
For info on what kind of headphones are best for audio work, take a look at the “Can You Hear Me Now?” section in Chapter 3, “Vision and Voice.”
Once you do that, you can start to checkerboard your clips. When two audio clips have a cut and are placed together, sometimes that cut will be audible because the difference between the ambient sound abruptly changes. To fix that, alternate which tracks each clip goes on. This is called checkerboarding (see FIGURE 2.20).

Then lengthen the duration of each clip to have them overlap (see FIGURE 2.21). Be careful not to lengthen the clip so much that you hear anything unwanted; they should be just long enough to extend the pause in audio.

Tip
You will know the importance of room tone only after needing to use it during audio editing and mixing. It will feel like an inconvenience recording room tone, especially when a scene is done shooting and the crew wants to start wrap.
Using either audio fade transition effects or volume keyframes, fade out the outgoing audio clip and fade in the incoming audio clip (see FIGURE 2.22). Keyframes are like pushpins on a rubber band. You need to have at least two pushpins to change the line from point A to point B.

When playing back the scene, you should not be able to detect any cuts in audio. If you hear any gaps or voids in audio, edit in some room tone with fades overlapping the audio around it. Room tone, also known as ambiance or ambient sound, is audio of the location the scene takes place in with everyone remaining silent.
During production, be sure to take the time before wrapping to record 30–60 seconds of room tone in case you need to use it in your audio mix.
Using keyframes, you can also bring down the audio level of distracting loud sounds, like certain words spoken too loudly, claps, or prop sounds (see FIGURE 2.23).

Playing back the sequence without sound effects or music, the cuts between audio clips should no longer be detectable. Your work as an audio editor and mixer is like that of a ninja. If someone notices what you’ve done, you have failed at your job.
Once you’re satisfied that your production audio sounds smooth and consistent, unmute the sound effects tracks, take off your headphones, and start listening to your project with audio monitors or speakers. If any sound effect is too loud or makes it difficult to hear important production audio, do not raise the volume of the production audio. Rather, lower the volume of the sound effect. Most sound effects need to have their levels lowered to sound natural.
Go through the sequence and lower the levels on all the sound effects so that they provide the desired result for the story and your sound design.
Tip
If an atmospheric sound effect is not long enough, feel free to duplicate it onto another set of tracks with a fade and overlap to loop the effect. If the effect is too short, the loop might sound unnatural.
Unmuting the music is the next step. Just like with sound effects, if the music is clashing with other important sounds, lower the music. Novice sound mixers tend to mix the music a little too loudly. This might be because they are so familiar with the story at this point; they aren’t listening as carefully as a first-time audience member would. As great as the music is, if it distracts the audience from hearing important information, then it is harming your story rather than enhancing it.
Give the mix a few listens, with the picture and without. Try listening to it on a different set of speakers. Export a copy and play it on a television set. Different listening environments will show different flaws in your mix. Take notes and be an effective ninja sound mixer.
Tip
Don’t be overly concerned with the levels on the audio level meter. Your audience will not be watching your project with meters. Trust your ears.
Sample Project: Public Service Announcement
A PSA is a short video, usually 30–60 seconds, that tells a story but aims to accomplish a particular mission with its intended audience. At the surface level, the least a PSA sets out to do is bring awareness to an issue or inform the audience of a problem. A successful PSA, however, not only brings awareness but effectively makes a call to action.
Workflow
Using what you’ve learned about style, genre, and audience identification, you will research a social issue or problem that you are interested in or passionate about. With that research, you will come up with a story that contains a plan for action that you want to convince your intended audience to execute after receiving your message.
1. Identify a social issue or problem that needs a change. It’s best to keep it local. Attempting to accomplish world peace with a 30-second video is an exercise in futility.
2. Research the issue. Go beyond the Internet; look for local organizations whose work is related to the issue. Reach out and talk to people who can help you come up with ideas for a story and what you want your viewers to do.
3. Write a treatment for a story you call tell visually, without dialogue. The first four decades of the history of motion pictures are filled with dynamic and engaging stories that didn’t require hearing people speak. Show, don’t tell. Most importantly, make sure it is clear what the viewer is being asked to do to solve the problem.
4. Write the script. Remember that a properly formatted script times out to about a minute a page. Your PSA script should be no longer than one page.
5. If you’re not creating your own music, find a royalty-free piece that appropriately matches the tone of your story and message. Get the proper permission if necessary.
6. Recruit your crew and your talent and then shoot your video.
7. During production, get crafty. Create any title cards or text you want onscreen in physical space. Digitally generated titles weren’t around for the first 80 years of the medium. Creating your own titles with art supplies will add uniqueness to your video. Use one of your title cards to credit the creator of the music you chose to use.
8. Start your editing by laying down the music track. Edit your shots in, keeping in mind that you have chosen a specific running time.
9. Add audio tracks and fill them up with atmospheric sound effects and specific action sounds where necessary.
10. Mix your audio. Make sure any sound effects you’ve added don’t conflict with the music or call attention to themselves, unless that is the intended effect. The same goes with the music. If any sound effects are important to the story and can’t be heard, lower the music levels.
11. Post the video on multiple video-hosting sites and then share the link through your social networks and to everyone you know.
12. Show the video to organizations related to your PSA topic; they might want to make mention of it on social networks or even embed the video in their website.
Suggested Topics
Here is a list of suggestions to help you determine which issue your PSA will handle. Remember to try not to select a topic that is too broad to cover in 30–60 seconds.
![]() Issues recently discussed in your social studies class
Issues recently discussed in your social studies class
![]() An issue directly related to your personal interests and hobbies
An issue directly related to your personal interests and hobbies
![]() Problems on your campus that can be solved through student involvement
Problems on your campus that can be solved through student involvement
![]() Issues that can be solved through citizen action rather than fundraising
Issues that can be solved through citizen action rather than fundraising
![]() Policies being proposed that are going to be voted on in an upcoming election
Policies being proposed that are going to be voted on in an upcoming election
![]() Behaviors you’d like to see improved in the people around you
Behaviors you’d like to see improved in the people around you
![]() Information that would be helpful to those younger than you (“If I knew then what I know now...”)
Information that would be helpful to those younger than you (“If I knew then what I know now...”)