18. iPad Accessories

This chapter looks at some optional accessories like printers, video adapters, keyboards, headphones, and cases. It also covers the Home app, which allows you to control electronics around your home.
![]() AirPlay Mirroring with Apple TV
AirPlay Mirroring with Apple TV
![]() Importing Photos with an SD Card and USB Adapters
Importing Photos with an SD Card and USB Adapters
![]() Charging Your iPad with Power Accessories
Charging Your iPad with Power Accessories
![]() Controlling Your Home With Your iPad
Controlling Your Home With Your iPad
Many accessories available for your iPad perform a variety of tasks, protect it, or just make it look pretty.
You might already have some things that work with your iPad—printers and wireless keyboards, for instance. Let’s look at a variety of accessories to see how to use them.
Printing from Your iPad
You can print from your iPad without connecting any cables. Apple calls this function AirPrint. You can print a web page or document directly from your iPad over your wireless network.
The one catch? It works only with printers that support AirPrint. Fortunately, the list is growing fast and now includes printers by many companies. You can find an updated list of AirPrint printers at http://support.apple.com/kb/HT4356.
Printing from the Notes App
Assuming you have one of these printers and have set it up on your local network, here’s how you print, using the Notes app as an example.
1. In the Notes app, with the note you want to print open, tap the Share button.
2. Tap Print.

3. At the bottom of the overlay that appears is a preview of what you are about to print.
4. Listed next to Printer you will see the name of the last printer you used, as long as the iPad is still connected through the network to this printer. But if you have never printed before, or the printers available have changed, tap Select Printer.

5. If the printer is on and has been configured to your network, it should appear in the list. Tap it to select it.

6. The printer name is showing. Tap its name again to select a different printer.
7. If there are any options to select, you see them listed. If there is more than one, you might simply see an Options button—if you tap that, it expands to show all the options. In this case, the printer can be switched between color and black and white.
8. Tap the –/+ buttons to set the number of copies to print, or leave it at 1 Copy.
9. Tap Print to send the note to the printer.
At this point, your iPad launches a special Print Center app. You might not notice it unless you quickly double-press the Home button to bring up the list of apps. You then see this Print Center app running as the left-most app in the list. If your document is small and your printer is fast, it might print so quickly that you will never catch the Print Center app running.
10. That’s all you need to do. But if you want to monitor the progress of your printout, double-press the Home button to bring up the list of apps currently running on your iPad. Swipe to look through the apps. You should see a Print Center app. If you are just printing one page and your network and printer are fast, it could appear and disappear before you even get a chance to see or select it.

11. You can see the status of the printing process and other information.
12. Tap Cancel Printing to stop printing.

Different for Other Apps
How you initiate printing differs from app to app. Using Pages, for example, you go to the Tools button at the top of the screen and select Share and Print. You see Print as one of the options. But for most apps, you initiate printing by looking for a Print option in the Share button that looks like a box with an arrow pointing up.
Not all apps include the ability to print. But that doesn’t mean you can’t print what you see on the screen. Just capture the screen by pressing the Sleep/Wake button and Home button simultaneously (see “Capturing the Screen” in Chapter 9, “Taking and Editing Photos”). Then, go to the Photos app and look in your Camera Roll for the new image. You can print that image using the Share button in the Photos app.
What If Your Printer Doesn’t Have AirPrint?
Although not all Wi-Fi printers support AirPrint, there is a way to cheat. Some enterprising third-party developers have come up with software for desktop computers that sets up a printer connected to the computer as an AirPrint printer. You aren’t really printing directly to a printer—you are going through the computer. Still, it might be a good option for some. Search on the Web for the Printopia (Mac), handyPrint (Mac), or Presto (PC).
AirPlay Mirroring with Apple TV
The Apple TV might be the best iPad accessory of them all. It enables you to display the screen of the iPad on a high-definition television. And it does this wirelessly, using the local Wi-Fi network and something called AirPlay Mirroring.
Setting Up AirPlay
You need to make sure several things are in place before you can use AirPlay Mirroring.
1. Make sure that both your iPad and Apple TV are connected to the same local network.
2. Make sure both your iPad and Apple TV are up to date. Using older or mismatched versions of software on the devices could prevent AirPlay from working.
3. Turn on AirPlay on your Apple TV. To do this, go into Settings, AirPlay, and turn it on (not shown).

4. On your iPad, swipe from the bottom of the screen up to bring up the Control Center. See “Using Control Center” in Chapter 1, “Getting Started.”
5. Tap the AirPlay button. Note that it might not appear if you do not have at least one AirPlay device, such as an Apple TV, connected to your network and enabled.
6. Select which Apple TV you want to mirror the iPad’s screen.
7. When you want to stop mirroring, repeat steps 4 and 5, but select Turn Off AirPlay Mirroring.

The Benefits of Apple TV
The Apple TV is a worthwhile device to have just for the ability to use AirPlay to show your iPad on a TV screen. However, you also get many other great features such as iTunes movie rentals, YouTube, Netflix, and many other video and gaming apps, depending on your specific Apple TV model.
The Mirror Crack’d
Some apps won’t mirror to Apple TV at all. Certain video streaming apps have purposely restricted mirroring due to licensing issues and other reasons. So you might not be able to mirror when using apps from certain cable networks.
Video Output Adapters
In addition to using an Apple TV to wirelessly mirror your iPad’s screen to a TV or projector, you can also use one of two cables to directly connect your iPad to a screen.
There are two models. One is for VGA connections, such as you might find on many boardroom and classroom projectors. The other is an HDMI connector, which works for most HD televisions produced in the last few years. However, you will find televisions with VGA connectors and projectors with HDMI connectors. Check your device before purchasing one of the two adapters. If you have both types of connections, get the adapter for the more modern and versatile HDMI connection.


Both adapters have a Lightning connector on the one end that plugs into the bottom of your iPad. The other end has either the HDMI or VGA connector, plus a port to connect a Lightning cable. This is for connecting your iPad’s power adapter so your iPad is receiving power at the same time it is sending the video signal to the TV or projector.
You don’t need to use this Lightning port—you can run your iPad on its battery while it’s connected to the screen. However, connecting your iPad to AC power prevents your battery from draining and your iPad from running out of power while you are presenting. Wouldn’t want to have to stop your presentation just before the slide where you ask the board members for money, would you?
1. Connect the adapter to the dock port on your iPad.
2. Connect the other end of the adapter to a standard HDMI or VGA cable. You cannot hook the adapters directly to a TV or projector because they have female connectors. A male-to-male connector bridges the gap between the adapter and the TV or projector, just like it would if you were connecting to a laptop computer.
3. Connect the other end of the cable to a monitor or projector that accepts either HDMI or VGA.
4. If you are using the VGA adapter and also want audio, then use an audio mini jack to connect the headphone port of the iPad to the line in the projector. The exact type of cable you need depends on what audio input the projector takes.
5. At this point, the video on the projector or monitor should mirror that of the iPad. Some apps might show different things on the iPad’s screen and the external display. For example, Keynote shows the presentation on the external display, whereas you have the presentation plus controls on the iPad’s screen.
TV Compatibility
The video coming from the iPad is compatible with both 720p and 1080p HD televisions and video devices. It also includes audio over the HDMI cable. Many televisions support only 1080i, not 1080p. In that case, the video might be shown in 720p instead.
Using Wireless Keyboards
If you have a lot of typing to do and are sitting at a desk anyway, you can use Apple’s wireless Magic Keyboard with your iPad. This is the same wireless keyboard that you would use with a Mac. You can also use just about any other Bluetooth-compatible wireless keyboard.

Choosing the Right Wireless Keyboard
If you have an older Apple wireless keyboard, it might not work with your iPad. The Apple Store warns that only “newer” keyboards can successfully connect to the iPad. Reports from people with older wireless keyboards indicate that this is true. However, you don’t need to stick with Apple’s wireless keyboard. Most Bluetooth keyboards work fine with the iPad. Search your favorite online store for all kinds of compact wireless Bluetooth keyboards. Check reviews to see if anyone has mentioned trying the model with an iPad. If you are having trouble connecting to a keyboard or any Bluetooth wireless device, Apple has some troubleshooting tips at http://support.apple.com/kb/TS4562.
1. To connect to the Apple Magic Keyboard, first make sure it is charged. Older Apple keyboards use AA batteries, but the latest Magic Keyboard needs to be plugged in occasionally to charge.
2. Tap the Settings app on your iPad and tap Bluetooth.
3. Make sure Bluetooth is turned on.
4. Turn on your Apple Wireless Keyboard by pressing the button on its right side (not shown). You should see a small green light turn on at the upper-right corner or back edge of the keyboard.
5. After a second or two, the keyboard should appear on your iPad screen. Tap it.

6. Look for a 4-digit number in the message displayed. Type that on your wireless keyboard. Then press the Return key.

7. After the connection is established, you should see Connected next to the name of your keyboard.
8. After you connect, the iPad automatically uses the physical keyboard by default, rather than bringing up the on-screen keyboard (not shown). To use the on-screen keyboard again, you can either disconnect or power off your Apple Wireless Keyboard, or you can press the Eject button at the upper-right corner of the keyboard to switch to the on-screen keyboard at any time.
9. If you want to disconnect the keyboard so it is no longer paired with your iPad, tap the i button, and then tap Forget this Device.

The iPad Pro Smart Keyboard
If you have an iPad Pro, in addition to being able to use a wireless keyboard, you can also purchase Apple’s Smart Keyboard. There is a different model for each size of iPad Pro. This keyboard isn’t wireless. It attaches to the side of the iPad and acts like both a stand and a screen cover as well.

The keyboard isn’t permanently attached to your iPad. It is held in place by magnets and gets power through that surface, so there is no need for batteries or charging. There are also third-party keyboards that use the same connection.

• Brightness (F1 and F2): Changes the brightness of the iPad screen.
• Volume (F10, F11, and F12): Mutes, lowers, and raises the volume.
• Eject (to the right of F12): Brings up or dismisses the on-screen keyboard.
• Arrows: Navigates editable text.
• Arrows+Shift: Selects editable text.
• Command: Can be used with X, C, and V for Cut, Copy, and Paste inside editable text.
• Command+Z: In many writing apps, you can use this to undo, just like when typing on a desktop computer.
• Audio Playback Keys (F7, F8, and F9): Goes to previous track, play/pause, and next track.
• Command+Space: Starts a search, just as if you were on the Home screen and swiped down from the middle of the screen.
Importing Photos with an SD Card and USB Adapters
The Lightning to SD Card Camera Reader lets you take an SD card and connect it to your iPad. That means you can take pictures with your standalone camera or video recorder, pull out the SD card, and then connect that card to your iPad to add the photos or video to your Photos library. If you are using iCloud Photo Library and are connected to the Internet, then the photos would be added to your library and available on other devices as well.
You can also buy a Lightning to USB adapter from Apple that lets you connect some cameras directly to your iPad. Either way, the Photos app launches and allows you to import the photos it finds.
Here is how to import photos directly from your camera or SD card.
1. Connect the SD card reader to your iPad’s dock port with the SD card in it (not shown). Or, connect your camera using the USB connector. If you are connecting a camera, you will most likely need to switch the camera on and into the same mode you use to transfer pictures to a computer.

2. After a slight delay, the Photos app should launch and images on the camera or card should appear on your iPad’s screen. You might need to tap the Import button at the bottom of the screen to see the photos.
3. Tap Import All to import all the photos on the card.
4. Tap the Delete All button if you want to delete the images without ever importing them into your iPad.

5. If you don’t want to import or delete all of the images, tap one or more images to select them instead.
6. Tap Import.
7. Tap Import Selected to bring in only the selected photos.

8. After importing the photos, you are given the chance to delete them from the camera or card. Tap Delete to remove them.
9. Tap Keep to leave the images on the camera or card.

Charging Your iPad with Power Accessories
A power user of any gadget usually acquires additional power chargers and cables. For instance, you might want to charge your iPad at home and at work, or even while traveling. Here are some suggestions for accessories that will keep your iPad charged. All of these are available in Apple Stores, the Apple online store, other online retailers, and many computer and electronics stores.
If you travel between two locations, such as home and work, or home and school, then carrying your one-and-only power adapter with you might be a problem. It is too easy to forget to bring it along.
You can buy a second charger and dock cable from Apple that is the equivalent of the one that came with your iPad. Alternatively, the iPad Dock from Apple enables you to stand the iPad up vertically while it’s either plugged in to a power outlet or docked with your computer. You can also use the iPad in this position and even pipe the audio into external speakers through the dock.
Here is a list of items you might want to consider:
• Apple Lightning to USB cable: An extra dock cable to plug your iPad into a Mac or PC for syncing and slow charging. Many cars and some public places like airports now have USB outlets that you can use with this cable or the one that came with your iPad. It is always good to have a spare cable, as losing your only one means you can’t charge your iPad.

• Apple iPad 12W USB power adapter: Charges the iPad at full speed, faster than a standard USB port. This doesn’t come with a cable, so if the plan is to have a complete set of power adapters and cables in two locations, make sure you pick up the aforementioned USB cable, too.

• Car Charger: You can find car USB phone chargers very cheap at superstores and online, and then use your own Lightning cable to connect your iPad. Make sure that the device outputs at least 10 watts of power, or it will charge your iPad slowly or not at all. Apple doesn’t have an official car charger, but it sells several third-party brands in the Apple Store.
• External Battery: If your needs are extreme, and the 10+ hour normal battery life of your iPad isn’t enough, you can shop for an external battery pack. You charge them up before you leave home, and then you plug your iPad into them with your Lightning cable—the iPad thinks it is getting power from a wall charger. Apple sells some in its store that can add a few more hours, or even as much as a full charge, to your iPad.
Not All Power Is the Same
Your iPad requires extra power to charge properly. With the power supply that came with your iPad, a 10- or 12-watt model, it should charge fully after about 4 hours. But with a smaller 5-watt iPhone power supply, or while hooked up to a standard 6-watt USB port on a computer, it takes twice that amount of time. Some low-power USB ports on computers won’t charge the iPad at all.
Listening with EarPods
Although you can use any standard earphones with your iPad, the official Apple EarPods headphones come with a controller on the cord that gives you additional functionality.
You don’t get a set of EarPods when you buy an iPad, but you do get a set when you buy a new iPhone or iPod, so you may already have these. You can also purchase them separately from Apple in Apple Stores and online.
In addition to the controls, the EarPods have a microphone that usually gives you better quality recording than using the one on the body of the iPad, which is typically farther from your mouth. It is a good idea to use the EarPods mic when making FaceTime or Skype calls, or recording using audio apps.
Here’s what you can do with the controller on the EarPods while you have music playing with the Music app. These also work in many third-party music apps and even audiobook players. You don’t need to have the audio app on the screen, or even your iPad unlocked to use these. The audio just needs to be playing.
1. Press the + button to raise the volume.
2. Press the – button to lower the volume.
3. Press the center button once quickly to pause the music. Press again to resume.
4. Press the center button twice quickly to skip to the next song. If you hold the second press, the current song fast-forwards until you release.
5. Press the center button three times quickly to go to the previous song. If you hold the third press, the current song rewinds until you release.

The EarPods are not only inexpensive, but regarded as pretty high quality. However, if you do prefer other headphones, note that they usually do not come with controls on the cord. Sometimes you will find only the volume controls, and other times you will find all three buttons—but the center button only serves to pause music and won’t perform other actions.
Protecting Your iPad
Most iPad users buy something to protect their iPad. Protection ranges from large impact- and weather-resistant cases to thin screen coverings. Some users even buy multiple cases to use in different situations.
iPad Smart Cover and Smart Case
A cover is just a cover, right? But Apple didn’t make “just a cover” for the iPad. They made a “smart cover.” By using magnets, this cover sticks to the front of the iPad without hiding the rest of the iPad’s design. And it is highly functional, acting as a stand as well. It does not, however, work with the original iPad.
The Smart Cover also performs two other functions. First, your iPad can detect when it is closed or opened. You can turn this option on or off by going to the Settings app, under General settings, and looking for the Lock/Unlock option.
Another function your Smart Cover performs is to clean the screen. The material on the inside of the cover gently wipes the screen each time you open and close the cover. Your screen might still need a good wipe-down with a soft cloth every once in a while, but the Smart Cover does keep it a little neater.

The Smart Case is basically the same as the Smart Cover, but it includes a cover for the back of the iPad. You can get the Smart Cover in several colors made from either polyurethane or leather material.
Apple makes Smart Covers and Smart Cases for the iPad Pro, iPad Air, and iPad mini. Naturally, you have to make sure you purchase the one that fits your model. They also make a Silicone Case for most models that only covers the back and edges of the iPad.
Third-Party Protective Covers and Cases
Instead of the Smart Cover, or in addition to it, you might want to get a protective cover for your iPad. The problem here is not finding one, but choosing from the hundreds of models already available.
Some covers cover only the back and sides of the iPad, leaving the screen open. Often these covers work in conjunction with an Apple Smart Cover, allowing you to use both at the same time.
The advantage of a cover over a case is that the cover stays on the iPad while you use it. So if you drop your iPad while trying to use it, the cover provides some protection.
A case or sleeve, on the other hand, is something you would put your iPad inside of in order to protect it when you’re not using the iPad. Then you would take the iPad out to use it.
Some cases fit loosely enough to allow you to also put a cover on the iPad, giving double the protection. There are also many products that are between a cover and a case, offering the protection of a case, but allowing you to still use the iPad without taking it out—at least to a certain extent. Some manufacturers use the terms “cover” and “case” interchangeably.
When looking for a case, there are many things to consider. Don’t look only in a local Apple Store—it stocks only a few cases. Look online to discover a wide variety. Pick one that fits your needs and style.
Size Matters
Remember that each version of the iPad is physically different. They are slightly different dimensions and thicknesses. The port on the bottom and the locations of the buttons are different as well, which means some cases may not have a properly sized or aligned opening. Check the product carefully to make sure you are getting one that fits your device.
A Keyboard and a Cover
Some covers and cases combine protection with a keyboard. They allow you to unfold the cover so the iPad, and a keyboard built into the case, resembles a small laptop computer. If you like using an external keyboard, and want to carry the keyboard around with your iPad, this might be the best setup.
Apple Pencil
The Apple Pencil is a stylus for the iPad Pro. It allows artists to use the iPad Pro as a canvas. You can draw using Apple’s tools, such as the drawing tools in Notes or Pages. You can also draw using third-party apps like Paper by FiftyThree, mentioned in Chapter 16, “Must-Have Apps.”
The Pencil senses where the tip of the pencil hits the iPad’s touchscreen. It also knows the amount of force you are applying and the angle you are holding the Pencil.
Although it is easy to see why an artist may want to use an Apple Pencil, it can also be useful for non-artists. For instance, you can use it with Microsoft Office apps to mark up a document with notes and symbols.

Controlling Your Home With Your iPad New!
A new app in iOS 10 is called simply Home, and it allows you to control electronics and appliances in your house. Unfortunately, it won’t just magically control any device. You need to have devices that are compatible with Apple’s remote control standard, called HomeKit. For instance, you can get a thermostat that is compatible with HomeKit and use that to control the temperature of your house from your iPad.
There are also light bulbs that can be controlled, either to be turned on or off, or to even change color. The simplest type of device is a plug that turns on and off some electric device, such as a lamp.
Controlling an Appliance with the Home App
As an example, here is how to add a simple switch that controls power to a lamp.
1. Launch the Home app.
2. When you first start the Home app, you see a default location—My Home. You can tap the location button to rename it.
3. Tap Add Accessory.

4. Because accessories are made by different companies, you might need to refer to the instructions that came with the accessory to get started. But for many devices, simply connecting it to power is enough. Then you see it on the Add Accessory screen. Your iPad finds it even if you haven’t set it up for your Wi-Fi network or paired with it as a Bluetooth device. Tap it to continue.

5. The Home app takes care of a lot of the details for you, like telling the device all it needs to know to connect to your Wi-Fi network. Tap Allow to grant permission for the accessory to use your Wi-Fi network.

6. Often, devices come with a serial number either on the device or on a piece of paper that came with the device. The Home app prompts you to enter this number. Alternatively, you can put this number in front of the iPad’s camera to save typing it.

7. Set the name for the device, instead of using the default name.
8. Tap Done.
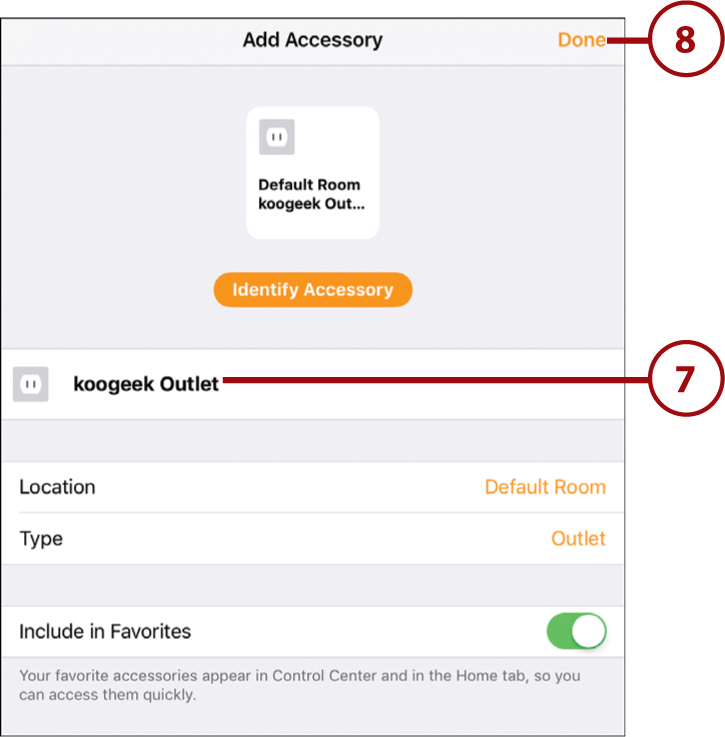
9. The device appears on your main screen in the Home app. Because this is an on/off switch, you can simply tap the button to turn it on or off. More complex devices might take you to screens with a variety of controls.

Automating Appliances
To automate electronics with Apple’s HomeKit technology, you need to have a device designated as the control hub. Previously, an Apple TV was the only option, but with iOS 10 you can designate an iPad as the control hub. After you do that, you can automate tasks, such as having a light turn on or off at certain times.
1. Start by going to the Settings app. Tap Home on the left.
2. Turn on Use This iPad as a Home Hub.

3. In the Automation app, tap the Automation button at the bottom of the screen.
4. Tap Create New Automation.

5. Tap A Time of Day Occurs to have an action occur at a specific time.

6. Set the time that will trigger this event. You can also choose Sunrise or Sunset, which adjusts according to your location and the time of year. You can also remove days from this schedule by tapping the circles at the bottom.
7. Tap Next.

8. Choose the device that will be affected.
9. Tap Next.

10. Tap the device to set it. For instance, this Default Lamp should be set to Turn On with this event.
11. Tap Done.

12. The automation event has been set. You can see it in the list, and tap it to adjust or delete it.

Honey, I’m Home!
You can also choose My Location Changes in step 5 to have the action take place when you leave or arrive home, or leave or arrive at any location. Of course, you would have to add an iPhone that is always with you to your HomeKit automation system so that the system knows where you are. Your iPad stays home and acts as the hub for this system, but it knows you are located where your iPhone is located. You can have the lights come on in your house as you arrive!
Set the Scene
You can also create “scenes” in the Home app. A scene may include multiple commands, like turning some lights on or off, setting others to a dim amount, and turning on some music. Then you can just tap on that scene and all of those commands are given.
Siri: Talk to My House
After you have things set up in the Home app with your iPad or Apple TV as the hub, you don’t even need to go into the Home app to do many tasks. For instance, if you have defined Office Lamp as a device, you can simply tell Siri to “Turn off the office lamp.”
If you have more complex devices, you use commands like:
“Set the temperature to 72 degrees.”
“Dim the lights to 50 percent.”
“Set my bedtime scene.”