
]>
27 PHOTOSHOP’S BRUSHES
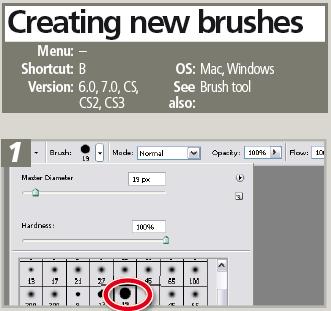
To create a new brush select the Brush tool from the toolbar and then display the Brush Preset dialog by clicking the down-arrow next to the brush stroke preview in the options bar. Choose a brush set from the menu accessed via the side-arrow (top right) and then click on a specifi c brush to modify.

Modify the characteristics of the selected brush by adjusting the various settings in the options bar. For more creative changes alter the slider controls for the brush dynamics in the Brushes palette (Window Brushes Palette).

Display the Brush Presets again and select the side-arrow in the top right of the popup. Choose New Brush Preset from the menu items. Type a name into the Brush Name dialog and click OK. The newly created brush is added to the bottom of the brush library.

Open the source picture containing the image part that you want to use as a base for the new brush tip. Using one of the selection tools outline the image part. Here I selected a single holly leaf.
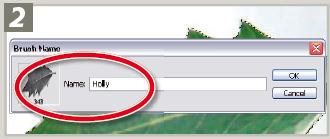
With the selection still active pick Edit > Defi ne Brush Preset and enter a new name for the Holly brush. Click OK to add the brush to the current set of brush tips.

Select the new brush tip from the bottom of the brush list thumbnails. Set the foreground color to black and click and drag to draw with the brush.

To further refi ne the look and characteristics of the new brush click on the Brushes Palette button in the options bar. Apply new settings for the Shape and Color dynamics and add some Scattering options before changing the fore- and background colors. Click and drag to test the new brush tip. When completed select the Save Brush option from the pop-out menu in the Brushes palette.