THEORY INTO PRACTICE
The Project – ‘A Family History’
2. Importing, tagging and creating Albums
4. Brightness, Contrast, Color
Now that you have an understanding of the program and many of its great features let’s look at how you can use these features with a real life project. You can download all the resources you need to complete the tasks from the book’s website (www.photoshopelements.net) and then you can follow along with the included video tutorials in which I perform all the steps detailed in the text. Once you are feeling confident with your new skills and abilities with Photoshop Elements 7.0 you can move on to the next step and start to substitute your own pictures for the ones I supplied.

The Project – ‘A Family History’
In previous versions of this book I detailed several different projects in this ‘Theory into Practice’ chapter. In a break from this tradition, I thought that to give a fuller view of the way that users can get the most out of Photoshop Elements, it would be useful to take a more in depth look at a single, multi-faceted project. So here I will be outlining the various steps involved in creating a multi-page Photo Book.
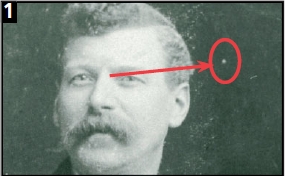
The content of this project will, no doubt, be very familiar to most readers, as it usually doesn’t take too long before some well-meaning relative discovers that your newly acquired digital imaging skills can be put to good use restoring the pictures from your family’s past. After all, most people have a collection of historical documents stored away in their lofts, or in a set of rarely-used drawers. Usually contained in boxes, or old suitcases, these collections are a mixture of photographs, special items, and letters. Undoubtedly, before long the family member with a new interest in digital imaging will inherit the task of restoring such heirlooms back to their former glory. Suffering from a mixture of scratches, stains and fading, the images can be improved and repaired with a combination of easy-to-use Elements techniques. The keepsakes too, can be converted to digital by being photographed, or even scanned, and together with the restored photos, the complete collection carefully laid out in an Elements’ multi-page document.

Figure 15.1 The multi-page document format used in both the Photo Book and Photo Collage projects allows the user to showcase their digital imaging skills and take advantage of design and layout options provided by these features. In this extended tutorial we take a bunch of photos and scanned mementos and produce a photo book. Along the way we take a closer look at the workflow that is best used for such projects.
Ready-made themes combining feature frames and textured backgrounds added as part of the creation process can be adjusted or even replaced. Extra objects can be manually added and the whole composition fine-tuned before outputting the pages to print, screen or web. So, without any more introduction, let’s get started.
The content for this type of project is wide and varied; from old photos, slides and negatives to letters and documents and small items and mementos. A scanner is invaluable for converting a variety of object types to a digital format. As well as being able to be used with prints, some models are capable of scanning negatives and slides as well. This ability is usually provided with an auxiliary attachment to flatbed units or via a special transmission lid. Small three-dimensional objects can also be converted to digital with a scanner. Simply place the item on the cleaned glass platen before scanning as usual. Larger items can be lit and photographed separately.
As is the case whenever photographing, it is important that the scanner (or camera) settings ensure that both delicate highlight and subtle shadow details are captured. Too much contrast and these areas will be saved as pure white and pure black. If in doubt, make a test scan and check the results in Elements. If there is a problem adjust the contrast setting and scan again.

It might seem a little pedantic but it is worth spending some time cleaning the glass surface before commencing scanning operations. Remember, removing dust and marks at this stage means less work later. When capturing items that may damage the platen, cover the surface first with plastic wrap.
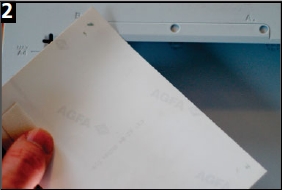
Next, clean the item to be scanned. If this is a photograph, use an anti-static cloth to help ensure no dust sticks to the surface. Place the photo on the platen making sure that the photo is orientated correctly. Close the lid and ensure that the photo is held flat against the glass.
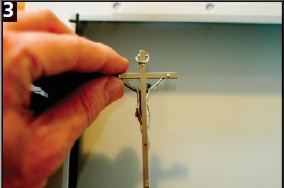
When scanning objects or mementos carefully place them on the platen, ensuring that they are sitting in contact with the glass surface as much as possible. If possible, close the scanner lid. This creates a clean background that can be easily removed later.
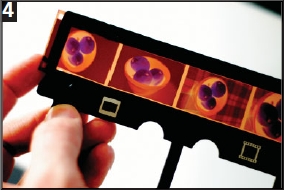
If the original is a negative (color negative shown here) then after cleaning, insert the negative into the holder making sure that the strip is oriented correctly. When setting the scanner controls select the color negative option in the scanning software.
![]() 2. Importing, tagging and creating Albums
2. Importing, tagging and creating Albums
With the source files created, import, tag and group the pictures into an Elements Album. The images used in this project are included on the book’s website. After downloading the ZIP file you must de-compress or Expand the files before you can use them. Then select File > Get Photos and Videos > From Files and Folders and navigate to the now decompressed Project-Images directory on your computer.

The next step is to get your photos into Photoshop Elements. If you are using the Get Photos and Video > From Scanner option then the pictures will already be imported into the Organizer workspace.
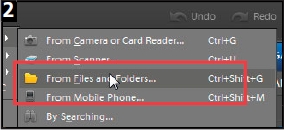
If, instead, you want to transfer your photos from your hard drive, select the From Files or Folders option. To download from a camera card choose the From Camera or Card Reader entry.

Once the photos have been transferred to Elements they will be displayed in the Organizer workspace. Add a Keyword Tag to the group by creating the tag and then selecting all of the imported images (Select > All) and dragging the tag to the pictures.
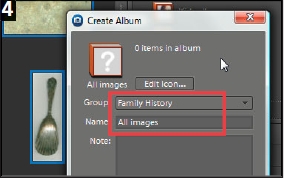
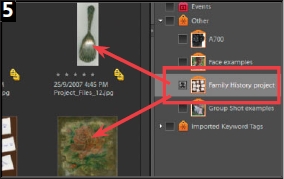
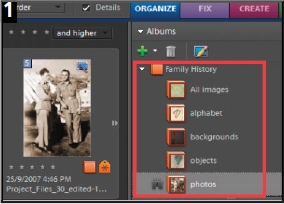
If the sequencing of the images is important for the type of project you are creating then as well as adding a keyword tag it is also a good idea to include the project images in an Album. In this example I created a new Album Group first (Family History) and then add the All Images Album heading to the group.
Now when you want to display the Keyword Tagged photos it is a simple matter of clicking onto the entry in the Keywords Tags section of the Organize pane. To restore the view of all images in the Catalog press the Show All button at the top of the thumbnail display.

Similarly, to show the contents of an Album click onto the entry heading. Once the Album images are displayed you can change the position of an image by dragging it to a new spot in the sequence. The number in the top left corner indicates the position of the image in the sequence.
As we have seen in previous chapters, it is best to edit and enhance your photos before including them in one of the Create or Share projects, as performing these changes after the event is often more difficult or, in some cases, not even possible. So the first task is to crop, straighten or trim the photos. To perform these edits the photos must be opened from the Organizer into the Full edit workspace. To do this, select the photo and then choose the Full Edit option from the right-click menu.

To start a new crop select the Crop tool and click-drag a marquee over the parts of the picture you want to keep. You don’t have to be exact with this first rectangle as you can adjust the size and shape of the marquee by click-dragging the corner and side handles.
By dragging the cursor whilst it is outside the marquee it can be rotated to crop and straighten at the same time. This enables you to straighten a crooked scan or realign a horizon line that is less than horizontal. The crop is executed by clicking the ‘tick’ at the bottom right of the crop marquee.

You can make a crop of a specific format, size and resolution by adding these values to the options bar before drawing the cropping marquee. Using this feature you can crop and resize in one step. To reset the Crop tool to normal choose the No Restriction option from the Aspect Ratio drop-down menu.

Sometimes scanned pictures can end up being slightly crooked because the original was not placed squarely on the scanning platen. The automatic Image > Rotate > Straighten Image function is designed for this scenario. When selecting this option Elements automatically rotates the main content in the photo to straighten it.

Extending the automatic squaring-off action of the Straighten feature, the Image > Rotate > Straighten and Crop Image option adds an automatic removal of the white space surrounding the corrected picture to the process. The feature works by identifying the color that surrounds the straightened image and uses this as a basis of the ensuing crop.
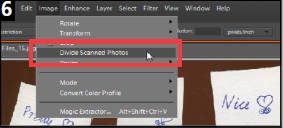
If you want to assemble and scan several images in one go then the Image > Divide Scanned Photos feature will prove a godsend. With this feature Elements will separate each of the individual pictures and place them in a new document. To ensure accurate division of photos place a colored backing sheet on top of the prints to be scanned. This helps the program distinguish where one picture starts and the other ends.
![]() 4. Brightness, Contrast, Color
4. Brightness, Contrast, Color
The next step in the process is to make some basic enhancement changes to the brightness, contrast and color in the photo. In Photoshop Elements you can perform such changes in a variety of ways. The simplest method is to select one or more of the auto options from the Fix pane in the Organizer space and apply it to selected thumbnails. For a little more control the images can be transferred to the Full or Guided workspaces where features such as Brightness/Contrast, Levels, Color Variations or Remove Color Cast can be used.
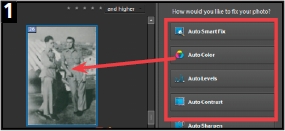
For the quickest and easiest changes to brightness, contrast and color, select the images to be enhanced and then choose one of the auto options from the list in the new Fix Pane. Select Edit > Undo if the correction is not satisfactory.
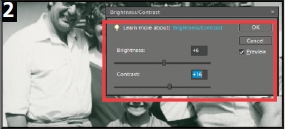
The Enhance > Adjust Lighting > Brightness/Contrast feature provides a quick and easy adjustment of the overall brightness of the image. Pushing the slider to the right lightens the midtones. Contrast is increased by moving the slider to the right and decreased by dragging it to the left.

The Levels feature provides a higher level of control over both brightness and contrast. To increase contrast in a photograph move the Highlight and Shadow Input sliders in the Levels dialog towards the center of the histogram. Moving the Midtone Input slider to the left increases the brightness of the photo.
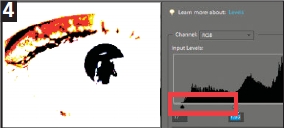
To help ensure quality adjustments holding the Alt key whilst moving the Input sliders will preview the pixels that are being converted to pure black or white (clipped). Move the sliders in until you see the first few pixels and then adjust the sliders slightly to ensure no pixels are being clipped.

The simplest way to increase contrast with the Adjust Color Curves feature is to click on the Increase Contrast entry in the Select Style menu. To decrease contrast in a photo click on the Backlight or Darken Highlights entries. You can fine-tune the results by moving the Adjust sliders.

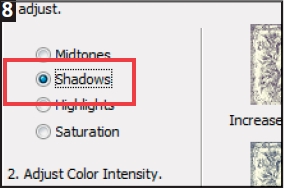
The Shadows/Highlight feature provides some brightness control using the Lighten Shadows slider. Moving this control to the right brightens the darkest portions of the image.
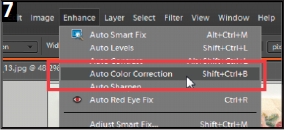
The Auto Color Correction feature provides a handy one-click correction of many color cast problems. The Auto Levels option can also provide good results and you should try these options first before moving on to more manual approaches if necessary.

When the Adjust Color for Skin Tone dialog first opens click on a section of skin tone to adjust the dialog’s default settings then use the Tan, Blush and Ambient Light sliders until the skin color (and the rest of the photo) is more natural.
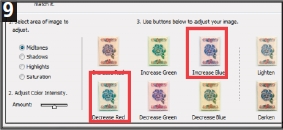
Using the Color Variations requires you to recognize the nature of the cast in your photos and then to click on a thumbnail sample that will help reduce the problem. In this example Decrease Red and Increase Green were both used to help correct the picture. The Amount slider is used to alter the degree of change applied when each thumbnail sample is pressed.

The Remove Color Cast feature works well if there is a part of the problem picture that is meant to be a neutral gray or white. After selecting the feature you then use the eyedropper cursor to click on the neutral picture part. Elements will change the color at this point to even amounts of red, green and blue and then apply the same changes to the rest of the photo.
![]() 5. Removing backgrounds
5. Removing backgrounds
With the photos straightened, cropped and enhanced, let’s now turn our attention to object images. These mementos are often included in compositions without their backgrounds and with the addition of a simple drop shadow to make them appear as though they are sitting on the surface of the layout. So removing backgrounds is a task that you may encounter in your project creation adventures and thankfully Photoshop Elements has several ways to ease the pain of this sometimes frustrating activity – from the simple Magic Eraser tool, to the more interactive Magic Extractor option and then, for the really tricky situations, a two-step process of selecting the background (using the new Quick Selection tool) and then deleting the background. In all techniques the background layer needs to be changed to a standard image layer first by double-clicking on the Layer entry and then okaying the New Layer dialog.

The Magic Eraser selects and then erases pixels of similar tone and color. The Tolerance setting determines how alike the pixels need to be before they are erased. High settings will include more pixels of varying shades and colors. Select the Contiguous option to force the tool to select pixels that are adjacent to each other and choose Use All Layers if you want to sample the color to be erased from a mixture of all visible layers.

The Magic Extractor feature quickly removes the background of a picture whilst retaining the subject in the foreground. The feature works by marking, with a scribbled line or a series of dots, the foreground (to be kept) and the background (to be removed) parts of the picture. Elements then automatically finds all the background parts in the picture and removes them from the document, filling the space with your choice of black, gray, white or transparency.
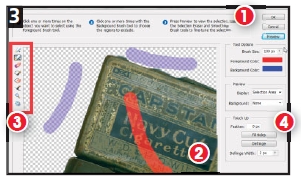
The Magic Extractor works within its own window (1), which includes a zoomable preview area (2), a set of tools for marking the fore- and background parts of a photo (3), touch-up options to refine extraction results (4) as well as settings to select what will fill the background area once it is removed.

The new Quick Selection tool combines the outlining ability of a Marquee tool with the color selection characteristics of the Magic Wand. The selection is created by painting over the parts of the picture that you want to select. In this case it is the background of the photo that we want to include in the selection. The selection outline will grow as you continue to paint. When you release the mouse button the tool will automatically refine the selection further.
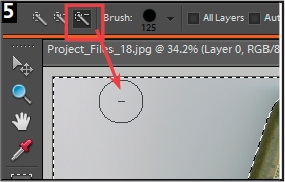
Like other selection tools, the Quick Selection tool also provides the option to add to or take away from an existing selection using either the Shift (add) or Alt/Option (take away) keys, or by clicking one of the selection mode buttons in the tool’s options bar.

To coincide with the release of this new Selection tool, Adobe has also created a new way to customize the selections you make. The Refine Edge feature is accessed via Select > Refine Edge. The feature brings together four different controls for adjusting the edges of the selection with two selection edge preview options. Use the settings here to preview and then fine-tune the quality of the selection edge used to outline the background of the photo.

With the background now carefully selected, this part of the photo can be deleted by hitting the Delete key. This will cause the selected area to be replaced with a checker board pattern indicating the area is now transparent. One way to ensure that the items placed in your composition look like they are meant to be there is to pay attention to the quality of the edge between the item and the transparent background. A harsh, sharp edge looks artificial whereas a softer edge seems more realistic. Be sure to add a slight Feather of 1 pixel to the selection before deleting the background.
Now onto restoring some of those older images. The most basic of tools used for repairing spots, marks and in some cases tears across the photo, is the Clone Stamp tool. The tool is a good place to start when first restoring your photos. Using the tool is a two-step process – select the area to be sampled and then paint over the mark. The same process is used when working with the more sophisticated Healing Brush tool. So skills built here can be easily transferred to Healing Brush work later.
In contrast the Spot Healing Brush provides a simpler, one-step solution, where the texture and color of the area surrounding the brush tip are used to paint over the mark or scratch. In most cases this tool works extremely well, but if you do find unwanted detail creeping into your retouched areas switch to the Clone Stamp (or Healing Brush tool) and select your own sample points.
The Clone Stamp tool works by sampling a selected area and pasting the characteristics of this area over the blemish, so the first step in the process is to identify the areas in your picture that need repair. Make sure that the image layer you want to sample is selected.

Next, locate areas in the photograph that are similar in tone, texture and color to the areas needing to be fixed. Use these areas to paint over the dust and scratches marks. Select the area to be sampled by holding down the Alt key and clicking the mouse button when the cursor (now changed to cross hairs) is over a part of the image that suits the area to be repaired.

With the sample point selected you can now move the cursor to the area to be fixed. Click on the blemish and a copy of the sample point area is pasted over the mark. Depending on how well you chose the sample area, the blemish will now be blended into the background seamlessly. Continue to click, repairing more blemishes as you go.

You may need to reselect your sample point if you find that the color, texture or tone doesn’t match the surrounds of the blemish. It may also be necessary to change brush size to suit different repair tasks. Changing the brush size will alter the size of both the Sample and Stamp areas.

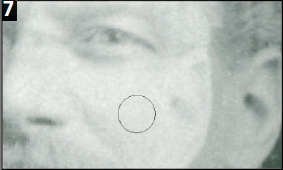
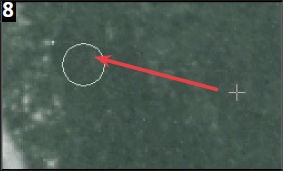
For difficult repair jobs where you need to recreate picture elements select a similar part from the photograph as your sample point. Here, the background is sampled to help repair the missing section of the scan in the upper right-hand corner.
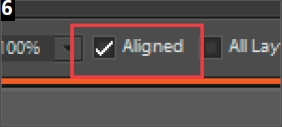
Switching between aligned and non-aligned can really help you with rebuilding picture parts. Aligned sets the sample point so that it remains the same distance from the stamped area no matter where on the picture you start to click, and Non-aligned repositions the sample point back to the original sample spot each time the mouse is moved and then clicked.
The Clone Overlay option was new for Photoshop Elements 6 and provides a ghosted view of the sampled area over the main image when painting with the Clone Stamp tool. This can be very helpful when trying to align specific sample parts with the background image. Activate the feature by selecting the Show Overlay setting in the Clone Overlay options dialog accessed via the feature’s button in the Clone Stamp tool bar.
The Healing Brush is designed to work in a similar way to the Clone tool; the user selects the area (Alt-click) to be sampled before painting and then proceeds to drag the brush tip over the area to be repaired. The tool achieves such great results by merging background and source area details as you paint. Just as with the Clone Stamp tool, the size and edge hardness of the current brush determines the characteristics of the Healing Brush tool tip

The Spot version of the Healing Brush removes the sampling step from the process. To use the brush you simply select the feature, adjust the brush tip size and harness and then click onto the blemish. Almost magically the Brush will analyse the surrounding texture, color and tones and use this as a basis for painting over the problem area.

The Spot Healing Brush can also be used for removing marks, hairs, streaks or cracks by click-dragging the tool across the offending blemish. Pro’s tip: If unwanted detail is used to cover the repaired area, undo the changes and then draw around the area to be healed with the Lasso tool and apply the brush again. This restricts the area around the blemish that the tool uses to heal.
With the bulk of the enhancement tasks out of the way, it is now time to consider some more aesthetic options. When thinking of historical photos most people can recall the sepia toned images of their relatives found in family photo albums. You can recreate the look and feel of these old style pictures by converting color photos to gray and then tinting them the familiar sepia brown hue. There are several options for changing color photos to monochrome including the Convert to Black and White feature first introduced in 5.0 as well as saturation and mode changes. In terms of tinting, Elements contains features for applying a single color change across the whole of the image or for separately tinting the highlights and shadows.

The Convert to Black and White feature (Enhance > Convert to Black and White) provides custom mapping of color to gray. Use the Style presets in the Convert to Black and White dialog to establish the basic look of the conversion. Preview the results in the After image in the top right of the dialog.

Next, fine-tune how colors map to specific grays using the Adjustment Intensity sliders. Drag to the right to emphasize these colors in the conversion and drag the controls for the opposite colors to the left to add more contrast to the conversion.

The simplest way to convert a color photo to monochrome is to select the Image > Mode > Grayscale option and then click on the OK button in the Discard Color warning box. However, you may need to adjust the image’s contrast after performing this change. Also, the mode of the photo will need to be changed back to RGB Color when it comes time to tint the picture.

You can also use the Remove Color option (Enhance > Adjust Color > Remove Color). This feature has the advantage of keeping the photo in RGB mode after the conversion, allowing hand coloring of the photo. The one-step Remove Color feature produces the same results as manually desaturating the photo using the controls in the Hue/Saturation feature (Enhance > Adjust Color > Adjust Hue/Saturation). With the Hue/Saturation dialog open, drag the Saturation slider all the way to the left (a setting of -100) to produce a grayscale result.

The simplest way to add a tint to your color photos and convert them to monochrome in one step is to make use of the Colorize option in the Adjust Hue Saturation feature in the Enhance > Adjust Color menu. After the Hue/Saturation dialog is opened proceed to the bottom right-hand corner of the dialog and select the Colorize option. Immediately the image will be changed to a tinted monochrome.

With the dialog still open use the Hue slider to alter the color of the tint. Traditional looking sepia tone is approximately a value of 30 and a blue tone equivalent can be found at a value of 215. The strength of the color is controlled by the Saturation slider.

To create a split tone effect (highlights one color and shadows a different hue) select the Color Variations option from the Enhance > Adjust Color menu. Check the Highlights option and then click on the thumbnail for the color to apply to these tones. Here I decreased Blue.
Without closing the Color Variations dialog now check the Shadows option and add a different color to these image tones. In the example the shadows were colored blue by clicking the Increase Blue thumbnail repeatedly. Click OK to apply the split toning changes.
![]() 8. Creating a Photo Book
8. Creating a Photo Book
Following the suggested Elements workflow we now have successfully enhanced, edited and adjusted the candidate photos so that they are now ready for inclusion in a new photo project. In this case the family history pictures and mementos will be used as the basis for a new multi-page Photo Book project. Keep in mind when creating such books that the minimum number of pages accepted by the online publisher (Kodak EasyShare Gallery) is 20, and so unless you particularly want a few pages free of photos, ensure that you have enough content to fill all 20 book pages. Also remember that the first image in the Project Bin (or Album used for the project) is featured on the title page, which can be seen through a die-cut hole in the front cover. For this reason, it is a good idea to create a specific Elements document that can be used for the title page.
When working with a range of different types of project content it is helpful to break the content into different categories. Here I have separated the documents into several Albums arranged under one Album Group heading.

After selecting the ‘Photos’ album, the next task is to drag the individual images around the workspace to adjust the sequencing of the group. For example the specially created title photo is dragged to the first position in the album so that it will be used on the title page of the Photo Book.

The thumbnails of the photos to include are then selected in the Organizer workspace before clicking on the Photo Book entry in the Create task pane.

The Edit workspace opens and the selected images are automatically placed into the Project Bin at the bottom of the screen. The Task pane on the right of the workspace displays the first group of Photo Book creation settings. Choose the Layout option to use for the book. Here I use the Choose Photo Layout entry to allow more design options for left and right pages. Click Next to display a second group of settings.

Select a theme (matched background and frames set) from the list of thumbnails. A larger preview of the design will be displayed next to the pane to help with selection. In this example I chose the Auto Fill but not the Add Captions option in the section beneath the Themes area. Click the Done button to create the multi-page document.

The pages are created and the photos are inserted with associated frames onto ready-made backgrounds. The book is displayed in a new preview mode with the pages listed separately in the Project Bin.
![]() 9. Add extra elements and fine-tune
9. Add extra elements and fine-tune
As you can see from the results the Photo Book creation process automatically places images in frames and positions them on the pages. The next step in the process is to fine-tune the layout and how the images are framed. After that, extra content can be added to the pages. This can include text and graphics plus those all important mementos that you have so carefully extracted from their backgrounds. To make these changes use the steps below.

The frame and its contents (together) can be edited using either the handles on the edge or options in the right-click menu. Keep in mind that the frame and the picture that it holds can be edited separately. Singleclicking the frame selects the frame and the picture together so that any changes made in this mode will affect both components. The quickest way to enlarge a frame to suit an image that has been cropped is to select the Fit Frame to Photo option.

The picture inside the frame can be scaled and rotated independent of the frame by firstly double-clicking the photo (to select the picture without the frame) and then click-dragging the side, corner or rotate handles. Alternatively you can scale, rotate 90° left, replace the current picture with a new one and apply or cancel the changes with the buttons in the pop-up control that appears at the top of the picture border.

To replace existing photos with different images whilst still retaining the frame, select the frame first and then click-drag a picture from the Project Bin to the frame. This action swaps the two pictures. Alternatively you can select the Replace Photo entry from the right-click menu and choose a new picture via the file dialog that is displayed.
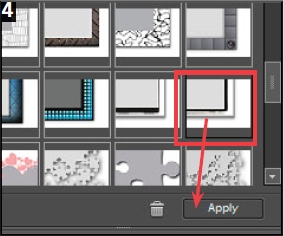
To add new photos to an existing layout you need to start by adding a new blank frame to the composition. Do this by clicking on the selected frame in the Artwork section of the Artwork panel in the Create pane and pressing the Apply button. A new frame will be created in the middle of the current page of the document.

In Elements you have two options for creating new pages that are displayed in the right-click menu when the cursor is over the pages in the Project Bin. The Add Blank Page option is used to add a white page with no frames, backgrounds or themes present. Once the page is created then text, graphics, shapes, frames, backgrounds and special effects can be added from the Artwork panel.

The second option is the Add Page Using Current Layout. This feature duplicates the layout settings of the selected page when creating the new one. Use this option to add new pages to a group of pages that already contain a background and frames as it will help to keep the look of the whole document consistent. The new page is then added to the document and a new thumbnail is displayed in the Project Bin to the right of the selected page.

Multi-page Photo Creation (.PSE) documents are displayed in the Photo Bin with a shaded background. The document can be expanded or collapsed via the sideways arrow button on the right of the last thumbnail. Changing the position of the page’s thumbnail in the Project Bin alters the page’s actual position in the document. Moving pages is a simple task, just click on the page to move and drag it to a new location in the document, release the mouse button and the page is relocated.
To add in the mementos (minus their backgrounds) that you created earlier you will need to use the File > Place option in the Edit space. Other images (without transparent backgrounds) can be opened and then dragged from the Project Bin onto the Photo Book.
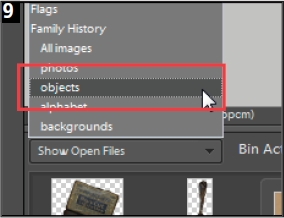
Alternatively, you can display the contents of any Elements Album inside the Project Bin. Simply click on the Show menu positioned in the top left of the Project Bin. Choose the Album entry from the list provided and the bin will then show the album images.

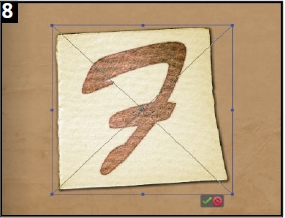
More sophisticated elements can be added by creating these first in the Edit workspace, saving the resultant document and then adding this image to the Photo Book. In this example, photos are placed onto the scraps of paper in the cigarette box. Start by creating a selection on the paper leaving a small border.
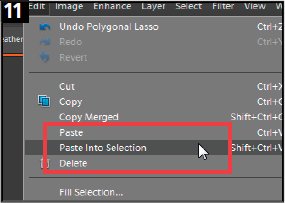
Next, open the photo that you want to place onto the paper and select all of the image (Select > All). Now copy the picture to the computer’s memory using the Edit > Copy command. Switch to the cigarette box photo and choose the Edit > Paste into Selection option.

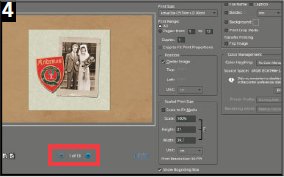
Before doing anything else choose the Free Transform feature (Ctrl T) and use the corner handles to make the image smaller and the rotate handle to pivot the photo. When you have finished click on the Commit button to apply the transformation.

Repeat these steps until all three papers have been filled with project images. Save the document and then use File > Place to add the image to the Photo Book composition. Use Free Transform again to adjust its size to suit the other elements on the page.
With the book pages now completed, you can output the multi-page document. You have two options – to upload the Photo Book to a print company for professional printing or binding, or output the document to a desktop machine for printing at home.
The Photo Book project is designed specifically to make the process of ordering online much simpler than in previous editions. Kodak EasyShare Gallery still handles the printing and binding but both Kodak and Adobe have streamlined the process and steps between completing the book document and completing the order. Printing at home is also a viable alternative as many paper companies can supply double-sided paper allowing you to print your book document ‘back to back’ just like the professionals. The binding component can be handled by your corner office supplies store for a small charge.

With the multi-page document open click onto the Print button in the floating Photo Book options bar to start the process. Elements then displays an Info dialog indicating that the book files are being prepared for uploading and that this process can take up to 20 minutes.

Once completed the first of several step dialogs is displayed by the Kodak EasyShare Gallery website. New users will need to register before proceeding. Returning users can log in using their email address and chosen password.
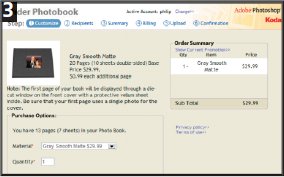
After logging in Kodak takes you through a six-step process that involves selecting the finish of the completed book, choosing recipients, billing details, uploading the files and confirming the order. With this process complete the book is printed and bound and shipped back to you via post or courier.
For outputting to a desktop printer select the File > Print option with the document open in the Edit workspace. Elements will then display the standard Print dialog with the exception that just beneath the preview area there are Forward and Back buttons enabling you to flip through the pages of the document.