
Choosing Your Digital Camera

Calliope hummingbirds are the smallest nesting bird in the US and Canada. This male is attracted to a sugar water feeder that has been carefully hidden with flowers.
The advances in digital technology and cameras has been truly breathtaking. Only a few years ago, digital cameras cost many thousands of dollars, yet produced images that were inferior to less expensive film cameras. Today the price of terrific digital cameras has dropped tremendously while the quality they produce has risen dramatically. This explains why digital cameras became so widely accepted among amateurs and professionals alike as the camera system of choice in the 2003–2006 time period.
DIGITAL ADVANTAGES
Digital single-lens reflex (D-SLR) cameras enjoy many advantages over film cameras. While the initial cost of a quality digital camera might be slightly higher than a film camera, the cost in the long run is much less since there is no ongoing film and processing cost. Being able to immediately review the images you shoot with a digital camera is an enormous benefit. Problems with exposure, composition, light, and sharpness are detected right on the spot and adjustments can be made while the subject is still present. This helps everyone get it right in the first place and encourages you to take more images. Due to the instant feedback, nature photographers learn quicker and have more fun in the process. Immediate feedback also makes it easier for nature photography instructors to guide their students so they get better images more rapidly.
Digital is much easier to travel with. Airport x-ray machines can easily damage film, but have no effect on digital cameras and storage media. No longer must photographers carry hundreds of rolls of film on an overseas photo trip. It is wise to carry your camera gear on the airplane because there is much less chance of having it damaged or stolen. Since most airlines limit you to one carry-on and a computer or purse (be sure to check the rules before flying), it is easy to carry on your camera bag (if you don’t overdo it) and the digital storage devices that can hold thousands of images in a compact space.

The interaction of these two lion cubs with the adult lion makes this image especially appealing. Adorable images are well received by viewers and eagerly sought by photo buyers.
Only in the past couple of years have D-SLRs produced images that were capable of making prints just as good as 35 mm slide film. Using software, digital images can be optimized to produce incredible prints. During the first three decades of my nature photography career, hardly anyone made their own prints. Spending hours in a darkroom working with toxic chemicals was not appealing. Very few photographers made their own color prints. Now the entire process is back in the hands of the photographers who do everything. They make the initial digital capture in the field, optimize the file, and print gorgeous images in the digital darkroom at home or in the studio.
In the old days (2003), most photographers edited their slides on a light-table with an 8x magnifying loupe. Examining all of the slides with the loupe was tedious work. This is no longer necessary with digital. Now each image is reviewed on a large computer monitor so the image is huge compared to a 35 mm slide.
Digital offers tremendous control over white balance, exposure, color, saturation, and contrast. The list of advantages goes on and on, but since you are reading this book, you are already sold on digital.
CAMERA CHOICES
Nearly everyone owns a compact point and shoot digital camera. These small cameras are easy to carry with us all of the time. They are highly automatic so it’s simple to capture splendid candid images of family and friends. The quality is quite good too, but they are limited in what they can do well. This book is intended for those who want to make high-quality images with D-SLRs cameras. These cameras accept many different lenses and other accessories making them ideal for photographing a wide range of subjects from flowers to landscapes to birds.
PRO VERSES AMATEUR CAMERAS
There was a huge difference between pro level film cameras and ones designed for amateurs. However, now that digital cameras are really miniature computers, the difference between cameras designed for amateurs and pros isn’t huge in terms of features, just in price. This means you can buy a D-SLR for less than $1000 and get nearly all of the features of a camera costing thousands more.
You’ll need a camera and lens to begin taking nature photographs so let’s select one. A number of excellent companies make D-SLR cameras today. This list includes Nikon, Canon, Pentax, Olympus, Sony, Fujifilm, Sigma, and others. If you are shooting one of these systems and have a number of lenses already, then you might want to stay with that system. But, if you are just starting out or don’t mind buying all new equipment, then carefully select a camera system because you may be staying with it for a long time. While all of the companies listed make fine equipment, some make a lot more than others. Nikon and Canon are the clear leaders in D-SLR cameras today. Both companies spend lots of money researching and developing their product line. You want to have choices in camera bodies and lenses. Having many lenses to choose from is especially important if you are a versatile nature photographer who photographs landscapes, closeups, and wildlife since all three subjects require entirely different lenses to do well.
While I would like to be diplomatic and say all systems are equally good, having many choices is a huge benefit. Although any of the current camera systems might work for you, you certainly can’t go wrong by going with either Nikon or Canon. I happen to shoot the Canon system while Barbara shoots Nikon. We are happy with both systems and I am certain each would work well for you too.
TERRIFIC CAMERAS
Listing the current cameras in various price ranges that are superb for nature photography is a bit of a problem in a book. New cameras arrive frequently so any suggestions I make here become outdated quickly. As I write this in early 2007, excellent cameras such as the Canon 30D or Nikon D200 can be purchased new in the $1500 price range. Most companies offer D-SLR cameras below $1000 such as the Nikon D80, Canon EOS Digital Rebel XTi, Pentax K10D, Samsung GX-10, and Sony Alpha 100. These cameras produce 10 megapixel plus files so each is capable of excellent images. Of course, you can spend more money too. The high-end Nikon D2Xs is about $5000 while the top of the line Canon 1Ds Mark II is $8000. By the time you read this, all of these cameras might be replaced by cameras that offer more speed, megapixels, and other bells and whistles for less money.
ESSENTIAL CAMERA FEATURES
Once you have decided on what camera system to own, it’s important to select a camera with features that are especially useful in nature photography. Here’s a list of features I feel are important for nature photography.
High-Megapixel Count
Your camera should have at least 8–10 megapixels. An 8-megapixel camera can easily produce gorgeous 16 × 20 inch color prints. What does 8 megapixels really mean? It means you have eight million effective pixels which is the smallest unit of a digital image. These eight million pixels are arranged in a regular pattern of little squares on the sensor in the back of the camera. When you take a photograph, light strikes the sensor and each pixel records how much light (photons) strikes it. In most cameras, each pixel is sensitive to only one color due to red, green, and blue color filters. Each pixel records information about the brightness of the color it can measure. This means the pixel with the blue filter can only measure blue light and so on. If you enlarge a digital image on the computer enough, you will see the square individual pixels.

When fast action is about to happen, it’s important to set the camera to shoot as many images per second as possible. This crocodile is hunting wildebeest that are swimming across the Mara River by the thousands.
Several expensive cameras produce image files of 12 megapixels or more. Is it worth spending thousands of dollars to get 2–6 more megapixels? These cameras aren’t worth the money if you plan to make 16 × 20 inch prints or smaller. However, the extra megapixels come in handy if you want to make really huge prints such as 20 × 30 inch wall murals. More pixels are useful if the image file needs to be cropped quite a bit. The disadvantage of cameras that produce super large files is fewer images fit on the storage media and the cameras cost more. It takes longer to transfer large files to the computer too.
Large Buffer and Fast Write Speed
A large buffer and fast write speed is crucial if you enjoy photographing action. Suppose the camera can shoot four RAW images per second and the internal buffer can store 6 images. This means if a swan is flying toward you, it is possible to take six images in 1.5 seconds. When the buffer is full, you can’t shoot another image until at least one shot is transferred to the memory card. Obviously, if the buffer could store 12 images or the write speed to the memory card was faster, you could shoot more images at the peak of the action. If you seldom photograph wildlife action, but prefer wildflowers, landscapes, or perching birds, then buffer capacity and write speed aren’t critical.

This crocodile let hundreds of wildebeest swim by before grabbing this youngster. Having a camera that can write data to the memory card quickly is crucial.

The crocodile pulls the wildebeest out of the herd which is still swimming by. It soon submerges to drown it’s victim. The entire sequence was over in about 15 seconds.
Mirror lockup capability is crucial for making sharp images in the shutter speed ranges of 1/8 to 1/30 second. The upward action of the mirror jars the tripod mounted camera causing a slight loss of sharpness in that shutter speed range. Using shutter speeds faster than 1/30 second or slower than 1/8 second greatly minimizes or eliminates fuzziness caused by the motion of the mirror.
Adjustable Self-Timer
Using your finger to trip a camera that is supported on a tripod will cause images to be less sharp at slow shutter speeds of 1/60 second and below. The best way to trip the shutter is to use a cable release or self-timer. It is helpful to have a selftimer that can be set to various intervals. A 10-second delay gives you time to get into the photo too. However, since most nature photographers don’t want to be in the photo, a 10-second self-timer delay is a long time to wait for the camera to fire. When photographing any still subject such as a wildflower or landscape, using the self-timer to fire the camera is effective for getting the sharpest image. Many cameras (but not all) offer a 2-second delay so this is something to look for.

When using a sturdy tripod, you will get the sharpest possible image if the mirror is locked up prior to the exposure when photographing any motioniess subject such as these shadows on the snow.

Orange Spring Mound is colored by bacteria that grow in the warm water. Since it doesn’t move or blow in the wind, it is effective to use mirror lockup and the two-second self-timer to fire the camera rather than use a remote release.
Using a tripod most of the time is necessary to consistently shoot sharp images. There is no point in using a tripod if you trip the shutter with your finger at speeds below 1/30 second. The pressure of your finger is certain to jar the camera causing a loss of sharpness. A cable release attaches directly to the camera. By pressing the button on the end of the release, the shutter trips and the image is taken. The cable separates your quivering body from the camera. Some releases don’t attach directly to the camera. Just point the remote device at the camera and push the button to take the image. Both systems work well.
Why do you need a remote release when your camera already has a self-timer since both the self-timer and the remote release separate your body from the camera? If you are photographing a waterfall, both systems work equally well. However, wind is a huge problem for nature photographers. If you are photographing a wildflower blossom that is swaying to and fro in the breeze, you must wait for a calm period so you can fire the camera when it is perfectly still. This is a time when using the self-timer is not effective because there is no way to know if the subject will be completely still a few seconds later when the camera fires. By using a remote release, you can take the image as soon as the subject stops swaying in the breeze. It’s much easier to shoot a sharp image with a cable or remote release when dealing with motion caused by wind. Here’s another situation where the remote release works better than the self-timer.

Photographing waves as they crash into the rocks doesn’t work well with a self-timer because you want to catch the peak of the action. Use a cable or remote release to trip the shutter instantly.
Let’s suppose wind is not a problem. You are photographing waves crashing on a rocky shoreline. It’s best to photograph the peak action as the wave explodes on the rocks. A remote release lets you shoot instantly to catch the action. A self-timer delay, even if only two seconds, misses the peak action most of the time.
Choice Between RAW or JPEG or Both
Make sure the camera offers the choice of shooting JPEG or RAW files or both at the same time. Unless you are certain you want only JPEG images or RAW files, it makes sense to set the camera so that both files are captured at the same time. JPEG images are processed by the camera. RAW images are files that contain the raw data collected by the sensor. Using software, a skilled person using a raw converter can often get the best possible quality from a RAW file. We will discuss these issues later on.
Large LCD Monitor
The LCD monitor is found on the back of the digital camera. This monitor is used to change many camera settings and to see images. LCD monitors that are easy to view are most helpful. Currently, LCD monitors that are 2 inches in size are typical and 2½-inch monitors are becoming more common. You’ll love a 2½-inch monitor so bigger is better.
Spot Meter
A spot meter measures the light from a tiny portion of the scene. It is quite useful in tricky lighting situations and exposing subjects that are dark or light. It does take experience and practice to master. You can get by without a spot meter, but if you are the precise type, then having one might be worthwhile. Unfortunately, many cameras don’t give you a true spot meter so if being able to meter tiny portions of your subject appeals to you, then make sure your camera comes with one. In the interest of full disclosure, my wife and I use matrix metering 50% of the time and spot metering the rest.
Back-Button Focus
Modern cameras offer a variety of autofocus controls. Cameras are setup so pressing the shutter button down part way initiates autofocusing. This is effective for hand-held photography. However, when shooting on a tripod, it is often better to remove autofocus from the shutter button and transfer it to a button on the back of the camera. Back-button focusing gives you enormous control and lets you switch instantly from continuous to one-shot focusing. Many cameras are able to do this by setting a certain custom function. Make sure your new camera has this capability. Back-button focusing will be discussed in great detail later.
PROTECTING YOUR CAMERA
Think of your camera as a miniature computer. It doesn’t like water, shocks, or being abused in anyway. Do everything you can to keep the camera and lenses dry. Shooting photos in the rain with an unprotected camera is asking for a punishing repair bill. Protective covers are made to protect the camera if you do shoot in the rain. It is possible to shoot under an umbrella to stay dry. You might wonder why anyone would shoot in the rain anyway. Wet subjects tend to have more saturated colors than when they are dry. By using a polarizing filter to reduce glare on wet surfaces, many subjects such as fall color or wildflower blossoms photograph quite nicely when wet. However, a few snowflakes or drops of water shouldn’t do any harm. On a cool morning, it’s possible for dew to form on the camera body when the sun begins to heat the air. I photograph a lot on dewy mornings and haven’t had any damage yet. Do not drop your camera in water!
Condensation on your camera body and lenses can be detrimental if you get too much of it. Don’t take your camera gear inside a warm room after it has been outside in the cold. Taking cold equipment inside a warm room causes the air next to the equipment to reach the dew point so moisture in the warm room condenses on it. Moisture can get inside the camera or lens causing wet spots in the optics that can take days to disappear.

Shaggy Mane Mushrooms spring from the ground following wet cool days in early October in northern Michigan. This group of four is nicely surrounded by freshly fallen maple leaves.

It’s bitterly cold when these trees on Two Top Mountain in eastern Idaho become entombed in snow. Always put cold camera gear in a plastic bag when you take it into a warm room to prevent moisture from condensing on it.
DEALING WITH COLD AND HOT TEMPERATURES
Do enjoy using your camera in cold or winter conditions. Snow, ice, and frost are wonderful subjects. Avoiding condensation is easy. While still outside in the cold air, put your camera bag in a plastic bag, squeeze out any extra air, and seal the plastic bag so warm indoor air can’t reach the camera bag. Now put the bag on the floor in a cool room. Leave the bag alone for a couple of hours so the camera gear can warm up slowly before getting it out and exposing it to warm air. On our Yellowstone winter tours, some people don’t leave their gear in the bag long enough. When they take it out, huge amounts of water form on the inside and outside of the lens. Once moisture forms inside the lens, it takes awhile to evaporate. One person couldn’t use their zoom lens during the following morning because the moisture inside the lens froze making zooming impossible.
Just the opposite problem happens when photographing in warm, humid regions. If it is hot outside and you store your gear in an air-conditioned room, condensation quickly forms if you take your cool equipment into warm air. This happens frequently in the Galapagos Islands which is famous for approachable and unique wildlife. The ocean air at sea level near the equator is typically hot and muggy. The plastic bag trick works here too. Put your camera bag in the plastic bag, squeeze out excess air and seal it up. Put the bag in the shade on the deck and give it an hour or more to warm up to outside temperatures.
DON’T SHOCK YOUR GEAR
Shocks probably destroy more cameras than any other cause. Modern cameras are delicate so they don’t like to be dropped or banged into things. Bouncing camera gear on anything hard is likely to generate a huge repair bill so always be careful.
I have seen plenty of camera gear destroyed in field workshops and tours. Here’s some of the ways camera equipment has met its demise. Some people try to hold two cameras at once, and one slips away smashing on the rocks. There is nothing like the sound of a $1000 crunch to get your attention. Another frequent mishap is most advanced photographers use quick release plates to mount their camera on a tripod. Once in awhile, they think they have slid the quick release plate properly into the clamp. They tighten the clamp on the tripod head, but only one side of the plate is in the clamp so the camera or lens isn’t actually attached to the tripod head. As soon as they let go of the camera, it crashes to the ground. This happens a lot so be careful. Cameras mounted on unattended tripods are blown over by wind or knocked down by waves. Other participants in workshops knock over unattended tripods too. If you are shooting in a park where other visitors may come close to you such as on a viewing platform, watch your gear carefully and be protective. Tourists and especially children are quite oblivious to expensive camera gear so protect it diligently. Be careful to secure camera gear in vehicles too.
CAMERA STRAPS
Either you like camera straps or you don’t. Since they come with most new D-SLR cameras, surely they must be useful. However, nearly every serious photographer I know doesn’t use them. Especially when shooting on a tripod, camera straps are always getting in the way. There is no right or wrong way here, just a matter of preference. Even though camera straps may have come with your camera, it doesn’t mean you have to use them.
KEEP YOUR LENSES CLEAN!
Some brilliant soul once said, ‘an ounce of prevention is worth a pound of cure.’ They are so right. Grit and dust can ruin your camera gear and reduce the quality of your images. It’s absolutely critical to protect your camera gear from the evils of dirt. Dust is a huge problem for digital photographers in many ways. First, always store camera lenses with their front and rear caps on. This prevents the expensive glass from being scratched needlessly. Make sure your lens surfaces are free of dust and smudges. Check both the front and rear glass elements to make sure nothing is on them every time you use them. Most of the time, you will need to do some cleaning. By carefully handling your lenses, you should never get a finger print on the glass. But, you may still get smudges from dried water drops from time to time.
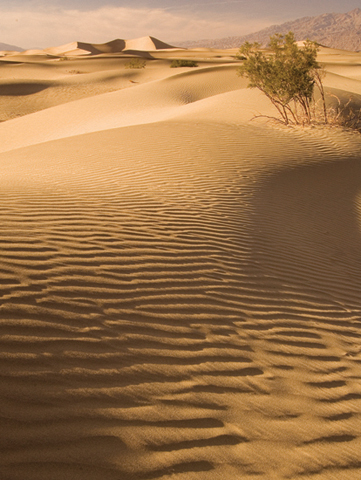
These sand dunes in Death Valley National Park are fun to photograph. Be careful to keep sand out of your camera equipment and always keep the lowest leg lock on your tripod out of the sand too!
Here’s a safe and effective way to clean a lens. Never grab a lens cloth and start rubbing the glass! If tiny bits of dirt are on the glass, you can easily scratch the glass. Instead, always use a soft photo brush to gently clean off the glass surface to remove any grit. Be sure to point the lens down while doing this so dirt falls away from the lens. If you point the lens up, you may move the grit around the lens without removing it. Now examine the glass carefully to see if all grit and dust is gone. If not, do it again until perfectly clean. See if you have any smudges from dried water drops or fingerprints. If you do, then the brush won’t remove it. A terrific way to remove smudges is to use a micro fiber cloth that is made for optical glass. Rubbing this over the lens beginning in the middle of the lens and working outward in a circular motion should work. If the smudge persists, try putting a small amount of lens cleaner directly on the cloth, never the lens, and rub the glass gently again. Following these steps should give you a perfectly clean lens.
KEEP THE CAMERA AND SENSOR CLEAN!
Keep dust and grit out of the camera body too. Dirt that settles on the sensor is an enormous problem for digital photographers. When a bit of dust adheres to your image sensor, the dust spot shows up on every image you take. While dust spots can be removed from the digital image with software, it’s far better to remove dust on the sensor before shooting. An effective way to reduce the amount of dust inside your camera body is to always keep a lens or body cap on the camera. Never leave a camera body sitting around where the insides are exposed to floating dust.
Changing lenses is necessary and hazardous. But, you still need to change lenses from time to time since that is the whole point of having a D-SLR. Turn the camera off when changing lenses since this eliminates sensor charge that attracts dust. Always change lenses as quickly as you can and point the camera body down so dust can’t easily fall inside it. Avoid changing lenses in dusty environments, especially if it is breezy.
CLEANING THE SENSOR
No matter what you do, you can be assured of getting dust on the sensor. Here’s how to look for it. Take a photograph of anything that is uniformly colored like the blue sky or a yellow wall. Load the image into your computer and blow it up to 100%. Now move around the image looking for dust spots that readily show up as black specs or spots on the computer monitor. Carefully follow the recommendation for removing the dust in your cameras instruction manual. All of the digital cameras I have seen lately have some sort of cleaning mode. Most cameras don’t really clean the sensor (although some now vibrate dirt off the sensor), they just move the mirror up so you can see the sensor. Use an inexpensive Giotto rocket blower to blow the dust off the sensor. Be careful though. Never touch the sensor with the tip of the blower since the sensor is delicate and easily scratched and don’t let the shutter close on the end of the blower either. Never use canned air since it could spray liquid on the sensor causing real problems. Normally using the Giotto rocket blower works well. Often it takes two or three attempts to blow all of the dust from the sensor. If dirt remains on the sensor, take the camera to a professional camera repair place to have the sensor cleaned. However, that can get expensive so using specially made cleaning swabs that are designed to clean the camera’s sensor is another way to conquer dirt on the sensor. You must be exceedingly careful to avoid scratching the sensor. Most camera companies don’t recommend cleaning the sensor yourself, but it can work well if you are careful. You’ll have to decide if the risk of cleaning the sensor yourself is worth it or not.
CAMERA BATTERIES
Most digital cameras come with a rechargeable battery and charger. Always order at least one extra battery. You need a spare since rechargeable batteries tend to work fine for quite awhile and then suddenly fail with little warning. If you go on any expensive or time-consuming photo trips, take three or four spare batteries with you. How many shots can be taken with a single battery depends on many variables. Using autofocus, image stabilization, and viewing the LCD monitor all consume battery power. If you are getting short on battery power, turning off some of these will make the battery last longer.
Cold temperatures lower the ability of a battery to run the camera. In cold weather, if your battery fails and you don’t have a spare, try putting the battery inside your coat to warm it up. Once the battery is warm, it should continue to operate the camera, until of course, it gets too cold again. Temperatures below zero are common in Yellowstone National Park during late January and early February. Rechargeable batteries work better than many people expect. Of course, it is wise to have at least one spare battery stored inside your coat staying warm in case the battery in the camera fails.
DIGITAL FILM
You’ll need memory cards in your camera to store your images. A number of different kinds of cards are made. This list includes CompactFlash (CF), XD Memory, Micro Drives, SmartMedia, Memory Stick, and Secure Digital (SD) to name a few. Your camera won’t accept all of these cards so your choice is limited to what your camera will accept.
Most D-SLRs accept either CF or SD cards. Be sure to check your cameras instructional manual to find out exactly what storage device must be used. Both of these memory cards are durable and transfer data quickly. SanDisk and Lexar are two of the best known manufacturers, but there are others. Storage capacities are going up and prices are falling. Presently you can buy 4 GB CF cards for about $150 and 2 GB SD cards for less than $100. There was a time when micro-drives were popular due to lower cost, but the other memory cards have dropped so much in price that there is no longer any reason to buy them. Micro-drives have moving parts so they are more fragile than other memory cards. For this reason, it is wise to stay away from them.

This snow-capped bull elk is finding small bits of vegetation to eat along the river. It helps to have a second set of batteries inside your coat keeping warm so they are ready to go in case the first set fails in the low temperatures.
Barbara and I currently use SanDisk 4 GB Extreme III CF cards in our cameras. This card holds 220 images from my camera that produces 16 MP RAW files and the read/write speeds are fast. Since these cards read fast, the buffer in the camera empties rapidly so more images can be shot.
CF and SD memory cards come in a variety of capacities. I wouldn’t consider anything less than 1 GB to start with. Larger capacity cards of 2 GB are available for both types of cards. Presently, CF cards are made with higher capacities than SD cards which top out at 2 GB. CF cards are available in 1 GB, 2 GB, 4 GB, 8 GB, 12 GB, and even 16 GB sizes. As the amount of storage space goes up, so does the price.
What memory card is right for you? The answer depends on how much you want to spend, how big your image files are, how fast you need to write to the card, and how many images do you want to risk on a single card. The nice thing about memory cards is you can reuse them over and over so they are quite cheap in the long run. Therefore, consider buying memory cards with at least 2 GB of storage capacity. If your camera shoots files larger than 10 megapixels, 4 GB memory cards are desirable. Of course, the more photos you put on one card, the more images you lose if the card malfunctions so safety is a consideration too. If you do a lot of action photography where you want that buffer to clear quickly so you can keep on shooting, then buy memory cards that read data from the buffer quickly. The more expensive Lexar 133x and SanDisk Extreme III memory cards are fast so they are preferred by action photographers.
BUYING A CAMERA
Perhaps the best way to buy your new camera is to purchase it from the local camera store. You get to see the camera and feel how it fits in your hands. Is it too heavy? Do the controls seem intuitive or hard to manage? Your salesman is able to answer all of your questions. If you buy the camera from the store, they will answer future questions regarding the equipment you purchased from them. The biggest drawback to buying locally though is the camera will probably cost more than from a large mail order camera store which advertise in the back pages of the major photo magazines.