
Using Lenses Effectively
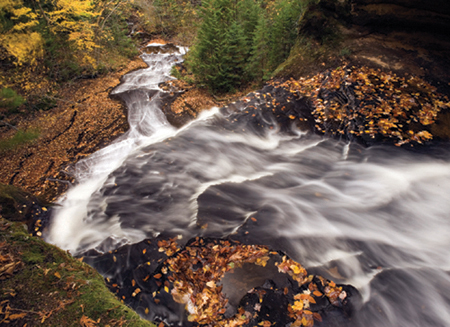
Extreme wide-angle lenses permit shooting from the top of Chapel Falls which is an unusual and pleasing viewpoint.
HOW LENSES WORK
Lenses focus and direct the light to the imaging sensor. Since there is a bewildering number of lenses being made today, deciding what lenses to purchase is a problem for most of us. However, once you know what to look for, having many choices makes it easier to buy lenses that match your needs and budget.
FOCAL LENGTH
All lenses have a focal length which is defined as the distance between the optical center of the lens and the sensor when the lens is focused at infinity. This distance is listed in millimeters. The focal length determines the lens angle of view or what the lens “sees”. The longer the focal length, the smaller the angle of view. The shorter the focal length, the wider the angle of view. For example, a Canon 50 mm macro lens has an angle of view of 46 degrees while the Canon 180 mm macro has a much smaller 14-degree angle of view. If you photograph a wildflower at the same magnification with both lenses, the wide angle of view of the 50 mm macro “sees” far more background than the 180 mm macro so you are more likely to have problems with distractions in the background. If cluttered backgrounds are ruining your images, always remember to try a longer focal length lens to get a smaller angle of view.
However, the large angle of view that short focal length lenses have is helpful at times. A short lens such as a 24 mm might be just what you need to photograph a cactus which include a dramatic sky full of beautiful clouds or perhaps a rugged mountain. If the background is appealing, then use the short focal length lens to include it in the image.
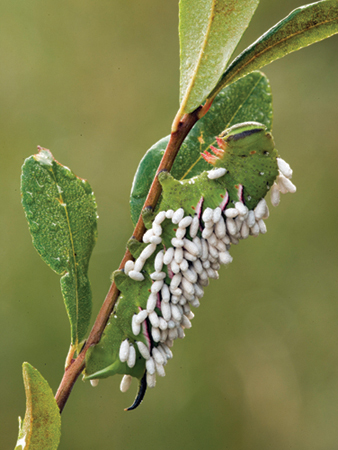
Using a 180 mm macro lens is effective for eliminating clutter and distracting details behind this sphinx moth caterpillar that has been parasitized by wasps.
MAXIMUM APERTURE
The lens aperture is determined by dividing the focal length by the optical diameter of the aperture. The maximum aperture is important because it determines the light passing ability of the lens. Lenses can have a variety of maximum apertures, even within the same focal length and made by the same company. For instance, Canon offers a 300 mm f/2.8 and a 300 mm f/4.0 lens. The 300 mm f/2.8 lens is said to be one stop faster than the 300 mm f/4.0 lens. Lenses with maximum apertures of f/2.8 are considered fast. A lens with a maximum aperture of f/8 would be called a slow lens because it doesn’t pass as much light. As you look at the list of lenses you can purchase for your camera, you will find many lenses that have the same focal length, but different maximum apertures. Let’s look at the advantages and disadvantages of maximum apertures.
Benefits of Fast Lenses
• The viewfinder is brighter which makes composing and manual focusing easier.
• Faster shutter speeds are possible for sharp images.

Using a 24 mm wide-angle lens very close to this cactus produces an interesting foreground that leads you all the way to the Sierra Nevada Mountain range in the distance.
• The camera may autofocus faster and more accurately.
• It is easier to throw the background out-of-focus.
• Less depth of field for selective focus is available at the widest aperture.
• It is more likely autofocus will still work if you use teleconverters, filters, or extension tubes.
Drawbacks of Fast Lenses
• Expensive.
• Heavy.
• Requires larger filters which are also bigger and more expensive.
• Harder to carry with you.
• May require a heavier tripod to support it.
DEPTH OF FIELD
This refers to the sharpness zone that extends in front of and behind the focal plane. Although the sharpness zone is truly a single plane, we think of it as a zone where details appear sharp to our eyes even if they may be slightly soft. This sharp zone increases as you stop down the lens from f/8 to f/16 for example. The depth of field decreases when you increase magnification. With any lens, shooting with a small f/stop such as f/2.8 and increasing the magnification by moving closer to the subject reduces depth of field which is desirable if you wish to make the background out-offocus. Capturing wildflower or animal portraits is a wonderful use of this technique. If you what maximum depth of field, stop the lens down to f/22 and move away from the subject. This reduces magnification which increases depth of field helping you get everything sharp in the image.

Using a 500 mm lens fairly wide open at f/8 provides a sharp portrait of the Masai Ostrich while throwing the background completely out-of-focus.
CROP FACTORS
In the old days, 35 mm single-lens reflex (SLR) cameras shot photos that were 24 × 36 mm in size because all cameras needed to be built to accommodate the popular film of the day. Digital cameras don’t need to be made for a certain size of film so digital sensors can be made in a variety of sizes. The only requirement is the image circle cast by the lens needs to be larger than the sensor. Since lenses were made to cover the dimensions of 35 mm film (24 × 36 mm), digital sensors can be made that size or smaller. In early 2007, very few digital cameras offer a sensor that corresponds to a 35 mm slide. Instead, the vast majority of digital cameras have a sensor smaller than 24 × 36 mm because the quality is still fine and it lowers the price of the camera. Using a smaller sensor is like cropping a 35 mm image which leads to a crop factor. This factor is derived by dividing 50 mm by the length of the diameter of the sensor. For example, 50 mm divided by 31 mm equals a factor of 1.6 which is the crop factor of the Canon 30D.

Using a 300 mm telephoto lens on a camera with a 1.5x crop factor makes the lens seem to have the reach of a 450 mm lens. This makes it easy to fill the frame with a small bird like this Gray Jay.
The crop factor is good and bad. It depends on what you want to do. One huge advantage is long lenses are now available to everyone, not just pros or wealthy amateurs. A crop factor of 1.6x effectively turns a 300 mm f/4 lens into a 480 mm (300 mm × 1.6x) lens that still has f/4 lens speed. The working distance of the 300 mm lens remains the same, but you get more apparent magnification. This 300 mm lens with the crop factor is more than $4000 cheaper than a prime Canon 500 mm f/4 lens and it weighs 5.9 pounds less! Now everyone can own and carry a lens in this focal length to fill the frame with wildlife. The crop factor works nicely on a zoom lens too. A 100–400 mm zoom becomes a 160–640 mm lens (with a 1.6x crop factor) and it doesn’t lose any light like it would if a teleconverter was used. Plus, the closest focusing distance of the lens remains the same so it is easier to fill the frame with a small subject. To fill the frame with a small bird like a house sparrow, an extension tube must be used between a 500 mm lens and the camera body to make it focus closer. But, a 300 mm lens with the 1.6x crop factor handles this subject quite nicely without the extension tube. The crop factor is advantageous in macro photography too. A 100 mm macro lens that can focus to lifesize (1x) offers higher apparent magnification. High magnification closeups are easier to do with the crop factor.
On the down side, the crop factor really isn’t more magnification. It is a crop of the image that once was 24 × 36 mm in size. You could do the same thing with a 35 mm slide by scanning the slide and then cropping the image. With the fullframe sensor in my Canon 1Ds Mark II, I commonly crop the image and don’t mind having a bird or mammal a little smaller in the frame than I would like if I can’t move closer because I can easily crop the file later. Of course, the more pixels you use to record the subject, the more options you have later for making large prints from the file. A sensor with a crop factor won’t have as many pixels (picture elements) as a full-frame sensor but the pixels it does have are recording light information from the central areas of the glass elements where lens imperfections have been greatly minimized as opposed to the outer edges of the glass in the lens. You are using the “sweet” parts of the lens to capture the image so this mitigates the reduced number of pixels somewhat.
The crop factor effect on wide-angle lenses is the most serious problem. A 1.6x crop factor converts a 24 mm wide-angle lens into a 38.4 mm lens which is getting close to a normal or standard 50 mm lens. A 17 mm lens is a wonderful wide-angle lens to use, but it becomes a 27.2 mm lens with the 1.6x crop factor. Be aware that digital cameras can have other crop factors too such as 1.3x, 1.5x, and 2x or something else so it all depends on the camera body you own. If you love shooting wideangle images, this is a frustrating problem. Fortunately, camera manufacturers have heard the uproar and now make wideangle zoom lenses for their cameras that have the crop factor. A recent addition to the Canon line is the new 10–22 mm f/3.5–4.5 zoom. It’s made for their camera bodies that have a crop factor. It cannot be used on a digital camera with a full-frame sensor because the lens doesn’t throw a large enough image circle to adequately cover a full-frame sensor. Nikon recently came out with 12–24 mm f/4 to solve the same problem and the other fine camera lines are doing the same. Lenses that can only be used with cameras that have the crop factor include Canons EF-S and Nikons DX ED-IF series. Since these lenses don’t need to throw such a large image circle, they can be made smaller and lighter.
IMAGE-STABILIZED LENSES
These lenses are built so you can use slower shutter speeds hand-held and still get sharp results. Canon calls these lenses image stabilized (IS) because a special group of lens elements can shift its position to compensate for camera shake producing a sharper image. Nikon lenses that do this are called vibration reduction (VR) lenses. It seems all the lens manufacturers are coming out with some lenses that have image-stabilizing technology. Some camera systems such as Sony, Pentax, and Samsung have sensor-based stabilization systems so all lenses used on their cameras benefit from the anti-shake treatment.

Barbara’s Nikon 12–24 mm lens worked beautifully to capture this winter scene of the Yellowstone River from a bridge.
This anti-shake technology does work fairly well. Without this feature, it was thought a stable photographer could effectively hand-hold a camera and make sharp images if they used a shutter speed that was equal to 1/focal length. With a 30 mm lens, a shutter speed of 1/30 second was sufficient. With a 200 mm lens, a shutter speed of 1/200 second was necessary to account for the increased magnification of the longer focal length. Of course, this depends on the photographer. Some are steadier than others. We have several Canon and Nikon lenses that have this technology and do use it when we must hand-hold the camera when shooting from a rocking boat for instance. However, we still use tripods whenever possible. In most cases, it is recommended to turn off this technology when shooting on the tripod.

Tripods are useless for photographing from a rocking boat. By using Canon IS and Nikon VR lenses, using ISO 200 instead of ISO 100, and more intermediate apertures of f/11, we have plenty of shutter speed to shoot sharp images of this arch along Pictured Rocks National Lakeshore.
PERSPECTIVE
Perspective is a visual effect that determines how close or far away the background appears to be from the subject. Often we use lenses to control perspective to simulate depth when a three-dimensional scene is reduce to two dimensions in the image. Telephoto lenses tend to compress the scene. They make the foreground and background look closer together. Wide angles tend to expand the feeling of depth. They make the foreground look bigger than the background when you physically move closer to the foreground. Since objects in the background are smaller relative to the foreground, wide-angle lenses increase the sense of depth, especially in landscape images. Perhaps that is why they are so widely used by landscape specialists. Therefore, to emphasize the foreground, use a wide-angle lens and move close to it. To make the background more dominant, use a longer lens and move away from the foreground.
LENS CHOICES
Zoom and Prime Lenses
Prime lenses have a fixed focal length. The Canon 24 mm f/1.4, 300 mm f/4, and 400 mm f/2.8 are examples. These lenses cannot change their focal length. Prime lenses frequently have more lens speed that zooms covering that range and may be slightly sharper. However, the quality differences between prime and zoom lenses has closed considerably. If you can afford it, always buy a zoom lens that is built with special low dispersion glass which improves image sharpness. We use prime lenses a lot, but there is a disadvantage of being unable to change the focal length which makes composing a bit more difficult at times.
Zoom lenses are enormously handy because the focal length can be changed over a certain range. A few Nikon examples include the 12–24 mm f/4, 18–200 mm f/3.5–5.6, and 200–400 mm f/4. Zoom lenses permit you to change the focal length to anything within their range. For example, the 18–200 mm f/3.5–5.6, lens starts at 18 mm, but can be zoomed all the way out to 200 mm which includes every focal length between the two. Zoom lenses are useful because it is so easy to change composition without changing the camera to subject distance. Another zoom lens advantage is one filter such as a polarizing filter covers all of the focal lengths on the lens. A Canon 100–400 mm zoom requires a 77 mm polarizing filter which works for every focal length between 100 mm and 400 mm. If you were to buy a fixed 100 mm, 200 mm, and 400 mm lens, you might find you need three different sized filters to fit all of the lenses. Since you only need one filter size for the zoom, this saves you money and weight, plus you spend less time cleaning filters and putting them on and taking them off the lens. Zoom lenses are popular with amateurs and pros because they work so well. We happily use zooms with excellent results.

The 17 mm lens on the Canon 1Ds Mark II which has no crop factor offers a nice perspective of Laughing Whitefish Falls. The rock and leaves in front are only a couple feet from the lens so the huge looming foreground grabs your attention and the flow of water guides you up the falls.
Constant and variable aperture zooms
There are two types of zoom lenses, constant maximum aperture and variable aperture. The Nikon 18–200 mm f/3.5–5.6 is a variable aperture. The lens starts out with a lens speed of f/3.5 at the shortest focal length and gradually becomes a somewhat slower f/5.6 lens as it approaches the 200 mm focal length. Variable aperture zooms are smaller, lighter, and less expensive to make so they are quite popular. Constant maximum aperture zooms such as the Nikon 200–400 mm f/4 do not change to a slower lens speed when the lens is zoomed out to the longest focal length. This make the lens bigger, more expensive, and heavier. However, we prefer to use constant maximum aperture zooms because they keep their fastest lens speed which permits us to use higher shutter speeds for sharp images. Having a constant maximum aperture is especially important for photographing wildlife with longer focal length zoom lenses.
A “slow” variable aperture zoom lens was a serious problem when most nature photographers shot film in the ISO 50 range. However, digital cameras produce beautiful results using ISO 400 so lens speed is now less of a factor than it once was. Zooms are more prone to flare problems than fixed focal length lenses because they are more complex.
Zoom lenses are made in two ways. Many zoom lenses are the push–pull variety where you pull the lens out to zoom to a longer focal length or push it in to switch a shorter focal length. These work quite well, but they do tend to permit dust to get inside the lens elements which requires a trip to the repair shop for cleaning. You may also have a problem shooting straight down when the lens is mounted on a tripod. Gravity can cause the lens to zoom out all by itself making it impossible to get a sharp image. Some of the best zoom lenses such as the Canon 100–400 mm f/4.5–5.6 have a locking ring so you can lock the lens at whatever focal length you desire to avoid this problem.
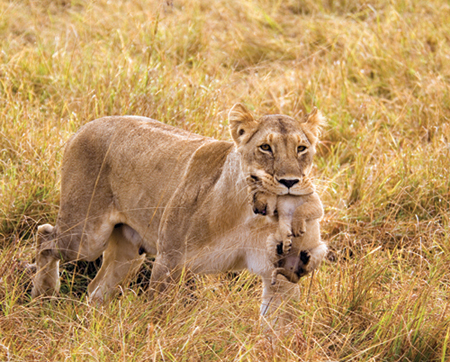
Barbara used a Nikon 80–400 mm f/4.5–5.6 lens to capture this lion cub being moved from one patch of bushes to another. The zoom lens permitted her to constantly recompose as the lion approached and finally ambled past her landrover.
The second and more common type of zoom lens uses a ring that you turn to change focal lengths. Most serious photographers prefer these because they are easier to use on a tripod (no gravity problem) and dust getting inside the lens isn’t a serious problem.
Using zoom lenses in the field
The advantages of zoom lenses over fixed lenses can be huge when it comes to making images. While leading a photo safari in Kenya’s famous Masai Mara, Barbara’s driver spotted a lioness carrying a cub directly at her landrover. It was still a hundred yards away so she had time to put her Nikon 80–400 mm f/4.5–5.6 zoom on her camera. She zoomed out to 400 mm and waited for the lion to march within range. As the lioness filled the frame, she put her autofocus sensor right on the forehead and let continuous autofocus track the cat producing sharp images. As the lioness continued to approach, she kept zooming to a shorter focal length and shooting until she was all the way to 80 mm when the huge cat ambled past her landrover only a few yards away. She managed to get three dozen shots off and nearly all of them were sharp and well composed. If she had a fixed focal length lens such as a 300 mm, she would have only shot a few images between the time the lion was big enough in the frame till the lion was too close. Zoom lenses give you time to quickly change compositions to make the most of any shooting opportunity. Using a zoom lens is often the difference between many excellent images and very few. Being able to change focal lengths quickly is a huge advantage!
Wide-Angle Lenses
These lenses “see” the world differently than you do. Wide-angle lenses work wonders for creating images with dramatic foregrounds. They fall in the focal length range of 10–35 mm. Some examples of wide-angle lenses include 15 mm, 16 mm, 20 mm, 24 mm, 28 mm, and 35 mm lenses. Many wide-angle zoom lenses such as the 17–35 mm, 17–40 mm, and 24–70 mm are excellent for nature photographers too. The 24–70 mm lens begins in the wide-angle range, but extends to the short telephoto range at 70 mm. For cameras that have a small sensor, special wide-angle lenses are made such as Nikons’s 12–24 mm and Canon’s 10–22 mm to counteract the crop factor so true wide-angle images can be made with these cameras too.
Wide-angle lenses are terrific when you have a gorgeous near foreground such as a patch of wildflowers and a huge sky or mountain background. By moving in close to the wildflowers, it is easy to make the wildflowers dominate the foreground which leads you into the background. Wide angles are terrific for making wildlife landscape images anyplace where wildlife is especially approachable such as penguin colonies in Antarctica or the Falkland Islands. Since wildlife in these places is so unafraid of humans, it is quite possible to approach a penguin colony close enough so you can fill the foreground with King Penguins for instance and include the fabulous landscape in the background. These lenses are effective for photographing waterfalls too. By setting up near the stream at the base of the waterfall, you can include the stream leading up to the waterfall in the background. Another fun image is to use a super wide-angle lens such as a 15 mm or 17 mm, lay on the ground, and shoot straight up in a deciduous forest ablaze with autumn color or during winter when the branches are fringed with heavy frost or snow. You need the super wide lens to include as many trees as possible.
Wide angles work well for making sunstar landscape images. This works best with wide angles if you stop the lens down to f/22 or f/32. F/22 offers plenty of depth of field, but the real reason you want to use it is you need a tiny aperture to turn the sun into a star. As you know, the f-number is a ratio. F/22 is a much smaller hole in a 17 mm lens than a 300 mm lens, although they pass the same amount of light. The reason the smaller aperture of f/22 on a wide-angle lens works so well to create the sunstar effect is due to diffraction. As light passes through the tiny hole, a percentage of the light touches the edge of the hole and bends causing diffraction which turns the sun into a star. The aperture at f/22 on a 300 mm lens is much larger so a smaller percentage of light strikes the edge of the aperture reducing the star effect on the sun.
Wide-angle lenses may be the most difficult group of lenses to learn to use well. Many effective wide-angle shots require you to get very close (measured in inches) to an interesting foreground to have a stunning and unusual viewpoint. This is not a position that people naturally assume. Since wide angles cover a wide field of view, you’ll find it is easy to include unwanted elements in the images such as telephone poles, wires, fences, tripod legs, and other manmade objects that you would rather exclude. Try lying on your back in the forest shooting straight up at the trees with a 15 mm lens. If you aren’t careful, your feet or even your belly may appear in the image so watch the edges of the frame to exclude unwanted objects. Of course, the digital image is easy to crop later if you do find distractions on the edge of the image.
You want a wide-angle lens or two in your camera bag. To help you decide what would be best for you, here is what we do. I shoot a Canon 15 mm lens in tight locations where I need to push the subject back and shooting up at trees. Not everyone needs this focal length, but it is a fun lens to use. My workhorse wide angle is a 17–40 mm f/4 zoom. This lens nicely covers the wide-angle range. However, the camera I primarily use has a full-frame sensor so I don’t have to contend with the crop factor. If your camera does have a crop factor, consider buying one of the extra wide zoom lenses that are made for cameras with small sensors such as the two mentioned earlier. Barbara’s Nikon cameras have the crop factor so she uses Nikons fine 12–24 mm with excellent results.

Turn the sun into a star by including the sun in the image, use the widest lens you have (a 15 mm here), stop the lens all the way down to f/22, and underexpose the sky to make the sun more dramatic.
Wide angles have other problems too. They are extremely prone to creating flare which are hot spots in the image from light bouncing around inside the lens. Always use a lens hood (shade) that is made for the lens to reduce this problem. Using a filter such as a polarizer may cause vignetting which reveals itself by making the corners of the image dark. This happens because the extremely wide angle of view sometimes let’s the lens “see” the edge of the filter. Special thin filters can be purchased for wide-angle lenses to reduce this problem. If you use a camera with a crop factor and use a wide-angle lens that is designed to be used on a full-frame sensor or 35 mm camera, then you probably won’t have this problem because the sensor is cropping out the corners already. If the lens is designed for use only on cameras with small sensors, then vignetting is more likely.
Standard Lens
The 50 mm lens is known as a standard lens. These are often included when you buy a new camera as a kit. These lenses are inexpensive, but deliver high-quality results. Some of these have extremely large apertures such as Canon’s 50 mm f/1.4 lens. The large aperture is excellent for shooting hand-held with available light and the shallow depth of field at f/1.4 easily throws the background out-of-focus. These are fine lenses, but so many zoom lenses cover the 50 mm range that most photographers (including us) haven’t owned one in years.
Medium Telephoto Lenses
These lenses include focal lengths in the 85–135 mm range. They are terrific for portraits because they offer extra working distance and the smaller angle of view makes it easier to isolate the subject from the background. They work well for landscapes and wildflowers. Most nature photographers don’t own prime lenses in this range anymore because so many quality zoom lenses cover this range and more. These focal lengths are important to have, but we cover it with 70–200 mm zoom lenses. There are many zoom lens choices that cover this range so take your pick. Some zooms such as the 28–300 mm lens cover an extremely wide range of focal lengths. While it is appealing to cover so many focal lengths with one lens, you are out of luck if the lens malfunctions. If you go on expensive photo trips, it is wise to have a couple lenses with overlapping focal lengths so you can keeping shooting should problems arise.
Telephoto Lenses
Focal lengths between 135 mm and 400 mm are included in this range. These lenses are incredibly useful in nature photography because the longer focal lengths magnify the subject giving you bigger images of wildlife. Telephoto lenses let you shoot down on the landscape to isolate a small section of the scene too. While many photographers feel you must have super telephoto lenses to photography wildlife, this is not true much of the time. There are lots of places in reserves and parks where wildlife is habituated to humans so they can be approached easily. Some animals such as moose and elk are easy to photograph with these lenses from a good distance away because the animal is so large. If your camera has a crop factor and most do, then this makes your telephoto lens into a super telephoto lens. Plenty of long zoom lenses are made that reach the 400 mm focal length. If your crop factor is 1.6x, this makes the lens give you the magnification of a 640 mm (400 mm × 1.6) lens! Of course, the lens really doesn’t have a focal length of 640 mm because the apparent magnification is really a cropping of the image due to the small sensor. Still, it is comforting to see big images of your wildlife subjects in the viewfinder and the image quality is terrific.

Long telephoto lenses in the 500 mm range are terrific for wary animals like this Lesser Flamingo at Lake Nakuru.
Here’s how we cover this range. I use Canon’s 100–400 mm f/4.5–5.6 L lens. It works well and is acceptably sharp at all focal lengths thanks to the special glass used in the lens. However, I do wish it wasn’t a push/pull zoom and would prefer a constant maximum aperture f/4. Barbara uses Nikon’s 80–400 mm f/4.5–5.6 with excellent results. These lenses cover a wide range of image possibilities and they are superb in Kenya for wildlife photography where you must stay in the vehicle or be eaten by lions, a strong incentive to stay in the vehicle. Anytime you must remain in a fixed position such as a vehicle or hide (blind), a zoom lens is terrific so focal lengths can be easily changed as wildlife moves closer or further away. Another wonderful Nikon lens that covers this range that Barbara uses (and I wish Canon made) is the 200–400 mm f/4 zoom. This constant maximum aperture f/4 lens is fast at all focal lengths and sharp. It autofocuses quickly too which is important in wildlife photography. Unfortunately, it is expensive, heavy, and won’t work with my Canon cameras or I would be using it too.
You don’t need to buy the most expensive lenses or cover every focal length either. Much less expensive lenses that deliver quality images include 70–300 mm, 75–300 mm, 100–300 mm, and 135–400 mm. Many zoom lenses are made to cover these focal lengths so there are plenty of choices to accommodate all budgets.
Super Telephoto Lenses
These huge and expensive prime lenses are used by most professional and serious amateur nature photographers. Super telephoto lenses begin at 400 mm and go up from there. These lenses gather lots of light with speeds of f/4 and sometimes f/2.8. The fast lens speed helps you shoot sharp images because it is easier to use fast shutter speeds in the 1/250 to 1/500-second range. Due to the large aperture at f/4, these lenses are terrific in dim light too. Super telephoto lenses greatly magnify the subject and provide plenty of working distance which is especially critical in wildlife photography. Working distance is the distance between the front of the lens and the subject. The more working distance you have between you and the animal, the less chance of frightening it.
Super telephoto lenses have lots of magnification. Divide the focal length of the lens by 50 mm to determine the magnification. A 500 mm lens magnifies the subject by 10x (500 mm divided by 50 mm equals 10) and a 600 mm magnifies by 12x. These figures assume you have a full-frame sensor. Since most digital cameras have a crop factor due to the small sensor being used, multiply the lens focal length by the crop factor and divide that by 50 to get the magnifying power of the lens. Here’s the math with a 500 mm lens and a digital camera body that has a 1.6x crop factor. Multiply 500 by 1.6 which equals 800. Dividing 800 by 50 shows you have a 16x lens. That’s a lot of magnification! Unfortunately, high magnification also magnifies camera and lens vibration causing unsharp images. Your technique with these lenses must be flawless or you won’t get sharp images. You’ll need to use heavy tripods and heads, focus carefully, and favor high shutter speeds even on a tripod to consistently produce sharp images.

A field hide (blind) confines you to one spot. A fast focusing zoom lens that covers the 200–400 mm range is ideal for photographing these male prairie chickens fighting so you can change the composition quickly.
Both Nikon and Canon build 500 mm f/4 and 600 mm f/4 lenses. Canon offers three prime 400 mm lenses and Nikon has the enormous 400 mm f/2.8. These are ideal lenses for wildlife, especially for bird photography where the extra magnification comes in handy for small birds. Barbara uses Nikon’s 500 mm while I use Canon’s 500 mm lens for a great deal of our wildlife photography whether it is an elk bugling during the fall in Yellowstone, shorebirds on a Florida beach, or finches mobbing our spring feeders. Most other manufacturers don’t make prime lenses in these focal lengths, but Sigma does offer a 500 mm f/4.5 that can be used with most camera systems. The large number of choices offered by Canon and Nikon is one reason their equipment dominates the wildlife photography field.
Special Lenses
Tilt/shift lenses
A few unique lenses offer view camera controls for digital SLR’s. Canon makes three tilt and shift lenses that include the 24 mm, 45 mm, and 90 mm. Nikon makes an 85 mm perspective control lens too. These are expensive lenses in the $1000 range, but they offer benefits to the nature photographer that are important. These lenses are made so they can actually bend in the middle (tilt) and also shift position relative to the sensor. All of these lenses can tilt and shift which are two separate lens movements that solve different problems. One small drawback to these lenses (besides the price) is they do not autofocus.

Lenses that focus closely make it easy to take portraits of the prairie chicken when they are next to the hide. Back-button focusing is enormously useful for shooting sharp images.
Let’s consider shifting a lens first. If you photograph a group of trees or perhaps a lighthouse by pointed the camera up, the vertical lines at the top of the viewfinder lean in. These leaning vertical lines are unnatural, distracting, and usually unwanted. Instead of pointing the lens up at the subject, point the lens so the optical axis is parallel to the ground. The top of the subject is cut off. Now shift the lens so the top is no longer cut off. Your vertical lines remain vertical. This effect and the amount of shifting that is needed are easily determined by watching the scene through the viewfinder.
I own Canons 45 mm and 90 mm tilt/shift lenses because the tilt feature is enormously useful in nature photography. Suppose you want to photograph a gorgeous field of sunflowers. If you are shooting at a 45-degree angle to the plane of the sunflowers in the field, you’ll have trouble getting all of them sharp at f/22. Even if stopping down all the way to f/22 does provide adequate depth of field to cover all of the sunflowers, it forces you to use a fairly slow shutter speed. This makes it impossible to shoot sharp images if it is breezy. A tilt lens easily solves this problem because it can bend in the middle or tilt. Normally you get the best use of your depth of field when the subject plane and sensor plane are parallel. But, tilting a lens rotates the plane of focus so it perfectly covers a field of flowers even when shooting at a 45-degree angle to the plane of the field. A tilt lens does not give you more depth of field. Instead, tilting the lens let’s you decide exactly where you want the plane of focus to fall on the subject. By using the tilt control, these lenses are enormously beneficial for making sharp images of large patches of wildflowers, herds of wildebeest, autumn leaves floating on a pond, waves crashing on a beach, penguin colonies, shiny raindrops on a leaf, and many other subjects where you want to shoot at an angle to the main plane of the subject. As with the shift control, the separate tilt control is easy to adjust to get it perfect because you can see the effect though the viewfinder. It just takes a little practice.
As I mentioned, Canon makes three tilt and shift lenses which include the 24 mm, 45 mm, and 90 mm focal lengths. Which ones are most useful for nature photographers? In my opinion (which might not be right for everyone), the 90 mm tilt/shift lens is the most useful. The 90 mm is a short telephoto that magnifies the subject so depth of field is more limited which is solved by tilting the lens. I love photographing sand dunes at dawn or dusk such as those found in Death Valley National Park or waves crashing on a rocky shoreline. In both cases, the 90 mm tilt/shift lens is perfect for the situation. The 45 mm is fine for landscapes and works wonders on penguin colonies, but how many penguin colonies do you expect to visit? The 24 mm tilt and shift lens already has a lot of depth of field because the short focal length reduces magnification so having better control of where the plane of focus lies isn’t so critical. But, if you photograph a lot of buildings or tall trees, the shift feature is handy for keeping the vertical lines in the scene vertical in the image.
Macro lenses
These terrific lenses are specially made to focus much closer than other lenses making high magnification closeup and macro images easy to do. The common macro lenses available include 50 mm, 100 mm, and 200 mm. All of these lenses are designed to be exceptionally sharp at very close distances, although they can be used for landscapes as well. We’ll cover these lenses in detail in a chapter on closeup photography.
ACCESSORIES
Lens Hoods
You’ll get the best quality from your lens by using hoods to shade the lens all the time. Without the lens hood, light could strike the glass at an angle which isn’t focused by the lens. Instead, it bounces around inside the lens creating unwanted flare which makes images appear washed out (fogged) or shows up as overexposed blobs (I think that is a technical term) with no detail. Whenever possible, always use a lens hood!
Many lenses arrive with a lens hood when you buy the lens. Unfortunately, some lenses don’t come with a lens hood so find out if the lens hood comes with the lens anytime you buy a lens. If the lens doesn’t come with the hood, be sure to order one because you need it. Always buy the lens hood from the lens maker if possible. Buying from them should eliminate mounting and vignetting problems that are possible with generic hoods from other companies. Don’t use a hood on a lens it wasn’t made for. If you mount a lens hood that was made for a 70–200 mm zoom on a 24–70 mm zoom, you most likely will find a vignetting problem at the short focal lengths because the angle of view at 24 mm “sees” the edge of the hood causing dark corners.
In addition to eliminating stray light, lens hoods do a lot to protect the lens from rain, sand, snow, twigs, and other obstacles that can scratch the lens. Lens hoods are good insurance for protecting the lens. Although it is wise to use lens hoods, there are times when it is best to not use them. If you must photograph in high wind (avoid if possible) and blowing sand is not a problem, consider skipping the lens hood because it catches the wind causing image softening vibration. By using only the lens on a sturdy tripod, hanging on to everything, blocking the wind with your body as much as possible, and shooting at the highest shutter speed possible, you have a chance to shoot sharp images. Another time when it is easier to skip the lens hood and not suffer any serious harm to your images happens when you are using a polarizing filter. If light is coming from behind you so it can’t strike the lens from the side, it might be okay to omit the lens hood. Polarizing filters are the most useful filter to digital photographers so you want to use them a lot. However, to use them properly, they must be rotated while mounted on the front of the lens to get the right angle so polarized light is reduced. On some lenses, when the lens hood is attached, it is virtually impossible to reach in from the front and turn the polarizing filter. You have two choices. You might remove the lens hood, turn the filter to the best position, and put the lens hood back on which is what we do. You could also omit the lens hood in situations where the chances of flare are minimal.
Teleconverters
A wonderful way to own a super telephoto lens without buying one is to use a high-quality teleconverter (sometimes called tele-extender or extender) made by the lens manufacturer. Most camera systems make teleconverters for their lenses. Teleconverters boost the effective focal length of the lens they are put behind by the power of the teleconverter. Placing a 1.4x teleconverter between a camera body and a 300 mm f/4 lens converts the lens into a 420 mm f/5.6 lens. The 2x teleconverter doubles the focal length so the lens becomes a 600 mm f/8 lens. The quality is quite good, though you do lose some sharpness since you are introducing more glass to the optical path. Naturally, the 1.4x loses less sharpness than the more powerful 2x teleconverter. Unfortunately, you do lose lens speed too. The 1.4x teleconverter eats one stop of light and the 2x gobbles up two stops. Since the lens is slower, it is harder to use fast shutter speeds.
Let’s look at the magnification produced by teleconverters a little closer. Does a 2x teleconverter double the size of the subject? Suppose you are photographing a robin singing on a rosebush. With a fixed 300 mm lens, the height and width of the bird on the sensor is 1/4 inch. Now add the 2x teleconverter and the height doubles to ½ inch. Is the size of the bird on the sensor twice as big. No! The 2x teleconverter doubles the width too. If the bird’s image on the sensor was originally 1/4-inch wide, its size on the sensor is now ½ inch by ½ inch. The area is four times larger so the 2x teleconverter quadrupled the size of the robin in the image. The 1.4x teleconverter really tends to double the area of the subject while the 2x quadruples the area. I mention this because teleconverters magnify the size of the subject much more than you might first suspect. I think it is best to start with a 1.4x teleconverter to see if that is all you need. It will be sharper than the more powerful 2x teleconverter and probably less expensive too.
Teleconverters do have their drawbacks. They don’t couple with all lenses and may not be compatible with zooms so make sure any teleconverter you consider buying actually works on the lens you plan to use it on. Also, teleconverters cost you light. This makes it more difficult to use the highest shutter speeds, the viewfinder is darker, and many lenses will not autofocus if too little light is passing through the lens which can happen, especially with 2x teleconverters.
The lens is literally your writing tool. It gathers the light and focuses it. The glass elements in the lens must be properly aligned and clean. Lenses are tough, but don’t bang them into things and never drop a lens. Lenses are full of fragile parts so impacts cause damage.
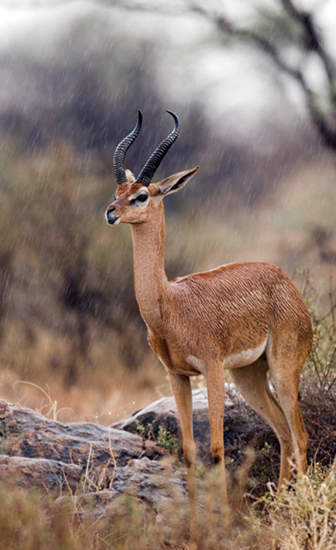
Cameras don’t like water, but many fine images can be made in the rain. This Gerenuk in Samburu National Park is waiting out the rain under the only cover it can find. Rain adds a wonderful mood to images so use it carefully whenever you can.
Lenses are like cats, they both hate water. Never let water get inside the lens so minimize exposure to rain, condensation, and especially salt spray. All of these things are hazardous to the health of your lens. It is true you can let some water gather on the outside of the lens for short periods of time without any harm if you put the lens away dry. Lenses are rather impervious to dry snow (wet snow should be avoided) because it bounces off the lens.
Keep the glass in your lens perfectly clean. Preventing dirt from finding its way on the lens in the first place is much better than cleaning it off. Always use lens caps on both the front and rear when the lens isn’t mounted on the camera body. Never let an uncovered lens point straight up for any length of time so dust can’t settle on it. Never touch the glass with your fingers because the oil on your skin is more difficult to remove.
Every time you use a lens, always check the glass surface for any dust, smudges, or dirt. Most of the time you will find something on the glass that shouldn’t be there so always clean it off. First, use a soft lens cleaning brush to remove loose grit from the surface. Point the lens down while gently brushing the lens to let gravity help you remove the dirt. Carefully check the lens again to make sure all of the grit is gone. If not, repeat the process. By the way, it helps to keep the brush protected from grit too. A plastic bag or it’s own case works wonders to keep the brush clean. Using a small vacuum to suck dust off the brush from time to time is worthwhile too. If all of the dust and dirt is removed from the lens, go ahead and mount the lens hood and you are ready to shoot. If you notice any smudges on the glass surfaces though, brushing the lens won’t help. You’ll need to use a micro fiber cloth to gently rub the lens beginning in the middle and work your way out to the edges of the lens. Move the cloth in a circular motion. A micro fiber cloth is specially made to clean optical glass surfaces and does a great job of it. If the smudge is still present, try using lens cleaner solution applied directly to the micro fiber cloth (not the lens surface) and rub again. This nearly always does the trick. A word of warning, never use the micro fiber cloth first to clean the lens. Always use the brush first because the last thing you want to do is use the cloth to grind the lens with a bit of grit. The lens has already been polished by the manufacturer, you paid good money for this service, and there is no need to “improve” on the process. You’ll likely end up scratching the lens.
Don’t forget about keeping equipment that you might add to the lens spotlessly clean too. Filters and teleconverters are used in the optical path so they must be clean. Many people use UV protection (or skylight) filters to keep dirt away from the lens and to protect it. These filters should be kept clean too. The UV filter does add some protection, but we haven’t owned one in 25 years. Any glass filter degrades the image slightly which normally shows up as a slight loss of sharpness and contrast. By being careful, I have only damaged a couple of lenses (by dropping them) and a protection filter would not have helped. Besides, we normally are using polarizing filters anyway so that filter offers protection just like a UV filter would.