
Using Flash Effectively

A single on-camera flash illuminated the face of this Sykes monkey at the Mountain Lodge near Mt. Kenya. The monkey was perched on a branch in deep shade so the much brighter background didn’t go completely black.
Using electronic flash to create wonderful images is a goal everyone can achieve. Unfortunately, many photographers are intimidated by these seemingly complicated devices. Digital photographers tend to quickly become comfortable with flash because they review the good (or poor) results of their efforts right away on the LCD monitor so they can make corrections until the images are pleasing.
PROBLEMS WITH ON-CAMERA FLASH
Flash is capable of achieving excellent lighting effects. Unfortunately, if your camera has a builtin flash, the light it produces creates terrible images most of the time. Any flash used on top of the camera produces nearly direct front-lighting so all shadows fall behind the subject. This creates images that appear to have little depth because shadows are critical for suggesting depth and revealing shape. Images shot with on-camera flash are often said to be flat. Your flash images will improve dramatically if you learn to use flash off the camera, combine flash with natural light, and use more than one flash at a time. None of this is difficult, but it does require some study and practice to become adept at it.
Advantages of Flash
Flash produces light whenever and wherever you need it. This makes it possible to take photos no matter how little natural light is present. Anyone who photographs nocturnal wildlife or subjects in dim light appreciates this advantage. Another important benefit of using electronic flash is it is balanced for daylight around 6000 K. Flash can remove an unwanted color cast in natural light. A white flower photographed in a green forest has an undesirable green color cast, but flash can minimize the green cast easily. Since it is easy to fire a flash that is not directly mounted on the camera with cords or wireless technology, it is simple to angle the flash to achieve whatever lighting effect you want. Another powerful advantage is short flash durations (usually about 1/1000 second) freeze subject or camera movement yielding sharp images. This permits shooting hand-held high magnification images of insects that are perfectly sharp and still use f/16 depth of field.
Disadvantages
Modern flashes are expensive ($250–$400 for the best ones) and do require effort to learn how to use them well. Having a flash and accessories that go with it takes up precious room in the camera bag and adds weight. You need a power source to use flash. This is normally batteries which must be kept recharged. Some flashes are designed so they can be plugged into AC power, but extra cords are needed to do this.
A huge problem with flash is the terrible looking light it creates when used poorly. Flash is prone to produce images with too much contrast unless steps are taken to reduce the problem. Flash is inherently high in contrast for two reasons. Large light sources create more diffused light and lower the contrast in an image. Flash is a tiny light source used near the subject so it illuminates only the part of the subject that is facing the flash while the other side remains very dark or totally black creating dark shadows. That is why accomplished nature photographers often use diffusers on the flash like portrait photographers to reduce the contrast. The second reason why a single flash is so high in contrast is there is no fill light in many cases. We all know bright sun creates images that can be beautifully exposed on one side, but burdened by deep shadows (often times objectionable) on the other side. A single flash used off the camera as the main light can create worse images than bright sun due to even more contrast! While the shadows on a sunny day are problematic to photographers, at least the blue sky is acting as a fill light to open up the shadows. Since a single flash doesn’t have a fill light to open up the shadows unless the photographer combines available light with flash, the shadows are black with little or no detail. The contrast range is much greater with flash than it would be if the light from the sun was used.
Flash does seem complicated. Anyone who studies the flash instruction book learns this quickly. Flashes are powerful tools with many different features so the manual seems difficult because so many different capabilities are covered. But, most of the features you want to use are straightforward and easy to learn if you take it one step at a time. Don’t try to learn everything the flash does all at once. Break it down and learn a little at a time.
Finally, flash is intimidating because it is difficult to see how the light illuminates the subject since the flash duration (the amount of time the flash is illuminating the subject) is so short. However, as you work with flash, you’ll soon learn to judge the lighting effects you get just by where you place the flash.

Firing five flashes at one time was necessary to capture the colors of this male rufous hummingbird and keep the background from going black. Three flashes illuminated the hummingbird while two flashes evenly lit the painted background. The instant feedback digital offers helps to learn simple and complicated flash techniques quickly.
THE INVERSE SQUARE LAW
This is an important law of light that describes what happens to the intensity of light over distance. The law states that the quantity of light is inversely proportional to the square of its distance. That should clear things up!
Perhaps an example of how the inverse square law works is easier to comprehend. The inverse square law describes what happens to light as it spreads out over distance. Let’s say the proper aperture to use is f/16 when the flash is 4 feet away from the subject. If you cut the flash to subject distance in half to only 2 feet, you do not double the amount of light hitting the subject. Instead, you quadruple the amount of light or add 2 stops of light to the subject. Conversely, if you move the flash back to 8 feet from the subject (twice as far), the amount of light striking the subject is only 1/4 as much because the beam of light is spreading out rapidly so the intensity drops. If you move the flash to 16 feet from the subject, the amount of light drops another 2 stops for a total of 4 stops. As you can see, the light output of the flash rapidly drops as the distance to the subject increases which affects how you use flash tremendously.
The typical electronic flash won’t do you much good if the subject is 50 feet away since very little of the flash actually reaches the subject. That’s why flash photos often end up with a black background. If you flash a wildflower and don’t allow natural light to help light the scene, a background that is 20 feet away appears completely black because the light from the flash spread out so much that little was left to light the background. Most skilled nature photographers avoid black backgrounds, especially for daytime subjects, but they are suitable for nocturnal subjects.

Using a single flash as the only light source at the sync speed of the camera nearly always causes a black background. This background isn’t desirable for the gray treefrog that was hunting insects during a calm morning.

Here is the same frog using natural light as the main light and a tiny pinch of fill-flash (2-flash compensation) against a natural green background. Use flash carefully!
It is possible and productive at times to use fill-flash with telephoto lenses to reduce shadows in birds and mammals. This means the flash must be fired from quite a distance away from the subject. The typical flash by itself isn’t able to throw much light on the animal due to the Inverse Square Law. However, flash extenders can be purchased at reasonable prices that mount on the flash head of most flashes. A flash extender is made with a special material that concentrates the light from the flash and keeps it from spreading out rapidly, greatly increasing its effective fillflash range. This is a very useful device that is widely used in wildlife photography. It works well when it is needed, but don’t feel like you need to use it all the time. When you have gorgeous light illuminating the subject, often it is best to use natural light and forget about adding fill-flash. The last thing you want to do is destroy the mood of early morning red sunlight.
SELECTING YOUR FLASH SYSTEM
Consider the flash system made for your camera first. All the major digital camera companies make flashes specifically for their cameras. Since these flashes are made to work closely with the camera, these flashes are often called dedicated flashes, offering advanced through-the-lens (TTL) metering capabilities which makes them easy to use. For general flash photography with a single flash or multiple flash, it is impossible to beat the system made for your camera. A dedicated flash properly exposes the subject most of the time. In situations that are light or dark, perfect flash exposures are easily made by properly using the flash compensation control. Since dedicated flash has TTL metering, using fillflash successfully is easily accomplished.
You need at least two and sometimes more identical flashes to do multiple flash photography. Two is needed frequently so one flash can act as the key light while the other is used to fill in the shadows created by the key flash. Dedicated flashes are easy to use and can be adjusted to provide a variety of lighting ratios. Barbara uses a Nikon SB-800 for fill-flash with her Nikon system. We own five Nikon SB-800 flashes to complete a multiple flash setup to photograph hummingbirds. These flashes used in combination are wonderful to work with and greatly simplify flash photography. Using dedicated flashes for your camera is the best way to go.
Determining Flash Exposure
The easiest, quickest, and most accurate way to determine flash exposure is to rely on dedicated flashes to automatically determine proper exposure for you. Modern systems that use TTL metering are amazingly accurate. Since the camera and flash work together to fire the flash and measure the light as it passes TTL, the camera turns the flash off when proper exposure is achieved. If you don’t have dedicated flashes, then another good way to determine the best exposure is to use a flash meter. Unfortunately, these are expensive. Since your digital camera has a histogram, it is quite feasible to set up multiple flashes and guess at the best exposure. By using the histogram to guide you, it is easy to zero in on the best exposure. This works well and is exactly what I do anytime I can’t use TTL flash metering rather than using my flash meter or sloshing through the quagmire of guide numbers.
When TTL Flash Fails
There are times when TTL flash metering fails due to subject reflectance. Like natural light exposure meters in cameras, the built-in flash meter in the camera is programmed to make everything middle tone or 18% reflectance. If the subject is a very dark red, blue, or green for example, the camera keeps the flash on until it becomes middle tone in reflectance which overexposes the subject. Conversely, a TTL flash metering system darkens white, pink, or light yellow flowers to make them middle tone. Since nature photographers often photograph very light or dark subjects, they frequently run into exposure problems due to subject or environmental reflectance values. You know that subjects with a reflectance that is not close to 18% require exposure compensation. But, it is quite feasible to find a middle tone brown insect crawling on light tan sand. While the reflectance of the brown insect doesn’t throw the flash exposure off, all the light tan sand surrounding it which is the environment does so exposure compensation toward the plus side is necessary.
Like natural light exposures, the subject or environmental reflectance values that vary considerably from 18% do cause poor exposures. To solve this problem, a flash exposure compensation control is found on the camera, flash unit, or both. Do not confuse the exposure compensation control for natural light with the one for flash. These two controls are different so be sure you know where they are, which is which, and how to use them. It is absolutely critical to know how to compensate flash exposure. Here are some useful guidelines. Any light-colored subject such as a yellow butterfly, pink wildflower, or light tan grasshopper needs about 1 stop more light so set the compensation dial to +1 stop. Any subject that is pure white or close to it needs about 2 more stops of light. Dark subjects such as a maroon flower might need less light, perhaps –1 stop. Black subjects need about 2 stops less light.
The beauty of shooting digital cameras is you have both the highlight alert feature and the histogram to check your exposure after taking the image. Get in the habit of checking these tools with each subject you photograph, especially if you use exposure compensation. If you use flash to expose a light yellow flower and set the compensation control to a + 1 compensation, take the shot and check the histogram. Be certain the histogram is not clipped on the right side of the graph, but it should end close to the right side. If the histogram is clipped a bit, too much compensation was given so reduce it to only +0.5 stop compensation and try again. Once you get the histogram data close to the right side of the chart without clipping, you have an excellent exposure.
DO YOU NEED A FLASH METER?
If you don’t have TTL flash metering, it is possible to use a special meter that measures flash. However, these meters are expensive ($300–$500 range), but they do work well for single and multiple flash setups. I own and used to frequently use a Minolta Flash meter. However, now that I have a histogram to go by, anytime flash is necessary with units that don’t offer TTL metering, I set up the flashes where I think they need to be and then take a shot. By checking the histogram, it is quickly apparent if the image is properly exposed. If the exposure is too dark, moving the flashes closer, increasing the ISO setting on the camera, or using a larger aperture puts more light on the subject. If the exposure was too light, doing the reverse subtracts light. Once the histogram ends close to the right side of the histogram graph, proper exposure is assured.
Flash Sync Speed
Digital single-lens reflex (D-SLR) cameras have a flash sync speed which refers to the fastest shutter speed that can be used with electronic flash successfully. Depending on the model, the sync speed is typically in the shutter speed range of 1/125–1/250 second. Please consult your camera manual to determine the exact sync speed for your camera.
The reason the camera must have a flash sync speed is due to how focal plane shutters work. The shutter prevents light from striking the sensor until it opens and then sends the sensor into darkness once again when it closes. The shutter is made with two blades that are often called curtains. When the shutter opens, a light-tight curtain moves out of the way so light reaches the sensor. At the end of the exposure, a second curtain moves to block the light once again. Let’s say the flash sync speed for the camera you have is 1/250 second. When shooting at that shutter speed, the first curtain opens, the flash fires illuminating the subject which reflects back TTL and is recorded by the sensor, and the second curtain begins its movement to block the light. The same pattern holds for all slower shutter speeds. However, if you try to use 1/500 second, the first curtain begins to open, but to achieve the high shutter speed of 1/500 second, the second curtain chases after the first curtain before it gets to the other side. Essentially, you have a rapidly moving slit for an opening. Since flash has such a short duration of perhaps 1/1000 second, the sensor must be fully exposed when the flash fires so every part of it can be exposed. This is impossible with a moving slit where the entire sensor isn’t uncovered at any single moment in time. If you have flash photos where one side is black, you probably fell victim to this problem when you set the shutter speed higher than the sync speed. Camera’s with dedicated flash communicate with each other so usually the camera won’t let you set too high of a shutter speed. This problem is much more likely to happen with any non-dedicated flash or manual flash photography.
In normal flash photography, you must use a shutter speed that matches the sync speed which is listed in your cameras manual or any slower shutter speed. Be aware the flash works at any shutter speed slower than sync speed too. Using slower shutter speeds permits mixing flash with ambient light easily to solve many lighting problems. The technique of using flash to light the foreground while using long shutter speeds to allow bright natural light to properly expose the background is commonly employed by skilled nature photographers today.
However, be careful when using shutter speeds slower than sync speed. If the ambient light on the foreground is bright and you use flash as the main light for the subject, it is possible to get ghosting. This happens when the flash records a sharp image of the subject while the bright ambient light creates a second blurry image if the subject or camera moves during the exposure. If the foreground is several stops darker than the background, this ghost effect is unlikely to occur because little ambient light from the subject strikes the sensor.
High-speed sync
If you could make the flash emit light longer, it would be possible to use faster shutter speeds with flash and still properly expose the entire sensor. Many cameras with their dedicated flashes can do this. Canon and Nikon refer to this as focal plane high-speed sync so the flash can be used at all shutter speeds. When you set high-speed sync to use fill flash on a bird in flight, you can shoot at 1/500 second or faster and still get proper exposure. The camera does this by firing a series of very quick flashes over a longer period so the rapidly moving slit in the shutter is able to expose the entire sensor. High speed sync is useful anytime you need to use flash with fast shutter speeds that are faster than sync speed. Using fill-flash for portraits of animals in bright sun where high shutter speeds are needed is a good use for this technique. If many cameras can shoot successfully with flash at all shutter speeds when set to high-speed sync, why bother having a sync speed at all? The drawback to firing a series of rapid flashes so the flash appears to be a continuous light source is the effective range drops by 2 stops or more so you must be much closer to the subject.
USES FOR FLASH
Flash as the Only Light Source
There are times when so little available light is present that flash is the only way to take an image. Caves are a good example. Even if the cave you are visiting is lit with artificial light, it may be too dim and poorly angled to light the scene well so flash needs to be used. Many forms of nocturnal wildlife such as owls, singing frogs, salamanders, and raccoons require flash to make images of these nighttime animals. In these cases, flash is the only light source being recorded by the sensor.
Using a single flash off-camera to photograph anything tends to create images with too much contrast and black backgrounds. Usually it isn’t desirable to have black backgrounds and so much contrast that detail is lost. Direct frontal flash produces a strange look too since the subject lacks shadows so little depth is apparent. There are better ways to use flash so let’s explore those.
Reduce Contrast with Fill-Flash
Fill-flash is used most frequently to lower contrast by opening up shadows when the light is bright. Sun and even bright overcast may create harsh shadows in the image. By using a touch of fill-flash, additional light is added to the shadows reducing contrast. Fill-flash with dedicated flash systems is both easy and quite beneficial for making beautiful images.
Anyone can effectively and easily use fill-flash with a D-SLR that has a dedicated flash. For example, let’s learn how to use fill-flash on a sleepy dragonfly that is laden with dew. Set the camera on aperture priority and matrix or evaluative metering. Compose the dragonfly and set the aperture to f/16 for depth of field. Since the subject isn’t going to move and you are using a tripod (hopefully) to support the camera to ensure a sharp image, use ISO 100 for the finest quality (less noise). Take a shot and look at the histogram. Make sure the histogram data is close to the right side without clipping any highlights which would be the dew drops. The highlight alert (blinkies) shows you if there is any overexposure. If the histogram isn’t where you want it, adjust the exposure compensation control until it is. Be sure to use the natural light compensation control, not the one for flash.
Now that the histogram is where you want it for the natural light exposure, set the flash exposure compensation to a minus value. This control is on the flash, the camera, or both. The flash exposure compensation control is normally labeled with a plus and minus on it along with a zigzag arrow indicating flash. Depending on the camera, the increments for flash compensation are normally 1/3 or ½ stop. Deciding how much fill you want is a matter of personal taste. The goal is to open up the shadows to reveal detail, but not to use such a strong fill-flash that it overpowers the natural light appearance. Shadows provide a feeling of depth to the subject and reveal texture so don’t eliminate them entirely. The amount of fill-flash to use depends on the situation and personal taste. Start with a fill-flash of –1.5 and bracket around that by also using –2 and –1 fill-flash. When first learning to use fill-flash, it doesn’t hurt to bracket even wider to see what happens. While it does cost you a little time in editing, bracketing helps you enormously in learning to use fill-flash.
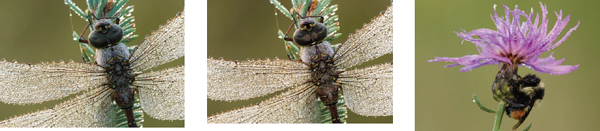
This dewy dragonfly is photographed backlit in the soft dawn light. The backlight makes the translucent dew drops sparkle more than front-light. Since light can’t penetrate through the center of the dragonfly, its back is dark. Adding a tiny dose of fill-flash (–1 2/3 compensation) adds light to the back reducing contrast and revealing detail with little effect on the already light wings. The spotted knapweed acts like a hat that shades this sleeping red-tailed bumble bee. Using fill-flash (–1 1/3 compensation) nicely opens up the shadows while still keeping the soft natural light mood.
Flash as the Main Light Source
Mixing light from the flash with natural light is an outstanding way to use electronic flash and fairly easy to do with modern equipment. While fill-flash is well known and widely used, it is possible to do the reverse and use natural light as the fill-light. Set the flash on automatic and use the more advanced metering modes. Canon has an evaluative metering system that measures the flash illuminating the subject and turns the flash off when it determines the subject is properly exposed. The names and exact controls vary with the system so you need to study the manual to find out exactly how your system operates. But, the general ideas described here apply to any system.
Suppose you find a light-colored mushroom deep in the forest. You don’t want to use a single flash as the only light source to avoid harsh shadows. It is better to mix flash and ambient light together. The light in the forest suffers from a greenish color cast due to all of the green leaves so you want to use natural light only as a fill. You want flash to be the main light source because it is balanced for daylight so the color is better for recording the mushroom. However, you should use the available light as a fill light to avoid black shadows. You don’t need to run a lot of calculations to figure out what must be done. Use the flash and natural light automatic metering systems along with the histogram exposure aid to figure out what to do.
First, determine proper exposure for the flash. Set the camera on aperture priority and matrix or evaluative metering. Since this mushroom is light, set the flash compensation to +1 and take a shot with the aperture set on f/16 for depth of field. Check the histogram to make sure the data on the histogram is snuggled up against the right side without clipping. If the histogram isn’t where you want it, try another compensation amount. At this point, you are only concerned about the flash exposure and the highlights in the image. Don’t worry if parts of the image are black with no detail. Now determine the natural light exposure. Keeping the aperture at f/16 (that’s why you should use aperture priority), let the camera select the shutter speed to properly exposed the mushroom with natural light. Perhaps the camera recommends f/16 at 1 second. Once again check the histogram to be sure it is close to the right side. Perhaps this requires setting the compensation for natural light to +1 stop. Since the flash is the main light and natural light acts as a fill to avoid black shadows, it is necessary to set the camera to underexpose the natural light a bit. Since we have already determined that setting the natural light compensation to +1 properly exposes the mushroom, set the compensation back to zero so the natural light exposure is 1 stop underexposed. By using a dedicated flash cord or remote flash controller to separate the flash from the camera, hold the flash a few inches to one side and slightly above the lens. When you shoot the image, the flash perfectly exposes the mushroom and the weaker natural light fills in the places that aren’t illuminated by the flash. The shadows are somewhat underexposed, but still retain plenty of detail. Of course, it is absolutely mandatory to have the camera supported by a tripod to avoid ghosting. If you tried to hand-hold this shot, the flash produces a sharp image because the flash duration is short. But due to the slow shutter speed being used, the natural light portion of the exposure is soft due to camera movement.
Increase Contrast with Flash
Flash can be used successfully to increase contrast such as darkening a background. Suppose you are photographing the maroon red flower of a northern pitcher plant. The background is a solid mass of light green sedges and grasses. You know the light background is distracting so toning it down is helpful. While it is possible to shade the background, flash can be used to darken the background. Set the camera to matrix and aperture priority. Use an aperture of f/11 which gives some depth of field, but not so much that the background becomes sharp. You are doing a portrait of the flower and want a non-distracting out-of-focus background. Focus on the flower and shoot an image. Check the histogram to make sure the data is close to the right-hand side without clipping. If it isn’t, use the natural light exposure compensation control to get it there. Since the flower is dark, it could be necessary to set the natural light exposure compensation to –.5 stop for the best exposure. Now set the exposure compensation to –1.5 stops. You are deliberately underexposing the natural light portion of the image by 1 stop. The flower and the background are now 1 stop darker. Attach the flash with a dedicated cord to the camera (or use a remote controller) and hold the flash above the lens and slightly to one side so it creates some shadows in the flower blossom. Set the flash to full power and take a shot. The flash should properly expose the flower blossom (check the histogram to be sure), but the background which is several feet away receives little light from the flash so it is 1 stop darker relative to the flower.
Use Flash to Improve Color
Fill-flash is enormously useful for improving the color temperature of available light. Shooting images in a green forest was a huge problem for film since the green color cast made everything look awful. Since flash is balanced for daylight around 6000 K, using flash as a main light or a strong fill light overpowers the green cast in natural light, producing the colors we expect the subject to be.
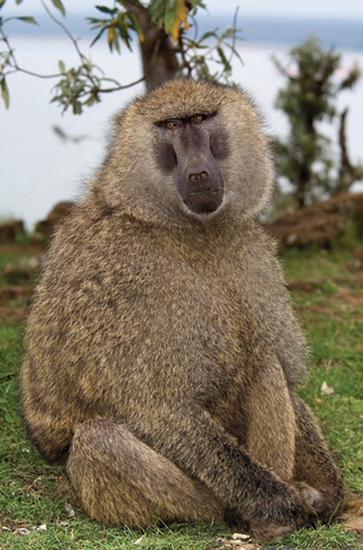
This olive baboon quietly rested under some green trees at Lake Nakuru. Fill-flash opened up unwanted shadows and removed most of the excess blue and green in the natural light.
Use Flash to Freeze Action
Electronic flash is a terrific way to freeze motion. Most electronic flashes at full power have flash durations close to 1/1000 second. Even though you must shoot at the flash sync speed of the camera which should be in the 1/125–1/250 second range, flash still freezes the action if the ambient light is low because the light illuminating the subject is only on for 1/1000 second or less. If the natural light is within 5 stops of proper exposure though, you may get ghosting. This happens when the flash makes a sharp image, but the natural light is strong enough to also record on the sensor creating a double exposure where the natural light exposure shows blur due to camera or subject movement.
REAR-CURTAIN SYNC
It can be desirable to pan with a running animal or flying bird and photograph it with flash. When the ambient light is strong, you get a sharp image of the animal from the flash and a blurry one from the natural light which can be quite appealing because it shows motion. There is just one problem though. When you use flash and natural light together to reveal motion, the flash fires at the beginning of the exposure (as soon as the first shutter curtain opens all the way) and goes out. Meanwhile, the longer natural light exposure is still being captured by the sensor. The result is an image where the animal is sharp and the blur is ahead of the animal instead of behind it. Fortunately, this problem is easily solved with most cameras because they offer a special setting for this situation. Depending on the camera, it may be called rear-curtain or second-curtain sync. This setting makes the flash fire at the very end of the natural light exposure so the blur of the running animal is behind the sharp flash image of the subject instead of in front of it.
USING MULTIPLE FLASH
Using two or more flash units at one time solves numerous lighting problems while offering tremendous creative choices. Multiple flash once was difficult to use well because you needed to learn how to use guide numbers or buy an expensive flash meter. Once again, TTL flash metering with dedicated flashes has simplified this process enormously.
Selecting Your Multiple Flash Setup
Always consider flash made by your cameras manufacturer first. You want flashes that are dedicated to the camera so they can communicate with each other. Canons 580 EX flash units are ideal for multiple flash. A great choice for Nikon is the SB-800 flash units. Pentax offers the AF-540, Olympus has the FL-50, and Sigma builds the EF-500 DG ST which is available for Canon, Minolta, Nikon, Pentax, and Sigma cameras. All of these units provide TTL flash exposure control.
Firing Multiple Flash at the Same Time
The first question you might have is how do you fire two flashes simultaneously in a multiple flash setup? We commonly use five flashes at once (and sometimes seven) for advanced high-speed hummingbird photography. There are a few prevalent ways to do this and all work well. Multiple Canon flashes for example can be fired at the same time by putting the Speedlite Transmitter ST-E2 in the hot shoe of the camera. By setting all of the Canon 580 EX flash units on slave, pressing the shutter causes the ST-E2 to send an infrared signal that fires all of the flashes instantly without using any wires. This wireless system is most effective as long as the flashes aren’t too far apart and the signal from the transmitter isn’t blocked. Another way to fire multiple Canon flashes is to mount one Canon 580 EX flash unit in the hot shoe and select the master setting on the flash. Set all the other flashes to slave. These flashes are now controlled by the 580 EX unit attached to the camera. Nikon has a somewhat similar system which they call the creative lighting system. It’s important to make sure the camera and the flashes you intend to use communicate with each to provide TTL metering and offer the ability to fire all of the flashes at the same time. No matter what multiple flash setup you decide to purchase, check carefully with the dealer for options and make sure everything you plan to use is compatible with each other.
Setting Up the Multiple Flash System
Using multiple flash at one time is a wonderful way to light your subject exactly the way you want it. Since more than one flash is used, it is easy to put a key flash somewhat above and perhaps 30 degrees to the right side of the subject. This flash nicely illuminates the right side of the subject, but deep black shadows appear on the left side since the flash couldn’t light it. Add a second flash (fill) to the setup by placing in on the left side of camera-subject axis, but keep it close to the axis to avoid creating crossing shadows on the subject. While it depends on the subject and personal preference of the photographer, normally the fill-flash is placed so it is at least 1 to 2 stops weaker than the main flash. A third flash could be used above and slightly behind the subject to rim it with light. This light is called the hair light. If you don’t want a black background, then you will benefit from placing a flash that is aimed at the background to light it up. Using three or more flashes at once might sound like a challenge to figure out, but it really is easy once you do it a few times.
SUPPORTING THE FLASH UNITS
Using more than one flash at a time means you must use flash supports to hold them in place. Many flash stands are made so what you need depends on your intended use and personal preferences. I use Manfrotto stacker stands (Model 3320) because they are quite stable, can hold the flash as high as I will ever need it, and they are designed to stack together so five stands are compact. These stands are made to accept a variety of connectors. I use the Manfrotto 3102 rapid adapter which is 3/8 inch in size. Now a Manfrotto #482 micro-ball head can be attached to the rapid adapter on top of the stand. By using the mini stand that came with my 550 EX flash, it is easy to slide the mounting foot into the mini stand and screw it on to the #482 micro-ball head on the flash stand. Since the flash is mounted on the small ball head, it is easy to point the flash in any direction.
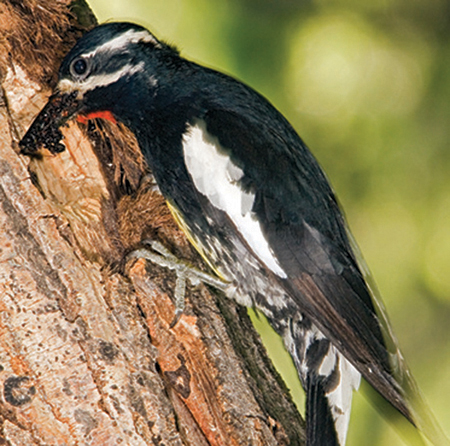
This male Williamson’s sapsucker was feeding it’s young. This pair excavated their nest cavity on a tree that was leaning over. To photograph this nest that was only 4 feet above the ground, a key and fill-flash was used to light the bird. A third flash lit the background.
Power for the Flashes
Rechargeable batteries and AC power are the two most frequent ways to power electronic flashes. When there is no AC power anywhere close, using rechargeable batteries is an effective way to go. Of course, if you are using four flashes at one time and each takes four batteries, you need 16 batteries to power the setup, plus you need a second set of 16 batteries if you don’t want to run out of power at an inconvenient time. Using batteries is a serious problem with multiple flash, but it does work if you have a second set of charged batteries and two or three battery chargers. It is preferable to use AC power, but many modern flashes are not designed to utilize this power so batteries may be your only choice.
Adjusting Light Ratios for Two Flashes
Using multiple flashes is a terrific way to light your subject well. But you need to know how to place the flash units and vary the lighting ratios. Normally, you want to avoid flat light (total front-light) because few shadows are created so the subject lacks depth. On the other hand, you don’t want shadows so dark that color and detail is hidden. From lots of experience, I find that using a lighting ratio of 4:1 between the key and fill-flash resembles natural light well. The difference between the key flash and the fill-flash is 2 stops. Setting this ratio is easy enough, assuming the two flashes are identical. Last year I photographed a red-naped sapsucker at it’s nest cavity. Since the woodpecker would face to the left as it perched at the nest cavity, I put the key flash 4 feet from the nest cavity. The key flash was 20 degrees to the right and slightly above the height of the camera. To reduce the light output of the fill-flash by 2 stops, I put this flash twice as far away at 8 feet. The fill-flash must open up the shadows created by the key flash that appear on the tree to the left of the woodpecker. I put the fill-flash on the left side of the imaginary line that connects the camera to the subject. The fill-flash was placed at the same height as the camera and as close to the camera-subject line as possible so it doesn’t create any shadows of its own. This flash arrangement effectively illuminates the woodpecker. I used the histogram to determine the best flash exposure and found I needed to use f/16. Before the woodpecker even appeared, I photographed the tree to see where the exposure was as indicated by the histogram. In this case, my exposure was 1 stop darker than I wanted it so I changed the ISO from 100 to 200. I could have moved the flashes closer or changed the aperture from f/16 to f/11 to get 1 more stop of light too. When I took my first image of the sapsucker, I checked the histogram one more time to make sure light feathers were not being overexposed.
Making This a Three-Flash Setup
The two-flash setup described above would produce fine results if the background was only a couple feet behind the woodpecker. However, if the background were several feet away or further, due to the Inverse Square Law, the light falls off rapidly as it travels over distance so the background goes black. Woodpeckers are active during the day so a black background appears unnatural. An easy way to solve this problem would be to place a large piece of bark or even a painted background 10 feet behind the nest cavity. Now I could point a third flash at the background. To make the background properly exposed, I needed to put an identical flash 4 feet away from the background, the same distance the key flash is from the woodpecker.
In this case, I didn’t do that. A natural background such as another tree was not in a good position. Since the nest was 6-feet high, it would be difficult (but not impossible) to move an artificial background into position. There is another way to get a light background without using flash. This strategy works anytime the natural light on the subject is much less than the background. This red-naped sapsucker nesting in my back yard was in dense forest. In the afternoon, the nest cavity is totally shaded by trees, but the background is a distance mountain in bright sun so the background was at least 5 stops brighter than the woodpeckers nest cavity.
My two flashes were set up so f/16 properly exposed the woodpecker. This means I had to keep the aperture at f/16 to control the flash exposure. However, flash properly exposes the woodpecker at sync speed (1/250 second in my case) or any slower shutter speed. The mountain background was too dark if I shot at f/16 and 1/250 second. Leaving the aperture at f/16 while using manual exposure, I pointed the spot meter in my camera at the bright mountain and slowed the shutter down until the meter indicated a fine exposure for the mountain. This happened when the shutter speed was 1/30 second. By using an exposure combination of f/16 and 1/30 second shutter speed, I easily photographed the woodpecker, getting detail in the bird and the background. The aperture controls the flash exposure while the extra long shutter speed of 1/30 second allows the brighter natural light on the mountain to perfectly expose the background. Getting a ghost image from the woodpecker moving wasn’t a problem because the natural light on the woodpecker was several stops less than the background. This method of using flash always works well anytime the subject has much less natural light on it than the background. It is a very effective technique that is well worth mastering.
Electronic flash has many uses in nature photography. It is nothing to be afraid of and quite easy to use once you get started. You’ll make mistakes in the beginning, but mistakes are opportunities to learn. Enjoy your exploration of flash!

This red-naped sapsucker had dug it’s nest in a live aspen in our yard. A key and fill-flash lit the woodpecker while a long shutter speed of 1/30 second allowed the bright mountain background to be exposed properly too. Learning to mix flash with natural light is crucial to successful flash photography. Manual exposure makes this technique easy to do.