C
WORKING WITH OTHER APPLICATIONS
Integrating Adobe Photoshop with Adobe Production Studio
Why Photoshop Integration is Important for Adobe Production Studio
Adobe’s Photoshop is an application that changed the way we all think about image editing. Adobe Premiere was one of the first software-based video editing applications on the scene. It’s only natural that they would be designed to work hand-in-hand. Converting and processing still images and graphics and creating graphic elements and masks for compositing will always be a critical part of creating video programs.
• Whether you’re creating a video for deployment on tape, CD-ROM, or DVD, Photoshop is a critical accessory for high quality video production with Adobe Premiere.
• Adobe After Effects relies heavily upon integration with Adobe Photoshop. This integration is explored through several of this book’s tutorials.
• Encore DVD uses Photoshop as the basis of its menu systems.
What is the Proper Frame Size to Create Graphics for Premiere Pro?
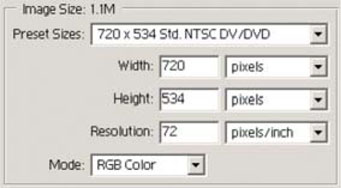
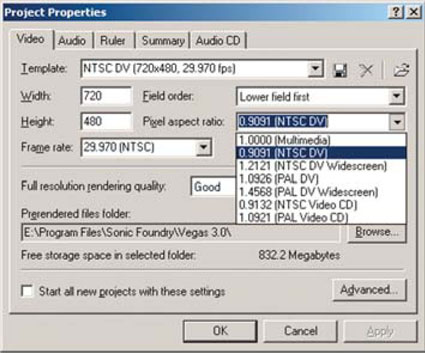
Frames sizes will vary as project settings can have different sizes and pixel aspect ratios in Premiere Pro. Premiere Pro 1.5 added a menu selection to create a “New Photoshop Document.”

This will open a Photoshop document that is configured properly for the Premiere Pro project you have open. Photoshop CS (or later) will create a document of both the proper dimension and pixel aspect ratio. If you are running an earlier version of Photoshop, the document will open with the proper pixel dimensions but will create the raster as square pixels only.
If you are capturing using Fire Wire, you are likely using the DV format. Regardless if you are using DV, DVCPRO, or DVCAM, your end result is a frame size of 720×480 for NTSC or 720×576 for PAL. If you are using Photoshop CS or later, you should design using the built-in non-square pixel document presets, which will match the native size of the video frame.
| Format | 4×3 Aspect Ratio Square Pixel | 16 × 9 Aspect Ratio Square Pixel | Native Size* Non-Square Pixel |
| NTSC | 720×534 | 864×534 | 720×480 |
| PA L | 768 × 576 | 1024 × 576 | 720×576 |
* Native size is the actual frame size stored by the Premiere Pro system and supported by Photoshop CS or later.

If you are working on a standard definition hardware-accelerated system, you are likely working at a standard frame size. The following offer general guidelines, but always consult the documentation that shipped with your hardware capture board or check the manufacturer’s Web site. If you are using Photoshop CS or later, design using the built-in non-square pixel document presets, which will match the native size of the video frame.
| Format | 4×3 Aspect Ratio Square Pixel | 16×9 Aspect Ratio Square Pixel | Native Size* Non-Square Pixel |
| NTSC | 720×540 | 864×486 | 720×486 |
| PAL | 768×576 | 1024×576 | 720×576 |
* Native size is the actual frame size stored by the Premiere Pro system and supported by Photoshop CS or later.
If you build in square pixels, the final step is to resize the square pixel graphic to the desired non-square pixel size. To do this choose Image>Image Size. Uncheck the Constrain Proportions box and type in the native size from the chart above. The graphic will now display correctly when played back from the timeline.
What about HD Graphics?
Premiere Pro supports several different versions of HD. Sizing your graphics will depend greatly on the tape format you are using. The good news is that the presets in Photoshop work well for HD.
| Format | Dimensions | Pixel Aspect Ratio |
| HDV/HDTV 720p | 1280×720 | Square (1.0) |
| HDV 1080 | 1440×1080 | Non-square (1.33) |
| DVCPRO HD 720p | 960×720 | Non-square (1.33) |
| DVCPRO HD 1080 | 1280×1080 | Non-square (1.5) |
| HDTV 1080 | 1920×1080 | Square (1.0) |
What is the Proper Frame Size to Create Graphics for After Effects?
Adobe After Effects is resolution-independent and meant for a variety of content creation tasks. As such, you can import Photoshop documents of any size. A general guideline is to bring the documents in at the size that you need. For example, if you were designing a motion menu for an NTSC DVD, you would use the 720×480 non-square pixels. However, if you plan to use a lot of elements in After Effects 3D space, you should strongly consider using square pixels.
What about Designing for Encore DVD?
The DVD specs and the DV specs line up precisely. As such, you can design using the following specs for DVD menus.
| Format | 4×3 Aspect Ratio Square Pixel | 16×9 Aspect Ratio Square Pixel | Native Size* Non-Square Pixel |
| NTSC | 720×534 | 864×534 | 720×480 |
| PA L | 768×576 | 1024×576 | 720×576 |
* Native size is the actual frame size stored by Encore DVD and supported by Photoshop CS or later.
What about Oversized Graphics?
It is possible to bring in a graphic that is larger than the screen. With Premiere Pro, you’ll likely want to bring the graphic in as a flattened file. In After Effects, you will need to determine if you want to import as a composition to preserve a layered file for animation. Otherwise, you can import the item as footage.
What File Types are Supported
The Adobe video applications are capable of supporting several graphic formats. Because all of the applications are made by Adobe, they can work with almost any format. Some of the most popular formats include:
| Format | Extension | Alpha? | Comments |
| BMP | .bmp | No | BMP: Windows bitmap format. This format supports color depths from dithered black and white to millions of colors. |
| JPEG | .jpg | No | CMYK images are not supported. A popular file format because it can create highly compressed yet good-looking graphics files. This format is not well suited for additional compression by editing into a video sequence. |
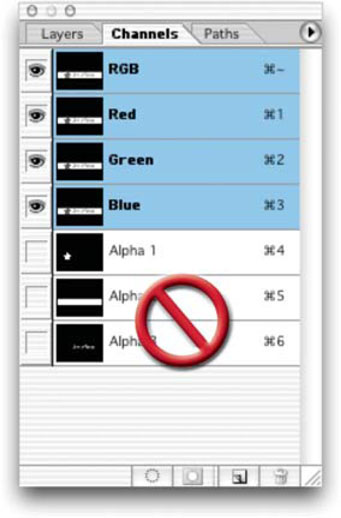
| Photoshop | .psd | Yes | CMYK images and files with more than four channels aren’t supported. Supports color and grayscale 8-bit graphics, millions of colors, and alpha channels. |
| PICT | .pct | Yes | A common image format used on Mac computers. |
| PNG | .png | Yes | Allows color depths from black and white to millions of colors+. |
| Targa | .tga | Yes | An uncompressed file format that is supported by nearly every media application. |
| TIFF | .tiff | Yes | RGB and Grayscale images import correctly. Advanced TIFF files created with Adobe Photoshop 6 or newer mport correctly. CMYK and files with more than four channels do not import correctly. |
Which Bit Depths are Supported?
Bit depth support will vary upon which versions of the application you have installed. While 8-bit support is universal (and the most common workflow), many will move to 16-bit imaging for greater color fidelity. If film output is in your site, then users may look to draw upon support for the newer 32-bit image formats.
Design With RGB or 601 Levels?
In their current versions, Adobe video applications correctly interpret RGB values (using the full 0-255 range). This will make it easier during the design process. Adobe Premiere Pro will properly map a 0 value to 7.5 IRE and a 255 value to 100 IRE. In Adobe After Effects, you design using the full color range, and color remapping will generally occur when the codec is applied in the Output Module.

For most users, the best practice is to design in full gamut RGB and apply the NTSC-safe filter on the file in Premiere Pro. This method ensures that all graphics are processed, but will cause the now-filtered graphic to be rendered when a properly prepared Photoshop document would not.
What Major Photoshop Features Import?
While subtle differences exist, Premiere Pro, After Effects, and Encore DVD all interpret Photoshop files the same way. You can choose to import Photoshop files as merged layers or load each or any independent layer of a document to use each layer as a separate element.
Additionally, importing a multi-layered Photoshop file as a “sequence” or “composition” will be a significant workflow improvement. When you load a file as a sequence or composition, a new sequence is created with each layer of your Photoshop document placed on its own track. You can easily manipulate the layers and nest the sequence into another sequence or use a “pre-comp” in After Effects.
The following properties transfer from Photoshop (accuracy and full support has improved with each new release):
1. Opacity
2. Blending Modes
3. Grouped Layers.
4. Layer Set—All layers within a layer set are imported to individual layers. After Effects treats them as “pre-comps” while Encore DVD uses the organization for rollover states for buttons.
5. Type Layers—Type is rasterized for Premiere Pro and After Effects. It can be converted back to vector text in newer versions of After Effects. Encore DVD preserves the editability of the text as vectors.
6. Shape Layers—Shape layers are rasterized by Premiere Pro. After Effects converts them to a solid with a Mask applied.
7. Solid Color Fill Layers—Solid Color Fill Layers are brought in as a graphic with a full-screen opaque alpha channel.
8. Gradient Fill Layers—Gradient Fill Layers are preserved upon import.
9. Pattern Fill Layers—Pattern Fill Layers import.
10. Layer Styles—The support of Layer Styles has improved with each release of the Adobe video applications. Older versions offered fair support. Newer versions have improved greatly.
11. Layer Mask—Layer Masks are applied upon import.
12. Adjustment Layers—These generally import into newer versions of After Effects and Encore DVD. Premiere Pro ignores them however.
How Do You Import Graphics into Adobe Production Studio?
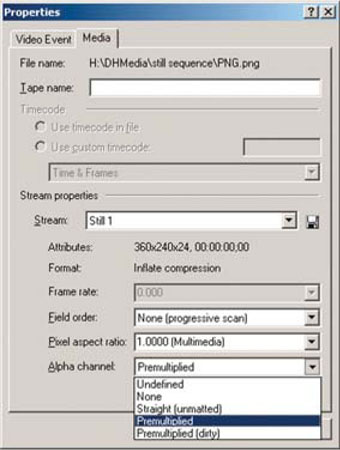
Photoshop outputs image files in a variety of file types. Still graphics are represented in source clip bins just like video clips. Premiere Pro sees alpha channels when the clip is placed on video track 2 or above. Adobe applications offer three ways to interpret alpha channel transparency (pre-multiplied with white alpha, pre-multiplied with black alpha, or straight alpha channel). Default duration for still images can be set in the preferences, but length can be easily adjusted on the timeline after the clip is placed as well. To import, choose File>Import, or double-click in an empty area of the project window.
How Do You Export Video Frames from Your System?
Stills can be exported from Premiere Pro as Tagged Image Files or TIFF, Compuserve GIFs, Truevision Targa or TGA, Windows Bitmap or BMP. In After Effects you can choose Composition>Save frame as…. and choose from a wide variety of output options.

General Tips On Usage
Tip: Be sure the Maximize backwards compatibility in Photoshop format is checked in the Photoshop preferences for the broadest import capabilities. This will assure that Photoshop saves a rasterized version of vector layers within the Photoshop file for proper interpretation upon import into Premiere Pro.
Tip: Photoshop CS (or later) can use non-square pixel aspect ratios, so creating documents for video formats using non-square pixels is a fairly straightforward process. Previous versions of Photoshop work with square pixels only.
Author’s Credit
Tim Kolb is an Emmy Award-winning director and author, and a veteran of video and television production. He serves as a program producer and first unit director for video programs, television commercials, CD-ROMs and DVDs. His work has been seen on the CBS Evening News, ESPN, ESPN 2, and CNN and he has been known to freelance for the likes of Court TV and ABC Sports. Besides Emmys, his shelf holds a Chicago Film Festival “Hugo”, American Advertising Awards, Tellys, International Television Association Honors, and Communicator Awards. He judges Emmys and Tellys and is an advisor to Adobe Systems and Canopus Corporation. He tends to hang out at several industry-related forums at creativecow.net, where he is a host. Tim can be reached at [email protected].
Special thanks to Daniel Brown and Richard Townhill of Adobe Systems for their critical assistance in assembling this appendix.
Integrating Adobe Photoshop with Apple Final Cut Studio
Why Photoshop Integration is Important for Final Cut Studio
Photoshop is tightly integrated with Apple’s Final Cut Studio. Apple supports most Photoshop features and encourages Photoshop integration throughout the entire suite.
• Final Cut Pro can import layered PSD files with most blend modes intact.
• DVD Studio Pro can use a layered PSD file as the basis for a DVD menu. This support is well documented in the application’s printed and online documentation.
• Motion can import a layered PSD file and can then be easily animated.
What is the Proper Frame Size to Create Graphics for this System?
If you are capturing using Fire Wire, you are likely using the DV format. Regardless if you are using DV, DVCPRO, or DVCAM, your end result is a frame size of 720×480 for NTSC or 720×576 for PAL. If you are using Photoshop CS or later, you should design using the built-in non-square pixel document presets which will match the native size of the video frame.
| Format | 4×3 Aspect Ratio Square Pixel | 16×9 Aspect Ratio Square Pixel | Native Size* Non-Square Pixel |
| NTSC | 720×534 | 864×534 | 720×480 |
| PA L | 768×576 | 1024×576 | 720 × 576 |
* Native size is the actual frame size stored by the FCP system and supported by Photoshop CS or later.
If you are working on a standard definition hardware-accelerated system, you are likely working at a standard frame size. The following offer general guidelines, but always consult the documentation that shipped with your hardware capture board or check the manufacturer’s Web site. If you are using Photoshop CS or later, design using the built-in non-square pixel document presets, which will match the native size of the video frame.
| Format | 4×3 Aspect Ratio Square Pixel | 16×9 Aspect Ratio Square Pixel | Native Size* Non-Square Pixel |
| NTSC | 720×540 | 864×486 | 720×486 |
| PA L | 768×576 | 1024×576 | 720×576 |
* Native size is the actual frame size stored by the FCP system and supported by Photoshop CS or later.

If you build in square pixels, the final step is to resize the square pixel graphic to the desired non-square pixel size. To do this choose Image>Image Size. Uncheck the Constrain Proportions box and type in the native size from the chart above. The graphic will now display correctly when played back from the timeline.
What about HD Graphics?
Final Cut Pro supports several different versions of HD. Sizing your graphics will depend greatly on the tape format you are using. The good news is that the presets in Photoshop work well for HD.
| Format | Dimensions | Pixel Aspect Ratio |
| HDV/HDTV 720p | 1280×720 | Square (1.0) |
| HDV 1080 | 1440×1080 | Non-square (1.33) |
| DVCPRO HD 720p | 960×720 | Non-square (1.33) |
| DVCPRO HD 1080 | 1280×1080 | Non-square (1.5) |
| HDTV 1080 | 1920X1080 | Square (1.0) |
What about Designing for DVD Studio Pro?
The DVD specs and the DV specs line up precisely. As such you can design using the following specs for DVD menus.
| Format | 4×3 Aspect Ratio Square Pixel | 16×9 Aspect Ratio Square Pixel | Native Size* Non-Square Pixel |
| NTSC | 720×534 | 864×534 | 720×480 |
| PAL | 768×576 | 1024 × 576 | 720×576 |
* Native size is the actual frame size stored by DVD Studio Pro and supported by Photoshop CS or later
What about Oversized Graphics?
It is possible to bring in a graphic that is larger than the screen. Make sure that the graphic is a single-layer document. This way FCP or Motion will recognize the square-pixel nature of the graphic and automatically compensate for you. Using a high-resolution image is useful for creating backgrounds or simulating motion control photography. Note: for DVD Studio Pro, it is best to bring graphics in at their final playback size.
In Final Cut Pro, keyframed motion parameters such as Center, Anchor Point, and Scale parameters in a clip’s Motion tab allow panning and zooming (in Motion, you can apply behaviors to the object.) Be certain not to scale over 100%, or image softening will occur. You will also want to be sure to that the Timeline is set to maximum quality for processing the stills. Press ![]() to open the Sequence Settings for the active sequence. Click the Video Processing tab then choose Best from the Motion Filtering Quality menu and click OK.
to open the Sequence Settings for the active sequence. Click the Video Processing tab then choose Best from the Motion Filtering Quality menu and click OK.
What File Types are Supported
Final Cut Studio is capable of supporting several graphic formats. Because Final Cut Studio is QuickTime-based, it can draw upon a wide variety of formats. Some of the most popular formats include:
| Format | Extension | Alpha? | Comments |
| BMP | .bmp | No | BMP: Windows bitmap format. This format supports color depths from dithered black and white to millions of colors. |
| JPEG | .jpg | No | CMYK images are not supported. A popular file format because it can create highly compressed yet good-looking graphics files. This format is not well suited for additional compression by editing into a video sequence. |
| Photoshop | .psd | Yes | CMYK images and files with more than four channels aren’t supported. Supports color and grayscale 8-bit graphics, millions of colors, and alpha channels. |
| PICT | .pct | Yes | A common image format used on Mac computers. |
| PNG | .png | Yes | Allows color depths from black and white to millions of colors+. |
| Targa | .tga | Yes | An uncompressed file format that is supported by nearly every media application. |
| TIFF | .tiff | Yes | RGB and Grayscale images import correctly. Advanced TIFF files created with Adobe Photoshop 6 or newer import correctly. CMYK and files with more than four channels do not import correctly. |
Which Bit Depths are Supported?
Both 8-bit and 16-bit RGB are supported reliably. Note that at this time, Final Cut Pro cannot properly recognize Photoshop images that contain layers when working in the 16-bit mode. It will import them as a flattened file. Motion, on the other hand, is designed to work in up to 32-bit mode (or float). You can save Photoshop files in 32 Bits/Channel mode and import them. Other 32-bit formats, including Open EXR, are also supported.
Design With RGB or 601 Levels?
When a graphics clip is edited into a sequence, its levels are affected by the “Process maximum white as” pop-up menu in the Video Processing tab of the Sequence Settings. If it is set to White, then the brightest white in the graphic will appear at 100 percent when viewed on FCP’s Waveform Monitor. If the sequence is set to Super-White, then the brightest white of the graphic will register 109 percent on FCP’s Waveform Monitor.
Use the Super-White setting if matching the brightness of imported graphics to video that was shot and captured with the super-white luminance levels. This is generally the case with many consumer camcorders. If the video was shot under controlled conditions, a maximum white level of 100 IRE in the recorded video signal, you should have “Process maximum white as” set to White. This will help ensure that the white levels of the graphics match properly. You can design with the full 0–255 range when working with Final Cut Pro or Motion.
If an imported graphic triggers Final Cut Pro’s range check feature, you should adjust the graphic’s saturation back in Photoshop. While using a three-way color corrector may seem desirable, you are adding unnecessary render time. The quickest fix is to reopen the graphic in the appropriate external editor.
You can define which applications will open for editing specific kinds of clips. Set the still image tab to open Adobe Photoshop. To open the clip in Photoshop, do one of the following:
1. Control-click on a clip in the Canvas or Browser. Then select Open in Editor from the pop-up menu.
2. Select a clip in the Timeline or Browser. Then select Clip in Editor from the View menu. Make any changes you need to the graphic. Then close and save changes. As long as you do not change the order or number of layers, the changes will automatically update in Final Cut Pro.
What Major Photoshop Features Import?
Final Cut Pro lets you import multilayered Photoshop files. It is possible to import any version of Photoshop files, but only those features that work in Photoshop 3.0 features are supported. Supported features include opacity, composite modes, layer order, and layer name.
The following properties transfer correctly from Photoshop:
1. Opacity—The imported layer’s opacity becomes the Opacity control in the Motion Tab.
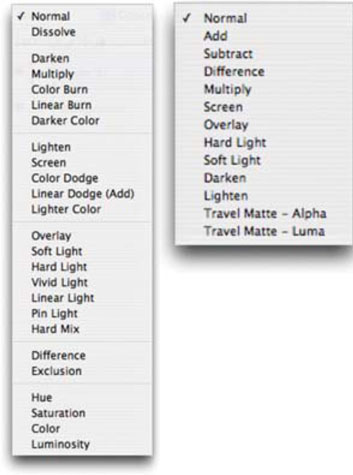
2. Blending Modes—For Final Cut Pro, the following blend modes transfer correctly: Add, Subtract, Difference, Multiply, Screen, Overlay, Hard Light, Soft Light, Darken and Lighten. In Motion, support for blending modes is much greater.
3. Grouped Layers—Layer grouping is ignored. However, all layers, including grouped layers, are imported as individual layers.
4. Layer Set—All layers within a Layer Set are imported to individual layers.
5. Type Layers—Type is rasterized.
6. Shape Layers—Shape Layers are rasterized.
7. Solid Color Fill Layers—Solid Color Fill Layers are brought in as a graphic with a full screen opaque alpha channel.
8. Gradient Fill Layers—Gradient Fill Layers are preserved upon import.
9. Pattern Fill Layers—Pattern Fill Layers import.
When importing a multilayered Photoshop document, Final Cut Pro creates a new sequence. All of the layers of the Photoshop file are composited together. The sequence uses a frame size identical to the imported file’s frame size.
What Photoshop Features Do Not Import?
1. Layer/Set Mask—Layer and set masks are ignored. To keep the mask’s transparency, you must merge the set or layer with an empty layer. Highlight the empty layer as a target.
2. Layer Effects—Layer effects must also be merged in order to travel.
3. Adjustment Layers—Merge the adjusted layers together.
4. Photo Filter Layers—Merge the adjusted layers together.
5. Paths—Paths cannot be imported.
How Do You Import Graphics into Final Cut Pro?
Importing graphics into your system is pretty straightforward. However, there are a few options that you need to understand. The steps are as follows.
To import a file or folder:
Step 1. At the Finder level, copy or move the files and folders that need to be imported to the project folder and hard disk. It is a good idea to keep all non-timecoded elements, such as graphics, sound files, and imported movies, in one folder. This facilitates the archival and backup procedures needed to preserve a project.
Step 2. In the Browser, select a destination.
a. Click on a project’s tab to import files or folders into the main (root) level of a project.
b. To import files directly into a bin within a project, you most first open that bin. Double-click the bin; it will open in a separate window. Import your items directly into this bin.
Step 3. To import, do one of the following:
a. Drag the files or folders from the finder to a project tab or bin in the Browser.
b. Choose Import from the File menu ![]() . Select File or Folder from the submenu. Select a file or folder in the dialog box, and click Open.
. Select File or Folder from the submenu. Select a file or folder in the dialog box, and click Open.
c. Control-click in the Browser or a bin’s window. Next, choose Import File or Import Folder from the pop-up menu. Select a file or folder then click Open.
Step 4. Save the project.
How Do You Import Graphics into Motion?
Importing graphics into your Motion is an easy process. Motion gives you precise control on how to import a layered PSD file.
Step 1. Choose File>Import.
Step 2. Navigate to the file you want to import, then click Import. This will open the Pick Layer to Import dialog box.
Step 3. Choose a command from the Layer Name pop-up menu.
a. Merged Layers: All layers of the Photoshop file are imported into a single object.
b. All Layers: A new layer is created and nested within the currently selected layer in Motion. Each layer of the Photoshop document appears as an individual nested object.
c. Individual Layers: Each layer in the the Photoshop file appears as a separate item a drop down menu.
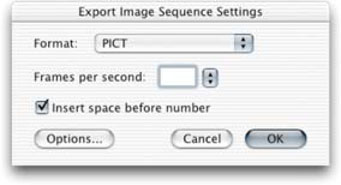
How Do You Export Video Frames From Your System?
Step 1. In the Canvas, Viewer, or Timeline, place the playhead at the desired frame.
Step 2. From the File menu, choose Export. Then pick Using QuickTime Conversion from the submenu.
Step 3. Select a location and enter a name for the file.
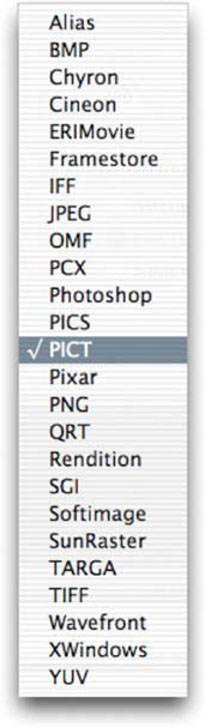
Step 4. Select Still Image from the Format pop-up menu.
Step 5. Click the Options buttons and pick a setting from the popup menu. Ignore the frame rate (fps), as it doesn’t apply to a single frame.
Step 6. You can customize the export setting by clicking on the second Options button. Adjust the options and export format, then click OK.
Step 7. When ready to export, click Save.
General Tips on Usage for Final Cut Pro
It is important to note that:
• An imported Photoshop file becomes a sequence in the Final Cut project.
• To import a layered Photoshop file as a single clip, it must be flattened in Photoshop first.
• A transparent background in the PSD file creates a transparent background in the new sequence.
• Layer opacity settings, some layer modes, fill layers, and visibility are preserved upon import.
• When making modifications to a PSD file that’s already used in a Final Cut Pro project, do not add or delete layers.
• A great file format is the layered TIFF format. Final Cut Pro will read the file in as a flattened file, however Photoshop will open it as a layered image. This gives you all the flexibility you need to make changes with none of the overhead of a layered file.
• Photoshop’s Save for Web command is a great way to save PNG-24 files. This is an easy way to save a flattened file with the transparency data intact.
Author’s Credit
Richard Harrington is an Apple Certified Trainer and Adobe Certified Expert. He has worked with Final Cut Pro since the first version. Rich frequently instructs for Future Media Concepts and has spoken and industry events such as the NAB Post|Production World Conference, DV Expo, and Photoshop World.
Integrating Adobe Photoshop with Avid Editing Systems
Why Photoshop Integration is Important for Avid Editing Systems
Avid editing systems are the most widely used option for video postproduction. They are indeed edit systems and not paint packages, however. The proper use of Adobe Photoshop is important to give Avid users access to advanced titling opportunities as well as to enable them to prepare logos and photos for import into projects. Avid recognizes this important connection and even offers an advanced course through Avid Education Centers called Creating Graphics and Mattes with Avid Media Composer and Adobe Photoshop.
What is the Proper Frame Size to Create Graphics for this System?
Depending upon which Avid system you are using and which video standard (NTSC or PAL) used in your particular country, your graphic size may vary. All graphics should be properly sized before you import them. Improperly sized graphics are prone to distortion and loss of quality.
For those working with standard definition video, such as Avid Media Composer, Avid Symphony, and Avid Xpress, use the following sizes. If you are using Photoshop CS or later, you should design using the built-in non-square pixel document presets which will match the native size of the video frame.
| Format | 4×3 Aspect Ratio Square Pixel | 16 × 9 Aspect Ratio Square Pixel | Native Size* Non-Square Pixel |
| NTSC | 648×486 or 720×540 | 864×486 | 720×486 |
| PA L | 768×576 or 720×540 | 1024 × 576 | 720×576 |
* Native size is the actual frame size stored by the Avid system and supported by Photoshop CS or later
There are two square pixel sizes listed for the 4×3 aspect ratio for flexibility. Designing at the 720×540 standard allows you to carry graphics to both NTSC and PAL. A small crop to 720×534 will also allow them to be used with DV footage or DVD titles.
For those working with the Digital Video formats on Avid Xpress DV, use the following sizes. If you are using Photoshop CS or later, design using the built-in non-square pixel document presets
| Format | 4×3 Aspect Ratio Square Pixel | 16 × 9 Aspect Ratio Square Pixel | Native Size* Non-Square Pixel |
| NTSC | 648×480 or 720×534 | 864×480 | 720×480 |
| PA L | 768×576 or 720×540 | 1024 × 576 | 720×576 |
* Native size is the actual frame size stored by the FCP system and supported by Photoshop CS or later
If you build in square pixels, the final step is to resize the square pixel graphic to the desired non-square pixel size. To do this choose Image>Image Size. Uncheck the Constrain Proportions box and type in the native size from the chart above. The graphic will now display correctly when played back from the timeline.
What about HD Graphics?
Avid supports several different versions of HD. Sizing your graphics will depend greatly on the tape format you are using. The good news is that the presets in Photoshop work well for HD.
| Format | Dimensions | Pixel Aspect Ratio |
| HDV/HDTV 720p | 1280×720 | Square (1.0) |
| HDV 1080 | 1440×1080 | Non-square (1.33) |
| DVCPRO HD 720p | 960×720 | Non-square (1.33) |
| DVCPRO HD 1080 | 1280×1080 | Non-square (1.5) |
| HDTV 1080 | 1920×1080 | Square (1.0) |
What about Oversized Graphics?
Avid editing systems require you to import your graphics at the proper size for editing. Larger graphics will be rescaled by Avid to fit. This is generally undesirable, as Avid systems do not scale at the same quality as Photoshop. There is one exception: many Avid systems include a Pan & Zoom plug-in. This can be used to load a larger image and create animated moves on the image.
What File Types are Supported?
Avid systems support 24 still graphic file formats. The two most common formats that Avid recommends are TIFF and PICT. The following table lists the most common formats you will likely encounter. For a complete list, see your online help file or Avid user’s manual.
| Format | Extension | Alpha? | Comments |
| Alias | .als | No | Alpha must be a separate file. |
| BMP | .bmp | No | |
| Chyron | .chr | Yes | Images must be saved as a frame store file. |
| JPEG | .jpg | No | CMYK images are not supported. |
| Photoshop | .psd | Yes | CMYK images and files with more than four channels are not supported. |
| PICT | .pct | Yes | |
| PNG | .png | Yes | |
| Softimage | .pic | Yes | |
| Targa | .tga | Yes | |
| TIFF | .tif | Yes | RGB and Grayscale images import correctly, as do layered TIFF files created with Adobe Photoshop 6 or newer.CMYK and files with more than four channels do not import correctly. |
| Wavefront | .rla | Yes |
Which Bit Depths are Supported?
Both 8-bit and 16-bit RGB are supported reliably. Note that at this time, Avid systems cannot properly recognize Photoshop images that contain layers when working in the 16-bit mode. It will import them as a flattened file.
Design With RGB or 601 Levels?
You have three choices when for color levels when importing with an Avid system: RGB, RGB Dithered and 601. The method you choose to use will affect how you work in Photoshop.

• RGB—This is the most common color model used. Most computer-generated graphics use RGB graphics levels (0–255). If you choose RGB upon import to the Avid system, they will be remapped to appropriate ITU-R 601 (formerly CCIR 601) video color. The blackest black in the document will be assigned video black levels, and the whitest white will be mapped to video white.
• RGB, dithered—If your file contains complex color effects, such as a gradient or complex glow, and you are importing at a high resolution (2:1), choose this option. The 8-bit limit of 4:2:2 video encoding is prone to banding with fine gradients.
• 601—This option is for use if the imported graphics file uses video levels based on the ITU-R 601 (formerly CCIR 601) standard. This would include frames of digitized video that were exported and processed in Photoshop. This also includes Avid color bars or images that include superblack for luma-keying.
If you are exporting a frame from your Avid system for touch-up in Photoshop, export it with 601 levels. Once you take it into Photoshop, be sure to avoid any adjustments to levels or saturation, or a visible color-shift will likely occur.
All other graphics that originate in Photoshop can be designed using the full color range of the RGB format. However, be certain to specify RGB or RGB, dithered levels when you import.
What Major Photoshop Features Import?
The following properties transfer correctly from Photoshop:
1. Opacity—The imported layer’s opacity becomes the Foreground Level control in the Effect Editor.
2. Layer Group—Layer Grouping is ignored. However all layers, including grouped layers, are imported as individual layers.
3. Layer Set—All layers within a Layer Set are imported to individual layers.
4. Type Layers—Type is rasterized.
5. Solid Layer—Solid Layers are brought in as a graphic with a full-screen opaque alpha channel.
6. Gradient Layer—Gradient transparency is preserved upon import.
7. Pattern Layer—Pattern Adjustment Layers make the trip.
What Photoshop Features Do Not Import?
1. Blending Modes—Merge the blended layers together. Only normal mode is supported
2. Layer/Set Mask—Layer and Set Masks are ignored. To keep the masks transparency you must merge the set or layer with an empty layer. Highlight the empty layer as a target.
3. Layer Effects—Layer effects must also be merged in order to travel.
4. Adjustment Layers—Merge the adjusted layers together.
5. Photo Filter Layers—Merge the adjusted layers together.
How Do You Import Graphics into the System? Any Special Options?

Importing graphics into your system is pretty straightforward. However, there are a few options that you need to understand. The steps are as follows.
Step 1. Select the bin where you want the imported file(s) to be stored.
Step 2. Choose File>Import
Step 3. Navigate to where the files are located
Step 4. Select the files to import. Hold down the ![]() or
or ![]() key (
key (![]() key) to select multiple files. The
key) to select multiple files. The ![]() key selects contiguous files, the
key selects contiguous files, the ![]() key selects noncontiguous files.
key selects noncontiguous files.
Step 5. Choose a Media Drive and specify the resolution settings that best match your project. Remember that compressed and uncompressed footage cannot be mixed.
Step 6. Click the Options button and specify the options that best match your project and source materials.
a. Aspect Ratio, Pixel Aspect
i. 601, non-square—This is the default setting. It assumes that your video has been properly sized for import to your Avid system. Use this option to import images with the native dimensions used by the Avid system: 720×480 (NTSC DV), 720×486 (NTSC), or 720×576 (PAL). Also use this option for 720×540 images or other images that match the 4:3 aspect ratio.
ii. Maintain, non-square—This option never scales or resizes. In a D1 environment, use this with images sized for DVD or DV (720×480). The image is centered and padded with black at top and bottom to fill out the 486 scan lines for those systems that need it.
In Xpress DV, up to 480 (NTSC) or 576 (PAL) lines are preserved. The extras are removed, or missing lines are padded with video black. Use this option for DV sized material being used in a D1 project, or vice versa.
iii. Maintain, square—This is for images that use square pixels, and are smaller than the video frame. This will prevent enlarging the image and thus softening it. Square pixels are resized for non-square usage and the empty areas are filled with video black.
iv. Maintain and Resize, square—This option assumes that the image aspect ratio is incorrect. It will letterbox the image and scale to fit the 720-pixel width or the 480 (NTSC DV), 486 (NTSC), or 576 (PAL) size. It will also compensate for square pixels. For best full-screen resolution of files created with square pixels, use 648×480 (NTSC) or 768×576 (PAL). To create a single resolution for both NTSC and PAL, use 720×540. Do not use this option to bring in a fullscreen square-pixel image that has already been stretched to non-square-pixel dimensions.
b. File Field Order—Leave set to non-interlaced for still graphics.
c. Color Levels—Choose from RGB, RGB, dithered or 601 based on the aforementioned criteria.
d. Alpha
i. Use Existing—Applies only to images that have an attached alpha channel. If you create your alpha channels with the save selection as channel button, this method will not work properly
ii. Invert Existing—This method inverts the Alpha Channel. This one is generally more useful to Photoshop users.
iii. Ignore—Alpha channel is disregarded.
e. Single Frame Import—Specify a length for the clip.
Step 7. When satisfied with your options, click OK to close the dialog box.
Step 8. Click OK to begin import.
Step 9. Specify how you want the files imported. Your Avid system can import your Photoshop graphic three different ways: as a flattened image, or from some to all of the layers in a multilayered graphic. If you simply intend to key the graphic without any complex reveal or animation, such as a lower third, choose flattened.

If you are going to use the layers to build an animation or complex reveal, choose to import as a sequence of layers or select layers. Each layer imports as a separate object (a matte key or master clip). These can then be manipulated individually like any other matte key or master clip.
Upon import, the Avid system presents you with a sequence with each layer on a separate track. This will allow you to edit all of the layers into a final sequence. The names and order of the layers are preserved from the original Photoshop file.

How Do You Export Video Frames from Your System?
Step 1. Load the clip or sequence that contains the desired clip into your source or record monitor.
Step 2. Park on the desired position with the position indicator (blue bar).
Step 3. Choose File>Export.
Step 4. The pop-up list at the bottom of the dialog box contains saved Export settings. You can use these or create specialized exports.
Step 5. Click the options button to access the Export Settings dialog box.
Step 6. Choose Graphic from the Export As menu.
Step 7. Specify the following options:
a. Use Marks—If selected, the in point is used. If deselected the position indicator is used.
b. Use Enabled Tracks—If selected, the highest active track is used. If deselected, the highest monitored track is used.
c. Graphic Format—Specify the output type. Avoid JPEG and GIF as they introduce undesirable compression.
d. Format Options—Access specific options for each format.
e. Width, Height—Use the presets to specify an output size. Use square pixels for print and web. Use Native size when touching up and re-importing or going to After Effects.
f. Scale to Fit or Crop/Pad—How the image is forced to fit the export size.
g. Color Levels—RGB is used most of the time. 601 levels if you plan to re-import after touchup.
h. File Field Order—The Single Field option is best when exporting.
Step 8. Deselect Sequential Files option.
Step 9. Click Save As to save the setting for future use.
• Step 10. Navigate to storage destination.
Step 11. Enter name for graphic with version number. Avoid alpha numeric characters and spaces.
Step 12. Click OK to save.
General Tips On Usage
It is important to note that:
• Opacity levels from Photoshop are converted to Foreground level in the Matte Key effect.
• Layer order and layer names are preserved during import to the system.
• A hidden layer will be imported as a matte key.
• Vector text and shape layers are rasterized during import to the Avid.
• Graphics must be RGB 8 or 16 bits, or grayscale.

Author’s Credit
Richard Harrington is an Avid Certified Instructor and has participated in the Avid Master Editor Workshop. He has worked with Avid systems since 1994 and enjoys working with the entire lineup of Avid products (although he doesn’t understand why the Transjammer AVX plug-ins went away). Rich frequently instructs for Future Media Concepts and has spoken at industry events such as the NAB Post|Production World Conference, DV Expo, Photoshop World, and the Avid Government Technology Symposium.
Integrating Adobe Photoshop with Autodesk Combustion
Why Photoshop Integration is Important for this System
It is to be expected that a client or designer will hand you resources created in Photoshop. The Photoshop file can be directly imported into Combustion retaining layers, transfer modes and opacity. While the discreet Combustion Paint Module itself uses image editing procedures similar to Adobe Photoshop, tools such as Custom Brushes, the Healing Brush, Liquify and Layer Styles are available only in Photoshop.
What is the Proper Frame Size to Create Graphics For this System With Square Pixels
Because Combustion is resolution-independent, it will not automatically resize images from square-pixel applications such as Photoshop. It is generally a good idea to design with the newer non-square pixel presets.
By default, the Combustion viewport(s) display a pixel ratio of 1:1 (square pixels), so an imported full frame Photoshop file may still appear to be squashed. In the Combustion menu, enable Window>Use Aspect Ratio to scale the viewport and display the output accordingly.
What File Types are Supported
File formats supported by Combustion are PSD (with layers, opacity and blend modes), BMP (24-bit only, no alpha support), GIF (32-bit, transparency support), JPG (24-bit, no alpha support), PNG (32-bit, full alpha support), TGA (32-bit, full alpha support), TIF (32-bit, full alpha support).
Which Image Modes are Supported
Combustion supports files created in Grayscale, Index and RGB modes. Combustion does not support files created in CMYK, Lab, or Mulltichannel modes. Newer versions of Combustion are also fully compatible with Photoshop’s 16-bit and 32-bit formats.
Design With RGB or 601 Levels
Design in Photoshop RGB. If the composition is being used for broadcast, it may be necessary to bring the graphic within color safe. After importing the graphic into Combustion, apply a Broadcast Safe Color Operator (menu Operators>Video> Broadcast Safe Colors) to reduce the luminance or saturation or to identify NTSC illegal colors for manual correction, such as with the Color Corrector. If the composite contains numerous layers imported from Photoshop, the Broadcast Safe Color Operator can be applied on the final output and optionally nested; this makes all layers “safe.” Of course, if you are doing genuine broadcast work, always make use of a vectorscope.
What Major Photoshop Features Import
Photoshop Layers are independently recognized by Combustion. Layers can be manipulated and modified individually or as a group. Photoshop Layers with visibility turned off will import into Combustion “off” and can be turned “on” by clicking the Layer icon in the Workspace. Photoshop Layer names are preserved on import.
Photoshop Layer Blend Modes are compatible with Combustion Layer Transfer Modes and can be changed easily in Combustion. However, new (Photoshop 7) Layer Blend modes will import as “Normal”, these include Linear Burn, Linear Dodge, Vivid Light, Pin Light and Linear Light.
Photoshop Layer Opacity imports perfectly and the full range of Opacity can be modified and animated in Combustion. The Advanced Blending “Fill Opacity” is not acknowledged.
Photoshop Clipping Groups are imported seamlessly using Combustion’s Stencil Layer option found in the Surface Controls. The Stencil Layer option is automatically set to Alpha.
What Photoshop Features Do Not Import
• Combustion does not recognize Layer Sets. All Layers are imported in order from top to bottom, disregarding Layer Sets and Layer Set names.

• Combustion does not recognize Layer Styles when the file is saved as a Photoshop file. Merge a Layer containing a Layer Style down into an empty Layer to rasterize it. However, if a Photoshop file is saved as a still image (BMP, GIF, JPG, PNG, TGA or TIF) Layer Styles are saved in the image and there is no need to rasterize.
• Adjustment Layers are not recognized by Combustion.
• Vector Type is rasterized on import into Combustion. If text needs to be scaled or edited, modify the original Photoshop file or use the Combustion Text Tools.
• Vector Shape Layers must be rasterized before being saved in Photoshop. Combustion ignores Vector Shape Layers on import.
How Do You Import Graphics into the System?
Before importing a Photoshop file into Combustion 3, set your preference for Photoshop Import Behavior. File>Preferences> Footage> General: Photoshop Import Behavior>Import Mode: Choose either Color or Color + Alpha. By choosing “Color”, no transparency information will be imported with the Photoshop file.
When importing Photoshop files into Combustion, a dialog gives details on how many layers are in the file and offers one of three Import Options:

Merged Image
The entire Photoshop file becomes a “flattened” single Layer in Combustion. Even after merging the file into a single Layer, individual Layers can be displayed one at a time through the Footage Controls>Source> Source Layer, uncheck Merge Layers and choose a layer from the drop-down.

Grouped
The Photoshop file is imported as individual layers parented to a Null Object. Each layer can be controlled and modified separately or manipulated together using the Transform Controls for the Null Object.
Nested
The Photoshop file is imported as individual layers parented to a Null Object within a Nested Composite. Each layer can be controlled and modified separately or manipulated together using the Transform Controls for the Null Object. The additional benefit of a Nested Import is that filters and Operators can be applied to the Nested Composite, affecting the entire group of layers uniformly.
How Do You Export Video Frames from Your System?
A single image can be exported from Combustion in over a dozen formats via File>Save Image with options for compression, frame size, bit depth and alpha channel. Be aware that the image is saved at Viewport Quality, so change the Viewport Display Quality to Best before saving an image.
An Image Sequence in any of the standard formats can be exported through Combustion in the menu File>Render.

General Tips On Usage
• If the Photoshop file is less than full frame (titles, icons), or larger than full frame (an image you want to “pan & zoom” around in) the square-to-non-square-pixel-ratio may not be as obvious. In this event, in the Combustion Footage Controls choose From File in the Pixel Aspect Ratio drop-down.
• If a file looks squashed or too wide in an NTSC Combustion composite and it’s origin can’t be determined, try scaling the Layer down 90% on the Y axis, if that fixes it, it was created with square pixels, most likely in Photoshop. Remember to enable Window>Use Aspect Ratio to display the proper aspect ratio in the viewport.
Author’s Credit
Lee “Rod” Roderick was handed a life sentence in video production in 1984 with no possibility of parole. He teaches and works out of North Gate Studios, his facility in Walnut Creek, California and is a Certified discreet Training Specialist for Combustion as well as a co-author of Discreet’s Combustion Courseware. Lee also produces the Combustion DVD training series “Combustion Underground” with Runaway Training –www.RunawayTraining.com. Lee’s work is not limited to graphics, he is an editor, director, producer, CD-ROM/DVD author and photographer for a wide array of clients throughout California and beyond.
Lee can be contacted at [email protected]
Thank you to Josee Belhumeur, Gary M. Davis and Ken LaRue for contributing to this supplement.
Integrating Adobe Photoshop with Sony Vegas
Why Photoshop Integration is Important for Sony Vegas
At some point, the Vegas user may need the services of an image editing application, and Adobe Photoshop is the natural choice. With Photoshop, you can create a title graphic, tweak an alpha mask, re-touch a still image, or convert a vector graphic to a raster graphic for a Vegas project.

What is the Proper Frame Size to Create Graphics for this System?
If you are working in Photoshop CS or later, you can use the built-in templates for non-square pixels. These documents will import cleanly and at the native size.
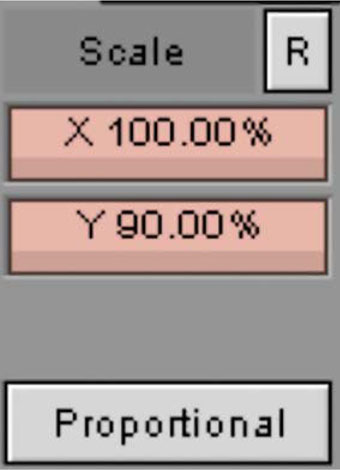
If you choose to work with square pixels, Vegas can stretch images internally, so it is not mandatory to compensate for pixel aspect ratio at the still image creation stage. If you load the image into Vegas, choose event pan/crop> match output aspect (see following graphic). Vegas will stretch the image using high quality internal scaling algorithms—you will usually notice little if any distortion due to stretching. Additionally, using this method, you will not have to resize your still images if you are rendering to multiple formats with different pixel aspect ratios.
Of course there may be times when using a pixel aspect correct source file is desirable—for instance when creating masks that will be used along with video footage, or when ultra-high quality is desired.
For DV Based Projects
| Format | 4×3 Aspect Ratio Square Pixel | 16 × 9 Aspect Ratio Square Pixel | Native Size* Non-Square Pixel |
| NTSC | 720×534 | 864×534 | 720×480 |
| PA L | 768×576 | 1024×576 | 720×576 |
* Native size is the actual frame size stored by the Vegas system and supported by Photoshop CS or later.
For Standard Definition Based Projects
| Format | 4×3 Aspect Ratio Square Pixel | 16×9 Aspect Ratio Square Pixel | Native Size* Non-Square Pixel |
| NTSC | 720×540 | 864×486 | 720×486 |
| PAL | 768×576 | 1024×576 | 720×576 |
* Native size is the actual frame size stored by the Vegas system and supported by Photoshop CS or later.
What about HD Graphics?
Sony Vegas supports different versions of HD. Sizing your graphics will depend greatly on the tape format you are using. The good news is that the presets in Photoshop work well for HD.
| Format | Dimensions | Pixel Aspect Ratio |
| HDV/HDTV 720p | 1280×720 | Square (1.0) |
| HDV 1080 | 1440×1080 | Non-square (1.33) |
| DVCPRO HD 720p | 960×720 | Non-square (1.33) |
| DVCPRO HD 1080 | 1280×1080 | Non-square (1.5) |
| HDTV 1080 | 1920×1080 | Square (1.0) |
What about Oversized Graphics?
It is possible to bring in a graphic that is larger than the screen. Make sure that the graphic is a single-layer document. If you are planning to zoom in on the graphic using motion effects within Vegas, it is a good idea to make the graphic larger than the video frame. If you double the frame size, you’ll be able to zoom in on the image with no distortion and get the “Ken Burns” look.
What File Types are Supported?
The .png format, while a little less commonly used than .psd or .tga, is an excellent choice for graphics destined for Vegas. In addition to high quality, Vegas can auto-interpret the presence of alpha channel in .png files.
| Format | Extension | Alpha? |
| BMP | .bmp | No |
| JPEG | .jpg | No |
| Photoshop | .psd | Yes |
| GIF | .gif | No |
| PNG | .png | Yes |
| Targa | .tga | Yes |
| TIFF | .tiff | Yes |
Which Bit Depths are Supported?
Vegas offers great flexibility when working with graphics.
• Vegas provides support for both 8- and 16-bits per channel
• The following color modes are supported: RGB, Indexed, Grayscale, CMYK.
• The following color modes are not supported: LAB, Multichannel.
Design With RGB or 601 Levels?
You can choose RGB or 601, depending on the destination format you are working with. If needed, color correction filters can be applied in Vegas to deal with illegal color values in RGB files. These will take longer to render, but may offer a more flexible workflow.
What Photoshop Features Import?
The first Alpha channel is properly understood on import. Do not save more than one alpha channel with your native .PSD file or it will be ignored. Feel free to use all of Photoshop’s features. If your file contains, Layers, Layer Sets, Layer Styles, Blending Modes, Vector Type, or Vector Shapes, Vegas will properly interpret them on import. The .psd files will be opened with all visible layers flattened. Alpha channel will be retained and can be enabled (with several interpretation options) in the Vegas media properties dialog.
Importing Graphics into the System
Vegas opens supported still image files like any other file type. You can adjust the alpha channel interpretation in the media properties dialog. You can also save the alpha channel settings so that any file with the exact same parameters you subsequently open will use the same alpha interpretation.
Exporting Video Frames from Your System?
Vegas can save a timeline snapshot .png (with alpha). Set the Vegas Preview window to project size, best quality cue to the frame you want to capture, apply any needed processing (filters, de-interlace etc), and Vegas will save a pixel aspect corrected still (either a .png w/alpha, or a low quality .jpeg). Timeline snapshots are WYSIWYG—what you see in the Vegas preview window is what you will see when you open the file in Photoshop for editing. In Photoshop you may need to check that the correct pixel aspect ratio was assigned (Image>Pixel Aspect Ratio).
General Tips On Usage
Rendering using the “Best” video rendering quality setting will produce the cleanest results, as the highest quality scaling algorithms are used. Render time will likely increase using “Best”, so it is a good idea to do a test render using the “Good” setting—in many cases this will look excellent and require less render time.
If you are zooming in on still images in a Vegas project, and notice flickering or “combing artifacts” in the moving image, you may want enable the reduce interlace flicker (event switch). There is no one setting that produces perfect results under any circumstance, so some experimentation is often needed to obtain the perfect look.
Author
David Hill has been involved with Vegas since 1999 and continues to work on Vegas with an exceptionally talented team of developers at Sony Pictures Digital Networks’ Media Software.