
2
Cameras and Accessories

SELECTING YOUR CAMERA
Chances are you already own the camera you’ll be using to shoot landscapes, but do read this anyway, so you know what to look for when it’s time to upgrade. Unlike the bygone days of film cameras, in which you might have used the same camera for several years, the rapid advances in digital technology and stunning improvements in image quality offered by the latest camera models encourage digital photographers to upgrade every two or three years.
NIKON AND CANON CAMERAS ARE SUPERB!
All digital cameras can produce fine landscape images, but some models are clearly better for landscapes than others. Just for the record, John has used Canon cameras for more than 30 years while Barbara shoots Nikon. You might be surprised to hear we shoot two different systems, but it makes perfect sense to us. We always know our Nikon gear is Barbara’s and Canon items belong to John, so we never get mixed up. This makes things simple, keeps peace in the family, and we each shoot what we like. Effectively teaching over a thousand photo students each year is important to us, too. Thoroughly knowing both the Canon and Nikon systems helps us teach, because the vast majority of our photography students also shoot Canon or Nikon.
If you’re deciding on a camera system to buy, what is the best choice? We really do mean buying into a system, because once you buy several lenses, accessories such as a dedicated electronic flash and, perhaps, software that is specific to your camera system, it’s very expensive to later switch to another camera manufacturer. No, this isn’t a decision to be taken lightly. We feel you can’t go wrong with either the Nikon or Canon system. Both systems offer many equipment choices, and each company is rapidly improving their products and adding useful features.
Both Canon and Nikon offer superb cameras and wide choices of lenses, including high-quality prime (non-zoom) lenses, tilt-shift lenses that control depth of field and convergence of vertical lines, zoom lenses with image-stabilization, and specialized macro lenses. Canon and Nikon each have cameras with a full-frame sensor that gives the full effect of wide-angle lenses.
Lying west of Page, Arizona, the Coyote Buttes encompass an area of spellbinding beauty. The crown jewel is the “wave,” an area of polished and twisted colorful sandstone. Access is by permit only and requires a six-mile round-trip hike, but it’s a “must do” spot for any landscape photographer. Our one-day, dawn-to-dusk visit remains one of the highlights of our careers and we hope to return soon.

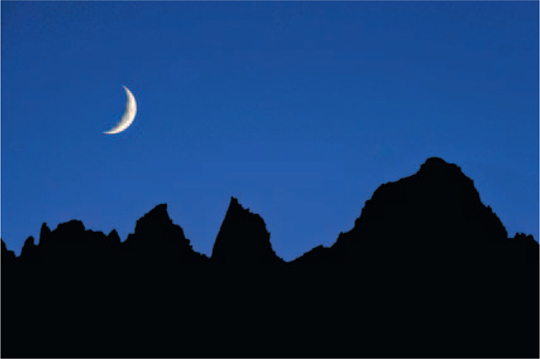
Some digital cameras like Barbara’s Nikon D3 (and many other Nikons) can shoot double exposures. She photographed the peaks of Mt. Whitney in silhouette first. Then she changed the exposure to properly expose the bright crescent moon that was floating high above the mountains. This process enabled her to move the moon closer to the mountain peaks, eliminating a large expanse of empty sky while retaining detail and color in both the night sky and the moon.
OTHER EXCELLENT CAMERA SYSTEMS
Several other companies build digital camera systems and they make fine equipment. The major players include Sigma, Fujifilm, Pentax, Sony, Panasonic, Samsung, and Olympus. Their cameras are perfectly capable of shooting superb landscape images, but their overall systems are considerably smaller than the Canon and Nikon systems, leaving nature photographers with far fewer choices of lenses and accessories.
All of these companies are expanding their lines of equipment, but they often lack long macro lenses in the 200 mm range and good choices of long telephoto lenses for wildlife photography. If you wish to seriously pursue close-up photography, you would miss not using a long macro lens. If you decide to photograph wildlife, then having the opportunity to use long lenses in the 500 mm range is desirable. Both Canon and Nikon have 500 mm f/4 and 600 mm f/4 prime lenses. However, this book is about landscape photography, and long macros and super telephoto lenses are seldom used by most landscape photographers.
The dawn sun wonderfully highlights the back-lit foxtail grass that flourishes in the meadows around Mono Lake. By using the tilt features of a Canon 45 mm T/S lens and waiting for a lull in the light breeze, these grasses were sharply focused throughout the image.

If you primarily want to shoot landscape images, then any of these camera systems can provide what you need, unless you love tilt/shift (T/S) lenses like us. As long as the system you select covers the focal length range of 16 to 400 mm with fixed focal length or zoom lenses, your landscape imaging needs are well covered. Sony is known for fine products, and seems determined to dominate the digital single-lens reflex (DSLR) camera market, so keep an eye on them. They are still behind Canon and Nikon in early 2009, but they may close the distance in the future. We hope all of the other camera companies challenge Canon and Nikon, because this encourages everybody to produce better products at lower prices, a situation that substantially benefits all photographers.
MEDIUM-FORMAT CAMERAS
Medium- and large-format film cameras were the tools favored by most serious landscape photographers before the digital revolution. By 2005, DSLR cameras were producing better images than medium-format film cameras, so the popularity of medium-format cameras declined quickly, soon losing out to digital capture. However, medium-format digital cameras are beginning to regain lost ground among landscape photographers. These cameras offer huge megapixel counts; for example, the Hasselblad H3D has 31 megapixels. This camera produces a fine digital image with low noise, increased dynamic range, great color, and has so many megapixels that huge images of 4 × 6 feet or larger can be made while retaining excellent detail. Unfortunately, in early 2009, this fine camera costs more than $20,000, and you still have to buy some lenses for it! Few nature photographers can afford it, including your authors. If, however, you want to specialize in landscape photography and have the money to spend, you might consider checking out digital medium-format options. The major players are Hasselblad and Mamiya. We haven’t gone to digital medium-format because they are so expensive, especially when you consider how rapidly the present state of digital technology goes out of date. Furthermore, it would be terribly detrimental to our teaching capability if we shot camera systems that none of our students used. Still, digital medium-format cameras are a viable option for the wealthy among us.
IMPORTANT CAMERA FEATURES
MEGAPIXELS
The camera’s digital imaging sensor is made up of tiny pixels (short for picture elements) that record and quantify the light that strikes them. Pixels are all the same size in a given sensor (in most cases), but vary in size among different sensors. Larger or smaller pixels; they’re all very tiny. If you multiply the number of pixels in the width of an imaging sensor by the number of pixels in the height, you find the total number of pixels in the sensor. For example, the Canon 1Ds Mark II has a sensor with a width of 4992 pixels and a height of 3328 pixels. Multiplying those two numbers gives a total of 16,613,376 pixels. The number is rounded off and the camera is called a 16.7 megapixel camera, where mega is a prefix meaning millions. Nikon’s D3 has 12.1 megapixels while Canon’s 1Ds Mark III has 21.1 megapixels.
The number of megapixels can be increased by making pixels smaller or making the imaging sensor larger. Both the Nikon D3 and the Canon 1Ds Mark III have a full-frame sensor with no crop factor. A full-frame sensor is a sensor with a size approximating that of a single frame of 35mm film, and crop factor describes the relationship between the size of a full-frame sensor and the size of some smaller sensor. Meanwhile, the Canon 1D Mark III has a smaller sensor (1.3 × crop factor) and 10.2 megapixels (MP). The imaging sensor is smaller and it contains fewer pixels. Both of these Canon cameras were introduced in 2007 and both were aimed at the advanced amateur and professional markets. Why would a professional photographer, who can buy either camera, select the Canon 1D Mark III with 10.2 MP over the Canon 1Ds Mark III with 21.1 MP?
DISADVANTAGES OF MORE MEGAPIXELS
Having more megapixels isn’t always an advantage and is sometimes detrimental to shooting fine images. First of all, cameras with a lot of megapixels and a full-frame sensor are much more costly than cameras with a smaller sensor, so price is significantly affected by the pixel count. Secondly, a high-megapixel camera shoots larger image files and operates more slowly because it takes longer to transfer the sensor’s data to the memory card. Thirdly, the memory card will hold fewer of the larger images so it takes longer to download the large files to the computer and hard drives will reach capacity more quickly. Most of these problems can be solved by using larger capacity storage devices and by being a bit more patient waiting for the files to be written.
The more important drawback to shooting images with large megapixel counts is that you can miss images altogether, because either the camera’s buffer is full or the shooting speed is too low for fast action. While this is more of a consideration for action (wildlife and sports) photographers than landscape shooters, we rarely meet folks who are exclusively one or the other. So let’s look at each of these factors in detail because they’re critical to getting or missing images in some circumstances. Canon’s 1Ds Mark II, for example, shoots 16.7 megapixel files. The large amount of data requires more time to be transferred to the camera’s buffer so the fastest speed at which this camera can shoot images is four frames per second. When shooting, data from the sensor are sent to a temporary storage area called a buffer and then written to the memory card. Let’s consider an analogy. As you put water into a bucket having a hole in the bottom, it’s leaking out, but if you put water in faster than it leaks out, you’ll eventually have a filled bucket. So it is with your digital camera’s buffer writing to card memory!
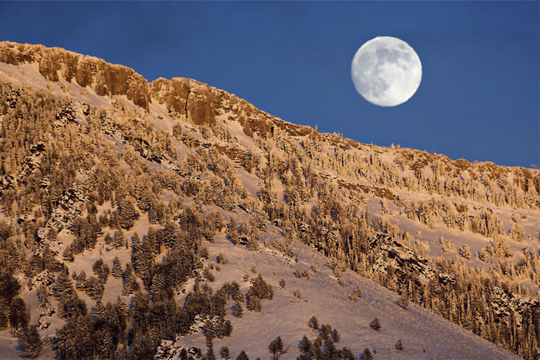
A 500 mm lens captured this moon rising over Black Mountain in Idaho. Since the mountain was still lit by the setting sun, a single image easily captured detail in both the mountain and the moon. We often use telephoto lenses to make landscape images.
We love how the red light at sunset beautifully colors this back-lit Lake Superior wave. We used a cable release to precisely catch the peak of the action.

When shooting, every shutter press causes picture data to leave the sensor and move into the storage buffer, which is faster. These data reside in the buffer while being written to the memory card, which is slower. Thus, when shooting too fast, the buffer can become filled (just like the bucket!), which prevents any more data from entering and temporarily shuts down the camera.
On this particular camera, the buffer can store ten 16.7 megapixel RAW images before it fills. As said, once the buffer is full, you can’t shoot another image until enough data have been written to the memory card and buffer space becomes available for at least one more image. At a shooting rate of 4 frames per second (fps), you can see that holding the shutter button down during peak action will disable the camera in 2.5 seconds because the buffer fills to capacity with 10 images. Photographers define the burst depth of a camera as the number of images you can shoot continuously before the buffer is full.
As we said above, having a large burst depth is clearly advantageous for action, but not as critical for landscape photographs. Shooting 4 fps sounds fast, but it’s actually slow for some action photography, so you might miss a lot of good images. It isn’t nearly fast enough for birds in flight or running cheetahs, even if it’s plenty fast enough for nearly all landscape images. However, sometimes action and landscape shooting coincide: If you were photographing a tornado zigzagging across the prairie or a wave crashing into a rocky shoreline, you might wish to shoot faster than 4 fps.
Landscape photographers aren’t often concerned with a camera’s shooting speed or burst depth. They tend to shoot relatively static subjects. So, if you’re exclusively a landscape photographer, you don’t need to put too much emphasis on either factor as you evaluate cameras. However, since many landscape photographers often train their cameras on subjects other than landscapes, firing speed and burst depth might be important to you.
ADVANTAGES OF MORE MEGAPIXELS
The landscape photographer’s limited concern with shooting speed and burst depth allows him to benefit from having more megapixels available. More megapixels are an advantage in making larger prints. Indeed, having more megapixels is more about size than about quality. For an 8 × 10 inch print, you probably couldn’t see a difference in print quality between the average 8 MP DSLR and the 21.1 MP Canon EOS 1Ds Mark III. But, if your print will be 4 × 6 feet in size, the 21.1 MP image file will easily produce a sharper image. For example, remember that the pixel dimensions of the Canon 1Ds Mark II sensor are 4992 × 3328 pixels. Limitations in ink technology and the inability of our eyes to resolve very fine detail seldom warrant making prints with resolutions greater than 300 pixels per inch (ppi). Most people couldn’t see the difference if higher ppi values were used. If 4992 pixels and 3328 pixels are divided by 300 pixels per inch, the resultant print size for 300 ppi is 16.64 × 11.09 inches. This is called the native resolution for 300 ppi. Computers, though, can use an interpolation process to synthesize additional pixels that lie between native pixels and allow even larger prints. Interpolation works well, but at some size, you start to seriously lose detail.
The 500 mm lens is perfect for capturing this wildlife landscape of a white-tailed eagle dropping its legs to land on sea ice in northern Japan.

As a landscape photographer, you must consider your needs and budget. An 8 MP DSLR easily produces a beautiful 16 × 20 inch print. With a colored border added to the print, you could go 20 × 24 inches. Do you want to make larger prints? If you don’t, the 8 MP camera is all you need and anyway, most consumer-level cameras have more than 8 megapixels. You can buy an 8 MP DSLR for well under $1000. If you want to make huge prints and you have the money to spend, then more megapixels give an advantage to the landscape photographer. If you want to sell landscape images for calendars or books, or you want to enlist a stock photo agency to sell your images, it doesn’t hurt to shoot the high-end cameras if you can handle their hefty price, which falls into the $4000 – 8000 range. Of course, DSLRs of any price range involve no incremental film or processing costs, so they end up cheaper to use than the initially less expensive film cameras. That’s dramatically true for high-volume shooters. At least we look at it that way and it works for us.
Having more megapixels is again an advantage if you must substantially crop the image. Perhaps you took a beautiful reflection at a lake near your home, but the strip of sky at the top was grossly overexposed and had no detail at all. You could still make a nice print by cropping out the overexposed sky and leaving in the enchanting reflection. If you cut 25% of the pixels out of a 12 megapixel file, you still have 9 megapixels left, which are perfectly capable of making a 16 × 20 inch print. If you started with only a 6 megapixel file, cropping out 25% of the pixels or 1.5 megapixels leaves you a little short for making a super sharp 16 × 20 inch print.
(a, b) Micah is our good friend who packs the mules and cooks the meals on our backcountry photo tours. Having a larger 16.7 megapixel camera is a huge advantage if you must crop the image. We didn’t want the boring sky, but knew it could be successfully eliminated later.

HIGH MEGAPIXEL COUNTS AREN’T EVERYTHING
All pixels aren’t created equal. Most point-and-shoot pocket cameras have 7 megapixels or more, but a large print from these files won’t have near the quality as an equally sized print from a 6 MP DSLR. The DSLR has a bigger imaging sensor, so its pixels are larger than those of the point-and-shoot cameras. Larger pixels count photons better, thus offering far better noise performance than point-and-shoot cameras with their very small pixels. (Yes, digital noise in your image can be reduced not only by using a camera with larger pixels, but also with any camera, by properly exposing the scene, and by using noise-reduction software such as Nik’s Dfine, Noise Ninja, and Noiseware in your post-capture editing.) However, noise reduction software isn’t our focus here: We’re interested in suitable camera equipment for the best landscape photography.
The lower noise of cameras with larger pixels means the camera can be used at higher ISO values with less noise-related image degradation. Higher ISOs make shooting in low light easier while maintaining good image quality. Was there ever a dedicated landscape photographer who didn’t welcome the occasional opportunity for improved dim-light shooting?
Digital noise is caused by pixel errors that show up primarily in the dark areas of an image. Pixel errors generally appear as unexpected bright or dark pixels (luminance noise) or as specks of red, green, and blue color (chrominance noise). Of the two types, chrominance noise is a greater problem, but both should be minimized whenever possible. When you make a print, digital noise looks a little like film grain, but as we saw above, noise can be minimized by choosing a camera with larger pixels, by properly exposing the scene, and by using noise-reduction software.
A sensor with large pixels is better able to accurately capture the color and detail when photographing in extremely dim light, as is often the case in slot canyons like this one near Page, Arizona.

SENSOR SIZE
Imaging sensors in different cameras aren’t standardized sizes. For example, Canon offers the full-frame sensor on the EOS 5D, 1Ds Mark II, and the 1Ds Mark III. This sensor size is equivalent to the size of a 35mm slide image. The Canon EOS 30D, 40D, 50D, and Digital Rebel XSi all use a smaller sensor with a 1.6 × crop factor. The Canon EOS 1D Mark III uses an in-between sensor size with a crop factor of 1.3 ×. Nikon also builds both full-frame cameras (these presently include the D3x, D3, and D700) and cameras with a smaller sensor, such as D300, D200, D80, etc. Nikon refers to the smaller sensor as the DX format, and even manufactures some lenses specifically for that format. We photographers benefit enormously from the manufacturers’ ability to vary sensor sizes to suit various purposes.
First, let’s wrap our brains around just what the crop factor is really all about. Some call it the magnification factor while others call it the lens conversion factor. Everyone is referring to the same thing, but we prefer to use the term crop factor because calling it a magnification or lens conversion factor isn’t really accurate. A 300 mm lens on a 35 mm film SLR and on a digital camera with a full-frame sensor will record images of the same size. If you switch to a camera with a 1.5 × crop factor, such as most of the Nikon DX cameras, the imaging sensor is smaller. A smaller portion of the subject fills that smaller sensor, giving a specious sense of magnification that falsely implies an increase in the focal length of the lens, as if the image was the same as that taken by a 450 mm lens on a full-frame sensor. However, the focal length of 300 mm is a fixed attribute of the lens, and can’t be converted by changing sensor sizes. However, the lens does appear to give you the framing that you might enjoy with a 450 mm lens. Yes, the size of the subject appears to be larger in the viewfinder, but the magnification isn’t really greater. If everything else remains the same, such as shooting distance and focal length, a camera with a smaller sensor is merely cropping the image that would be recorded with the same lens on a full-frame sensor. The image really isn’t magnified, nor is the lens magically converted into a longer focal length. If distance and lens type caused a picture of you to just fit in a full-frame sensor, and if that distance and lens type were maintained, your image on a smaller sensor would have your visible body the same size as before, but your hat and legs might be missing! It’s just as if the full-frame image had been cropped.
The crop factor of most DSLRs isn’t the same as greater magnification, but with a given lens, a given subject fills more of the sensor and fills more of the viewfinder; both are a gratifying illusion when you’re wishing for a longer lens.
SMALL SENSOR ADVANTAGES
Be aware that the considerations here aren’t really photographic advantages, but rather cost-related ones:
1. Smaller sensors are much cheaper to build. Additionally, if the smaller sensor has correspondingly fewer pixels, then all of the camera’s other electronics are simplified, battery requirements are lessened, the camera can be smaller, weight is lower, lenses are simpler and cheaper, and the simpler camera has lowerwarranty costs, packaging and shipping costs, and on and on and on. It all results in a much lower camera cost.
2. The seemingly greater magnification caused by the crop factor of a small sensor is helpful when you wish to fill the frame with a distant landscape but don’t have a full-frame camera with a longer focal-length lens. Again, this is primarily a cost advantage rather than a photographic one: You still get a cropped image.
3. The viewing angle of the lens is smaller when the image is focused on a small sensor, so it’s easier to keep distractions out of the background.
4. Many companies design and manufacture special lenses for use on camera bodies that have a crop factor, because those bodies form the largest market segment of digital cameras. The lenses don’t have to produce as large an image circle as lenses for full-frame sensors, so they can be smaller, lighter, and less expensive.
5. Small sensors seem to attract less dirt, and are easier to clean than a full-frame sensor.
6. The small sensor, when used with a lens designed for full-frame sensors (the overwhelming majority of lenses), uses only a portion of the lens’ image circle. It’s the portion nearer to the center of the image circle, an area often called the sweet spot because it’s the area of optimal lens performance. The bottom line is that the image on a small sensor may be sharper overall than a full-frame image made with the same lens.
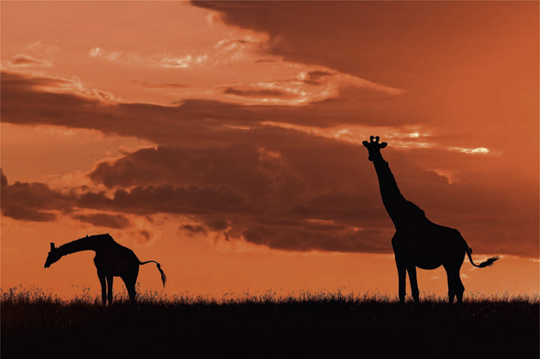
We used a longer focal length from below the hill to isolate these Maasai giraffes against the reddest portion of the evening sky. The camera’s crop factor helped us exclude unwanted elements from the image.
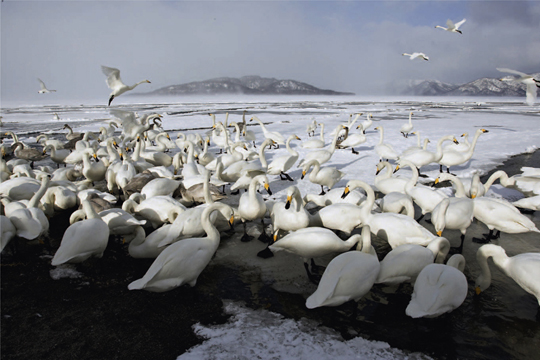
John used his Canon 1 Ds Mark II to make this wildlife landscape of whooper swans in Japan. This camera has a full-frame sensor (no crop factor), so his 17–40 mm lens set at 17 mm maintained a true wide-angle view.
SMALL SENSOR DISADVANTAGES
1. The sensor contains fewer light-sensitive receptors, called photo sites, or pixels, so the camera’s megapixel count is lower.
2. If a small sensor has a larger number of pixels, the individual pixels must be smaller. Smaller pixels don’t record light as well, resulting in reduced color accuracy and increased digital noise.
3. Small sensors normally have fewer pixels than full-frame sensors, so you can’t crop their images as much and still maintain the high resolution you may want for your large prints.
4. Probably the most serious problem for the landscape photographer is the crop factor of the small sensor when the image will require use of a wide-angle lens. A crop factor of 1.5 × will cause a 20 mm wide-angle lens to act like a 30 mm lens (20 mm × 1.5 = 30), so you lose the wide field of view of the 20 mm lens. Wide-angle lenses are enormously effective for many landscape images, but they won’t seem as wide with the crop factor of a small sensor.
LARGE LCD MONITOR
Photographers prefer large LCD monitors on the backs of their cameras. Early digital cameras had small monitors, but later monitors have gradually grown. A 2.5-inch (diagonal) monitor is the minimum you should accept today, although we think that a 3-inch monitor is much better. Also, a monitor that displays more pixels produces a sharper image that’s easier to check for sharpness and content. We use the monitor primarily to view our menus when changing settings and to check the histogram and highlight alert when determining proper exposure. Many photographers use the monitor to check their composition, lighting, and sharpness. We don’t use the monitor for these things because we know the composition and lighting before we shoot the image. Our shooting habits enable us to easily get perfectly crisp images, so in most situations, there’s no need to check for sharpness either.
The greatest irritant to LCD monitor use is the difficulty seeing its image clearly in high ambient light levels. Stated simply, the sun wipes out the image! Our solution is to use a viewing device called the HoodLoupe. It hangs from a thin, lightweight strap worn around the neck and, when needed, is placed against the monitor. The user examines his image by looking through the HoodLoupe eyepiece while the loupe blocks out the irritating ambient light. The loupe can be adjusted for the user’s eyesight and permits him to examine the image’s finest details.
LUMINANCE AND RGB HISTOGRAMS
All digital cameras offer a histogram to check the exposure. Using the histogram is the best way to ensure the very best exposure, so be sure to activate it. In most cameras, it can be turned on somewhere in the menu and viewed on the LCD screen. The typical histogram is the luminance histogram, although Canon calls it the bright histogram in some of their camera manuals and others just call it the histogram. This histogram charts your pixel values from pure black with a value of zero to pure white at the 255th value. Most digital cameras have three color channels (red, green, and blue), although some systems offer slightly different schemes. The luminance histogram averages the three color channels and charts the results. Once you understand how to interpret the histogram (discussed in Chapter 4, Mastering Exposure), shooting terrific exposures is easy.
There’s a problem with the luminance histogram, though. It’s possible to clip one and even two color channels, yet when the three color channels are averaged together, no clipping is shown. Clipping a single color channel could cause a loss of detail in important areas of the subject, so it’s normally avoided. For example, photographing a subject with a lot of red, such as a scene full of red maple trees during autumn, could easily clip the red color channel because so much red light is striking the sensor. This leads to a loss of detail in the red leaves. (By the way, Barbara finds that clipping the red color channel is especially problematic when making her fine art prints because red objects lose their detail so completely. So if nothing else, don’t overexpose the reds!)
Any scene with an abundance of one color like this red dawn background is prone to clipping a color channel. Using the RBG histogram option provides an individual histogram of each color channel, so clipping can be avoided. The white-backed vulture lifting off this acacia tree is a typical scene at dawn in Kenya’s Maasai Mara Game Reserve.

Many cameras now have another histogram choice that goes by a variety of names. Some call it the color channel histogram. We prefer to call it the RGB histogram for the red, green, and blue channels mentioned above. This histogram display shows an individual histogram for each separate color channel along with an overall luminance histogram. The RGB histogram is simple to use, and will help you capture the optimum exposure for most scenes. It displays the histogram for each individual color channel and can be used to avoid overexposing any of the color channels, so no important detail is lost in the image. The RGB histogram is a powerful feature, so make sure your camera has it before buying a new DSLR.
MIRROR LOCKUP
A DSLR mirror, in its normal movement, causes the camera to vibrate ever so slightly, which can cause a slight loss of image sharpness when shooting at shutter speeds in the 1/4 to 1/60 second range. Accordingly, many cameras allow the mirror to be locked before shutter release to reduce camera vibration. Make sure your intended camera purchase has the mirror lockup feature and, if yourpresent camera has it, be sure to use it whenever appropriate.
Some cameras have their mirror lockup switch on the camera body, but most digital cameras with mirror lockup offer a custom function to set it. Mirror lockup is especially useful to landscape and close-up photographers, so it’s well worth having and using. We’ll discuss strategies for using this feature in more detail in Chapter 5.
SELF-TIMER
A self-timer is a useful accessory for landscape photographers. All cameras have a self-timer, and the default setting is typically ten seconds. One example of self-timer use is when the photographer mounts the camera on a tripod, activates the self-timer, pushes the shutter button, and runs around the camera to enter the scene to be photographed within it. The typical default ten-second delay works great for that scenario, but isn’t very useful for some other purposes. Fortunately, many cameras allow user adjustment of the delay time. Landscape and close-up photographers often prefer a shorter self-timer delay. A two-second delay is often used to obtain sharper images by reducing camera shake. Suppose, on your tripod-mounted camera, you push the shutter-release button very gently. That gentle push and the resulting mechanical motion of the mirror join to cause a slight vibration in the camera. In turn, that vibration can cause a certain unsharpness when shooting at shutter speeds from 1/4 second to 1/60 second. The self-timer eliminates vibration caused by that button push and, as said before, mirror lockup eliminates that vibration caused by the mirror. When using vibration reduction the photographer generally wouldn’t want to wait and waste the default ten seconds and would prefer to set her self-timer to a more convenient two seconds.
CABLE RELEASES
The cable release is another important aid to image sharpness. Camera vibration and resulting image softness are reduced by isolating the photographer’s hand from the camera. You should always be using a camera that can be fired by a cable release. Older cameras used a mechanical cable release and modern cameras use an electrical cable release. The modern electrical release comprises a hand-held push button, a flexible connecting wire, and a mating connector for the camera.
Some of today’s cameras eliminate the cost and reliability issues of an on-camera connector by using a cable-free remote release that operates by infrared light or by wireless radio, just like your TV remote. Infrared and radio releases share the upside of allowing greater distances between the camera and photographer. One downside with some models is that the remote release can only fire from in front of the camera, since that’s where the infrared sensor is. They also need batteries and are easily lost. Come to think of it, cable releases are easily lost, too! We once found a cable release in a meadow where we had been taking photo students for many years. It had obviously been lost years earlier because it was badly rusted, but it still had the red ribbon that had been tied around it to help the owner see it. Mechanical or electrical, cable-attached or remote, optical or radio, an off-camera release is an important weapon in the never-ending battle for sharper images.
Palette Spring at Mammoth Hot Springs in Yellowstone offers wonderful patterns. Since wind can’t wiggle the subject, this is the perfect time to use mirror lockup, f/16 depth of field, and the 2-second self-timer to trip the shutter for maximum sharpness.

Scott Falls is an adorable tiny waterfall, especially after a recent rainstorm. The orange and red maple leaves nicely fill in the foreground. Steady breezes tend to be common during Michigan’s autumn season, so use a cable release to fire the camera when the leaves are motionless. We call this “catching the peak of stillness.”

SPOT METER
A spot meter measures the light reflected from a very tiny 2 or 3% of the scene. In the past, we used manual exposure, spot-metered some part of a scene, adjusted the exposure for the tonality (reflectance) of the metered area, and shot. This was a very effective way to expose slide film, and works every bit as well for digital capture. However, we’ve recently modified our exposure techniques to take advantage of the digital histogram and the highlight alerts (blinkies), so spot-metering isn’t nearly as valuable to us now.
CUSTOM FUNCTIONS
Sadly, far too many photographers never take advantage of the custom functions that nearly all cameras have. Custom functions let you program the camera to reflect your personal shooting techniques and styles. You probably won’t use the majority of the custom functions — few photographers do — but some of the functions can be very important to the enjoyment of your camera and to your photographic success. Make sure that any camera you buy has custom functions and diligently check each one to see if it might be helpful to you. We’ll go over custom functions in detail in Chapter 5.
MEMORY CARDS
Digital images are first sent from the sensor to the camera’s internal buffer and then written to a memory card. There are several configurations of cards, and depending on your camera, you may require a Compact Flash (CF) card, a Secure Digital card, a Memory Stick Pro Dual, or some other type of card. Some cameras have slots for two different types of cards, and some, like the Nikon D3, have slots for two cards of the same type. Four of the best known manufacturers of memory cards are Delkin, Kingston, Lexar, and SanDisk. We’ve used SanDisk CF cards for all of our digital shooting, have never had a problem with them, and we can recommend them from several years of personal experience.
We love custom functions! They let us configure our cameras so they work the way we want them to. Here, we used custom functions to set mirror lockup, back-button focusing, highlight tone priority, and live view exposure simulation. These frosted plants grow along the Madison River in Yellowstone.
The prices of memory cards, like prices of most digital equipment, have decreased over the years while the card speed, capacity, and reliability have increased. A one gigabyte (1 GB) Compact Flash card was considered huge only a few years ago. Today, though, even low-end DSLRs shoot image files upwards of 10 megabytes (10 MB), so it’s more convenient to routinely use memory cards with greater capacity. We currently (early 2009) use SanDisk Extreme IV cards that hold 8 GB and 16 GB of data. A 16 GB card can hold around 1600 10 MB files. It’s surely a lot smaller, lighter, and cheaper than the 45 rolls of film needed for 1600 images! These big cards can be purchased for less than $250, a price likely to drop in the future. Notice that all memory cards of a given capacity aren’t the same. Some cards can be written to, and can write, faster than other cards. We strongly recommend that you use the higher speed memory cards that permit faster camera operation. We freely admit that card speed isn’t critical for landscape photographers, but you’ll certainly appreciate that increased speed if you shoot action images. Additionally, the larger file sizes of many newer cameras will make you appreciate the larger capacity and faster memory cards.
Some argue that it’s better to use more smaller capacity cards than fewer larger capacity cards so you won’t have all of your image eggs in one card basket. But, goes the counter-argument, by using a greater quantity of the smaller capacity cards, you increase the statistical likelihood of card failures and of misplacing a card. The more relaxed pace of landscape photography makes it less critical but, in wildlife photography, we find that smaller cards always seem to become filled at the most inopportune times and that increases our chances of missing a good shot. There’s no right or wrong choice here. It depends on your needs and how you feel.
USE MEMORY CARDS PROPERLY
Knock on wood, we’ve never lost an image from the malfunction of a SanDisk card. Some of our students have, so we know it’s always a risk. We do know that using cards properly will reduce your risk of lost images. How do you use a card properly?
1. Never let the camera’s battery go completely dead while you’re photographing. Losing power while data are written to the card can easily corrupt not only the image written, but all the other images already on the card. Always keep your camera batteries as near to fully charged as practicable.
2. Never delete individual images from the card, and download all of the images on the card to your main storage device as soon as practicable. We download the images to our computer’s hard drive and then download a backup copy to an external hard drive.
3. Once you have a backup of your images, re-insert the memory card into its camera. Erase the images, not by using the camera’s erasing option, but by formatting the card. Do not format the card in your computer, it might cause the card to malfunction in the camera. Format only in the camera!
4. Don’t permit the ingress of dirt. Certain card types, such as the popular CF card, have scores of tiny holes in the card into which even tinier pins of the camera are inserted for electrical contact. These itsy-bitsy holes in the card are easily plugged by pocket and purse lint and debris and can cause very expensive camera damage when the card is inserted into a camera. Our point? Don’t put these cards into your pocket or purse without protection by some kind of card case!