6
Light on the Landscape

LIGHT MAKES THE IMAGE
It’s no secret that light is extremely important to making consistently wonderful images of the landscape. Everyone seems to know that, which makes us wonder why so many landscape images are marred by mediocre light. Shooting in light unsuited for the subject is a sure-fire recipe for lousy and very forgettable images. Pleasing and memorable landscape images demand light with the right combination of attributes. Color, contrast, and direction must all work together to enhance the scene! Photography captures only the light, and it’s crucial to your image.
Some argue there’s no such thing as bad light. In very limited ways, we agree. Any light can make good images, if used for an appropriate subject. Natural light can often be modified with reflectors, diffusers, filters, or flash to make subjects more photogenic. However, some light is just horrible for some subjects, no matter how skillful the photographer. For example, bright sunshine on a waterfall surrounded by trees and bushes is a photographic disaster! The difference in brightness between the whitest water lit by the sun and darkest shadows of the foliage and black rocks is just too much contrast for the camera’s sensor. The image either loses important highlight detail or it suffers noise, poor colors, and detail loss in the shadows or, in extreme cases, both. In that light, you can favor the highlights or you can favor the shadows. Pick one. Either pick ends up with a terrible image. (Hint: Photographers who must pick one will always favor the highlights!) Cloudy days and full shade both offer the soft and low-contrast light that’s so much more suitable for making a fine woodland waterfall image.
Wind and light combine to restrict what landscapes can be successfully photographed. We have taught field photography workshops in the gorgeous and uncrowded Upper Peninsula of Michigan each year since 1985. During the fall color workshops our students frequently ask where we’ll be going the next morning, and our answer is: It depends on the light and the wind, so we’ll decide early tomorrow morning just as we’re leaving.
It doesn’t happen often enough. The combination of totally still water, intense autumn color reflections, golden light at dawn, and black storm clouds in the western sky is a sure-fire recipe for dramatic images.

If morning brings clear and calm conditions, we go for autumn color reflections in the quiet waters of inland lakes. If conditions are clear and windy, waves ruin the reflections, so we look for landscape opportunities along the rocky coastline of Lake Superior. Hopefully, the wind is out of the north, as it often is during that time of the year, causing spectacular waves to crash onto the rocky shoreline and offering rich opportunities for dramatic images.
If the new day dawns cloudy and calm, then the lake reflections have muted colors. So we don’t hit the lakes. Instead, we look for colorful trees that offer pleasing compositions of branches and leaves, always reminding students to avoid any white or gray bland sky that may be offensively visible through the leaves. We do stay close to the lakes, though. Sometimes the morning sun slips through a hole in the clouds and provides marvelous images of autumn reflections in a lake, dramatically emphasized by ominous black storm clouds.
Cloudy and windy is a tough combination, unless you like images of blurry leaves. Yes, at times that can be artistic (in small doses), but not generally. Instead, we seek secluded waterfalls that are tucked into canyons facing away from the wind. High winds can sway the vegetation surrounding the waterfall, but they don’t affect the rocks, and rarely the water, so even high winds can permit nice images.
With a little practice, everyone can learn to select good photo locations suited to the prevailing weather conditions. Selecting the right spot is at least 50% of the battle for fine images. Always consider a wide range of possibilities and then carefully select your destination. We listen to weather forecasts, but we know from decades of bad experiences that many weather guessers have low success rates. Don’t be afraid to change your destination when weather changes. We sometimes announce our photo destination, only to switch to an alternate spot en route when the weather suddenly changes.
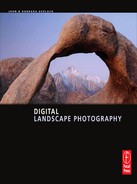
The light is dim in this slot canyon near Page, Arizona. Fortunately, new digital cameras produce much better quality when used for long exposures measured in seconds and at higher ISOs.
LIGHT QUALITIES
Light has four distinct qualities: amount, color, contrast, and direction. Those four qualities are each important to the making of fine images. Of the four, we believe that contrast and light direction are the most important to the landscape photographer. Let’s look at each of the four qualities.
AMOUNT
This is the easiest one to understand and manage when making wonderful landscape images. It simply refers to how much light is illuminating the scene. Too many of us have been programmed to shoot in bright sunlight shining over our shoulder. A bright sun high in the sky gives the worst possible light for the vast majority of landscapes, because that light is extremely contrasty, giving muted colors and ugly harsh shadows. As always, there are exceptions. For example, we’ve made many pleasing images of slot canyons at noon on sunny days because we needed a high-in-the-sky sun to penetrate the slot and illuminate the canyon walls.
There always seems to be one or more exceptions that contradict any photographic rule, but here’s one strong guideline: A clear morning has its best light starting about an hour before sunrise and continuing until a couple of hours after sunrise. Likewise, the best evening light begins a couple of hours before sunset and continues until the final colors disappear, perhaps an hour or more after sunset.
The direction of the sun at sunrise has a substantial effect on the period of golden light. That period is much longer in high-latitude locations, such as within the Arctic Circle, Alaska, and Antarctica. In North America, the golden light lasts longer in the winter, because in summer, the sun rises farther north and more quickly. The beautiful red and gold ambient light of dawn and dusk certainly varies with the latitude and seasons, but the day’s earliest light and its latest light nearly always produce excellent lighting for outstanding landscape images.
Low light is a minor issue for landscape photographers. The amount of light can be extremely low on cloudy mornings and cloudy evenings, too, when the sun is low in the sky. The absolutely invariant use of a good tripod and the other techniques for shooting sharp images, as discussed in Chapter 5, are very important for successful low-light landscape work.
If you’re inclined to shoot hand-held in light so dim that you need to take heroic measures, you can help by bracing your camera against any available steady object, such as a fence railing, a tree, the car hood, or even the aforementioned sober friend. You can use shorter lenses, raise your ISO, and use a larger aperture to permit higher shutter speeds. If available, turn on your anti-shake system. All of that will help. But the real solution, in case you missed it before, is the absolutely invariant use of a good tripod.
POLARIZING FILTER
All landscape photographers should make routine use of this important filter. Glare, scattered light, and polarized light are present in all scenes, no matter if they’re illuminated by sunshine or by the diffused light of a cloudy day. The polarizer removes subject glare, removes unwanted reflections, darkens blue skies and enhances white clouds, reveals greater subject detail, and provides more color saturation. Polarizers are so important that you should have one to fit every one of your lenses. The lenses we use for most of our landscape images have filter-thread sizes of 77mm, 72mm, 62mm, and 58mm, and we have a B + W circular polarizing filter for each of those sizes.
This autumn scene stands out because it’s bathed in the last golden light of the day. A circular polarizing filter removed much of the glare from the water and shiny leaves.

Several of our lenses each have the popular 77mm thread, so we move our one 77mm polarizer from lens to lens as needed. Some photographers have only a single polarizer, one that fits the largest thread size in their lens arsenal, and they use adapter rings for the smaller lenses. This reduces cost, because only one polarizer is needed and the adapter rings are relatively cheap. However, some workshop students have found this scheme to be inefficient. Adapter rings get lost. They also get twisted, distorted, deformed, bent, warped, worn, and broken, which can cause them to be difficult or impossible to install and can cause them to be equally difficult or impossible to remove. We just don’t recommend them.
Polarizers come in two basic types: older ones called linear polarizers and newer ones called circular polarizers. The terms define only their optical characteristics, not their physical configuration. Indeed, they look alike. The metering and autofo-cus systems of modern cameras may or may not work properly with linear polarizers, so it’s best to buy and use only circular polarizers.
Polarizers tend to give a slight blue cast to the image, so warming polarizers with a slight yellowish tint were developed to help cancel the blue cast. Film photographers routinely need warming polarizers, but digital photographers can so easily manipulate color-cast with the camera’s white balance controls and with post-capture editing software that they have little need for warming polarizers.
If you’re buying a polarizer, get a good quality multi-coated circular polarizer, such as those made by B + W, Tiffen, Canon, or Nikon. Polarizers comprise two circular discs of special glass housed next to each other in a two-piece metal mounting ring. The rear disc is adjacent to the lens and remains stationary. In use, the photographer manually rotates the front disc to achieve the desired polarization effect.
As you know, adding extra glass to the optical path will cause a slight loss of sharpness and can worsen flare problems. However, the polarizer’s many benefits more than compensate for the slight loss of sharpness. Nonetheless, you should minimize that loss and minimize flare by spending the extra money to buy only high-quality multi-coated polarizers.
Using the Polarizer on a Sunny Day
Polarizing filters effectively remove polarized light except on one plane from the blue sky, darkening the sky, saturating the colors, and making the white clouds more prominent. It’s possible, though, to make the sky too dark, unnaturally so, especially at elevations above 5000 feet. It’s easily avoided — merely turn the polarizer to something less than maximum polarization.
Polarizers show the greatest effect when shooting at right angles to the sun; that is, polarization is zero at 0 degrees and is maximum at 90 degrees. At dawn and dusk, the greatest amount of polarized light lies in the northern and southern skies, so they show the greatest polarization effect.
As said, the polarizer has little effect on the sky when shooting directly toward or directly away from the sun. Also, when the sun is high overhead, the polarizer can darken the sky near the horizon in any direction. Don’t forget that beyond darkening blue skies, the polarizer has many other uses — it reduces glare, it saturates colors, it eliminates unwanted reflections, and it enhances detail — a veritable potpourri of benefits that shout for the landscape photographer’s frequent attention.
Using the Polarizer on Overcast Days
Polarizing filters are quite effective on cloudy days, too. Although you won’t be using the polarizer to darken a blue sky when the sky is totally cloudy, the polarizer nicely removes glare from leaves and wet surfaces, revealing the detail and color that was hidden by the glare. The effects of the polarizer are more subtle in overcast light, but apparent if you look carefully as you turn the filter. Look for an increase in color saturation and a reduction of glare on wet or shiny surfaces. Our polarizing filters are used as often on cloudy and overcast days as they are on sunny days. Polarizers are so critical to good landscape images that photographers should use them routinely unless, for some particular image, they can articulate a specific reason for not polarizing.
Four Important Polarizer Tips
1. Polarizers are in the optical path of the lens, so buy high-quality ones and keep them clean and scratch-free.
2. Polarizers must be rotated to get the proper effect. After mounting has been completed, rotate the polarizer while looking through the viewfinder to see the effect. Rotate it only counter-clockwise (while looking from the rear of the camera) to avoid inadvertently unscrewing it from the lens and having it crash to the rocks below.
3. Polarizers add glass surfaces into the optical path, and are likely to exacerbate flare problems. Always use a lens hood to shade the filter. The short hoods of wide-angle lenses may allow rotation of the polarizer by reaching in with a single finger. The deeper hoods of longer lenses may have to be removed to rotate the polarizer. Be sure to replace it before shooting. If bright sun is near your shooting direction, don’t hesitate to augment the lens hood with your hand or your hat. Your images will love you!
4. Polarizers must be readjusted when changing between horizontal and vertical compositions. Forgetting this step is a common mistake, even for pros, so try to remember!
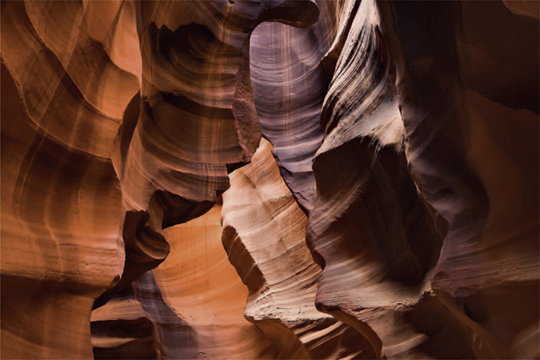
(a) This small creek in Great Smoky Mountains National Park offers many compositions. Although the day was cloudy and quite dark, plenty of glare reflected from the wet rocks. (b) We used a circular polarizer to remove the glare, revealing colors and details that were hidden.
COLOR OF LIGHT
White light is composed by combining the light of the individual visible colors. A color is determined by the wavelength of its light, and all the colors lie in a spectrum of light in the specific order of red, orange, yellow, green, blue, indigo, and violet. Science students may remember Roy G. Biv, a memory device to help remember the sequence of colors. They may also remember that wavelength is a measurable characteristic of several phenomena, including sound waves, radio waves, microwaves, X-rays, light, and others. Red light has the longest wavelengths in the visible light spectrum, violet light has the shortest. The longer wavelengths penetrate the atmosphere easier than shorter ones. This plays a key role in the color of light illuminating the landscape. For example, daylight has a pronounced reddish hue at the beginning and end of a clear day because the sun is lower and its light must travel a greater distance through the atmosphere. The greater distance causes shorter wavelength violet and blue light to be absorbed more than the longer wavelength red and yellow light, which better penetrate the atmosphere.
The sky turns blue shortly after sunrise because the shorter wavelength blue light is more easily scattered in the upper atmosphere and reflected down to earth. As the sun rises higher, its light travels through less and less atmosphere, allowing the light to contain more blue. The increased blue content reduces the warm red glow of early morning.
THE RED LIGHT AT DAWN AND DUSK
The sun is low in the sky at dawn and dusk, and the prevailing red light makes this a special time for photographing the landscape. Additionally, the early and late golden light of a clear day accentuates the colors in most landscapes. In fact, odds are that more gorgeous landscape images are made an hour or so before and after sunrise and sunset than at all other times of the day combined.
Even though color in a digital image is easily adjusted with software, you should still take advantage of the exquisite light that nature so readily offers. Shooting around dawn and dusk makes it hard to join the breakfast and dinner crowd, but there are many photographic rewards to eating and socializing at unconventional times.
The golden light of dawn and dusk is superb for mountains, sand dunes, old barns, ghost towns, and rocky outcrops. Autumn colors reflect beautifully in still water. In many places, dawn and dusk tend to be calm periods, so the wind doesn’t stir foliage in the scene. Golden light isn’t effective for everything,though. Water and blue wildflowers may not appear natural in color in golden light and, in other light, such as that of the direct sun, the very high contrast can be a problem for many scenes.
A camera’s automatic white balance (AWB) feature can easily wash out the attractive red and gold colors of dawn and dusk, so AWB should be disabled when shooting at those times. Instead of using AWB, set the camera’s white balance control to the Cloudy or Shade settings, and you’ll ensure a good rendition of the attractive early and late light. That suggestion is most appropriate for JPEG images. The white balance setting is less critical for RAW images because white balance is so easily adjusted in post-capture editing.
If you want a really magenta sky, and if your camera permits, manually set the white balance to 10,000 K and shoot away. You have thus told the camera that the light is very blue, which is a lie, but the camera dutifully adds a lot of red to the picture to counteract the imaginary blue light. The result is a vivid magenta sky that might be just what you wanted. Don’t forget to reset the white balance, or your next portrait subject will look very peculiar indeed!
THE BLUE LIGHT IN OPEN SHADE
The sky is blue on a clear sunny day because air molecules in the upper atmosphere scatter a large percentage of the shorter wavelength blue light. The longer red and yellow wavelength aren’t scattered much, and most pass straight through. The scattered blue light is reflected toward earth, so when one looks at the sky, it appears blue.
High winds are blowing the snow off the mountain peaks in the Sierras. The sky is blue on a sunny day because it scatters primarily the blue portion of the visible light spectrum.

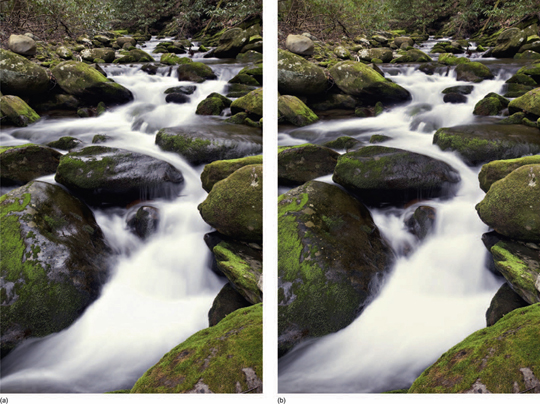
A blue color cast is useful for enhancing the color of a waterfall. Laughing Whitefish Falls is a northern Michigan waterfall that photographs well on cloudy days when the light has a natural blue cast. Two images were combined using high dynamic range (HDR) techniques to capture more detail in the dark objects.
Now, let’s define open shade as a shaded area that, on a sunny day, has blue sky above but is shaded from the direct sun by some intervening object like a tree, a building, or a mountain. The blue light of open shade is very helpful for river and waterfall images, among other subjects. Many of these scenes look best when the water has a slight blue cast, and if your foreground includes large patches of blue wildflowers, the blue light can improve their color. However, the intense blue light of open shade is usually harmful to landscape images because other colors, such as green, orange, red, and yellow, look muted and seriously off-color when illuminated by blue light. As an example, the red rocks of Bryce Canyon aren’t nearly as attractive in blue light, so steps must be taken to modify the light. Fortunately, digital capture makes this easy to do. Simply set the camera’s white balance control to its Shade position, and the resulting image will have a pleasing, more yellowish, warmer, tone. This color control is particularly important for obtaining nice JPEG images, and it makes good sense to get close even when shooting RAW images. If close isn’t quite good enough, it’s easy to later refine your RAW image with your RAW conversion software.
CLOUDY LIGHT
The light of a cloudy day has a slight blue cast. This blue cast can be desirable for some images, like those of water or blue wildflowers, but it’s undesirable for nearly everything else. JPEG shooters will benefit from using the camera’s Cloudy white balance setting to remove the blue cast, and RAW shooters can use AWB or Cloudy white balance settings, and later refine the image in the RAW converter.
Don’t miss this important point: Light is less blue on a cloudy day than in the shade with blue sky overhead. That’s why your camera offers the choice of Shade or Cloudy white balance settings.
MIXED COLORS
Experienced photographers are well aware of the extra blue light found on overcast days or in open shade. However, some scenes add a second colorcast to the mix. The green leaves of a thick forest give a green tint to the light, which in turn, gives a green cast to your images. So, if you’re shooting in the thick forest on an overcast day or in the shade of the mountain, you must deal with a compound color-cast that’s both green and blue. You can easily use either of the Shade or Cloudy white balance choices to neutralize the excess blue, but that obnoxious green cast is still there. There are two good ways to handle mixed light situations.
Color Adjustment of RAW Images
Digital capture handles a blue-green color mix quite easily with proper techniques. With the camera set to generate RAW images, we set our white balance to Cloudy to remove much of the blue color-cast of our digital file. Later, during post-capture RAW conversion, we use the converter’s Green-Magenta control to remove the green cast and the Blue-Yellow control to remove any residual blue cast. Voilà! Blue taboo and green unseen!
JPEG Color Adjustments
Color-cast correction of JPEG files is somewhat more difficult in post-capture editing, so it’s more important to exercise good control in the camera. Yes, image-editing software is improving but, in the meantime, the astute photographer takes charge when shooting.
Compound color-cast problems are solved for JPEG files, first by employing the camera’s custom white balance feature. Every camera model seems to have its own method, so consult your camera manual for the details. In brief, using custom white balance requires you to shoot a test subject that’s either pure white or neutral gray — a gray card is just fine — in the same light as your scene. Be sure to properly expose the test target and to fill the entire frame with the test target. Set the camera to custom white balance. Then, select the image of your test target to instruct the camera that this image should have no color bias. The camera applies whatever white balance correction is needed to neutralize the color-cast — any colorcast — whether single or compound.
Leaving the camera on custom white balance, shoot the actual scene, remembering that the scene must be in the same light as the test target! If you go to a new area, having a different but also objectionable color-cast, you can repeat the process. For example, if you leave the forest to shoot in a nearby open meadow under the same cloud cover, you should select a new target and shoot the test shot again. Although the light in both forest and meadow has a strong blue component, there is much less green light in the meadow, so using the test target shot in the greenish light of the forest might make images shot in the field too magenta. If no color-cast correction is needed in the new area, remember to take the camera off of its Custom white balance setting.
We never use AWB because it may remove a favorable color-cast like blue in the shadows as you see here or the red light in a dawn sky. This is Yellowstone’s second most famous tree because it’s photographed a lot. It’s located in the rolling hills of Hayden Valley. The most famous tree grows near Old Faithful geyser.

WHITE BALANCE SELECTIONS
Your camera offers many white balance choices, which may include AWB, Sun, Cloudy, Shade, Custom, White Fluorescent, Tungsten, Color Temperature (K), and Flash. Some are frequently used for landscape images while others have limited landscape use. Let’s explore their uses.
AWB
Use AWB when you don’t want to bother setting a specific white balance to compensate for the color of the prevailing light. It works quite well for most outdoor scenes. Usually it’ll get you close, which is satisfactory for most JPEGs. It’s also satisfactory for RAW images because of the ease of changing color balance during post-capture RAW conversion, as we’ve said before.
Auto white balance doesn’t work well if you wish to keep a strong color-cast. Perhaps you want a strong blue cast in the shadows of a snowy landscape to suggest cold temperatures. Letting AWB take away the blue may be detrimental to the feeling you intend to evoke with the image. You’re better off using the Sunny white balance choice. AWB also drains the red from sunrises and sunsets, so don’t use it for them, either.
Daylight
Daylight white balance is a logical choice anytime your landscape is illuminated by sunlight. Use Daylight white balance unless there’s a compelling reason to do otherwise.
Shade
Shade white balance works well to remove excess blue light when photographing in open shade with a blue sky overhead.
Cloudy
Many successful landscape images are captured on cloudy days because of the low contrast. Use Cloudy to remove the slight blue color-cast so typical of those conditions. Cloudy white balance produces a slightly warmer image by adding a little yellow. Many photographers, including us, prefer a very slight yellow cast to their images, so this choice is suitable for both cloudy and sunny days.
Tungsten
The Tungsten white balance choice reduces the red color-cast found under tungsten lighting. This lighting is typical of ordinary incandescent bulbs. We don’t think Tungsten white balance will be a factor in your landscape work, but it could be useful for other subjects when photographing indoors. Perhaps you could use Tungsten white balance to add a strong blue color-cast to your outdoor images for creative reasons.
White Fluorescent
This one takes out the excess green light found under fluorescent lamps. It’s another white balance setting that you won’t often use in landscape photography, but you might use it for photographing people under white fluorescent lights or, perhaps, city scenes at night if the setting is under fluorescent lighting. Note, though, that other cityscape lighting, such as incandescent lighting, can produce other color-casts.
This intimate landscape of a red maple leaf lying on a white birch log is illuminated with blue light on this cloudy day and green light from several nearby white pine trees. This unappealing mixture of color is easy to control with a digital camera. If you shoot RAW, set the camera to Cloudy to take out the excess blue light and use the RAW converter to reduce the excess green light. If you shoot JPEG, photograph a gray card, select the image, and set the camera to Custom white balance to neutralize both the blue and the green color-casts.

Flash
Most flashes produce a light that is slightly blue. Cameras set to Flash white balance will attempt to compensate for the blue light. A word of caution, though: Some flashes are made with built-in yellow filtering to compensate for their own blue light. If the camera is also compensating, one could end up with an overcompensated, too warm image. Canon flashes are in that category, so if you’re using one and don’t want overly warm images, leave the camera on AWB or Daylight.
Mt. Sheridan is beautifully reflected in the calm waters of Heart Lake in the Yellowstone wilderness. A bit of flash nicely highlights the beach stones in the foreground. Mixing natural light and flash together is a powerful technique that’s highly effective and easy to do with modern equipment.

Custom
This choice requires some effort to learn how to use it, but the results are worthwhile if you shoot JPEGs in mixed light sources. The proper use of the Custom white balance setting will ensure excellent color fidelity in your images when shooting in difficult lighting situations.
Color Temperature (K or Kelvin)
A photographer uses this setting to precisely instruct the camera how to compensate for the color of the light. The color temperature of the prevailing light is entered, and the camera then knows exactly how to compensate to produce a color-neutral image. Few photographers use this setting, largely because accurate use of it theoretically requires an expensive color-temperature meter.
Even without a color-temperature meter, however, this white balance setting can be used to substantially punch-up the magenta colors in sunrises and sunsets. Set the camera on K, dial in a value of 10,000 K, and shoot the scene. You lied to the camera by telling it you’re shooting in extremely blue light. The camera adds a lot of warm-toned compensation to counteract the blue light. But the light in the sunrise or sunset is already warm, not blue, and here the incorrect compensation produces an overabundance of orange and red — just what you wanted!
CONTRAST
Contrast is the term used to describe the brightness differences between various parts of a scene. Bright sun produces more contrast than other types of daylight, because the sun is such a small light source and so far away. If the sun isn’t directly behind the camera, those attributes create very bright highlights and very deep shadows, so much so that the sensor may be unable to properly record both. The photographer is compelled to make a choice and, as has been previously said, and said, and said, he should probably favor the highlights.
DYNAMIC RANGE
The luminance range of a scene is the range of brightness levels of subjects within that scene, which is another way of saying brightness range or contrast. Dynamic range, as used in photography, is yet another term describing the luminance range of a scene (the contrast of the scene) or describing the capability of a processing component to faithfully process a given luminance range. A digital processing component is an image-forming device like a camera, a part of a camera, a scanner, or it may be an image-reproducing medium such as a computer monitor, a projector, or a printer and its printing paper. Like the proverbial weak link of a chain, the dynamic range of any digital system, from camera to output, is no greater than the dynamic range of its weakest component. Every component has its own limitations in how white its whites are and how black its blacks are. The resulting limited range of brightness is called that component’s dynamic range.
If the dynamic range of a scene exceeds the dynamic range of the processing system, then the fidelity of the finished image is compromised, which can be a problem for the photographer. An example of such a scene is our notorious waterfall in the harsh light of the noon-day sun. Another and subtler example is a pretty white birch with its pale yellow leaves growing in front of some very dark green pines. That can be a wide dynamic range scene, even in soft light. A wide dynamic range scene, processed by a system of only limited dynamic range, gives images with ugly blown-out highlights or with blocked shadow areas lacking detail or, in extreme cases, both. Today, the innovative digital-darkroom worker can apply HDR computer techniques to help compensate for her system’s dynamic range limitations. We’ll say more on this in Chapter 9. But, short of that remedy, the photographer has the option of either accepting the limits of the dynamic range available to her and carefully engineering the exposure of her image or, which is the better option, of coming back tomorrow when the light is better.
YOUR EYES VS. DIGITAL CAPTURE
We are truly blessed to be able to see such a wide variety of color in both bright and dim light. The ability of our eyes to process scenes of extreme contrast and the dynamic range of our body’s vision system far exceeds that of film or digital photography systems. The human eye can process somewhere around 13 or 14 stops of light, and ordinary digital cameras are limited to about 7 to 9 stops. Keeping in mind the definition of a one-stop difference as a doubling or halving of the light, it’s clear that the dynamic range of human vision vastly exceeds that of our cameras.
We sometimes use the Color Temperature (K) white balance choice to enhance the sky at dawn or dusk. These wildebeest were marching along the skyline at dawn one morning, but the sky was only slightly red. Setting the camera to K and dialing in 10,000 K made the camera add plenty of extra color to the sky.

CONTRASTY SCENES
Many landscape images suffer from too little detail in important highlights and shadows, which is the direct result of excessively contrasty scenes. Making images when the scene is too high in contrast is a major mistake for many photographers, unless steps are taken to deal with it. Often, which has been said previously, it’s best to come back at another time when the light is more suitable for the scene. Even though excessive contrast is generally detrimental to our images, occasionally more contrast is just what’s needed. For example, sand dunes can often benefit from the contrast of direct sunlight (albeit preferably at a lower angle, such as early morning or later evening) because sunlight can be used to accentuate the texture and shape of the dunes. And the higher contrast of side-light or back-light on a wave crashing into a rock is frequently helpful. Certain silhouetted landscape subjects, like a tree isolated against the rising sun, can produce beautiful images of extreme contrast. Still, for many and perhaps most landscape images, low-contrast light is more effective.
CONTROLLING EXCESSIVE CONTRAST
Wait!
Sometimes the harsh sun makes contrast far too high, but a short wait for a friendly transient cloud may solve the problem by lowering the offending contrast. If no cloud cover is forthcoming — and yes, we’ll say it again — coming back tomorrow can be a good solution. This effective strategy is one of searching out good landscape spots and planning your schedule to coincide with better shooting conditions. The opposite strategy is used by one amateur shooter we know. He keeps a notebook in his car in which he records the locations and problems of potentially good scenes that he sees, but were seen in the wrong light, at the wrong time of day, in the wrong weather, in the wrong season, or when he was just too busy to deal with it. Then, rather than planning his schedule to fit the scene, he can often use his notes to find a scene that fits his schedule.
Fill Flash
If a small portion of the image, such as the foreground, is in deep shadow, one might use flash to brighten the dark shadow areas. Recently, we photographed Grotto Falls in Great Smoky Mountain National Park. Grotto Falls is special because you can easily hike behind it to make images from that unusual vantage point. Of course, from the inside, the top of the ledge from which the water drops is completely black. An electronic flash worked perfectly to illuminate the dark rocks while the natural light properly exposed the cascading water.
HDR
High dynamic range describes a digital technique for preserving detail in both the highlights and shadows of high-contrast scenes. HDR works well with static landscapes in which nothing is moving. The photographer uses his tripod-mounted camera to shoot several images that are identical except for exposure. First, shoot an image in which the highlights are about one-stop underexposed. Then make additional shots, increasing the exposure by at least one stop and no more than two stops each time. Do this until the darkest shadows are about two stops overexposed. Finally, use Photoshop, Photomatix Pro, or some other HDR tone-mapping software to merge several shots into a single image. It’ll show excellent detail throughout the brightness range. We’ll cover HDR techniques in much greater detail in Chapter 9.
Double Process an Image
It’s possible to produce an HDR image by double-processing a single image. This procedure is generally more effective when shooting RAW images. In RAW conversion, process an image to optimize the highlight detail while ignoring the shadow areas. Save the converted file. Then, process the same RAW image and this time adjust the RAW converter to maximize the detail and quality of the dark tones while ignoring the highlights. Use noise reduction software to improve shadow detail and color. Save that image, too. Now use HDR software to merge the two saved images into one final image. The tone-mapped final image you save will show good detail throughout its entire brightness range. This procedure is more convenient than shooting multiple images with varying exposures, but it’s less effective because of noise in the shadow areas.
Split Neutral-Density (ND) Filters
Split ND filters are an old-fashioned but highly effective way to lower the contrast of many landscape scenes. The most common application is for scenes having a very bright sky and a dark foreground, where the contrast of the scene exceeds the dynamic range of the digital system. The filters are usually rectangular pieces of plastic. They’re available in various sizes to fit specific filter holders, but a typical size is 3″ × 4″ × 1/8″ thick. The sheets are tinted over a portion of their area. From the top down to the middle, they’re dark and from the middle to the bottom they’re clear. The filters are available in different strengths — the darkened segment may have an attenuation of 1, 2, or 3 stops — and the transition region may be either hard (abrupt) or soft (gradual).
(a) Grotto Falls in Great Smoky Mountains National Park is unique because you can walk behind the falls, offering an unusual vantage point. (b) Unlike the other image, we used flash to light up the upper rock to reveal some detail in the foreground.

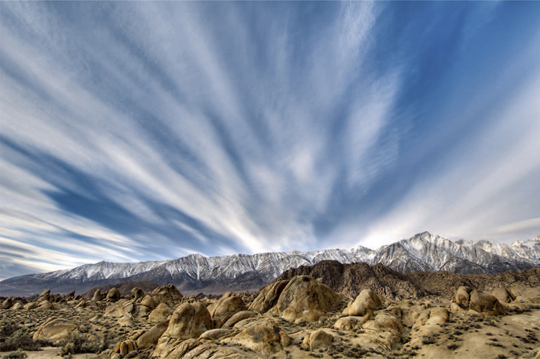
The contrast between the dark Alabama Hills and the light sky is far too much for traditional photographic techniques to successfully capture. Rather than fuss with a split neutral-density filter, we shot a series of images with different exposures and merged them together with Photomatix Pro — a dedicated HDR software program.
The filters are inserted into a proper holder and, in the typical application, slid up or down until the dark portion of the filter just covers the bright sky and the clear portion of the filter is over the darker foreground. By darkening the bright sky, the contrast between sky and foreground is greatly reduced. Split ND filters with a gradual transition are most useful when there’s no sharply defined straight line in the scene between the highlights and the shadows. Here, the gradual transition in light attenuation makes it easier to hide any telltale sign of the filter in the resulting image. If, on the other hand, the scene abruptly changes from light to dark with a clear straight line, such as a bright sky meeting the surface of a dark sea, then the hard ND filters work better. All of the foregoing notwithstanding, the recent advances in HDR techniques offer such a vast improvement over ND filters that we no longer use them.
LIGHT DIRECTION
FRONT-LIGHT
The direction of the natural light is critical to the success of many landscape images. A scene is considered front-lit when the sun is directly or nearly directly behind the camera. This is the light that many photographers use much of the time. Direct frontal lighting produces a low-contrast scene because the shadows created by the sun fall behind the subject and are largely invisible to the camera. The camera, therefore, can easily record the entire brightness range of the scene. Frontal lighting does a good job of revealing the colors of a scene, but the absence of shadows tends to produce an image lacking in depth. Direct frontal lighting can produce fine images, especially in the red light of the early or late sun, but after a while they can get boring. Some shadows are often beneficial to reveal texture and to imply depth, so perhaps direct frontal light should be used less than it is.
OVERCAST LIGHT
Cloudy days and overcast days produce low-contrast scenes easily dealt with by the camera’s sensor. It’s somewhat like frontal lighting in that shadows are minimal, but the color of the light is cooler (more blue). Although the scene appears as if front-lit, the sun may be any place in the sky if the cloud cover is thick enough. Overcast light is especially suited for fields of wildflowers, provided one very carefully composes to disallow any bland sky from appearing in the image. We use this light for nearly all of our waterfall images, especially for those waterfalls surrounded by dark forest, because the high-contrast scene demands a low-contrast light. Contrast considerations aside, the dim light of an overcast day, especially early and late, makes it easy to use long exposure times to get that smooth silky running water in our waterfalls or to depict wildflowers swaying in the wind. And, if the exposure time is still too short, consider a light-reducing ND filter, not to be confused with the split ND filter previously discussed. These filters are a uniform gray color and come in different densities. We sometimes use a.9 ND filter that blocks three stops of light so we can use longer shutter times to blur the water more.
This intimate landscape of paintbrush wildflowers photographs well on this calm cloudy morning. The clouds act as a huge soft box to eliminate harsh shadows.

SIDE-LIGHT
Side-lighting can produce few or many shadows, light or dark, depending on the lighting. If the angle between the camera-to-subject line is less that 20 degrees from the camera-to-light line, then the shadows are minimal. As the sun’s angle moves toward 90 degrees, the shadows get longer. In all cases, side-light easily reveals texture and suggests depth in a two-dimensional image. The side-light of early morning and late evening is wonderful for many landscapes such as seashores, sand dunes, rock formations, and a forest of cacti. All of us could and should use side-lighting more than we do. Spending a few days shooting only side-lit images is a fine way to teach yourself the benefits and joys of side-lighting. You’ll soon discover those numerous situations where side-lighting works best and a few where it doesn’t work at all.
Side-lighting produces more shadows than front-lighting or overcast lighting, so side-lit scenes have more contrast. However, high contrast can be difficult or impossible for the digital system to properly handle, so do be careful. Extremely bright sun may create too much contrast for side-light to be successful for some landscapes. Generally, the softer sunshine and warmer colors of dawn and dusk work far better for making nice side-lit landscape images. Always use the first and last two hours of a sunny day to shoot your images. Your success rate will be much higher.
BACK-LIGHT
Back-light comes from behind the subject. It tends to create extreme contrast because shadows face the camera. You can expect dark shadows with bright highlights. It’s the most difficult light to successfully use, but the most dramatic when everything works. Photographing a gorgeous acacia tree in Kenya against the rising sun isn’t only appealing, but a good way to use soft back-lighting.
This acacia tree in Kenya is a fine example of being on location well before sunrise, which is still 20 minutes away. To capture this image, choose a low viewpoint to get the tree above the horizon as much as possible. Focus on the tree, stop down to f/16, and expose for the bright background using the histogram to guide you.

When the sun has risen high in the sky, back-lighting is higher in contrast. It’s effective to include the sun in the image at those times, particularly when using a wide-angle lens. This is especially true if you stop the wide-angle lens down to f/22 and underexpose the sky a bit, which turns the sun into a star shining in a very dark blue sky background! Once again, early and late in the day are terrific times to use back-light. Look for instances where the back-light can rim the subject. The spines of a field of cacti, a prairie full of grasses, or an exploding milkweed pod are typical subjects that glow when back-lit.
Both side-light and back-light are higher in contrast, so RAW images work best here. During the RAW conversion process, exposing to the right (ETTR) without clipping important highlights, if not done fully in the camera, increases your chances of getting sufficient detail and reducing noise in the shadows. Finally, HDR techniques are very effective for back-lit images.
REFLECTED LIGHT
One of the great joys of shooting in mountainous or rocky regions is working with reflected light. A splendid example is the light reflected by a rock wall and bounced around within the depths of a canyon. The slot canyons near Page, Arizona, are wonderful subjects for reflected light. A creek or pool of water illuminated by light reflected from colorful rock walls or by the light reflected by autumn maple trees offers a perfect opportunity to shoot many wonderful and unusual landscape images.
(a) The strong sunlight comiae overlapping dunes in Death Valley National Park. At times, you need bright light to create the shadows that suggest depth in the image.

(b) An unruly cloud covered the sun momentarily reducing the contrast. While the image is still pleasing, the reduction in contrast eliminates much of the texture in the overlapping layers of sand.

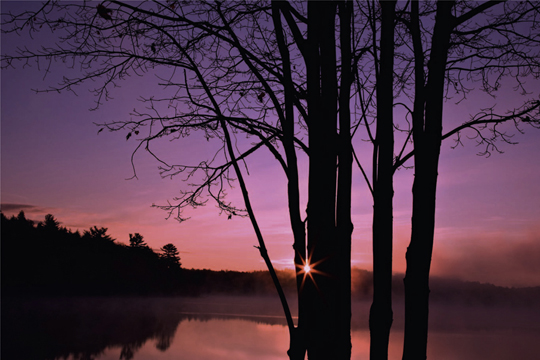
It’s fun to carefully compose the image so the sun is touching a foreground object such as the two trees on each side of it. Often, if you stop down to f/22 with a wide-angle lens, the sun will become a star.
IT’S ONLY DIGITAL
Your landscape images will improve if you use more side- and back-lighting early and late in the day, when the color of the light is most favorable. Always remember that there’s no film cost and no processing cost when shooting digital images. Take lots of chances and play extensively with the light, even when you think it may not work. You’re certain to expand your knowledge of the role of light, which you’ll be able to apply it to your landscape shooting, and you’ll most assuredly capture many remarkable images to cherish. It’s quite routine for the serious photographer to delete many more images than she keeps! A National Geographic shooter once remarked during an interview that he had shot about 15,000 images for one article, and only a half-dozen or so were ultimately used. That’s about one-half of one-tenth of one percent! Oh yes, he’s a very successful photographer. Even your authors might be just a bit chagrined by throwing away that many, but we’d bet that his keepers were potential Pulitzer winners!