When we speak to each other, we understand as much from the context of our words as from the words themselves. To be understood, we need to be clear about the context of our statements. We use semantics to do this, putting ideas together in a logical manner. We don’t think about it, it’s an instinct like breathing—we do it all the time.
In CSS, where you place your styles defines where and how they will be applied. You need to understand how styles cascade down the document, and how to apply different styles depending on the medium. With a bit of practice, the semantics of CSS will also become as instinctual as speaking or even breathing.
In Chapter 4, I cleverly avoided showing you exactly where to put your CSS code. Instead I showed it disembodied from the HTML code it was intended to style. However, where you put your CSS code in relation to your HTML code has a direct impact on how it works and what elements it affects. There are three places to put your CSS code, depending on the scope of elements you want your styles to define:
01 | Inline |
02 | Embedded |
03 | External |

So far, I have shown you examples of a complete CSS rule, consisting of a selector and a declaration:
h1 { color: red; }
However, CSS allows you to use the style attribute to place style declarations directly into an HTML tag:
<h1 style=“color: red;”>Through the Looking-Glass</h1>
This is called placing the style inline. It has the same effect on the style of the level 1 header tag as the full CSS rule, but only affects that single instance of the tag. All other level 1 headers on the page remain unaffected.
You can add as many different styles as you want to the style attribute, as long as you separate each declaration by a semicolon:
<h1 style=“color: red; font-family: Georgia; text-align: center;”> Through the Looking-Glass</h1>
Although useful for quickly adding styles where they are needed in a design, inline styles have two major drawbacks that diminish the flexibility of CSS, so they should be used sparingly if at all:
01 | Because inline styles affect only that one tag in that one instance, you can’t easily make global changes to styles. |
02 | Inline styles are the final word on what styles are applied to that element, so they cannot be overridden. |
I sometimes use inline styles while developing a site to quickly test out ideas, but before my Web pages go live, I take inline styles out of my HTML code and replace them with classes or IDs.

Inline Style:
Affects only the tag it is in.
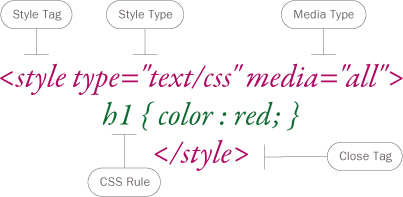
Styles that are meant to affect an entire Web page (but not necessarily an entire Web site) are embedded into the HTML code using the HTML <style> tag, which will contain CSS rules:

Embedded styles will be applied to any relevant elements in the page. Making a change to any of the rules in this list will affect all of the elements on the page that are affected by that rule. The type will always be “text/css” (yes, there are other types; no, no one uses them). We will discuss media types later in this chapter, but the default is “all,” to tell the browser the styles should be applied to all media types.
Embedded Style:
Affects the entire page it is on.
Although inline and embedded styles allow you to add CSS to Web pages, the real power of CSS comes when you apply styles to an entire Web site. Instead of changes affecting a single page or tag, you can change dozens or thousands of pages by switching a single style. To do this, you need to set up an external style sheet, and then link it to a Web page or import it into a Web page or another external style sheet.
For example, say you have a Web page called main.html, with your content structured using HTML. To style this file, you would create an external style sheet called default.css, and place a <link> tag or @import rule in the HTML file pointing to the external style sheet. Those styles will now be applied to the Web page just as if the code was embedded in it. However, we could also link that same file to more files—for example ch01.html or ch02.html—and get the same styles applied to the content on those pages.
However, you are not limited to a single external style sheet. If you need to tailor the design of each page, you can link to or import additional style sheets to mix and match styles. For example, you can have a ch01.css and a ch02.css style sheet to customize those pages with their own backgrounds (or anything else you need). To cut down on the number of files you are linking to, you could import default.css into ch01.css and ch02.css to get the same results.

Setting up an external CSS file is simple: Start a new file in your favorite text editor, and start typing in your CSS code. An external style sheet is simply a text file with your CSS code. That’s it and nothing else. No HTML tags or JavaScript, just CSS. In fact, if you have anything else in the file other than CSS and notes (see the next section), the CSS will not work.
The code in the CSS text file might look like:
h1 { color: red; }.hilight { background-color: yellow; }#slide01 { border: 1px solid blue; }
Notice that there is no <style> tag around the CSS code.
When you are ready, save the file, giving it a meaningful filename with the extension .css. For example, You might have an external file called default.css and another one called ch01.css.
Since you may have multiple external style files for a single site, it’s a good idea to collect them all into one place—usually a folder called css.

You have two options for adding external styles to your Web pages: linking or importing. The most common method is to use the <link> tag:
<link href=“default.css” type=“text/css” media=“all” />
The <link> tag is a self-closing HTML tag that includes a reference to the external CSS file, which can either be a relative path (the location of the external file in relation to the HTML file that’s pulling it in) or an absolute URL. As with the <style> tag, the <link> tag includes a type, which is always “text/css”, and a media type, which, for now, we’ll set to “all” so that the styles are applied to any media type.
The <link> tag will inject the CSS code from the external style sheet wherever it is placed in an HTML document, just as if that code was embedded in the HTML file. As with embedding the code in the page, though, it’s best to place the link within the <head> tag and above any JavaScript so that the styles are available as soon as the page is rendered in the browser window. Otherwise, you risk having the content load before the styles and then redraw itself after the styles have been processed.
You can add as many different link tags as you want to your Web page, allowing you to mix and match different styles. Before you go too crazy, though, study “The Cascade” section later in this chapter to understand how different CSS rules interact with and override each other.

Linked External Style:
Affects any page it is linked to.
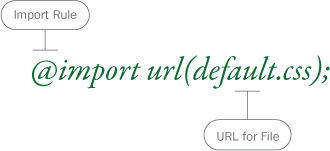
The second way to add an external CSS file to your HTML code is using the @import rule, which can be added within any <style> tag you have embedded in a page, as long as they come before any other CSS code in the tag. You can also add them directly at the top of another external CSS file:
@import url(default.css);
Using the import rule will pull the CSS from the external file, placing it directly into that position in an HTML document or in another CSS file, based on the URL provided, either as a relative path (where the file is in relation to the summoning file) or an absolute path (the full URL, starting with http://www).
Like the <link> tag, you can add as many @import rules as you want to your external style sheets and HTML files, but it’s important to understand how the cascade works (described later in this chapter) if you want your styles to work the way you intend them to.
Imported External Style:
Affects any page or CSS file it is imported into.
When creating designs, we often add notes and comments to remind us why we did something or to explain to people looking at the design after us what is going on. CSS allows us to add these notes, but they need to be set off from the rest of the text to ensure they don’t interfere with the code. Open a CSS note with a slash followed by an asterisk. Then, reverse the pattern to close the note:
/* Note goes here */
Anything you place between these two marks will be completely ignored by the browser, as if it did not exist. For example, you might want to add a one-line note about what a particular rule is doing:
/* Resets how content on the page is presented */
Or you might want to add a multi-line note with details on who created the design and how they can be contacted for further details:
/*——————————————By: Jason Cranford TeagueEmail: [email protected]——————————————-*/
Note that in this example, the extra dashes at the top and bottom are only there to help set off the comment from the rest of the page. They are not required.

It’s important to remember that almost all HTML tags have styles indirectly applied to them. An inherited style can come from styles that are predefined by the browser itself (browser-default styles) or from an element’s parent tags (parent-inherited styles).
For example, given the following style:
The hilight class’s text color is purple.
.hilight { color: purple; }
And this block of HTML:
<h1 class=“hilight”>The Characters of<cite>Through the Looking-Glass</cite></h1>
The book title, Through the Looking-Glass, will be purple because the citation tag inherits the style from the hilight class in its parent tag. However, it goes without saying that it will also be black, bold, and italicized because it is in the level 1 header, and italicized because of the citation tag. Now this may not come as any shock to you: Of course the <h1> tag makes text bold, but why? There is no mystical property of the universe that says when you invoke the alpha-numeric combination of “h1” that text will be bold. The text is bold because the person who created this browser decided to program it so that text in the header level 1 tag is bold. So, if no other styles override them, the text will at least have these default styles to make it stand out to anyone reading it.


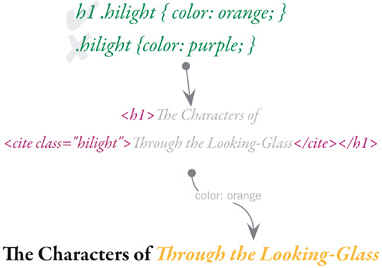
Style declarations are not engraved in stone and can be easily overridden. The most obvious way to override a style is to simply restate it later in your CSS. For example, if we wanted to override an inherited style, we might say something like:
The hilight class’s text color is purple, but the cite tag’s text color is orange.
cite { color: orange; }
.hilight { color: purple; }
In the following block of HTML:
<h1 class=“hilight”>The Characters of<cite>Through the Looking-Glass</cite></h1>
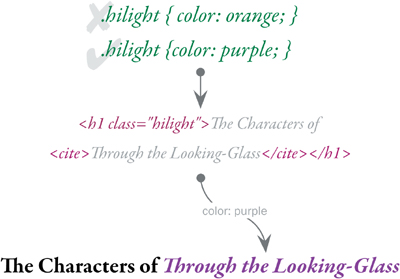
the entire header will be purple because of the hilight class, but the book title, Through the Looking-Glass, will be recolored orange because the declaration for the citation tag overrides the parent-inherited style.

You can override a style for any selector simply by declaring the rule again with the same attribute but a different value:
.hilight { color: orange; }
.hilight { color: purple; }
The second instance of the hilight class will override the one before it, basically allowing you to change your mind.
The basic rule of thumb is that the last instance of the style declared is the one applied to the page.
Why would you want to override styles? This example shows the change immediately after, but that would not be very likely—you would just change the first rule. However, once your CSS starts getting longer and more complex, spanning multiple Web pages and multiple external CSS files, you may need to override the style set for one element on one page with another.
The order you place your CSS rules in will have a direct effect on which style ends up being applied, with the last one listed being the one that gets used, if there are no other overriding factors such as specificity, importance, and media type.
What are specificity, importance and media? Read on.
Although the order you place your CSS rules in is important, it is not the final word in determining whether a style is applied to an element or not. Specificity refers to how much context you provide in a given CSS rule. The more specific the context the rule is to be applied, the more weight it is given when determining whether or not it is applied, even allowing you to override the order in which styles are set. If you are unsure what I mean by context, check Chapter 4’s “Styles In Context” section first.
The basic rule of thumb is that the more specific you are about the context of a CSS rule, the more likely it is that the style will be applied to the element.
The more selectors included in your contextual rule, the more specific it is. If there are no other overriding factors—such as importance and media type—then a more specific rule gets applied regardless of order.
So, for example:
h1 .hilight { color: orange; }
is a more specific context than just:
.hilight { color: purple; }
The first CSS rule tells the browser how to style the hilight class if it is in a level 1 header tag, whereas the second rule only applies to the general case of the hilight class. And
#content h1 .hilight { color: brown; }
is even more specific, so it will win out over the other two rules that are placed after it in the style sheet.

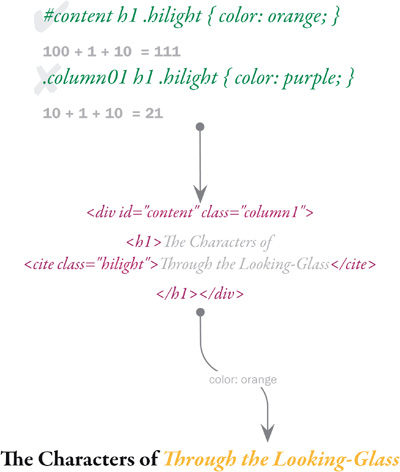
So what happens when you have the same number of selectors in a contextual rule that applies to the same element? For example:
#content h1 .hilight { color: purple; }
.column01 h1 .hilight { color: orange; }
Both of these CSS rules have three selectors, so which style is applied? In this case, you have to look at how many of each kind of selector appears in the rule. Each selector type—HTML, CSS, and ID—has its own specific weight when it comes to determining specificity. An HTML tag has a weight of 1, classes have a weight of 10, IDs have a weight of 100, and inline style (styles placed directly into an HTML tag with the style attribute) trump them all with a weight of ∞—that is, they cannot be overridden no matter how specific the CSS rule. In the example of above, the first CSS rule would have a weight of 111:
100 (#content) + 1 (h1) + 10 (.hilight) = 111
The second one has a weight of only 21:
10 (.column01) + 1 (h1) + 10 (.hilight) = 21
In this case, the first rule will be applied.
So, what happens in cases where the weights add up to be exactly the same? We fall back on order: The last CSS rule declared is the style used.
The basic rule of thumb is any rule with ID selectors in the context is going to override most other rules; a rule with a class in the context will override a rule with just HTML selectors.
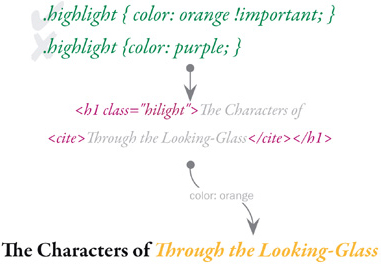
Inheritance, order, and specificity combine to determine which styles are applied to which elements, but you still have an ace in the hole if you need to force particular styles to be applied: !important will override all other concerns, forcing a style to be applied. By placing this immediately after a value—but before the semicolon—you are telling the browser that this is the most important style declaration being applied, overriding all other declarations, with the exception of inline styles.
For example, if you have rules for the same selector, but add !important to the first:
It’s important that the hilight class text color is orange.
.hilight { color: orange !important; }
The hilight class text color is purple.
.hilight { color: purple; }
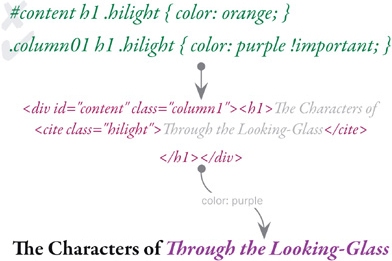
Despite the fact that the purple declaration is second, any text within the hilight class will be orange. !important will also override specificity:
#content h1 .hilight { color: orange; }
.column01 h1 .hilight { color: purple !important; }
Even though the first declaration to use orange for the text color has greater specificity, the second declaration will be used because it is important.
We generally think of the Web as a screen-based medium, but Web pages can be output on a variety of different devices. You need to be able to create style sheets that tailor your pages to a variety of media. Earlier in this chapter, when you learned how to add styles to a Web page or a Web site, I mentioned that you can also specify a media type to which the style sheet should be applied. The default is all—that is, apply these styles regardless of the device. Although CSS allows for several media types, really there are only four types you need to worry about:
01 | Screen |
02 | Print |
03 | Handheld |
04 | All |
For details on getting the best results with media types, check out Chapter 12: “The Last Word.”
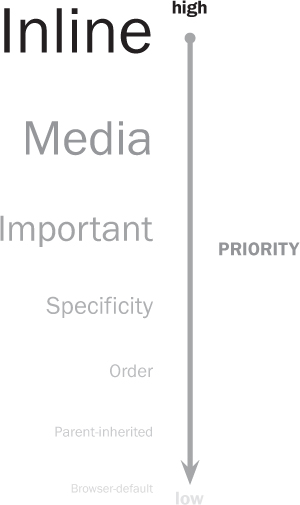
While the browser is rendering your Web page, each style declaration cascades through the Web page with a particular priority based on its media type, importance, specificity, order, and inheritance until its rule matches a particular element. (Sounds pretty poetic, doesn’t it?) The cascade is predictable, and usually obvious as long as you don’t try to overthink it.
Styles are applied in order of priority:
01 | Inline styles |
02 | Media |
03 | Importance |
04 | Specificity |
05 | Order |
06 | Parent-inherited |
07 | Browser-default |