
1. The G11/G10 Top Ten List

Ten Tips to Make Your Shooting More Productive Right Out of the Box
With your new Canon G11 or G10 in your hands, you’re probably anxious to jump right in and start cranking off exposures. What you really should be doing, though, is sitting down with the instruction manual to learn how to use all of the camera’s features…but what fun is that?
Of course, this behavior usually leads to frustration in the end—there are always issues that would have been easily addressed if you had known about them before you started shooting. Maybe if you had a Top Ten list of things to know, you could be more productive without having to spend countless hours with the manual. So this is where we begin.
The following list will get you up and running without suffering many of the “gotchas” that come from not being at least somewhat familiar with your new camera. Here are the top ten things you should know before you start taking pictures with your Canon G11 or G10.
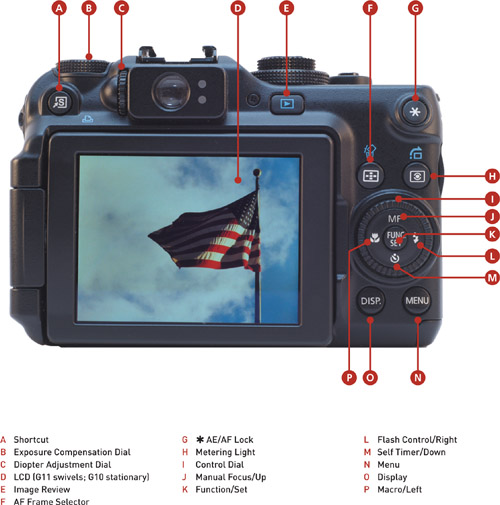
Poring Over the Camera
CAMERA FRONT
The G10 and G11 bodies are nearly identical, so I’m using the G11 as spokesmodel for both cameras. The major differences are the G11’s flip-out LCD, compared to the G10’s integrated screen on the back of the camera, and the G11’s new mode layout on the Mode dial (turn the page to compare).

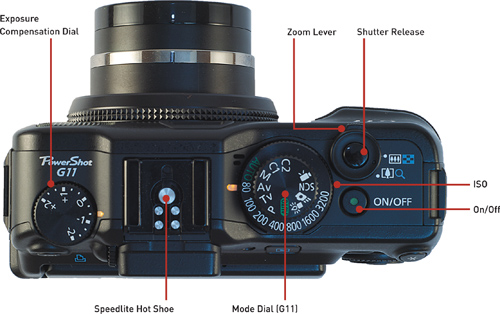
Poring Over the Camera
CAMERA TOP

1. Charge Your Battery
This will be one of the hardest things for you to do because you really want to start shooting, but a little patience will pay off later.
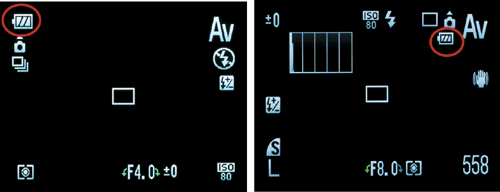
When you first open your camera and slide the battery into the battery slot, you will be pleased to find that there is probably juice in the battery and you can start shooting right away. What you should really be doing is getting out the battery charger and giving that power-cell a full charge. Not only will this give you more time to shoot once you start, it will start the battery off on the right foot. No matter what claims the manufacturers make about battery life and charging memory, you’ll likely get better life and performance from your batteries when you charge them fully and then use them right down to the point where they have nothing left to give. To check your battery level, insert it into the camera, turn on the camera, and look for the battery indicator at the top left (G11) or top right (G10) of the LCD (Figure 1.1).
FIGURE 1.1 The LCD shows how much charge is left on your battery; G11 at left, G10 at right.
2. Don’t Shoot without a Memory Card
Nothing will ruin your day faster than shooting for a couple of hours only to find that you didn’t have a memory card in your camera and thus haven’t saved any of the pictures that you’ve taken. Thankfully, Canon has made it all but impossible to make such a mistake with the G11/G10. If you turn your camera on without a memory card installed, you’ll see a “No memory card” message at the top of the LCD. Furthermore, if you press the shutter button to take a picture, you’ll get another message (“Cannot record!”) on the LCD in combination with an audible signal—six chirps—to get your attention.
There’s a small chance that you could miss this. Perhaps you’re in a noisy environment or you’ve turned the sound off on the camera, and you’re not carefully looking at the LCD. And, after all, your camera will display your shot on the LCD. This is where you could get fooled into thinking that your image has been saved. When you turn your camera on, always be sure to check for the “No memory card” message on the LCD.
We will have an in-depth discussion on memory cards and proper formatting in Chapter 2.
3. Set Your JPEG Image Quality
Your G11 and G10 have a number of image quality settings to choose from, and depending on your needs, you can adjust them accordingly. Most people shoot with the JPEG option because it allows them to capture a large number of photos on their memory cards. The problem is that unless you understand what JPEG is, you might be degrading the quality of your images without realizing it.
The JPEG format has been around since about 1994 and stands for Joint Photographic Experts Group. JPEG was developed by this group as a method of shrinking the size of digital images down to a smaller size for the purpose of reducing large file sizes while retaining the original image information. (Technically, JPEG isn’t even a file format—it’s a mathematical equation for reducing image file sizes—but to keep things simple, we’ll just refer to it as a file format.) The problem with JPEG is that, in order to reduce a file size, it has to throw away some of the information, a technique referred to as “lossy compression.” This is important to understand because, while you can fit more images on your memory card by choosing a lower-quality JPEG setting, you will also be reducing the quality of your image. This effect becomes more apparent as you enlarge your pictures.
The JPEG file format also has one other characteristic: to apply the compression to the image before final storage on your memory card, the camera has to apply all of the image processing first. Image processing involves such factors as sharpening, color adjustment, contrast adjustment, noise reduction, and so on. Many photographers now prefer to use the RAW file format to get greater control over their image processing. We will take a closer look at this in Chapter 2, but for now let’s just make sure that we are using the best-quality JPEG possible.
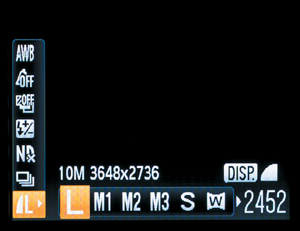
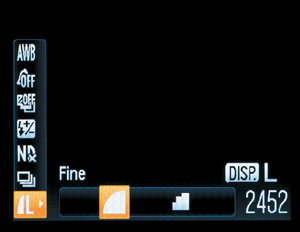
The G11 has 12 quality settings for the JPEG format: two settings each for the Large (L), Medium 1 (M1), Medium 2 (M2), Medium 3 (M3), Small (S), and Widescreen (W) settings. The two settings—Fine and Normal—represent more or less image compression based on your choice. The G10 has 18 quality settings, as it adds a Superfine compression option. The L, M1, M2, M3, S, and W settings determine the actual physical size of your image in pixels. Let’s work with the highest-quality setting possible. After all, the goal is to make big, beautiful photographs, so why start the process with a lower-quality image?
SETTING THE IMAGE QUALITY
1. Press the Function/Set (FUNC./SET) button at the center of the Control dial to bring up the Function menu along the left side of the LCD.
2. Use the Down button to navigate to the Quality setting at the bottom of the menu.
3. Use the Right button to select the Large (L) setting (A), then press the Function/Set button again.
A
4. To set the compression on the G11: Follow the steps above to select the Large setting, then press the Display (DISP.) button to bring up the Compression setting options. Select the Fine setting (B), then press the Function/Set button.
B
To set the compression on the G10: Press the Function/Set button, then use the Down button to navigate to the Compression setting, which is second from the bottom. Use the Right button to select the Superfine setting (C). Press the Function/Set button to lock in the change and return to shooting.
C

As you will see when scrolling through these settings—by looking at the number at the bottom right on the LCD—the higher the quality, the fewer pictures you will be able to fit on your card. Always try to choose quality over quantity. Your pictures will be the better for it.
4. Avoid Using the Auto ISO Setting
The ISO setting in your camera allows you to choose the level of sensitivity of the camera sensor to light. The ability to change this sensitivity is one of the biggest advantages to using a digital camera. In the days of film cameras, you had to choose the ISO by film type. This meant that if you wanted to shoot in lower light, you had to replace the film in the camera with one that had a higher ISO. So not only did you have to carry different types of film, but you also had to remove one roll from the camera to replace it with another, even if you hadn’t used up the current roll. Now all you have to do is adjust the ISO dial on the top of the camera to select the appropriate ISO.
Having this flexibility is a powerful option, but just as with the Quality setting, the ISO setting has a direct bearing on the quality of the final image. The higher the ISO, the more digital noise the image will contain. Since the goal is to produce high-quality photographs, it is important to get control over all of the camera controls and bend them to your will. If you have the ISO set to Auto, this means the camera determines how much light is available and chooses what it believes is the correct ISO setting. Since you want to use the lowest ISO possible, you should always be manually selecting the appropriate ISO.
Which ISO you choose depends on your level of available or ambient light. For sunny days or very bright scenes, use a low ISO such as 80, 100, or 200. As the level of light is reduced, raise the ISO level. Cloudy days or indoor scenes might require you to use ISO 400. Low-light scenes, such as when you are shooting at night, will mean you need to bump up that ISO to 1600. The thing to remember is to shoot with the lowest setting possible for maximum quality.
5. Set Your Focus
The Canon focusing system is legendary for its speed and accuracy. The focus modes will give you a ton of flexibility in your shooting. There is, however, one small problem that is inherent with any focusing system. No matter how intelligent it is, the camera is looking at all of the subjects in the scene and determining which is closest to the camera. It then uses this information to determine where the proper focus point should be. It has no way of knowing what your main emphasis is, so it is using a “best guess” system. To eliminate this factor, you should set the camera so that you can ensure that you are focusing on the most important feature in the scene.
The G10 has two autofocus (AF) modes, Single and Continuous, which determine how the camera focuses. In Single mode, the camera will only focus when the shutter is pressed halfway. In Continuous mode, the camera continually focuses—which can help you get the shot, but can also deplete your battery quickly.
The G11 has the same capability, but instead of listing the modes as Single and Continuous, you just turn the Continuous AF setting on or off. For the G10, we’ll select the Single mode, and for the G11 we’ll turn off the Continuous autofocus.
Additionally, there are four AF frame modes that determine where the camera is focusing. For now, you should use the FlexiZone mode, which gives you the most control regarding where the camera focuses. Once you have become more familiar with the focus system, you can experiment with the other modes.
SETTING THE FOCUS MODE (G11)
1. To turn off the Continous AF setting, press the Menu button and, in the Shooting menu (the one with the camera icon), navigate down to the Continous AF setting. Use the Right button to select Off (A).
A
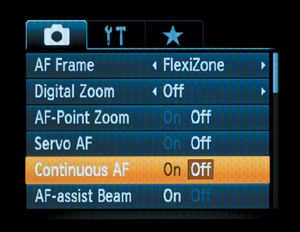
2. To set the AF frame mode to FlexiZone, navigate in the same menu up to the AF Frame setting, and use the Right button to select FlexiZone (B). Press the Menu button (or press the shutter button halfway) to return to shooting mode.
B

SETTING THE FOCUS MODE (G10)
1. To set the focus mode to Single, press the Menu button and, in the Shooting menu (the one with the camera icon), navigate down to the AF Mode setting. Use the Right button to select Single (C).
C

2. To set the AF frame mode to FlexiZone, navigate in the same menu up to the AF Frame setting, and use the Right button to select FlexiZone. Press the Menu button (or press the shutter button halfway) to return to shooting mode.
Figure 1.2 Use the directional buttons to move the AF Frame and choose where to focus.
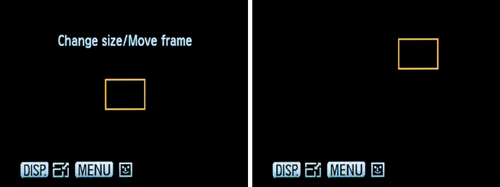
To take advantage of the FlexiZone setting when shooting, simply press the AF Frame Selector button (just above and to the left of the Control dial), then use the Left, Right, Up, and Down buttons to move the frame over your subject where you want the camera to focus (Figure 1.2). (You can also rotate the Control dial to quickly move the frame.) Press the Display button to switch to a smaller frame to specify a tighter focus area; press it again to return to the larger frame. And if people are in your shot, the camera can help you focus on them: press the Menu button to move the frame to each person’s face.
Press the shutter halfway to focus—you will hear a chirp when the camera has locked in and focused on the subject—then press it fully to take the picture. To move the frame back to the center point, press and hold the AF Frame Selector button.
You can also leave the frame in the center, focus on your subject, and then recompose your shot. Just place the focus point in the viewfinder on your subject, depress the shutter release button halfway until the camera chirps and, without letting up on the shutter button, recompose your shot and then press the shutter button all the way down to make your exposure.
6. Set the Correct White Balance
White balance correction is the process of rendering accurate colors in your final image. Most people don’t even notice that light has different color characteristics because the human eye automatically adjusts to different color temperatures—so quickly, in fact, that everything looks correct in a matter of milliseconds.
When color film ruled the world, photographers would select which film to use depending on what their light source was going to be. The most common film was balanced for daylight, but you could also buy film that was color balanced for tungsten light sources. Most other lighting situations had to be handled by using color filters over the lens. This process was necessary for the photographer’s final image to show the correct color balance of a scene.
Your camera has the ability to perform this same process automatically, but you can also choose to override it and set it manually. Luckily, you don’t need to have a deep understanding of color temperatures to control your camera’s white balance. The choices are pretty simple:
• Auto: The default setting for your camera. It is also the setting used by all of the Scene modes (see Chapter 3).
• Day Light: Most often used for general daylight/sun-lit shooting.
• Cloudy: The choice for overcast or very cloudy days. This will eliminate the blue color cast from your images.
• Tungsten: Used for any occasion where you are using regular household-type bulbs for your light source. Tungsten is a very warm light source and will result in a yellow/orange cast if you don’t correct for it.
• Fluorescent: Used to get rid of the green-blue cast that can result from using regular fluorescent lights as your dominant light source.
• Fluorescent H: Used for fluorescent lights that are balanced for daylight.
• Flash: Used whenever you’re using the built-in flash or using a flash on the hot shoe. You should select this white balance to adjust for the slightly cooler light that comes from using a flash. (The hot shoe is the small bracket located on the top of your camera, which rests just above the eyepiece. This bracket is used for attaching a more powerful flash to the camera.)
• Underwater: This will reduce the blue color cast that comes from shooting underwater. (Note: a waterproof case for your G11/G10 is sold separately.)
• Custom1 and Custom2: Indicates that you are using a customized white balance that is adjusted for a particular light source. To set the custom white balance, point the center box at something white and press the Display button. You can then select that Custom setting to shoot using that white balance value.
The G11 and G10 have two types of shooting modes to choose from using the Mode dial: Automatic and Creative. All of the Automatic modes, which are identifiable by icons, do not allow for much, if any, customization. The Creative modes, defined by letters, allow for much more control by the photographer (Figure 1.3).
1. Select one of the Creative shooting modes such as P (you can’t select the white balance when using any of the Automatic modes).
2. Press the Function/Set button in the middle of the Control dial to bring up the Function menu. Navigate to the White Balance setting (at the top of the screen).
3. Use the Left and Right buttons or the Control dial to select the proper white balance for your shooting situation.
4. Press the Function/Set button to lock in your selection.
5. Check the LCD to ensure that the proper white balance is selected. You can see right on the display how changes to the white balance setting will affect the color in your image.
FIGURE 1.3 The camera’s shooting modes are divided into the Automatic and Creative modes.

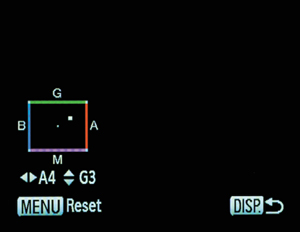
The G11 takes the white balance control a step further by letting you make a manual adjustment that applies to all of the presets. If you prefer a cooler image or want to correct for a color cast, for example, you can adjust the white balance range to be more blue, no matter which setting you choose (including Auto).
ADJUSTING THE WHITE BALANCE (G11 ONLY)
1. Choose any of the white balance presets using the steps outlined above.
2. Press the Display button.
3. Use the arrow buttons to position the white balance point in the adjustment field, moving it toward B (blue), G (green), A (amber), or M (magenta). (To reset your changes, press the Menu button.)
4. Press the Display button to exit the screen.
7. Adjust the Viewfinder Diopter
If you use the viewfinder on your G11 or G10 camera, everything may not appear in crisp focus. To remedy this, use the Diopter Adjustment Dial, located to the left of the viewfinder, to adjust for your vision (Figure 1.4). There is no “correct” setting for this adjustment so you will have to dial it in yourself. Simply look through the viewfinder (if you normally wear glasses, leave them on) and adjust the dial until everything looks sharp. It’s a small thing, but it can make a big difference when you use the viewfinder.
FIGURE 1.4 Adjust the focus of the viewfinder.

8. Know How to Override Auto Focus
As good as the Canon autofocus system is, there are times when it just isn’t doing the job for you. Often you’d like to compose a scene and specify where the actual point of focus should be. This can be especially true when you are using the camera on a tripod, where you can’t pre-focus and then recompose before shooting (as discussed earlier). To take care of this problem, enable the manual focus by pressing the MF button (Figure 1.5).
A large “MF” appears in the center of the LCD, and a bar showing a distance display appears along the right side of the screen. Using the Control dial, adjust the focus as necessary—using the distance display as a rough guide—and take your picture.
I’ll cover manual focus in more detail in later chapters.
FIGURE 1.5 Press the MF button to manually focus.

9. Review Your Shots
One of the greatest features of a digital camera is its ability to give instant feedback. By reviewing your images on the camera’s LCD screen, you can instantly tell whether you got your shot. This visual feedback allows you to make adjustments on the fly and make certain that all of your adjustments are correct before moving on.
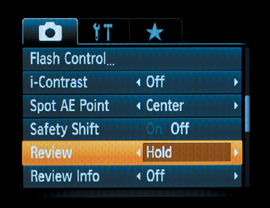
When you first press the shutter release button, your camera quickly processes the shot and then displays the image on the LCD display. The default setting for that display is only two seconds. Personally, I don’t find this to be nearly enough time to take in all the visual feedback that I might want. Instead of using this “quick glance” method, change your display time to the Hold setting. This will keep the image up on the display until you decide that you are ready to move on to your next shot. (Note that this option will drain your batteries a little faster than the default setting.)
CHANGING THE REVIEW TIME SETTING
1. Press the Menu button and, in the Shooting menu, navigate to the Review setting.
2. Use the Right button to select the Hold option (or choose a longer increment, up to 10 seconds).
3. Press the Menu button again to return to the shooting mode.
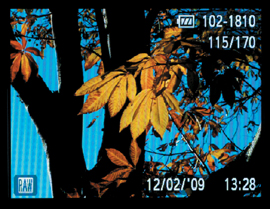
When reviewing your images in Playback mode (by pressing the Playback button), four display modes give you different amounts of information. The default view displays only your image.
For more visual feedback, press the Display button to scroll through the other display options. Press it once to see the photo’s Quality setting, the image number that you are currently viewing (“3/207” would mean that you’re looking at the third image of 207 total images) and its file name, the time and date of the shot, and the camera’s battery level (Figure 1.6).
FIGURE 1.6 The basic shot information.
Pressing the button a second time results in a huge amount of information being displayed along with the image. You will now be able to see the following items in your display: shutter speed, aperture, exposure compensation, image name, image thumbnail, histogram, shooting mode, ISO, white balance setting, quality setting, size of the image in megabytes and pixels, image number, date, and time (Figure 1.7). This display also shows “blinkies,” or areas that are blown out with pure white (see Chapter 4).
FIGURE 1.7 This display mode offers you a lot of information at a glance.
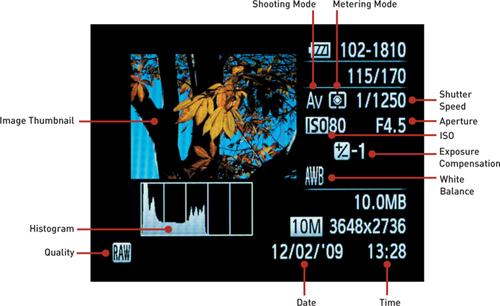
You probably won’t want to use this display option as your default review mode, but if you are trying to figure out what settings you used or if you want to consult the histogram (see the sidebar “The Value of the Histogram,” just ahead), you now have all this great information available.
FIGURE 1.8 The fourth display option shows you the Focus Check display.
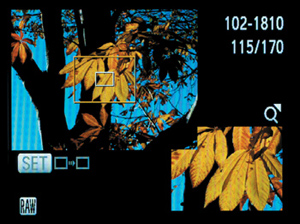
The fourth display option reveals the Focus Check display, which shows a magnified area of the image, allowing you to confirm that you’ve achieved sharp focus in your image (Figure 1.8).
Pressing the shutter release or Menu button results in closing the image display. To get your image back up on the LCD screen, simply press the Playback button on the back of the camera.
10. Hold Your Camera for Proper Shooting
You might think this is really dumb, but you should take a few seconds to read this over and make sure that you are giving yourself the best chance for great images. Many people hold their cameras in a fashion that is either unstable or just plain uncomfortable-looking. Learning the correct way to hold your camera now will result in better images later. The purpose of practicing correct shooting form is to provide the most stable platform possible for your camera (besides using a tripod, of course).
The basics of properly holding the camera begin with grasping the camera body with the right hand. You will quickly find that most of the important camera controls are within easy reach of your thumb and forefinger. Keeping the camera as close to you as possible will help stabilize it—and while you will usually use the LCD screen (as opposed to the viewfinder) to frame and focus your shots, there are still a couple of things you can do to reduce self-induced “camera shake”: support the camera with your left hand, and draw your elbows as closely to your body as you can. This helps stabilize your shooting position.
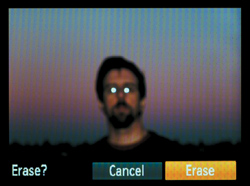
Deleting or erasing images is a fairly simple process that is covered on page 29 of the G11 manual and on page 20 of the G10 manual. To quickly get you on your way, simply press the Playback button and spin the Control dial until you find the picture you want to delete. Then press the Image Erase button—the one that looks like a trashcan—just above and to the left of the Control dial. Select Erase, and then press the Set button (Figure 1.9).
Caution: Once you have deleted an image, it is gone for good. Make sure you don’t want it before you drop it in the trash.
FIGURE 1.9 Some pictures you know are destined for the trash bin.
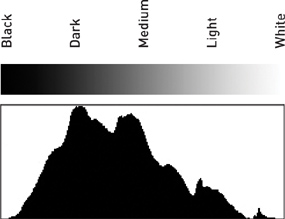
Simply put, histograms are two-dimensional representations of your images in graph form. The G11 and G10 offer a luminance histogram when you’re shooting (press the Display button to view it), which is valuable when evaluating your exposures. In Figure 1.10, you see what looks like a mountain range. The graph represents the entire tonal range that your camera can capture, from the whitest whites to the blackest blacks. The left side represents black, all the way to the right side, which represents white. The heights of the peaks represent the number of pixels that contain those luminance levels (a tall peak in the middle means your image contains a large amount of medium-bright pixels). Looking at this figure, it is hard to determine where all of the ranges of light and dark areas are and how much of each there are. Looking at the histogram, you can see that the largest peak of the graph is in the middle and trails off as it reaches the edges. In most cases, you would look for this type of histogram, indicating that you captured the entire range of tones, from dark to light, in your image. Knowing that is fine, but here is where the information really gets useful.
When you see a histogram that has a spike or peak riding up the far left or right side of the graph, it means that you are clipping detail from your image. In essence, you are trying to record values that are either too dark or too light for your sensor to accurately record. This is usually an indication of over- or underexposure. It also means you need to correct your exposure so that important details will not record as solid black or white pixels (which is what happens when clipping occurs). There are times, however, when some clipping is acceptable. If you’re photographing a scene where the sun will be in the frame, you can expect some clipping because the sun is just too bright to hold any detail. Likewise, if you are shooting something that has true blacks in it—think coal in a mineshaft at midnight—there are most certainly going to be some true blacks with no detail in your shot. The main goal is to ensure that you aren’t clipping any “important” visual information, and that is achieved by keeping an eye on your histogram.
FIGURE 1.10 This is a typical histogram, where the dark to light tones run from left to right. The black-to-white gradient above the graph demonstrates where the tones lie on the graph and would not appear above your camera histogram display.
Take a look at Figure 1.11. The histogram displayed on the image shows a heavy skew toward the left with almost no part of the mountain touching the right side. This is a good example of what an underexposed image histogram looks like. Now look at Figure 1.12 and compare the histogram for the image that was correctly exposed. Notice that even though there are distinct peaks on the graph, there is a more even distribution across the entire histogram.
FIGURE 1.11 This image is about two stops underexposed. Notice the histogram is skewed to the left.

FIGURE 1.12 This histogram reflects an image with better exposure.

Chapter 1 Assignments
Begin your shooting assignments by setting up and using all of the elements of the Top Ten list. Even though we have yet to cover the Creative shooting modes, you should set your camera to the P (Program) mode on the Mode dial. This will allow you to interact with the various settings and menus that have been covered thus far.
Basic camera setup
Charge your battery to 100% to get it started on a life of dependable service. Next, using your newfound knowledge, set up your camera to address Image Quality.
Selecting the proper white balance
Take your camera outside during daylight and photograph the same scene using different white balance settings. Pay close attention to how each setting affects the overall color cast of your images. Next, move inside and repeat the exercise while shooting in a tungsten lighting environment. Finally, find a fluorescent light source and repeat one more time.
Focusing with FlexiZone
Change your camera setting so that you are focusing by pressing the shutter halfway—turning Continuous AF off (G11) or using the Single focusing mode (G10). Also, set your AF frame mode to FlexiZone. Practice focusing on a subject and then recomposing before actually taking the picture, and also practice putting the focus frame over your subject and focusing. Try doing this with subjects at varying distances.
Evaluating your pictures with the LCD
Set up your image display properties and then review some of your previous assignment images using the different display modes. Review your shooting information for each image, and take a look at the histograms to see how the content of your photo affects the shape of the histograms.
Discovering the manual focus mode
Change your focus mode from auto to manual focus, and practice using the Control dial to lock the focus. Get familiar with how to use manual focus to achieve sharp images.
Get a grip: proper camera holding
This final assignment is something that you should practice every time you shoot: proper grip and stance for shooting with your camera. Use the described technique and then shoot a series of images. Try comparing it with improper techniques (camera raised above your head with one hand, standing on a wire and juggling chainsaws while shooting, and the like) to compare the stability of the grip and stance.