
5. Moving Target

Shooting Action, Stopping Motion, and More
Now that you have learned about the Creative modes, it’s time to put your newfound knowledge to good use. Whether you’re shooting the action at a sporting event or a child on a merry-go-round, you’ll learn techniques that will help you bring out the best in your photography when your subject is in motion.
The number one thing to know when trying to capture a moving target is that speed is king! I’m not talking about how fast your subject is moving, but rather how fast your shutter is opening and closing. Shutter speed is the key to freezing a moment in time—but also to conveying movement. It’s all in how you turn the dial. There are also some other considerations for taking your shot to the next level, which we’ll explore in this chapter.
Poring Over the Picture

Stop Right There!
Shutter speed is the main tool in the photographer’s arsenal for capturing great action shots. The ability to freeze a moment in time often makes the difference between a good shot and a great one. To take advantage of this concept, you should have a good grasp of the relationship between shutter speed and movement. When you press the shutter release button, your camera goes into action by activating the sensor for a predetermined length of time. The longer you leave your shutter open, the more your subject moves across the frame, so common sense dictates that the first thing to consider is just how fast your subject is moving.
Typically, you will be working in fractions of a second. How many fractions depends on several factors. Subject movement, while simple in concept, is actually based on three factors. The first is the direction of travel. Is the subject moving across your field of view (left to right) or traveling toward or away from you? The second consideration is the actual speed at which the subject is moving. There is a big difference between a moving sports car and child on a bicycle. Finally, the distance from you to the subject has a direct bearing on how fast the action seems to be taking place. Let’s take a brief look at each of these factors to see how they might affect your shooting.
Direction of Travel
Typically, the first thing that people think about when taking an action shot is how fast the subject is moving, but in reality the first consideration should be the direction of travel. Where you are positioned in relation to the subject’s direction of travel is critically important in selecting the proper shutter speed. When you open your shutter, the lens gathers light from your subject and records it on the camera sensor. If the subject is moving across your viewfinder, you need a faster shutter speed to keep that lateral movement from being recorded as a streak across your image. Subjects that are moving perpendicular to your shooting location do not move across your viewfinder and appear to be more stationary. This allows you to use a slightly slower shutter speed. A subject that is moving in a diagonal direction—both across the frame and toward or away from you—requires a shutter speed in between the two.
Subject Speed
Once the angle of motion has been determined, you can then assess the speed at which the subject is traveling. The faster your subject moves, the faster your shutter speed needs to be in order to “freeze” that subject (Figure 5.1). A person walking across your frame might only require a shutter speed of 1/60 of a second, while a cyclist traveling in the same direction would call for 1/500 of a second. That same cyclist traveling toward you at the same rate of speed, rather than across the frame, might only require a shutter speed of 1/125 of a second. You can start to see how the relationship of speed and direction comes into play in your decision-making process.
FIGURE 5.1 A fast-moving subject that is crossing your path will require a faster shutter speed. [Photo: Jodie Griggs]

Subject-To-Camera Distance
So now we know both the direction and the speed of your subject. The final factor to address is the distance between you and the action. Picture yourself looking at a highway full of cars from up in a tall building a quarter of a mile from the road. As you stare down at the traffic moving along at 55 miles per hour, the cars and trucks seem to be slowly moving along the roadway. Now picture yourself standing in the median of that same road as the same traffic flies by at the same rate of speed.
Although the traffic is moving at the same speed, the shorter distance between you and the traffic makes the cars look like they are moving much faster. This is because your field of view is much narrower; therefore, the subjects are not going to present themselves within the frame for the same length of time. The concept of distance applies to the length of your lens as well. If your lens is at a wide-angle setting, you can probably get away with a slower shutter speed than if you were zoomed in, which puts you in the heart of the action. It all has to do with your field of view. That telephoto zoom gets you “closer” to the action—and the closer you are, the faster your subject moves across your viewfinder.
Using Shutter Priority (Tv) Mode to Stop Motion
As we covered in the last chapter, Tv mode gives you control over shutter speed, while handing over aperture selection to the camera. The ability to concentrate on just one exposure factor helps you quickly make changes on the fly while staying glued to your camera’s LCD and your subject.
There are a couple of things to consider when using Tv mode, both of which have to do with the amount of light that is available when shooting. While you have control over which shutter speed you select in Tv mode, the range of available shutter speeds depends largely on how well your subject is lit.
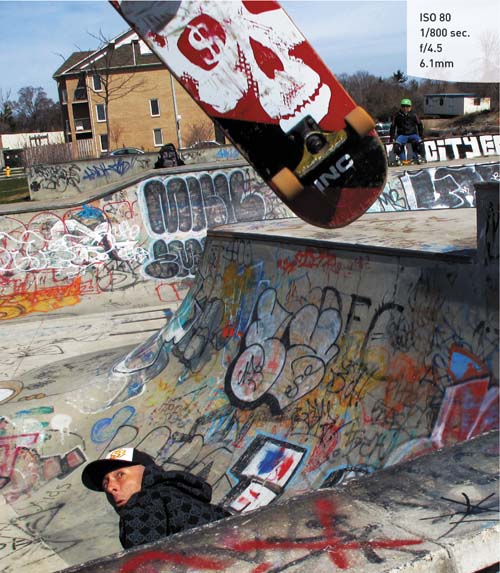
Typically, when shooting fast-paced action or trying to capture something that happens quickly, you will be working with very fast shutter speeds (Figure 5.2). This means your lens will probably be set to its largest aperture. Although the G11 and G10 offer a maximum aperture of f/2.8, that applies only when shooting at the lens’s widest setting. As you zoom, the largest aperture available to you reduces; the largest aperture you can expect when fully zoomed is f/4.5. If the available light is not sufficient for the shutter speed selected, you’ll need to raise the ISO of the camera to balance the exposure.
Let’s say you’re shooting a baseball game at night, and you want to get some great action shots. You set your camera to Tv mode and, after testing out some shutter speeds, determine that you need to shoot at 1/500 of a second to freeze the action on the field. When you press the shutter button halfway, you notice that the f-stop readout is blinking at f/4.5. This is your camera’s way of telling you that the lens has now reached its maximum aperture and any pictures you shoot are going to be underexposed at the currently selected shutter speed. You could slow your shutter speed down until the aperture reading stops blinking, but then you would get images with too much motion blur.
The alternative is to raise your ISO to a level that is fast enough for a proper exposure. The key here is to always use the lowest ISO you can get away with. That might mean ISO 200 in bright sunny conditions or ISO 1600 for an indoor or night situation. Just remember that the higher the ISO, the greater the amount of noise in your image. (This is the reason you see professional sports photographers using those mammoth lenses perched atop a monopod: they could use a smaller lens, but to get those very large apertures they need a huge piece of glass on the front of the lens. The larger the glass on the front of the lens, the more light it gathers, and the larger the aperture for shooting. For the working pro, the large aperture translates into low ISO—and thus low noise—fast shutter speeds, and razor-sharp action.)
FIGURE 5.2 Here’s an enlarged detail of a photo we saw in Chapter 4. The fast shutter speed captures the skateboard mid-air with very little blurring. (Increasing the ISO may have frozen it completely.) Also note that the f/4.5 aperture—the middle of the G10’s range—keeps the background elements in focus, too. [Photo: Anneliese Voigt]
ADJUSTING YOUR ISO AS YOU SHOOT
1. Press the shutter button halfway and check for the blinking aperture readout in the bottom portion of the LCD.
2. If it is blinking, adjust the ISO dial to the next highest value.
3. Lightly press the shutter button and check to see if the aperture is still blinking.
4. If it’s not blinking, shoot away. If it is, repeat steps 2 and 3 until it is set correctly.
Using Aperture Priority (Av) Mode to Isolate Your Subject
One of the benefits of working in Tv mode with fast shutter speeds is that, more often than not, you will be shooting with the largest aperture available. Shooting with a large aperture allows you to use faster shutter speeds, but it also narrows your depth of field.
To isolate your subject in order to focus your viewer’s attention on it, a larger aperture is required. The larger aperture reduces the foreground and background sharpness: the larger the aperture, the more blurred they will be.
The reason I bring this up here is that when you are shooting most sporting events, the idea is to isolate your main subject by having it in focus while the rest of the image has some amount of blur. This sharp focus draws your viewer right to the subject. Studies have shown that the eye is drawn to sharp areas before moving on to the blurry areas. Also, depending on what your subject matter is, there can be a tendency to get distracted by a busy background if everything in the photo is equally sharp. Without a narrow depth of field, it might be difficult for the viewer to establish exactly what the main subject is in your picture.
As we established in Chapter 4, Av mode is the key to controlling aperture and, in turn, depth of field. So how do you know when you should use Av mode as opposed to Tv mode? It’s not a simple answer, but your LCD screen can help you make this determination. The best scenario for using Av mode is a brightly lit scene where maximum apertures will still give you plenty of shutter speed to stop the action.
Let’s say that you are shooting a soccer game in the midday sun. If you have determined that you need something between 1/500 and 1/1250 of a second for stopping the action, you could set your camera to a high shutter speed in Tv mode and just start shooting. But you also want to be using an aperture of, say, f/4.5 to get that narrow depth of field. Here’s the problem: if you set your camera to Tv and select 1/1000 of a second as a nice compromise, you might get that desired f/stop—but you might not. As the meter is trained on your moving subject, the light levels could rise or fall, which might actually change that desired f-stop to something higher like f/5.6 or even f/8. Now the depth of field is extended, and you will no longer get that nice isolation and separation that you wanted.
To rectify this, switch the camera to Av mode and select f/4.5 as your aperture. Now, as you begin shooting, the camera holds that aperture and makes exposure adjustments with the shutter speed (Figure 5.3). As I said before, this works well when you have lots of light—enough light so that you can have a high-enough shutter speed without introducing motion blur.
FIGURE 5.3 Several factors contribute to the appearance of this photo: a high shutter speed catches the droplet just as it’s separating; a tight zoom frames the shot and helps to provide a shallow depth of field with the focus on the droplet’s stem; and a relatively wide aperture (the widest possible at that zoom level) enhances the depth of field and provides enough light that the photographer didn’t need to increase the ISO. [Photo: Dean Ducas]

Manual Focus for Anticipated Action
While I utilize the automatic focus modes for the majority of my shooting, there are times when I like to fall back on manual focus. This is usually when I know when and where the action will occur and I want to capture the subject as it crosses a certain plane of focus. This is useful in sports like motocross or track and field events, where the subjects are on a defined track, or when you’re setting up a fast-moving shot. By pre-focusing the camera, all I have to do is wait for the subject to approach my point of focus and then start firing the camera.
When reviewing your shots on the LCD, don’t be fooled by the display. The smaller your image is, the sharper it will look. To ensure that you are getting sharp, blur-free images, make sure that you zoom in on your LCD display.
To zoom in on your images, press the Image Review button located above the LCD display and then turn the Zoom lever clockwise to zoom (Figure 5.4). Continue turning the lever to increase the zoom ratio.
To zoom back out, simply turn the Zoom lever counterclockwise.
Another option is to enable the Focus Check review feature, which displays a smaller preview of your full image but also includes a zoomed-in portion; move the Zoom lever to quickly increase the size of the portion to check the image’s focus (see Chapter 1).
FIGURE 5.4 Zooming in on your image helps you confirm that the image is really sharp.

Keep Them in Focus with Servo AF
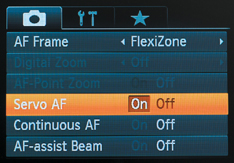
With the exposure issue handled for the moment, let’s move on to an area that is equally important: focusing. As you learned in Chapter 1, a few autofocus options are available to you. We disabled the Continuous autofocus feature to preserve battery life, but the capability to let the camera work to keep a shot in focus is definitely helpful when shooting action. The alternative is to engage Servo AF mode, which offers continuous focus, but only when the shutter button is pressed halfway down; normally, half-pressing the shutter button locks focus. When using Servo AF mode, the AF Frame appers as a blue outline. You can also press the AF Frame Selector button to reposition the frame and specify where to concentrate the focus.
SELECTING SERVO AF MODE
1. While you’re using one of the Creative modes, press the Menu button.
2. Press the Down button to highlight Servo AF.
3. Press the Left or Right button to switch Servo AF to On.
4. Press the Menu button to exit.
Keeping up with Continuous Drive Mode
Getting great focus is one thing, but capturing the best moment on the sensor can be difficult if you are shooting just one frame at a time. In the world of sports, and in life in general, things move pretty fast. If you blink, you might miss it. The same can be said for shooting in the Single Shot drive mode.
The drive mode determines how fast your camera will take pictures. The Single Shot drive mode is for taking one photograph at a time. With every full press of the shutter, the camera will take a single image. The Continuous mode allows for a more rapid capture rate. Think of it like a machine gun. In Continuous mode, the camera continues to take pictures as long as the shutter release button is held down (or until the buffer fills up).
The Continuous—or “burst”—mode lets you capture a series of images at up to 1.1 frames per second (G11) or 1.3 frames per second (G10). (No, you can’t actually capture 0.3 frames—it’s an average.) Admittedly, that’s not terribly impressive when you’re shooting fast action, especially compared to the output that DSLRs can produce (anywhere from 3 to 12 or more frames per second). However, that’s still faster than shooting in Single Shot mode when you take into consideration the time it takes to write the image to the memory card and prepare for the next shot. See Figure 5.5.
The G11 and G10 also feature two other Continuous shooting modes: Continuous Shooting AF engages the autofocus while firing off shots to try to keep each shot sharp; the regular Continuous mode locks focus when you press the shutter button halfway. Continuous Shooting LV replaces its AF counterpart when you’ve set a manual focus point. The shots-per-second rate is reduced to 0.7 images per second for these two modes, since they’re performing other processing tasks.
Unlike most features of both cameras, Canon moved the Continuous shooting mode control between the G10 and G11. Here’s where to find them.
SETTING UP THE CONTINUOUS DRIVE MODE (G11)
1. Press the Function/Set button.
2. Press the Down button until you select the Drive Mode icon.
3. Press the Left or Right button, or rotate the Control dial, to choose a mode. The icon that looks like stacked-up little rectangles is the Continuous mode.
4. Press the Function/Set button to lock in your change.

SETTING UP THE CONTINUOUS DRIVE MODE (G10)
1. Press the Continuous Shooting/Self Timer button just below the Function/Set button.
2. Press the Down button, or rotate the Control dial, to choose a drive mode.
3. Press the Function/Set button to lock in your change.

To shoot, just press the shutter button and hold until the desired number of frames has been captured.
Your camera has an internal memory, called a “buffer,” where images are stored while they are being processed prior to being moved to your memory card. Depending on the image format you are using, the buffer might fill up, and the camera will stop shooting until space is made in the buffer for new images. If this happens, you will see the word “Busy” appear on the LCD panel. The camera readout in the viewfinder tells you how many frames you have available.
FIGURE 5.5 Use the Continuous drive mode to capture sequences or make sure you’re getting the action. [Photos: Jeff Carlson]

A Sense of Motion
Shooting action isn’t always about freezing the action. There are times when you want to convey a sense of motion so the viewer can get a feel for the movement and flow of an event. Two techniques you can use to achieve this effect are panning and motion blur.
Panning
Panning has been used for decades to capture the speed of a moving object as it moves across the frame. Panning is achieved by following your subject across your frame, moving your camera along with the subject, and using a slower-than-normal shutter speed so that the background (and sometimes even a bit of the subject) has a sideways blur but the main portion of your subject is sharp and blur-free (Figure 5.6). It doesn’t work well for subjects that are moving toward or away from you. The key to a great panning shot is selecting the right shutter speed: too fast and you won’t get the desired blurring of the background; too slow and the subject will have too much blur and will not be recognizable. Practice the technique until you can achieve a smooth motion with your camera that follows along with your subject. The other thing to remember when panning is to follow through even after the shutter has closed. This will keep the motion smooth and give you better images.
FIGURE 5.6 Following the subject as it moves across the field of view allows for a slower shutter speed and adds a sense of motion. [Photo: Thespina Kyriakides]

Motion Blur
Another way to let the viewer in on the feel of the action is to simply include some blur in the image. This isn’t accidental blur from choosing the wrong shutter speed. This blur is more exaggerated, and it tells a story. In Figure 5.7, a fast shutter speed would have surely frozen the action, but the “action” in this shot isn’t that there are cars in the road. Instead, the story is the lone soldier standing just to the side of traffic, not observing from a distance. The longer shutter speed turns the road into a blur of light.
Just as in panning, there is no preordained shutter speed to use for this effect. It’s simply a matter of trial and error until you have a look that conveys the action. The key to this technique is the correct shutter speed combined with keeping the camera still during the exposure. You are trying to capture the motion of the subject, not the photographer or the camera, so use a good shooting stance or even a tripod.
FIGURE 5.7 A long shutter speed blurs the passing cars and adds emphasis to the soldier standing guard. [Photo: RK Hamilton]

Tips for Shooting Action
Give Them Somewhere to go
Whether you are shooting something as simple as your child’s soccer match or as complex as the wild motion of a bucking bronco, where you place the subject in the frame is equally as important as how well you expose the image. A poorly composed shot can completely ruin a great moment by not holding the viewer’s attention.
The one mistake I see many times in action photography is that the photographer doesn’t use the frame properly. If you are dealing with a subject that is moving horizontally across your field of view, give the subject somewhere to go by placing them to the side of the frame, with their motion leading toward the middle of the frame (Figure 5.8). This offsetting of the subject will introduce a sense of direction and anticipation for the viewer. Unless you’re going to completely fill the image with the action, try to avoid placing your subject in the middle of the frame.
FIGURE 5.8 Try to leave space in front of your subject to lead the action in a direction. [Photo: Scott Edwards]

Get in Front of the Action
Here’s another one. When shooting action, show the action coming toward you. Don’t shoot the action going away from you. People want to see faces.
Faces convey the action, the drive, the sense of urgency, and the emotion of the moment. So if you are shooting action involving people, always position yourself so that the action is either coming at you or is at least perpendicular to your position.
Put Your Camera in a Different Place
Changing your vantage point is a great way of finding new angles. Shooting from a low position with the lens at a wide-angle setting might let you incorporate some foreground to give depth to the image. Shooting from farther away while zoomed in will compress the elements in a scene and allow you to crop in tighter on the action. Don’t be afraid to experiment and try new things. The image in Figure 5.9 is a great example of using the compact size of the G10 to one’s advantage.
FIGURE 5.9 Taking a photo of the road would be fine, as would using a long shutter speed to blur the scenery as the motorcycle sped past it. Instead, the photographer caught the reflection of the road, the scenery, some sun flare, and the bike in his helmet’s visor. (The black color of the camera also nicely blends in with the shadows of the bike, so at first glance you don’t notice the G10 in the shot.) [Photo: Dean Ducas]

Chapter 5 Assignments
The mechanics of motion
For this first assignment, you need to find some action. Explore the relationship between the speed of an object and its direction of travel. Use the same shutter speed to record your subject moving toward you and across your view. Try using the same shutter speed for both to compare the difference made by the direction of travel.
Wide vs. telephoto
Just as with the first assignment, photograph a subject moving in different directions, but this time, switch between the wide-angle and telephoto positions of the lens. Check out how the telephoto setting will require faster shutter speeds than its wide-angle setting.
Getting a feel for focusing modes
Switch the focusing control to Servo AF mode, find a moving subject, and become familiar with the way the mode works compared to the normal AF setting.
Anticipating the spot using manual focus
For this assignment, you will need to find a subject that you know will cross a specific line that you can pre-focus on. A street with moderate traffic works well for this. Focus on a spot on the street that the cars will travel across and switch to manual focus. To do this right, you need to set the drive mode on the camera to the Continuous mode. Now, when a car approaches the spot, start shooting. Try shooting in three- or four-frame bursts.
Following the action
Panning is a great way to show motion. To begin, find a subject that will move across your path at a steady speed and practice following it in your viewfinder from side to side. Now, with the camera in Tv mode, set your shutter speed to 1/30 of a second and the focus mode to Servo AF. Now pan along with the subject and shoot as it moves across your view. Experiment with different shutter speeds and focal lengths. Panning is one of those skills that takes some time to get a feel for, so try it with different types of subjects moving at different speeds.
Feeling the movement
Instead of panning with the motion, use a stationary camera position and adjust the shutter speed until you get a blurred effect that gives the sense of motion while still being able to identify the subject. There is a big difference between a slightly blurred photo that looks like you just picked the wrong shutter speed and one that looks intentional for the purpose of showing motion. Just like panning, it will take some experimentation to find just the right shutter speed to achieve the desired effect.