

The pink-hued clouds at sunset contrast beautifully with the blue tones of the snow encasing these Lodgepole Pine trees along the boardwalk through Midway Geyser Basin in Yellowstone National Park. The trees are bent and twisted from the snow and dense frost because the steam from warm springs continually adds new frosty layers. Nikon D300, Nikon 18–200mm lens, ISO 640, f/13, 1/200 second, Sun WB, manual metering and AF-C autofocus with back-button control.
The Magic of Light
Every photographer we know is convinced they are able to see the light. By watching thousands of clients shoot in the field and viewing untold images that are brought from home, in truth we know most shutterbugs really do not “see” the light. They see only when there is adequate light to photograph, but they simply do not comprehend the way the color of the light, the direction of the light, and the contrast in the light work together to produce truly photogenic light that consistently results in beautiful images.
I was lucky in two ways early in my photo career. First, by my early twenties, I already knew that my passion was photographing natural things. Forty years later, that passion has only intensified! Second, Larry West and John Shaw, my first and only photo instructors in the mid-1970s in Michigan emphasized light repeatedly. I made it a habit to always photograph a subject when the light was superb, or I modified the light with a diffuser, reflector, or flash to make it far more suitable for good images. If the light is unattractive and I cannot make it better, then I do not shoot pictures. Instead, I use the time to scout for subjects and plan to revisit them when lighting conditions are optimum. Shooting only with exquisite light is a sure-fire way to capture many gorgeous images.
Mastering the exceptional shooting habits explained in this book is crucial for success. Learn your camera gear well and use it efficiently. Sometimes fabulous light lasts for lengthy periods of time, but, at other times, spectacular light is fleeting. Should a rainbow suddenly appear in your landscape, you may only have seconds to capture the colors before a cloud blocks the sun and the rainbow fades away!

Most landscapes photograph best when the light is dim, either early or late in the day, on a cloudy day, or even at night. Bright undiffused midday sun is usually unfavorable for most scenes because the contrast is too great and the color is undesirable. The Milky Way is framed with the cattails at the bottom and a large aspen tree on the left. Nikon D4, Nikon 14–24mm f/2.8 lens, ISO 3200, f/3.2, 20 seconds, 3700K WB, manual metering and focusing.
THE QUALITIES OF LIGHT
QUANTITY
The amount of light is what most photographers notice first and that is what they “see.” If the light is bright enough, they know it is possible to shoot images. If the ambient light is dim, consequently they can’t shoot images. The quantity of light isn’t much of a limiting factor anymore. The quality produced by high ISOs such as ISO 1600 and ISO 3200 nowadays allows you to photograph action while shooting in quite dim light. On a tripod, you can make fine landscape images by moonlight and even capture the millions of stars that make up the Milky Way. No matter how dim the ambient light, you can always find subjects to photograph. Even if the ambient light is almost non-existent, you can always use flash to shoot images.
There are times when the ambient light is too bright for your photo purposes. If you are trying to show the motion of flowers blowing in the breeze or waves crashing on the beach, bright overcast or direct sun is too bright to allow the slow shutter speeds necessary to show motion. It is possible to use a variable neutral density filter to reduce the ambient light enough to be successful. It is undemanding to plan to be at a spot when the ambient light is sufficiently dim by arriving a little before dusk. Obviously, as the sun sets, the light diminishes to the point when long exposure times become necessary.
COLOR
Ambient light varies considerably in color. Everyone knows sunlight is redder early and late in the day when the sun hovers low in the sky. The visible light spectrum is made up of red, orange, yellow, green, blue, indigo, and violet. The longer red and orange wavelengths penetrate more of the atmosphere when the sun is near the horizon. The shorter wavelengths of green through violet do not penetrate the dirt particles and water molecules too well and most are filtered out of the light. Since the sunshine is made up of a preponderance of red light at dawn and dusk, the light has a strong reddish tint to it, which is beautifully photogenic for many subjects—though not all. Red light is superb to photograph mammals, mountain landscapes, farm scenes, and considerably more, but terrible to photograph blue subjects such as bluebonnet wildflowers.
Overcast days may be bright or dark, depending on how thick the cloud cover is at the time. In both cases, clouds tend to scatter blue light, so the light takes on a slightly blue cast that appears in your images. As you look at the subject in blue light, you may not see the blue colorcast as our brains modify the look of what we see because human skin isn’t blue. However, your camera captures the excess blue light and it actually appears in the image. Imagine a fine bright sunny June day! The sky is cobalt blue and the sunshine on the subject produces neutral colors—neither too blue nor red. Why is the sky blue? Dust particles and water molecules scatter much of the blue, indigo, and violet rays of light because these short wavelengths do not penetrate obstacles effectively. This scattered light reflects in all directions. Some of it strikes the earth and your eyes. The sky is blue because the light it reflects is primarily blue in color. Therefore, should you photograph anything in the shade, especially open shade in which there are no overhead obstacles, such as a tree canopy, to block the light, the ambient light does have a pronounced blue unpleasant colorcast. Fortunately, there are simple ways to conquer it.
The color of your surroundings dramatically affects the colors the camera captures. Photograph a white mushroom in a green beach-maple forest during summer and you will notice a strong green colorcast in the image. Leaves are green because they primarily reflect green light while absorbing other colors. A red barn reflects red light, a yellow American goldfinch reflects yellow light, and a white ring-billed gull reflects all colors to produce white light. The color of the light and the subject combine to produce colors that the camera sensor captures. For this reason, we prefer using the RGB histogram built in our camera to avoid overexposing an important color. The most difficult situation for the camera’s sensor is a colored subject that matches the color of the light illuminating it. A red barn in the red light of dawn, a green flower in the green light of a summer forest, or a patch of blue flowers in the blue light of open shade are all situations where it is easy to overexpose the prevailing color with an averaging histogram. If you use the RGB histogram, you will immediately see when a primary color—red, green, and blue—is overexposed. Reduce the exposure to compensate.
White Balance Controls
Digital imaging offers numerous advantages. One benefit includes being able to change the colors in your images using camera settings called White Balance. The options vary among cameras. Different makers may use varying names for the same thing. Most cameras offer the following choices: Auto, Daylight (Sun), Cloudy, Shade, Tungsten, Fluorescent, Flash, Custom White Balance, and Color Temperature. These selections allow you to modify the color of the images captured by your camera at the time they are shot rather than changing it later with software.

Grasshoppers are lethargic on cool dewy Michigan mornings. The light in the shade has a strong blue colorcast, which is undesirable for this warm-toned grasshopper. Canon 7D, Canon 180mm f/3.5 macro lens, ISO 100, f/16, 1/2 second, Daylight (Sun) WB, manual focus and metering.

The Shade white balance option adds yellow to the image, which reduces the blue colorcast making this grasshopper more naturally colored. The only change to the shooting data is the Shade white balance option.
JPEG vs RAW
There is no wrong answer because it depends on your needs. A RAW image is simply an image data file that contains all of the data the sensor collected and contains largely unmodified information collected by the sensor. True, the original photons of light the sensor measures are analog data digitized (turned into numbers) by the camera’s on-board analog-to-digital converter, but the white balance choice does not modify the colors. A JPEG starts as RAW data, but the camera processes the data by adjusting the colors, sharpening the image, perhaps applying picture styles, and then finally shrinking the data down by discarding much of them to produce an 8-bit image that can be read by everything. RAW files require proprietary software to view them. They keep all of their data so they are much bigger files that offer the greatest opportunity to adjust with image processing software.
If RAW is largely unprocessed data, and you shoot only RAW, how is it that you can see the image on the LCD display as soon as you shoot? All RAW files contain a small embedded JPEG so you can see the image, generate a histogram, and allow the highlight alert to function. Setting in-camera processing parameters—picture styles and white balance choices—does affect the embedded JPEG, but not the RAW data file. Since the image displayed on the camera’s LCD is derived from a JPEG, white balance does also affect the histogram and the highlight alert somewhat.
Does it matter whether you shoot RAW or JPEG? Yes, but it also depends on your needs. If you want the images already processed because either you do not have time to process them yourself and/or do not want to learn how to do it, then JPEG is perfect for your needs. JPEGs are smaller files so they take up less space on the camera’s memory card, fewer data are quicker to load to the computer, and the camera’s buffer is less likely to fill up, so you can shoot longer bursts of images. Photographers who demand the best image quality and greatest processing flexibility prefer RAW. Serious fine-art printmakers customarily want to start with RAW data. If you occasionally want both RAW and JPEGs of the same image, then most cameras allow you to set RAW + JPEG. That is what we do, although, we are considering the use of RAW only. It is easy enough to change the RAW image into a JPEG. Every image printed in this book began as a RAW file. Barbara processes the image with Photoshop and then converts it back to a JPEG for use in the book. Barbara does not start with a JPEG because if it is overly processed it tends to pick up artifacts.
Picture Styles
Your camera may offer a way to affect the overall color balance of your images. Canon calls these picture styles. For example, the Canon 5D Mark III offers six picture styles: Standard, Portrait, Landscape, Neutral, Faithful, and Monochrome. These settings do not change the RAW data, but they do change the appearance of the JPEG image. That includes the embedded JPEG in the RAW file. The appearance of the image will be different, even if the camera is set to RAW only. Nevertheless, for purposes of deciding what images I wish to keep or discard, I like my JPEGs to be attractive. Therefore, I tend to use the Landscape Picture Style because greens and blues appear more vivid. Picture Styles will affect the resulting histogram, but the change in histogram data position isn’t great and is nothing to worry about.
Choosing the White Balance
Auto
The camera will automatically adjust the white balance for the prevailing light by neutralizing colorcasts. Many photographers who shoot only RAW and plan to adjust the colors while processing RAW images leave their cameras set to Auto. This approach eliminates the need to switch to different white balance settings. The RAW file allows one to adjust the colors in the image significantly with no loss of quality!
Daylight (Sun)
Choose this Daylight WB when photographing in direct sunshine to match the light better. If the sunlight is red, then you will get this usually desirable colorcast in the image.
Cloudy
The light has a bluish colorcast on an overcast day because the clouds scatter a high proportion of blue light. To reduce the excess blue in the image, set Cloudy WB. The camera adds yellow, neutralizing the blue.

The vintage tractor driving across the tulip field at the Wooden Shoe tulip farm benefits from using the Sun (Canon calls it Daylight) white balance option to avoid colorcasts because the ambient light is from a warm-colored light source—the sun. Nikon D4, Nikon 14–24mm f/2.8 lens, ISO 400, f/16, 1/250 second, Sun WB, manual metering and autofocus on the back-button control.
Shade
On a sunny day, the light in the shade is considerably blue because shady spots are illuminated primarily with reflected blue light from the sky. Set the white balance to Shade to make the camera add even more yellow than the Cloudy WB option to neutralize more blue light.
Tungsten
Household lamps tend to have a reddish colorcast. Tungsten reduces the red, but this WB choice isn’t widely used by outdoor photographers.
Fluorescent
Use the Fluorescent option when shooting under fluorescent lights to minimize the green that prevails with this light source.
Flash
Electronic flash may have a slightly blue colorcast. To reduce the blue, set the Flash WB. Some flash units have a yellow-filtered flash tube to eliminate the colorcast. The Flash WB option is very similar to the Cloudy WB.
Custom White Balance
If you shoot JPEGs only, then this Custom white balance option is your best choice for getting the most realistic color. The process varies from one camera to another, but they all set it in a similar manner. Set the camera to Custom WB, photograph a white sheet of paper in the same light as the subject, select the image of the white paper, and the camera analyzes the white paper target and neutralizes any colorcast that is present. When the light is too blue, the camera creates a Custom WB to eliminate the excess blue from the image. If the light is too green, it removes that color. When you photograph a white flower on a cloudy day in the green forest, multiple colorcasts are present. The light is too green from the leaves and too blue from the overcast. Using the Cloudy WB will reduce the blue colorcast problem, but merely warms up the green colorcast. Custom WB neutralizes both colorcasts at the same time!
If you move to another location where the colorcasts in the light are different, repeat the process of photographing the white paper and selecting that image to create a new Custom white balance. We do not use Custom WB very often because it is time-consuming and we would have to carry a white piece of paper with us. Since we shoot RAW, it is simple enough to adjust one or more colorcasts with software. We do not worry about the JPEG we capture simultaneously. If we shot only JPEGs, however, then we would use Custom WB frequently.
Color Temperature
To regularly use this option you need an expensive color temperature meter. Perhaps that is the reason many cameras do not offer it. If you have the Color Temperature WB option and desire red sunrises or sunsets, follow this procedure: Set the Color Temperature WB. When you do, it allows you to set the color temperature. Dial in the highest value possible. On my Canon cameras, it is 10,000K. Use this color temperature to add an abundance of magenta to the images. It truly pops the red colors in sunrise and sunset images.
We did indeed find a use for the opposite end of the scale when we photographed the San Xavier Mission near Tucson, Arizona. We were shooting the mission at midnight with the stars’ trails behind it. Passing cars on the adjacent road weakly illuminated the white church with their headlights from time to time. This yellow light produced a sickly amber colorcast in the church. While I was trying different white balance presets, Barbara quickly found that using the K white balance option and setting it to 2500K produced wonderful colors. To summarize: use high K values in the 8000 to 10,000 range to make the light redder. To reduce warm colorcasts, set the K white balance to a smaller number, such as 2500K, to neutralize warm colorcasts.

Yogi and Barbara are dramatically silhouetted in their kayak on Pete’s Lake one brisk autumn morning near Munising, Michigan. The thick fog makes all of the highlights white. To add some pinkish tones, the Kelvin (K) white balance option is selected and then 10,000K is set. The pink can be increased in post-processing, but we prefer to do it in the camera. Some cameras do not offer the Kelvin white balance option. In such cases, use the Shade WB. Canon 1D Mark III, Canon 70–200mm lens at 168mm, ISO 400, f/16, 1/500 second, 10,000K WB, manual exposure and AI Servo AF on the back-button control.

Warm-colored lights from nearby Tucson, Arizona homes and passing cars generate a sickly yellow colorcast on Mission San Xavier del Bac. I pondered how to neutralize the intense unwanted yellow when Barbara figured out the solution. I was beginning to arrive at this answer on my own, but Barbara—as usual—was thinking a few minutes ahead of me. How do you think the yellow light problem was solved in the camera? Canon 5D Mark III, Canon 70–200mm f/4 lens at 122mm, ISO 1600, f/6.3, 25 seconds, Cloudy WB, manual focus using live view and manual metering.
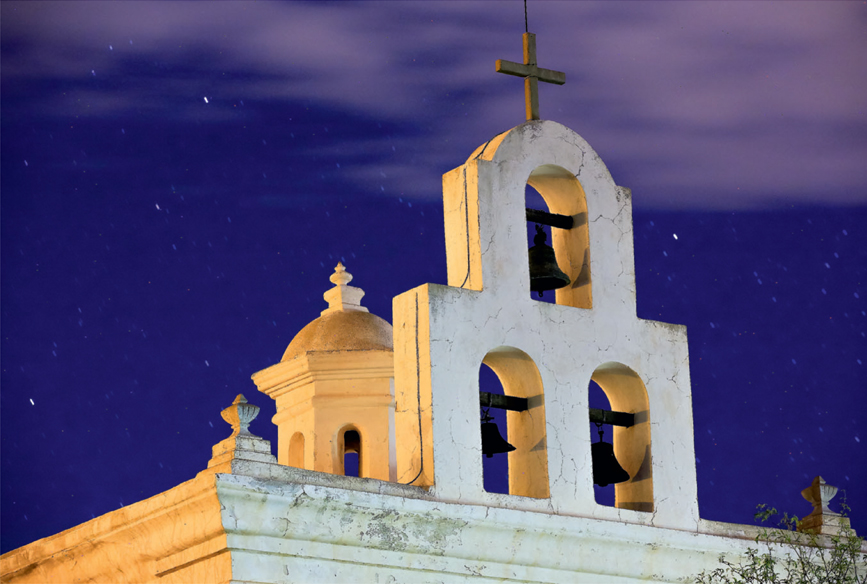
Instead of using the Cloudy WB and making the light even more yellow, Barbara set the Kelvin (K) white balance option and dialed in 2500K. We frequently use the 10,000K white balance option to enhance the red skies of sunrise and sunset. Now to subdue light that is too warm, we discovered setting 2500K accomplishes the job quite adequately. Switching to 2500K is the only change I made from this version and the previous yellow one that is far too yellow.
LIGHT DIRECTION
Front Light
The light comes from the direction of the photographer and strikes the subject. This light direction is inherently low in contrast because the shadows fall behind the subject, making them mostly invisible to the camera. Front light is good for showing subject colors and shapes because shadows do not obscure anything. However, the low contrast light is undesirable for showing texture because some shadows are needed to reveal surface texture. The most common light used is front light. As a result, photographers who use it will produce less dramatic images. Although front light is more popular, backlight and sidelight always produce more spectacular images when those choices are appropriate for the subject.

Clepsydra Geyser is a photographer’s delight because it continuously erupts and remains in what geyser experts call a constant “wild phase.” Late afternoon sun pleasantly sidelights the Yellowstone National Park geyser, which reveals depth because some shadows are visible. A steady and helpful south breeze blows the water and steam north allowing the geyser’s cone to be visible. Canon 1DS Mark III, Canon 70–200mm f/4 lens, ISO 200, f/4.5, 1/3000 second, Cloudy WB, aperture-priority with exposure compensation set to +.7 EV, autofocus on the cone of the geyser using back-button control.

The sow coastal brown bear nurses her cub at Hallo Bay, Alaska, in late evening light. The soft back light gorgeously highlights the fur rimming the bears with a warm glow. Nikon D4, Nikon 200–400mm f/4 lens at 320mm, ISO 1250, f/10, 1/640, Sun WB, manual exposure and AF-C on the back-button focus control. Note: AF-C means continuous autofocus on a Nikon camera.
Sidelight
This light strikes the subject at an angle to the camera. Light coming from the side is excellent for showing texture and details in countless subjects. For instance, sand dunes photograph best with the early morning or late evening sunshine that hits the dunes at an angle to the photographer because the sidelight creates soft shadows that nicely highlight the undulating lines in the dunes. The texture in butterfly wings readily shows when the butterfly is slightly underexposed with the ambient light and the flash is aimed at right angles to the camera–subject axis to skim the light across the wings. Sidelight is a gorgeous light when the subject has texture and the contrast isn’t too great. Often, flash or reflectors can be used to reduce excessive contrast.
Backlight
Light direction comes from behind the subject. Successful photographers frequently use gorgeous backlight to capture stunning images. Beginners tend to forget to use it because it does take a while to perceive the possibilities of backlight. All subjects that are translucent or have hairy or fuzzy edges work well with backlight. Shadows created by backlight falling on the side of the subject facing the camera tend to increase the contrast greatly. Fortunately, digital capture, especially when using RAW, handles high contrast reasonably well. You can use flash, reflectors, and HDR techniques to manage and subdue high contrast. Another possible problem is that backlight comes directly at the lens, and even using a lens hood may not eliminate flare caused by the light hitting the front glass directly.
Backlight tends to cause high contrast, so it doesn’t work as well with dark subjects because a dark backlit subject with a light background is often too high in contrast. Conversely, light subjects, mountain goats or gulls for example, photograph beautifully when backlit against a darker background. The white fur of the goats, even though in the shadows, still reduces the inherent contrast.
Cross Light
Cross light comes from two main directions and crosses at the subject location. It is incredibly effective with smaller subjects from a great-horned owl to a tiny insect at twice life-size magnification. We use it frequently and with great success. Find a subject that is nicely backlit. The side facing you is the shadowed side. Now use a flash or reflector to illuminate the shaded side of the subject. When properly exposed, you still get the gorgeous rim lighting from the backlight while the second light nicely fills in the shadows to lower the contrast and sometimes provide a catch-light in an animal’s eyes. Since a reflector or flash is typically required, it is only possible to light objects that are not too large.
Diffused
Since the light comes from all directions, this light is somewhat similar to front light because it is very low in contrast. Diffused light is the typical light you find on a dark cloudy day, but it is present in shaded spots, too. It doesn’t reveal texture well at all but does show overall shape and color because nothing is lost in the shadows. It is quite easy to add contrast by using flash, which helps reveal texture. Underexpose the ambient light a small amount and properly expose the subject with a flash that is held to skim the light across the subject.
CONTRAST IN THE LIGHT
A bird that is photographed in high noon sunshine is high in contrast because the top of the bird is lit with bright sunlight while the bottom is in shadow. The difference between the sunlit portion and the shadows will easily exceed three stops of light. The contrast tends to appear harsh when viewed in the image because if the highlights are well-exposed, the shadows may suffer from a lack of color and detail. If the shadows are beautifully exposed, then the sunlit portions of the bird are overexposed and lack color and detail. The light must have less contrast in order to successfully capture color and detail everywhere in the bird. Fortunately, you can often control high contrast with photo accessories or software.
Diffuser
If the subject is fairly small, putting a white diffuser between the sun and the subject will instantly diffuse the light and lower the contrast. Be sure to keep the diffuser out of the background in your image and diffuse the light on both the subject and the background. If you diffuse the light on the subject while the background remains in bright light, the background will be overexposed unless you use HDR or use a flash to light up the subject.
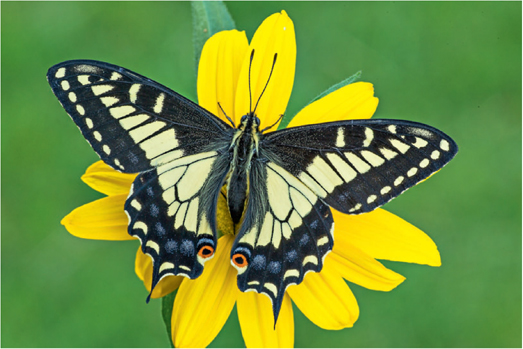
While photographing this butterfly, a weak shaft of sunlight beautifully rim lights this handsome creature. The sunlight behind the butterfly and the overhead cloudy skies lighting the front of it work together to provide a pleasing cross light. The natural cross light lasted only a minute before once again the sunlight became thoroughly diffused by dense clouds. Canon 5D Mark III, Canon 180mm f/3.5 macro lens, ISO 200, f/18, 1/6 second, Cloudy WB.

Brilliant sunshine warms the skin, but the contrast in the light is usually detrimental to making attractive images. Observe the overexposed highlights in the Claret Cup cactus spines and the glare on the blossoms. Canon 5D Mark III, Canon 180mm f/3.5 macro lens, ISO 100, f/16, 1/25 second, Daylight (Sun) WB, manual exposure and focusing.

A dense white sheet nicely diffuses the harsh sunlight to produce a light that is much lower in contrast. This allows the camera’s sensor to record detail everywhere easily. Diffusing the light does indeed change the white balance from the warm color of sunshine to a bluish colorcast. Therefore, to compensate for the excess blue in the light when the Claret Cup cactus blossoms are diffused, the white balance is changed to the Shade WB option. Canon 5D Mark III, Canon 180mm f/3.5 macro lens, ISO 100, f/20, 1/4 second, Shade WB, manual exposure and focusing.
Reflector
The Photoflex 5-in-1 MultiDisc is excellent for modifying the light. The product works especially well because it has four different colored reflecting surfaces and a white diffuser all contained in one compact package. We like the 22-inch size for packing, but the 32-inch size works better for shooting images when we need a diffuser. The disc has a bendable metal frame and folds up to a small size for convenient packing. The colored fabric surfaces include soft gold, gold, white, and silver. We normally prefer the soft-gold side, which is a combination of silver and gold, since the warmer reflected light looks appealing on most subjects. If we do not want to warm up the light, though, then the white side works perfectly. It also has a built-in white translucent side that doubles as a useful diffuser.
Bounce the light off the reflective surface by angling the reflector until you are able to see the shaded side of the subject begin to brighten. Adjusting the reflector angle slightly gives you some control on the amount of reflected light striking the subject. You may also change the distance between the reflector and the subject to adjust light output. Reflectors are simple to use and effective when the ambient light is reasonably bright. If the light is dim, then it is more difficult to reflect enough light to do the job. In such cases, it is better to use a flash.
Electronic Flash
Flash is incredibly useful, precise, versatile, and tremendously underutilized by most photographers! Think of the flash as a small sun that is eager and able to deliver light any time you need it. Use fill flash to lower the contrast. The procedure is not complicated. Determine the ambient light exposure first using the histogram. The dark shadows remain dark. Now set the flash to a minus compensation, –1 flash exposure compensation (FEC) is a good place to start, point the flash at the subject and shoot. Look at the image and scrutinize the shadows. If the shadows are now too light, reduce the flash output by setting –1.7 FEC and try again. If the shadows are not light enough, then set zero compensation and shoot again. Usually in two or three shots you’ll arrive at the correct amount of flash that pleasingly reduces the contrast by adding light to the shadows without overdoing it.
HDR
High Dynamic Range imaging (HDR), covered in Chapter 4, works perfectly well for lowering the contrast of motionless subjects. Shoot a series of images in which the exposure is varied by at least one stop, but not more than two stops of light, and combine the different exposures with HDR software. Some cameras offer built-in HDR capabilities.
Photoshop’s Shadow/Highlight Controls
Photoshop has a marvelous tool that will precisely adjust the shadows and highlights in your images independent of each other. It is so effective that routinely it is not necessary to shoot a series of images with different exposures. Now, when the contrast isn’t too extreme, a single image can be adjusted with software to lower the overall contrast, allowing detail in both the shadows and the highlights. Less expensive and easier to use software such as Lightroom also offers these adjustments.
Graduated Neutral Density Filters
These filters are various densities of gray on one-half of the filter and clear on the other half. Graduated neutral density filters are used to lower the contrast in landscapes. If the sky is bright and the foreground shadowed, place the dark-half side of the filter over the bright sky and the clear side over the dark foreground to lower the dynamic range of light and capture good color and detail through the scene. These filters still have many devotees and deservedly so, but HDR and other solutions are making neutral density filter use less appealing and far less necessary. We no longer use them, preferring HDR or balanced flash to reduce the contrast.
Polarizing Filters
The blue sky is often too light compared to the rest of the scene. Use a polarizing filter to remove polarized light in the sky and to darken it. The sky is not uniformly polarized. A polarizer will not significantly darken the sky when you are shooting toward the sun or directly away from it, but it will have an immense effect when you are shooting at that portion of the sky that has the greatest amount of polarized light.
To locate that region of polarized light, point your finger at the sun and form a right angle with your thumb. Rotate your hand both ways to draw an arc while keeping the finger pointed at the sun. The arc that your thumb points at is the area of the sky with the most polarized light and where the polarizer will have its greatest effect.
Glare off shiny subjects, especially when wet, causes high contrast problems. Polarizers are quite useful when photographing ponds, lakes, and oceans. Use a polarizing filter to remove this glare. Generally, glare is polarized light and easily removed with the filter, but glare on metal is not polarized and can’t be removed with the polarizing filter. Remember to buy a good polarizing filter brand such as B + W or Hoya, and turn the filter on the lens to see when the sky darkens or the glare minimizes. If you set the polarizer for a horizontal composition, remember to turn the polarizer when you recompose to make the scene a vertical, or the polarizer will not remove the polarized light.
BOTTOM LINE
Photographing anything in light that is inherently unsuitable for the subject produces plenty of dreadful images. Your images will improve dramatically when you spend your time shooting attractive subjects when they are beautifully bathed in splendid light using techniques that deliver sharp images! In other words, do not shoot in horrible light unless you are able to modify the light to make it photogenic.

Kenya’s Samburu National Park is a good place to photograph the uncommon greater kudu. This stunning buck posed beautifully in the late evening light. Canon 7D, Canon 500mm f/4.0 lens, Auto ISO 800, f/7, 1/250 second, Cloudy WB, shutter-priority exposure mode with Auto ISO, continuous autofocus on the back-button control.