

Yellowstone’s Castle Geyser generates dramatic 40-minute eruptions that shoot water and steam 70 feet into the air. Unfortunately, eruption intervals occur about 12 hours apart, so you don’t get many opportunities to photograph this impressive geyser. Castle is a predictable geyser, but the prediction window is plus or minus 2 hours. If Castle Geyser is predicted to erupt at midnight, it could be any time between 10:00 pm and 2:00 am. Castle is worth waiting for! The green in the sky is not the northern lights. It is a phenomenon called airglow. Nikon D4, Nikon 14–24mm f/2.8 lens, ISO 3200, f/2.8, 20 seconds, 3700K WB, manual exposure and focusing.
The Night Sky
Capturing the starry night sky as pinpoints of lights or producing star trails to reveal the motion of our rotating earth is now easily available with all digital cameras. Recent camera and software innovations have created an entirely new world of photo opportunities. Now modern cameras deliver remarkable photos using ISO values between ISO 800 and 3200, making it possible to capture images that were nearly impossible to obtain until recently. Advances in wireless flash, live view for precise manual focusing, light painting, and multiple exposure capabilities have added tremendously to what can be accomplished. As I write this, a whirlwind of potential photo prospects swirl in my head and I can feel the excitement boiling over within the community of dedicated night photographers. Due to the instant feedback that cameras offer and the fact that it does not cost anything to shoot images once you have the equipment, incredible new photo strategies have surfaced that produce dazzling images. The ranks of dedicated night sky photographers are beginning to swell. If you see someone staggering around due to lack of sleep, remember they could well be a night sky photographer!
PHOTO EQUIPMENT
CAMERA
Even though all digital cameras take night shots, some are more suitable for this purpose. Exposures exceeding one second plus the need for ISOs greater than 800 are typical of night photography. A camera that shows less noise at high ISOs and longer exposures is very desirable. Both of us use full-frame sensor cameras—Nikon D4 and Canon 5D Mark III— because their larger pixel sizes produce a more favorable signal-to-noise ratio, which, in turn, produces an image with less noise. The camera should be able to meter down to 30 seconds and have separate button (non-menu) controls for the ISO, aperture, and shutter speed. It helps to be able to find instantly the three controls just mentioned only by touch, plus the live view, live view magnifying control, and image playback button in complete darkness. Practice until you can do it easily! Turning a flashlight on to see camera controls ruins your night vision temporarily and could adversely affect other photographers near you.

Mission San Xavier del Bac is located on the southwest side of Tucson, Arizona. It is an historic Spanish Catholic Mission that remains in use today. A fast lens is needed to allow a less noisy ISO option. Nikon D4, Nikon 14–24mm f/2.8 lens at 32mm, ISO 1600, f/3.2, 3700K WB, manual focusing, four exposures were shot by varying the shutter speed (1.6, 3, 6, and 13 seconds). These exposures were processed using Photomatix Pro to reduce the contrast in the scene and create one final image.
If you are recording star trail images that require shooting a series of images over an hour period, it makes sense to operate two cameras at the same time to use your time efficiently. If you own two or more cameras or plan to shoot many star trails, consider getting a second camera to shoot so two different compositions can be captured simultaneously.
Nearly everyone attaches a camera strap to the camera without thinking about it. Straps always get in the way, especially when shooting on a tripod in the dark. Consider removing the strap for night photography. We never use a camera strap when we shoot on a tripod, which is most of the time, so we rarely have them attached to the camera.
Always have extra fully-charged batteries with you, especially for night photography. When many images are shot over a long period, the sensor is activated for long exposure times and the outside temperature can be cool. Any or all of these factors will drain battery power. Many cameras offer a battery pack that can be added to the camera. We never saw a reason to acquire one until we started shooting night images. Now these battery packs look appealing because the camera can shoot much longer before a battery recharge is needed.
Live view is invaluable for manually focusing in the dark. We use small extremely powerful flashlights to light up the foreground subject. Next we activate live view, scroll the rectangular box that appears over to the area where we want sharp focus, magnify that spot by 5x or 10x, and manually focus on the object. Live view makes it simple to manually hit sharp focus. The small flashlight we use to light the foreground is an LED Lenser M7 (www.ledlenser.com). It works tremendously well to light up subjects or objects over 600 feet away. Since the foreground object that must be in focus is usually much closer than 300 feet, it is quick to sharply focus on the foreground on the blackest night with this flashlight. It costs a little over $100 and uses four rechargeable AAA batteries.
LENSES
A night sky image looks impressive when it includes numerous stars—the more the better. Wide-angle lenses from 15mm to 35mm all work well, especially if they have a maximum aperture of f/4, or preferably f/2.8, and faster. For my night shooting, I mainly use the Canon 16–35mm/2.8 and Canon 24–105mm f/4. Barbara uses the Nikon 14–24mm/2.8 zoom. High quality zoom lenses are effective for night photography where you are composing foregrounds of different sizes in the scene. Any lens with a single focal length between 15mm and 35mm that has a lens speed of f/2.8 or faster is an excellent choice for the night sky.
Why do lenses with a maximum lens speed of f/2.8 or faster work so well for capturing the stars? The more starlight sent to the camera’s sensor, the larger the number of stars that appear in the image. Some stars are bright and some are dim. Big apertures allow the sensor to collect more photons of light from dim stars. When enough photons (particles of light) are collected, the star becomes visible in the image. A large aperture is one of three major ways to gather more stars in the image. Using a higher ISO magnifies the sensor data and will reveal more stars, too. The third way is to point the camera at a part of the sky that has plenty of stars, such as the Milky Way. The combination of a big aperture—such as f/2.8—and a high ISO choice of 1600 or 3200 allows more stars to appear in the sky. What about the shutter speed?
Using longer shutter speeds to increase the exposure of the stars helps only up to a point. Depending on a few variables—pixel size, focal length, area of the sky in the image—once an 8 second shutter speed is reached, keeping the shutter open does not increase the brightness of the stars or how many are recorded, but it does increase the brightness of the atmospheric light. Why? Remember that stars move because the earth is spinning. After a few seconds, the photons of light from a star that strike a pixel move on to the next pixel because the star moved relative to the sensor and no more photons of light strike the first pixel. Instead, other pixels are being illuminated and the process continuously repeats itself.

It is truly amazing how many stars make up the Milky Way. Barbara shot thirteen vertical images and made certain to overlap each image by about 50 percent to create this horizontal panorama of Sedge Meadows in Montana’s Lee Metcalf Wilderness where the skies are truly free of light pollution. This is her first attempt at making a star panorama and it was literally thirteen “shots in the dark.” Nikon D4, Nikon 14–24mm f/2.8 lens, ISO 6400, f/2.8, 25 seconds, 3700K WB, manual exposure and the lens was set to infinity focus.
TRIPOD
A sturdy tripod is mandatory for night photography due to the long exposure times that are necessary and the number of images that must be shot to create star trails. The tripod maintains the composition and frees up your hands for holding a flash or flashlight to paint the foreground with light. Although a lightweight tripod can be used, a heavier tripod is better if any breeze is blowing. Wind will vibrate a tripod, resulting in a loss of sharpness. Indeed, if it is windy at all, don’t waste your time photographing the night sky unless you can find shelter out of the wind. When there is wind, remember that it may be possible to open a window in your home or take up a position on the quiet side of the forest edge or by a large rock to avoid the wind.
LOCKING CABLE RELEASE
Photographing an attractive tree or rocky outcrop with thousands of stars sharply recorded in the night sky is simply done by using f/2.8, ISO 3200, and 8 seconds as a starting point. Shoot the image and adjust the ISO up or down from there. There is no need to use mirror lock-up when shooting an 8-second exposure because the mirror slap problem is most acute between shutter speeds of 1/4 to 1/30 second.
You can trip the camera smoothly by using the 2-second self-timer option when photographing stars as points of light. However, if you plan to capture star trails, then it is necessary to shoot dozens of exposures at regular intervals. The least expensive and most convenient way to do this is to buy an inexpensive locking cable release. Set the camera to continuous shooting and press the button on the cable release to fire the first image. Then lock the release in the fire position. The camera will keep shooting images until the camera batteries quit or the memory card fills to capacity. As an example, I use the Canon Remote Switch RS-80N3 for night shooting. Canon offers the far more expensive Timer Remote Controller TC-80N3, but I find no compelling reason to buy it.
Some shooters use intervalometers to control their cameras. They indeed work, but they are more expensive and somewhat more difficult to use than a locking cable release. However, some cameras—like Barbara’s Nikon D4—have the intervalometer built in to the camera, so there is no reason not to use it. Intervalometers allow you to set the shutter speed and number of images to be shot. Once the camera shoots the set number of images, it stops shooting. The locking cable release requires the photographer to be at the scene with the camera in order to stop shooting images—which is no big deal.

Enormous Balanced Rock near Castleford, Idaho, is supported only by a tiny pedestal. This high desert scenic site is free and always open to the public. One hundred consecutive images were shot at 20-second intervals. Barbara used StarStaX software to combine the images into the one you see here. StarStaX is available as Freeware at www.markusenzweiler.de/software/software.html. Nikon D4, Nikon 14–24mm f/2.8 lens at 24mm, ISO 1250, f/3.5, 20 seconds, 3700K WB, manual metering and manual focus on infinity.
WIRELESS FLASH OR A STRONG FLASHLIGHT
Often it is desirable to light the foreground to make the color and foreground details visible against the starry sky. Through-the-lens flash metering with a dedicated flash is incredibly effective. However, in many cases, it is better to use a flashlight to use light-painting techniques to light things up. Light painting works extremely well because using an exposure of at least 4 seconds leaves plenty of time to paint the foreground with light. When shutter speeds are 1 second or less, then flash works far better for lighting things up.
HEADLAMP
Wearing a tiny headlamp to provide light is helpful for moving about unfamiliar terrain. The headlamp straps to your head. Numerous models are available, so there are plenty of choices. Any sporting goods store will surely stock various headlamps because they are incredibly popular with hunters, fishermen, and other outdoor users.
FOCUSING
Let’s explain three options for focusing on the foreground during night photography.
1 Arrive before dark and focus on the subject in the normal daytime manner. Once everything is in focus, turn the autofocus off and tape the focus in place to avoid accidently changing the focus. Wait for night to arrive and the stars to appear. It will be quite a long wait as the sky must get very dark in order to successfully photograph the stars.
2 Use a bright flashlight to light the foreground. Manually focus on the foreground using a magnified live view image. This is our standard procedure and works incredibly well using our powerful flashlights.
3 With the wide-angle lenses most commonly used for night photography, infinity focus isn’t that far away. In many cases, if the nearest foreground is 20 or more feet away, merely setting the lens manually to infinity focus works perfectly. We use this option a lot!

White Dome Geyser erupts for 2 minutes at 30- to 40-minute intervals. The massive cone is 20 feet high and the water shoots up to 30 feet into the air. The geyser is found along the Firehole Lake Drive in Yellowstone National Park. We selected this geyser to be the first one to photograph at night because it is photogenic and provides several possibilities to photograph it over 3 hours. Being able to photograph the frequent eruptions helped us quickly learn to photograph geysers. Nikon D4, Nikon 14–24mm f/28 lens at 14mm, ISO 6400, f/2.8, 25 seconds, 3700K WB, manual exposure and manual focus by setting the lens to infinity.
In any case, always shoot an image and check the sharpness on the camera’s LCD screen. Usually the stars are not sharply focused when focusing on the foreground. That is not a huge problem, however. If the stars are a little out of focus, they are bigger and therefore look more prominent and brighter in the image. If shooting star trails, the out of focus stars are not sharp in any case and the trails are wider because points of light look larger when not in focus.
STARS AS POINTS OF LIGHT
IMAGE FORMAT
Use whatever image format you normally prefer. We always shoot landscapes with our cameras set to capture a large RAW and high quality JPEG so that we have the option of using either file type. Currently, we have little need for RAW when producing star trails because the software we use does not handle RAW, but works only with JPEGs. Eventually, we may switch to software that handles our RAW files.
WHITE BALANCE
We get nice results using Tungsten because we like the blue colorcast in the night sky. The best way to decide for yourself is to shoot the starry sky with all of your white balance choices. If your camera offers the Kelvin white balance choice, many night shooters use settings in the 2800°K–4000°K range.
EXPOSING THE STARS
The light of the stars on a clear dark night is relatively constant. However, the brightness of the atmosphere that affects the overall sky brightness varies considerably. Use manual exposure, open the lens to its maximum aperture (hopefully f/2.8), set the exposure to 8 seconds, and ISO 1600. Shoot an image and review it on the camera’s LCD. If it looks acceptable, then you are in business. If the sky is too bright, darken the exposure by lowering the ISO or reducing the shutter time to 4 seconds. If the image is too dark, add more exposure by going to ISO 3200 and shoot again. If possible, try to avoid going to higher ISOs to reduce the noise problem. Keep making adjustments until you arrive at the desired exposure. Remember, after about 8 seconds, the stars don’t get much brighter because they “scamper” over to another pixel, but shutter times certainly affect the brightness of the reflected light in the sky.

The stars of the Milky Way reflect brightly in a bend of Alp Creek in Sedge Meadows of Montana’s Lee Metcalf Wilderness. Nikon D4, 14–24mm f/2.8 lens at 24mm, ISO 6400, f/2.8, 25 seconds, 3700K WB, manual exposure mode and manual focus.
PREVENTING STAR TRAILS
If you want the stars to be rendered as pinpoints of light, there is a rough guideline to go by to avoid star trails. Divide the focal length of the lens being used into 500 to determine what the exposure time can be before the stars begin to show a trail. With a 20mm lens, you can use a shutter speed of (500/20) 25 seconds. With a 50mm lens, the shutter speed must be reduced to only (500/50) 10 seconds. Only a rough guide can be estimated because stars move faster in different areas of the sky. Due to the rotation of the earth, stars due east and west seem to move the fastest, while stars in the southern and northern skies tend to show considerably less movement. Indeed, the North Star (also called Polaris) does not appear to move at all and the stars near it show greatly reduced movement. In practice, we use the “500 guideline” as a starting point, shoot the image, and then magnify the image on the LCD to see if star movement is a significant problem or not. We suggest you do the same.
THE DEPTH OF FIELD PROBLEM
It is artistically pleasing to light an object in the foreground to succeed in making it stand out against the stars. However, the greatest problem is having too little depth of field. If you shoot at the maximum aperture of the lens in order to capture as many stars as possible, then depth of field is too shallow to adequately cover the foreground object. What to do? I spent a year pondering this dilemma off and on until the answer finally dawned on me recently one evening while photographing.
We have a rusty old hand plow that we use as a decoration in the garden. I thought it would be a fine subject to isolate against the stars in the sky. When I shot using f/2.8, I captured a multitude of stars, but the shallow depth of field at f/2.8 did not come close to covering the depth in the plow. When I stopped down to f/16, the depth of field was wonderfully adequate for the plow, but I could not capture many stars due to insufficient exposure. I struggled with this dilemma for a period of time until I suddenly remembered the multiple exposure options on the Canon 5D Mark III.
The answer involved using the multiple exposure control to shoot two exposures to produce one image. I set the camera to ISO 3200, 20 seconds, and f/16. I focused on the plow and illuminated it with a weak headlamp (my batteries were fading) for the entire 20-second exposure. The f/16 aperture produced plenty of depth of field to sharply capture the plow and eliminated most of the stars from the sky. In the second exposure, I used ISO 3200, 20 seconds, and f/2.8. I used my headlamp to manually focus the lens to infinity in order to sharply focus the stars without changing the composition in any way. Then I turned off the headlamp and shot the image. The camera beautifully combined the two images to produce a well-exposed plow at f/16 and a gorgeous star background at f/2.8. The takeaway of this example is to shoot a double exposure to get the depth of field that is required for the foreground. While I do not know if or how multiple exposure works on other cameras, the key point is to realize that it is possible with the Canon 5D Mark III and possibly your camera to shoot one exposure at f/16 and then change to f/2.8 for the second exposure. Also, I could have shortened the shutter speed for the star portion of the image to 8 seconds. I needed 20 seconds for the plow portion of the image to give me time to paint the plow with the light from my headlamp.
My solution for the old plow is a real game-changer idea that will be incredibly useful going forward. Being able to properly expose and sharply focus both the foreground and the background in night photography using the multiple exposure option opens up a whole new world of possibilities. You must be able to use your camera controls easily in the dark without being able to see them. In the plow shot, I was changing both the focus and the aperture from one shot to the next in the double exposure. I do admit I turned on my headlamp to look at the focus scale on my lens to set it to make the stars sharply focused. To focus the plow, I shined my strong flashlight on it and used live view to obtain sharp focus.

We bought this antique rusting hand plow to use as a photo prop because it makes an intriguing shape against the night sky. The plow was precisely placed on a rock to isolate it nicely against the stars. When we posted an image of this plow on our Facebook page, some of our visitors said they used a plow like this one when they were young. Does that make them antiquated, too? No, it just means they get senior discounts. Canon 5D Mark III, Canon 16–35mm f/2.8 lens at 22mm, ISO 3200, f/2.8, 20 seconds, Tungsten WB, manual exposure and focusing using live view.

I was pondering how to get more depth of field in the foreground, while still being able to focus sharply and to expose the starry sky beautifully and meanwhile do it all in the camera. The solution finally dawned on me when I was making this image and it has become a tremendous game-changer on how I approach photography. Remembering the multiple exposure option on my camera, I set it to two shots and the multiple exposure control option to Bright, which preserves highlights. In the first exposure, I set the camera to 10 seconds, f/8, and used a flashlight to focus on the plow and finally “paint” it with light. At these exposure settings, few stars were bright enough to appear in the image. I needed the 10-second exposure time to give me time to paint the plow with the flashlight. In the second exposure, I focused to infinity and changed the exposure to f/2.8 and 20 seconds. Although the plow is now out of focus, it doesn’t affect the image because it is greatly underexposed. By learning that I can change the f/stop, shutter speed, and focus between the two images that make up the double exposure, I now have far greater freedom over how I make images. I wish I could have changed the ISO, but I found no way to do it. I changed the f/stop, shutter speed, and focus between each exposure with the aid of a dim red headlamp. Canon 5D Mark III, Canon 16–35mm f/2.8 lens at 22mm, ISO 3200, Tungsten WB, manual exposure and focus.

I made this image over a period of two days. When I created the previous image the night before, the crescent moon sank below the horizon earlier in the night and was not available to add to the scene. Being pleased with how the multiple exposure option helped me out the night before, I studied it carefully the next morning and discovered I could select any image that resides on my memory card and use it to be the first of a multiple exposure. Sounds promising! An hour after sunset when the crescent moon was still hovering above the horizon that night, I set the camera to multiple exposure, selected the plow image to be the first of a double exposure (the camera copies it and does not modify the original), and shot the moon with a long lens to make it large in the image. When I first shot it and shared the image with Aaron Priest—a night sky photo expert—he told me I was an “idiot” in an adorable fashion. In my original image, stars occupied the black area of the moon. He said, “If stars were in front of the moon, all of us would need stronger suntan lotion.” Barbara used Photoshop to remove the stars from the front of the moon and make this area dark as it should be. Thank goodness for smart people pointing out flaws that should be obvious! The moon was shot with a Canon 200–400mm lens set at 400mm. Exposure for the crescent moon is 1/ISO at f/11, which I call the Mooney 11 rule. Using ISO 400, this equates to 1/400 second at f/11 or 1/800 at f/8, which is what I used.
While you are thinking about it, check your camera to see if it offers multiple exposure options. If so, try shooting some double exposures and see if the shutter speed, aperture, white balance, and ISO can be changed from the first image to the second of the double exposure. Knowing what can be changed offers new opportunities for shooting creative images. In my case with the Canon 5D Mark III, I can change the shutter speed, aperture, and white balance, but not the ISO.
Photographing this plow was a little tricky at first. I was changing the aperture and the focus between shots. It is easy to forget to change one of them, especially in the dark. I shot a number of multiple exposure pairs that allowed me to compose the plow vertically and horizontally. Each double exposure gave me another chance to vary the light painting on the plow. Realizing—finally—that I can change the depth of field between shots profoundly changes the way I take night photos. With my camera, both the shutter speed and the f/stop can be changed between exposures, but I could not find a way to change the ISO. If I could, then I would use ISO 400 to reduce the noise when shooting the plow portion of the multiple exposure. Check your camera to see if it has a multiple exposure mode. Look carefully to see exactly what can be changed between shots. If the f/stop is changeable, there are tremendous opportunities for sharply recording both the foreground and the background.
How did the crescent moon magically appear in my image? Did I pop the moon in with Photoshop or some other software? No way! That would be too complicated for me. Instead, I discovered—it is always wise to read the manual—that the Canon 5D Mark III allows you to select a previously shot image that still resides on the memory card to be the first image of a multiple exposure. I selected the image. Then the camera copied it to create an entirely new image while leaving the original image intact. Then I used a 400mm lens 24 hours later to add the crescent moon into the image’s upper left corner. The exposure for the moon is ISO 400, f/8, and 1/500 of a second. Think of it as a delayed triple exposure. I could not shoot a photo of the moon on the night I photographed the plow because it had already set below the western horizon. If your camera offers multiple exposures, be sure to fully understand your options because being able to shoot multiple exposures opens up an incredible new way of photographing!
STAR TRAILS
Decades ago, I remember shooting star trails with Delicate Arch, Balanced Rock, and other famous rock formations in Utah’s fabulous Arches National Park. I used Kodachrome 25 and exposed a single frame for 1–3 hours at a time. The longer the exposure, the longer the star trails. When I launched into digital in 2003, star trails seemed impossible to make. Long exposure times do not work well with digital cameras. As exposure times increase, the sensor heats up and creates even more noise in the image. For a decade, we believed we could not do star trails anymore. However, with the introduction of inexpensive and free software, star trails can be captured better than ever! We find the software is easy to use and intuitive while greatly minimizing the problem of noise. We are enjoying our night shooting immensely and hope you will, too.
Here are the steps to splendid star trails.
1. CHOOSE A DARK NIGHT WITH FEW CLOUDS
A dark night allows the faintest stars to appear. Avoid light pollution that is so common in urban areas. Dust in the air also reduces the clarity of the stars. For a darker sky, avoid those times when the moon is up and especially if it is larger than a crescent. The more light in the atmosphere, the fewer stars that can be captured. Remember, this is only a guideline. Some stars are much brighter than others. Even when photographing the San Xavier Mission in Tucson with all of the city lights and car headlights occasionally lighting the mission, we were able to get pleasing star trails.

The star trails behind a section of Mission San Xavier del Bac show it is possible to make star trails even when there is plenty of light pollution from other homes in the area, headlights from cars driving by, and the city lights of Tucson. Light pollution makes it difficult to capture images of the faintest stars, but bright stars still record nicely. It is possible to have so many star trails that it makes the starry background too cluttered. Nikon D4, Nikon 200mm micro lens, ISO 800, f/4, 30 seconds, 3700K WB, manual exposure mode and focus. Eighty-seven images were combined using StarStaX software to produce the star trails. Notice a lower ISO 800 and f/4 was used to prevent overexposing the mission because there was considerable light on the mission from nearby homes.
We are lucky to live near West Yellowstone, Montana, because the air tends to be quite clear with little dust. We often drive to nearby mountain peaks around 9000 feet for a better view of the night sky and excellent photo prospects.
2. COMPOSE THE SCENE
Select a scene in which the foreground is far away so it is close to infinity focus. This allows you to sharply focus both the scene and the stars. If the foreground is close, then focus on it and let the stars be slightly out of focus. Unfocused stars are not a problem when creating star trails because the stars are not sharp anyway and the trail merely becomes a little wider and more prominent—nothing wrong with that.
3. DETERMINE THE EXPOSURE USING THE ISO, F/STOP, AND SHUTTER SPEED
As a starting point, try ISO 1600, f/2.8, and 20 seconds. Adjust the exposure as needed. The goal is to capture a nicely silhouetted foreground in which the shape readily shows up against the sky with plenty of stars. Remember the number of stars is primarily determined with the ISO and f/stop, not the shutter speed. The shutter speed is useful for controlling how bright the sky background will be and any moonlight that might be illuminating the foreground.
If you stop down to f/8, you will lose some of the fainter stars, but you can still capture the brighter ones. Sometimes having too many star trails makes the image appear too cluttered with white lines. Stopping the aperture down to reduce the number of star trails can result in more pleasing star trail images.
4. SHOOT THE IMAGES
Set the camera to continuous shooting and use a locking cable release or intervalometer to shoot multiple images over a long period of time. At a minimum, shoot continuously for 45 minutes, but an hour or more is often better. We usually use 20-second exposures and don’t worry if the stars show movement during this period because we want trails in any case. In other words, during an hour of shooting, the camera fires a shot every 20 seconds and continues 180 times.
Using the intervalometer on her Nikon D4S, Barbara sets the shutter speed and the total number of exposures to be captured and the camera does the rest. With my Canon 5D Mark III, I use a $20 locking cable release and press the cable release to fire the first exposure and lock it.
The camera continuously shoots another exposure every 20 seconds until I stop it. Usually, we go back to the car or sit on a rock on a warm night to talk, drink coffee, or take a short nap while waiting for the time to elapse. Then we return to check the camera, create a new composition, and wait again. Sometimes we each shoot two cameras simultaneously when photographing the geysers at night in Yellowstone National Park. Why? Old Faithful Geyser, for example, erupts about every 75 minutes. The peak of the eruption is only optimum for about 1 minute. With two cameras each, at least each of us gets two compositions during the eruption before we have to wait another 75 minutes for the next one. We learned to photograph geysers at night by photographing White Dome Geyser first since it erupts approximately two or three times an hour, so that gave us more chances to experiment.

The camera was focused ahead of time on Castle Geyser’s cone while awaiting the eruption that occurred around midnight. Barbara used a flashlight to illuminate the cone to permit manual focusing using a magnified live view image. Then she used a flashlight to “paint” the tower of steam and water with light. The light illuminating the right side of the geyser that created the pleasing sidelight came from car headlights in a nearby parking lot. The green glow in the sky is real. It is called airglow or nightglow and comes from a very weak emission of light from the earth’s atmosphere that prevents the night sky from ever being completely dark. Nikon D4S, Nikon 14–24mm f/2.8 lens, ISO 3200, f/2.8, 20 seconds, 3700K WB, manual focus and exposure.
If you leave your camera, make sure it is stable. Cameras sometimes are destroyed when the owner walks away from a tripod-mounted camera and the wind blows it over. A sudden rainstorm can be disastrous as well. Though human thieves are less of a problem in remote areas at night, it is always a concern. If you are shooting near a lake, watch for big waves and the rising tide could be a dangerous problem at the ocean. Fog and dew can form on the lens, so watch out for those possibilities. A clear and dry area works well for night photography.
The key to excellent star trails is to shoot enough images to make the trails long enough and to compose an attractive scene. When you process the stack of star images, you do not have to use them all. If you have too many and the trails are too long, you can select fewer images to include in the final image, but if you do not have enough, then you are out of luck.
Remember that Polaris does not move and the nearby stars rotate slowly around it. Use the Big Dipper constellation to find Polaris. Locate the two outer stars of the Big Dipper that are furthest away from the handle or the right-hand side of the dipper’s bowl. Follow the line these two stars suggest upward above the dipper’s bowl. When you see a faint star, you have found the North Star (Polaris.) Remember that Polaris is a faint star. Beginners have trouble finding it because they fixate on the brighter stars. It is effective to compose Polaris to make it nearly touch part of your foreground subject, or to be in the middle of a rock arch with the stars circling around it.
PROCESS THE STACK OF STAR IMAGES
Search the Web for star stacking software. Plenty of inexpensive and free software choices are available. We are currently using StarStaX, a free software download that is producing excellent results for us and it is uncomplicated to use. To download this software, go to www.markus-enzweiler.de/software/software.html. Load the images into the software and press Run. The software looks at each image and adds the stars from each image in the stack into one image, producing star trails. Getting gaps in the star trails is a frequent problem. The software gives you a way to fix the gaps. It is easy enough to use that even I can do it without any help—admittedly a tiny bit of help—from Barbara, who is adept with computers.
NORTHERN LIGHTS
Everyone is dazzled when they see the northern lights dancing in the night sky. They are tremendously fun to photograph, but success depends on being at the right place when they happen and using impeccable camera technique. Northern lights are connected to solar storm activity on the surface of the sun. Some years are better than others. March and October tend to be the best months for seeing them. Northern lights can sometimes be seen as far south as Texas, but usually Alaska, Canada, and the northern tier of states are the most likely places to see them. Of course, other countries in the far north, especially Iceland and Finland, get fabulous displays of these dancing colorful lights in the night sky.
Barbara spent time in Alaska around Denali and managed to get a few periods of good northern lights. It is not easy as the lights are only somewhat predictable, but sun activity is closely monitored by weather Internet stations, especially www.spaceweather.com. When northern lights do happen, the display might last for only a few minutes or possibly a few hours. Naturally, the sky must be mostly free of clouds to be able to view them. To improve your chances, spend a week or more in Fairbanks during March and stay up all night when it is clear. There is a good chance you will get to photograph the lights in Fairbanks. Be sure to scout out shooting locations during the day and be ready to shoot at dark. Some photo instructors run northern lights photo tours to the best locations around the world. A web search will lead you to them.

The North Star (Polaris) doesn’t appear to move in the sky because the earth’s axis of rotation points almost directly at it. This makes Polaris an especially useful star to use as a center of interest. Barbara carefully composed this Balanced Rock scene so Polaris touches the edge of the famous rock. Notice the stars nearest Polaris don’t move nearly as much as stars further away. Nikon D4, Nikon 14–24mm f/2.8 lens, ISO 3200, f/2.8, 20 seconds, Incandescent WB, manual exposure mode and manual focus. One hundred images were merged to produce this image using StarStaX software.
The best northern lights viewing is during the winter months when it is dark most of the time. Although solar activity occurs all year long, northern lights are not viewable during much of the spring, summer, and early fall because the daylight is too bright. That means northern lights photography requires shooting in freezing to frigid temperatures. Proper warm dress is crucial to allow you to shoot when the temperature is thirty below zero and the wind is blowing. With fully-charged batteries, cameras work just fine in such cold, but you might not. Optimum viewing times seem to fall between 10:00 pm and 3:30 am. I have seen a few northern lights displays along the south shore of Lake Superior in Michigan’s Upper Peninsula, and all of them occurred during this time period.
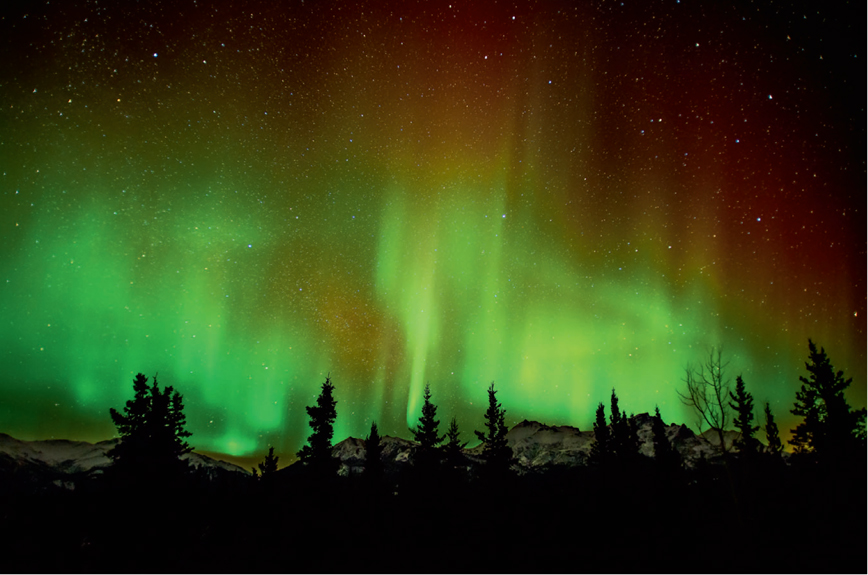
Northern lights are caused by the collision of solar wind and magnetospheric charged particles with the atmosphere at high altitude. These captivating light displays are commonly seen at high latitudes with Fairbanks, Alaska, Finland, and Iceland being particularly outstanding places to view them during the months between September and March. Although the aurora is fascinating to watch and photograph, the challenges are many. The sky must be clear, it can’t be too windy, the aurora must happen, and it is usually bitterly cold. Barbara managed to get one good display over a ten-day period near Denali National Park and she stayed up all night waiting for it to happen! Nikon D4, Nikon 14–24mm f/2.8 lens at 24mm, ISO 1250, f/2.8, 20 seconds, Cloudy WB, manual focus and exposure.
EQUIPMENT
All of the camera gear used for star photography doubles nicely for northern lights. We are not big fans of aperture-priority, but it is effective here as the brightness of the display can vary considerably from moment to moment. Set the aperture wide open to the maximum f/stop on the lens and let the shutter speed vary. In aperture-priority, the camera maintains the set aperture and the shutter speed varies to adjust for brighter or darker northern lights displays. Use the exposure compensation control to follow the ETTR guidelines for optimum exposure.

Northern light displays are somewhat predictable. Monitor www.spaceweather.com to see when the displays are most likely to happen. At the correct latitude, light displays occur quite often. A good way to photograph the aurora is to spend a week or two in Fairbanks, Alaska, during mid-March, which is a time of peak activity. On any clear night, watch the skies and be ready to shoot when it happens because the light display can suddenly quit at any moment. Nikon D4, Nikon 14–24mm f/2.8 lens at 24mm, ISO 1250, f/2.8, 20 seconds, Cloudy WB, manual focus and exposure.
COMPOSING THE IMAGE
We almost always include a foreground scene to give scale to the dazzling light show above it. Since most of the northern lights shooting is done in the winter, a snowy landscape is typical and works just fine. Finding a mountain or some tall trees to isolate against the sky works wonders to add interest to the lights dancing in the sky above it. If you turn a light on in the cabin, or even light a tent pitched in the snow, it gives a strong sense of being there.
Northern lights is an enormous topic that could easily fill an entire book all by itself. An excellent detailed source of information for photographing the northern lights is an e-book, How to Photograph the Northern Lights with a Digital Camera, by Patrick J. Endres.
WHEN DO YOU SLEEP?
Since clear or partly cloudy night skies offer such a splendid photo opportunity to photographers, the challenge is to get enough sleep. The golden light at sunrise and sunset is well known for its photogenic qualities, so all photographers want to shoot then. If you shoot at dawn and dusk and the night sky, then how do you get enough sleep? Some night shooters sleep during the midday hours, but we discovered this sleeping pattern does not suit our natural biological rhythms well. Instead, we photograph during the first 4 to 6 hours of the evening and then retire for the night. Of course, if something spectacular is happening—northern lights, lunar eclipse, or a meteor shower—then we stay up all night.
The optimum time for photographing the night sky in the northern hemisphere is between September and April when the dark of night comes early in the evening. Also consider the higher latitudes because night comes earlier and lasts longer. Obviously, the southern hemisphere is best between March and September during their long night period. Early sunsets and long nights make it more convenient for photographing the night sky while still getting a “good” night’s sleep! Should you be near the equator, you’ll get approximately 12 hours of daylight and 12 hours of night year round, which is good for stars, but you won’t see the northern lights there. All too often we night photographers suffer from sleep deprivation, but a few nights of cloudy skies will mercifully let us catch up!

Magnificent Corona Arch lies just outside Moab, Utah. We photographed it first in the golden light of dusk and then waited a couple of hours for the sky to darken to show the stars prominently. This is a complex shot that is fully described on our instructional Facebook page. Here’s a summary of the process. Barbara shot the arch late in the evening. Without moving the camera, she waited two hours for the sky to reach astronomical darkness. Then she shot more than 100 consecutive images to combine later with StarStaX software to show star trails. However, she used only thirty-three images to produce this image, plus the image of just the arch at sunset. These images were combined with Photoshop CS6. Nikon D4S and Nikon 14–24mm f/2.8 lens at 14mm for all shots. For the single arch image at sunset, she used ISO 100, f/16, 1.6 sec., 10,000K WB, manual exposure mode and AF-C on the back-button. For the star images two hours later, she used ISO 3200, f/2.8, 15 seconds, 3200K WB, manual exposure and manual focus.