
Common concepts and benefits of unit testing
Creating your first unit test using the Visual Studio unit testing framework
Executing, managing, and viewing the results of unit tests
Data-driven unit tests
Testing non-public members from tests
Generating test stubs from code
Enabling code coverage and test impact analysis
Programmatic unit testing involves writing code to verify a system at a lower and more granular level than with other types of testing. It is used by programmers for programmers, and is quickly becoming standard practice at many organizations. All editions of Visual Studio 2010 (apart from the free Express editions) include unit testing features that are fully integrated with the IDE and with other features (such as reporting and source control). Developers no longer need to rely on third-party utilities (such as NUnit) to perform their unit testing, although they still have the option to use them.
This chapter describes the concepts behind unit testing, why it is important, and how to create effective unit test suites. You learn about the syntax of writing unit tests, and you will learn how to work with Visual Studio's integrated features for executing and analyzing those tests. The discussion then goes into more detail about the classes available to you when writing your unit tests, including the core Assert class and many important attributes. You will also see how easy it is to create data-driven unit tests, whereby a unit test is executed once per record in a data source, and has full access to that bound data.
Also described in this chapter are the features Visual Studio offers for easily accessing non-public members from your unit tests. In addition, you will learn how Visual Studio enables the generation of unit tests from existing code, as well as the generation of member structures when writing unit tests.
In this chapter, you will learn how Visual Studio can help measure the effectiveness of your tests. Code coverage is the concept of observing which lines of code are used during the execution of unit tests. You can easily identify regions of your code that are not being executed and create tests to verify that code. This will improve your capability to find problems before the users of your system do. And, you will learn about the test impact analysis feature, which allows you to quickly and easily see what tests must be run for particular changes to the code base. Code coverage and test impact analysis are only available in the Visual Studio 2010 Premium and Ultimate editions.
You've likely encountered a number of traditional forms of testing. Your quality assurance staff may run automated or manual tests to validate behavior and appearance. Load tests may be run to establish that performance metrics are acceptable. Your product group might run user acceptance tests to validate that systems do what the customers expect. Unit testing takes another view. Unit tests are written to ensure that code performs as the programmer expects.
Unit tests are generally focused at a lower level than other testing, establishing that underlying features work as expected. For example, an acceptance test might walk a user through an entire purchase. A unit test might verify that a ShoppingCart class correctly defends against adding an item with a negative quantity.
Unit testing is an example of white box testing, where knowledge of internal structures is used to identify the best ways to test the system. This is a complementary approach to black box testing, where the focus is not on implementation details but rather on overall functionality compared to specifications. You should leverage both approaches to effectively test your applications.
Unit testing as a concept has been around for decades. However, in recent times, the process of performing unit tests by writing code to execute those tests has become popular. This form of programmatic unit testing is now what many people refer to as a "unit test" — and sometimes use the term "unit test" to cover all forms of testing conducted using the programmatic unit testing frameworks, even if those tests are actually not tests of the unit of code, but are actually full integration tests.
A common reaction to unit testing is to resist the approach because the tests seemingly make more work for a developer. However, unit testing offers many benefits that may not be obvious at first.
The act of writing tests often uncovers design or implementation problems. The unit tests serve as the first users of your system, and will frequently identify design issues or functionality that is lacking. The act of thinking about tests causes the developer to question the requirements of the application, and, therefore, seek clarification from the business very early in the lifecycle of the software development project. This makes things easy and inexpensive to rectify as the clarification is received.
Once a unit test is written, it serves as a form of living documentation for the use of the target system. Other developers can look to an assembly's unit tests to see example calls into various classes and members. An important benefit of unit tests for framework APIs is that the tests introduce a dependency at compile time, making it trivial to determine if any code changes have impacted the contract represented by the API.
Perhaps one of the most important benefits is that a well-written test suite provides the original developer with the freedom to pass the system off to other developers for maintenance and further enhancement knowing that their intentions of how the code would be used are fully covered by tests. Should those developers introduce a bug in the original functionality, there is a strong likelihood that those unit tests will detect that failure and help diagnose the issue. In addition, because there is a full set of unit tests making up the regression tests, it is a simple task for the maintenance team to introduce a new test that demonstrates the bug first, and then confirm that it is correctly fixed by the code modification. Meanwhile, the original developer can focus on current tasks.
It takes the typical developer time and practice to become comfortable with unit testing. Once a developer has saved enough time by using unit tests, he or she will latch on to them as an indispensable part of the development process.
Unit testing does require more explicit coding, but this cost will be recovered, and typically exceeded, when you spend much less time debugging your application. In addition, some of this cost is typically already hidden in the form of test console- or Windows-based applications that a developer might have previously used as a test harness. Unlike these informal testing applications, which are frequently discarded after initial verification, unit tests become a permanent part of the project, run each time a change is made to help ensure that the system still functions as expected. Tests are stored in source control as part of the same solution with the code they verify and are maintained along with the code under test, making it easier to keep them synchronized.
Note
Unit tests are an essential element of regression testing. Regression testing involves retesting a piece of software after new features have been added to make sure errors or bugs are not introduced. Regression testing also provides an essential quality check when you introduce bug fixes in your product.
It is difficult to overstate the importance of comprehensive unit test suites. They enable a developer to hand off a system to other developers with confidence that any changes they make should not introduce undetected side effects. However, because unit testing only provides one view of a system's behavior, no amount of unit testing should ever replace integration, acceptance, and load testing.
Because unit tests are themselves code, you are generally unlimited in the approaches you can take when writing them. However, you should follow some general guidelines:
Always separate your unit test assemblies from the code you are testing. This separation enables you to deploy your application code without unit tests, which serve no purpose in a production environment.
Avoid altering the code you are testing solely to allow easier unit testing. A common mistake is to open accessibility to class members to allow unit tests direct access. This compromises design, reduces encapsulation, and broadens interaction surfaces. You will see later in this chapter that Visual Studio offers features to help address this issue. However, be open minded that often what makes code easy to test in isolation makes that code more maintainable.
Each test should verify a small slice of functionality. Do not write long sequential unit tests that verify a large number of items. While creating focused tests will result in more tests, the overall suite of tests will be easier to maintain. In addition, identifying the cause of a problem is much easier when you can quickly look at a small failed unit test, immediately understand what it was testing, and know where to search for the bug.
All tests should be autonomous and isolated. Avoid creating tests that rely on other tests to be run beforehand. Tests should be executable in any combination and in any order. To verify that your tests are correct, try changing their execution order and running them in isolation.
Test both expected behavior (normal workflows) and error conditions (exceptions and invalid operations). This often means that you will have multiple unit tests for the same method, but remember that developers will always find ways to call your objects that you did not intend. Expect the unexpected, code defensively, and test to ensure that your code reacts appropriately.
The final proof of your unit testing's effectiveness will be when it saves you more time during development and maintenance than you spent creating the tests. Experience has shown that you will realize this savings many times over.
Unit testing is not a new concept. Before Visual Studio introduced integrated unit testing, developers needed to rely on third-party frameworks. The de facto standard for .NET unit testing has been an Open Source package called NUnit. NUnit has its original roots as a .NET port of the Java-based JUnit unit testing framework. JUnit is itself a member of the extended xUnit family.
There are many similarities between NUnit and the unit testing framework in Visual Studio. The structure and syntax of tests and the execution architecture are conveniently similar. If you have existing suites of NUnit-based tests, it is generally easy to convert them for use with Visual Studio.
Visual Studio's implementation of unit testing is not merely a port of NUnit. Microsoft has added a number of features that are unavailable with the version of NUnit available as of this writing. Among these are IDE integration, code generation, new attributes, enhancements to the Assert class, and built-in support for testing nonpublic members.
Unit testing is a feature available in all but the free Express editions of Visual Studio. This section describes how to create, execute, and manage unit tests.
Unit tests are themselves normal code, identified as unit tests through the use of attributes. Like NUnit 2.0 and later, Visual Studio uses .NET reflection to inspect assemblies to find unit tests.
Note
Reflection is a mechanism by which details about .NET objects can be discovered at execution time. The System.Reflection assembly contains members that help you identify classes, properties, and methods of any .NET assembly. Reflection even enables you to call methods and access properties of classes. This includes access to private members, a practice that can be useful in unit testing, as you will see later in this chapter.
You will also use attributes to identify other structures used in your tests and to indicate desired behaviors.
This section takes a slower approach to creating a unit test than you will in your normal work. This will give you a chance to examine details you could miss using only the built-in features that make unit testing easier. Later in this chapter, you'll look at the faster approaches.
In order to have something to test, create a new C# Class Library project named ExtendedMath. Rename the default Class1.cs to Functions.cs. You'll add code to compute the Fibonacci for a given number. The Fibonacci Sequence, as you may recall, is a series of numbers where each term is the sum of the prior two terms. The first six terms, starting with an input factor of 1, are {1, 1, 2, 3, 5, 8}.
Open Functions.cs and insert the following code:
namespace ExtendedMath
{
    public static class Functions
    {
        public static int Fibonacci(int factor)
        {
            if (factor < 2)
                return (factor);
            int x = Fibonacci(--factor);
            int y = Fibonacci(--factor);

            return x + y;
        }
    }
}
You are now ready to create unit tests to verify the Fibonacci implementation. Unit tests are recognized as tests only if they are contained in separate projects called test projects. Test projects can contain any of the test types supported in Visual Studio. Add a test project named ExtendedMathTesting to your solution by adding a new project and selecting the Test Project template. If the test project includes any sample tests for you (such as UnitTest1.cs or ManualTest1.mht), you can safely delete them. Because you will be calling objects in your ExtendedMath project, make a reference to that class library project from the test project. You may notice that a reference to the Microsoft.VisualStudio.QualityTools.UnitTestFramework.dll assembly has already been made for you. This assembly contains many helpful classes for creating units tests. You'll use many of these throughout this chapter.
As you'll see later in this chapter, Visual Studio supports the generation of basic unit test outlines, but in this section, you'll create them manually to make it easier to understand the core concepts.
Once you have created a new test project, add a new class file (not a unit test; that file type will be covered later) called FunctionsTest.cs. You will use this class to contain the unit tests for the Functions class. You'll be using unit testing objects from the ExtendedMath project and the UnitTestFramework assembly mentioned earlier, so add using statements at the top so that the class members do not need to be fully qualified:
using ExtendedMath;
using Microsoft.VisualStudio.TestTools.UnitTesting;
To enable Visual Studio to identify a class as potentially containing unit tests, you must assign the TestClass attribute. If you forget to add the TestClass attribute, the unit tests methods in your class will not be recognized.
To indicate that the FunctionsTest class will contain unit tests, add the TestClass attribute to its declaration:
namespace ExtendedMath
{

 [TestClass]
    public class FunctionsTest
    {
    }
}
Unit tests are required to be hosted within public classes, so don't forget to include the public descriptor for the class. Note also that parentheses after an attribute are optional if you are not passing parameters to the attribute. For example, [TestClass()] and [TestClass] are equivalent.
Having identified the class as a container of unit tests, you're ready to add your first unit test. A unit test method must be public, nonstatic, accept no parameters, and have no return value. To differentiate unit test methods from ordinary methods, they must be decorated with the TestMethod attribute.
Add the following code inside the FunctionsTest class:
[TestMethod]
public void FibonacciTest()
{
}You have the shell of a unit test, but how do you test? A unit test indicates failure to Visual Studio by throwing an exception. Any test that does not throw an exception is considered to have passed, except in the case of ExpectedException attribute, which will be described later.
The unit testing framework defines the Assert object. This object exposes many members, which are central to creating unit tests. You'll learn more about Assert later in the chapter.
Add the following code to the FibonacciTest:
[TestMethod]
public void FibonacciTest()
{

 const int FACTOR = 8;
 const int EXPECTED = 21;

 int actual = ExtendedMath.Functions.Fibonacci(FACTOR);

 Assert.AreEqual(EXPECTED, actual);
}
This uses the Assert.AreEqual method to compare two values, the value you expect and the value generated by calling the Fibonacci method. If they do not match, an exception will be thrown, causing the test to fail.
When you run tests, you will see the Test Results window. Success is indicated with a green checkmark and failure with a red X. A special result, inconclusive (described later in this chapter), is represented by a question mark.
To see a failing test, change the EXPECTED constant from 21 to 22 and rerun the test. The Test Results window will show the test as failed. The Error Message column provides details about the failure reason. In this case, the Error Message would show the following:
Assert.AreEqual failed. Expected:<22>, Actual:<21>
This indicates that either the expected value is wrong, or the implementation of the Fibonacci algorithm is wrong. Fortunately, because unit tests verify a small amount of code, the job of finding the source of bugs is made easier.
Once you have created a unit test and rebuilt your project, Visual Studio will automatically inspect your projects for unit tests. You can use the Test List Editor and Test View windows to work with your tests, as well as run tests directly from your code.
The easiest way to open these windows is by enabling the Test Tools toolbar and clicking either the Test View or Test List Editor buttons. They are also available by selecting Test
Test View provides a compact view of your tests. It enables you to quickly select and run your tests. You can group tests by name, project, type, class name, and other criteria. Figure 7-1 shows the Test View window.

Double-click on any test to navigate to that test's code. To run one or more tests, select them and click the Run Selection button (the first button in the toolbar).
The Test List Editor offers all of the features of the Test View window, but provides more options for organization and display of your tests. Figure 7-2 shows the Test List Editor.

By default, all tests are listed, but you can organize tests into lists. In Test List Editor, right-click on the Lists of Tests node on the tree on the left-hand side. Select New Test List and the Create New Test List dialog will appear, as shown in Figure 7-3. You can also create a new test list by choosing Test

Give the list a name and optionally a description. You can also place this list within another list.
Once you have created a list, you can drag tests from the Test Manager list onto it. The list enables you to easily select all related tests for execution by checking the box next to the list name.
You can also group by test properties. First, click the All Loaded Tests node to ensure that all tests are listed. Then, in the Group By drop-down list, scroll to and select Class Name. You will then see your tests in collapsible groups by class name.
If you have many tests, you will find the filtering option useful. With filters, you can limit the list of tests to only those that match text you enter. Next to the Group By list is a Filter Column drop-down and a text box. Enter the text you wish to match in the text box; you can optionally select a column you would like to match against. For example, if you wish to show only tests from a certain class, enter that class name then select Class Name in the Filter Column list. When you click the Apply Filter button, only tests from that class will be displayed. If the Filter Column is set to [All Columns], tests will display if any of their fields contain the text you enter.
You also have the capability to run a unit test directly from code. To do that, open the unit test and navigate to the method. Right-click on the unit test method in the code and, from the context menu, select Run Tests. This will then run the selected test method.
You can also run the tests by using the keyboard shortcuts. The two most commonly used shortcuts are probably Ctrl+R or Ctrl+T (which will run the tests in the current context in debug mode). Therefore, if you are in a unit test method, it will just run that test in the class. The whole class will then run if you are somewhere else in the solution (such as in the code under test). Then it will run all tests.
Whenever you run a set of tests, a group of settings apply to that run. Those settings (called the test run configuration) are stored in an XML file with a .testsettings extension. A test run configuration is created automatically for every new test project, named local.testsettings.
The settings include items such as the naming structure of your results files, configuration of remote test execution, enabling of code coverage, and specifying additional files to deploy during your tests.
To edit a test run configuration, choose Test

You may have more than one test run configuration, perhaps to support different execution environments or code coverage settings, but you must select a single configuration as "active" when you run your tests. To set another configuration as active, choose Test
The default configuration settings will generally be fine for your initial unit testing. As you begin to require additional unit testing features, you may need to adjust these settings. For example, later in this chapter, you will learn how to monitor code coverage with Visual Studio. In that discussion, you will learn how to use the test run configuration to enable that feature.
Once you have selected and run one or more unit tests, you will see the Test Results window. This window displays the status of your test execution, as shown in Figure 7-5.

You can see that one of the tests has failed, one has passed, and one was inconclusive. The error message for any nonpassing test is displayed. You can double-click on any test result to see details for that test. You can also right-click on a test result and choose Open Test to navigate to the unit test code.
Notice that the nonpassing tests are checked. This convenient feature enables you to make some changes and then quickly rerun just those tests that have not passed.
Because unit tests are simply methods with special attributes applied to them, they can be debugged just like other code.
Breakpoints can be set anywhere in your code, not just in your unit tests. For example, the FibonacciTest calls into the ExtendedMath.Fibonacci method. You could set a breakpoint in either method and have execution paused when that line of code is reached.
However, setting program execution will not pause at your breakpoints unless you run your unit test in debugging mode. The Test View, Test Results, and Test List Editor windows all feature a drop-down arrow next to the Run button. For example, in Test List Editor, click on the arrow next to the Run Checked Tests button. You will see a new option, Debug Checked Tests. If you choose this, the selected unit tests will be run in debug mode, pausing execution at any enabled breakpoints and giving you a chance to evaluate and debug your unit test or implementation code as necessary.
Note
If you have enabled code coverage for your application, you will see a message indicating that you cannot debug while code coverage is enabled. Click OK and you will continue debugging as normal, but code coverage results will not be available. Code coverage is examined in detail later in this chapter.
Keep in mind that the Run/Debug buttons are "sticky." The last selected mode will continue to be used when the button is clicked until another mode is chosen from the drop-down list.
This section describes in detail the attributes and methods available to you for creating unit tests. All of the classes and attributes mentioned in this section can be found in the Microsoft.VisualStudio.TestTools.UnitTesting namespace.
Often, you'll need to configure a resource that is shared among your tests. Examples might be a database connection, a log file, or a shared object in a known default state. You might also need ways to clean up from the actions of your tests, such as closing a shared stream or rolling back a transaction.
The unit test framework offers attributes to identify such methods. They are grouped into three levels: Test, Class, and Assembly. The levels determine the scope and timing of execution for the methods they decorate. Table 7-1 describes these attributes.
Table 7.1. TABLE 7-1
Attributes | Frequency and Scope |
|---|---|
Executed before ( | |
| Executed a single time before or after any of the tests in the current class are run |
| Executed a single time before or after any number of tests in any of the assembly's classes are run |
Having methods with these attributes is optional, but do not define more than one of each attribute in the same context. Also, keep in mind that you cannot guarantee the order in which your unit tests will be run, and that should govern what functionality you place in each of these methods.
Use the TestInitialize attribute to create a method that will be executed one time before every unit test method in the current class. Similarly, TestCleanup marks a method that will always run immediately after each test. Like unit tests, methods with these attributes must be public, nonstatic, accept no parameters, and have no return values.
Following is an example test for a simplistic shopping cart class. It contains two tests and defines the TestInitialize and TestCleanup methods.
using Microsoft.VisualStudio.TestTools.UnitTesting;

[TestClass]
public class ShoppingCartTest
{
    private ShoppingCart cart;


 [TestInitialize]
    public void TestInitialize()
    {
        cart = new SomeClass();
        cart.Add(new Item("Test");)
    }


 [TestCleanup]
    public void TestCleanup()
    {
        // Not required - here for illustration
        cart.Dispose();
    }

    [TestMethod]
    public void TestCountAfterAdd()
    {
        int expected = cart.Count + 1;
        cart.Add(new Item("New Item");)
        Assert.AreEqual(expected, cart.Count);
    }

    [TestMethod]
    public void TestCountAfterRemove()
    {
        int expected = cart.Count − 1;
        cart.Remove(0);
        Assert.AreEqual(expected, cart.Count);
    }
}
When you run both tests, TestInitialize and TestCleanup are both executed twice. TestInitialize is run immediately before each unit test and TestCleanup immediately after.
The ClassInitialize and ClassCleanup attributes are used very similarly to TestInitialize and TestCleanup. The difference is that these methods are guaranteed to run once and only once no matter how many unit tests are executed from the current class. Unlike TestInitialize and TestCleanup, these methods are marked static and accept a TestContext instance as a parameter.
The importance of the TestContext instance is described later in this chapter.
The following code demonstrates how you might manage a shared logging target using class-level initialization and cleanup with a logging file:
private System.IO.File logFile;[ClassInitialize]public static void ClassInitialize(TestContext context) { // Code to open the logFile object }[ClassCleanup]public static void ClassCleanup(TestContext context) { // Code to close the logFile object }
You could now reference the logFile object from any of your unit tests in this class, knowing that it will automatically be opened before any unit test is executed and closed after the final test in the class has completed.
Note
This approach to logging is simply for illustration. You'll see later how the TestContext object passed into these methods enables you to more effectively log details from your unit tests.
The following code shows the flow of execution if you run both tests again:
ClassInitialize
   TestInitialize
      TestCountAfterAdd
   TestCleanup
   TestInitialize
      TestCountAfterRemove
   TestCleanup
ClassCleanupWhere you might use ClassInitialize and ClassCleanup to control operations at a class level, use the AssemblyInitialize and AssemblyCleanup attributes for an entire assembly. For example, a method decorated with AssemblyInitialize will be executed once before any test in that current assembly, not just those in the current class. As with the class-level initialize and cleanup methods, these must be static and accept a TestContext parameter.
[AssemblyInitialize]public static void AssemblyInitialize(TestContext context) { // Assembly-wide initialization code }[AssemblyCleanup]public static void AssemblyCleanup(TestContext context) { // Assembly-wide cleanup code }
Consider using AssemblyInitialize and AssemblyCleanup in cases where you have common operations spanning multiple classes. Instead of having many per-class initialize and cleanup methods, you can refactor these to single assembly-level methods.
The most common way to determine success in unit tests is to compare an expected result against an actual result. The Assert class features many methods that enable you to make these comparisons quickly.
Of the various Assert methods, you will likely find the most use for AreEqual and AreNotEqual. As their names imply, you are comparing an expected value to a supplied value. If the operands are not value-equivalent (or are equivalent for AreNotEqual), then the current test will fail.
A third, optional argument can be supplied: a string that will be displayed along with your unit test results, which you can use to describe the failure. Additionally, you can supply parameters to be replaced in the string, just as the String.Format method supports. The string message should be used to explain why failing that Assert is an error. If you have multiple Asserts in a single test method, then it is very useful to provide a failure message string on every Assert so that you can very quickly identify which Assert failed.
[TestMethod]
public void IsPrimeTest()
{
    const int FACTOR = 5;
    const bool EXPECTED = true;

    bool actual = CustomMath.IsPrime(FACTOR);


 Assert.AreEqual(EXPECTED, actual, "The number {0} should have been computed as
                 prime, but was not.", FACTOR);
}
Assert.AreEqual and AreNotEqual have many parameter overloads, accepting types such as string, double, int, float, object, and generic types. Take the time to review the overloads in the Object Browser.
When using these methods with two string arguments, one of the overrides allows you to optionally supply a third argument. This is a Boolean, called ignoreCase, that indicates whether the comparison should be case-insensitive. The default comparison is case-sensitive.
Working with floating-point numbers involves a degree of imprecision. You can supply an argument that defines a delta by which two numbers can differ yet still pass a test — for example, if you're computing square roots and decide that a "drift" of plus or minus 0.0001 is acceptable:
[TestMethod]
public void SquareRootTeset()
{
    const double EXPECTED = 3.1622;

 const double DELTA = 0.0001;
    double actual = CustomMath.SquareRoot(10);


 Assert.AreEqual(EXPECTED, actual, DELTA, "Root not within acceptable range");
}
Note
When asserting that two instances of a complex type are equal, you are actually testing the behavior of the Equals() operator on that class. This is important to bear in mind if you are ever overriding the Equals operator in your own classes.
AreSame and AreNotSame function in much the same manner as AreEqual and AreNotEqual. The important difference is that these methods compare the references of the supplied arguments. For example, if two arguments point to the same object instance, then AreSame will pass. Even when the arguments are exactly equivalent in terms of their state, AreSame will fail if they are not, in fact, the same object. This is the same concept that differentiates object.Equals from object.ReferenceEquals.
A common use for these methods is to ensure that properties return expected instances, or that collections handle references correctly. The following example adds an item to a collection and ensures that what you get back from the collection's indexer is a reference to the same item instance:
[TestMethod]
public void CollectionTest()
{
    CustomCollection cc = new CustomCollection();
    Item original = new Item("Expected");
    cc.Add(original);
Item actual = cc[0];
Assert.AreSame(original, actual);
}As you can probably guess, IsTrue and IsFalse are used simply to ensure that the supplied expression is true or false as expected. Returning to the IsPrimeNumberTest example, you can restate it as follows:
[TestMethod]
public void IsPrimeTest()
{
    const int FACTOR = 5;


 Assert.IsTrue(CustomMath.IsPrime(FACTOR), "The number {0} should have been
               computed as prime, but was not.", FACTOR);
}Similar to IsTrue and IsFalse, these methods verify that a given object type is either null or not null. Revising the collection example, this ensures that the item returned by the indexer is not null:
[TestMethod]
public void CollectionTest()
{
    CustomCollection cc = new CustomCollection();
    cc.Add(new Item("Added"));
    Item item = cc[0];


 Assert.IsNotNull(item);
}IsInstanceOfType simply ensures that a given object is an instance of an expected type. For example, suppose you have a collection that accepts entries of any type. You'd like to ensure that an entry you're retrieving is of the expected type, as shown here:
[TestMethod]
public void CollectionTest()
{
    UntypedCollection untyped = new UntypedCollection();
    untyped.Add(new Item("Added"));
    untyped.Add(new Person("Rachel"));
untyped.Add(new Item("Another"));
object entry = untyped[1];
Assert.IsInstanceOfType(entry, typeof(Person));
}As you can no doubt guess, IsNotInstanceOfType will test to ensure that an object is not the specified type.
Use Assert.Fail to immediately fail a test. For example, you may have a conditional case that should never occur. If it does, call Assert.Fail and an AssertFailedException will be thrown, causing the test to abort with failure. You may find Assert.Fail useful when defining your own custom Assert methods.
Assert.Inconclusive enables you to indicate that the test result cannot be verified as a pass or fail. This is typically a temporary measure until a unit test (or the related implementation) has been completed. As described in the section, "Code Generation," later in this chapter, Assert.Inconclusive is used to indicate that more work is needed to complete a unit test.
Note
There is no Assert.Succeed because success is indicated by completion of a unit test method without a thrown exception. Use a return statement if you wish to cause this result from some point in your test. Assert.Fail and Assert.Inconclusive both support a string argument and optional arguments, which will be inserted into the string in the same manner as String.Format. Use this string to supply a detailed message back to the Test Results window, describing the reasons for the nonpassing result.
The Microsoft.VisualStudio.TestTools.UnitTesting namespace includes a class, CollectionAssert, that contains useful methods for testing the contents and behavior of collection types.
Table 7-2 describes the methods supported by CollectionAssert.
Table 7.2. TABLE 7-2
METHOD | DESCRIPTION |
|---|---|
| Ensures that all elements are of an expected type |
| Ensures that no items in the collection are |
| Searches a collection, failing if a duplicate member is found |
| Ensures that two collections have reference-equivalent members |
| Ensures that two collections do not have reference-equivalent members |
| Ensures that two collections have value-equivalent members |
| Ensures that two collections do not have value-equivalent members |
| Searches a collection, failing if the given object is not found |
| Searches a collection, failing if a given object is found |
| Ensures that the first collection has members not found in the second |
| Ensures that all elements in the first collection are found in the second |
The following example uses some of these methods to verify various behaviors of a collection type, CustomCollection. When this example is run, none of the assertions fail, and the test results in success. Note that proper unit testing would spread these checks across multiple smaller tests.
[TestMethod]
public void CollectionTests()
{
    CustomCollection list1 = new CustomCollection();
    list1.Add("alpha");
    list1.Add("beta");
    list1.Add("delta");
    list1.Add("delta");


 CollectionAssert.AllItemsAreInstancesOfType(list1, typeof(string));
 CollectionAssert.AllItemsAreNotNull(list1);

    CustomCollection list2 = (CustomCollection)list1.Clone();


 CollectionAssert.AreEqual(list1, list2);
 CollectionAssert.AreEquivalent(list1, list2);

    CustomCollection list3 = new CustomCollection();
    list3.Add("beta");
    list3.Add("delta");
CollectionAssert.AreNotEquivalent(list3, list1);CollectionAssert.IsSubsetOf(list3, list1);CollectionAssert.DoesNotContain(list3, "alpha");CollectionAssert.AllItemsAreUnique(list3);}
The final assertion, AllItemsAreUnique(list3), would have failed if tested against list1 because that collection has two entries of the string "delta".
Similar to CollectionAssert, the StringAssert class contains methods that enable you to easily make assertions based on common text operations. Table 7-3 describes the methods supported by StringAssert.
Table 7.3. TABLE 7-3
METHOD | DESCRIPTION |
|---|---|
| Searches a string for a substring and fails if not found |
| Applies a regular expression to a string and fails if any matches are found |
| Fails if the string does not end with a given substring |
| Applies a regular expression to a string and fails if no matches are found |
| Fails if the string does not begin with a given substring |
Following are some simple examples of these methods. Each of these assertions will pass.
[TestMethod]
public void TextTests()
{
    StringAssert.Contains("This is the searched text", "searched");

    StringAssert.EndsWith("String which ends with searched", "ends with searched");

    StringAssert.Matches("Search this string for whitespace",
                        new System.Text.RegularExpressions.Regex(@"s+"));

    StringAssert.DoesNotMatch("Doesnotcontainwhitespace",
                           new System.Text.RegularExpressions.Regex(@"s+"));

    StringAssert.StartsWith("Starts with correct text", "Starts with");
}
Matches and DoesNotMatch accept a string and an instance of System.Text.RegularExpressions.Regex. In the preceding example, a simple regular expression that looks for at least one whitespace character was used. Matches finds whitespace and the DoesNotMatch does not find whitespace, so both pass.
Normally, a unit test that throws an exception is considered to have failed. However, you'll often wish to verify that a class behaves correctly by throwing an exception. For example, you might provide invalid arguments to a method to verify that it properly throws an exception.
The ExpectedException attribute indicates that a test will succeed only if the indicated exception is thrown. Not throwing an exception or throwing an exception of a different type will result in test failure.
The following unit test expects that an ObjectDisposedException will be thrown:
[TestMethod]

[ExpectedException(typeof(ObjectDisposedException))]
public void ReadAfterDispose()
{
    CustomFileReader cfr = new CustomFileReader("target.txt");
    cfr.Dispose();
    string contents = cfr.Read();  // Should throw ObjectDisposedException
}
The ExpectedException attribute supports a second, optional string argument. The Message property of the thrown exception must match this string or the test will fail. This enables you to differentiate between two different instances of the same exception type.
For example, suppose you are calling a method that throws a FileNotFoundException for several different files. To ensure that it cannot find one specific file in your testing scenario, supply the message you expect as the second argument to ExpectedException. If the exception thrown is not FileNotFoundException and its Message property does not match that text, the test will fail.
You may define custom properties for your unit tests. For example, you may wish to specify the author of each test and be able to view that property from the Test List Editor.
Use the TestProperty attribute to decorate a unit test, supplying the name of the property and a value:
[TestMethod]

[TestProperty("Author", "Deborah")]
public void ExampleTest()
{
   // Test logic
}
Now, when you view the properties of that test, you will see a new entry, Author, with the value Deborah. If you change that value from the Properties window, the attribute in your code will automatically be updated.
Unit tests normally have a reference to a TestContext instance. This object provides run-time features that might be useful to tests, such as details of the test itself, the various directories in use, and several methods to supplement the details stored with the test's results. TestContext is also very important for data-driven unit tests, as you will see later.
Several methods are especially useful to all unit tests. The first, WriteLine, enables you to insert text into the results of your unit test. This can be useful for supplying additional information about the test, such as parameters, environment details, and other debugging data that would normally be excluded from test results. By default, information from the test run is stored in a test results file, an XML file with a .trx extension. These files can be found in the TestResults subdirectory of your project. The default name for the files is based on the user, machine, and date of the test run, but this can be modified via the test run configuration settings.
Here is a simple example of a unit test that accesses the TestContext to send a string containing the test's name to the results:
[TestClass]
public class TestClass
{
   private TestContext testContextInstance;

   public TestContext TestContext
   {
      get { return testContextInstance; }
      set { testContextInstance = value; }
   }

   [TestMethod]
   public void TestMethod1()
   {
      TestContext.WriteLine("This is test {0}", TestContext.TestName);
   }
The AddResultFile method enables you to add a file, at run-time, to the results of the test run. The file you specify will be copied to the results directory alongside other results content. For example, this may be useful if your unit test is validating an object that creates or alters a file, and you would like that file to be included with the results for analysis.
Finally, the BeginTimer and EndTimer methods enable you to create one or more named timers within your unit tests. The results of these timers are stored in the test run's results.
An excellent way to verify the correct behavior of code is to execute it using realistic data. Visual Studio provides features to automatically bind data from a data source as input to unit tests. The unit test is run once for each data row.
A unit test is made data-driven by assigning attributes for connecting to and reading from a data source. The easiest way to do this is to modify an existing unit test's properties in the Test List Editor window. Begin with a normal unit test outline, and then open the Test List Editor. Select the unit test and view its properties.
First, establish the connection to the data source by setting the Data Connection String property. You may either enter it manually or click the button labeled with ellipses ("...") to use dialogs. You have three options for data sources. You can link to an ODBC data source, such as a database or Excel spreadsheet. You can also use a comma-delimited file or an XML file as a datasource. The DeploymentItem attribute may be used with a test method to specify the source file containing the test data.
As mentioned previously, the unit test will be called once per row in the data source. You can set how rows are fed into the unit test via the Data Access Method property. Sequential will feed the rows in exactly the order returned from the data source, whereas Random will select random rows. Rows are provided to the unit test until all rows have been used once.
Setting these properties will automatically decorate the selected unit test with the appropriate attributes. You do not need to use the Properties window to create data-driven tests. For example, you may wish to copy attributes from an existing data-driven test to quickly create another.
To access the data from within the unit test, use the DataRow property of the TestContext. For example, if you bound to a table with customer data, you could read the current customer's ID from the CustomerID column with the following:
long customerID = TestContext.DataRow["CustomerID"];
Besides a column name, the DataRow property also accepts a column offset. If CustomerID were the first column in the table, you could supply a zero as the argument with the same result.
Because the unit test is run once per row in the data source, you want to be able to tell which rows caused certain results. Fortunately, this detail is already tracked for you. In the Test Results window, right-click on the test result and choose View Test Results Details. You will see a list of pass/fail results for each record in the database, enabling you to easily see which rows caused your test to fail.
Visual Studio makes it very easy to write comprehensive tests against actual data. However, keep in mind that it is not enough to test only valid data, such as your real customer data. You will also want to have unit tests that verify your code's behavior when invalid data is supplied.
What if you want to test a class member that is not public? For example, suppose you're writing a private function that is never publicly accessed and is only used internally by other members. You'd like to test this method, but your test code does not have access to private members (or to internal members if the code is in a separate assembly).
There are four main approaches for addressing this issue:
Make the private members you need to test public.
Make the private members you need to test internal, and add the test assembly to the
internalsVisibleToattribute on the original assembly.Ensure that the private members are reachable through a public member and test via those public members.
Use .NET reflection in the tests to load and directly invoke the nonpublic members.
With Visual Studio, this final approach is abstracted for you. The following two sections describe how Visual Studio helps to automate this previously manual task.
Warning
Testing private members is a controversial subject. Some people prefer to test only via public members to allow for easier refactoring. Others argue that an API should never be modified just for the sake of easier testing. If you agree with the former opinion, you can safely skip the remainder of this section.
Suppose you'd like to test the private field and method of the following class:
public class Example
{
    public Example() {}

    private string password = "letmein";

    private bool VerifyPassword(string password)
    {
        return (String.Compare(this.password, password, false) == 0);
    }
}
Because the field and method are marked private, a unit test will not have the capability to directly access them. How can you ensure that VerifyPassword is working correctly?
Visual Studio introduces the PrivateObject class, which is a wrapper around reflection code that enables you to access nonpublic members in a fairly straightforward manner.
Table 7-4 summarizes the methods supported by PrivateObject.
Table 7.4. TABLE 7-4
METHOD | DESCRIPTION |
|---|---|
| Returns the selected item from a private array member. Supports multidimensional arrays with additional arguments. |
| Returns the value of the target field. |
| Returns the value of the target field or property. |
| Returns the value of the target property. |
| Invokes the target method, optionally passing parameters. |
| Assigns the given value to the indicated element of a private array. Supports multidimensional arrays with additional arguments. |
| Assigns the supplied object to the target field. |
| Assigns the supplied object to the target field or property. |
| Assigns the supplied object to the target property. |
To use it, you first create an instance of the PrivateObject class, passing a Type object for the class you wish to work with:
using System;
using Microsoft.VisualStudio.TestTools.UnitTesting;

namespace Explorations
{
    [TestClass]
    public class ExampleTest
    {
        private PrivateObject privateObject;
        const string PASSWORD = "letmein";

        [TestInitialize]
        public void TestInitialize()
        {

         privateObject = new PrivateObject(typeof(Example));
        }
    }
}
Now you can create your tests. Use the GetField method of the PrivateObject instance to access nonpublic fields, supplying the name of the desired variable. Similarly, use Invoke to call methods, supplying the method name as the first argument, followed by any parameters to that method:
using System;
using Microsoft.VisualStudio.TestTools.UnitTesting;

namespace Explorations
{
    [TestClass]
    public class ExampleTest
    {
        private PrivateObject privateObject;
        const string PASSWORD = "letmein";

        [TestInitialize]
        public void TestInitialize()
        {
            privateObject = new PrivateObject(typeof(Example));
        }


     [TestMethod]
     public void ComparePrivatePassword()
     {
         string password = (string)privateObject.GetField("password");
         Assert.AreEqual(PASSWORD, password);
     }
     [TestMethod]
public void TestPrivateVerifyPassword(){bool accepted = (bool)privateObject.Invoke("VerifyPassword", PASSWORD);Assert.IsTrue(accepted);}} }
Because PrivateObject uses reflection, you must cast the results of these calls from the generic Object type back to the correct underlying type.
PrivateObject is used to access instance-based members of a class. If you must access static nonpublic members, you use the PrivateType class, which has a very similar interface and is a wrapper of reflection code.
Table 7-5 summarizes the methods exposed by PrivateType.
Table 7.5. TABLE 7-5
METHOD | DESCRIPTION |
|---|---|
| Returns the selected item from a private static array member. Supports multidimensional arrays with additional arguments. |
| Returns the value of the target static field. |
| Returns the value of the target static property. |
| Invokes the target static method, optionally passing parameters. |
| Assigns the given value to the indicated element of a private static array. Supports multidimensional arrays with additional arguments. |
| Assigns the supplied object to the target static field. |
| Assigns the supplied object to the target static property. |
The usage is very similar to PrivateObject. Create an instance of the PrivateType, indicating which type you wish to work with, and then use the methods to access members as with PrivateObject. Suppose you added a private static count of password failures with a wrapping private property called FailureCount. The following code could read and test that property:
[TestMethod]
public void TestPrivateStaticFailureCount()
{
    PrivateType example = new PrivateType(typeof(Example));
    int failureCount = (int)example.GetStaticProperty("FailureCount");
    Assert.AreEqual(failureCount, 0);
}
Again, you create an instance of PrivateType, passing the type reference for the class you wish to access. Then you use that instance, invoking GetStaticProperty to retrieve the value you wish to test. Finally, you ensure that the value is zero as expected.
Note
Use caution when testing static data. Because static data is shared and is not automatically reset between your tests, sometimes the order of your tests will affect their results. In other words, if you test that a value is initialized to zero in one test, and then set it to a test value in another test, if the order of those tests is reversed, the zero test will fail. Remember that you must be able to run your tests in any order and in any combination.
Remember the work you did earlier in this chapter to create your first unit test? You created the first unit tests manually to help convey basic concepts, but Visual Studio has support for automatically generating code. You may generate unit tests from your implementation code or generate limited implementation code when writing your tests.
If you have ever needed to add unit testing to an existing project that had none, it was likely a frustrating experience. Fortunately, Visual Studio has introduced the capability to generate outlines of unit tests based on selected implementation code.
Let's begin with the Functions class you used earlier in this chapter. Open Functions.cs and ensure it contains the following code:
using System;

namespace ExtendedMath
{
    public sealed class Functions
    {
        private Functions() {}

        public static int Fibonacci(int factor)
        {
            if (factor < 2)
                return (factor);
            int x = Fibonacci(--factor);
            int y = Fibonacci(--factor);

            return x + y;
        }
    }
}
If you have been following the examples in this chapter, delete your existing FunctionsTest.cs file. Now, you can right-click in your code and choose Create Unit Tests, or click the Create Tests button from the Test Views toolbar. The Create Unit Tests dialog will appear, as shown in Figure 7-6.

Note
Right-clicking in code is context-sensitive, and the dialog will default appropriately based on where you clicked. For example, if you click from your class definition, all of that class's members will be selected for generation by default. Clicking on a method will default with only that method selected.
Select the members for which you would like to generate unit tests and then click OK.
Visual Studio will create a new class file, FunctionsTest.cs, if it does not already exist. Inside, you will find a class, FunctionsTest, marked with [TestClass] attribute.
At the top of the class is a TestContext field initialized to null, with a TestContext property to enable you to access context from your tests:
private TestContext testContextInstance;

public TestContext TestContext
{
get
{
return testContextInstance;
}
set
{
testContextInstance = value;
}
}Next, you will find commented-out placeholder methods for ClassInitialize, ClassCleanup, TestInitialize, and TestCleanup, wrapped in a region:
#region Additional test attributes
//
//You can use the following additional attributes as you write your tests:
//
//Use ClassInitialize to run code before running the
//first test in the class
//
//[ClassInitialize()]
//public static void MyClassInitialize(TestContext testContext)
//{
//}
//
//Use ClassCleanup to run code after all tests in a class have run
//
//[ClassCleanup()]
//public static void MyClassCleanup()
//{
//}
//
//Use TestInitialize to run code before running each test
//
//[TestInitialize()]
//public void MyTestInitialize()
//{
//}
//
//Use TestCleanup to run code after each test has run
//
//[TestCleanup()]
//public void MyTestCleanup()
//{
//}
//
#endregion
Finally, you will see the actual generated unit test:
/// <summary>
///A test for Fibonacci
        ///</summary>
        [TestMethod()]
        public void FibonacciTest()
        {
            int factor = 0; // TODO: Initialize to an appropriate value
            int expected = 0; // TODO: Initialize to an appropriate value
            int actual;
            actual = Functions.Fibonacci(factor);
            Assert.AreEqual(expected, actual);
            Assert.Inconclusive("Verify the correctness of this test method.");
        }
The generated code defines a basic structure that depends on the signature of the member being tested. In this example, it recognized that Fibonacci accepts an integer and returns an integer, including an Assert.AreEqual for you. The TODO indicates that factor and expected are only default values, and you must adjust them to ensure correct test values.
Note
Keep in mind that generated code will often benefit from careful refactoring, and your generated unit tests will be no exception. For example, look for ways to consolidate common tasks into shared functions.
Optionally, but by default, generated tests end with calls to Assert.Inconclusive to indicate that the unit test needs further inspection to determine its correctness. See the section "Using the Assert Methods," earlier in this chapter, for more information.
The unit testing features in Visual Studio have full support for code coverage. Code coverage automatically inserts tracking logic (a process called instrumentation) to monitor which lines of code are executed during the execution of your tests. The most important result of this is the identification of regions of your code that you have not reached with your tests.
Often, you may have branching or exception-handling logic that isn't executed in common situations. It is critical to use code coverage to identify these areas because your users certainly will. Add unit tests to cause those areas of code to be executed, and you'll be able to sleep soundly at night.
Note
Code coverage is a useful tool, but it should not be relied upon as an exclusive indicator of unit test effectiveness. It cannot tell you the manner in which code was executed, possibly missing errors that would result with different data or timing. A suite of unit tests based on a variety of different inputs and execution orders will help to ensure that your code is correct, complete, and resilient. Use code coverage to help identify code your tests are missing, not to tell you when your tests are complete.
A tenet of effective unit testing is that the removal of any line of code should cause at least one unit test to fail. This is, of course, an ideal but is worth keeping in mind as you develop your systems.
Code coverage is activated via a setting in the Test Settings. Open the configuration for editing by choosing Test
Click the Configure button to open the Code Coverage Detail window. Select the assemblies you wish to instrument from the Code Coverage Configuration list. If you don't see an assembly you'd like to instrument, you can click Add Assembly to manually add it. Figure 7-7 shows the Code Coverage Configuration page.
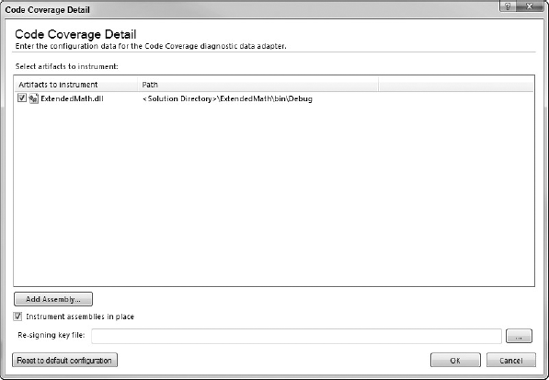
The instrumentation process modifies your original assemblies, invalidating original signatures. If you are working with signed assemblies, use the Re-signing key file field to specify a key file with which to sign the instrumented assembly.
Once you have enabled coverage and selected the assemblies to instrument, run your unit tests as normal. You will then be able to see results of the coverage in the Code Coverage Results window. This window will show counts of lines and percentages of code covered and uncovered. You may expand the view by clicking the plus signs to see details at the assembly, class, and member levels. Executable lines of code will be highlighted in red if they have not been run by your tests and in blue if they were. Code that is purely structural or documentation will not be highlighted. Figure 7-8 illustrates the results of a code coverage test.

In this example, you have achieved 50 percent code coverage of the Fibonacci method. By viewing the method, you can see by the color-coding that half the method has been tested.
Again, keep in mind that 100 percent code coverage does not mean you have finished writing your unit tests. Proper testing may involve multiple executions of the same code using different data. Code coverage is one measure of effectiveness but certainly not the only one. Plan your testing cases up front, and then use code coverage to alert you to scenarios you forgot to test.
Having unit tests that run and verify your code is working correctly is a must-have in the modern development world. Depending on the size and complexity of your code, you may have hundreds or even thousands of unit tests. And, as you are making changes to your code, you should run your tests to ensure that you have not introduced any new errors into the system. However, as you can imagine, running the entire suite of unit tests every time you make a code change can take a considerable amount of time. Wouldn't it be nice to know exactly which tests you need to run to test the code changes you just made?
Well, now you have that capability. Visual Studio 2010 introduces a new feature designed to do just that: test impact analysis. With test impact analysis, as you make code changes, you can view which tests are impacted by the code change — not just unit tests, but even manual tests that have been previously executed against a build with the appropriate data collectors enabled. This allows you to quickly and easily run just the tests needed to verify the code changes. You also have the capability to view tests that are related to a particular method before you start making changes, so you can see ahead of time what tests may be affected. This allows you to ask the question, "If I change this method, what tests would need to be run to verify it?"
There are some things you need to do before you can use test impact analysis. First and foremost, you must be using the unit testing framework within Visual Studio, and storing your source code in Team Foundation Version Control.
Next, you must enable data collection when you run your unit tests. This allows Visual Studio 2010 Team Foundation Server to collect data related to the unit tests and the code being tested. This data can be collected via the Team Build process automatically, or it can be collected from tests run on your local computer.
Note
If the unit tests are run locally or via the Microsoft Team Manager product, the test results must be uploaded into Team Foundation Server and associated with a team build in order for test impact analysis to work
To enable data collection for your test project, follow these steps:
In Visual Studio, open the solution containing the test project for which you want to enable data collection.
In Solution Explorer, double-click the
Local.testsettingsfile to open the Test Settings window.In the Test Settings window, select Data and Diagnostics.
In the list, check the Test Impact check box.
Click the Apply button, then click the Close button to close the Test Settings window.
You can also enable data collection as part of the Team Build process. To do that, you must enable data collection in the build definition of your build. For more information, see Chapter 21. Basically, you would follow these steps:
Using Team Explorer, create a new build definition, or modify an existing build definition.
Click Process in the navigation bar of the build definition.
Scroll to the Testing Category in the Build process parameters list.
Set the Analyze Test Impacts property to True.
For Test Container TestSettings File, specify a
.testsettingsfile that you have already enabled data collection on.Save your changes to the build definition.
There are two ways to make use of the test impact analysis feature in Visual Studio 2010. You can view (and optionally run) the tests that have been impacted by your code changes. You can also select a code method, and see all the tests that would be impacted by making changes to that method.
To view the tests that have been impacted by code changes, follow these steps:
In Visual Studio, select Test

In the Test Impact View Window toolbar, click Show Impacted tests.
The Test Impact View window will display all the tests that have been impacted by the code changes, as shown in Figure 7-9. You can choose to highlight one or more tests, and click Run Selection to run the tests. If no tests have been affected, the window will display the phrase, "No tests are impacted."

To view all the tests that could be impacted by changing a particular method, follow these steps:
In Visual Studio, select Test
In the Test Impact View window, click Show Calling Tests.
In the Visual Studio code editor, right-click the method for which you want to list tests, and select Show Calling Tests.
The Test Impact View window will display all the tests that call the selected method, as shown in Figure 7-10. You can choose to highlight one or more tests, and click Run Selection to run the tests.

The best way to show the effectiveness of test impact analysis is through an example. In the following example code, you create a very simple calculator class library with three methods:
Add— Adds two numbers togetherSubtract— Subtracts two numbersComplex— Uses both theAddandSubtractmethods to perform a more complex operation
using System;
using System.Collections.Generic;
using System.Linq;
using System.Text;

namespace Calculator
{
    class MyCalculator
    {
        public int Add(int p1, int p2)
        {
            return (p1 + p2);
        }

        public int Subtract(int p1, int p2)
        {
            return (p1 - p2);
        }

        public int Complex(int p1, int p2, int p3)
        {
            int value = 0;

            value = Subtract(Add(p1, p2), p3);

            return (value);
        }
    }
}
This code is then checked into version control in Team Foundation Server 2010.
Next, you must create some unit tests to test your methods. Right-click on class MyCalculator and select Create Unit Tests to open the Create Unit Tests window, as shown in Figure 7-11.
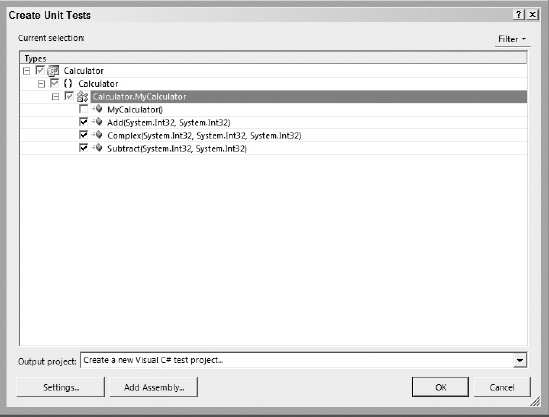
Select the Add, Subtract, and Complex methods. Click the OK button to close the wizard. Enter MyUnitTests as the name of the test project and click Create. A new test project named MyUnitTests is created. Inside this test project is a class file named MyCalculatorTests.cs. Inside this file are three test methods that have been stubbed out: AddTest, SubtractTest, and ComplexTest.
The test methods require some modifications to be valid tests. Modify the AddTest method to look like this:
[TestMethod()]
        public void AddTest()
        {
            MyCalculator target = new MyCalculator();

            int p1 = 4;
            int p2 = 5;
            int expected = 9;

            int actual = target.Add(p1, p2);

            Assert.AreEqual(expected, actual);

        }
Modify the SubtractTest method to look like this:
[TestMethod()]
        public void SubtractTest()
        {
            MyCalculator target = new MyCalculator();

            int p1 = 10;
            int p2 = 6;
            int expected = 4;

            int actual = target.Subtract(p1, p2);

            Assert.AreEqual(expected, actual);

        }
Finally, modify the ComplexText method to look like this:
[TestMethod()]
        public void ComplexTest()
        {
            MyCalculator target = new MyCalculator();

            int p1 = 3;
            int p2 = 4;
            int p3 = 2;
int expected = 5;
int actual = target.Complex(p1, p2, p3);
Assert.AreEqual(expected, actual);
}Run the unit tests to ensure that they are valid, then check all changes into Team Foundation Server.
Now that you have your unit tests created and checked into version control, you must enable data collection on the test project. In Solution Explorer, double-click Local.testsettings. This opens the Test Settings window. Select Data and Diagnostics in the left-hand side of the window. Check the box next Test Impact. Click the Apply button, and then the Close button to close the Test Settings window.
Data collection is now enabled, but before test impact analysis can be utilized, you must upload the test results into Team Foundation Server, and, to do that, you must have a build to upload them against. (See Chapter 21 for more information on creating a new build definition.) Once you have created a build definition, run the unit tests created previously. In the Test Results window, click the Publish button (the first button in the section, before the Group By drop down) to open the Publish Test Results window. Select a build with which to associate the test results, and click OK to close the Publish Test Results window. Once the publishing of the test results is complete, you are now ready to make use of the test impact analysis functionality.
Let's make a code change to the Add method. Modify the Add method to be the following:
public int Add(int p1, int p2)
        {
            int value = 0;

            value = p1 + p2;

            return (value);
        }
To see what tests have been impacted, open the Test Impact View window, as shown in Figure 7-12.

With the Show Impacted Test button selected, you can see there are two tests that will need to be run: AddTest and ComplexTest. By selecting a specific impacted test, you can see what methods are causing the impact (in this case, the changes to the Add method). Notice the Run Test link at the top of the window. Clicking this link will automatically run all impacted tests for you, providing a quick and easy way to run those tests.
Microsoft has brought the advantages of unit testing to the developer by fully integrating features with the Visual Studio development environment. If you're new to unit testing, this chapter has provided an overview of what unit testing is, and how to create effective unit tests. This chapter examined the creation and management of unit tests, and detailed the methods and attributes available in the unit test framework. You should be familiar with attributes for identifying your tests, as well as many of the options that the Assert class offers for testing behavior of code.
You've learned how to generate code with Visual Studio, either by generating tests from code or code from tests. As you saw, it is also very easy to bind unit tests to a data source to create data-driven tests. This chapter also showed that Visual Studio offers a simple way to access private members for testing, addressing a need that previously required manual workarounds.
You learned how to use code coverage to help identify where your unit tests may have missed some scenarios. And, finally, you learned about test impact analysis, and how it can be used to identify what tests to run after code changes have been made.
If you have been using other frameworks for your unit testing to date, you'll enjoy not having to leave the IDE to work with your tests, as well as the familiar options and syntax that Visual Studio offers.
You should become familiar with the benefits of unit testing, keeping in mind that unit tests are not a replacement for other forms of testing, but a very strong supplement.
Obviously, testing is an important aspect to prove that your code is ready to be deployed into production. However, just because the code passes all the unit tests doesn't mean that it is necessarily ready to ship.
Chapter 8 examines the code analysis tools in Visual Studio that help you quickly look for common mistakes, security issues, or even violations of standards. You also learn about how to use Code Metrics to help you identify parts of the systems that may prove difficult to maintain.