
Chapter 19. Enabling Presence Information in SharePoint with Microsoft Office Communications Server 2007
IN THIS CHAPTER
- Configuring Presence Within SharePoint
- Understanding Microsoft’s Unified Communications Strategy
- Installing Office Communications Server 2007
- Exploring Office Communications Server Tools and Concepts
- Installing and Using the Communicator 2007 Client
- Installing and Configuring Live Communications Server 2005 SP1
- Best Practices
SharePoint 2007 products and technologies give organizations unprecedented document management capabilities, allowing knowledge workers to collaborate more efficiently and share ideas more freely. In addition to its robust document management capabilities, SharePoint 2007 allows organizations to integrate with a presence management platform to help platform users to easily tell if a document’s author is online and available, allowing for instant collaboration with that individual.
SharePoint integrates with this type of online presence information if used in collaboration with Microsoft’s presence platform, the Office Communication Server 2007 and its predecessor, Live Communications Server 2005. Using one of these platforms, SharePoint users can more easily collaborate with knowledge workers real-time, using an Instant Messaging client such as the Communicator 2007 product.
This chapter covers the products that comprise the Microsoft real-time communications (RTC) strategy: Office Communications Server 2007, Live Communications Server 2005, and the Communicator 2007 client. Step-by-step guides on how to install, use, and administer these applications are presented, and best practices in their deployment and architecture are outlined. In addition, specifics on enabling presence information lookup from within a SharePoint environment are outlined.
Configuring Presence Within SharePoint
Microsoft Office SharePoint Server 2007 allows for the ability to readily determine the online status of fellow coworkers and other members of a SharePoint site through online presence information, displayed to the user through a smart tag next to the user’s name, as illustrated in Figure 19.1.
Figure 19.1. Viewing presence information in a SharePoint site.
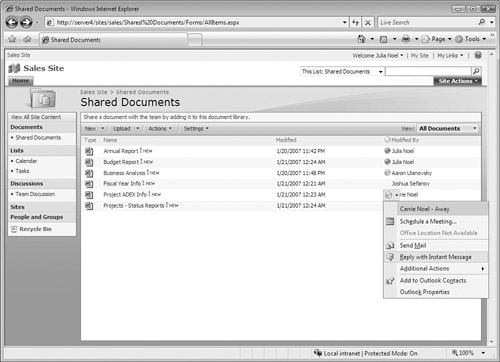
The color of the smart tag quickly identifies whether the user is available (green), busy (yellow), or not available (blank). Right-clicking on these smart tags displays a sequence of options, such as sending an email to the user or instant messaging with them. This makes it easier for users to collaborate with the owners of documents, allowing for quick and easy communications.
Enabling and using presence information within a SharePoint environment requires the presence technology to be enabled on the web application within SharePoint, and also requires the correct version of instant messaging software on the client. In addition, for enterprise instant messaging functionality, an enterprise IM solution such as Live Communications Server 2005 or Office Communications Server 2007, both covered in this chapter, is required.
Enabling Presence Information on a Web Application
Online presence information is enabled by default on a SharePoint web application. In certain circumstances, however, it might be necessary to disable online presence information for troubleshooting. It is subsequently important to understand where in the SharePoint administrative hierarchy the presence information is stored and how it can be turned on and off.
To toggle on or off Online Presence for an individual web application, do the following:
1. From the SharePoint Central Administration Tool on a SharePoint server, navigate to the Application Management tab.
2. Under SharePoint Web Application Management, select Web Application General Settings.
3. From the General Settings page, shown in Figure 19.2, select either Yes or No under the Enable Person Name Smart Tag and Online Status for Members, depending on whether you want to turn on or off presence.
Figure 19.2. Toggling on or off Online Presence info.

4. Click OK to save the changes.
Online presence info can only be turned on or off for the entire web application. It is not possible to toggle the setting for any subcomponent of a web application.
Examining Presence Functionality Within a SharePoint Site Collection
By default, anytime a user’s name appears within an Office 2007 application such as SharePoint, Exchange, Word, Excel, and so forth, online presence information appears next to that user via the user’s smart tag. The status information must be fed to the application from an instant messaging client, however, or the smart tag is not able to display the status of the individual and appears blank.
The following instant messaging clients are supported for viewing presence information in a SharePoint 2007 site:
- Office Communicator 2005/2007
- MSN Messenger/Windows Live Messenger version 4.6 or greater
- Microsoft Windows Messenger version 4.6 or greater
By default, SharePoint 2007 shows presence only for users who are members of the user’s contacts within the IM client. If a user is a contributor to a SharePoint site, but is not in the contact list of another user, that user’s presence information is not displayed by default. To display a user’s presence when she is not in the contact list of the other user, a centralized enterprise instant messaging platform must be used in conjunction with SharePoint 2007.
SharePoint 2007 supports both the Live Communications Server (LCS) 2005 software and the Office Communications Server (OCS) 2007 software to provide this additional layer of presence information within a SharePoint site. Further sections of this chapter outline the design requirements and installation procedures involved in implementing these technologies.
Understanding Microsoft’s Unified Communications Strategy
Microsoft has placed considerable emphasis on its unified communications (UC) strategy in the Office 2007 suite of products, including SharePoint 2007, the Office 2007 client products, and the related suite of products. Microsoft is looking to position several products as solutions to the various types of communications that knowledge workers use, such as phone, email, instant messaging, video conferencing, and voice mail.
These products in the RTC suite work very closely with SharePoint 2007 to further extend the capabilities of the environment and to further improve the efficiencies gained when communications barriers are broken down in an organization.
Outlining the History of the Unified Communications Products
Microsoft has made several forays into the video conferencing and instant messaging space, which have eventually led to the current state of the product today. What we now know as Office Communications Server (OCS) 2007 was originally part of the Exchange 2000 Beta Program (Platinum) but was removed from the application before it went to market. It was then licensed as a separate product named Mobile Information Server (MIS) 2000. MIS had some serious shortcomings, however, and adoption was not high.
Microsoft rebranded the application upon the release of Exchange 2003 by naming it Live Communication Server (LCS) 2003. This version was deployed much more extensively than the previous versions, but still suffered from some integration problems with products such as SharePoint and Exchange.
The LCS product was re-released two years later as Live Communications Server 2005, with an SP1 version coming later that added some additional functionality as well. This version of the product was widely deployed, and was the most solid implementation to date.
Timed to release shortly after SharePoint 2007, the new version of LCS was named the Office Communications Server (OCS) 2007. This version marked the ascension of the technology as a core component to many organization’s collaboration designs.
This chapter covers installation and configuration of both versions of the platform, assisting those organizations who want to integrate the most recent version, LCS 2005, and those who want to integrate with the latest OCS 2007 software.
Exploring the Office Communications Server 2007 Product Suite
Office Communications Server 2007 builds upon some impressive capabilities of its predecessors, while at the same time adding additional functionality. The following are key features of the application:
- Web conferencing—OCS has the capability to centrally conference multiple users into a single virtual web conference, allowing for capabilities such as whiteboard, chat, and application sharing. In addition, these conferences can be set up and scheduled from within the user’s Outlook client.
- Video conferencing—In addition to standard web conferencing, OCS allows for video conferencing between members of a conference. The OCS server can act as the bridge for this type of conferencing, or it can redirect users to a third-party bridge as necessary.
- Instant messaging—The OCS server also acts as an instant messaging server, providing centralized IM capabilities as well as the capability to archive IM traffic and to filter it for specific information. OCS allows an organization to gain more control over the instant messaging traffic that is being used.
- Presence information—Tied into the instant messaging functionality of OCS is the software’s capability to provide presence information for users. Presence information is the primary driving factor for deploying OCS 2007 in a SharePoint 2007 environment.
- Public IM connectivity—Microsoft and Yahoo! recently agreed to make it easier to interoperate between their various IM tools. In response to this agreement, Microsoft made it possible to integrate a corporate IM platform on OCS with external private IM clients on the MSN or Yahoo! platforms. OCS does this through the concept of a Public IM Connectivity (PIC) license.
- IM federation—OCS also has the capability to tie a corporate IM environment into the OCS or LCS environments at another organization, through a process known as IM federation. Externally facing OCS federation proxy servers are used for this capability.
- Contact management—OCS integrates Outlook contacts with IM contacts, making a common list of contacts.
- Outlook integration—OCS now offers the capability for the instant messaging functionality to be tied into the Free/Busy and Out of the Office functionality of Outlook and Exchange Server. This allows users to determine the status of a user directly from the IM client.
OCS 2007 is available in the following two versions:
- Standard Edition—The Standard Edition of OCS 2007 allows for a single server to be deployed using an MSDE database. It supports up to 15,000 concurrent users.
- Enterprise Edition—The Enterprise Edition allows for pools of servers connected to a common SQL database to be utilized, allowing up to 120,000 users.
Server roles are defined for OCS servers to allow the server to scale to larger organizations. A single server can hold multiple roles, and multiple servers can be deployed with a single role, as necessary. The following server roles exist in OCS:
- Server—The default server for OCS handles IM, web conferencing, and presence information.
- Archiving server—An OCS archiving server archives instant messages and specific usage info and stores it in a SQL database.
- Proxy server—An OCS proxy server allows for requests to be forwarded when those requests do not require authentication and/or user registration.
- Edge server—An OCS edge server creates an encrypted, trusted connection point for traffic to and from the Internet. It serves as a method of protecting internal servers from direct exposure and is often placed into the demilitarized zone of a firewall.
The OCS product is central to Microsoft’s unified communications strategy, as it serves as a mechanism to unite the various products such as Exchange and SharePoint by providing information about when a user is online and ideal mechanisms to communicate with him.
OCS 2007 has the capability to tie an organization’s IM clients into a Yahoo! instant messaging client infrastructure as the two companies have resolved their differences and are now collaborating in this space.
Viewing the Communicator Client
On the client side of the unified communications equation, Microsoft has released a new version of the corporate instant messaging client. This version is known as Office Communicator 2005 and the latest iteration of the product is Office Communicator 2007. The Communicator client provides the end user with a mechanism to conduct instant messaging conversations with users, to share her desktop with another user or with a group of users, and to transfer files and view video content.
The Communicator client serves as a replacement for free Internet instant messaging clients, which can serve as a conduit for viruses and spyware. In addition, the Communicator client does not include any type of advertising in its console, as do the public IM clients for Windows Live Messenger (MSN), Yahoo!, and AOL.
Installing Office Communications Server 2007
Office Communications Server 2007 has a surprisingly complex installation process at first glance. What Microsoft has done, however, has been to divide the installation process into multiple sections, providing for checks along the way so there is less room for error. Because the installation requires an Active Directory (AD) schema upgrade, it is important that the process run smoothly, so it’s a good thing that this process is designed the way it is.
This section of the chapter focuses on the installation of the Standard Edition of Office Communications Server 2007. The Enterprise Edition installation routine is similar, but with more emphasis on multiple server deployment and on the use of a full SQL database.
Extending the AD Schema
Office Communications Server 2007 integrates deep into an existing Active Directory environment. It integrates so deeply, in fact, that an extension of the underlying Active Directory schema is required before the product can be installed. Active Directory schema upgrades are no small thing, of course, so it would be wise to become familiar with the consequences of extending the schema and to make sure that a backup of the domain takes place first. To start the installation process, perform the following steps:
1. Run the Office Communications Server 2007 Setup from the media. Click on the deploy.exe file.
2. From the Deployment Wizard, click on the Deploy Standard Edition Server link.
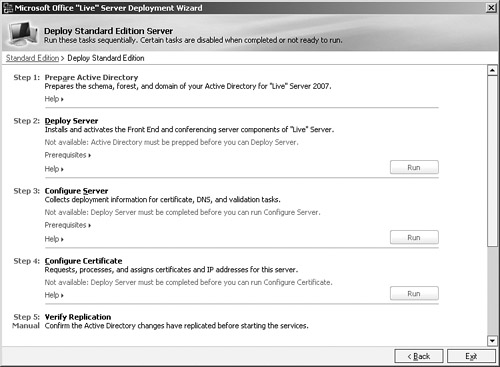
3. Review the steps on the subsequent dialog box for the Deployment Wizard, shown in Figure 19.3. Click Prepare Active Directory.
Figure 19.3. Deploying OCS 2007.
Installation of Office Communications Server 2007 requires an Active Directory Schema upgrade to the AD forest. It is important to fully understand the consequences of a schema upgrade in advance, as an upgrade will replicate to all domain controllers in a forest.
4. Under the subsequent dialog box, shown in Figure 19.4, click the Run button to start the schema upgrade process.
Figure 19.4. Starting the Schema upgrade process.

5. At the Schema Preparation Wizard Welcome screen, click Next to begin the process.
6. In the Schema File Location dialog box, leave the default location selected and click Next.
7. At the review screen, review the settings and, keeping in mind the caution previously given about schema upgrades, click Next to continue.
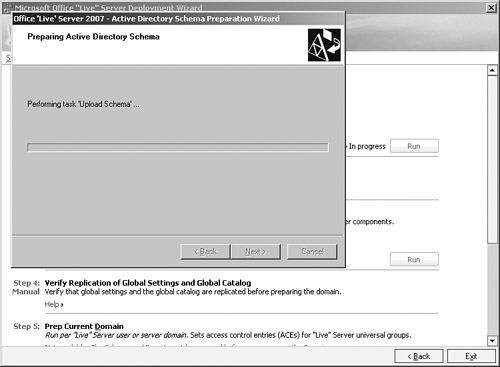
8. The schema upgrade process begins, as shown in the dialog box in Figure 19.5. When complete, click Finish.
Figure 19.5. Extending the schema.
After the schema update has run, be sure you wait until the new schema extensions have replicated to all domain controllers in the forest. After this has been verified, return to the Deployment Wizard to continue.
Preparing the AD Forest
After the schema extension is complete, perform the following steps:
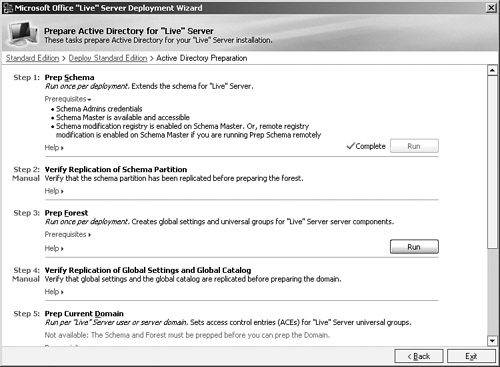
1. Return to the Deployment Wizard and click the Run button under Step 3: Prep Forest, as shown in Figure 19.6.
Figure 19.6. Prepping the forest.
2. Click Next at the Welcome screen of the Forest Preparation Wizard.
3. The subsequent dialog box, shown in Figure 19.7, gives you the option to choose between storing the global settings in the root domain, or in the configuration partition. In most cases, install in the root domain. Click Next to continue.
Figure 19.7. Choosing where to store global settings.

4. Under Domain, choose the domain where OCS will create the groups used by the server. This is typically the main resource domain where the servers are installed. Click Next to continue.
5. At the review screen, click Next to continue.
6. Click Finish when complete.
7. After this step is complete, ensure that the newly created objects have replicated on all domain controllers in the forest and proceed to the next step.
Prepping the Domain
The following procedure must be run on each domain in the forest where OCS will be installed:
1. Click the Run button under the Prep Current Domain listing in the Deployment Wizard.
2. From the Domain Preparation Wizard, click Next to continue.
3. From the Domain Preparation Information dialog box, review the warning illustrated in Figure 19.8 and click Next to continue.
Figure 19.8. Prepping the domain.

4. Click Next at the review dialog box.
5. Click Finish when complete.
6. Once again, make sure replication takes place before advancing to the next step in the installation process.
Delegating Setup and Administrative Privileges
To continue the installation process, perform the following steps:
1. From the Deployment Wizard, click on Delegate Setup and Administration under Step 7.
2. Click the Run button underneath Delegate Setup Tasks.
3. At the Setup Delegation Wizard Welcome dialog box, click Next to continue.
4. At the Authorize Group dialog box, shown in Figure 19.9, choose the Trustee domain and enter a name of an existing universal security group. Members of that group will receive permissions to activate the server. Click Next to continue.
Figure 19.9. Delegating setup and administrative privileges.
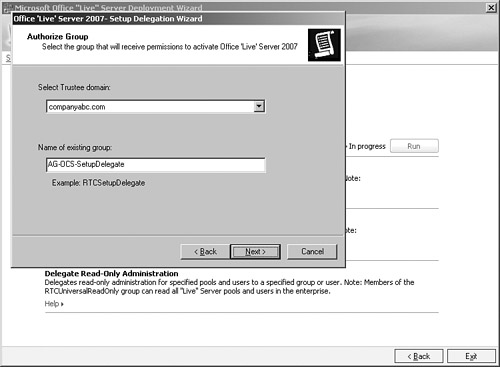
The group chosen must be a universal security group, or installation will fail.
5. At the OU Location dialog box, enter the full distinguished name of the Organization Unit (OU) in Active Directory where the OCS Server computer accounts will be located. For example, the following Distinguished Name (DN) was entered in this example:
OU=OCS,OU=Servers,OU=Computers,OU=Resources,DC=companyabc,DC=com
6. After entering the DN of the OU servers, click Next to continue.
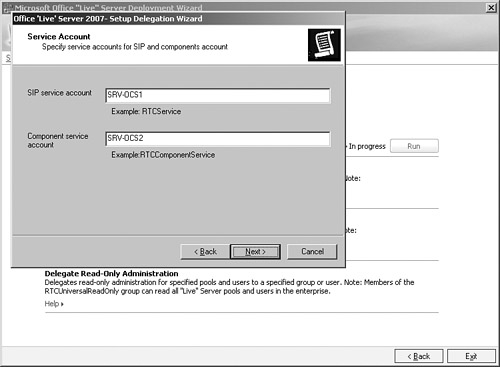
7. Enter the name of the service accounts that will be used for the Session Initiation Protocol (SIP) and components services, such as what is shown in Figure 19.10. These accounts should be created in advance in AD.
Figure 19.10. Entering service account information.
8. Review the information in the subsequent dialog box and then click Next to begin the setup.
9. Click Finish when the setup is complete.
At this point, setup of the Active Directory portion of the OCS Enterprise is complete, and individual servers can now be deployed.
Configuring IIS on the Server
The installation of the server portion of the process requires that the World Wide Web service of Internet Information Services (IIS) be installed on the server. To install the IIS component, perform the following actions:
1. From the server that OCS will be installed on, click Start, Control Panel, Add or Remove Programs.
2. Click Add/Remove Windows Components.
3. Select Application Server from the list (only click on the name to highlight it, do not check the box) and click the Details button.
4. Select Internet Information Services (IIS) from the list (again, only select it, do not check the box) and click Details.
5. Scroll down and check the box for World Wide Web Service, as shown in Figure 19.11, and click OK.
Figure 19.11. Installing the web service.

6. Click OK again, and then click Next.
7. If prompted for the CD-ROM, enter the media and click OK.
8. Click Finish when complete.
Deploying an OCS 2007 Server
After all of the prerequisites have been satisfied and the AD schema has been extended, the process for installing an OCS 2007 standard server can begin. This process is the same for as many OCS servers as need to be deployed. To begin this process, perform the following steps:
1. From the Deployment Wizard, click on Deploy Standard Edition Server.
2. Under Step 2, click the Run button, as shown in Figure 19.12.
Figure 19.12. Deploying server components.

3. At the Welcome screen, click Next.
4. Leave the installation folder at the default and click Next to continue.
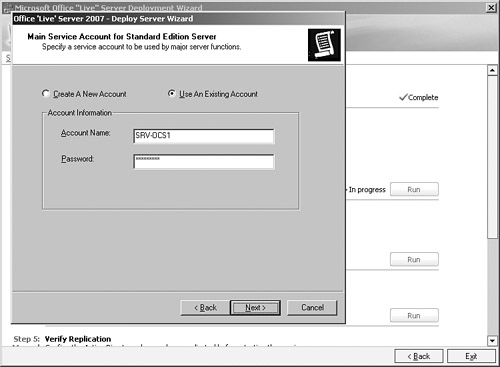
5. In the Main Service Account dialog box, as shown in Figure 19.13, select to use an existing account and enter the service account information entered in the previous steps for delegation. Click Next to continue.
Figure 19.13. Specifying service account settings.
6. In the Component Service Account dialog box, choose to use an existing account, and then enter the second service account created during the delegation steps (for instance, SRV-OCS2) and its password. Click Next to continue.
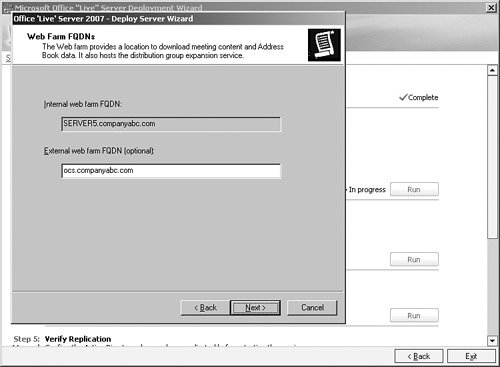
7. Under the Web Farm FQDN dialog box, shown in Figure 19.14, enter the external FQDN of the farm as it will be made available to Internet users (if applicable). Click Next to continue.
Figure 19.14. Entering web farm FQDN settings.
8. Enter the database and log information into the fields in the Database File dialog box. Click Next to continue.
For best performance, separate the database and logs onto physically separate drive sets.
9. Click Next at the Ready to Deploy dialog box.
10. Click Finish when complete.
Configuring the Server
After the server software has been installed, OCS services are not started by default. Instead, the Deployment Wizard encourages administrators to configure certain settings first before starting OCS services. To configure these settings, follow this procedure:
1. From the Deployment Wizard, click Run under Step 3 (Configure Server).
2. Click Next at the Welcome screen.
3. Select the installed server from the drop-down box shown in Figure 19.15 and click Next to continue.
Figure 19.15. Configuring the OCS server.

4. If any additional SIP domains are needed in the environment, enter them in the subsequent dialog box. If not, accept the default of the domain name (for example, companyabc.com) and click Next.
5. Under Client Logon Settings, select that all clients will use DNS SRV records for auto logon and click Next to continue.
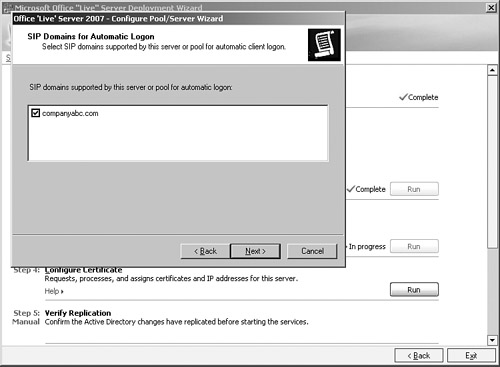
6. Check the domain(s) that will be used for SIP automatic logon, such as what is shown in Figure 19.16, and click Next to continue.
Figure 19.16. Selecting SIP domains for automatic logon.
7. On the External User Access Configuration dialog box, select to not configure external user access now. External user access can be configured at a later date from the Admin tool. Click Next to continue.
8. Click Next at the Verification dialog box.
9. Click Finish when complete.
Configuring Certificates for OCS
Communications to and from the OCS server should ideally be encrypted and the user should also be able to trust that they are actually accessing the server that they expect. For this reason, Microsoft made it part of the installation process to install certificates onto the OCS server. To start the process of installing a certificate on the server, perform the following steps:
1. From the Deployment Wizard, click Run under Step 4 (Configure Certificate).
2. Click Next at the Welcome screen.
3. From the list of available tasks, shown in Figure 19.17, select to create a new certificate and click Next.
Figure 19.17. Creating a new certificate for the OCS server.

4. Select to send the request immediately to an online certification authority and click Next to continue.
This step assumes that an internal Windows Certificate Authority exists in the organization. If not, the request must be sent off to a third-party certificate authority (CA), such as VeriSign or thawte.
5. Type a descriptive name for the certificate, and leave the bit length at 1024 and the cert as exportable. Click Next to continue.
6. Enter the Organization and Organizational Unit of your organization. It should exactly match what is on file with the CA. Click Next to continue.
7. At the Server Subject Name dialog box, enter the subject name of the server (FQDN in which it will be accessed), such as what is shown in Figure 19.18. Enter any subject alternate names as well. It is also recommended to check the box to add the local machine name. Click Next to continue.
Figure 19.18. Entering the server’s subject name.

8. Enter the appropriate country, state, and city information into the Geographical Information dialog box, bearing in mind that abbreviations cannot be used. Click Next to continue.
9. Select the local CA from the drop-down list and click Next to continue.
10. Click Next at the verification dialog box.
11. In the Success dialog box, click the Assign button.
12. Click OK to acknowledge that the settings were applied.
13. Click Finish to exit the wizard.
14. After the certificate is installed, check to make sure that the changes have replicated.
Starting the OCS Services on the Server
After the certificate has been installed, the services for OCS can be started via the Deployment Wizard via the following process:
1. From the Deployment Wizard, click the Run button under Start Services.
2. From the wizard Welcome screen, click Next.
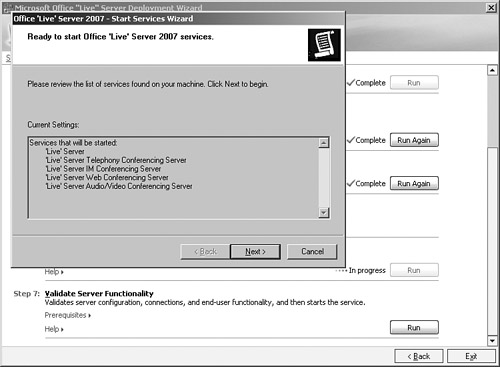
3. Review the list of services to be started, as shown in Figure 19.19. Click Next to continue.
Figure 19.19. Starting the services.
4. Click Finish when the wizard is complete.
Validating Server Functionality
The Deployment Wizard contains a useful mechanism for running a series of tests against the server to ensure that everything was setup properly. To run this wizard, do the following:
1. From the Deployment Wizard, click Run under Step 7 (Validate Server Functionality).
2. Click Next at the Welcome screen for the Validation Wizard.
3. Select the boxes to validate the local server configuration, connectivity, and SIP logon, and click Next to continue.
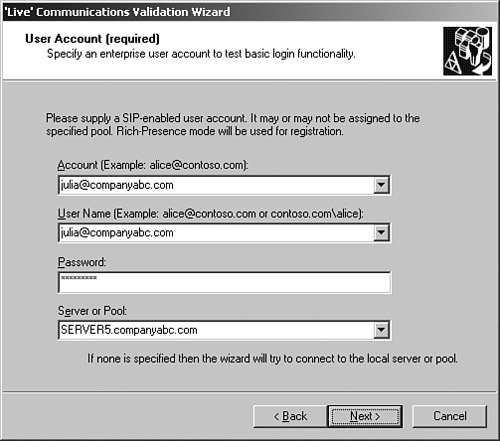
4. Enter an account for testing login functionality, as shown in Figure 19.20. Click Next to continue.
Figure 19.20. Testing IM functionality.
5. Enter a second user account to test two-party IM functionality. Click Next when ready.
6. On the subsequent Federation dialog box, select whether to test federation, if it is enabled. Click Next to continue.
7. Click Finish when complete and review the logs for any errors.
Installing the Admin Tools
Administrative tools for OCS 2007 can be installed on a separate server from the OCS server itself. The system in question need only be either Windows Server 2003 SP1 or R2 edition, or Windows XP Professional XP2. To install admin tools on a different system, do the following:
- From the initial Deployment Wizard screen, click the link for Administrative Tools.
- Click Next at the Welcome screen.
- Select I Accept for the license terms and click Next.
- Click Next to start the installation.
- After installation, click Close to exit.
Exploring Office Communications Server Tools and Concepts
After OCS 2007 has been installed in an organization, the job of administering the environment comes into play. OCS functionality is not difficult to grasp, but it is important to have a good grasp on several key concepts in how to administer and maintain the OCS environment. Central to these concepts is a familiarity with the OCS admin tools, as illustrated in the following sections.
Administering Office Communications Server
Administration of an OCS 2007 environment is comprised of two components, user administration and server administration. User administration is primarily concerned with enabling a user for OCS access, giving him an SIP account, moving him from one server to another, and enabling or disabling public IM connectivity and federation.
Adding Users to OCS
The Office Communication Server 2007 Admin tool allows for both user and server administration. Enabling a user account for OCS access, however, requires the use of the Active Directory Users and Computers (ADUC) tool, which can be downloaded from Microsoft as part of the Windows Server 2003 Service Pack 1 Admin Pack (adminpak.msi). Installing it on the server that runs OCS displays additional OCS tabs, and allows for new drop-down menu options that enable and disable OCS access.
To enable a user account for OCS access, perform the following steps from the ADUC tool on the OCS server:
1. From Active Directory Users and Computers, right-click on the user to be enabled and choose Enable Users for Office Communications.
2. Click Next at the Welcome Wizard.
3. Select the server pool from the list and click Next to continue.
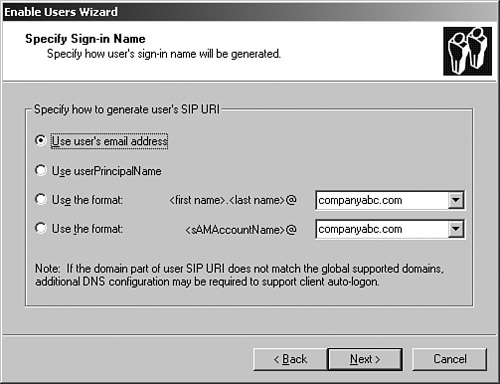
4. In the User Account dialog box shown in Figure 19.21, specify how to generate the SIP address for the user. Click Next to continue.
Figure 19.21. Enabling a user for OCS.
5. Click Finish when complete.
Configuring User Settings from the OCS Admin Tool
After a user account has been provisioned for OCS access using the ADUC tool, it shows up in the Users container underneath the Server Name icon in the console pane of the Admin tool. Right-clicking on the user and selecting properties invokes the dialog box shown in Figure 19.22.
Figure 19.22. Modifying user settings in OCS 2007.
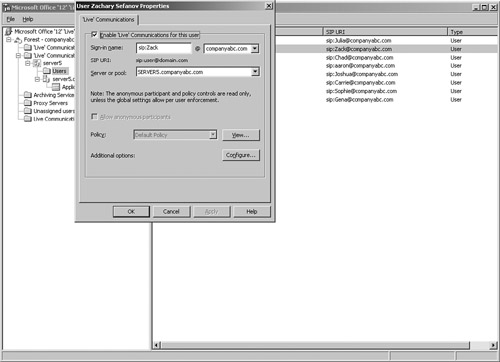
Clicking on the Configure button also opens up advanced options, such as Federation and Public IM options. The OCS console allows for OCS users to be deleted or moved to other servers.
Configuring Server Settings from the OCS Admin Tool
Server-specific settings can be configured from the OCS Admin tool by right-clicking the server name and choosing Properties, <Server Role> (where <Server Role> is the role that will be configured, such as front end, web conferencing, A/V, or web component). The dialog box shown in Figure 19.23 displays some of the settings that can be manipulated here.
Figure 19.23. Changing server settings in the OCS Admin tool.

Using the Instant Messenger Filter in OCS 2007
OCS 2007 also includes a built-in instant messenger filter, shown in Figure 19.24, that gives organizations control over what type of traffic is being sent through IM. This allows administrators to limit the risk that IM clients can pose, particularity with spyware and other vulnerabilities. It also includes a file transfer filter that can be modified to block specific file extensions.
Figure 19.24. Viewing the IM Filter in OCS.

Together with a Public IM Connectivity (PIC) license running on an OCS Edge Proxy server, this allows an organization to let employees use the IM client for external IM functionality, but without exposing the organization to unnecessary risks.
Installing and Using the Communicator 2007 Client
The client component of an OCS 2007 implementation is the Communicator 2007 client. This client is essentially the business version of Microsoft’s IM client, which provides instant messaging, conferencing, video, and audio capabilities.
Using the Communicator 2007 Client
The Communicator client, shown in Figure 19.25, communicates to the OCS 2007 server via an encrypted TLS channel, securing the traffic from prying eyes. Users can set their presence information directly from the client, allowing other users in the OCS system to view whether they are online and available for conversations.
Figure 19.25. Viewing the Communicator 2007 client.

Installing the Communicator 2007 Client
The Communicator 2007 client can be installed as part of a deployment package in an application such as SMS 2003 or System Center Configuration Manager 2007, or it can be manually deployed to desktops. The following procedure illustrates how to manually install the client on a desktop:
- Run the Communicator 2007 client setup from the client media.
- Click Next at the Welcome screen.
- Select I Accept for the license terms and click Next.
- Enter a patch for the application (typically accept the default path given) and click Next to continue.
- Click Finish when complete.
Installing and Configuring Live Communications Server 2005 SP1
SharePoint 2007 presence information can also be viewed using the older version of the Office Communications Server product, known as Live Communications Server 2005 SP1. From a SharePoint presence functionality perspective, there are very few differences between LCS 2005 SP1 and OCS 2007, so some organizations may choose to implement the older version of the product in certain circumstances.
Installing Live Communications Server 2005 SP1
Live Communications Server 2005 Service Pack 1 is the final version of the LCS 2005 product and is available for installation. Installation of LCS 2005 is very similar to that of OCS 2007, and the installation options are similar as well, as illustrated in Figure 19.26.
Figure 19.26. Installing LCS 2005 SP1.

The steps outlined in the installation procedures for OCS 2007 are nearly identical to those of LCS 2005, with a few minor changes and a few less dialog boxes from which to choose. Schema changes to the AD environment are required as well, although fewer total schema changes are made than with OCS 2007. After installation, management of the LCS user environment is performed using the AD User’s and Computers tool as well, and SIP functionality for users can be enabled with the use of this tool.
Examining the Communicator 2005 Client
In addition to the down-level server version of the software, a down-level client, Communicator 2005, is available for installation for environments that have not fully migrated to the Office 2007 Suite. The Communicator 2005 client, shown in Figure 19.27, works with LCS 2005 and OCS 2007, and can be used to display presence information from SharePoint 2007 just as well as the Communicator 2007 client does.
Figure 19.27. Viewing the Communicator 2005 client.

If an organization chooses to install the older version of the client or the server software, presence information is retained within SharePoint. That said, the newest version of the software has the tightest integration with other Office 2007 product suites, and it is generally recommended for those environments which have deployed an Office 2007 infrastructure.
Summary
The real-time communications functionality that Microsoft has designed into Office Communications Server 2007, Office Live Meeting, and the Communicator 2007 client are ideal for organizations looking to get more productivity out of their SharePoint 2007 environment. In addition, tight integration with other Office 2007 products, including Exchange 2007 and Outlook 2007, make them an ideal match for organizations, as they allow for improved efficiency in communications between knowledge workers.
Best Practices
- Enable presence information on a SharePoint web application when possible to take advantage of the enhancements to collaboration it provides.
- Consider the use of Office Communications Server 2007 over the older Live Communications Server 2005 for centralized presence information, particularly if the Office 2007 client suite is deployed.
- Take care when installing OCS 2007 or LCS 2005, as they extend the Active Directory schema during installation. Be sure to fully understand the implications of a schema change before making this change.
- Deploy the Enterprise version of OCS/LCS if more than 15,000 users will be using the environment or if redundancy of server components is required.
- Use the instant messaging filter in OCS 2007 to filter out potential spyware and unwanted files from users.
- Consider the use of a Public IM Connectivity (PIC) license to allow internal corporate IM users access to public instant messaging clients such MSN and Yahoo!. Be sure to examine the cost implications of installing a PIC, as they can vary depending on the number of PIC clients that will be supported.
- Deploy the Communicator client using an automated deployment solution such as System Center Configuration Manager (SCCM) 2007 or the older version of the product, Systems Management Server (SMS) 2003 Service Pack 1.