In this chapter
Microsoft Dynamics AX 2012 has been marketed as “Powerfully Simple.” Making this a reality was not just a marketing slogan, but instead was a key design goal for the release.
As an enterprise resource planning (ERP) solution, Microsoft Dynamics AX must provide the many powerful, built-in capabilities that are required to run a thriving company in the twenty-first century. The needs of organizations are becoming more complex. Companies are trying to organize themselves in new and unique ways to become more efficient. Leaders of these organizations are asking their people to achieve more with less. Governments want more transparency in the business operations of a company. Combined, all these things increase the complexity of running a business and the demands on an ERP system.
The challenge for Microsoft Dynamics AX 2012 was to harness these powerful capabilities in a way that users would find simple to use. There is a natural tension between these goals, but that tension is far from irreconcilable.
At Microsoft, simplicity is defined as the reduction or elimination of an attribute of the design that target users are aware of or consider unessential. The easiest way to simplify a design is by removing elements from that design. For example, if you want to simplify the experience of creating a new customer, you can do so easily by reducing the number fields that the user needs to complete on the new customer form. With fewer fields, the user can complete the form in fewer keystrokes, which also minimizes the chance that the user will make a mistake. The problem is that fields can’t simply be removed from the new customer form because those fields are required to support the powerful capabilities that customers need.
So to have a simple and powerful user experience, Microsoft Dynamics AX 2012 has been designed for the probable, not the possible. To design for the probable means that you need to truly understand what the user is most likely to do and not assume that all actions are equally possible. You can focus your designs on what is likely, and then reduce, hide, or remove what is unlikely.
For example, Microsoft Dynamics AX contains approximately 100 fields that contain information about a customer. In the prior release, when the user created a new customer, the Customer Details form presented all 100 fields. The user had to look through all these possible fields to determine what to enter. Microsoft Dynamics AX 2012 introduced a new dialog box (Figure 5-1) that appears when a user creates a new customer. This dialog box displays the 25 fields that users are most likely to use. The user can simply enter data in these fields, and then click Save And Close to create the new customer. If the user needs to enter more detailed information about the customer, he or she can click Save And Open to go to the full Customer Details form to enter data in the other 75 fields.

This chapter describes the key concepts of the Microsoft Dynamics AX user experience and explains how you can extend the capabilities of the product while maintaining a focus on simplicity. This chapter supplements the Microsoft Dynamics AX 2012 User Experience Guidelines on MSDN (http://msdn.microsoft.com/en-us/library/gg886610.aspx). For more detailed information, refer to these guidelines.
Designing an ERP system that is simple for all users is challenging because many types of users use the product. The pool of users encompasses more than 86 roles, and those roles use Microsoft Dynamics AX for many different scenarios. These scenarios range from picking and packing items in a warehouse to processing payments from a customer in the finance department. It is not surprising that users in these various roles have different mental models for how the system should work for them. Designing the user experience for specific roles provides a much better experience than providing the same experience for all users.
Historically, ERP systems were designed as a thin wrapper around the tables in the database. If the database table had 20 fields, the user interface would display those 20 fields on a single form, similar to how they were stored in the database. When a new feature was needed, new fields were added to the table and those fields were displayed on the form. Over time, ERP systems became very complex because more and more fields were added without regard to who would be using them. This led to user experiences that were designed for everyone but optimized for no one. The end goal of a role-tailored user experience in Microsoft Dynamics AX is to make the user feel as if the system was designed for him or her.
In Microsoft Dynamics AX 2012, the user experience is tailored for the various roles that the product targets. The security system includes 86 roles that system administrators can assign to specific groups of users. The user experience is tailored automatically based on the roles and shows only the content that is needed by a user who belongs to a given role. Based on the user’s role, actions on the Action pane, fields, field groups, or entire tabs might be removed from certain forms. With each field or button that is hidden, the product becomes easier to use. The menu structure is also tailored so that each user sees only the areas or the content in these areas that pertain to the user’s role. Users feel like they are using a smaller application tailored to their needs, as opposed to a large, monolithic ERP system. For more information about working with roles, see Chapter 11.
To illustrate this concept, look at the navigational structure for Microsoft Dynamics AX 2012. The product contains 20 area pages targeting the various activities needed to run a business. While a system administrator sees all these areas, a specific role such as a Shipping Clerk, Purchasing Agent, or Order Processor sees only the four to six areas that relate to the role, as shown in Figure 5-2.

In Microsoft Dynamics AX, user experience components are divided into two conceptual layers:
The navigation layer consists of top-level pages that serve as a starting point for the user as he or she navigates through the application. Area pages, Role Centers, and list pages are navigation-layer elements.
The work layer consists of the forms in which users perform their daily work, such as creating and editing record and entering and processing transactions. Details forms and transaction details forms are work-layer elements.
Figure 5-3 illustrates how the user navigates through the primary elements that make up the Microsoft Dynamics AX 2012 user experience. The following sections describe these elements in detail.

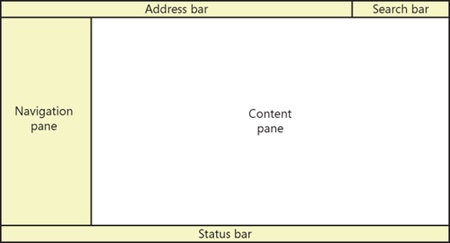
Navigation layer forms such as the Role Centers, area pages, and list pages are displayed within the Microsoft Dynamics AX Windows client in a flat navigation model. This model is similar to that of a website, in that pages are displayed within the content region of the page, replacing each other as the user progresses from one form to the next. The client workspace consists of the following components, as illustrated in Figure 5-4:
Address bar Provides an alternate method of navigating through the application. A user can type a path or click the arrow icon next to each entry in the path to select the next location. The address bar has buttons that allow navigation backward and forward between the recently displayed pages. The address bar also provides a mechanism for the user to switch companies because the current company is the first entry in the address path.
Search bar Lets users search for data, menu items, or help content. The user can use the search bar as an alternate method of navigation if he or she doesn’t know how to find a particular form. The search bar is an optional component that must be configured as part of setup. For more information, see Enterprise Search at http://technet.microsoft.com/en-us/library/gg731850.aspx.
Navigation pane Appears on the left edge of the client workspace and is used for navigating to the various areas within the application or the user’s list of favorite forms. Optionally, this pane can be collapsed or hidden through the View menu.
Content pane Appears to the right of the navigation pane and displays top-level pages, such as area pages, Role Centers, and list pages.
FactBox pane Appears at the right of the workspace and provides related information about a specific record in a grid. The FactBox pane appears only on list pages. Users can personalize the contents of the FactBox pane by using the View menu.
Status bar Appears at the bottom of the workspace and displays additional information in a consistent location, such as user name, company, or notifications. The user can personalize the contents of the status bar by using the Options form (Click File > Tools > Options).
The remaining forms in Microsoft Dynamics AX are where the user performs work such as configuring the system, creating new transactions, or entering information into journals. These forms open in a new window that is separate from the client workspace. The work layer pages are described in detail in the upcoming sections.
A Role Center page is the user’s home page in the application. A Role Center provides a dashboard of information that pertains to a user’s job function in the business or organization. This information includes transaction data, alerts, links, and common tasks that are associated with the user’s role in the company.
Microsoft Dynamics AX 2012 provides different Role Center content for the various roles. Each Role Center provides the information that the users who belong to that role need to monitor their work. A Role Center also provides shortcuts to frequently used data and forms. Each user can personalize the content that appears in his or her Role Center.
A cue is a visual representation of a query that appears as a stack of paper. A cue represents the activities that the user needs to perform. The stack grows and shrinks as the results of the query change.
Cues are an excellent way for users to monitor their work. For example, an Accounts Payable clerk can monitor a cue of pending invoices, invoices due today, or invoices past due, as shown in Figure 5-5. Clicking a cue opens the appropriate list page with the same query applied. When the clerk wants to act on the invoices, the clerk clicks the cue.

While Microsoft Dynamics AX includes great Role Centers for the various roles, they must be customized to meet the needs of the people who will be using them. It is highly recommended that partners and system administrators take the time to customize the Role Centers for the various users within the organization.
Designing a great Role Center requires a deep understanding of the user. Here are a few techniques that you can use to help understand your customers:
Survey people in the various roles to understand the top 10 questions they have related to their job. Then, explore ways that you can provide answers to as many of those questions as possible with a Role Center.
Show users the content of their default Role Center on a piece of paper. Then, ask them to circle the content that they find useful and to cross out the content that they don’t find useful. You can also give them a blank piece of paper to sketch out additional content that they would like to see. Users typically get excited with these types of exercises because they feel empowered describing what they want from their ERP system.
Observe users performing their daily tasks. Often, users cannot articulate what they need to become more efficient, but it may be obvious if you observe them performing their jobs. As you are observing them, watch for the patterns that emerge in their work.
Find out which forms users open frequently, and consider adding links to those forms to the Role Center QuickLink on their Role Center or a favorite in their navigation pane. A QuickLink is a part on the Role Center that provides quick access to any form within Microsoft Dynamics AX.
Find out if users frequently go to a list page and filter the content to see a particular group of records. If so, you can make them more efficient by adding a cue to the Role Center that is configured to provide direct access to this list with the appropriate filter applied. For some users, we’ve seen Role Centers that have been customized to include a page full of cues that were needed by the user.
Summarize frequently viewed reports as a chart or graph.
Here are a few other things to consider when you design a new Role Center or extend an existing Role Center:
Remove any parts that users don’t need.
Place the most important content toward the top of the page.
Ensure that the page loads quickly, within 2 to 5 seconds. This may require you to optimize the queries and cubes that display the information within these parts. For more information about optimizing queries, see Chapter 13.
Area pages are the primary method for users to navigate through the application. By default, Microsoft Dynamics AX provides 20 different area pages. Each area page focuses on a specific department or activity; for example, Human Resources or Accounts Receivable, as shown in Figure 5-6. Depending on their role, users may see only a small set of area pages.

The content of an area page is divided into six groups of links:
Common Contains links to the most important entities that are used within this area, such as customers, vendors, products, sales orders, invoices, and so on. These links usually take the user to the list page for an entity. Through the list page, users should be able to navigate to all things that are related to the entity.
Inquiries Provides access to all the inquiry-type forms for the area. If possible, do not create new inquiry forms for entities that have list pages. Instead, consider providing different views within a list page because lists are where users expect for find all content related to an entity.
Periodic Provides access to tasks that need to be performed periodically. If you are considering adding new forms to the Periodic section, think about whether the form is specific to an entity that would be better suited to be accessed through the entity’s list page and details page.
Journals Provides access to journals that are related to this area. A journal is a concept that makes sense to a financial user, but not to other users outside the finance department. Use caution when you introduce new journals to Microsoft Dynamics AX to make sure that this is the correct approach for your users.
Reports Provides access to reports that are related to this area. Note that we are discouraging creating new reports whenever possible. Users don’t want to view information in a report, but instead prefer seeing this information on a form such as a list page because it is more interactive than a report.
Setup Provides links to the forms needed to configure this area.
Designing area pages is an exercise in organizing the content in a way that makes sense for users. Here are some tips to consider when you design a new area page or extend an existing area page.
Take the time to understand the user’s mental model as it relates to the work that they do. Make sure that you place the links to the forms they need to use in the most logical area. The best way to do this is to perform a simple card sort exercise to help you understand how users want to organize their content.
To conduct a card sort, do the following:
Create index cards for the entries that you are considering for an area page.
Ask potential users to groups these index cards into piles that they feel go together.
Have users give a name to each pile.
Place the frequently accessed entities in the Common section. This section should provide navigation to a list page.
This technique can give you a good indication of how to organize the content on an area page or a group of area pages. For more information about card sorting, see “Card sorting: a definitive guide” at http://www.boxesandarrows.com/view/card_sorting_a_definitive_guide.
Avoid creating additional reports, inquires, and periodic forms for features related to a common entity. Instead, provide access to these forms through the entity’s list page and details forms. This way, for example, the user doesn’t have to search the area page for things related to a customer, but instead knows that all things related to a customer can be found on the Customer list page and details form.
Avoid adding multiple new pages to the Setup section. Instead, look for ways to consolidate setup information for a feature area into a single form by using the table of contents pattern. By consolidating this information, the user needs to find only one form and can easily see all related configuration information without having to go back to the area page.
Avoid creating new area pages that are specific to a custom solution unless this makes logical sense. For example, if your solution provides the capability to do credit checks on customers, it is typically better to add links to these features in the Accounts Receivable area than it is to create a new area page specifically for credit checks. Accounts Receivable users expect these features to be part of the Accounts Receivable area and not in a separate area.
Spend the time necessary to organize the content in a way that is logical to your users. Users will not only benefit while they learn to use your features, they will also benefit during extended use. Often, even experienced Microsoft Dynamics AX users struggle to remember where to find an infrequently used form. Typically, this happens because the form is accessed from a place that wasn’t logical to the user.
List pages are the starting point for many tasks in Microsoft Dynamics AX. Any scenario that starts with finding a record or a set of records is best suited for a list page, as shown in Figure 5-7. List pages are designed to be the place where users can find information and then act on that information.
To fully understand the power of a list page, consider a simple scenario of a customer service representative (CSR) in a manufacturing company who receives calls from customers. When the CSR receives a call from a customer, she wants to be efficient and take the least amount of time while on the phone. This scenario is optimally suited for a list page. The steps in this scenario correspond to the numbered items in Figure 5-8 and illustrate how a CSR can use a list page to perform a group of related tasks without having to leave the list page.

When a call comes in, the CSR answers the phone while simultaneously opening the Customer list page. She assumes that a customer is calling.
The customer announces that his name is Terry and he is calling from Sunset Wholesales. The CSR greets the customer while typing Sunset into the Quick Find field.
The CSR notes that only one customer record with Sunset in the name is displayed in the list. To verify that she has found the correct customer record, she looks at the FactBox on the right. It shows three contacts from Sunset Wholesales, and Terry’s name is in the list.
The customer wants a quote on purchasing 50 48-inch high-definition flat-screen televisions. The CSR clicks the Sell tab of the Action pane and clicks the new Sales Quotation button.
She proceeds to enter the quotation and quotes a price for the customer.
If, in this scenario, the customer Sunset Wholesale was not already in the system, the CSR would have searched for the customer, but no match would have been found. In this case, she could easily add a new customer from the Action pane, as shown in Figure 5-9.
If the customer called to check the status of his most recent payment, the CSR could quickly check the Recent Activity FactBox (Figure 5-10) to see the amount of the payment and the date it was received.


A list page is a great alternative to a traditional report. Historically, ERP systems have been focused on traditional reports as a way to get information out of the system. To an extent, Microsoft Dynamics AX 2012 has migrated away from traditional reports, and instead uses list pages as a place to view simple reports. For example, the customer aging list in Accounts Receivable > Collections is shown in Figure 5-11. This is a list of customers that displays information typically seen in an aged trial balance report. Having an interactive list of customers is much better than a traditional report because the user can sort this list easily by customer balance to see the customers who owe the organization the most money at the top. Additional information about this customer is easy for the users to see in the FactBoxes. A user who wants to take action with this customer has full access to commands that are related to a customer. The Collections list page is also a great example of a role-tailored experience. This page displays a list of customers with specific information that Collections users need to see.

These are all examples that demonstrate how a list page is a great starting point for many scenarios. In these scenarios, it allows the user to find the customer and take the appropriate action quickly. Notice that when the CSR received the phone call, she did not know what the customer was calling about. Starting from the Customer list, she could easily find the customer, then wait for the customer to state what he or she wanted. At this point, she could take any action she needed to help the customer in a timely manner.
While this example focused on the Customer list, you’ll see similar benefits in other list pages as well.
As a developer extending Microsoft Dynamics AX, you will need to extend an existing list page or design a new list page for an entity. Here are some tips to consider when you design a new list page or extend an existing one:
Organize the tabs of the Action pane by activity. For example, on the Customer list page, we organized the commands based on typical activities that you perform against a customer, such as Sell, Invoice, Collect, etc. This helps the user find commands more easily, especially if there are many actions.
Provide access to all actions that the user needs to perform against the entity in the Action pane. Users expect all actions to be available from the list page. Don’t force them to go elsewhere to initiate an action.
Allow the user to perform bulk actions by multiselecting items in the list. This is one of the most powerful capabilities of a list page because the user can easily filter the list and then select all records to take an action against.
Provide secondary list pages that are filtered to show a specific set of records that need to be accessed frequently by the user. These secondary list pages should be added as a cue in the corresponding Role Center. This helps the users monitor the number of records in the list and get quick access to the list by clicking on the cue in the Role Center. Past Due Customers and Customers on Hold are examples of secondary lists that are included on the Customers list page.
Design FactBoxes to display information that the user typically would have to open additional forms to see. By providing this information in a FactBox, you greatly simplify the user’s experience because no additional action is required.
Consider which columns the user needs to see in the list, and display those columns by default. Although the product provides users with a mechanism for adding columns to a list page, it is best if you can ensure that the fields the user needs to see are displayed automatically.
Ensure that the page loads quickly. Users expect the list to appear within 2 to 5 seconds. This will require that you optimize the queries used to load the list page. For more information about optimizing queries, see Chapter 13.
When adding a new list page, follow the Microsoft Dynamics AX 2012 User Experience Guidelines on MSDN (http://msdn.microsoft.com/en-us/library/gg886610.aspx) to ensure that the list, Action pane, and FactBoxes are designed appropriately and match the rest of the application.
Details forms are the primary method for creating and editing primary entities such as customers, vendors, workers, and products. A user opens a details form by double-clicking a record on a list page. By default, the details form for an existing entity opens in read-only mode. To modify the record, the user can click Edit to switch the form to edit mode.
All fields of a details form are grouped into FastTabs that the user can expand and collapse, as shown in Figure 5-12.

FastTabs can display summary fields, which display key fields contained in the FastTab so that the user does not have to expand the FastTab. For example, in Figure 5-13, the summary field displays the customer’s credit rating and payment terms, among other information.

Details forms have an Action pane that display commands organized in the same way as the corresponding list page. The list page and the details form should have the same set of actions, with only a few exceptions. A details form also can contain FactBoxes to display related information. Many details forms contain the same set of FactBoxes as the list, but this is not a required feature. For more information, see the User Experience Guidelines (http://msdn.microsoft.com/en-us/library/gg886610.aspx).
If you are introducing a new primary entity into Microsoft Dynamics AX 2012, you will need to create a new details form, in addition to a list page. Primary entities are typically tangible things that directly relate to the work a company performs, such as customers, vendors, employees, or inventory items. They tend to have many fields, many actions, and a great deal of related information.
The primary effort required for designing a new details form is to organize all of the fields within FastTabs. This exercise will require some knowledge of your users and the work they do with these entities. To organize fields into FastTabs, here are some guidelines to consider:
Create FastTabs that are organized into groups that are logical to your users. This can be another situation where a card sort can help inform your decisions. Ask your users to organize the fields of the entity into groups and then ask them to name the groups. As you go through this exercise, test the organization with your users to see if it is intuitive for them. It may take multiple iterations to organize the fields correctly. Don’t be discouraged; multiple iterations are normal to get the correct design.
Keep the number of fields in a FastTab as low as possible because taller FastTabs are less usable than shorter ones. When a tall FastTab is expanded, users lose their context in the form because a taller FastTab requires more scrolling and doesn’t allow multiple FastTabs to be expanded at the same time.
Order the FastTabs to put the most important FastTabs at the top and the least important ones at the bottom.
Here are a few other tips for designing a details form:
Organize the tabs of the Action pane by activity. This helps the user more easily find their commands, especially if there are many actions.
Provide access to all the actions that the user needs to perform against the entity in the Action pane. Users expect all actions to be available in the Action pane. Don’t force users to go elsewhere to initiate an action.
If multiple roles use the form, ensure that members of each role see only the commands that are required for their jobs. You can organize commands so that entire Action pane tabs are hidden from specific roles. You can configure this through the Microsoft Dynamics AX 2012 security model. For more information, see Chapter 11.
Design FactBoxes to display information that the user would typically have to open additional forms to see. By providing this information in a FactBox, you greatly simplify the user’s experience because no additional action is required.
Ensure that the page loads quickly. The user will expect the form to open within 2 to 5 seconds. This will require that you to optimize the queries that are used to load the form. For more information about optimizing queries, see Chapter 13.
Give users the capability to edit multiple records from within the details form, as shown in Figure 5-14. The user can initiate this through the Grid View button on the status bar.

Transaction details forms are used for creating and editing transactions in Microsoft Dynamics AX. A transaction is a business event that occurs within a company that needs to be recorded in the ERP system. Examples of transactions in Microsoft Dynamics AX are sales orders, purchase orders, invoices, bank deposits, and so on. The user experience for recording transactions is critical for any ERP system because many transactions must be recorded on a daily basis. Transaction details forms must be optimized for efficiency so that users can enter new transactions easily. These forms must be intuitive so that users don’t make mistakes that cost time and money to resolve. Users of these forms typically use them repeatedly throughout the course of the day. They learn every nuance of the form to become as efficient as possible, and they become frustrated by any extra step that is required because, over the course of a day, the extra step slows them down.
The Sales Order and Purchase Order transaction details forms are possibly the most complex forms within Microsoft Dynamics AX because of the number of fields and actions that they need to support. With each release, new fields and actions are typically added to these forms to support additional capabilities that customers request. Figure 5-15 shows the Sales Order detail form, which is used to create new sales orders. This form has been simplified by providing quick access to the important header fields and the lines of the order. It has been optimized for the orders that are typically created by a user, while still supporting all possible options. This will require many users to customize these forms to meet their needs. The goal with these forms is to design a great experience that can be customized easily for the specific needs of each user.

Transaction details forms are similar to details forms because users open them from a list page by double-clicking a transaction record. By default, transaction details forms open in read-only mode the same way that a details form does. To modify the record, a user clicks Edit to switch the form to edit mode. Transaction details forms differ from details forms because they typically have line items to indicate the details of the transaction. The line items are the main focus of these forms and are where the users spend most of their time. Transactions can vary greatly in their complexity: a simple transaction might require only 1 or 2 line items, but a complex transaction might require more than 100 line items. Transaction details forms must be designed to accommodate both of these situations.
A transaction details form has two views, which users can toggle between by using buttons in the Action pane:
Line view Displays only the header fields that are most likely to be needed when a user creates a new transaction. Line view is the default view and is designed to support the majority of the user’s tasks. You should modify this set of header fields to display the most important fields for your users.
Header view Displays all the header fields of the transaction. Typically, many of these fields use default values and are not completed directly by a user. These fields are omitted from the Line view to make it easier to use.
As a developer extending Microsoft Dynamics AX, you may need to extend an existing transaction details form or design a new transaction details form for an entity. Here are some guidelines to consider when you extend or design a new transaction details form:
Organize the tabs of the Action pane by activity. This helps the user more easily find commands—especially if there are many actions.
Provide access to all actions that the user needs to perform against the entity in the Action pane. Users expect all actions to be available in the Action pane. Don’t force users to go elsewhere to initiate an action.
If multiple roles use the form, ensure that members of each role see only the commands that are required for their jobs. You can organize commands so that entire Action pane tabs are hidden from specific roles. You can configure this through the Microsoft Dynamics AX 2012 security model. For more information, see Chapter 11.
Ensure that the columns in the line items list are the fields that the user completes most frequently. Entering fields into the grid is much more efficient than using the line details at the bottom of the form.
Design FactBoxes that display information to users that help them while entering new transactions or when viewing an existing transaction. By providing this information in a FactBox, you greatly simplify the user’s experience because no additional action is required to see this information.
Ensure that the page loads quickly. The user will expect the form to display within 2 to 5 seconds. Performance of this form is extremely critical because it is used repeatedly throughout the day. Any performance issue on the forms will frustrate the user.
When adding a new transaction details form, follow the Microsoft Dynamics AX 2102 User Experience Guidelines at http://msdn.microsoft.com/en-us/library/gg886610.aspx. Note that the guidelines refer to transaction details forms as details forms with line items.
The Enterprise Portal web client provides a similar user experience to the Microsoft Dynamics AX Windows client. Any user who is familiar with the Microsoft Dynamics AX client should also feel comfortable using Enterprise Portal. Like the Microsoft Dynamics AX client, Enterprise Portal also contains navigation layer and work layer forms, but the navigation path is simplified, as shown in Figure 5-16.
The following sections describe the Enterprise Portal user experience. For more information about creating Enterprise Portal pages, see Chapter 7.

In Enterprise Portal, navigation layer forms include Role Centers and list pages. The user has the same Role Center between the Microsoft Dynamics AX client and Enterprise Portal. List pages in Enterprise Portal are similar to those in the Microsoft Dynamics AX client and, from a developer perspective, are actually the same form (see Chapter 7). All Enterprise Portal navigation layer forms appear within the Enterprise Portal workspace, which consists of the following components:
Top navigation bar Contains a set of links at the top of the page. A user can use this bar to navigate between the various areas, such as Sales and Procurement, that are visible to him or her. Each link in the top navigation bar points to the default page of the corresponding area.
Search bar Lets users search for help content and data and forms. By default, users can use the search bar to search for Microsoft Dynamics AX help and Microsoft SharePoint help. If you want to enable searching for data and forms, Enterprise Search must be configured as part of the setup. For more information, see Enterprise Search at http://technet.microsoft.com/en-us/library/gg731850.aspx.
Action pane Displays a set of buttons that are categorized into contextual tabs and button groups similar to the Action pane in the Microsoft Dynamics AX client and Microsoft Office applications. This enhances simplicity and discoverability because the actions available vary based on the permissions of the user.
Navigation pane Contains a set of links on the left side of the page that allow a user to navigate to the various areas and pages within an area. Note that the Navigation pane in Enterprise Portal doesn’t provide access to all areas; instead, it provides navigation within an area. This differs from the Navigation pane in the client.
Content pane Appears to the right of the Navigation pane. The Content pane displays content pages such as Role Centers, as well as list pages.
FactBox pane Appears at the right of the workspace and provides related information about a specific record in a grid. The FactBox pane is displayed only on list pages within the workspace. Unlike FactBoxes in the Microsoft Dynamics AX client, the FactBox pane in Enterprise Portal cannot be personalized by the user.
The primary work layer forms in Enterprise Portal are details forms, which are used for entering information into Microsoft Dynamics AX. A details form lets users view, edit, and act upon data. These forms are similar to the details forms in the Microsoft Dynamics AX client but have a smaller set of fields and actions.
When you are designing for Enterprise Portal, consider where users will perform similar actions in the Microsoft Dynamics AX client, and plan the user experience so that it is consistent:
Organize the content into areas similar to those in the Microsoft Dynamics AX client. If users find customers in the Sales and Marketing area of the client, they will expect customers to be located in the same area of Enterprise Portal.
Organize commands in the Action pane in a similar manner to those on the client.
For more information about designing new forms for Enterprise Portal, see the Microsoft Dynamics AX 2012 User Experience Guidelines at http://msdn.microsoft.com/en-us/library/gg886610.aspx.
This chapter has talked about how to design powerful and simple user experiences for your users. The key to designing powerful and simple experiences is to truly understand your users so that you can focus your designs on what the user is likely to do. Don’t assume that you know what your users know or what they need or want. Also, don’t assume that their managers know what they need or want. Instead, take the time to observe them working, and talk to them about what they need. Also, keep in mind that sometimes users cannot articulate what they need or want. You will have to develop the skills to observe and listen for their unarticulated needs.
Based on the insights you gain, sketch out some possible designs take them back to the users for their feedback. Avoid prototyping the solution; instead, simply create a sketch. This might feel awkward if you think that you need to have a perfect design before you take it back to users. Keep in mind that they will appreciate the opportunity to provide feedback early in the process. When they see that you haven’t invested a lot of time on your designs, they will be more willing to provide feedback. If you get feedback that you are off the mark on your designs, it is easy for you to change direction at this point because you haven’t invested a lot of time on your sketches.
When you are getting feedback from your users on your designs, don’t demo the design to them and ask for their opinion. Instead, ask them to explain what they are seeing with these designs and describe how they think they would take actions with them. If they are able to describe how the designs work and indicate how they can be used, you are on the right track. If not, take their input and sketch out some new designs. Don’t go too long without talking to your users, and don’t be afraid to fail. The key is to fail early when you haven’t invested much time in your designs, and to determine the right design before you begin coding your feature. Create two or three iterations until you get a design that seems to resonate with users. Remember that designing a simple, easy-to-use feature is a difficult exercise.