
Lesson 9: Working with Tables

Tables have a long and storied history in web design. In this lesson, you will learn how to structure and style tabular data using tables. Additionally you will understand the basics of using tables for layout and be able to compare and contrast them with Cascading Style Sheets (CSS) for layout.
What you’ll learn in this lesson:
- • Creating and modifying tables
- • Styling tables in CSS vs. HTML
- • Importing table data
- • Sorting table data
Starting up
Before starting, make sure that your tools and panels are consistent by resetting your workspace. See “Resetting the Dreamweaver workspace” in the Starting up section of this book.
You will work with several files from the dw09lessons folder in this lesson. Make sure that you have loaded the dwlessons folder onto your hard drive from www.digitalclassroombooks.com/epub/dreamweavercc. See “Loading lesson files” in the Starting up section of this book.
Before you begin, you need to create site settings that point to the dw09lessons folder. Go to Site > New Site, or, for details on creating a site, refer to Lesson 2, “Setting Up a New Site.”
Using tables in web design
Tables are ideally suited for displaying tabular data. As discussed in Lesson 5, “Creating Page Layouts with CSS,” in the beginning days of the Web, tables were the best tools available for designers when it came to layout. Over the years, Dreamweaver has steadily introduced a number of tools and visual aids to help people work with tables. Dreamweaver has mirrored the Web in that it has begun to shift its focus to CSS layout rather than table layout. Slowly, the table is reclaiming its original purpose: displaying tabular data.
In this lesson, you will learn how to automatically import and format existing data into a table. You will also explore how to modify rows and columns, style tables with CSS, and create new tables from scratch.
Importing table data
You’ll get a chance right away to see tabular data in action by importing a .csv file into Dreamweaver. A majority of tabular data is exported from spreadsheet programs in the .csv (comma-separated values) and .txt (text) file formats. These are called comma, tab, or other delimited files. Essentially this means that a spreadsheet application converts the data within its rows and columns to an intermediate format that Dreamweaver can read.
Although Dreamweaver can open these files, it does not format them directly. With a comma-delimited file, for example, each column value is separated by a comma and each line break starts a new row. For example, here is how Dreamweaver displays the raw .csv file that you are going to be working with:

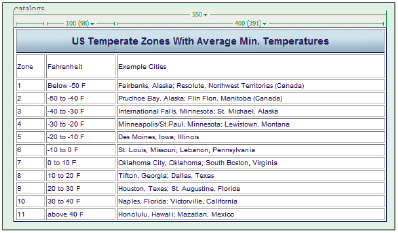
The text editor’s view of a comma-delimited file.
When imported into Dreamweaver, this file will be translated accordingly into the rows and columns of a new table.
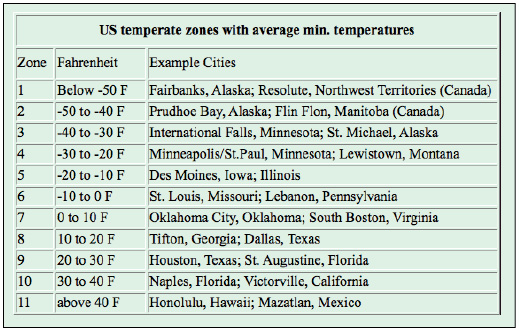
1 In the Files panel, double-click the tips.html file to open it. This is a styled page for the tips section of the OrganicUtopia site. You will be inserting a .csv file with data on the vegetable-growing zones of North America.
2 Click after the last sentence in the main paragraph and press Enter (Windows) or Return (Mac OS) to make sure your cursor is below the text. Choose File > Import > Tabular Data. The Import Tabular Data dialog box opens.
3 In the Import Tabular Data dialog box, click the Browse button and locate the temperate_zones.csv file in your dw09lessons folder. Click Open.
4 Click the Delimiter menu to see the various options that are available. In your case, you will be choosing Comma. In the Table width section, leave the Fit to data option selected.

The settings in the Import Tabular Data dialog box affect the way a table is created.
 You can either set a specific width for the generated table or let Dreamweaver construct the table automatically, based on the line-length of the incoming data.
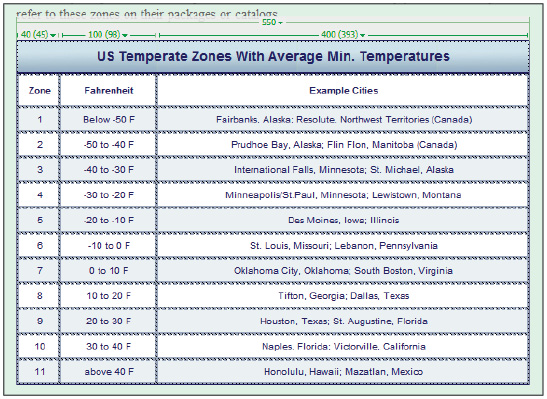
5 Click OK and your table is imported into your document below the text. Your table is imported with 3 columns and 12 rows. A quick way to confirm this is to look in the Property Inspector, where there is a field for columns and rows as well as other useful ways to work with tables.
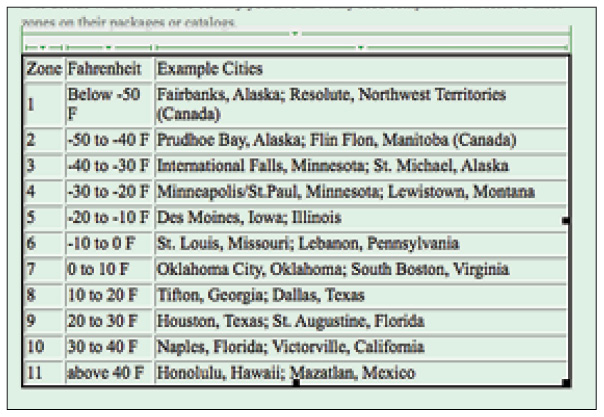
A three-column and 12-row table generated by Dreamweaver from a comma-delimited file.
6 Click Dreamweaver’s Code view button to see the code that makes up this table. It’s safe to say that this is something you would not want to code by hand.
The table is now ready to be formatted according to your specifications. As you can see, you can save yourself a lot of time if your source data is properly formatted. Dreamweaver creates a table for you with all the data properly placed, eliminating the need for you to build a table, and type, or copy and paste, content into each cell.
Selecting table elements
It’s worth taking a few moments to learn how to select the various elements of your table. Selecting a specific part of a table can be little tricky until you learn how. In this exercise, you’ll look at ways to select a table’s rows and columns both by hand and using controls in the Property Inspector. The components of a table include rows, columns, and cells, and other elements such as table headers and footers. The table you created needs some modification. It’s rare that a table is created exactly right, and making small tweaks to the column widths and the row heights is the norm.
1 Click the Design view button in the Document toolbar and click anywhere on the background of the page. In this case you do not want the table to be selected. Without clicking, place your cursor over the edges of the table; you see the different sections of the table light up with a red border. Also notice that your cursor switches to a black arrow. The red border is Dreamweaver’s visual cue for which part of the table you will be selecting, and the black arrow points in the direction of the row or column to be selected.
2 Place your cursor high in the upper-left corner until the entire table is outlined in red. Click once, and the table is selected.
A red border designates which section of the table you are selecting—in this case, the entire table.
3 Place your cursor to the left of the word Zone until you see the top row outlined; click once to select the row.
4 Move your cursor to the top of the word Zone until you see the numbered column outlined in red; click once to select the column.
Selecting a single cell is a little trickier, as the red outlines only appear when your cursor is on the edge of a table, not inside of one.
5 Click inside the cell with the word Zone. In order to select the cell, use the tag selector at the bottom left of your document window. These tags are an alternative way to select parts of the table.
6 Click the <table> tag first; this selects the table just as you did in step 2. Click the <tr> tag next; this selects the table row. The <tr> tag appropriately stands for table row. Lastly, click the <td> tag, and the cell itself is selected; <td> is defined as a table cell in HTML. Note that in each of these cases the selected element is outlined in black.

Clicking the appropriate table tag in the tag selector selects that part of the table.
Some people prefer this method of selecting elements of their tables because it removes the chance that clicking the table will move or modify it.
7 Click inside any cell in the table again, and choose Modify > Table > Select Table. This is yet another way to select tables. The Modify > Table command is one you’ll be returning to. You can also select the table by right-clicking (Windows) or Ctrl+clicking (Mac OS) the table and choosing Table > Select Table from the context menu.
Modifying table size
Although importing tabular data from a text file is quick and easy, the data is seldom formatted perfectly. When you first imported the data, there was a choice to Fit Table Width To Data. The width of the table, when you choose this option, isn’t always predictable due to the way Dreamweaver does its calculations. Although it is possible to set the width of the table during the import stage, this isn’t always convenient if you don’t know what the data looks like. Luckily, it’s easy to change the size of tables in Dreamweaver. The first thing you’ll do is set a fixed width for the table.
1 If your table is not currently selected, select it now by clicking the <table> tag in the tag inspector. In the Property Inspector, type 550 in the W text field and make sure the drop-down menu to the right is set to pixels, then press Enter (Windows) or Return (Mac OS). This expands the table to a width of 550 pixels.
If necessary, re-select the table and look closely at the top of it; there is a visual guide outlined in green that displays the width of your table as well as the width of each column. This guide will come in handy when you are trying to create precisely measured tables, although it can also be turned off.
 You can turn off this guide by choosing View > Visual Aids > Table Widths.
2 Choose File > Save, then File > Preview in Browser and open this page in your browser. Resize the browser window a few times. Because the table has a fixed width of 550 pixels, its width stays constant. Close the browser and return to Dreamweaver.
3 In the Property Inspector, your table should still be selected. In the W (Width) text field, type 75 and choose % from the drop-down menu to the right; notice a change in your table width in the Design view.

You can set the table width to a percentage of the browser window by using the Property Inspector.
Choose File > Save, then preview the page in your browser again and resize the browser window. The table width now resizes because you set it to be a percentage rather than a fixed width. Close the browser and return to Dreamweaver.
4 Reset your table to the original width by typing 550 in the W text field and choosing pixels from the drop-down menu.
You also have the ability to resize the columns and rows in the Design view. You can do this manually using the Property Inspector.
5 Place your cursor inside the table and then over the dividing line between the first column and the second column. Your cursor changes to a double-arrow. Click and drag slowly to the right to expand the width of the first column. This has the effect of reducing the second column’s width, although it leaves the third column’s width alone. After changing the column widths, notice at the top of the two columns there are blue numbers that update showing the column widths. If these numbers do not appear, move your cursor over the top of the columns to display.
6 Expand the first column to at least 45 pixels; the content in the second column breaks to the next line. Place your cursor on the dividing line between the second and third column, and click and drag slowly to narrow the width of the third column (thereby expanding the width of the second column). This example uses values of 395 pixels for the third column and 88 pixels for the second.
 If you are mathematically inclined, you may have noticed that the three column values don’t add up to 550. This is because there are additional factors of cell padding, cell spacing, and borders to consider.
Oftentimes, approximate column widths are not sufficient; Dreamweaver allows you to apply exact column widths in the Property Inspector.
7 Place your cursor above the first column until the red outline appears and click once to select the column. The bottom half of the Property Inspector now allows you to adjust the properties of only this column. Type 40 into the W text field and press Enter/Return. The width does not appear to change dramatically, but it is now 40 pixels.
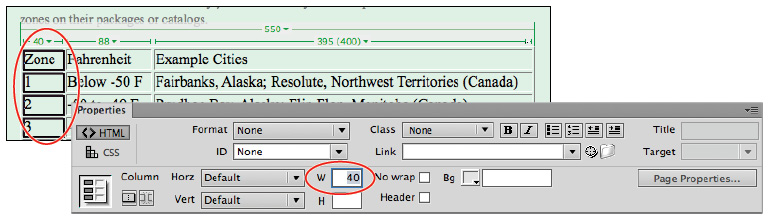
Selecting a column and entering a specific width in the Property Inspector sets the column to that width.
8 Click above the second column to select it. Type 100 into the W text field. Click above the third column and type 400 in the W text field and press Enter/Return. (This will have little effect on the appearance of the table.)
You also have the ability to create a fixed height for rows.
9 Click the left edge of the top row to select the whole row. In the Property Inspector, type 35 in the H text field, and press Enter (Windows) or Return (Mac OS) to apply the change.
Modifying table structure
In addition to modifying the width of columns and rows, the structure of a table often needs to be modified (for example, adding and deleting rows and columns, as well as merging cells in the column). First, you’ll add a new row to the top of your table and then convert it to a header row. There are a few ways to add rows and columns in Dreamweaver, you’ll begin with the Modify > Table command.
1 Click inside any of the cells within the first row. Dreamweaver needs to have some frame of reference when adding a row.
2 Choose Modify > Table > Insert Rows or Columns. The Insert Rows or Columns dialog box opens.
3 The Insert Rows radio button should be selected. For Number of rows, leave the default value of 1. In the Where section, select Above the Selection. Click OK to add the new row to the top of the table.
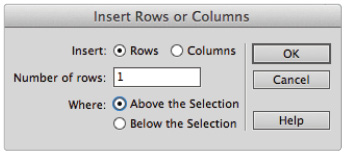
Use the Insert Rows or Columns dialog box to add new rows or columns to an existing table.
4 Place your cursor on the left side of the new row until the red outline appears. Click once to select it. In the Property Inspector, locate the Header check box and check it to designate this row as a Header row. Behind the scenes, Dreamweaver uses the HTML <th> tag to define this as a table header and the text will appear bold and centered. This will help you style your table later on.
Now you’ll merge the three cells in this top row in order to add the header text that will span across your columns.
5 With the top row still selected, right-click (Windows) or Ctrl+click (Mac OS) to open a context menu. Choose Table > Merge Cells, and the three cells merge into one. This is referred to as columnspan.
6 Click inside this merged cell and type US temperate zones with average min. temperatures.
Merging cells creates a columnspan, allowing you to add header text.
7 Choose File > Save to save your work.
Creating a table
In addition to creating a table from tabular data, you can also create a table from the ground up using Dreamweaver’s Insert Table command.
1 Click to the right of your existing table, and then press Enter (Windows) or Return (Mac OS) two times. You will be placing a second table two lines below the first.
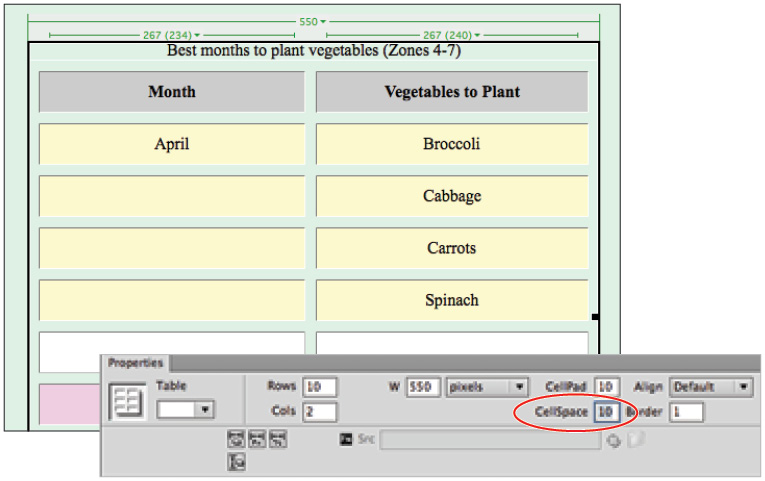
2 Choose Insert > Table, and the Table dialog box opens. Type 12 in the Rows text field, and 2 in the Columns text field. Type 550 in the Table width text field to match the width of your first table and make sure the drop-down menu is set to pixels. Set the Border thickness value to 1 if it is not already.
The Cell padding and Cell spacing values should have no value; you’ll return to these properties shortly.
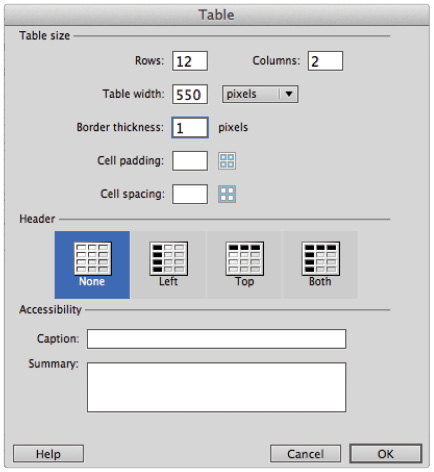
The Insert > Table command creates a new table.
3 In the Header section, select the third option, Top, in order to designate the top row as the header.
4 In the Caption field, type Best months to plant vegetables (Zones 4–7). Table captions are a bit more specific than table headers. A table caption is a short description of the table contents and has its own <caption> element; by default, they are displayed centered and at the top of the table.
Table captions are not required, but they are useful, especially from an accessibility perspective, as they supply useful information to screen readers and other devices. Click OK to insert the table.
5 Below the caption, in the first cell of the first column, type Month. In the first cell of the second column, type Vegetables to Plant. Your columns could shift; in order to adjust them, click the divider between the two columns, and click and drag it as necessary to visually divide the two columns evenly.
6 In the second row of the Month column, type April. Press the down arrow key five times and type May.
7 Below the Vegetables to Plant column, type Broccoli. Press the down arrow on your keyboard to move to the next row. Using this technique, first type Cabbage and then type each vegetable name in its own row—first Carrots and then Spinach. Skip one row and, making sure you are beginning in the same row as May, type Corn, Tomatoes, Peppers, Cucumbers.

Press keyboard arrows to quickly move from one cell to another when typing text.
8 To delete the two extra rows at the bottom of the table, click in the first cell of row 11, and then drag down and to the right. The four cells are selected. Press Delete to remove the rows.
9 Choose File > Save, and keep this file open for the next exercise.
Formatting and styling tables in HTML
There are two different paths to take when it comes to styling a table. The first method is to use HTML tag properties to modify attributes such as the cell padding, border, and background color in a table. However, these same attributes can also be controlled with the second method, CSS. It’s fair to say that there are more options for styling a table with CSS; however, styling a table with HTML tags is faster for most people. Which method you choose often depends on the project specifications. You’ll be learning both methods here so that you have the option to choose. You’ll also get a chance to consider the pros and cons of both methods. First, you’ll start off with the traditional method of styling tables with HTML tags and properties.
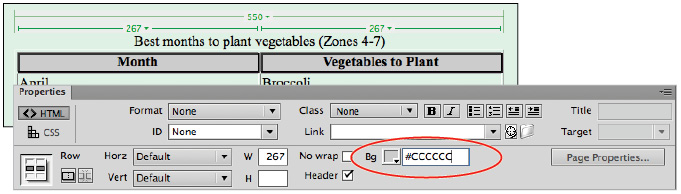
1 In the second table you created (Best months to plant vegetables), click the edge of the header row (Month and Vegetables to Plant) to select it. In the Property Inspector, click the HTML category, if necessary, and then click the Bg (Background) color text field, type #CCCCCC, and press Enter/Return. The background color of the header row changes to gray.
Select a row and click the Bg color swatch to apply a background color.
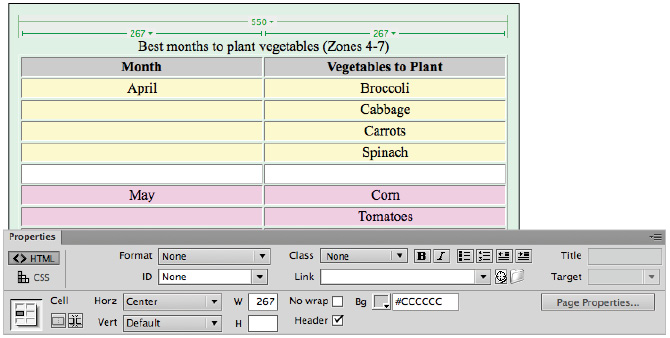
2 Click inside the April cell, then drag down and to the right until you reach the cell containing the text Spinach; this selects all the cells in these four rows and two columns.
3 Click the Background text field, type #FFFCCC, and press Return/Enter. All four rows now have the same background color.
4 Select the empty row between April and May. Click the Bg color swatch and choose white for this background color and press Enter/Return. Then click in the May cell and drag down and to the right to the last cell containing the text Cucumbers. Click the Bg color swatch and type #FFCCFF in the text field in the bottom-left corner and press Return/Enter to commit the change.
Now, you will center the text in your columns.
5 Click at the top of the first column to select it. In the Property Inspector, from Horz (Horizontal) drop-down menu, select Center. Select the second column and repeat this step to center this text.
Select a column and click the Center option in the Horizontal menu of the Property Inspector.
6 Choose File > Save, then File > Preview in Browser. Your text is visually categorized by background color now, but it would be a stretch to say that this is a visually pleasing table. There are a few other properties that you can adjust to make this table look a bit better. Close the browser and return to Dreamweaver.
You’ll now examine the properties of cell padding.
7 Click in one of the corners of the table until the entire table is outlined in red. Then click the table to select it. In the Property Inspector, locate the text field for CellPad and type 10. Press Enter (Windows) or Return (Mac OS) to apply the change. There are now 10 pixels of space added to the inside of all cells. This has the effect of giving your text a bit more breathing room from the borders around it.
Cellpadding is a property that determines the amount of space, measured in pixels, between the sides of a cell and its contents.
8 With your table still selected, locate the text field for CellSpace in the Property Inspector. Type 10 in the CellSpace text field, then press Enter (Windows) or Return (Mac OS) to commit the change. The table changes appearance again. This time, the width between the cells is increased.
Cellspacing is the property that determines the amount of space between your cells.
A table with cellpadding of 10 pixels and cellspacing of 10 pixels.
The space between the cells (the cellspacing) is taking on the properties of the background color. Unfortunately, you cannot control the color of the cellspacing, and so you will actually remove it completely.
9 In the Property Inspector, type 0 in the CellSpace text field and press Enter (Windows) or Return (Mac OS). This removes cellspacing completely. At this point, you only have properties for cellpadding.
10 With the table still selected, locate the text field for Border; it is currently set for 1 pixel, which is the default setting used when a table is created. Replace this value with 0 and press Enter (Windows) or Return (Mac OS). This removes the border completely.
This trick of removing borders completely is used quite a bit with pure HTML tables. This is because there are no good ways to control the appearance of borders using pure HTML. Increasing the border size creates a thick, beveled look that can detract from the rest of your page. Better control for borders exists in CSS.
11 Place your cursor on the small black square on the lower-right of the table until you see the double-arrow. Click and drag the table to the left to reduce its width. You can use the value at the top of the table if you choose, or just change the width until you’re satisfied. This example uses a new width of 350 pixels.

Click and drag the edge of a table to reduce the width.
12 With the table still selected, click the Split view button in order to see the code generated for this table. In the first line of the table, you see the settings for the width, height, border, and cell padding. In all the <td> or cells, you see the properties for alignment and background color repeated for every row. This extra code is part of the tradeoff for the easy application of the color and alignment. Part of the dilemma with this table now is that the alignment and background color settings, as well as the cellspacing, cellpadding, and border settings, are not linked to your CSS in any way.

The visual styling of the table elements is combined with the structure.
One problem of creating pure HTML tables is the inability to quickly copy the style of one table and apply it to another. Because the content of the table and the style are intertwined, it’s hard to separate one from the other. The larger problem is that pure HTML tables have none of the benefits associated with CSS. If your tables are not linked to any CSS, what happens when you redesign your website? As you saw in the last lesson, a simple change in CSS code can change the background color of your entire site. If the design of your tables clashes with your page, you have a lot of work to do as you locate each table and tweak it to fit.
Formatting and styling tables with CSS
In this exercise, you’ll style your initial table using many of the same concepts covered in the previous exercise, such as padding and borders, but this time you’ll do it with CSS. There is a little bit more work involved initially, but the result will be a table that not only is more visually appealing than an HTML-based table but also has a reusable style that can be applied to new tables. It’s possible to create tag-based styles for all your tables—in other words, to create CSS rules for the various HTML table elements (<td>, <tr>, and so on). In fact, this is not a bad idea when creating a default style for tables in a website. In this example, however, you will be creating a class style that can readily be applied to different tables. It’s not unusual to have three or four different styles of tables in a large website, each with their own CSS class definitions.
First you’ll start by creating general rules for the background color, border, and font appearance of the table; then you’ll create more specific rules as you drill down into the table.
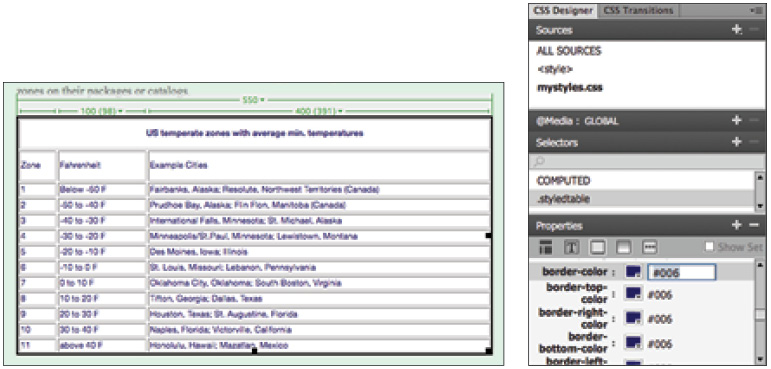
1 Click the Design View button to return to this view. Select the first table you created (US Temperate Zones…) by clicking one of the corners when you see the red outline. If necessary, choose Window > CSS Designer to open the CSS Designer panel.
2 In the CSS Designer panel, select the mystyles.css external style sheet in the Sources pane. This is an important step because you would like to add these styles to your external style sheet rather than writing them to the tips.html page only.
3 Click the Add Selector button (![]() ) in the bar at the top of the Selectors pane to create a new rule for the table. Dreamweaver will populate the selector field with body table. Click this name and change it to .styledtable. Press Enter (Windows) or Return (Mac OS).
) in the bar at the top of the Selectors pane to create a new rule for the table. Dreamweaver will populate the selector field with body table. Click this name and change it to .styledtable. Press Enter (Windows) or Return (Mac OS).
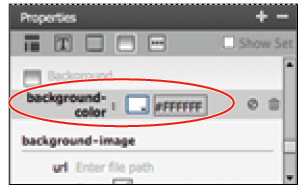
4 Select the Background button ( ![]() ) in the Properties panel to show the background properties. Then click the background-color swatch, and choose the color white (#FFFFF).
) in the Properties panel to show the background properties. Then click the background-color swatch, and choose the color white (#FFFFF).
Creating a new class for the style of the table and defining it in the external style sheet.
You see no changes onscreen because you need to apply the .styledtable class to the table. You’ll do that now, and then return to adding more styles.
5 Your table should still be selected; if it isn’t, then select it now. In the Property Inspector, the table properties should be active. (If you are seeing the HTML and CSS properties, you have not selected the table.) On the right side of the Property Inspector, choose styledtable from the Class drop-down menu to apply the class. The background of your table changes to white.

Apply a class to a table by choosing the class name in the Property Inspector.
6 Now you’ll return to the styledtable class style and add additional properties. You could have created all your rules first and then applied the styledtable class; however, doing it this way allows you to preview your styling in real-time. Now you’ll add some borders and change the font-styling for the entire table.
7 Click once on .styledtable in the Selectors pane of the CSS Designer panel to reselect the class.
Then select the Text button ( ![]() ) in the Properties panel to show the text properties.
) in the Properties panel to show the text properties.
8 In the text properties, click to the right of the font-family property to activate the drop-down menu, and choose the Gotham, Helvetica Neue, Helvetica, Arial, sans-serif font set.
9 If necessary, scroll down to the font-size text field, choose px for the units, and type 10 for the value. Press Enter (Windows) or Return (Mac OS).
10 Scroll back up to the color property, and click in the text field to the right of the color swatch. Type #006 (a dark blue), and press Enter (Windows) or Return (Mac OS) to see your changes to the table. Now you’ll add a thin border around the entire table.
11 Select the Border button (![]() ) in the Properties panel, and scroll down to the border-style property. Click to activate the drop-down menu and choose solid. From the border-width drop-down, choose px, and type 1 in the text field to its left. In the border-color text field, type #006, which is the same dark blue you used for the font-color. Press Enter (Windows) or Return (Mac OS) to see the results.
) in the Properties panel, and scroll down to the border-style property. Click to activate the drop-down menu and choose solid. From the border-width drop-down, choose px, and type 1 in the text field to its left. In the border-color text field, type #006, which is the same dark blue you used for the font-color. Press Enter (Windows) or Return (Mac OS) to see the results.
Your styled table with background-color, font styling, and a border.
The last property you’ll add to the .styledtable class is one that is not as common as the previous ones you’ve set. It’s important to realize that the language of CSS is quite large to begin with, and will continue to expand in the future. There are CSS properties that might not be used every day but nonetheless can be very useful. You’ll add one such property now called border-collapse. This property removes the space between table cells.
12 If it’s not already selected, select the Border button (![]() ) in the Properties panel, and scroll up to the border-collapse property. Click the collapse button (
) in the Properties panel, and scroll up to the border-collapse property. Click the collapse button (![]() )immediately to the right. You will not see an obvious change on screen; this property and value will help older browsers render the table correctly.
)immediately to the right. You will not see an obvious change on screen; this property and value will help older browsers render the table correctly.
13 Choose File > Save All. Preview your page in your browser to see your styling. Close the browser and return to Dreamweaver.
Advanced CSS styling of tables
You have created a basic style for this table. You will now sharpen up the appearance of this table by adding a background image to the header, setting the text alignment and padding, and finally, creating subtle borders between each of the data cells.
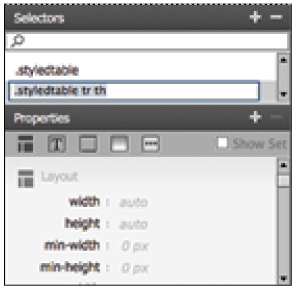
1 Click anywhere inside the header of the first table, and in the lower-left corner of your document window, click the <th> tag to select the header. You defined this top row as a table header earlier in the lesson.
2 In the Sources pane of the CSS Designer panel, click mystyles.css to select your external style sheet file. This is an important step because you would like to add these styles to your external style sheet rather than writing them to the tips.html page only.
3 Click the Add Selector button (![]() ) in the bar at the top of the Selectors pane to create a new rule for the header. The Selector Name text field has been automatically populated as .styledtable tr th. Press Enter (Windows) or Return (Mac OS) to accept this value.
) in the bar at the top of the Selectors pane to create a new rule for the header. The Selector Name text field has been automatically populated as .styledtable tr th. Press Enter (Windows) or Return (Mac OS) to accept this value.
This compound rule is what you want because you are creating a specific rule for <th> tags, but only those found inside the .styledtable class. Remember that compound rules are read from left to right. So, within the .styledtable class, you are targeting table rows <tr> and specifically, table headers <th> within table rows.
Create a compound rule to style all header rows within the .styledtable class.
4 With the compound rule selected, select the Background button (![]() ) in the Properties panel, and scroll down to the background-image property. Click in the url text field, and click the Browse button to the right. In the Select Image Source dialog box, locate the bg_header.jpg image in the dw09lessons folder and click OK (Windows) or Open (Mac OS).
) in the Properties panel, and scroll down to the background-image property. Click in the url text field, and click the Browse button to the right. In the Select Image Source dialog box, locate the bg_header.jpg image in the dw09lessons folder and click OK (Windows) or Open (Mac OS).
5 Scroll down to the background-repeat property, and click the repeat-x button (![]() ) to the right. The source image is a gradient that is designed to tile horizontally, and you’ll see a preview of this effect on your table. You’ll add a few other touches to this header row.
) to the right. The source image is a gradient that is designed to tile horizontally, and you’ll see a preview of this effect on your table. You’ll add a few other touches to this header row.

Choose a background image and tile it horizontally in the header row with repeat-x.
6 Select the Border button (![]() ) in the Properties panel, and scroll down to the border-bottom-width property. Click to choose px from the pull-down menu to the right, and type 2 in the text field to its left. Then scroll up to the border-bottom-color property. Type #006 in the text field to the right of the color swatch; this is the same dark blue color that you’ve been using for other styling in this table. Press Enter (Windows) or Return (Mac OS)to see the results.
) in the Properties panel, and scroll down to the border-bottom-width property. Click to choose px from the pull-down menu to the right, and type 2 in the text field to its left. Then scroll up to the border-bottom-color property. Type #006 in the text field to the right of the color swatch; this is the same dark blue color that you’ve been using for other styling in this table. Press Enter (Windows) or Return (Mac OS)to see the results.

Applying a two-pixel-wide, solid, blue border to the bottom of the header row.
7 Select the Text button (![]() ) in the Properties panel, and scroll down to the font-size property. Click to choose px from the drop-down menu to the right, and type 14 into the text field to its left to make the text slightly larger. Scroll down to the text-transform property, and click the Capitalize button (
) in the Properties panel, and scroll down to the font-size property. Click to choose px from the drop-down menu to the right, and type 14 into the text field to its left to make the text slightly larger. Scroll down to the text-transform property, and click the Capitalize button (![]() ). This property adds a capital letter to the beginning of each word.
). This property adds a capital letter to the beginning of each word.
Your header row is now styled.
8 Choose File > Save All. Keep this file open as you will continue working on it in the next exercise.
Controlling cell alignment, padding, and borders with CSS
You’ll now make the content within your table a bit more readable by aligning your text and padding your cells, as well as creating borders around each cell. Controlling borders and padding is much more flexible in CSS than in HTML; for example, the cellpadding values in HTML are uniform—there is no control over left, right, top, and bottom, as there is in CSS. The same applies to borders. However, before you begin styling padding with CSS, it’s a good idea to remove these values from the HTML so that there are no surprises.
1 Click any corner of the table in order to select it. In the Property Inspector, notice the values for CellPad and CellSpace; they are empty, but this stands for default, not zero. You must specifically instruct Dreamweaver to use a value of zero.
2 For all three properties of CellPad, CellSpace, and Border, type 0. Press Enter (Windows) or Return (Mac OS) when you have added the last value.

Type 0 for CellPad, CellSpace, and Border to make sure they are removed.
3 Click inside any cell of your table, and in the bottom-left corner of your document window, click the <td> tag to select a cell. You could also Ctrl+click (Windows) or Command+click (Mac OS) a cell to select it.
4 In the Sources pane of the CSS Designer panel, click mystyles.css. Then click the Add Selector button (![]() ) in the bar at the top of the Selectors tab to create a new rule. As in the last exercise, you are creating a Compound rule that applies only to cells within the .styledtable class. Your selector name reads .styledtable tr td. Press Enter (Windows) or Return (Mac OS) to confirm this setting.
) in the bar at the top of the Selectors tab to create a new rule. As in the last exercise, you are creating a Compound rule that applies only to cells within the .styledtable class. Your selector name reads .styledtable tr td. Press Enter (Windows) or Return (Mac OS) to confirm this setting.
5 Select the Text button in the Properties panel, and scroll down to the text-align property. Click the center button to the right to see all text in the table center.
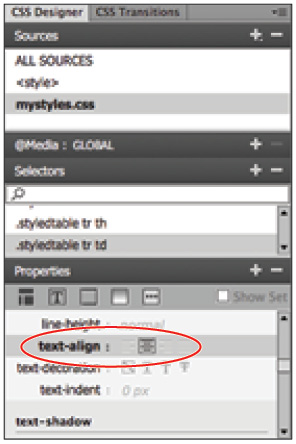
Applying a text-align of center to the <td> element centers all text in your cells.
6 Select the Layout button in the Properties panel, and scroll down to the padding property. Click the top value and type 5 in the text field. Do the same for the bottom value. Then click the left value and type 2 in the text field and press Enter/Return.
One of the main differences between HTML cellpadding and CSS cellpadding is the ability in CSS to control all four sides of a cell’s padding individually.
7 Select the Border button in the Properties panel, and scroll down to the border-top-border-style. Click in the field to the right to choose dashed from the drop-down menu. Change the border-width <code font> value to thin.
8 Scroll up in the Border properties, and in the border-color text field, type #9AA8BD, the hexadecimal number for a light blue-gray. Press Enter (Windows) or Return (Mac OS) to apply the style.
9 Select the row below the header row, and, if necessary, click the HTML button in the Property Inspector, then click the Bold button to bold the text for Zone, Fahrenheit, and Example Cities.
10 Choose File > Save All. Then preview your page in your browser to see your table.
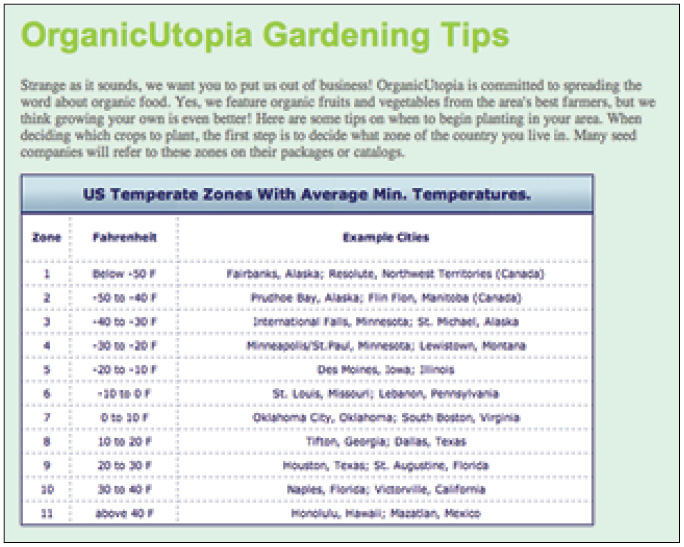
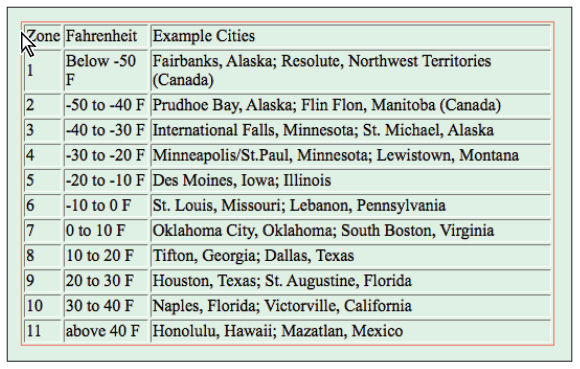
The table as rendered in a web browser.
You’re nearly finished. Now you’ll add some final touches to your table to give it a little extra polish and readability. Close your web browser.
Creating alternate row styling with CSS
A common feature found in many tables is to alternate colors for every other row. When done correctly, this increases the contrast between the rows and allows the user to visually separate the content of the table. This is easily done in CSS by creating a new class solely for background color.
Unlike the last few exercises, you will not be using a compound selection. Instead, you will be creating a new class. The reason for this is that you only want to style every other row. There is no automatic way to do this in CSS; after you create the class, it will have to be applied manually.
1 Click the edge of the row labeled 1 to select it. In the Sources pane of the CSS Designer panel, click mystyles.css. Then click the Add Selector button (+) in the bar at the top of the Selectors tab to create a new rule. Dreamweaver will populate the selector name field. Click the suggested name and change it to .oddrow and press Enter/Return.
2 Select the Background button (![]() ) in the Properties panel to show the background properties. Then click in the field to the right of the background-color swatch, and type #EAF1F4, the hexadecimal color for a light blue. Press Enter (Windows) or Return (Mac OS) to set the color.
) in the Properties panel to show the background properties. Then click in the field to the right of the background-color swatch, and type #EAF1F4, the hexadecimal color for a light blue. Press Enter (Windows) or Return (Mac OS) to set the color.
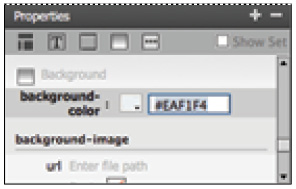
Create a new class named oddrow to style individual rows.
Now you will apply the oddrow class to every other row.
3 The row labeled 1 should still be selected; if not, do so now. In the Property Inspector, click the HTML button. From the Class drop-down menu, choose oddrow. The light-blue background color is applied.
4 Starting with the row labeled 3, apply the oddrow class to all the odd-numbered rows.
Styling alternating rows with a background color can improve readability.
5 Choose File > Save All. Preview your page in the browser, then close the browser when you are finished.
Reusing CSS for other tables
As you have seen, CSS styling for tables is very powerful and capable of spicing up the appearance of tables without sacrificing their structure. Like CSS for text and layout, the real power is obvious when you apply and link the style to another table.
1 In the Files panel, double-click the file veggie_names.html. This page is currently linked to the same external style sheet as the tips.html page, and includes an unstyled table. All that needs to be done is to apply the styledtable class you created to this table.
2 Click anywhere in the table, and then click the <table> tag in the lower-left corner of the document window to select the table.
3 In the Property Inspector, choose styledtable from the Class drop-down menu on the far right. The style is applied, and the appearance of this table matches the other. The style is flexible enough that, even though the top row has three cells, it has the header style applied.
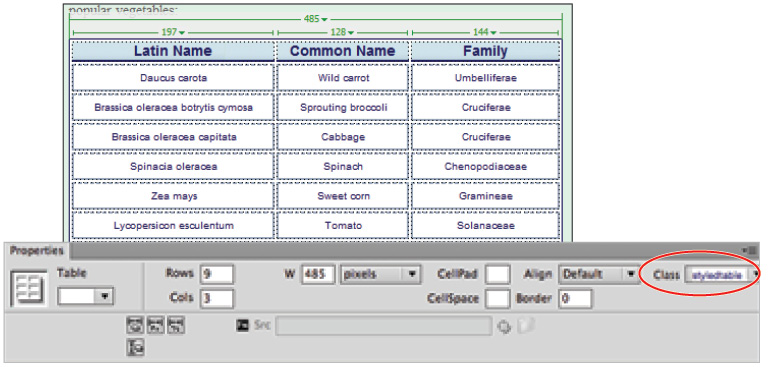
Applying the styledtable class to a previously unstyled table.
That’s it! The hard work of creating the original style pays off when it comes time to creating new tables with identical style. Better yet, if you need to make a global change such as changing the background-color or font color, changing a property in the external sheet will ripple through to all tables.
4 To add the alternating rows of color, click the third row. In the Property Inspector, click the HTML button, and from the Class drop-down menu, choose oddrow. Repeat this step with every other row to add the style.
The added benefit of having this class handy is that some tables benefit from this style more than others, and so it is your decision whether or not to use it.
5 Choose File > Save All. Keep this file open for the next exercise.
Data sorting tables
There are a few other features related to managing tables that you might find useful. The structure of tables can be both a blessing and a curse. For example, take a look at the table from the previous exercise. What if you wanted to swap the order of the first two columns? There is no easy way to do this with a static HTML table. Another limitation of tables, especially tables created from tabular data where you might not have control over the order, is the difficulty of sorting the data. Dreamweaver has a feature that allows you to sort your data alphabetically by the column of your choice.
In the first part of the exercise, you will do some copy-and-pasting in order to switch the first two columns.
1 Click a corner of the table to select it. Choose Edit > Copy to copy the table.
2 Click to the right of the table, press Enter (Windows) or Return (Mac OS) twice, and choose Edit > Paste. You can copy and paste tables in Dreamweaver within a page, or from one page to another.
3 In the first table, click at the top of the second column (Common Name) to select the entire column. Choose Edit > Copy to copy the contents of the column. Now click at the top of the first column (Latin Name) to select it. Choose Edit > Paste to replace the content of the first column. You now have duplicate columns momentarily, but the next step is to copy content from the second table.
4 In the second table, click the top of the first column (Latin Name) to select it. Choose Edit > Copy to copy this column’s contents. Return to the first table and click the top of the second column; then choose Edit > Paste.
5 Select the second table and delete it now, as you no longer need it.
Now you’ll sort the first column alphabetically using Dreamweaver’s little-known Sort Table feature.
6 Select the table and choose Commands > Sort Table to open the Sort Table dialog box. You do not have to make any changes here because the default settings are fine, but take a quick look at the options. The Sort by menu allows you to choose which menu Dreamweaver will use to sort. The Order menu allows you to choose how the table should be sorted, either alphabetically or numerically. Alphabetically is correct for now.

Choose Commands > Sort Table to sort a table alphabetically.
7 Click OK, and the table is sorted, with the first column now in alphabetical order.
8 Choose File > Save All and then File > Close All.
Self study
Using your new knowledge of creating tables to display data in Dreamweaver, try some of the following tasks to build on your experience:
Use the Import Tabular Data command to import a tab-delimited .txt file, setting the table’s fixed width on import. Select the table using the Tag Selector, and change its width to 50 percent of the page size using the Property Inspector. Preview the table in a browser, noting the way the table changes as the browser window is resized.
Build another table using the Insert Table command, and add a caption to it. Type text into the cells, center the text, and drag the row and column dividers to make them consistent in size. Add a background color and a border to the table using the Property Inspector, and switch to Code View to note the changes to your HTML code.
Create and use an internal CSS rule to change the font used, add padding to the cells, and alternate the colors of your first table’s rows. Experiment with applying the class rule to your second table, and note how its appearance changes. Finally, use the Sort Table command to organize both your tables’ data alphabetically.
Review
Questions
1 What’s the difference between a percentage-based table and a fixed-width table?
2 What is tabular data and how does it relate to tables in Dreamweaver?
3 Name an advantage and a disadvantage of using CSS to style your tables.
Answers
1 A percentage-based table stretches to fit the size of the browser window. A fixed-width table does not resize because it is pixel-based.
2 Tabular data is text often exported from a database or spreadsheet in a delimited format. Dreamweaver creates tables from these files through the Import Tabular Data command found in the File menu. Rows and columns are automatically created in Dreamweaver based on the structure of the text file.
3 One advantage of using CSS to style tables is the ability to link a single style to multiple tables using an external style sheet. A disadvantage might be that the process requires more time in the beginning, and a good understanding of HTML table tags and CSS selectors.