Lesson 2: Setting Up a New Site

Dreamweaver’s strength lies in its powerful site creation and management tools. You can use the software to create everything from individual pages to complete websites. The pages you create within your site can share similar topics, a cohesive design, or a common purpose. And, once your Dreamweaver site is complete, you can efficiently manage and distribute it from within the program.
What you’ll learn in this lesson:
- • Defining site settings
- • Establishing local and remote folders
- • Selecting, viewing, and organizing files with the Files panel
- • Defining Page Properties
Starting up
Before starting, make sure that your tools and panels are consistent by resetting your workspace. See “Resetting the Dreamweaver workspace” in the Starting up section of this book.
You will work with several files from the dw02lessons folder in this lesson. Make sure that you have loaded the dwlessons folder onto your hard drive from www.digitalclassroombooks.com/epub/dreamweavercc. See “Loading lesson files” in the Starting up section of this book.
Creating a new site
In Dreamweaver, the term site refers to the local and remote storage locations where the files that make up a website are stored. A site can also include a testing server location for processing dynamic pages. To take full advantage of Dreamweaver’s features, you should always start by creating a site. Dreamweaver CC can also be used to setup and manage a Business Catalyst Site. Business Catalyst is a part of the Creative Cloud service that Adobe provides (for a fee) that allows you to connect your website with analytic software and other features. However, we do not cover setup of Business Catalyst sites in this book.
The easiest way to create a standard new site in Dreamweaver is to use the Site Setup dialog box. One way to access this dialog box is by choosing Site > New Site from the menu bar.
 You can also use the Manage Sites dialog box to create a new site. This and other functions of the Manage Sites dialog box are discussed later in this book.
In this lesson, you begin by using the Site Setup dialog box to accomplish the following tasks:
- • Define the site
- • Name the site
- • Define the local root folder
- • Set up a remote folder
- • Explore advanced settings
- • Save the site
By default, the Site Setup dialog box opens with the Site Settings available. The options available here will help guide you through the essentials of defining your site. The Servers, Version Control, and Advanced Settings options allow you to set up local, remote, and testing servers directly.
1 Launch Dreamweaver CC, if it is not already open, then choose Site > New Site. First, you have to name the site. In the Site Name text field, type Organic Utopia.
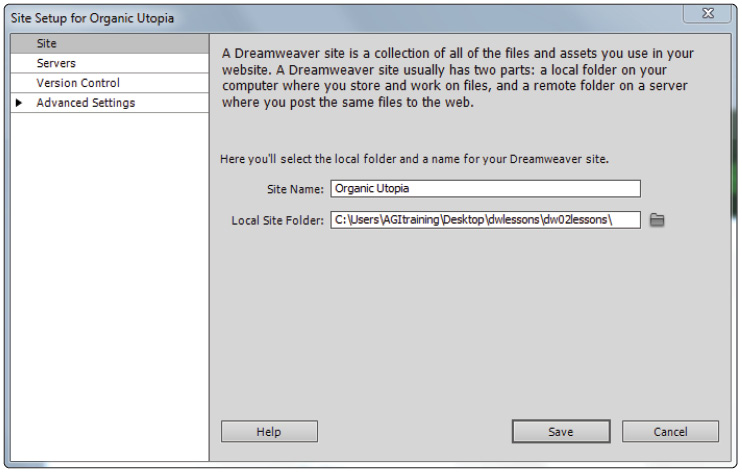
Type the Site Name into the text field.
Next, you need to set up a local root folder, which is where Dreamweaver stores the files with which you’re currently working. The Local Site Folder field allows you to enter information regarding where you’ll be working with your files during development.
 To ensure that the links you set up on your computer will work when you upload the site to a web server, it is essential that you store all the site’s resources in one main folder on your hard drive, then identify it within Dreamweaver. This is because the links will only work properly if all the site’s elements remain in the same relative location on the web server as your hard drive.
2 Click the Folder icon () to the right of the Local Site Folder text field to navigate to any pre-existing files. In the next step you will locate the lesson files we have provided for this lesson.
If you did not click on the folder icon and just clicked Save, Dreamweaver would simply create a new folder on your system where you could begin to create new pages in your site. In this case, you will be pointing to a preexisting folder that already has files within it.
It is important to distinguish between adding a new site (which is what you are doing now) and creating a new site from scratch. In both cases, the important part is that Dreamweaver knows where this folder is on your system. This folder is known as the root folder and will always contain the content that will eventually be your website.
3 Navigate to your desktop and locate the dw02lessons folder you copied to your desktop earlier.
4 Select the dw02lessons folder. On the Windows platform, click Select Folder (Windows). On the Mac OS platform, click Choose to choose this as your local root folder. The field now shows the path to your newly defined local root folder.
At this point, you have done the minimum amount of steps required to begin working on a site. Now you will take a look at some of the optional features within the Site Setup process.
5 Click the Servers tab. This section allows you to define the remote server where your website will end up being hosted. Take a moment to read the heading in the dialog box. Note that it says you do not need to fill in this information to begin creating a website. It is only necessary if you are connecting to the Web.
You are not connecting to the Web in this lesson, but you should take a look at the screen anyway to understand the information needed.
6 Click the + button and the Basic site settings window appears. Here there are fields for Server Name, Connect Using, FTP Address, Username and Password, along with other options. These settings allow you to choose both a destination and a method (FTP being the most common) for Dreamweaver to use to transfer files.

Set up access to your remote folder.
As noted earlier, this is an optional step, and you do not have to define your remote folder at this stage. Dreamweaver allows you to define your remote folder at a later time, such as when you’re ready to upload.
7 Click the Advanced tab. Click the Server Model menu in the Testing Server section. Here there are choices for different scripting languages such as PHP and ASP pages. If you are an advanced user, this is where you would set up the connections to your testing server.
Again, you won’t be making any changes here, so click Cancel.
8 Click the Version Control option on the left to access Subversion settings. Subversion, a VCS (or version control system), keeps track of changes made to files, enabling users to track changes and return to previous versions of any file. For this exercise, make sure the Access pull-down in this window is set to None, as you won’t be using Subversion.
You’ve now completed the site setup process using basic settings. Don’t close the Site Setup dialog box yet, though, as you’ll now explore the options found under the Advanced Settings option.
Advanced site-creation options
Chances are if you are new to Dreamweaver or web design you won’t need these advanced settings. If you are in this category, click Save and skip to the Adding Pages section. Other users might be curious as to what these settings are and should proceed.
1 Click the arrow next to Advanced Settings in the Site Setup dialog box to expand the drop-down menu.
2 From the categories listed below Advanced Settings, choose Local Info.

Choose Local Info from Advanced Settings.
The information you set in the Local Info window identifies your Default Images folder, what your links are relative to, and a web URL to be used if you don’t have a remote server defined. One of the more important Local Info settings is case-sensitive link checking.
The case-sensitive links checking feature ensures that your links will work on a Unix server, where links are case-sensitive. If you’re using a Windows or Mac OS server, this doesn’t matter as much, but it is a good idea to follow the strict naming and linking conventions of a Unix system in case you ever move your site to a different server.
If you happen to have already defined a CSS3 site-wide Media Query file, this is where you could redefine or modify it.
(We cover the creation of site-wide Media Query files in Lesson 16, “Responsive Design and Layout for Mobile Devices.”)
The remaining categories to the left of the Advanced tab of the Site Setup dialog box help to define your site’s production, collaboration, and deployment capabilities. They include the following:
Cloaking allows you to specify file types or specific files that you do not want uploaded to the server.
Design Notes is a collaboration tool that keeps notes regarding the development of the page or site.
File View Columns is an organizational tool. If you want to share the custom columns with others, you must enable Design Notes as well.
Contribute is a separate application that enables users with basic word processing and web browser skills and little or no HTML knowledge to create and maintain web pages.
Templates can be automatically updated with rewritten document paths using this option.
jQuery is a JavaScript library for web designers. It allows designers to build pages that provide a richer experience for their users.
Web Fonts allows you to define where you are storing the web fonts you would like to use for this site.
Edge Animate Assets allows you to define where you are storing any assets created in Edge Animate that you would like to use for this site.
3 At this point you are finished defining your settings, so click Save and then in the Manage Site dialog box, click Done. Dreamweaver creates a site with the settings you have defined.
You are now ready to work with pages for your defined website and take advantage of Dreamweaver’s site features.
Adding pages
Dreamweaver contains many features to assist you in building pages for your site. For example, you can define properties for pages, including titles, background colors or images, as well as default text and link colors.
The first step for creating a new page correctly was taken when you defined the site in the last exercise. By defining the root folder, Dreamweaver will always create new pages in your site automatically. These pages are now visible in the Files panel in the lower right of your screen.

The Files panel.
 If your Files panel does not look the same as it does here, choose Window > Workspace Layout > Reset ‘Compact’.
1 Choose File > New. The New Document dialog box opens.

Use the New Document dialog box to add a page to your site.
2 You can create a new page using a predesigned layout, or start with a blank page and build a layout of your own. In this exercise, you’ll start with a blank page while in later lessons you will get a chance to explore some of the other options. Click the Blank Page category on the left side of the New Document dialog box.
3 In the Page Type column, you can select the type of page you want to create (for example, HTML, PHP, and so on). Select HTML if it is not currently selected.
In the Layout column, you can choose to base your page on a prebuilt design. These predesigned layouts fall into one of three categories:
<none> creates a blank HTML document without any pre-existing layout.
2 column fixed, right sidebar, header and footer creates a document with a fixed width content area with two columns for content; a main column, sidebar, header and footer. This document includes instructions and sample text to demonstrate how to modify the file.
3 column fixed, header and footer creates a document with a fixed width content area with three columns; a centered main column with left and right sidebars, a header and footer. This document also includes instructions and sample text to demonstrate how to modify the file.
4 Click <none> in the Layout column to build the page without using a prebuilt layout.
5 Click the DocType menu in the lower-right corner. This DocType drop-down menu defines the document type for different versions of HTML including XHTML 1.0 Transitional and HTML5. HTML5 is the default setting and is suitable in most cases, so be sure to bring it back to this option.

Choose HTML5 as your DocType.
 The Layout CSS and Attach CSS settings are irrelevant here, as you didn’t choose a CSS-based layout for this page.
6 Click Create to create a new, blank HTML page. You will learn more about Workspaces a bit later, but to make sure you are working as we are, choose Window > Workspace Layout and choose Reset ‘Compact’. Your screen should now look like ours. (Although if you are in Code or Split View, you should switch to the Design view now.)

Your new, blank HTML page.
Saving a page to your site
You should get accustomed to saving pages to your local root folder early and often. It is very important that you store all your site’s resources in one main folder on your hard drive so that the links you set on your computer will work when your site is uploaded to a server.
1 Choose File > Save.
2 In the Save As dialog box, Dreamweaver should have automatically opened your dw02lessons folder which was defined earlier in the Site Settings.
If this is not the case, navigate to your desktop and locate the dw02lessons folder.
3 In the File name text field, name your file about_us.html.
 Notice that even though the file is for the About Us page, you are naming it about_us.html. When naming your files and directories, avoid using spaces, periods, slashes, or any other unnecessary punctuation, as doing so will likely cause the server to misdirect your files.
4 Click Save to save the page in your local root folder. In the Files panel note that the file about_us.html has now been added. Again, site settings are very important in Dreamweaver because files are automatically saved and organized based on having a site definition.
Defining page properties
Now that you’ve created a page in Dreamweaver, you’ll use the Page Properties dialog box to specify its layout and formatting properties. For example, you can set page titles, background colors and images, text and link colors, as well as other basic properties of every web page. You use this dialog box to define page properties for each new page you create, and to modify the settings for pages you’ve already created.
1 To access the Page Properties dialog box, choose Modify > Page Properties, or use the keyboard shortcut Ctrl+J (Windows) or Command+J (Mac OS). The Page Properties dialog box appears with the Appearance (CSS) category selected by default.

The Page Properties dialog box.
Settings found in the Appearance (CSS) category will automatically create a Cascading Style Sheet that defines the appearance of your page. Using a CSS file to define these page properties adds flexibility to your design, as styling can be changed more easily and more universally than if your defaults are defined using HTML code.
2 The Page Font and Size fields define the default appearance of text on your page. For now, leave these settings at their defaults. You’ll be styling type with CSS in later lessons in this book.
3 The Text color option allows you to set a default color in which to render type. To set a text color, click the color swatch next to Text and the Swatches panel appears. You can choose your default text color by clicking the appropriate swatch from the Swatches panel.
You can also type the hexadecimal notation for your desired color into the text field. Type the hex code #666666 in the text field to specify a dark gray as the default text color.
 You’ll see the effects of this change later in this lesson, when you add text to your page using the Files panel.
4 Use the Background color option to choose a background color for your page. Click the color swatch next to the Background text field and the Swatches panel appears. You can choose your background color by clicking the appropriate swatch from the Swatches panel. Try this by clicking any color swatch, then clicking Apply to see the results.
You can also choose the background color by typing the hexadecimal notation for your desired color into the Background text field. Type the hex code #739112 in the Background text field, then click Apply to specify a green as the background color.

Set a background color for your page.
5 The Background image field allows you to set a background image for your page. Dreamweaver mimics a browser’s behavior by repeating, or tiling, the background image to fill the window. To choose a background image, click the Browse button next to the Background image text field. The Select Image Source dialog box appears.
6 Navigate to the folder titled images within the dw02lessons folder and double-click bg_gradient.gif for your page background; then click Apply. You will see the background image, which is a gradient, appear on the page. Background images are tiled both horizontally and vertically by default, which is not appropriate for this image, so you will fix this with the Repeat property.
7 From the Repeat drop-down menu, choose repeat-x. Click Apply to see the change.
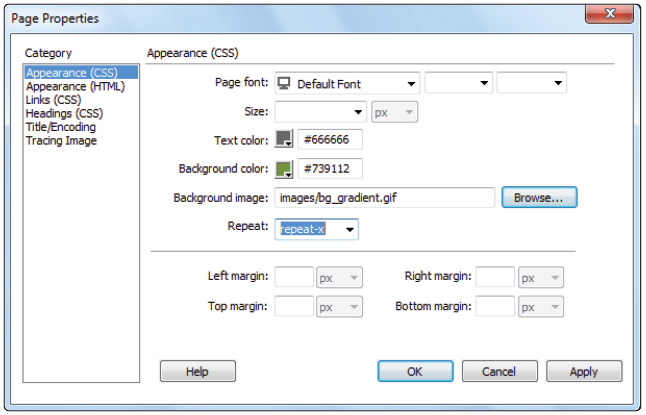
Select repeat-x from the Repeat drop-down menu to change this property.
 You can also type the path to your background image into the Background image text field.
8 By default, Dreamweaver places your text and images in close proximity to the top and left edges of the page. To build in some extra room between your page edges and the content on them, use the Margin settings in the Page Properties dialog box. In the Left margin text field, type 25 to place your content 25 pixels from the left edge of the page. In the Top margin text field, type 25 to place your content 25 pixels from the top edge of the page.
The Appearance (HTML) category in the Page Properties dialog box contains many of the same settings you just defined. Setting default page attributes with HTML code, however, is not recommended. Setting appearance with CSS is a better option.
The Links (CSS) category allows you to define the appearance of linked text within your document. For more information on creating hyperlinks, see Lesson 3, “Adding Text and Images.”
9 Click the Links (CSS) category on the left side and leave the Link font and Size settings at their defaults. This ensures that your hyperlinks will display in the same typeface and size as the rest of the text on your page.
10 Set the colors for your different link types in the following fields:
Link color: Type #fc3 for the default link color applied to linked text on your web page.
Visited links: Type #ccc for the color applied to linked text after a user has clicked on it.
Rollover links: Type #f03 for the color applied to linked text when a user rolls over it.
Active links: Type #ff6 for the color applied when the user clicks on linked text.
 Hexadecimal codes can be written in shorthand using only three alphanumeric characters when the two digits that make up each RGB component are the same value. For instance, #fc3 is the same as writing #ffcc33.
11 Because you’re using CSS formatting, you can choose whether or not (and/or when) you want your links to be underlined. This is not possible with HTML formatting. Choose the default setting of Always underline in the Underline style drop-down menu.

Choose default colors for links, visited links, and active links.
The Headings (CSS) category allows you to define the font, style, size, and color of heading text within your document.
12 Click the Headings (CSS) category and leave the settings at their defaults for now. You’ll be using CSS to style your heading text later in this book.
13 Click the Title/Encoding category to the left of the Page Properties dialog box to expose more settings. Most of these settings are better left alone unless you know what they do and why you need to change them, with the major exception of the first one: Title.
14 Type Organic Utopia: About Us in the Title text field. This sets the title that appears in the title bar of most browser windows. It’s also the default title used when a user bookmarks your page.
Leave the Document Type (DTD) set to HTML5. This makes the HTML document HTML5 compliant.
Unicode (UTF-8) will likely be set as the default option. This specifies the encoding used for characters in your page, letting the browser know which character set to use.
The Unicode Normalization Form is likely set to C (Canonical Decomposition). This setting is rarely changed unless you have a specific reason for changing it. Unicode Normalization Forms have to do with the way special characters such as glyphs are rendered on the screen.
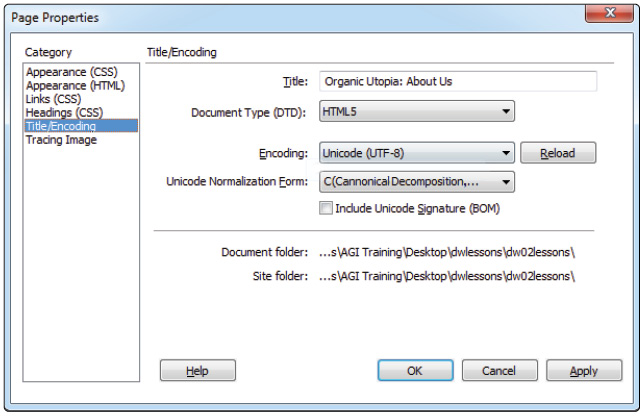
The Title/Encoding category allows you to title your page or specify the encoding used.
15 Click the last category in the list, Tracing Image. A tracing image is a JPEG, GIF, or PNG image that you create in a separate graphics application, such as Adobe Photoshop or Fireworks. It is placed in the background of your page for you to use as a guide to recreate a desired page design.
16 Click the Browse button next to the Tracing image text field. You can also type the path to your image directly into this text field.
17 In the Select Image Source dialog box, navigate to your dw02lessons folder, select the file named tracing.gif from the images folder, then click OK (Windows) or Choose (Mac OS).
18 Set the transparency of the tracing image to 50 percent by sliding the Transparency slider to the left.
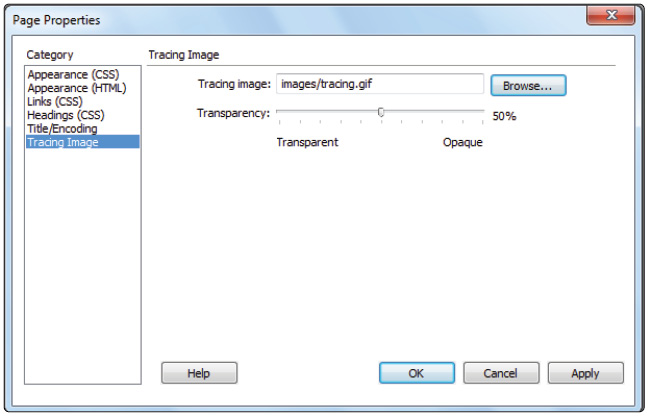
Place a tracing image in the background of your page.
19 Click Apply to see the results. Tracing Images can be useful tools for building layout. Oftentimes, you can import a page mockup created originally in Photoshop or another application and use it as a visual guideline.
20 When activated, the tracing image replaces any background image you’ve added to your page, but only in Dreamweaver. Tracing images are never visible when you view your page in a browser. Now that you have a sense of how the tracing feature works, you’ll remove it. Select the path within the Tracing image field and press Delete to remove it.
21 Click OK to close the Page Properties dialog box.
22 Choose File > Save. Now that you’ve finished setting up your page properties, you’ll examine your page in Dreamweaver’s three different work view modes.
Work views
In this book’s lessons, you’ll do most of your work in the Design View, as you’re taking advantage of Dreamweaver’s visual page layout features. You can, however, easily access the HTML code being written as you work in the Design View and use it to edit your pages through Dreamweaver’s other work views. You’ll switch views, using the Document toolbar.

The Document toolbar.
1 In the Document toolbar, click the Design view button if it is not currently selected. Design view is a fully editable, visual representation of your page, similar to what the viewer would see in a browser.

With Design view, you see your page as the viewer will see it.
2 Click the Code view button to switch to the Code view. Your page is now displayed in a hand-coding environment used for writing and editing HTML and other types of code, including JavaScript, PHP, and ColdFusion.
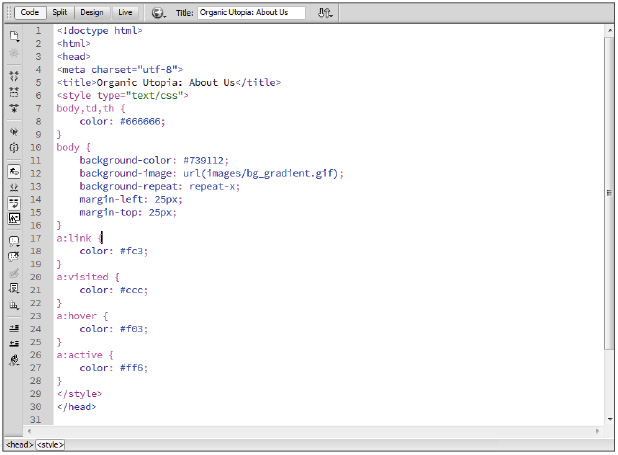
Code view shows the HTML code generated to display your page.
3 Click the Split view button to split the document window between the Code and Design views. This view is a great learning tool, as it displays and highlights the HTML code generated when you make a change visually in Design mode, and vice versa.

Use Split view to display your page in both modes at once.
4 Switch back to the Design view to continue this lesson.
A deeper look into the Files panel
You have already seen how Dreamweaver populates the Files panel when you define a new site. However, the Files panel is more than just a window into your root folder; it also allows you to manage files locally and transfer them to and from a remote server. The Files panel maintains a parallel structure between local and remote sites, copying and removing files when needed to ensure synchronicity between the two.
The default workspace in Dreamweaver displays the Files panel in the panel grouping to the right of the document window.
When you chose to use the dw02lessons folder as your local root folder earlier in this lesson, Dreamweaver set up a connection to those local files through the Files panel.
Viewing local files
You can view local files and folders on the right side of your screen within the Files panel, whether they’re associated with a Dreamweaver site or not.
1 Click the drop-down menu in the upper-left part of the Files panel, and choose Desktop (Windows) or Computer > Desktop folder (Mac OS) to view the current contents of your Desktop folder.
2 Choose Local Disk (C:) (Windows) or Mac HD (Mac OS) from this menu to access the contents of your hard drive.
3 Choose CD Drive (D:) (Windows) from this menu to view the contents of an inserted CD. On a Mac, the CD icon and the name of the CD appear in the menu.
4 From the drop-down menu at the top of the Files panel, choose Organic Utopia to return to your local root folder view.
Selecting and editing files
You can select, open, and drag HTML pages, graphics, text, and other files listed in the Files panel to the document window for placement.
1 Double-click the index.html file located in the Files panel. The page opens for editing. Click beneath the heading The lowly beet.
2 Click the plus sign (Windows) or arrow (Mac OS) to the left of the images folder to expand it and then click and drag the beets.jpg image file from the Files panel to the index.html document window. Release the mouse button just below the heading The lowly beet.
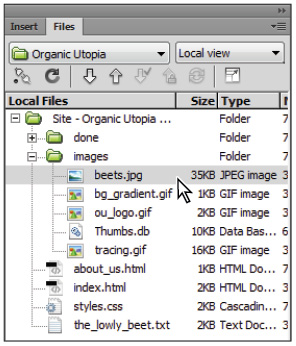
Click and drag the beets.jpg file to index.html.
 If you have an image editor such as Photoshop or Fireworks installed on your computer, you can double-click on the beets.jpg image file to open for editing and optimizing.
3 Double-click on the_lowly_beet.txt in the Files panel to open it directly in Dreamweaver.
4 Choose Edit > Select All to select all the text in this file. You could also use the keyboard shortcuts, Ctrl+A (Windows) or Command+A (Mac OS).
5 Choose Edit > Copy to copy the text to the clipboard. You could also use the keyboard shortcuts, Ctrl+C (Windows) or Command+C (Mac OS).
6 Click the index.html tab of the document window to return to the index page. Click to the right of the beet image to place an insertion cursor, and press Return (Windows) or Enter (Mac OS) once to start a new paragraph.
7 Choose Edit > Paste. You could also use the keyboard shortcuts, Ctrl+V (Windows) or Command+V (Mac OS). The text has now been added to the open page, beneath the image, in the default text color you chose earlier.

Paste the new text in the page.
8 Choose File > Save All and then File > Close All.
In the next lesson, you will get a chance to work far more with text and images.
Self study
Using your new knowledge of site creation techniques in Dreamweaver, try some of the following tasks to build on your experience:
1 Choose Site > New Site to invoke the Site Setup dialog box, and use it to create a new local site called Practice_Site on your desktop. Make sure you understand the difference between creating an empty site from scratch (as you are doing here) and adding a pre-existing site (as you did in the opening exercise of this lesson).
2 Use the File > New command to create a new, blank HTML page and save it to your Practice_Site. Then choose Modify > Page Properties to access the Page Properties dialog box, and experiment with the background, links, margin, and title options available. Finally, switch to the Code and Design view in the document window to view the code generated by your experiment.
Review
Questions
1 What characters should you avoid using when naming files and folders on your site and why?
2 How is the local root folder essential to the creation of your site?
3 Where can you view, select, open, and copy files to and from your local root folder, and to and from remote and/or testing servers?
Answers
1 Avoid using spaces (use underscores instead), periods, slashes, or any other unnecessary punctuation in your site name, as doing so will likely cause the server to misdirect your files.
2 It’s essential that you store all your site’s resources in your local root folder to ensure that the links you set on your computer will work when your site is uploaded to a server. In order for your links to work properly, all the elements of your site must remain in the same relative location on the web server as on your hard drive.
3 Dreamweaver provides the Files panel to help you both manage files locally and transfer them to and from a remote server. You can view, select, open, and copy files to and from your local root folder, and to and from remote and/or testing servers in this panel.
