
Lesson 4: Styling Your Pages with CSS

Many years ago, creating a beautiful web page required a lot of work, using the limited capabilities of HTML tags. The introduction of Cascading Style Sheets changes the way pages are created, giving designers an extraordinary amount of control over text and page formatting, as well as the ability to freely position content anywhere on a page. In this lesson, you’ll focus on the fundamentals of working with CSS in Dreamweaver.
What you’ll learn in this lesson:
- • An introduction to Cascading Style Sheets (CSS)
- • Using the CSS Designer panel
- • Creating tag and class styles
- • Styling text and hyperlinks
- • Creating external style sheets
Starting up
Before starting, make sure that your tools and panels are consistent by resetting your workspace. See “Resetting the Dreamweaver workspace” in the Starting up section of this book.
You will work with several files from the dw04lessons folder in this lesson. Make sure that you have loaded the dwlessons folder onto your hard drive from www.digitalclassroombooks.com/epub/dreamweavercc. See “Loading lesson files” in the Starting up section of this book.
Before you begin, you need to create site settings that point to the dw04lessons folder that contains resources you need for these lessons. Go to Site > New Site, or, for details on creating a site, refer to Lesson 2, “Setting Up a New Site.”
What are Cascading Style Sheets?
In the last lesson you had a brief introduction to Cascading Style Sheets (CSS); now you will dive in a bit deeper. CSS is a simple language that works alongside HTML to apply formatting to content in web pages, such as text, images, tables, and form elements. Developed by the World Wide Web Consortium (W3C), CSS creates rules, or style instructions, that elements on your page follow. There are three locations for CSS: (1) An internal style sheet where the styles are located directly within the <head> section of an HTML document, (2) inline styles (the CSS is located side by side with your HTML tags), or (3) An external style sheet where styles are located in an external file that can be linked to any number of HTML pages. If you completed Lesson 3, “Adding Text and Images,” you have had experience with the first option.
A style sheet is a collection of CSS rules; typically, rules that belong to a specific project, theme, or section are grouped together, but you can group rules in any way you want. You can place styles directly within your page using the <style> tag or in an external .css file that is linked to your document with the <link> tag. A single page or set of pages can use several style sheets at once.
You can apply CSS rules selectively to any number of elements on a page, or use them to modify the appearance of an existing HTML tag. Each CSS rule is composed of one or more declarations. A declaration contains both a property and a value. Examples of properties include color, width, and font size. Examples of values for these properties are green, 450px, and 12px, respectively. Dreamweaver’s CSS Styles panel lets you easily view and modify any of these properties and values and change the appearance of your page in real time.
This sample rule is composed of three declarations that control the color, typeface, and size of any text to which it’s applied. In the simplest example, the CSS rules define the appearance of an H1 or heading element:
h1 {
color: red;
font-family: Gotham, "Helvetica Neue", Helvetica, Arial, sans-serif;
font-size: 28px;
}
Here is the result of the preceding code snippet applied to text:

CSS-styled text shown in the Design view.
CSS rules can affect properties as simple as typeface, size, and color, or as complex as positioning and visibility. Dreamweaver uses CSS as the primary method of styling page text and elements, and its detailed CSS Styles panel makes it possible to create and manage styles at any point during a project.
CSS replaces inefficient HTML styling
Before CSS came along, you styled text on a page using the <font> tag in HTML; you could wrap this tag around any paragraph, phrase, or tidbit of text to apply color, or to set the font size and typeface. Although it was reliable, it was also very inefficient. Imagine a page with 10 paragraphs. Using the <font> tag, you would have to add the <font> tag 10 times, even if the color, size, and typeface values were exactly the same. Although the <font> tag is not in use as much anymore, you should still understand how it works. You will now open an HTML document in which the list is styled using the <font> tag.
1 In your Files panel located in the upper-right corner of your screen, locate and double-click the HTML file named FontTagList.html to open it in the document window.
2 Click the Code view button in the Document toolbar at the top of the document window. Notice that the <font> tag is used to style the items in the bulleted list.
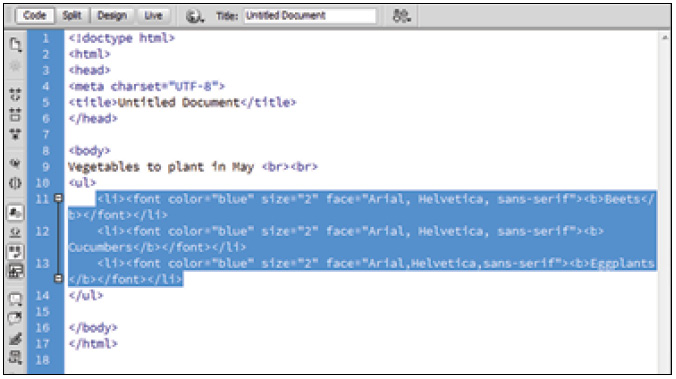
Here, a <font> tag is used to format each bullet point. If you add more bullet points, you’ll need to use more <font> tags to keep the style of those bullets consistent with the others.
As you can see, there’s a lot of repetition in this code.
3 Click the Design view button on the Document toolbar. Position your cursor at the end of the last bulleted item, press Enter (Windows) or Return (Mac OS) to add a new bullet point, and type Peppers. You see that the text reverts to the default typeface, size, and color. You would have to add a new <font> tag with the same attributes as the others to get it to match. If you wanted to change an attribute such as the color for all the bullet points, you would have to adjust each tag separately. In early versions of Dreamweaver, there were actually ways to perform global changes using HTML; however, these were sometimes tricky to control, and CSS offers a better solution in any case.
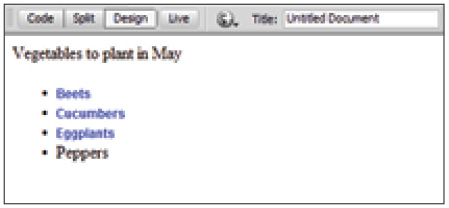
You could lose the formatting between bullet points when using <font> tags.
4 Choose File > Save to save your work, then choose File > Close.
The benefits of CSS styling
CSS introduces a new level of control and flexibility far beyond the <font> tags in HTML. A significant benefit of CSS is the ability to apply consistent formatting of elements across one or all pages in a website. In the following exercises you will learn a few different ways to create CSS rules that affect the style of your text. The first method you will explore involves creating tag- or element-based style rules. If you completed Lesson 3, “Adding Text and Images,” you saw this method used to format text. This type of rule alters the appearance of an existing HTML tag, so the tag and any content that appears within it always appears formatted in a specific way. Instead of having to add a <font> tag around the contents of each new bullet point in a list, it would be easier for you to set a rule that states that items in a list should always be blue, for example.
1 Locate and double-click the file named CSSList.html from the Files panel to open it.
2 Click the Design view button in the Document toolbar if necessary. The list that appears onscreen, unlike the one you saw in the previous example, is formatted without the use of <font> tags, and uses only CSS.
3 Position your cursor after the last bulleted item and press the Enter (Windows) or Return (Mac OS) key to create a new bullet point. Type Peppers. The new text matches the bullet points above it.
4 Press Enter/Return again to add a fifth bullet point, and type Okra.
No matter how many bullet points you add, the formatting is applied automatically every time.
5 Click the Split view button at the top of the document window so that you can see both code and design:
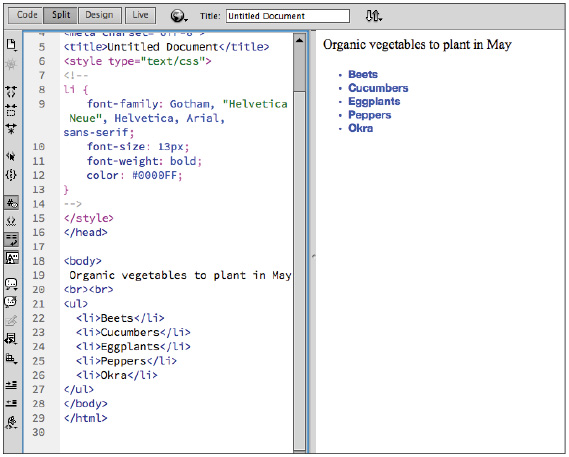
CSS allows you to define a style rule for a list item. All list items on this page will be blue.
What you’ll notice is the absence of any formatting tags like the <font> tags you saw in the last exercise. In this example, you have several list items; however, all the styling information, such as the font-family, size, font style, and color, is being defined in one place: the CSS rule for the <li> tag.
6 If necessary, scroll to the top of the page and you’ll see the code that makes this possible:
<style type="text/css">
<!--
li {
font-family: Gotham, "Helvetica Neue", Helvetica, Arial, sans-serif;
font-size: 13px;
font-weight: bold;
color: #0000FF;
}
-->
</style>
In the code above, a CSS selector (seen here as li) is being used to define the style of all list items. It’s almost like a dress code for all <li> tags; they know that when they are used on the page, they must look a certain way. Best of all, if you need to modify their appearance, you make your changes to that single style rule at the top of the page. You will get a chance to do this shortly; however, let’s take a step back and look at how CSS is controlled in Dreamweaver.
7 Choose File > Save to save your work, then choose File > Close.
How do you create CSS rules in Dreamweaver?
In this exercise, you will take a tour of Dreamweaver’s CSS controls. If you haven’t worked with CSS before, this is a chance to learn a bit more about how it works. If you have worked with CSS previously, this section will help you understand the Dreamweaver interface and how it applies to familiar concepts. Regardless of your comfort level with CSS, you won’t be making any changes, merely getting familiar with features that you will be using in later exercises.
You work with CSS rules in a few ways in Dreamweaver:
Using the CSS Designer panel
Dreamweaver CC introduces CSS Designer panel, a new interface to create rules and/or style sheets that you can place directly within one or more pages in your site. You can easily modify rules directly from the CSS Designer panel. Furthermore, you can selectively apply rules from several places, including the Style or Class menu on the Property Inspector, or the tag selector at the bottom of the document window.
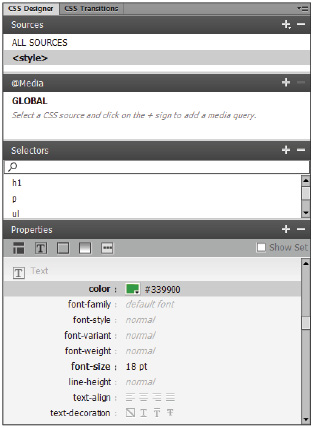
The CSS Designer panel contains four panes labeled Sources, Media, Selectors and Properties. You’ll get a chance to explore these shortly. In the following figure, the panel with the Selectors and Properties panes is expanded.
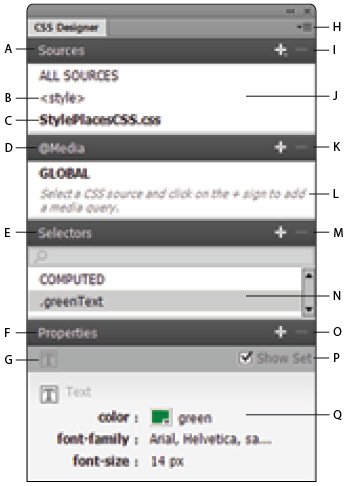
A. Sources Menu.
B. Internal Style Sheet.
C. External Style Sheet.
D. Media Queries Menu.
E. Selectors Menu.
F. Properties Menu.
G. Properties Panel.
H. CSS Panel Menu.
I. Add/Remove CSS Sources.
J. Sources Pane.
K. Add/Remove Media Queries.
L. Media Queries Pane.
M. Add/Remove Selectors.
N. Selectors Pane.
O. Add/Remove Properties.
P. Show Set Properties.
Q. Properties Pane.
To ensure that you are seeing the same panels we are, you’ll reset your workspace. Choose Window > Workspace Layout > Compact. Then choose Workspace Layout > Reset ‘Compact’ to make sure the panels are reset.
After resetting your workspace, the CSS Designer panel should be expanded. Click the File panel tab at the top of the screen to expand it.
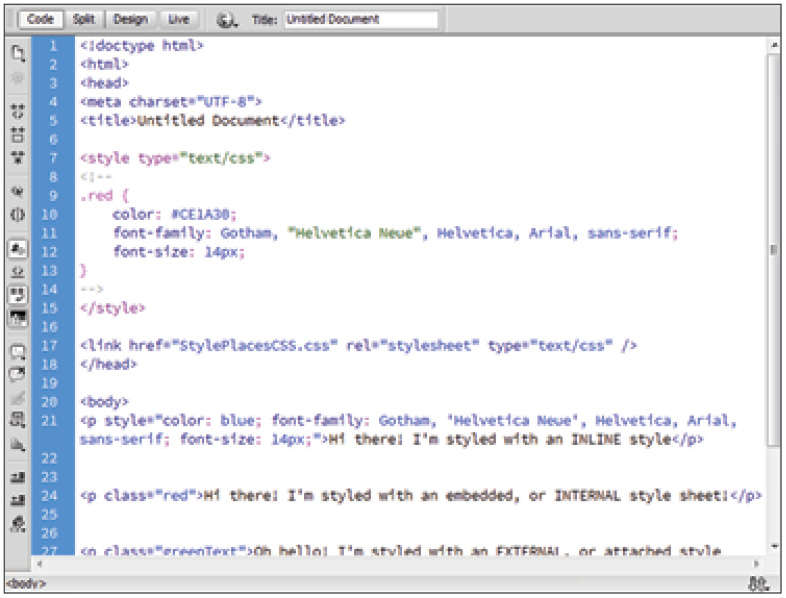
1 Double-click the StylePlaces.html document in your Files panel to open it, and click the Design View button, if necessary.
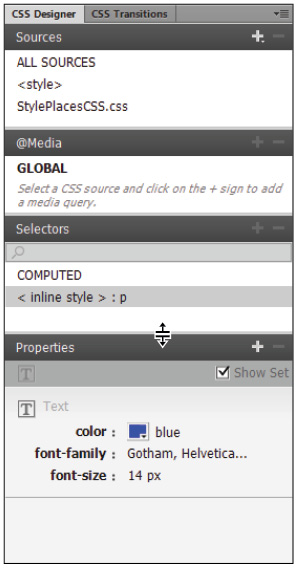
2 Click in the first line, Hi there! I’m styled with an INLINE style! and then choose <inline style> : p from the Selectors Pane of the CSS Designer Panel.
3 Locate and click the Show Set check box in the Properties panel at the top of the Properties pane. Selecting this option enables you to see the CSS properties for the current selection. Depending on your monitor resolution, you might not have enough room to see all the information in this panel. You can adjust the different panel groups by hand.
4 Place your cursor at the top of the Properties pane in the CSS Designer panel. A black double-arrow cursor will appear. You can now click and drag downward to lengthen this pane.
You can expand a panel by clicking and dragging the edges.
Take a few moments to read through this panel and absorb the summary. Don’t worry too much about each detail; you’ll have plenty of time to familiarize yourself with this panel. It hopefully makes sense that the properties of the first paragraph are the color blue, the font-family Gotham, and the font size of 14 pixels.
5 Click in the second paragraph and notice that the color property changes to red. Click in the third paragraph and notice that the color property changes to green. The current selection always lists the properties of the selected text.
6 Click the .greenText Selector in the Selectors Pane of the CSS Designer Panel, then click the Show Set check box in the Properties panel to clear the check box. You will toggle between these two views often. Checking Show Set allows you to see the specific CSS properties and values of a selected object while clearing the check box allows you to see all of the possible styles you can set in your document.
In the Code view
CSS rules can also be created and modified directly in the Code view. Editing CSS in Dreamweaver’s Code view offers a great degree of control and is often called hand-coding. Many coders and designers prefer hand-coding because of this control, but it’s not for everyone. For example, when you work in the Code view misspellings or an incomplete knowledge of CSS syntax can easily break a page.
1 Click in the second paragraph if you are not currently inside it. Click the Code View button to view your page in Code view. If you haven’t worked with code previously, see if you can locate the second paragraph of HTML. (It has the class named red.)
2 On the left side of the screen, notice that the line numbers are running from top to bottom; when working with code, each line has its own number, making it easy to refer to and locate objects.
On line 10, select the value red in the color property and then delete it. Now type #CE1A30. As soon as you start typing, Dreamweaver’s code-hinting appears, giving you a color picker. Code-hinting is a form of assistance from Dreamweaver that can make the task of typing code by hand a little easier. However, you can also ignore it, and you should for this exercise. Press the Esc key to dismiss the color picker.
Modifying the CSS color property in Code View.
3 Click the Design view button. The text is still red; however it is using a hexadecimal color instead of a keyword. The danger of adding CSS properties manually is that if you mistype the value, you might get a different color or no color at all.
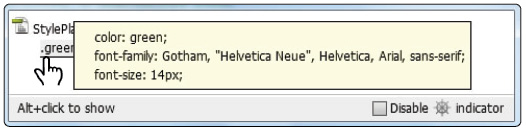
Working with the Code Navigator
The Code Navigator allows you to view the CSS properties directly in the Design view through a small pop-up window. Additionally, it allows you to click a property and edit it directly in the Split view.
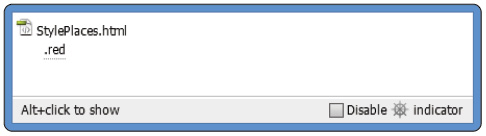
1 Press Alt (Windows) or Command+Option (Mac OS) and click the third paragraph. A small window appears, listing the properties of the CSS rule applying to this paragraph. The window lists the name of the style sheet, as well as the rule .greenText.
2 Place your cursor over the .greenText class, and the properties appear in a yellow pop-up window. This feature allows you to quickly view the properties without needing to move to the CSS Styles panel or go into Code view.
The Code Navigator displays the CSS rules applied to a paragraph.
Understanding Style Sheets
The term Cascading in Cascading Style Sheets alludes to the fact that styles can live in three different places, each of which has its strengths and weaknesses. You’ve actually been working with all three types of styles in the last exercise. The first paragraph is being defined with an inline style, the second with an internal style sheet, and the third with an external style sheet.
Inline styles
An inline style is a set of CSS properties defined directly in an HTML tag using the style attribute. These are slightly less common because you can’t reuse them easily, and reusability is one of the major benefits of CSS. Nevertheless, inline styles are a part of the CSS language, and you should know what they are.
1 In the file StylePlaces.html, click three times rapidly to select the first paragraph.
2 Click the Split view button, and notice that your selected text is nested inside a paragraph or <p> element; however, the CSS style rules for color, font-family, and font-size are contained directly inside the opening paragraph tag. This is called an inline style because the CSS rules are not separated from the HTML.
Although inline styles are part of CSS, they are used infrequently. They present many of the same problems as the older <font> tags in HTML. They only apply to one tag at a time and are not easily reusable. Inline styles are useful when an internal or external style sheet might not be available; a good example of this is HTML-based e-mail. They are also used in certain situations to override other styles, but you will learn more about this later.
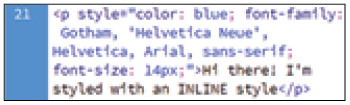
An inline style places rules within a HTML opening tag.
Internal versus external style sheets
Internal style sheets are CSS rules that are contained directly within a document, using the <style> tag. The entire style sheet is contained within the opening and closing <style> tags. External style sheets are style rules saved in a separate document with the extension css. One of the fundamental differences between internal and external style sheets is that with internal style sheets, the CSS rules apply only to the HTML in a single document.
For example, if you had a ten-page website and could only use internal style sheets, you would essentially have ten style sheets: one per page. If you made a change on one page and then needed to make the other pages look the same, you would have to either copy or redefine internal styles from page to page—not an enjoyable prospect.
External style sheets, by contrast, have CSS rules located in one single document. You can attach .css files, or external style sheets, to an unlimited number of HTML pages. This method is extremely flexible: if a style rule such as the font-color for a paragraph is changed in the external style sheet, all paragraphs in the site are instantly modified, whether it be two pages, ten pages or 100 pages.
In Dreamweaver, when you create a new style, the default behavior is to use an internal style sheet. In many ways, a web browser doesn’t care which type of style sheet you use; it renders the page exactly the same. There are certain situations when an internal style sheet makes more sense than an external style sheet and vice-versa. You will explore this in more detail in later exercises, but first you need to know how to determine whether a style is internal or external.
1 Open StylePlaces.html if you do not already have it open and click the Design View button to enter the Design view. In the Sources pane of the CSS Designer panel, you will see a listing for <style> and one for StylePlacesCSS.css. The first line is the internal style sheet, and the second is for the external style sheet. The external style sheet also is visible in the Related Files portion of the document toolbar.
2 Click the <style> tag in the Sources pane. The rule for properties set in the class .red will be displayed in the Selectors pane below. Next, click StylePlacesCSS.css in the Sources pane to show the properties for the class .greenText. You might have noticed that the listing for the inline style is not here; only rules for internal and external style sheets are visible in the Sources pane.
In the last exercise, you used the Code Navigator to view the CSS rules applied to a paragraph. You can also use the Code Navigator to quickly determine where the CSS rules are located.
3 Back in Design view, Alt+click (Windows) or Command+Option+click (Mac OS) inside the second paragraph to open the Code Navigator. The window reads StylePlaces.html and the class .red is indented below it. If a style is located inside an HTML document, as it is in this case, it must be an internal style.
The Code Navigator has located the origin of this CSS rule to be in StylePlaces.html.
4 Place your cursor over the .red class, once again, all the properties appear.
5 Click the .red rule, and Dreamweaver’s Split view opens, sending you directly to the internal style. An experienced hand-coder might use this to directly edit the rule as you did earlier, although you will not be making any changes at this point. Now you will look at the external style sheet again using the Code Navigator.
6 Alt+click (Windows) or Command+Option+click (Mac OS) in the third paragraph to open the Code Navigator.
7 This time, the Code Navigator window lists StylePlacesCSS.css first. If a style is located inside a .css document, as it is in this case, it is an external style. Place your cursor over the .greenText class, and all the properties appear.
8 Click the .greenText class, and in the Split view, the external style sheet StylePlacesCSS.css appears. Doing this actually opens the external style sheet, which is a separate document.

An External Style Sheet is a separate document with the extension .css and is accessible through the Related Files bar.
To return to the original HTML document, click the Source Code button immediately to the left of the button labeled StylePlacesCSS.css.
9 Choose File > Save All. Close this document for now. Choosing Save All saves not just the HTML document, but the external stylesheet at the same time.
Understanding why they’re called Cascading
You have learned how CSS integrates with HTML, and that there are three categories of styles: inline, internal, and external. Additionally, you have seen that an HTML document, such as the one from the last exercise, can contain all three types. Now you’ll begin to explore when you might use one type over the other. A good way to look at this is to ask the question: Which one of the three style types is most dominant?
To help you picture this, consider the following situation: you have a paragraph, or more accurately, a <p> tag in your document, and you have the three style types (inline, internal, and external). Each one targets the <p> tag with the same property (color, for example) but they all have different values. So which one wins? The answer is the inline style, which is the most dominant because it is closest to the HTML source. The strength of competing styles is largely related to where the style is in relation to the HTML source. For internal and external styles, if they have competing rules, whichever style comes last within the HTML is the strongest. So in the following scenario, imagine that there is a paragraph style in the external style sheet (styles.css) declaring paragraphs to be blue. Because it comes after the internal style sheet’s rule for red paragraphs, the external style sheet wins and the paragraph is blue.
<style type="text/css">
p {
color: red;
}
</style>
<link href=" styles.css" rel="stylesheet" type="text/css" />
However it is equally possible that the author of the HTML has arranged the styles in a different order:
<link href=" styles.css" rel="stylesheet" type="text/css" />
<style type="text/css">
p {
color: red;
}
</style>
Here, the paragraphs will be red because the internal style sheet comes last in the HTML code. There is no default order of styles in the documents that Dreamweaver creates, so you do need to be aware of this rule.
 We have simplified the relationship for now. The strength of internal styles versus external styles can actually change depending on where the references to these styles are in the HTML. If the reference to the internal style sheet appears last in the HTML, these rules would be strongest. If the reference to the external style appears last in the HTML, then these would be the strongest.
Creating and modifying styles
You will now get a chance to begin working more deeply with CSS. In this exercise, you’ll be picking up where you left off in the last lesson with the events page for the OrganicUtopia website. In that lesson, you covered the creation of new CSS rules; however, you essentially worked with just one category of CSS rules, the element or tag-based rules. In all instances from the last lesson, you defined the properties for a tag, such as <h1>, <p>, and <ul> (unordered lists). You will now explore how to create classes and IDs. First, a brief review of the styles you used in the last lesson for tag styles.
A tag style assigns rules directly to a specific HTML tag to alter its appearance. You can attach tag styles to any tag from the <body> tag down; as a matter of fact, when you modify page properties (Modify > Page Properties) to change default text formatting and background color, you are using a tag style assigned to the <body> tag.
The most basic tag styles are very straightforward. For instance, when you create a rule definition for the <p> (paragraph) tag, all paragraphs appear the same. The limitations begin when you want to customize one specific paragraph to appear different from the others. You will explore some solutions to this dilemma; for now, keep in mind that tag styles are a great way to ensure consistency across multiple elements and pages where specific tags are used, such as lists, tables, and paragraphs.
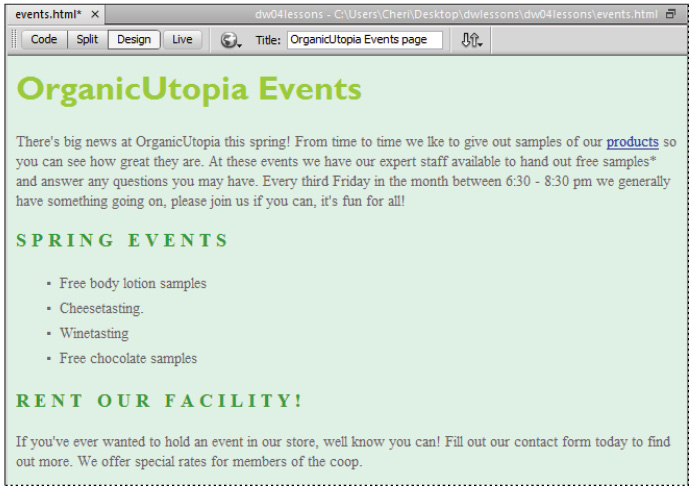
1 Double-click the events.html file in the Files panel to open it. This page has already had its Heading 1, paragraph, and list styled. You will now style the Heading 2.
2 In the Design view, click inside the heading Spring Events. This is already formatted as a Heading 2 for you.
3 Click the <style> item under Sources pane in the CSS Designer panel. This will activate the Selectors pane and allow us to create a new style rule for the Heading.
4 Click the Add Selector button in the Selectors menu to create a new CSS style for our h2 heading element. Notice that Dreamweaver recognized that your cursor was within an h2 element within the body so it added body h2 to the text box in the Selector pane. In this case you will simply use h2 as our selector.
5 Select body h2 and type h2 to create a selector for Heading 2 headers then press Enter (Windows) or Return (Mac OS). You may have to press this key twice to commit the change.
6 Make sure the Show Set checkbox is unchecked to allow you to view all of the available styles.
7 Click the Text button in the Properties menu to limit the choices to only show the text-related properties.
8 Locate the font-size property, click the default text medium, and then choose pt from the list of items.
9 Dreamweaver will place your cursor within a text box to the left of pt. Type 18 and then press Tab to commit the change.
10 Locate the color property from the selection list. Click the Set color text field and type #339900 and press Tab to select a green color.
Your heading now changes to green. You have just styled the font-size and color of the <h2> tag. At this point, all text formatted as h2 appears this way. You will now format the last heading in the page in order to see this.
The CSS Designer panel shows the current, or computed, values of the actively selected element.
11 Click inside the text, Rent our facility.
12 In the Property Inspector, make sure that you are viewing the HTML mode by clicking the HTML button and note that the Format for this text is currently set to None. From the Format drop-down menu, choose Heading 2 to see your text change.

Formatting text as a Heading 2 assumes the properties of the CSS rule.
What you have seen in this exercise is an example of HTML and CSS working together with a tag style. In this case, all text tagged in the HTML as a Heading 2 or <h2> is defined by the CSS rule as green and 18 pixels. At this point, you might want to create more complex layouts; if you understand the fundamentals of styling tags, it will pay off as you move to the next level of CSS.
13 Choose File > Save but keep this file open. You will be working on it in the next exercise.
Creating a class style with the CSS Designer panel
In the last exercise, you created a new CSS rule by defining the properties of the <h2> tag. Now you will create another CSS rule, this time using a class. In CSS, class styles have unique names and are not associated with any specific HTML tag. A CSS class can have a specific style that can be applied to one or more elements in your website. So you might create a class called holidayText, for example, and the properties of this class might be a single rule defining the font-color. Once the class is created, this text could then be applied to a table, paragraph, heading, or form element simultaneously. So on Halloween, if you change the property of the font-color to orange, all text that is defined by the holidayText class is orange, and on Valentine’s Day, if you change the property of the font-color to red, it all changes to red.
In this exercise, you will create a class for the copyright text at the bottom of the page in order to distinguish it from the rest of the page.
1 Locate the paragraph at the bottom of your page, click immediately before the copyright symbol, and then drag across until the two lines are selected.
2 Look at the Properties pane in the CSS Designer panel and note that this text has a size of 14 pixels and a dark grey color. This is because these are paragraphs and the CSS rules for paragraphs in this document currently have these properties. You will now format all this text with a different size and font, and then add a background color.

The CSS Designer panel displays the computed or current value of the selected text.
Because CSS is so flexible, you often have many options for styling. You could update the paragraph rule that already exists or you could create a new rule using a specific class or id. For now, we will create our rule using a class which we will only apply to the copyright paragraph.
3 Click the <style> item under Sources pane in the CSS Designer panel. This will activate the Selectors pane and allow us to create a new style rule for our paragraph within the current document.
4 Click the Add Selector button in the Selectors pane to create a new CSS style for our class. This will create a new text box in the Selectors list where you can add a new class name. Because you have selected a paragraph within the body, Dreamweaver has pre-filled the text box with body p em. Select and delete this text so that you can create a class selector in the next step.
5 Class selectors begin with a period (.) and include a descriptive name to describe how the class will be applied. Type .copyright in the text box in the Selectors list then press the Tab key.
6 Click the Text button in the Properties menu to limit the choices to only show the text-related properties.
7 Locate the font-size property and choose px from the list of units. Dreamweaver will place your cursor in the text box to the left of the unit to allow you to enter the value.
8 Type 10 and then press the Tab key to commit the change.
9 Now that you have created the rule for the .copyright class, you still have to apply it to our text selection. Make sure the text is selected or your cursor is within the paragraph and click the drop-down arrow for Class in the Property Inspector.
10 Choose copyright from the menu to apply our new class to this paragraph. You may want to click once within the paragraph to deselect the text. You should now see that the last paragraph of text is formatted using the 10pt font size specified in the copyright class CSS rule.
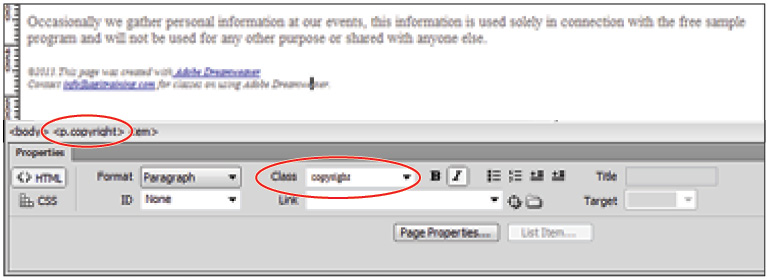
The Property Inspector Class field and Tag Selector show that the copyright class has been applied to the selected paragraph.
11 Click once in the first line of the copyright text. Click the CSS button in the Property Inspector to see the CSS styles and properties. Notice in the Property Inspector, in the Targeted Rule section, the menu is now set for .copyright. This is important, as it confirms that you are modifying the class, not creating a new rule or modifying the paragraph tag style. In the Property Inspector, choose Gill Sans, Gill Sans MT, Myriad Pro, DejaVu Sans Condensed, Helvetica, Arial, sans-serif from the Font menu to add this property to the copyright class. Now you’ll add a new line of text and apply the copyright class to it.
12 Place your cursor at the end of the last line of the paragraph and press Enter (Windows) or Return (Mac OS) to add a new line. Type the following text: All images on this website are the copyright of Glenn “The Hodge” Hodgkinson. Notice that the text is still using the copyright style. If you wanted to remove this class for any reason, you could click the Targeted Rule drop-down menu and choose Remove Class.
Creating and modifying styles
To take advantage of the full power of CSS, you will begin to dive further into the new CSS Designer panel. In this exercise, you’ll explore some of the powerful options that CSS has at its disposal. The first thing you’ll do is change the background color of your page by adding a new style to the body tag.
Before you get started, choose Window > Workspace Layout > Expanded. This will show the CSS Designer panel in an expanded mode with the Sources, Media and Selectors panes on the left side and the Properties pane on the right. This Expanded view will make it easier for you to select and modify the style rules in the following exercises.If you want to go back to the narrower version of the CSS Designer panel, you can choose Window > Workspace Layout > Compact from the menu.

The expanded mode of the CSS Designer panel makes it easier to select and modify style rules.
1 Place your cursor at the end of the last line of text in your document window.
2 Click the <style> item under Sources pane in the CSS Designer panel. This will activate the Selectors pane and allow us to create a new style rule to change the background color of the page.
3 Click the Add Selector button in the Selectors menu to create a new CSS style for our body tag. This will create a new text box in the Selectors list. Dreamweaver will prepopulate this field based on where you clicked in your document.
4 If Dreamweaver prepopulated this field with text, delete this text and type body in this field instead. Press Enter (Windows) or Return (Mac OS) to create the selector for our body element. You may need to press Enter/Return twice to commit the change.
5 Click the Background button in the Properties menu to limit the choices to background-related properties.
6 Locate the background-color property and click the set color field to the right of the color swatch to enter a color for your background,
7 Type in the following hexadecimal number: #E0F0E4 and press Enter (Windows) or Return (Mac OS) to apply the color change. You will now change the background color for the copyright class at the bottom of the page.
8 Click <style> in the Sources pane, then in the Selector pane, click the .copyright class to enable editing of these properties.
9 Click the Background button in the Properties menu to display the background properties.
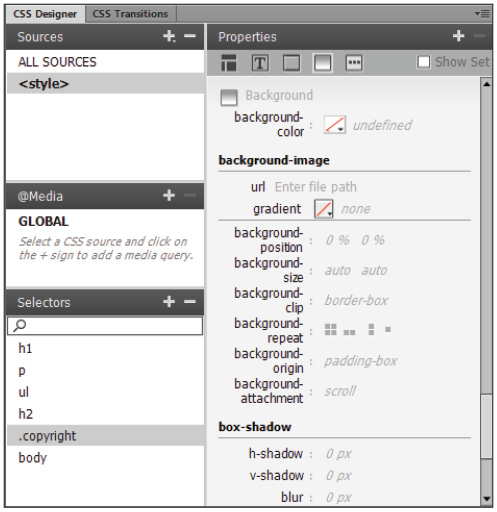
The CSS Designer panel displays the background properties for the copyright class rule.
10 Click the background-color swatch and choose white (#FFFFFF) from the list. The two copyright paragraphs at the bottom of the page are styled with white backgrounds. The gap between the two paragraphs reveals the background color because these are separate paragraphs, and are both block elements. The gap is somewhat visually unappealing and is something you will be fixing a bit later in the lesson.
Advanced text formatting with CSS
Text on the Web is necessarily limited due to the fact that designers cannot assume that fonts they choose in Dreamweaver will be available to the user. There is a small set of fonts that designers can use that are essentially guaranteed to be on all users’ systems. Given this limitation, you can use some of the properties in CSS to give your text a distinctive look. In this exercise, you will work with the line spacing of your paragraphs and lists, and the letter spacing of your headings.
 The limitations on web fonts are slowly changing, and in Dreamweaver CC, there is now a new feature that makes it easier to use web fonts and allows you access to a wider range of font choices. For now, it is still important to learn the basics. We cover the new web fonts feature in Lesson 8, “Using Web Fonts.”
1 Click p in the Selectors list so you can edit the paragraph properties. You might have to click the <style> item under the Sources pane in the CSS Designer panel first.
You will now override the default line-height for your paragraphs. If you have a print background, you might be familiar with leading, which is the amount of space between the lines in a paragraph. Line-height is the same thing as leading.
2 Click the Text button in the Properties menu to limit the choices to only show the text-related properties.
3 Locate the line-height property and click the text normal in the Set line-height field to bring up the units menu. Select px from the menu for pixels then type 20 and press Enter (Windows) or Return (Mac OS) and you will see the space between your paragraph lines increase. Extra line-height can often make your text more readable, so it is great that you have this option in CSS. However, a problem might arise if you change the font-size. For example, setting the fixed value of 20 pixels looks good with 14-pixel type, but what if you were to later change the font-size of your paragraph? The 20-pixel line-height would look strange. A more flexible way to assign line-height is to use a percentage.
4 Click the px value to the right of line-height and choose percent (%). Change the value from 20 to 120, and press Enter (Windows) or Return (Mac OS). You won’t actually see a dramatic difference because the end result is similar, but by assigning the line-height to 120 percent, your initial font-size isn’t as important. There will always be the height of the line plus 20 percent extra, no matter what the font-size is.
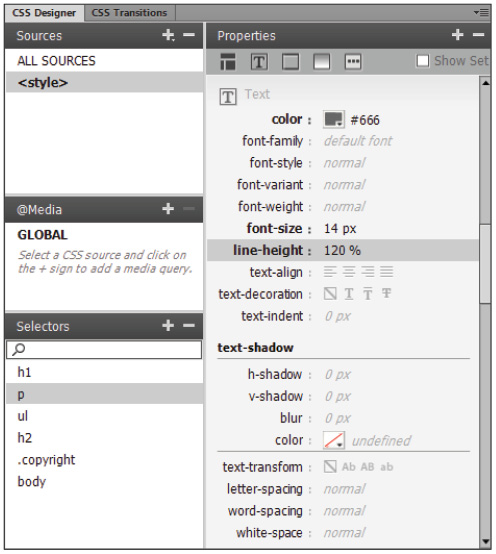
Changing the line-height value of a paragraph to a percentage is more flexible than using pixels.
Notice that the list under Spring Events did not change. This is because the line-height property applies solely to paragraphs, not lists. If you want to make this list appear the same, you could always apply the same value of line-height. However, you will be adding extra space between the lines to make the list stand out from the rest of the page.
5 Click the ul selector in the Selectors pane. You might have to click <style> in the Sources pane to show all the selectors.
6 You will notice the ul element’s line-height is set to 120%. In the field for line-height, click the value 120% and change it by typing 150, then press Enter (Windows) or Return (Mac OS). You now have extra space between your list items. Next, you’ll style your Heading 2 element.
7 Click the h2 selector in the Selectors list and locate text-transform in the list of text properties. Click the Uppercase icon to set the text for your h2 headings to display in uppercase and you will see your two headings Spring Events and Rent Our Facility! transform to uppercase. This helps your headings stand out and is faster than retyping these headings by hand. Now you’ll add some space between all the letters.
 Transforming your text to uppercase is just a style; in the HTML, your original text still has the standard formatting. One of the few times this might be an issue is if your web page is being viewed without a style sheet; older cell phones and PDAs with web browsers do not fully support style sheets (or use them at all), and so your text would appear lowercase as it is in the HTML.
8 Locate the letter-spacing property just below the text-transform property. In the text field to the right of letter-spacing, click the word normal and choose px from the drop-down menu. In the text box to the left type 5, press Enter (Windows) or Return (Mac OS), and the two headings are extended. Each letter pair now has 5 pixels of space between them. When used correctly, letter-spacing can make your headings more readable and unique.
Adding letter-spacing and uppercasing to your headings can make them stand out.
Fine-tuning page appearance with contextual and pseudo-class selectors
CSS allows you to create styles that are targeted at specific HTML elements on your page. Understanding these techniques is crucial if you want to gain control over the appearance of your page. Look at the Spring Events list on your page: lines 1 and 4 both begin with the word Free. Let’s say you wanted to emphasize this word to attract your user’s attention. You could simply bold the word, but what if you not only wanted to bold it, but change the color as well? It would be possible to create a class to do this, but there is another option that has some useful benefits called contextual selectors.
Dreamweaver actually refers to contextual selectors, which is the official CSS term for them, as compound selectors. Despite the terminology, they are very powerful and important to understand.
Contextual selectors apply formatting to tags and classes when they appear in a specific combination. For instance, you often have separate rules for the <p> (paragraph) and <strong> (bold) tag, but what if you want a rule for <strong> tags that are used inside <p> tags? Contextual selectors can handle this; for instance, you can designate that any text inside a <strong> tag must be red, unless it is used within a <p> tag, in which case it should be blue. This breathes new life into your tag styles by multiplying the number of times you can use them in conjunction with each other.
1 In the first line of the Spring Events list, select the word Free. Click the HTML button in the Property Inspector, then click the Bold button. (This actually creates a <strong> tag in the HTML.) Using the example from above, let’s say that simply bolding this wasn’t enough and you wanted to add some color.
2 Click <style> in the Sources pane of the CSS Designer panel and then click the Add Selector button in the Selectors menu to create a new CSS style for our selection. Dreamweaver will recognize that you have selected a list item within an unordered list in the body of your page and will pre-fill the selector field with body ul li strong. Select and delete the word body from the field leaving ul li strong and press Enter (Windows) or Return (Mac OS).
This might look strange at first, but it’s logical if you read it from left to right. The body tag is the ancestor, or parent, of the ul tag, which is the parent of the li tag, which is the parent of the strong tag. In other words, your style will only apply to strong tags, which are nested in a list item (which is nested in the unordered list, and so on).
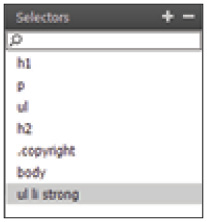
The CSS Designer panel can be used to create contextual selectors, such as ul li strong.
3 Click the Text button in the Properties pane of the CSS Designer panel to show the text-related properties.
4 Click the color swatch to the right of the color property and choose the dark green swatch in the top row, #003300. The text will immediately change color.
5 Select the word Free in the fourth line and click the Bold button in the Property Inspector. The word takes on the same appearance. Bolding anything in the list causes it to have the same appearance, while bolding anything outside of a list has the default effect.
Styling hyperlinks
You’re slowly beginning to pull together a page with a color theme to it, even if there is no layout per se. A frequently asked question when people are learning to create web pages is how to style the hyperlinks on a page. This can be accomplished with CSS, although there are some precautions. Since the early days of CSS, the default style for unvisited hyperlinks has been a bright blue with an underline and a purple color with an underline for visited hyperlinks. An argument can be made that users might be confused by hyperlinks that do not fit this mold. On the other hand, many designers like being able to color their hyperlinks to match the rest of their page. Regardless of the debate, it’s important to understand how to do this.
Technically speaking, hyperlinks live in a category called a pseudo-class. A pseudo-class selector affects a part or state of a selected tag or class. A state often refers to an item’s appearance in response to something happening, such as the mouse pointer rolling over it. One of the most common pseudo-class selectors is applied to the <a> tag, which is used to create hyperlinks. You’ll now create a pseudo-class selector to affect the appearance of hyperlinks on the events.html page in different states.
1 Click the products link in the first paragraph, click <style> in the Sources pane, and then click the Add Selector button in the Selectors pane to create a new CSS style for our selection.
Again, Dreamweaver will recognize that you have selected a hyperlink or anchor in the body of your page and pre-fill the text box in the Selectors list with body p a but you will change this.
2 Type a: in the text box and notice that Dreamweaver presents you with a list of pseudo-class selectors including link, visited, hover, active and more. Press Enter (Windows) or Return (Mac OS) to select the first option, :link. The a:link psuedo-class selector will affect the appearance of a hyperlink that hasn’t been visited.
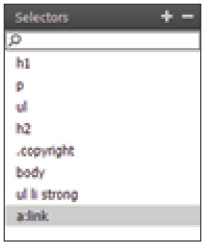
Using a psuedo-class selector can alter the appearance of an element in a given state.
3 Click the Text button in the Properties pane to show the text-related properties.
4 Click the color swatch to the right of the color label and choose the green shade you used in the previous exercise (#003300). The product link in the first paragraph, as well as the two links at the bottom of the page are now green instead of blue. Now you’ll set the style for hover links, or a:hover.
5 Make sure that the products link in the first paragraph is selected and choose <style> from the Sources pane in the CSS Designer panel. Click the Add Selector button in the Selectors pane and Dreamweaver will create a new text box in this pane. You will add the next pseudo-class selector for the a:hover state of the products link. The a:hover state defines the color of a hyperlink when a user places their cursor over it.
6 Once again remove any text Dreamweaver added, then type a: in the text box and notice that Dreamweaver presents you with the list of pseudo-class selectors. This time select :hover, press Enter/Return, and then click the Text button in the Properties pane to display the text-related properties.
7 Click the color palette to the right of the color property and select the bright orange swatch near the center of the Swatches panel (#CC6600).
8 Locate the text-decoration property and click the icon for none (an empty box with a line through it). This removes the underline from the hyperlink for the hover state only.

Set properties for a:hover, or the appearance of hyperlinks when the mouse pointer rolls over them.
You can preview the appearance of the hyperlinks by clicking the Live View button in the Application bar or opening your page in a browser.
9 Choose File > Save; then choose File > Preview in Browser and choose a browser from the list to launch it. Place your cursor over the products link, but don’t click it. You can now see the text appears orange when hovering over the link. Click the products link to bring you to the products page, and then click back to the events page by clicking the Events link at the bottom of the page. The products link is now purple because the browser understands you have visited it.
You will leave off styling the a:active link for now. Setting the a:active property defines the way a link appears when it is being clicked on by a user.
10 Close the web browser. Return to Dreamweaver and select Window > Workspace Layout > Compact to collapse the CSS Designer panel.
Div tags and CSS IDs
Your page is coming along nicely on the style front, as you have used quite a bit of CSS, but looking at your page, it’s fair to say that it is still lacking a cohesive style. All your various headings and paragraphs, as well as your list, are floating about on the page, and with the exception of the copyright text at the bottom of the page, it’s difficult at a single glance to get a sense of where one section ends and another begins. It’s time to add more structure to your page through the use of the <div> tag and more control of your CSS with ID selectors.
Let’s look at the structure first. It would be nice to gather the text on the bottom of your page, starting with the line, Occasionally we gather…, and then the two paragraphs below, and put it all into a single section. You could then take this new section and style it separately from the rest of the page. This is possible with the <div> tag. In this exercise, you will begin by creating a footer ID.
1 Click and drag to select all the text from the line, Occasionally we gather…, down to the bottom of the page. You will be grouping these three paragraphs together.
2 Just above the CSS Designer panel, alongside the Files Panel, is the Insert tab. Click this once to open the Insert panel. If the drop-down menu is not set to Common, select Common from the menu now. In the Common section, click Div and the Insert Div dialog box opens. In the Insert section, the default choice is Wrap around selection; this is exactly what you want to do, so leave this option as is.
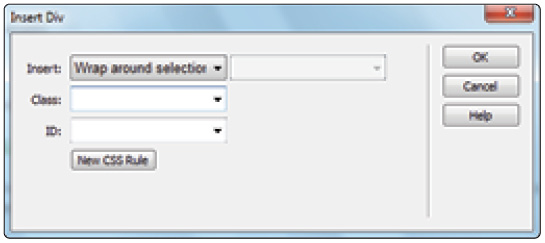
The Insert Div window allows you to create a section within your page.
A <div> tag by itself doesn’t do anything until some CSS properties are attached to it. In other words, unlike other HTML tags, which often have a default visual effect in the browser (think of headings), the <div> tag has no effect on your rendered page unless you specifically instruct it to. You will now get to do this.
3 In the field labeled ID, type footer. Just like classes, IDs should have good, descriptive names to help identify them. Notice that there is a field for class as well. Classes and IDs are very similar. The difference between them is that classes can be used multiple times on different elements on a page, whereas an ID can only be used once. In this case, an ID is appropriate because there is only one footer on this page.
4 Click OK and Dreamweaver will insert <div> tags around your selection which will be represented in the design view as a box surrounded by a dotted border. This representation will not be displayed in the browser or Live View and is only used to assist you in identifying divs within your page.
5 In the CSS Designer panel, select <style> in the Sources pane to tell Dreamweaver you want to create a new embedded style.
6 Click the Add Selector button in the Selectors pane to create a new CSS style for our selection. This will create a new text box in the Selectors list which will be populated with the value #footer.
You don’t need to change anything here; just confirm that you are creating an ID with the name footer. The footer name is preceded by the pound sign (#). This is the main difference between ID names and class names. If this were a class named footer, it would be named .footer. Press Enter (Windows) or Return (Mac OS) to create the new selector.
7 Select the Background icon in the Properties pane, then click the swatch next to background-color and choose the pure white swatch (#FFFFFF). In Dreamweaver’s Design view, the box around the text now has a white background unifying the footer text.
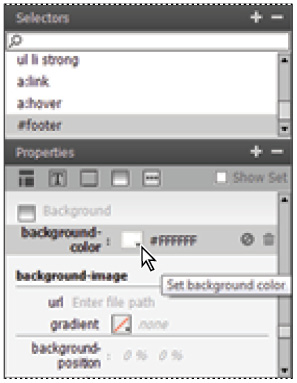
Set the Background-color to #FFFFFF in the Properties pane of the CSS Designer panel.
If you haven’t guessed by now, these are the first steps toward page layout with CSS. A footer is a common element on most pages, and there are a few other obvious ones as well: headers, sidebars, and navigation bars to name a few. You’ll begin working with these page structures more deeply in upcoming lessons, but first you’ll need to have some more control of the CSS rules that you’ve been working with this lesson.
Internal versus external style sheets
Now that you’ve seen how to modify a few items in a single page at once, you can imagine how powerful a style sheet shared by every page in your website can be. As noted earlier, when you create new CSS rules, you have the opportunity to define them in the current document or in a new CSS file. A collection of rules stored in a separate .css file is referred to as an external style sheet. You can attach external style sheets to any number of pages in a site so that they all share the same style rules.
So far, you’ve created internal, or embedded, styles. This means you wrote the style rules directly into the page using the <style> tag. Although you can format a page with an internal style sheet, this method is not very portable. To apply the same rules in another page, you have to copy and paste the internal style sheet from one page to another. This can create inconsistency among pages if the same rule is updated in one page and not the other.
To utilize the true power of style sheets, you need to create an external style sheet that any or all pages on your site can share. When you change an external style, pages linked to that style sheet are updated. This is especially handy when working with sites containing many pages and sections.
You can create external style sheets in the following ways:
- • Move rules from an internal style sheet into a new CSS file.
- • Define styles in a page in a new document using the Sources pane of the CSS Designer panel.
- • Create a new CSS document from the Start page or File menu.
Now you will export internal styles from your events.html page into a separate CSS file so that other pages can share them.
1 First, you need to create a new CSS file. Click the plus icon in the Sources pane and choose Create a New CSS File.
2 The Create a New CSS File dialog box appears. Click the Browse button and navigate to your dw04lessons folder. Type mystyles.css in the File name text field and click Save. You can leave the Add as value set to Link to link your new CSS file to the current document and click OK.
3 The new CSS file is now listed beneath the <style> source for the internal style sheet in the Sources pane. You are now ready to move your rules.
4 With the events.html document open, choose <style> from the Sources pane, then expand the Selectors pane so that you can see all the rules you have created. If you have limited screenspace, double-click the Insert panel to collapse it. Also remember you can expand a pane by clicking the bottom edge and dragging down.
5 In the Selectors pane, click the first rule at the top of the panel and scroll down if necessary to locate the last rule. Shift+click the last rule in the panel so that all the rules in the list are selected. Click and drag the selected rules to mystyles.css in the Sources pane. Release your mouse button as your cursor hovers over the file name.
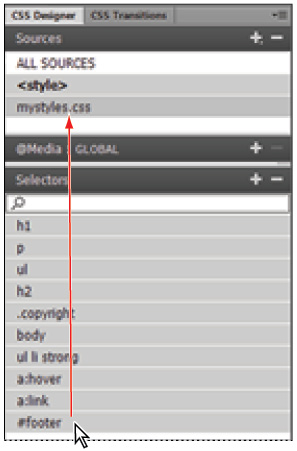
Select all rules in your style sheet and then click and drag them to mystyles.css in the Sources pane.
6 Look inside your Selectors pane and note that the styles you had selected are no longer listed. Click mystyles.css in the Sources pane and you will see that the new style sheet now includes all of your rules. The internal style sheet (shown as <style>) is still in your document, but it contains no rules.
Attaching an external style sheet to your page
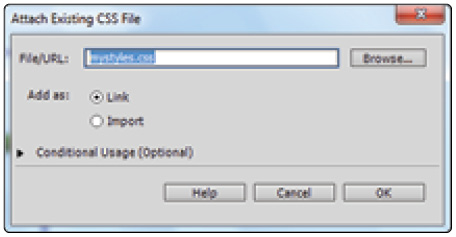
Dreamweaver automatically made the new external style sheet available to the current page by attaching it. However, you will have to link this style sheet to other pages in your site to use it. You can accomplish this with the Attach Existing CSS File command in the Sources pane of the CSS Designer panel.
1 Double-click the products.html file from the Files panel. This page is a version of the products page you created in Lesson 3, “Adding Text and Images.” You will now link your new style sheet to this page.
2 Click the Add CSS Source button in the Sources pane and choose Attach Existing CSS File from the menu. The Attach Existing CSS File dialog box appears.
3 Next to File/URL, click the Browse button to locate a style sheet to attach. In the dw04lessons folder, select the mystyles.css file from the Select Style Sheet dialog box and click OK (Windows) or Open (Mac OS). Click OK to close the Attach Existing CSS File dialog box.
Adding an external style sheet.
The page refreshes with the styles defined in the external style sheet. You can also see that the CSS Designer panel shows that mystyles.css and all its rules are now available for use and editing.
Modifying attached style sheets
Because an attached style sheet appears in your CSS Designer panel, you can modify any of its rules and the changes will apply across other pages that share that style sheet. You’ll be another step closer to layout now by modifying the body property in order to add some margins to your page.
1 Click mystyles.css in the Sources pane of the CSS Designer panel to display the selectors and properties set in the external file.
2 Click the body selector in the Selectors pane to display the properties for the body tag. You might need to click the Show Set check box in the Properties panel to clear the checkmark and show all of the available properties.
3 Click the Layout icon in the Properties pane down to the margin control. The margin control provides a new visual interface for setting the margin properties. The link button in the center of the margin control is used to set the four margin settings to the same values. You can set the individual margins by clicking the areas representing the top, bottom, left and right margins.
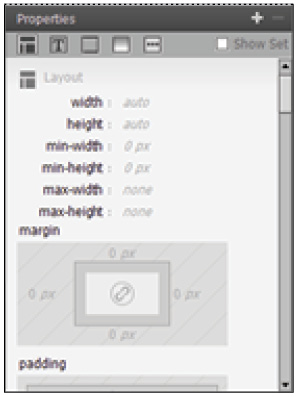
The margin control allows you to set margins using a visual interface.
Because CSS is based on a box model, it treats every element as a container. Because the <body> tag is the largest container, if you modify its margins, it affects all the content on the page. You’ll specifically be changing the left and right margins to create a more centered layout.
4 Click the unit px in left side of the margin control to set the left margin. Select % from the units menu, then type 15 in the value text box and press Enter (Windows) or Return (Mac OS) to set the margin.
5 Click the unit px in the right side of the margin control to set the right margin. Select % from the units menu, then type 15 in the value text box and press Enter (Windows) or Return (Mac OS) to set the margin.
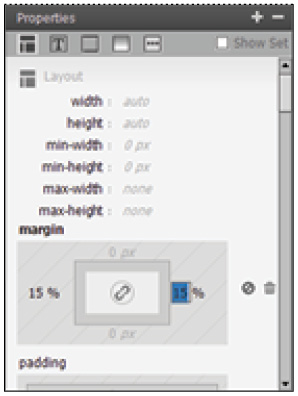
Change the left and right margin for body to 15 percent.
After both margins are set, your content should now sit in the middle of the page.
6 Choose File > Save All, and then preview your page in the browser. You are able to navigate between the products page and the events page using the hyperlinks in each document. Shorten the width of your browser, and notice that the content adjusts accordingly. There will always be 15 percent space to the left of content in the browser window and 15 percent to the right, thereby centering your content. Open the events.html file in your web browser to see how this page’s appearance is now being controlled by the external style sheet. When done, close the browser.
Creating a new .css file (external style sheet)
Although it’s easy to move styles to a new .css file, you can also create styles in a new .css file from the beginning. The CSS Designer panel gives you this option by clicking the Add CSS Source button in the Sources pane. By creating styles in an external .css file, you can avoid the extra step of exporting them later and make the style sheet available to other pages immediately.
1 In the Files panel, double-click the event1.html file.
2 From the the Add CSS Source button in the Sources menu, choose Create a New CSS File and the Create a New CSS File dialog box appears. Browse to your dw04lessons folder and name the new file morestyles.css, and then click Save. Keep the Add as: option set to Link and click OK to create the file.
3 Click the <body> tag in the lower-left corner of the document status bar, then click morestyles.css in the Sources pane. Click the Add Selector button in the Selectors menu.
When you click the Add Selector button, Dreamweaver prefills the selector name box with body p. Delete the letter p leaving only the word body as the name, and then press Tab to create the selector.
4 Click the Background button in the Properties pane to show the background properties.
5 Click the swatch to the right of the background-color property and set the background color to light yellow, #FFFFCC.
Your page’s background color should be yellow, and the CSS Designer panel reflects that the style was created in a new external style sheet. Now you can attach this style sheet to any other page in your site.
6 Choose File > Save All.
Self study
Create a new document and add some unique content to it, such as text or images. Afterwards, use the Designer panel to define at least one tag style, two class styles, and one contextual selector (advanced) in a new, external .css file. Create a second document and attach your new external style sheet to it, using the Attach Existing CSS File command from the Sources pane of the CSS Designer panel. Add content to this page, and style it using the style rules already available from your external style sheet. If desired, make changes to the rules from either document, and watch how both documents are affected by any modifications made to the external style sheet.
Review
Questions
1 What are the four types of selectors that can be chosen when creating a new CSS rule?
2 In what three places can styles be defined?
3 True or false: A style sheet is composed of several CSS rules and their properties.
Answers
1 Tag, Class, ID and Compound (which includes contextual and pseudo-class selectors).
2 Inline (written directly into a tag), internal (embedded inside a specific page using the <style> tag), or external (inside a separate .css file).
3 True. A style sheet can contain many CSS rules and their properties.