
Chapter 11
Using InfoPath with SharePoint 2013
WHAT’S IN THIS CHAPTER?
- Designing InfoPath forms
- Using features in InfoPath and InfoPath Forms Services 2013
- Applying InfoPath best practices
- Programatically working with InfoPath Forms
WROX.COM CODE DOWNLOADS FOR THIS CHAPTER
The wrox.com code downloads for this chapter are found at www.wrox.com/remtitle.cgi?isbn=1118495829 on the Download Code tab. The code is in the chapter 11 download and individually named according to the names throughout the chapter.
Capturing and displaying data is a critical part of SharePoint. InfoPath helps end users modify those views quickly. The key advantage of InfoPath is that it provides an easy-to-use interface for structured forms and provides rich developer functionality for adding business logic.
To create and display forms, SharePoint 2013 uses a service on the server called InfoPath Forms Services. This service is designed to enable end users to use their browsers to fill out InfoPath forms and enable administrators to manage those forms. SharePoint provides a full object model for the InfoPath client, InfoPath forms, and InfoPath server administration. This enables developers to build enterprise business processes and forms that can be sophisticated yet easy to create. This has enabled the development of powerful business applications such as dashboards, data capture forms, and many more.
InfoPath continues to improve the integration with the other Office 2013 products with changes to the look and buttons like the Insert Image location. No new functionality or scenarios have been introduced, but InfoPath 2010 and SharePoint 2010 features are still supported and highlighted for InfoPath 2013 and SharePoint 2013 developers.
The biggest change in InfoPath 2013 is the new way to write and edit code. When writing code for InfoPath 2013, InfoPath now requires Visual Studio 2012 with the Microsoft Visual Studio Tools for Applications 2012 add-on to be installed. You will quickly notice that you need these components as soon as you try to open the code editor. The programming experience and assembly references have not fundamentally changed, but you now have the benefits of the most up-to-date version of Visual Studio when developing InfoPath forms.
INTRODUCING THE TRAINING MANAGEMENT APPLICATION
In this chapter, you use an example of a Training Management application built for a fictitious company named Adventure Works, which illustrates the capabilities of InfoPath 2013 and Forms Services 2013. There have not been many large changes between InfoPath 2010 and InfoPath 2013, so many of these examples would work in both systems. First, walk through the application and how it works from the user’s perspective.
Scenario: The Human Resources (HR) Department at Adventure Works uses SharePoint and InfoPath to implement a training-course system. You can think of the Training Management application as a set of three use cases as follows:
- New training creation use case
- Training registration use case
- Increment stat counter use case
The Adventure Works staff can perform various activities in this application. For example, the training coordinator can create training events and add them to a SharePoint list named Trainings. This list will be customized and enhanced by InfoPath 2013 to facilitate the training creation use case.
Also, the HR Department at Adventure Works allows its employees to register for a training class. The training registration form is designed in InfoPath and can be hosted inside the InfoPath Form web part on a web part page. The training registration form must be rendered in a typical desktop web browser and in browsers on handheld or mobile devices.
After a training request is filled out and saved, the result is stored in a form library named Registrations, and an event handler associated with the Registrations form library updates a counter in another custom SharePoint list, named Stats. The Stats list is hidden from employees so that its content can’t be modified and it does not clutter navigation.
Creating the Sample List
To create powerful forms with SharePoint and InfoPath you need to create the SharePoint lists and libraries that you can work with. To create the training list, start by creating a new custom list and add the following fields:
- Title — A title for the training events; a single line of text.
- Class Code — Each class has a unique identifier for the training class (unique eight-character fixed); a single line of text.
- Description — The description of the training; a single line of text.
- Start Date — The training start date; date and time.
- End Date — The training end date; date and time.
- Cost — The cost of the training (in dollars); currency.
- Level — The difficulty level associated with the training (a number from 1 to 5); number.
- Enrollment Deadline — The date that enrollment ends; date and time.
- Address — The address of the training facility (multiple lines of text); multiple lines of text.
- Additional Information — Optional information about the training itself (enhanced rich text with pictures, tables, and hyperlinks); multiple lines of text.
Figure 11-1 illustrates all the fields of the new Trainings list, their types, and whether they are required when submitting to the list.

CUSTOMIZING SHAREPOINT LIST FORMS
SharePoint 2013 provides a simple and easy-to-use way of customizing SharePoint list forms. The forms created in InfoPath 2013 can be used and embedded into SharePoint to build dynamic sites. One of the exciting features in InfoPath 2013 is the ability to extend or enhance the forms used by SharePoint lists for creating, editing, or showing list items. You can modify list form layouts, set validation rules, or create additional views using little or no code. When you finish modifying the list forms, reflecting your changes back to SharePoint is just a matter of using the one-click publishing capability that comes out of the box with the list form.
Customizing SharePoint List Forms
To customize the list forms in SharePoint 2013, navigate to a list or library, and click Customize Form in the Customize List section of the List tab that appears on the Ribbon, as shown in Figure 11-2.

This launches InfoPath Designer in SharePoint list mode, and a basic form is auto-created from the fields specified in the list’s schema. You can see the fields in the Fields task pane on the right side of the design canvas in which mandatory fields are designated with a red asterisk.
When you click one of the existing form fields, the control tools’ contextual Ribbon appears on the top and gives you the ability to interact with the list columns inside of InfoPath Designer. Any changes at this point will be persisted later to the SharePoint list when the form is published. For example, if you change a control’s binding to a new field, that field will be automatically added to the list’s schema when the form template is published to SharePoint.
The controls placed on the forms are selected based on the field type of that column. Figure 11-3 shows the sample list created with text and Date/Time columns already added to the form for each field. The Date and Time Picker control enables you to type a date and time or selects a date from a calendar display.

In addition to auto-generating the form through the SharePoint Ribbon buttons, you can launch InfoPath Designer by going to the New tab on the File menu and choosing SharePoint List as the template. You then enter the URL of the wanted list and the same InfoPath form auto-generates for you.
InfoPath Controls
A number of InfoPath controls can be placed into your form with InfoPath 2013. Each field type maps to one of the InfoPath controls when the form generates. The controls are part of categories that define how they work on your form; these categories are Input, Objects, and Containers. The controls used to map to fields will be from the Input category. You can see all the Input category controls listed here.
- Text Box
- Rich Text Box
- Drop-Down List Box
- Combo Box
- Check Box
- Date Picker
- Date and Time Picker
- Multiple-Selection List Box
- List Box
- Person/Group Picker
Changing the form and controls is easy as you can see by extending the form based on the scenario. By using a container called a Section or Optional Section, you can group controls together. For this example, you create an Optional Section to meet the requirements that the training coordinator will want to save real estate on the form, and only enter the information if needed. Add the Optional Section to your form using the following:
Now you have the Optional Section and the same Rich Text Box bound to the Additional Information file inserted into the form, as shown in Figure 11-4.

Creating Business Logic with Rules and Views
Programming has evolved dramatically over the last decade with technologies like XML and XSD. These standards have made it possible to separate data and presentation layers, especially on the web. This is the foundation that InfoPath is built on, and two components of InfoPath use these technologies to help build the business logic of the InfoPath forms. These technologies are called Rules and Views that together create the User Interface for displaying data, and the logic to make the user interface and data behave as needed.
Rules
Rules in InfoPath are a set of one or more actions used to create a dynamic experience for the users of the form when they fill it out. There is always an event that triggers a rule, and in response, the rule performs some action such as a format change or a validation check:
Adding rules to a form is straightforward. You use the following sample rules based on the scenario to build some sample rules on your form:
- If End Date < Start Date, show a validation error message.
- If Enrollment Deadline > Start Date, show a validation error message.
- Only the Address and Additional Information fields can be edited after the training is created.
To add these rules follow these steps:

Repeat the steps for the Enrollment Deadline control using Table 11-1. Figure 11-5 shows what the RuleEndDate Condition will look like.

Views
Views provide a way to have different layouts of the same information in a single form, and depending on the view shown to the user, they see the layout for only that view. Views are just a presentation of the data in the form, and the same fields can be displayed in multiple views using separate controls. Views are a great way to present your form differently to the users based on different states that the form is in. The view can be changed based on rules or actions triggered by the user during run time of the form.
You can create a new view from the Page Design tab, but you need to add the controls and layout to the new form after it is created. Using the scenario, you will make the fields that need not be edited read only. To do this you will create a different view that will be used when the user edits a list item. To create the views follow these steps:

At this point your Edit Training view should look like Figure 11-7.

To change between the views using the form, you need to set up the actions to change between the views based on the conditions set. After you perform the following steps, you have a rule that runs when the form loads:
Now you have customized the input form and provided the needed logic for the training form.
Publishing List Forms
When you finish designing your forms, you need to publish them to SharePoint. This is the step that creates the connection between SharePoint and InfoPath. The form that has been created can be published directly to the SharePoint list generated using the File tab, and then the Info tab or Publish tab. Figure 11-8 shows the current state of the form. Also, InfoPath already knows which list to publish to because you opened the InfoPath Designer directly from SharePoint. This means that there is no additional configuration required when publishing this form to SharePoint. Just verify that the publishing location is correct, click the button that says Quick Publish, and you are done.

After a form is published to a SharePoint list you may want to save the form locally. In this case do not close the form, but instead click the Save As option, and save the template to your local drive. The important point to remember here is that saving a form template locally or on a network share is a totally different process from publishing it. Publishing versus saving a form template is covered in greater detail in the section “Publishing InfoPath Forms,” but for now know that there are two types of finalized forms: Publishing and Saving.
After the form has been successfully published and its template is locally saved, you can test that all the design and dynamic logic work as expected in SharePoint. Return to the SharePoint list in the site, and create a new list item to view the recently published forms. The default ASPX page is replaced with the default view of the form template you just customized and published. After filling out the form (see Figure 11-9), you can submit it by clicking Save on the top of the Ribbon. At this point, the form applies the appropriate rules to validate your input and adds a new list item to the SharePoint list.

If you closely look at the URL of the rendered form, you see that the form, unlike uncustomized list forms, is not loaded by the NewForm.aspx page. Instead, it is loaded by another out-of-the-box web part page called newifs.aspx.
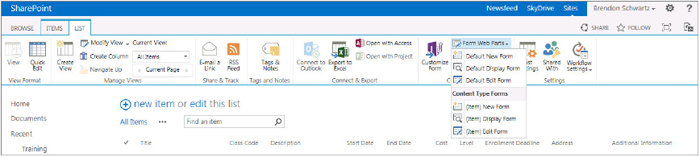
The newifs.aspx, displayinf.aspx, and editifs.aspx pages are part of the list’s infrastructure in SharePoint 2013. These pages were added in SharePoint 2010 to provide tighter integration with InfoPath forms directly into lists. They are all web part pages that can be customized via the browser. All three pages are accessible from the List tab ⇒ Form Web Parts drop down on the Ribbon, as shown in Figure 11-10. Each page hosts an instance of the InfoPath Form web part that knows how to locate and load the form template associated with the SharePoint list.
When editing an existing list item, you see that the rule you placed in the Load event of the form kicks in and switches the view from New Training to Edit Training (see Figure 11-11), where you can edit the last two fields of the form only.

If you want to undo everything and revert to the out-of-the-box ASPX forms after you have customized the forms, you can do this quickly without any issues. Browse to the List Settings page of the SharePoint list, click Form Settings, select Use the Default SharePoint Form, and click OK. Optionally, if you leave the Delete the InfoPath Form from the server unchecked, the InfoPath form you customized remains on the server. The next time you click Customize Form, the saved InfoPath form will be used in the InfoPath Designer instead of a new one being auto-generated from scratch.
Two things about SharePoint list forms to consider: First, custom code is not supported in a customized list form using InfoPath 2013. If you open any of the forms that have been auto-generated from a SharePoint list, there is no Developer tab on the Ribbon to launch the coding tools. Second, you can publish a list form only to the list it belongs to. This also means that converting your list form to a form library is not possible.
DESIGNING INFOPATH FORM TEMPLATES
InfoPath separates data from schema and presentation. This means that the form you design to be used as a Form Template can store only a reference to your design and keep the data separate from the presentation layer. Each form template will be used in a form library and also store the data in that library.
To build upon the scenario, create a form library named Registrations that will be used to store the form template and completed forms (the data). Every time the form is filled out, an instance of the form template is stored in the form library. The result is just an .xml file that contains the data that was entered into the form and a reference to the form template. Everything else that makes up the form is provided by its form template.
Unlike the list form, Form Templates can be filled out using two form entry options. One option is to browse directly to the SharePoint form library and click the New Form button. The other option is to navigate to a web part page where an InfoPath form web part has been added that references the form template. Both options open the forms for users to fill out. After you press the Save button, the results are saved in the SharePoint form library.
What Is a Form Library?
A form library is a specific type of document library that includes an InfoPath form as its primary template and easily allows users to fill out a new InfoPath form or edit an existing one. Instead of storing documents, the form library is designed to save the InfoPath form XML and open it with the right version of the InfoPath form template.
Although InfoPath Designer 2013 enables you to create a form library on a SharePoint site when you publish your form template, there are situations in which you may want to create the form library beforehand. For example, you may want to create the form library, change its settings such as versioning, and set up permissions to it before publishing the form template, simply because people who publish may not have enough permission to complete such a task. Follow these steps to create a form library:
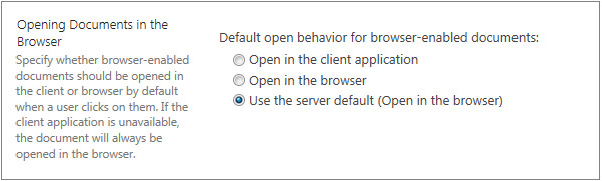
After the form library is created, you can specify how its form templates should be opened. Browse to the Form Library ⇒ Form Library Settings, and select Advanced Settings. These settings are listed under Opening Documents in the Browser, as shown in Figure 11-12. The default behavior when you create the form library from within SharePoint is to open the forms in the browser, but nothing stops you from changing it to InfoPath Filler 2013 (by selecting Open in the client application).
Designing Your Form Template
Building a form template is similar to building a form for a SharePoint list except you start with an open canvas and do not have an auto-generated form based on fields. Start by opening InfoPath Designer 2013 from your local machine. On the New menu select the type of form you want to design. InfoPath makes this process easy by providing a form template called SharePoint Form Library. When selecting a template to start from, InfoPath Designer provides descriptive text in the top-right corner of the New page to help describe what the form provides, as shown in Figure 11-13. It is important to take a moment and review prebuilt templates, their concepts, the matching color schemes, and the optional layout used in each.

All available form templates are grouped into four main categories:
- Popular Form Templates — A wide range of popular form templates to start your design. When customizing SharePoint lists and document libraries, this is the category that you want to focus on.
- Advanced Form Templates — This category covers templates for more advanced scenarios, mostly for querying and submitting data to databases, web services, or other external data sources.
- InfoPath 2010 Form Templates — Form templates that also work in InfoPath 2010 in backward-compatible mode.
- Template Parts — Contains three templates for building reusable components — also known as mini-form templates. When built, mini-form templates can simplify the creating of more complex forms, much like splitting the page into user controls in classic ASP.NET.
From Available Form Templates, choose the SharePoint Form Library template, and click Design Form on the right side of the dialog box.
After you open InfoPath Designer 2013, you may notice that laying out your form to get a professional look and feel is now easy. InfoPath uses page layouts as a framework to organize your form’s content, including controls, graphics, and tables (which include section layouts).
Building a Form Template
Now that you understand what the form library and form template are, you can create a form to upload to the library based on the training scenario. First, you need to replace the page layout that InfoPath gives you by default with something more appropriate for the Training registration form. Just delete everything you see on the form (Ctrl+A/Delete). On the Page Design tab, select one of the five page layout templates, for example Color Bar. Add an appropriate title, and adjust the form so that it is centered. At this stage, your form contains only one page layout and a title, as shown in Figure 11-14.

Next, you need to add a section layout to the form to create a logical grouping of information that you want to collect in your form. From the Insert tab under the Tables gallery, choose Single Column Stacked 4 — No Heading, and insert it where it says Add Tables, right underneath the title. The template adds three rows by default, and you need to add three more rows so that the following controls can be placed on the form:
- Event Name — A required Drop-Down Listbox control linked to the Trainings list
- Alternate Email — A required text box with validation rules
- Emergency Contact Name — A required text box
- Emergency Contact Phone Number — A required text box with validation rules
- Short Bio — An optional text box
- Manager — An optional People/Group Picker control
From the new Controls gallery on the Home tab, add the required controls to the main section layout on the design canvas. You can set the controls to be required by right-clicking each control and selecting the Cannot Be Blank check box in the control’s Properties dialog box (Validation section). Because each control on the form and its auto-generated field represent the data on the form, give them more descriptive names. To do that, name the controls and the fields (field1 to field6) as described in the preceding bulleted list.
Applying Themes
InfoPath 2010 introduced the ability to quickly change the look and feel of your form just like the other Office products with themes. If you need to change the overall look of your form, you can simply apply a new theme to the entire form. To do this, look on the Page Design tab in the Themes gallery. You can select an appropriate style that best describes your form needs. Pick a color scheme that matches your site or company colors.
If you still have your cursor within a table cell on your form, on the Layout Contextual tab, click the Borders button, and make some adjustments to the form so that there is a border around the entire layout page. When these steps are complete, the form should look like the one in Figure 11-15.

To complete the form, you need to add some rules to the form template just like you did with the SharePoint list form. Follow these steps to add the needed rules.
Repeat these steps for the Alternate Email Address field, but change the Data Entry pattern from the Phone Number pattern to the Email pattern.
Many validation rules require specific common patterns used in many forms. As you can see in Figure 11-16, there are many ready-to-use data entry patterns that you can choose from. You can even customize each pattern’s associated regular expressions and create your own customized pattern.

People and Group Picker Control
You can use the People and Group Picker control to provide the person selection in SharePoint. Notice how, by adding this control to the design canvas, a group has been added in the Fields task pane containing three fields: DiaplayName, AccountID, and Account Type.
To see the SharePoint related properties, go to the People Picker control’s Properties dialog box, and on the SharePoint Server tab, specify the SharePoint site URL to query for people and groups. Notice in the General tab how you can narrow down the people/group picking query to choices like People Only, People and Groups, Allow Multiple Selections, or even a specific SharePoint group, as shown in Figure 11-17.

If you added a People/Group Picker control to a customized SharePoint list form (such as the Trainings list forms), you don’t need to go through all these additional steps to set it up. The control is smart enough to pick the right context for you.
Querying SharePoint Lists in Forms
Almost every form connected to SharePoint uses list data in the form. Querying SharePoint lists is a built-in feature of InfoPath with wizards to guide you through the process. To add a SharePoint list connection to a form, use the Data tab, and click the From SharePoint List in the Get External Data gallery. On the first page of the Data Connection Wizard, type the full URL of the SharePoint list, and click Next. The second screen in the wizard enables you to select the SharePoint list you will get data from. After you click Next, the third screen of the wizard is where you select the fields that must be included in the data source.
The wizard provides the option Store a Copy of the Data in the Form Template. Use this if you are building the form offline or need to work with the data in the form, even if a connection cannot be made. Also, you can provide the option Automatically Retrieve Data When Form Is Opened, which provides a rule on when the data source should be called.
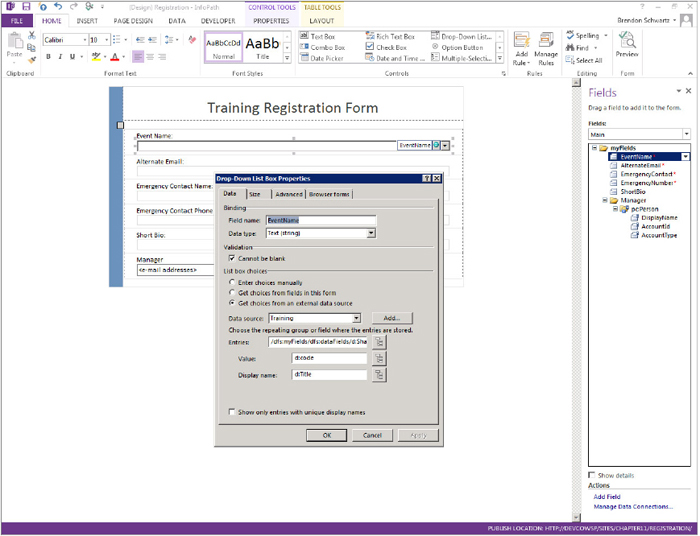
To connect a field using the example, click in the Event Name control’s Properties dialog box, select Get Choices from an External Data Source, and in the data source, select the secondary data source. Click the XPath image next to the Entries box, and choose the data fields of the data source, which will be d:SharePointListItem_RW element. Set the Value to the Class Code field, and the Display to the Title field, as shown in Figure 11-18, and then click OK.
With many data sources, you need only a subset of data that’s relevant to the users, but the data source fetches all the list items. As many list items are created over time, there is a chance that the items could become irrelevant or simply not used anymore. To address this issue you can use a filter that enables the users to view only relevant list items.
Using the example, the Training list has a column that you can use to filter the Enrollment Deadline that indicates when the registration for the training is due. This is the column to use to define the filter by following these steps:
Querying REST Web Services
In the previous section, you used the traditional technique for querying SharePoint lists. Alternatively, you can query data including SharePoint lists using REST Web Services with a capability called WCF Data Services.
WCF Data Services is a framework that enables interactions with SharePoint data in a RESTful manner. With SharePoint 2013 there are also new OData RESTful endpoints that provide data in either Atom or JSON formats.
Everything starts with a URL because REST is all about using URIs to identify resources, modify them, and transfer them using a representation of the resource. The most obvious advantage of using REST is simplicity. Anyone who can craft a URL can work with REST APIs, which makes REST even more powerful compared to other data access methodologies. Because InfoPath 2013 supports connecting to REST APIs, you can query the SharePoint lists (a resource in the REST context) using SharePoint’s REST Web Services.
To add a REST connection to a SharePoint list, navigate to the Data tab in the InfoPath Ribbon. In the Get External Data gallery, click From Web Service, and then click From REST Web Service.
The REST URL would be formatted as follows:
http://<site>/_vti_bin/ListData.svc/<list>
Such as:
http://devcow.sharepoint.com/_vti_bin/ListData.svc/Trainings
Type the URL in the Address text box, and click Next in the wizard. In the next step, give the new data source a name and check the Automatically Retrieve Data When Form Is Opened option to create a secondary data source.
Before you consume this feed in your InfoPath form, examine the XML output from the endpoint by typing the feed URL in the browser and pressing the Enter key. This is a simple way to see what the returned results are. If you use Internet Explorer, you may need to turn off the feed reader view in the browser to see the returned raw XML. In Internet Explorer this option can be turned off by unchecking the Turn on Feed Reading View option in the Tools ⇒ Internet Options ⇒ Content Tab ⇒ Feed and Web Slices ⇒ Settings.
One great advantage of using REST data sources is that you can easily restrict the returned entities by applying the $filter expression to the entity set, identified in the last segment of a REST URI. In other words, you filter data right in the source instead of using form-level filtering.
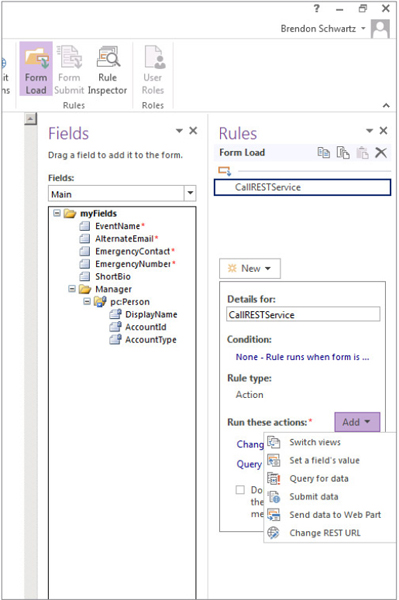
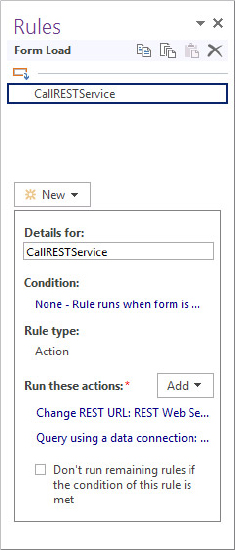
The $filter can be difficult to figure out so look at an example. On the Data tab, click Form Load from the Rules category. This opens the Rules task pane in which you can create rules that will run when the form is opened. Create a new rule and leave the condition section empty. This runs the rule whenever your form loads and is not based on a specific condition.
Next, click the Add button and select Change REST URL (see Figure 11-19). This action makes it easier to change the filters of REST URLs such as SharePoint. The Change REST URL action enables developers to change the REST URI dynamically when an event is triggered, such as Form Load or Submit. This brings up the Rule Details dialog box, which gives you more options for manipulating the URI you initially set for the data source, as shown in Figure 11-20.

To implement the filter, click the function (fx) button next to the URL and insert the following:
 concat("https://devcow.sharepoint.com/_vti_bin/ListData.svc/Training",
"?filter=EnrollmentDeadline gt datatime'", now(), "'")
To make the REST Web service call, you need to add another rule to the form load that runs the action. To add this action, click the Add button in the Rules task pane again, but this time choose Query for the data rule action. As shown in Figure 11-21, in the Rule Details dialog box, you just need to click OK because the Action and Data Connection values have already been set. Figure 11-22 shows both rules and their order in the Rules task pane for the Form Load event.

Using the REST web services, you can now change the Event Name drop-down list box to be bound to the new data source. In the Control’s Properties dialog box, select Get Choices from an External Data Source, and in the data source, select the secondary data source. Next, click the XPath image next to the Entries box, and choose the entry element. The entry element represents an individual list item in the returned feed and acts as a container for meta data and data associated with each list item. Set the Value to the Code field, and the Display to the Title field; then click OK.
A great feature with InfoPath is that you can use the Preview form without publishing it to a SharePoint site. Press F5 and preview the form. Your form should load only the trainings in which the enrollment deadline is greater than today. Using these techniques shows how easy it is to combine the power of REST data sources with formulas in InfoPath 2013 to create filters using absolutely no code.
Submit Behavior
Submitting forms in InfoPath is a powerful capability. Submitting provides the ability to control the behavior of the form and where the collected data ends up. Submitting an InfoPath form is different from saving it, and these two actions shouldn’t be confused. The most obvious difference is that you cannot submit a form that has validation errors, but that is not the case when you save the form. Another difference is that when you save an InfoPath form, the results are saved as XML in the form library. When you submit the form, not only do you have the option of saving the results as XML, but you also have plenty of other options, such as closing the form or running rules without writing any custom code. In many scenarios, the level of control you get out of the box for submitting your forms is what makes it a more appealing option than just saving the form.
If you go to the Data tab and select the Submit Options button, you will find several settings to define the submission behavior of the form. You can design your form to submit to a series of powerful connection points, such as the SharePoint form library, e-mail, a web service, a web server, a DCL connection, or even a hosting environment. Finally, if you want to satisfy complex submission requirements, you can write custom code by selecting the appropriate option, as shown in Figure 11-23.

Also, you can define your own Submit button. Simply add a regular button, and in the Control Properties tab, set its action to Submit, as shown in Figure 11-24. Alternatively, you can click the button and choose Submit Data from Add Rule in the Control Tools Properties contextual menu (see Figure 11-25). Both actions result in the same behavior for the button.


After Submit is enabled in a form and all the properties are set, a Submit button appears on the SharePoint Ribbon next to the Save and Save As options when the form is first opened, as shown in Figure 11-26.

Some of the buttons in the SharePoint Ribbon are customizable from within the form template (Form Options ⇒ Web Browser). For example, you can hide the Save button and leave Submit as the only option to persist the form’s data.
Form Programming
One of the most used classes is the Environment variable to determine if the form is displayed in the browser and if the form is displayed on a mobile platform. Using the Environment variable, you can implement a mobile-friendly form. Using the scenario for the chapter, you can build a mobile-friendly form using custom code that is in the form’s load event to detect whether the form is rendered in the a mobile browser, and then switch the default view to a lighter view accordingly.
The mobile view of a form starts with a new form called Mobile View and hiding any controls that would not be a good fit for mobile platforms. The controls that would not be a good fit are any that require a large amount of input, due to the difficultly of entering large amounts of text. Also, controls like the People Picker control that is just rendered as a text box in mobile web browsers without the search for a user capability. A good practice is to have a way to tell if the data were entered from a mobile browser, and you can do that by storing the value in a field to indicate that the form was submitted using a mobile browser.
To write custom code in your form and work with the InfoPath object model, the minimum requirements are:
- Microsoft .NET 4.0
- Microsoft Visual Studio 2012
- Microsoft Visual Studio Tools for Applications 2012
- Selection of the default programming language (C# or VB.NET) to use when writing the code for the form. This can be set on the Developer tab using the Language button. The programming language can be changed only before any code has been written for the form; so, for example, you cannot mix and match VB.NET and C# code in one form.
To begin implementing the mobile view, you need to create the mobile field. In the Fields task pane, click Add Field and define a field named IsMobileField of type True/False (Boolean). Next, create a new view in the registration form named Mobile View; the steps to create the view can be reviewed from earlier in the chapter. Simply copy and paste everything from the default view into the new view, and change the title to Mobile Training Registration. In the mobile view, delete the entire rows that contain Short Bio and Manager controls to make the form more compact. Next, you need to select the On Load Event from the Developer tab. This launches the code editor, and you will be ready to start developing in Microsoft Visual Studio, as shown in Figure 11-27.

Although it is entirely possible to write the code for the event handlers beforehand and wire them up manually later by changing the form definition file (.xsf), the approach recommended by Microsoft is to create the event handlers in design mode just as you did for the Form Load event. This way, InfoPath automatically creates the declarations of the event handlers in the code and makes the required modification to the form definition file that enables a form template to use those event handlers. The form definition file (.xsf) is covered in greater detail in the “Form Anatomy” section later in this chapter.
Adding Event Handlers
To detect the mobile browser and set the fields in InfoPath, complete the FormEvents_Loading event handler, as shown in Listing 11-1. The event handler uses the MainDataSource property of the XMLForm class to call the CreateNavigator method to return an instance of the XPathNavigator class. The returned object defines a random and read-only access cursor model over the form’s underlying XML data, which at this point is positioned at the root node.
Using the InfoPath object model, you can access and change almost everything in the form at run time. You just need to know how to get a reference to the element you want to change. This is made possible because the underlying data in InfoPath is all XML, so the XPathNavigator and XmlForm classes can be easily used for interacting with the form’s data. The XMLForm object is initialized in the form load, so you don’t need to use the this keyword in C# (or the Me keyword in Visual Basic) to access its members, such as MainDataSource or NamespaceManager.
Using the Environment Class Object
Next, the code uses the Environment object to determine which run-time environment and program was used to open the form. This class provides a property called IsMobile, which returns true if the form is viewed by a mobile browser.
Finally, the overloaded SelectSingleNode method is used to navigate to the IsMobielField field. Then, the code uses the SetValue method of the second XPathNavigator object to set the value of the field to true; otherwise, it is set to false. The SelectSingleNode method takes an XPath expression (string) and a resolver parameter for resolving namespace prefixes (via the NamespaceManager property of the XmlForm class). To determine the absolute XPath to the IsMobileField field in the SelectSingleNode method, right-click the field in the Fields task pane in InfoPath Designer, and from the context menu, click Copy XPath.
LISTING 11-1: Code for Setting the IsMobileField Value
        public void FormEvents_Loading(object sender, LoadingEventArgs e)
        {
            XPathNavigator rootNav = MainDataSource.CreateNavigator();
            if (Environment.IsMobile)
            {
                XPathNavigator mobileFieldNav =
                    rootNav.SelectSingleNode("/my:myFields/my:IsMobileField",
                    NamespaceManager);
                mobileFieldNav.SetValue("true");
            }
        }
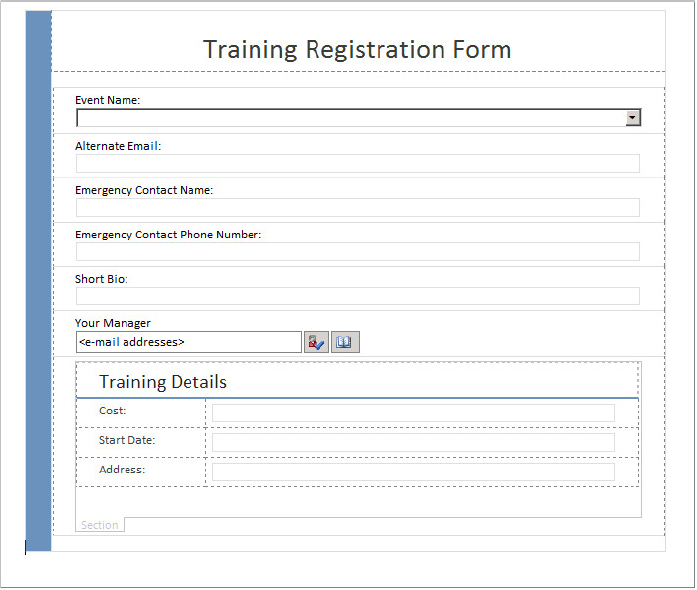
Another common programming task that you can use is to change data on the form when a field changes. To do this you need a new section on the Registration form that displays the training details such as cost, start date, and address. Only add this section and its contents to the default view, to keep the mobile view as light as possible. This section should appear only when an employee selects a training opportunity from the Event Name drop-down list box control; otherwise it remains hidden.
To implement this dynamic behavior, use the following steps. The registration form will look like Figure 11-28 with the changes applied:
To hide the form you can use the dynamic logic with the conditional rules. With formatting in InfoPath 2013, you can apply text formatting and background shading to controls, and disable or highlight controls based on user input or a condition. Use the following steps to add the conditional formatting to your forms.
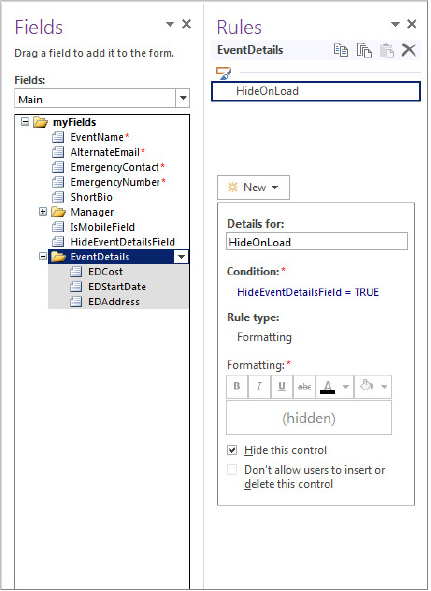
At this point, the formatting rule you just created, with the custom code to add to your form’s Load event in Listing 11-2, ensures that the Event Details section is hidden when the registration form loads in the default view.
LISTING 11-2: Code for Setting the HideEventDetailsField Value
        public void FormEvents_Loading(object sender, LoadingEventArgs e)
        {
            XPathNavigator rootNav = MainDataSource.CreateNavigator();
            if (Environment.IsMobile)
            {
// Code Omitted for brevity
            }
            else
            {
                XPathNavigator hideEventDetailsFieldNav =
                rootNav.SelectSingleNode("/my:myFields/
                my:HideEventDetailsField", NamespaceManager);
                hideEventDetailsFieldNav.SetValue("true");
            }
        }
With the Event Details section hidden at the form’s startup, now you need to add the necessary logic to show this section and populate its content when the Event Name drop-down list box changes. To create a new event handler for the drop-down list, first save the form and then right-click the EventName field. From the Context menu, select Programming ⇒ On After Change Event to launch Visual Studio if it is not already open.
InternalStartup() Function
As you can see in the following code snippet, the event binding code is placed in the InternalStartup() method of the FormCode.cs (or FormCode.vb) file in your form template project. The binding is done using the XmlChangedEventHandler delegate that represents the method that will handle the changed event of the EventName field.
         public void InternalStartup()
        {
            EventManager.FormEvents.Loading += new
            LoadingEventHandler(FormEvents_Loading);
            EventManager.XmlEvents["/my:myFields/my:EventName"].Changed += new
            XmlChangedEventHandler(EventName_Changed);
        }
The EventChanged event handler is auto-generated with no code in it. The code you write in this event handler uses the training class code the employee selects from the Event Name drop-down list box as a key to select the rest of the training details. After the matching training is found, your code populates the Event Details section with the rest of the details so that the employee can review the form before saving it, as shown in Listing 11-3.
LISTING 11-3: Code for EventName_Changed Event Handler
        public void EventName_Changed(object sender, XmlEventArgs e)
        {
            XPathNavigator rootNav = MainDataSource.CreateNavigator();
            XPathNavigator hideEventDetailsFieldNav =
                rootNav.SelectSingleNode("/my:myFields/my:HideEventDetailsField",
                NamespaceManager);
            hideEventDetailsFieldNav.SetValue("false");
            XPathNavigator eventNameNav =
                rootNav.SelectSingleNode("/my:myFields/my:EventName",
                NamespaceManager);
            XPathNavigator trainingsNav =
            DataSources["Trainings"].CreateNavigator();
            trainingsNav.MoveToRoot();
            XPathNodeIterator codeSelectionIterator =
                trainingsNav.Select("//*[local-name() = 'Code']");
            while (codeSelectionIterator.MoveNext())
            {
                if (codeSelectionIterator.Current.InnerXml.Equals(eventNameNav.
                    Value)
                    && !codeSelectionIterator.Current.InnerXml.Equals(""))
                {
                    XPathNavigator matchedTraining = codeSelectionIterator.Current;
                    matchedTraining.MoveToParent();
                    XmlDocument training = new XmlDocument();
                    training.LoadXml(matchedTraining.OuterXml);
                    XPathNavigator detailsNav = training.CreateNavigator();
                    XPathNavigator domNav = MainDataSource.CreateNavigator();

                    //Populate the Cost Field
                    XPathNavigator detailNav =
                        detailsNav.SelectSingleNode("//*[local-name() = 'Cost']");
                    XPathNavigator formNav =
                        domNav.SelectSingleNode("/my:myFields/my:EventDetails/
                        my:EDCost", NamespaceManager);
                    formNav.SetValue(detailNav.Value);

                    //Populate the Start Date Field
                    detailNav =
                        detailsNav.SelectSingleNode("//*[local-name() =
                        'StartDate']");
                    formNav =
                        domNav.SelectSingleNode("/my:myFields/my:EventDetails/
                        my:EDStartDate", NamespaceManager);
                    String eDate = detailNav.Value;
                    eDate = eDate.Substring(0, 10);
                    formNav.SetValue(eDate);

                    //Populate the Address Field
                    detailNav = detailsNav.SelectSingleNode("//*[local-name() =
                    'Address']");
                    formNav =
                        domNav.SelectSingleNode("/my:myFields/my:EventDetails/
                        my:EDAddress", NamespaceManager);
                    formNav.SetValue(detailNav.Value);
                    break;
                }
            }
        }
The first three lines of the code set the HideEventDetailsField field to false so that the formatting rule in the form kicks in and the Event Details section is toggled so that it is visible.
Navigating Elements in the Form
As discussed the data is XML, and using the built-in .NET classes for navigating through elements is critical. To create the navigation objects, notice the first bolded lines in Listing 11-3 where a reference to the secondary data source is constructed and an XPathNavigator object is created for accessing the data source. Next, the cursor is positioned at the root of the data source and an iterator (of type XPathNodeIterator) over all the Class Code nodes is returned. Because the returned XPathNodeIterator object is not pointing to the first node in the selected set of Class Code nodes, a call to the MoveNext method must be made to position the cursor on the first node in the selected set of nodes. This is done in the While expression.
The rest of the code is simply looping through the selected nodes and finding the one that matches the training class code selected by the user. When the control flows into the while loop, two conditions are checked in the beginning:
- The training class code in the current context node equals the training code selected by the user.
- The user has not selected a blank value from the Event Name control.
If both of these conditions are met, this means that a node in the data source with matching training code has been found. Notice the second bolded lines. The matching node is stored in the matchedTraining variable, and the corresponding XPathNavigator is moved to the parent node of the current Class Code node, which is the node that contains all the information about the training. The outXML of the parent node is stored in the training object of type XMLDocument, and a navigator (detailsNav object) is created for it. Another navigator (domNav object) is created to access the fields in the Event Details section of the form.
The rest of the code uses the elements to populate the information. The controls in the Event Details section are populated with information retrieved from the detailsNav navigator object.
Now, the additional information section and all its contents show up only if an employee selects a training opportunity; otherwise, they are hidden. In general, showing and hiding parts of your forms help you design organized forms in which only relevant information is shown to the users. Click the Preview button (from the Quick Access Toolbar) to test your form before publishing it. Typically, the Preview button is a powerful tool that can be used when designing InfoPath forms; use it as much as needed to verify forms before they are published.
Publishing InfoPath Forms
InfoPath is all about collecting, parsing, and validating data from multiple sources. The data that’s collected in a form needs to be persisted somewhere. In the design phase of your forms, it’s important to know where the form eventually ends up because determining the final destination of your form defines your form’s publishing model.
Again, just as with submitting a form versus saving it, publishing and saving a form template are not identical processes. Saving a form template is just saving it so that it can be reopened for further changes. However, publishing a form template refers to a process that prepares the form for distribution. If you do not publish a form template, you haven’t distributed it properly, and users cannot fill it out. Unlike list forms, form templates created by InfoPath Designer can be published to a variety of destinations. You can publish them to a SharePoint Server, a list of e-mail recipients, a network location, or a shared folder on a computer, as listed in the Publish tab in the File tab menu.
Although SharePoint 2013 makes it easy to change the out-of-the-box SharePoint list forms to custom InfoPath forms, the traditional approach of publishing to form libraries is still available for many scenarios. This can be a good option when you need to abstract complex logic in your form by using custom code. As discussed previously, the SharePoint list forms do not support custom code.
Publishing to a Form Library
To publish your form to a form library, open InfoPath to the File menu tab, and click Publish. Then click the SharePoint Server button to launch the Publishing Wizard. The wizard is similar to InfoPath 2010. First, you choose the location of the SharePoint site. Next, you select Enable This Form to Be Filled Out by Using a Browser, and choose the Form Library option, as shown in Figure 11-30.

In the next wizard, specify that the form template should be updated in an existing form library, and from the available libraries choose a SharePoint form library on your site. Click Next to proceed to the next step.
The next step of the wizard offers two important options:
- Property Promotion — This option enables you to set specific fields in your form to be visible as columns in the SharePoint library, which can be used in SharePoint as meta data or workflow variables.
- Web Part Connection Parameter Promotion — InfoPath 2010 introduced forms that can participate in the web part connections. Unlike SharePoint list forms in which every field is, by default, available to participate in a web part connection scenario, when you publish a form to a SharePoint form library, you need to take explicit actions to determine what fields are available to be used in a web part connection. You also need to specify whether a promoted field is used as a subscriber (Input), publisher (Output), or subscriber/publisher (Input/Output) parameter. Obviously, subscriber parameters can receive data only from other web parts but cannot send data. Publisher parameters can send data to other web parts but cannot receive data.
Both of these options are also available in the Property Promotion category in the Advanced form options dialog in the File menu tab.
Although it’s entirely possible to promote all the fields inside an InfoPath form and make them available as columns, in forms with complex schemas, this technique may not be efficient. Again, remember that one reason to use a form library is to hide the schema and encapsulate everything in the form itself. The last step in the wizard presents a summary of some of the information collected throughout the Publishing Wizard.
Unlike with list forms, when a form is published to a form library, it cannot be accessed using Form Options on the library settings page or from the Customize Form in SharePoint Ribbon. Instead, it is configured in the Document Template section of the Advanced Settings option in the library settings page. Click the link that says Edit Template, and this launches InfoPath Designer 2013 and downloads the form template for further changes.
With the form successfully published to the InfoPath forms library, you can now open the form in your web browser of choice. Navigate to the SharePoint form library, click Documents on the Library Tools contextual menu, and click the New Document button. Figure 11-31 shows the selected form opened and filled out in Internet Explorer.

When you complete filling out the form, press the Save button, and give the form a proper name to save it in the InfoPath forms library. Notice that the Event Details section is not visible when the form loads up or in editing mode, which is exactly what you coded before.
Publishing to a Content Type
When publishing a form template to SharePoint, you have another option, which is publishing to a content type. Binding a form template to a content type allows the template to be reused in other form libraries.
During the Publishing Wizard when you promote fields, always make sure that mappings between the promoted fields and the site columns are exactly what you expect them to be. Otherwise, you may end up causing duplicate site columns and making the previously published site columns orphaned. In the Publishing Wizard, select each field name, and click Modify to see the mapping with the site column. Typically, the first time you publish the form template to a server, you expect fields to be promoted to new site columns labeled with None: Create New Site Column. However, in subsequent republishing processes, you want to map to an existing site column (This Content Type) rather than creating another new column.
If you continue to publish to the same server, the association is remembered in the form’s schema, and you don’t need to take any further action. When you publish a form template to multiple servers and then you come back, make some changes to the form template, and republish it again to the first server. In this case, your promoted site columns are re-created multiple times under the Microsoft InfoPath site column group with the same name but different IDs. Remember, always check the mappings before pressing the Publish button in the last step of Publishing Wizard.
Form Security
The last page of the Publishing Wizard provides the ability to manage the security level of the form. Each form template created in InfoPath 2013 should have one of the available three security levels:
- Restricted
- Domain
- Full Trust
By default, InfoPath Designer 2013 adjusts the security level of your form according to the functionalities included in the form template, and that is the recommended option, as shown in Figure 11-32. When you start, all new blank form templates come with the Restricted security level, meaning that the form can access content only inside the form. As you complete the form and add functionality, such as querying SharePoint lists, scripts, or HTTP submit, the security level of the form will be automatically raised to Domain. The Domain security level is the maximum trust level that can be set automatically by InfoPath Designer 2013. This security model allows access outside of the form, but only within the domain in which the form template physically resides. Keep in mind that InfoPath Designer 2010 added the ability to create forms that run inside sandboxed solutions that are tied to the form templates with the Domain security model. Sandboxing forms are covered in the next section.

If you need to do things that the Domain security level doesn’t allow (for example, deploying certificate-signed form templates), then you need to manually set the security level to Full Trust. Note that the Full Trust security level requires your form to be administrator approved. This means that the form template must first be reviewed and approved by the farm’s administrator and then deployed through the Central Administration site.
Sandboxing Your Forms
Like rules and formulas, writing custom code enables form developers to greatly enhance the functionality of their forms with managed assemblies that become part of the form template.
Sandboxed solutions introduced with SharePoint 2010 allow form developers to create their forms with managed code and directly publish them to a form library while the security level of the form is still set to Domain. This greatly increases the number of options for creating forms and allows more users to safely create power forms.
A unique characteristic of sandboxed solutions is that they run in partially trusted mode. So, using them doesn’t conflict with the Domain security model of the form. This means that the form can be deployed using the site collection administrator privilege and right from within the InfoPath Designer, instead of through the Central Administration site.
The sandboxing infrastructure comes from the core platform and is widely used to limit the security vulnerabilities of the farm, while giving developers easy deployment of their code to any site collection. After a form with custom code is published to a SharePoint form library, it ends up in the site collection’s User Solution gallery and is activated by default.
Form Anatomy
The result of saving an InfoPath form template is a file with an .xsn extension. An XSN file is a kind of compressed CAB (cabinet) file that contains other XML files. If you change the extension to .CAB and double-click the file, it opens the form template as an archive file. Alternatively, you can select Export Source Files from the Publishing tab on the File tab menu to export the source files of the form template. Figure 11-33 shows the exported files of a form template.

The form definition file (manifest.xsf) contains a listing of all other files that make up the template, as well as other information, including views used in the form, external data sources, and error messages. If you open this file in a text editor such as Notepad and scan it, you soon realize why this file is considered the heart of the form template.
Scroll through the XML code until you locate the xsf:extensions element. This element is used to specify properties and features of the form templates such as managed code form template project settings for Visual Studio, settings for the views included in the form, and whether the form should be browser-compatible. If the form includes any property promotion or if the form is published to a content type, then relevant child elements appear in the xsf:extensions element to instruct SharePoint how to perform the bindings.
As you complete your form design, you should examine the content of the manifest.xsf often to become familiar with the different parts of the form template and the underlying hooks to the form library.
Toward the end of the manifest.xsf file content, there is an xsf:dataObjects element used to define all the secondary data sources in the form. This element contains a collection of xsf:dataObject child elements.
Notice the bolded section in the following code snippet. Within the parent collection, each xsf:dataObject element is an in-memory representation (XML document object model) of the associated external data source. The XML Document Object Model (DOM) programming interface enables form developers to traverse the secondary data source’s tree-like structure and manipulate its nodes. The association between the xsf:dataObject element and the secondary data source is created via the xsf:dataObject element. In this particular example, a SharePoint adaptor that points directly to the Trainings list is used to query for data. The xsf:dataObject element also has a schema attribute that references the schema file used for the data object. The schema file is also part of the form template (refer to Figure 11-33).
<xsf:dataObjects>
<xsf:dataObject name="Trainings" schema="Trainings.xsd" initOnLoad="yes">
<xsf:query>
<xsf:sharepointListAdapterRW queryAllowed="yes" submitAllowed="no"
  siteURL="https://devcow.sharepoint.com/sites/chapter11/"
  sharePointListID="{CC157A05-5592-41F4-A448-DA002F54405D}" name="Trainings"
  contentTypeID="" sortBy="ID" sortAscending="yes" relativeListUrl="Lists/
  Training/">
<xsf:field internalName="Title" required="yes" type="Text"></xsf:field>
<xsf:field internalName="code" required="no" type="Text"></xsf:field>
<xsf:field internalName="Description" required="no" type="Text"></xsf:field>
<xsf:field internalName="start" required="no" type="DateTime"></xsf:field>
<xsf:field internalName="end" required="no" type="DateTime"></xsf:field>
<xsf:field internalName="Cost" required="no" type="Currency"></xsf:field>
<xsf:field internalName="Level" required="no" type="Number"></xsf:field>
<xsf:field internalName="deadline" required="no" type="DateTime"></xsf:field>
<xsf:field internalName="Address" required="no" type="FullHTML"></xsf:field>
<xsf:field internalName="info" required="no" type="FullHTML"></xsf:field>
<xsf:field internalName="ID" required="no" type="Counter"></xsf:field>
</xsf:sharepointListAdapterRW>
</xsf:query>
</xsf:dataObject>
In addition to the schema files created for each secondary data source, the form template maintains a schema for the main XML data that it recognizes in a file named myschema.xsd. Listing 11-4 shows the schema file for the Registration Form template.
LISTING 11-4: Training Registration Form Schema
<?xml version="1.0" encoding="UTF-8" standalone="no"?>
<xsd:schema targetNamespace="http://schemas.microsoft.com/office/infopath/2003/
  myXSD/2012-09-20T03:11:21" xmlns:xsi="http://www.w3.org/2001/XMLSchema-instance"
  xmlns:pc="http://schemas.microsoft.com/office/infopath/2007/PartnerControls"
  xmlns:ma="http://schemas.microsoft.com/office/2009/metadata/properties/
  metaAttributes"
  xmlns:d="http://schemas.microsoft.com/office/infopath/2009/WSSList/dataFields"
  xmlns:q="http://schemas.microsoft.com/office/infopath/2009/WSSList/queryFields"
  xmlns:dfs="http://schemas.microsoft.com/office/infopath/2003/dataFormSolution"
  xmlns:dms="http://schemas.microsoft.com/office/2009/documentManagement/types"
  xmlns:xhtml="http://www.w3.org/1999/xhtml"
  xmlns:ns1="http://schemas.microsoft.com/ado/2007/08/dataservices"
  xmlns:m="http://schemas.microsoft.com/ado/2007/08/dataservices/metadata"
  xmlns:ns2="http://www.w3.org/2005/Atom"
   xmlns:my="http://schemas.microsoft.com/office/infopath/2003/myXSD/
 2012-09-20T03:11:21" xmlns:xd="http://schemas.microsoft.com/office/infopath/2003"
 xmlns:xsd="http://www.w3.org/2001/XMLSchema">
<xsd:import schemaLocation="BuiltInActiveXControls.xsd"
  namespace="http://schemas.microsoft.com/office/infopath/2007/PartnerControls"/>
<xsd:element name="myFields">
<xsd:complexType>
<xsd:sequence>
<xsd:element ref="my:EventName" minOccurs="0"/>
<xsd:element ref="my:AlternateEmail" minOccurs="0"/>
<xsd:element ref="my:EmergencyContact" minOccurs="0"/>
<xsd:element ref="my:EmergencyNumber" minOccurs="0"/>
<xsd:element ref="my:ShortBio" minOccurs="0"/>
<xsd:element ref="my:Manager" minOccurs="0"/>
<xsd:element ref="my:IsMobileField" minOccurs="0"/>
<xsd:element ref="my:HideEventDetailsField" minOccurs="0"/>
<xsd:element ref="my:EventDetails" minOccurs="0"/>
</xsd:sequence>
<xsd:anyAttribute processContents="lax"
  namespace="http://www.w3.org/XML/1998/namespace"/>
</xsd:complexType>
</xsd:element>
<xsd:element name="EventName" type="my:requiredString"/>
<xsd:element name="AlternateEmail" type="my:requiredString"/>
<xsd:element name="EmergencyContact" type="my:requiredString"/>
<xsd:element name="EmergencyNumber" type="my:requiredString"/>
<xsd:element name="ShortBio" type="xsd:string"/>
<xsd:element name="Manager">
<xsd:complexType>
<xsd:sequence>
<xsd:element ref="pc:Person" minOccurs="0" maxOccurs="unbounded"/>
</xsd:sequence>
</xsd:complexType>
</xsd:element>
<xsd:element name="IsMobileField" nillable="true" type="xsd:boolean"/>
<xsd:element name="HideEventDetailsField" nillable="true" type="xsd:boolean"/>
<xsd:element name="EventDetails">
<xsd:complexType>
<xsd:sequence>
<xsd:element ref="my:EDCost" minOccurs="0"/>
<xsd:element ref="my:EDStartDate" minOccurs="0"/>
<xsd:element ref="my:EDAddress" minOccurs="0"/>
</xsd:sequence>
</xsd:complexType>
</xsd:element>
<xsd:element name="EDCost" type="xsd:string"/>
<xsd:element name="EDStartDate" type="xsd:string"/>
<xsd:element name="EDAddress" type="xsd:string"/>
<xsd:simpleType name="requiredString">
<xsd:restriction base="xsd:string">
<xsd:minLength value="1"/>
</xsd:restriction>
</xsd:simpleType>
<xsd:simpleType name="requiredAnyURI">
<xsd:restriction base="xsd:anyURI">
<xsd:minLength value="1"/>
</xsd:restriction>
</xsd:simpleType>
<xsd:simpleType name="requiredBase64Binary">
<xsd:restriction base="xsd:base64Binary">
<xsd:minLength value="1"/>
</xsd:restriction>
</xsd:simpleType>
</xsd:schema>
The schema file contains a set of predefined types such as boolean and string, as well as new complexType and simpleType based on the data source. In addition to the type declarations, the schema imposes some constraints on the structure and content of the form’s data. For example, the my:requiredString type means the element cannot be blank, and the xsd:sequence element defines a specified sequence within the containing element, such as the myFields element.
Notice the first bolded line in Listing 11-4. This line identifies the http://schemas.microsoft.com/office/infopath/2007/PartnerControls namespace and schema components (inside the BuiltInActiveXControls.xsd file) referenced in the myschema.xsd file. This is because of the Manager People Picker control you placed on the form.
Also, notice the myFields bolded section in Listing 11-4, which appears to be the first element in the myschema.xsd file. This element references other elements that each represent a control in the form template.
The next fields to analyze in Figure 11-33 are the view<name>.xsl files. These XSL-based files are the views that you created in the form template. Most of the formatting rules or form-level filters you apply to data end up as XSL code and are placed in the respective view file.
Three more files in Figure 11-33 warrant some attention.
First, The <formname>.dll file is the generated assembly for the code you added to EventName_Changed and FormEvents_Loading event handlers in the Form Programming section. Second, the template.xml file contains the actual XML data that is edited by InfoPath. By default, when debugging or previewing a form template, the data in the template.xml file is used. Optionally, you can create your own data file and instruct InfoPath Designer 2013 to use it when previewing the form in InfoPath Designer 2013. The third file is sampledata.xml. This file specified the default values of the fields when the form opens in the client or browser application. This file is not used for previewing or debugging purposes, as the template.xml file is. In this file, you can find only the field definitions, type, and option to supply a default value and the actual value.
Working with the Form XML in Code
The XML data stored in the form library conforms to the form’s schema (myschema.xsd), so you can write or generate code that conforms to this schema to load the XML and interact with it. Recall from an earlier discussion that one of the primary reasons for using a form library is to easily access all the data stored within the InfoPath form without promoting any fields.
Generating Wrapper Classes for Form XML
One tool that can help generate the class files from XML is called XSD.exe. You can use the XSD.exe utility to generate a wrapper class that represents the data elements. This generated class enables you to access the form’s data using a strongly typed object instead of parsing the XML data by using XPath (like all the other samples so far). To perform the steps to generate the class file, navigate to the location of the extracted form’s exported files (see the previous section) and run the following command using the Visual Studio Native Tools command prompt:
Xsd.exe /c myschema.xsd BuiltInActiveXControls.xsd
The XSD.exe utility is not following the imports and/or includes in the myschema.xsd file, so you need to specify the BuiltInActiveXControls.xsd schema file directly on the command line, too. Otherwise, the utility throws a missing element exception. The generated file is named after the schema files used in the command line, myschema_BuiltInActiveXControls.cs. Change the filename to RegistrationsSchema.cs instead. Note that the generated partial classes in this file are given the same name as the root elements, as shown in Listing 11-5.
LISTING 11-5: Partial myFields Class
using System.Xml.Serialization;

public partial class myFields {
    private string eventNameField;
    private string alternateEmailField;
    private string emergencyContactField;
    private string emergencyNumberField;
    private string shortBioField;
    private Person[] managerField;
    private System.Nullable<bool> isMobileFieldField;
    private bool isMobileFieldFieldSpecified;
    private System.Nullable<bool> hideEventDetailsFieldField;
    private bool hideEventDetailsFieldFieldSpecified;
    private EventDetails eventDetailsField;
    private System.Xml.XmlAttribute[] anyAttrField;

    /// <remarks/>
    public string EventName {
        get {
            return this.eventNameField;
        }
        set {
            this.eventNameField = value;
        }
    }

    /// <remarks/>
    public string AlternateEmail {
        get {
            return this.alternateEmailField;
        }
        set {
            this.alternateEmailField = value;
        }
    }

    /// <remarks/>
    public string EmergencyContact {
        get {
            return this.emergencyContactField;
        }
        set {
            this.emergencyContactField = value;
        }
    }

    /// <remarks/>
    public string EmergencyNumber {
        get {
            return this.emergencyNumberField;
        }
        set {
            this.emergencyNumberField = value;
        }
    }

    /// <remarks/>
    public string ShortBio {
        get {
            return this.shortBioField;
        }
        set {
            this.shortBioField = value;
        }
    }

    /// <remarks/>
    [System.Xml.Serialization.XmlArrayItemAttribute("Person",
    Namespace="http://schemas.microsoft.com/office/infopath/2007/PartnerControls",
    IsNullable=false)]
    public Person[] Manager {
        get {
            return this.managerField;
        }
        set {
            this.managerField = value;
        }
    }

    /// <remarks/>
    [System.Xml.Serialization.XmlElementAttribute(IsNullable=true)]
    public System.Nullable<bool> IsMobileField {
        get {
            return this.isMobileFieldField;
        }
        set {
            this.isMobileFieldField = value;
        }
    }

    /// <remarks/>
    [System.Xml.Serialization.XmlIgnoreAttribute()]
    public bool IsMobileFieldSpecified {
        get {
            return this.isMobileFieldFieldSpecified;
        }
        set {
            this.isMobileFieldFieldSpecified = value;
        }
    }

    /// <remarks/>
    [System.Xml.Serialization.XmlElementAttribute(IsNullable=true)]
    public System.Nullable<bool> HideEventDetailsField {
        get {
            return this.hideEventDetailsFieldField;
        }
        set {
            this.hideEventDetailsFieldField = value;
        }
    }

    /// <remarks/>
    [System.Xml.Serialization.XmlIgnoreAttribute()]
    public bool HideEventDetailsFieldSpecified {
        get {
            return this.hideEventDetailsFieldFieldSpecified;
        }
        set {
            this.hideEventDetailsFieldFieldSpecified = value;
        }
    }

    /// <remarks/>
    public EventDetails EventDetails {
        get {
            return this.eventDetailsField;
        }
        set {
            this.eventDetailsField = value;
        }
    }

    /// <remarks/>
    [System.Xml.Serialization.XmlAnyAttributeAttribute()]
    public System.Xml.XmlAttribute[] AnyAttr {
        get {
            return this.anyAttrField;
        }
        set {
            this.anyAttrField = value;
        }
    }
}

//Code Omitted For Brevity
With the wrapper class generated by the XSD.exe tool, you can add the file to any Visual Studio project and access the objects through class references. To use the file in a SharePoint project, start Visual Studio 2013 and create a new project using the SharePoint 2013 project template.
Working with Form XML Data in SharePoint Code
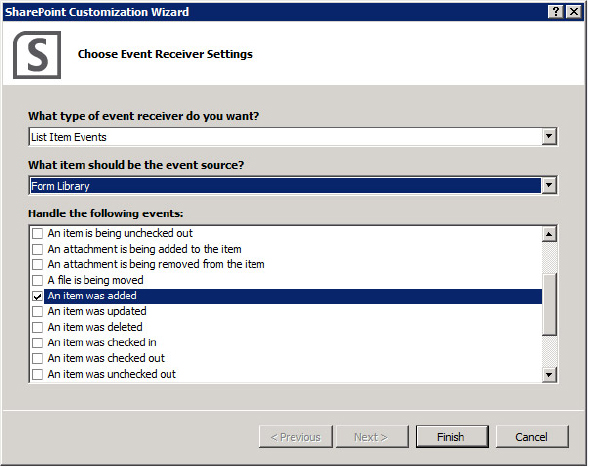
Next, choose Deploy as a farm solution, and click the Finish button. The SharePoint 2013 project needs the event receiver added to the project by adding a new item. Click Add Item and select event receiver in the template gallery; give the event receiver a name. In this example, your code should be able to respond to “An item was added” event of type List Item Events for a Form Library, as shown in Figure 11-34.
After you finish the wizard, Visual Studio stubs out all the necessary code and the Feature and Solution package necessary to deploy this event handler as a farm WSP solution. At this point, you can add to your project the wrapper class (RegistrationsSchema.cs) that the XSD.exe utility generated.
When the package is deployed and the associated feature is activated, the callout code in Listing 11-6 is used to access and increment the counter value in the Stats list for a particular training. Next, rename EventReceiver1.cs to UpdateStatSink.cs, and add the callout code within the class to override the ItemAdded method.
In the code, notice the first bolded section. In this section, the InfoPath form that was just added is retrieved and stored in a variable of type SPFile. Next, InfoPath’s XML file is deserialized into a strongly typed C# object of type myFields. This is done via a call into a helper method called DeserializeFormData (SPFile, Type), which is covered a bit later in this section. If the returned object is not null, a LINQ query is used to see if the selected training code exists in the Stats list.
The second bolded section indicates if the Count function returns a number greater than zero, meaning the matching training code is found in the Stats list. Then, the code continues with incrementing its Counter field by one. This is all done through a call to a second helper method named IncrementCounter (SPListItem). On the opposite, if the matching training code is not found, a new list item is added to the Stats list, and the Code and Counter columns are set accordingly.
LISTING 11-6: UpdateStats Event Receiver ItemAdded Method
        public override void ItemAdded(SPItemEventProperties properties)
        {
            SPFile ifpFile = properties.ListItem.File;
            myFields fields =
(myFields)DeserializeFormData(ifpFile, typeof(myFields));
            if (fields != null)
            {

                SPLinqDataContext cdc =
new SPLinqDataContext("http://dev.devcow.com/sites/hr");


                var result = from trs in cdc.Stats
                             where trs.Title.Equals(fields.EventName)
                             select new { trs.Id };

                SPList statList = properties.Web.Lists["Stats"];
                if (result.Count() > 0)
                {
                    SPListItem matched =
                    statList.GetItemById((int)result.First().Id);
                    IncrementCoutner(matched);
                }
                else
                {
                    SPListItem newItem = statList.Items.Add();
                    newItem["Title"] = fields.EventName;
                    newItem["Counter"] = 1;
                    newItem.Update();
                }

            }

        }
Listing 11-7 demonstrates the DeserializeFormData() helper method called from the ItemAdded method, which demonstrates how to change the InfoPath XML data into the strongly typed classes. This method starts with receiving two parameters of type SPFile and Type. In the code, the SPFile parameter is opened in binary format, and the actual content is stored in a byte array, which is read into a memory stream a bit later.
Notice the highlighted lines in the code. First, a new instance of the XMLSerializer class is initialized, and an object of type rootElementType is serialized into it. The rootElementType parameter is of type myFields because that is what was passed in from the ItemAdded code. In the next line, a new XmlReader instance is created using the memory stream and, in the line after, it is deserialized into the result variable. Finally, the result variable is returned to the caller, which contains the actual content of the form data in a strongly typed object.
LISTING 11-7: DeserializeFromData Helper Method
        private object DeserializeFormData(SPFile ipfFile, Type rootElementType)
        {
            byte[] xmlFormData = ipfFile.OpenBinary();
            object result = null;
            if (xmlFormData != null)
            {
                using (MemoryStream fileStream = new MemoryStream(xmlFormData))
                {
                    XmlSerializer serializer = new XmlSerializer(rootElementType);
                    XmlReader reader = XmlReader.Create(fileStream);
                    result = serializer.Deserialize(reader);
                    fileStream.Close();
                }
            }

            return result;
        }
Listing 11-8 demonstrates the second helper method used in the ItemAdded method. The only thing that needs to be highlighted about this method is the extra logic that is written to handle the race condition when multiple instances of the event handler try to update the Counter column in the Stats list. This condition can occur when two or more registration forms are saved at the same time by different users.
The SharePoint object model automatically locks the list item when retrieving and incrementing the Count field’s value, so all you need to do is to place your code in a try/catch block. If the race condition occurs, the SharePoint object model throws an exception, meaning the existing counter value is dirty. If the value is considered dirty, the code has logic to make three attempts to retrieve and increment the value again. If all three attempts fail, the exception will be logged, and the update won’t happen.
LISTING 11-8: IncrementCounter Help Method
        private void IncrementCoutner(SPListItem item)
        {
            int retryUpdate = 0;

        doUpdate:
            try
            {
                int currentCounter = int.Parse(item["Counter"].ToString());
                item["Counter"] = currentCounter + 1;
                item.Update();
            }
            catch (Exception ex)
            {
                retryUpdate += 1;
                if (retryUpdate <= 3)
                {
                    System.Threading.Thread.Sleep(3000);
                    goto doUpdate;
                }
                else
                {
                    // Log the exception
                }
            }
        }
The last step to getting your event handler to work is to update the Class node in the Elements.xml to include the changes you have just made to the project. Listing 11-9 shows the Elements.xml file of the feature that has been added to the project by Visual Studio 2012. This file identifies the assembly’s fully qualified name, class (UpdateStatSink), and ItemAdded method to implement in the event handler.
In this example, the event handler is associated with all the form libraries of the site as specified by the ListTemplateID attribute in the bold line. In general this not an ideal situation; instead, the event handler should be associated with a content type or a particular custom form library so that it is not kicked off on every form library in the site.
LISTING 11-9: Elements.xml file
<?xml version="1.0" encoding="utf-8"?>
<Elements xmlns="http://schemas.microsoft.com/sharepoint/">
  <Receivers ListTemplateId="115">
    <Receiver>
      <Name>UpdateStatERItemAdded</Name>
      <Type>ItemAdded</Type>
      <Assembly>$SharePoint.Project.AssemblyFullName$</Assembly>
      <Class>UpdateStatsEventHandler.UpdateStatER</Class>
      <SequenceNumber>10000</SequenceNumber>
    </Receiver>
  </Receivers>
</Elements>
To deploy and debug the solution, press F5, and Visual Studio deploys the WSP package as a farm solution and activates the features. Visual Studio also associates the event handler with all the form libraries on the site. Navigate to the Central Administration site under Solution Management, and verify that the solution has been successfully deployed, as shown in Figure 11-35.
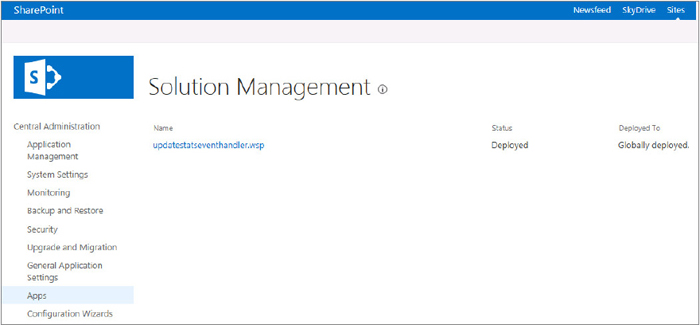
Try the code by browsing to the form library and creating a new form, such as the Registration form. You should now have a fully functional solution so that when forms are saved to the Registration form library, the even handler is kicked off to update the related counter in the Stats list.
TOOLS FOR FORM DEVELOPERS
As you have seen so far, InfoPath 2013, along with Form Services 2013, provides a highly extensible platform on which you can build electronic forms that play an important role in various business processes across your organization. You can use a number of tools and utilities to make form development easier. Now have a quick look at a few of the tools that you can leverage when working with InfoPath forms.
The Rule Inspector
When adding declarative business logic (dynamic logic) or even custom code (imperative logic) to your form, it is often challenging to keep track of all fields and groups that invoke this logic or how this logic may affect other fields, groups, or logic in the form template.
To address this challenge, InfoPath Designer 2013 includes a tool called the Rule Inspector. When you access this tool, you initially see either the Overview pane alone or both the Overview pane and the Details pane, depending on how the tool is accessed, as shown in Figure 11-36.
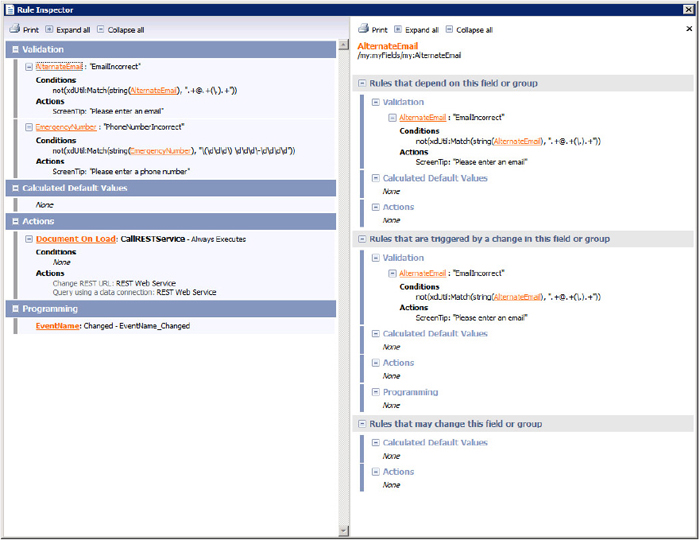
The Overview pane on the left lists all the business logic currently used in the form template, grouped into four categories: Validation, Calculated Default Values, Actions, and Programming. This grouping enables you to easily see what fields or groups contain the business logic, the type of the logic, and some information about each rule. If you click any orange links in the Overview pane, the Details pane expands with more specific information, mostly about the dependencies on other fields, groups, or rules in the form. Although the imperative logic in the Programming group is not disassembled, it is still helpful to know what is going on in the code behind in a high-level view without having to launch Visual Studio.
For many form developers, when troubleshooting or reviewing an InfoPath form, the Rule Inspector is a helpful tool, and the first place they go after they open the form in Design mode.
The Design Checker
In InfoPath 2013, one of the driving forces behind browser-enabled forms is to have parity with the InfoPath client and parity with forms online in SharePoint. A good practice to verify that the forms are valid is to run the Design Checker to identify incompatibility issues and ensure that your form template works correctly. This tool can be found in the File tab on the Info page. The text in the middle indicates that the form template is currently compatible with Forms Services as a web browser form.
With the compatibility settings applied, you can click the Design Checker button on the Info page of the File tab to bring up the Design Checker task pane. At that point all local and online checks are performed, and potential errors or warnings are revealed in the Task pane, as shown in Figure 11-37.

Typically, errors prevent the form template from being published as a browser-enabled form. However, warnings can be discarded, which may result in a nonworking, browser-enabled form. Simply go through the list of issues, review them, and take appropriate actions to resolve them.
InfoPath JavaScript Tool
In addition to the tools discussed so far, there are tools that can be executed right from within Internet Explorer when the form first loads:
- IP_DebugComplexity.ComposeSummary()
As the name implies, the first tool provides a summary of the following counters in the browser-enabled forms:
- View Data Tree Node
- Include Hidden Controls
- HTML InfoPath Controls
- HTML Elements
As shown in Figure 11-38, to run this tool, you should type the following JavaScript code into the address bar of the browser, and press Enter:
javascript:alert(IP_DebugComplexity.ComposeSummary())

The Compose Summary tool doesn’t fix anything in the form, nor does it give you guidelines on how to fix the issues. It just provides some facts that can be used to reduce the form’s complexity. The total number of HTML elements that a form produces is an important factor in measuring the form’s complexity.
SUMMARY
This chapter introduced to you new ways to work with InfoPath Designer and SharePoint. You were introduced to building rich business applications that can be built with SharePoint lists. You can use the tools learned in this chapter to make small changes to a single list or build an entire application that requires rich forms to present and collect data.
The topics covered in the chapter were customizing SharePoint list forms with InfoPath Designer using the Customize Form button from SharePoint. You learned how to add views, rules, actions, and formatting to the form to make a powerful form with little-to-no coding. Then you took the form a step further and learned how to integrate complex logic using Visual Studio and managed code to the form. Knowing that you have full control of the form in managed code provides the power to build any solution. The code from the chapter showed how to navigate the XML that is the data structure of the InfoPath form and data.
Finally, you looked at what makes the InfoPath form and all the files created when building a form. Then you looked at ways to consume the InfoPath form in other applications such as SharePoint. The code used tools to help build the auto-generated code and files for using strongly typed classes, and you looked at tools that you can use to review your form when publishing it to a SharePoint location. All these tools together can help you build the applications of your organization.