Chapter 6
Getting Started with Developing Apps in SharePoint 2013
WHAT’S IN THIS CHAPTER?
- Comparing apps to solution-based development
- Learning how app development leverages external hosting platforms
- Building your first app, hosted in Azure
WROX.COM CODE DOWNLOADS FOR THIS CHAPTER
The wrox.com code downloads for this chapter are found at www.wrox.com/remtitle.cgi?isbn=1118495829 on the Download Code tab. The code is in the chapter 06 download and individually named according to names throughout the chapter.
ARCHITECTURAL OVERVIEW OF SHAREPOINT APPS
Chapter 5, “Introducing Windows Azure and SharePoint 2013 Integration,” introduces the benefits of cloud computing. Chief among these benefits is the ability to separate portions of responsibility to different services or providers. This decoupled approach is as familiar to anyone used to a services-based approach to application development as it is to infrastructure architects who leverage a mix of hosted and on-premise servers. Microsoft Office 2013 and SharePoint 2013 leverage the capabilities of the cloud within the new app experience.
An app is a self-contained functional application, complete with user experience, data storage, and business logic. Anyone familiar with modern mobile devices is familiar with the concept of an app. Apps for Office and SharePoint combine the power of enterprise software with the flexibility of the Web. Apps are specifically targeted to solve specific business scenarios, and due to their self-contained architecture are easy to manage. The portability of apps is such that an app for Office 365 works in an on-premise installation and that apps developed for SharePoint may even work as apps for Office. The rest of this chapter and Chapter 7, “Further Developing Apps in SharePoint 2013,” focus on SharePoint apps; the development story for Office apps is introduced in later chapters.
SharePoint 2013 adopts this decoupling approach with the new app model known as app isolation, a clear separation of core portal functionality and extensions to that functionality plugged into the SharePoint user interface while being hosted on alternative infrastructures. By adopting this new app model, SharePoint is a big winner in a number of ways:
- Apps are self-contained and independent of SharePoint server deployments. This means that any SharePoint environment can install and host an app without worrying about farm deployments or administrator approvals.
- Apps reduce platform risks, freeing the platform from worrying about app-based customizations during service packs and updates. Because the app is effectively an external web application running in an iFrame, SharePoint doesn’t need to worry about putting customizations at risk when an approved Microsoft service release makes changes to the server.
- Apps are deployed by default to isolated subsites within a specialized domain. This domain isolation leverages modern web browser technologies to prevent cross-site scripting attacks, whereas the external hosting model prevents unauthorized or incorrectly written code from executing on the SharePoint server.
- Apps are designed to support multitenant installations. The site administration-controlled approach to installing and managing functionality eliminates unintentional farm-level customizations, allowing numerous distinct tenants to occupy the same farm.
- Apps lower the bar for developers by supporting any web technology that can emit HTML, CSS, and JavaScript. This includes any flavor of ASP.Net, Java, Ruby, PHP, CoffeeScript, TypeScript, and more.
Programming Model Overview
An app for SharePoint is any focused, secure solution that connects to the SharePoint server via client-side APIs, either CSOM or REST. The app is either entirely client-side code embedded in a SharePoint page or a wholly contained application that resides on independent hardware and authenticates to the portal through the OAuth 2.0 protocol in a manner familiar to users of Facebook applications. Apps that connect to an instance of SharePoint are managed by that instance’s App Management Service. The App Management Service is designed to centrally manage, secure, and license apps.
Most apps for SharePoint 2013 will be developed as web applications; although, an application for a desktop or mobile device such as an iPad also qualifies. Because the interconnection to SharePoint is managed with an OData-compliant REST interface, remote .NET client APIs, and OAuth security protocols, an app can be developed in any language with any development tool. Furthermore, this standards-compliant REST interface enables the development of apps that expose interfaces in varied and diverse environments such as iOS apps. To learn more about the OData standard, refer to the OData site at http://www.odata.org. As stated in Chapter 2, “What’s New in SharePoint 2013,” the promise of having both OData (as the protocol and enabler) and REST (as the design pattern) is to make SharePoint Data accessible to almost any other platform and any type of device via URL and standard HTTP verbs.
Microsoft has included a number of enhancements in Visual Studio 2012 that specifically target the SharePoint app development experience. For Office 365 apps, a web-based development environment called the Napa Office 365 Development Tools is available free of charge.
Comparing Apps and Solutions
An app is a standalone application, with all that it entails. Because it stands alone, the infrastructure, management, and upgrades for apps happen outside of SharePoint. Although the hosting options for apps will be examined more closely in the next section, you must understand that an app that requires server-side code must be installed on its own web server infrastructure, apart from SharePoint. Apps that exclusively leverage client-side scripting for logic may be hosted in SharePoint, but no app code can be installed on a SharePoint server. Apps are acquired by site administrators and farm administrators from the public SharePoint Store or from an internal corporate App Catalog.
Solutions are different from apps in that they are rarely completely standalone applications. Instead, solutions are usually packages intended to customize or extend the functionality of one or more SharePoint sites. Solutions are almost always custom development exercises by either third-party developers or an internal development team. Code is installed into SharePoint either by administrators as a full trust solution or by site administrators as a partial trust or sandboxed solution.
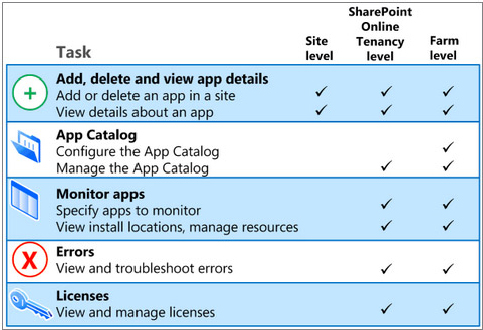
Where both full trust and sandbox solutions are managed by farm administrators, apps enable greater administrative flexibility. Apps are designed for multitenancy, meaning that one site owner can add a specific app, whereas another may choose not to. When an app developer releases an upgrade to the SharePoint Store or App Catalog, each individual site administrator is notified of the available update and can independently upgrade the app on their sites. Because an app is an entirely self-contained application, if a site administrator decides to remove a particular app from a site, the app instance and all of its data are deleted from the site. Administrators can watch for app errors and issues; site owners have the ability to add and delete apps from their sites. Microsoft has created an App Overview for IT Pros poster, which details the delineation of app management capabilities, as shown in Figure 6-1.
To monitor and manage apps, farm administrators leverage Central Administration’s General Application Settings page. SharePoint Online administrators leverage the SharePoint Online Application Center’s Apps page. Site owners use their site’s All Site Content page.
Hosting Options
As previously mentioned, a core decision of the app programming model is where to host the code and data. The user interface is typically presented to SharePoint users as HTML, CSS, and JavaScript in the browser, whereas the independent back end may be hosted in SharePoint or on some other infrastructure. The app model supports three app hosting options, which replace the farm and sandbox solutions of SharePoint 2010. Sandbox solutions and farm solutions continue to be viable development targets in 2013, but all new development should leverage the app model instead. This is the only mechanism to leverage the App Store for Office 365. The three app hosting options include the SharePoint hosted app, the provisioner hosted app, and the Azure auto-hosted app. The differences between these models are defined by their different deployment stories. Figure 6-2 summarizes the three hosting options.

The SharePoint-hosted app is an app manifested inside of SharePoint and lives only inside of SharePoint. You must understand that even with a SharePoint-hosted app, there is no code running on the server; all code must run in the client. A SharePoint-hosted app is effectively an .aspx page full of JavaScript that implements the wanted behavior via client-side script and service calls.
Cloud-hosted apps are actually any app hosted outside of the SharePoint server, including those hosted on a local IIS server in the same data center. Because the app is hosted off of the SharePoint server, the app can be developed and hosted using any technology the developer cares to choose, such as PHP or Java. Cloud-hosted apps enable server-side code that communicates with SharePoint via the same client-side script and service calls as SharePoint-hosted apps. Due to the external hosting, the OAuth 2 protocol is used to provide the authentication mechanism that is required to allow access.
Cloud-hosted apps include two distinct deployment models, the provisioner-hosted app and the Azure auto-hosted app. The provisioner-hosted app enables the developer to define his own infrastructure, regardless of whether this infrastructure is a local server or a cloud service provider such as Amazon.com or even Azure (which a developer may choose to have much more explicit control over the behavior of the Azure-based management experience). You must understand that the selection of a provisioner-hosted app deployment model means that additional servers are required to meet the needs of the SharePoint environment. Be sure to include this extra server in infrastructure planning phases.
An Azure auto-hosted app is an app created in SharePoint that includes a web project and a SQL project. When the app is installed from either of the two market places, the app’s web deployment manifest is automatically delivered to Azure, which automatically and invisibly provisions an Azure website service and an optional Azure SQL database instance. The application’s back-end infrastructure and server-side code is completely abstracted away from the developer and the user. Both cloud-hosted app options enable the creation of extremely rich and fully featured application experiences in contrast to a SharePoint-hosted app.
As an Office 365 customer, integration to Azure is automatically wired up when an Azure auto-hosted option is selected for deployment. When an end user installs an Azure auto-hosted app, Office 365 automatically deploys and provisions a copy of the app as a Windows Azure website, and Office 365 then manages it on behalf of the end user who installed it.
Regardless of how an app is developed and deployed, after installed into a SharePoint instance, the SharePoint app management engine secures the app and the underlying platform by enforcing a level of isolation. Any time an app executes, it actually executes on a unique app domain with a unique, generated URL. This is done to prevent deliberate and accidental cross-site scripting attacks. The other benefit of this approach is that each tenant is isolated from every other tenant during execution.
EXAMINING AN APP
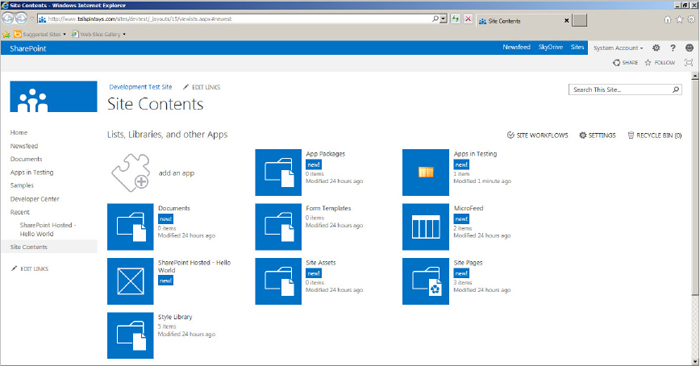
Now you will quickly visit a SharePoint site to understand a bit more about apps before jumping into the actual development of apps. Begin by opening a default SharePoint site. The default homepage for a SharePoint team site offers a number of navigation options and an enticing interactive Get Started app in the middle of the screen. Along the left side of the screen is the familiar contextual Quick Launch menu, complete with the familiar Site Contents link. Click the Site Contents menu option to see the lists, libraries, and other apps.
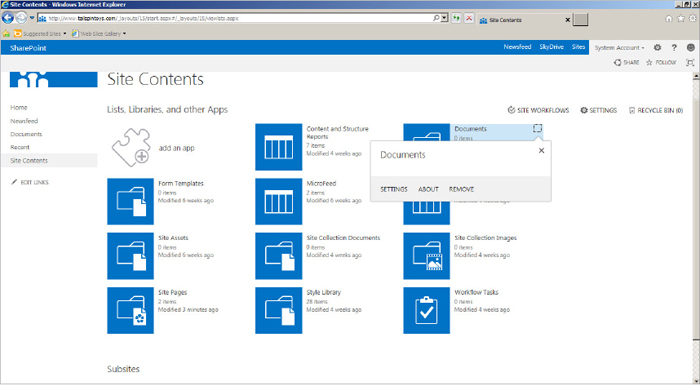
Notice that the Site Contents page refers to all site contents as Lists, Libraries, and other Apps, as shown in Figure 6-3. All items, including document libraries, image libraries, and task lists are considered to be apps that store their data in a list. Although the rest of this chapter discusses how to create custom apps with code that resides outside of SharePoint, you must understand that default SharePoint constructs are the exact same things that they were before. Calling these familiar SharePoint concepts “apps” is just a change in vocabulary. This change in vocabulary cleans up the experience for an end user who may not understand the difference between a document library (app) and a custom solution with code running on Azure. The core set of SharePoint functionality does not change; it does not get a dedicated tenant-based URL in an auto-created subweb or any special permissions.

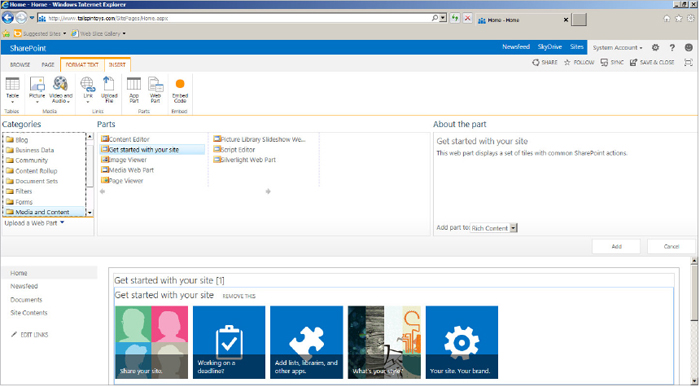
You also need to understand that the new app-centric SharePoint 2013 experience does not eliminate web parts as an important development target. You simply need to put the default homepage of a team site into edit mode to see that the interactive Getting Started page component is actually a web part that can be placed on any page. Figure 6-4 demonstrates exactly that scenario.
Hover over an app to see the region highlight on mouse over. In addition to the mouse-over-text highlighting, an ellipsis or three dots indicating a hover card context menu appear in the top-right corner. Click this ellipsis to see that the management for an app is easily accessible from the Site Contents page, as shown in Figure 6-5. From this experience you can manage the settings and permissions of an app.
Adding an App
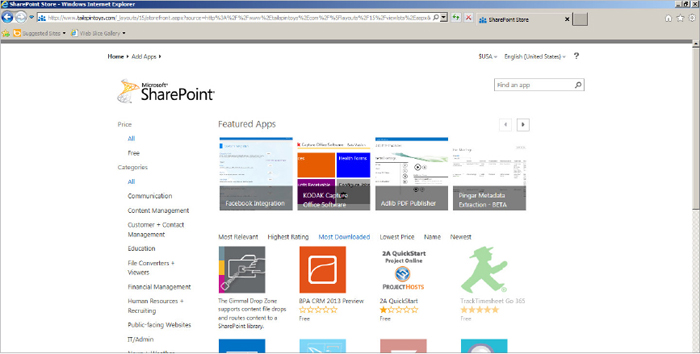
Click the Add an App button seen in Figure 6-5 to examine the native apps and the app store experiences. Native apps, as previously mentioned, are essentially nothing more than the lists, libraries, and web parts which were available in the SharePoint 2010 environment. However, in addition to the native apps, a default installation and Office 365 environments also have access to the SharePoint Store. The SharePoint Store is a public app marketplace where end users can find free and premium apps built by hundreds or thousands of enterprise application developers. Figure 6-6 illustrates the SharePoint Store experience.
DEVELOPING YOUR FIRST APP
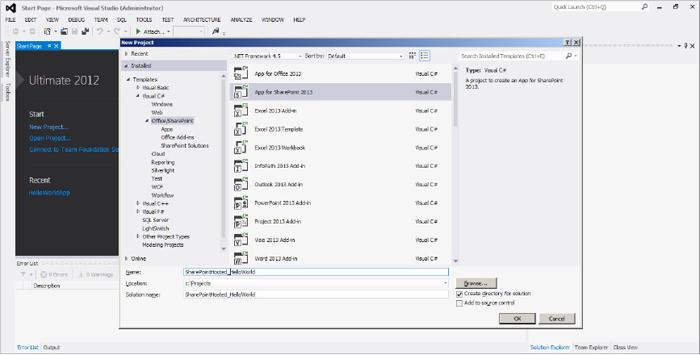
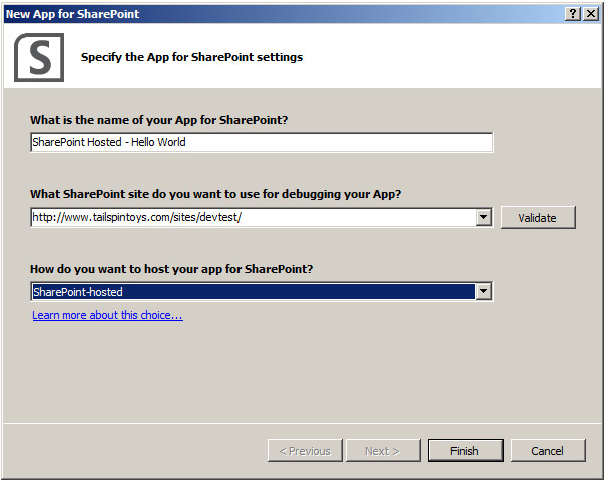
To create apps, the first thing to do is create a developer site collection that accepts deployments of apps from Visual Studio. To create a developer site, simply create a new site collection in Central Administration, and select the Developer Site template from the Collaboration tab, as shown in Figure 6-7.

After the developer site is in place, open Visual Studio 2012 and follow these steps to create a simple SharePoint 2013 app. A rite of passage for all new systems and development methodologies is to first create a Hello World app, and this is no exception.
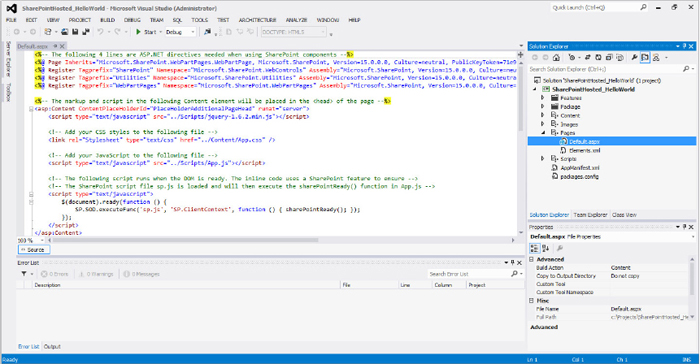
Near the bottom of the Default.aspx page is div inside of the PlaceHolderMain content place holder. This div leverages the JavaScript code in App.js (found in the Scripts folder in the Solution Explorer) to identify the current user. Add the following line above the div:
<h1>Hello World! This is my first SharePoint 2013 app!</h1>
This is the extent of the code change necessary to demonstrate a working SharePoint 2013 app hosted inside of SharePoint. However, before launching the app and marveling at the successful first app, it is worth briefly examining the other components of the Visual Studio solution to understand the contents of the App for SharePoint 2013 project template.
- The Features folder contains the SharePoint Feature packaging, which is required to activate and provision the files associated with the new SharePoint-hosted app. As in 2010, the Feature designer in Visual Studio supports explicit inclusion and exclusion of items in the Solution, Feature Activation Dependencies, and access to the Element Manifest.
- The Package folder contains the new SharePoint 2013 App Package designer, which sports a user experience similar to the Feature designer. This Package manifest contains details for a SharePoint-hosted app, which indicate a clear lineage from the older SharePoint Solutions such as a Manifest, which includes a Solution node with a SolutionId attribute.
- The Content folder currently contains the app’s App.css style sheet and is the ideal location for other content items in future apps. In addition to the app’s content files, an Elements.xml manifest is present. Double-clicking the Content folder opens this Elements.xml file.
- The Images folder is the clearly named repository of app images such as the AppIcon.png. An Elements.xml manifest file keeps track of items that need to be deployed.
- The Pages and Scripts folders previously have been described. Like the Images folder, they are clearly named, and each contains an Elements.xml manifest.
- The last two items in the default template include an AppManifest.xml and a packages.config file. Double-clicking the AppManifest.xml opens a specific designer that guides the developer through making changes to the app such as managing the title, name, and icon for the app as well as manipulation of permission requests, prerequisites (features or capabilities), and adjustment of the query string. For now the default selections work, and these options are examined in more detail later in the “Developing a Provider-Hosted App” section.
At this point, the “development” tasks are complete, and the project template has been briefly discussed. Press the Start button in Visual Studio to deploy the app to the developer site. After the app has been successfully deployed, the web browser opens and automatically navigates to the Site Contents page. Here, as shown in Figure 6-11, the new SharePoint Hosted - Hello World app is now present as an installed app. Although this is a developer site, the installation is complete, and the app exposes monitoring and permissions via the ellipsis in its top-right corner.
Notice the app isolation as executed by a distinct URL. The developer site lives at the original URL (http://www.tailspintoys.com/sites/devtest) but when the new app is opened, the browser goes to a new URL (http://app-d2dcbf5e27c6cd.apps.tailspintoys.com/sites/devtest/SharePointHostedHelloWorld). The bolded alphanumeric code in the URL is unique to the specific site. The rest of the new app URL would be consistent for any other site that is in the TailSpinToys domain that launches this app. The SharePointHostedHelloWorld keyword at the end of the URL is actually the name of the app that was coded into the AppManifest.xml in Visual Studio. Your browser also contains additional details in the URL bar, standard tokens such as the host URL and the language/culture pair. Figure 6-12 demonstrates the successful Hello World app.

This concludes the Hello World app demonstration. Granted, this was a simple demonstration, but consider what has been covered in this example. From this example, you now understand that a dedicated development SharePoint site collection must exist with its top-level site based on the Developer Site template. You now know how to create a project in Visual Studio 2012 and know the basic structural components of the default project template. Finally, you understand that although no code is allowed on the server for a SharePoint hosted app, a savvy web developer with access to jQuery can create extremely compelling HTML5 applications that provide tremendous business value across a range of devices and browsers. The next sections look more deeply into developing apps.
CLIENT-SIDE OBJECT MODEL
Now that the Hello World application has been completed, a quick review of the client-side object model (CSOM) is in order. The client-side object model is especially important to SharePoint apps developers because it is the only mechanism with which an app can interact with the server to perform remote communication and control tasks. As with SharePoint 2010, there is actually more than one version of the CSOM, one of which is designed to work with .NET clients such as Windows Forms, WPF, and Silverlight because .NET clients can understand results as .NET objects. The other version of the CSOM is designed to work with ECMAScript callers such as JavaScript, and results are returned to callers as JSON.
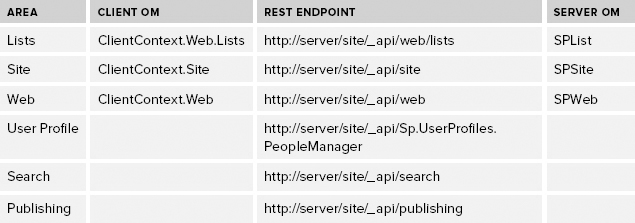
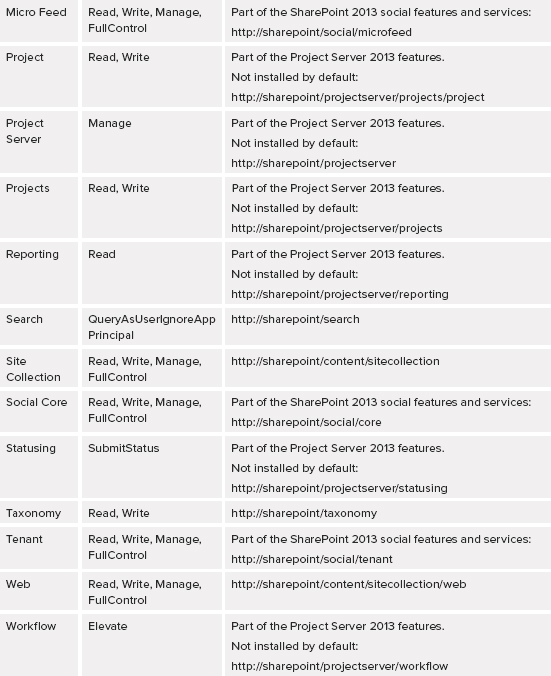
There is also a difference in the namespaces provided by the .NET and ECMAScript object models. Because you extend the Ribbon using script, the ECMAScript OM has a Ribbon namespace, whereas the managed client OM does not. Plus, there is a difference in naming conventions for the foundational part of the namespaces. For example, if you want to access a site, in the .NET API you would use the Microsoft.SharePoint.Client.Site object, but in ECMAScript you would use SP.Site. Table 6-1 shows the different namespaces for the two client OMs.
TABLE 6-1: Supported Namespaces in Client OMs

To show you how to map your understanding of server objects to the client, Table 6-2 shows how server objects would be named in the client OMs.
TABLE 6-2: Equivalent Objects in Server and Client OMs

Before diving into writing code with the client OM and adding references in VS, you first need to understand where these DLLs are located and some of the advantages of the DLLs, especially size.
As with other SharePoint .NET DLLs, you can find the .NET DLLs for the client OM located under %Program Files%Common FilesMicrosoft SharedWeb Server Extensions15ISAPI. Where SharePoint 2010 offered two DLLs for the managed OM, Microsoft.SharePoint.Client and Microsoft.SharePoint.Client.Runtime, SharePoint 2013 offers nine DLLs including
- Microsoft.SharePoint.Client
- Microsoft.SharePoint.Client.DocumentManagement
- Microsoft.SharePoint.Client.Publishing
- Microsoft.SharePoint.Client.Runtime
- Microsoft.SharePoint.Client.Search.Applications
- Microsoft.SharePoint.Client.Search
- Microsoft.SharePoint.Client.ServerRuntime
- Microsoft.SharePoint.Client.Taxonomy
- Microsoft.SharePoint.Client.UserProfiles
If you look at these DLLs in terms of size, combined they are at 1.6 MB. Compare that with Microsoft.SharePoint, which weighs in at more than a hefty 25 MB.
Because the ECMAScript implementation is different from the .NET one and needs to live closer to the web-based code for SharePoint, this DLL is located in %Program Files%Common FilesMicrosoft SharedWeb Server Extensions15TEMPLATELAYOUTS. There, you can find four relevant JS files: SP.js, SP.Core.js, SP.Ribbon.js, and SP.Runtime.js. Of course, when you debug your code, you use the debug versions of these files, such as SP.debug.js, because the main versions are minified to save on size and bandwidth. Also, you can set your SharePoint deployment to use the debug versions of these files automatically by changing the web.config file for your deployment located at %inetpub%wwwrootwssVirtualDirectories80 and adding to the system.web section the following line: <deployment retail="false" />. Again, these files are less than 1 MB.
Finally, Silverlight is a little different in that it has its own implementation of the client OM for Silverlight specifically. You can find the Silverlight DLLs at %Program Files%Common FilesMicrosoft SharedWeb Server Extensions 15TEMPLATELAYOUTSClientBin. You can find two files, Microsoft.SharePoint.Client.Silverlight and Microsoft.SharePoint.Client.Silverlight.Runtime. Combined, the files also come in under 1 MB in size.
Microsoft has redistributable versions of the .NET and Silverlight object models to install on your client machines. If you have Office 2013 installed on your machine, you don’t need the redistributable version, and if you don’t, you can retrieve the 32-bit and 64-bit versions of the redistributable installer at www.microsoft.com/downloads/en/details.aspx?FamilyID=b4579045-b183-4ed4-bf61-dc2f0deabe47. Given the long URL, it is probably easier to search for “SharePoint Server 2013 Client Components SDK.”
CSOM Improvements over SharePoint 2010
Although the introduction of the client-side object models in the 2010 product changed how developers access SharePoint functionality, it was not always easy to use. As mentioned earlier, CSOM coverage of SharePoint 2010’s capabilities was quite limited. The client-side development experience was frequently frustrating, in part because of those limitations and because of the limited support for non-.NET languages. Although CSOM was introduced to SharePoint developers in SharePoint 2010 as a significantly reduced set of capabilities when compared to server-side code, SharePoint 2013’s CSOM has had a significant amount of work put into it by Microsoft. Although the CSOM is not yet at 100-percent parity with the server-side object model, it has significantly more coverage in the 2013 product than in the 2010 product. In addition to deeper access to some commonly used namespaces, some significant new capabilities are now accessible from client-side code including
- Social
- Search
- Managed meta data
- BCS
- Activity feeds
- User profiles
Microsoft has made commitments to improve the reach and accessibility of SharePoint APIs and has chosen to do so from the same web service platform. In addition to the new APIs available in the client object models, a new Representational State Transfer (REST) service has been made for each API. This new REST service enables developers to use any technology that supports REST web requests when creating apps. At a high level, Figure 6-13 shows the .NET/Silverlight and ECMAScript object model interactions. The client object models are all built to interact with the client.svc web service, which handles batching, serialization, and parsing of requests and replies (refer to Figure 6-13).

RESTful SharePoint 2013
SharePoint 2010 introduced REST services for SharePoint, but SharePoint 2013 offers a number of improvements. First, understand the core capabilities of the REST interface. SharePoint 2013’s REST service endpoints enable HTTP-based CRUD (Create, Read, Update, and Delete) operations on most of the SharePoint client object model types and members. This new capability grants REST access to objects such as lists, sites, and more. To read from a SharePoint type or member, use HTTP GET commands. To insert, use HTTP PUT commands. To update a SharePoint type or member, use HTTP POST commands. You can also use the POST command to create new structural elements in SharePoint such as lists and sites. And you can use the HTTP DELETE command to remove or recycle SharePoint content.
SharePoint 2013 follows the OData specification and uses the Atom protocol to respond to REST service requests; although, you can use the Accept header to request JSON formats instead of Atom formats.
REST service URI endpoints correspond to the client OM API in most cases, leveraging the following structure: Http://servername/site/_api/namespace/object|property|indexer(index)|method(parameters)/?$ODataOperation/.
For example, http://server/site/_vti_bin/client.svc/web/lists can accept POST commands to create new lists in the specified SharePoint site. To shorten the preceding URL, http://server/site/_api/web/lists reaches the same endpoint. Because Microsoft recommends that URLs are kept below a 260-character limit, the use of the _api convention is the preferred URI notation.
Table 6-3 identifies a number of REST service endpoints in addition to /web.
TABLE 6-3: SharePoint 2013 REST Service Endpoints
As noted in the description of the REST service structure, REST service endpoints support calls similar to the CSOM calls. For example, you can leverage an indexer and pass in a GUID to retrieve a specific item or to search for an item in a list by its title with the _api/web/lists/getbytitle(‘item title’) equivalent of the GetByTitle from other CSOM methods.
The following example demonstrates how you can use REST to query the Contacts list and retrieve an item with ID equals of 1:
http://Tailspintoys.com/_api/web/lists/getByTitle('Contacts')/
  getItemByStringId('1')
The following code snippet is an example of how to leverage the REST services in C# to get all of the lists in the site. First, the code creates the request to the lists REST endpoint and retrieves the details in an Atom format.
HttpWebRequest listRequest =
    (HttpWebRequest)HttpWebRequest.Create(sharepointUrl.ToString() +
      "/_api/Web/lists");
    listRequest.Method = "GET";
    listRequest.Accept = "application/atom+xml";
    listRequest.ContentType = "application/atom+xml;type=entry";
    listRequest.Headers.Add("Authorization", "Bearer " + accessToken);
    HttpWebResponse listResponse = (HttpWebResponse)listRequest.GetResponse();
    StreamReader listReader = new StreamReader(listResponse.GetResponseStream());
    var listXml = new XmlDocument();
    listXml.LoadXml(listReader.ReadToEnd());

    var titleList = listXml.SelectNodes("//atom:entry/atom:content/m:properties/
      d:Title", xmlnspm);
    var idList = listXml.SelectNodes("//atom:entry/atom:content/m:properties/
      d:Id", xmlnspm);
The previous code snippet assumes that an accessToken has already been retrieved by the application.
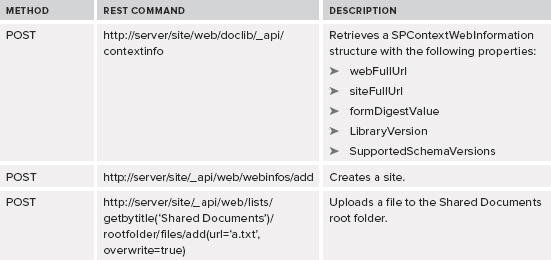
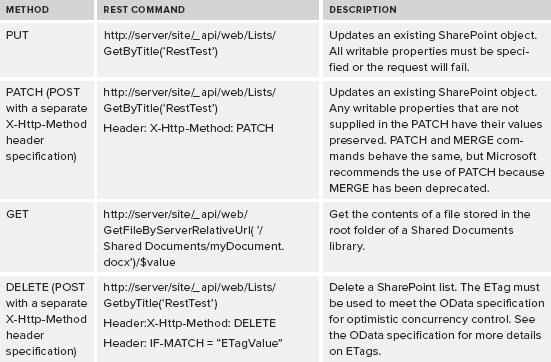
Table 6-4 is a tiny slice of the power available to users of the REST service.
TABLE 6-4: Helpful REST Commands
Microsoft has produced an MSDN article about programming using the SharePoint 2013 REST service that covers the REST programming interface in greater depth. The article can be found online at http://msdn.microsoft.com/en-us/library/fp142385(v=office.15).aspx and is titled “Programming using the SharePoint 2013 REST service” for those who prefer to leverage search rather than attempting to type obscure alphanumeric codes into the URL bar.
DEVELOPING EXTERNALLY HOSTED APPS
JavaScript-driven HTML5 apps can certainly be extremely powerful, but there are occasions in which server-side code is required. Although SharePoint is no longer a candidate host platform for compiled application code, the available hosting options include provider-hosted and auto-hosted (Azure-hosted) apps. A provider-hosted app is one where the developer defines the infrastructure as opposed to the auto-hosted app, where the infrastructure decisions are removed from the developer.
High-Trust Apps for Single Server Development Environments
If you, as a developer, attempt to create a single server development environment as is the case with many portable virtual machine-based development environments, there are a number of special considerations for provider-hosted apps. The problem with running both SharePoint and the provider infrastructure is that SharePoint requires a number of special steps including the presence of a certificate and the creation of a unique client ID to use a server-to-server (STS) communication protocol. Apps that use this STS protocol are known as high-trust apps because the app is allowed to assert any user identity because the app creates the user portion of the access token. The STS protocol is a generic protocol used by Microsoft applications including Exchange, Lync, and other applications that require temporary access tokens. SharePoint provider-hosted apps that are created for on-premise cannot use a context token to identify the user as an app in the cloud would. What a high-trust app is NOT is a full-trust app. A high-trust app must still be coded to ask the installing user for explicit permissions.
MSDN has an excellent article detailing the steps required to configure a provider-hosted app as a high-trust app. You can find the article online at http://msdn.microsoft.com/en-us/library/office/apps/fp179901(v=office.15), which has been replicated in part here for the sake of completeness.
$publicCertPath = "c:ProjectsHighTrustSampleCert.cer"$appId = "4ed7b623-a09f-4b5d-9ff6-8e48a9c5c049"$spurl = "http://www.tailspintoys.com/sites/devtest"$spweb = Get-SPWeb $spurl$realm = Get-SPAuthenticationRealm -ServiceContext $spweb.Site$certificate = Get-PfxCertificate $publicCertPath$fullAppIdentifier = $appId + '@' + $realmNew-SPTrustedSecurityTokenIssuer -Name "High Trust Sample App" -Certificate $certificate -RegisteredIssuerName $fullAppIdentifier$appPrincipal = Register-SPAppPrincipal -NameIdentifier $full AppIdentifier -Site $spweb -DisplayName "High Trust Sample App"All of these steps are required to get the environment into shape for an internally produced yet externally hosted app.
Developing a Provider-Hosted App
The following steps walk through the process of creating a simple provider-hosted app.


TABLE 6-5: Development Endpoints

Developing an Azure Auto-hosted App
Before beginning the conversation about Azure auto-hosted apps, you must understand that auto-hosted apps in SharePoint 2013 can be installed only on SharePoint Online websites. This is because SharePoint Online accounts can bundle in pricing for Azure apps, making them free to developers and users.
The steps to build an Azure auto-hosted app are nearly the same as the steps to build a provisioner-hosted app. Follow these steps to get started:

<customErrors mode="Off"/>

<body style="font-family:'Segoe UI'">
    <form id="form1" runat="server">
    <div>
    <h2>Available Themes</h2>
    </div>
    <asp:Button ID="Button1"
        runat ="server"
        OnClick="Button1_Click"
        Text="List Available Themes"
        BackColor="#FFFFFF"
        ForeColor="Black"
        Font-Size="Medium"
        Style="border-style: solid;"
        Height="50px"
        Width="180px" />
    <asp:Literal ID="Literal1"
        runat="server"><br /><br /></asp:Literal>
    <asp:GridView ID="GridView1"
        runat="server"
        BackColor="LightGray"
        BorderStyle="None"
        Caption="Themes"
        CaptionAlign="Left"
        CellPadding="5"
        GridLines="None"
        HorizontalAlign="Left">
        <AlternatingRowStyle BackColor="White"
            ForeColor="Black" />
    </asp:GridView>
    </form>
</body>using Microsoft.SharePoint.Client; using System; using System.Collections.Generic; using System.Linq; using System.Net; using System.Web.UI.WebControls; using System.Xml.Linq;
// members
SharePointContextToken contextToken;
string accessToken;
Uri sharepointUrl;
protected void Page_Load(object sender, EventArgs e)
{
    // request the access token
    TokenHelper.TrustAllCertificates();
    string contextTokenString = TokenHelper.GetContextTokenFromRequest(Request);
    if (contextTokenString != null)
    {
        // Get context token
        contextToken = TokenHelper.ReadAndValidateContextToken(contextTokenString,
        Request.Url.Authority);
        // Get access token
        sharepointUrl = new Uri(Request.QueryString["SPHostUrl"]);
        accessToken = TokenHelper.GetAccessToken(contextToken,
        sharepointUrl.Authority).AccessToken;

        // Pass the access token to the button event handler.
        Button1.CommandArgument = accessToken;
    }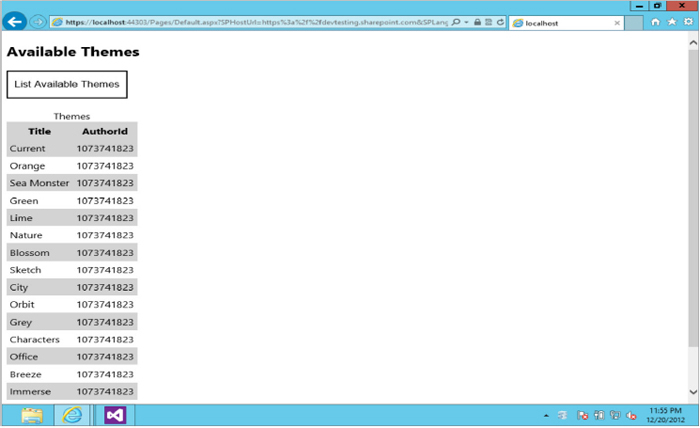
}protected void Button1_Click(object sender, EventArgs e)
{
// retrieve the user's access token
string accessToken = ((Button)sender).CommandArgument;
if (IsPostBack)
{
sharepointUrl = new Uri(Request.QueryString["SPHostUrl"]);
}
// REST/OData section.
string oDataUrl = "/_api/Web/lists/getbytitle('Composed
Looks')/items?$select=Title,AuthorId,Name";
HttpWebRequest request =
(HttpWebRequest)HttpWebRequest.Create(sharepointUrl.ToString() + oDataUrl);
request.Method = "GET";
request.Accept = "application/atom+xml";
request.ContentType = "application/atom+xml;type=entry";
request.Headers.Add("Authorization", "Bearer " + accessToken);
HttpWebResponse response = (HttpWebResponse)request.GetResponse();
// Response markup parsing section.
XDocument oDataXML = XDocument.Load(response.GetResponseStream(),
LoadOptions.None);
XNamespace atom = "http://www.w3.org/2005/Atom";
XNamespace d = "http://schemas.microsoft.com/ado/2007/08/dataservices";
XNamespace m = "http://schemas.microsoft.com/ado/2007/08/dataservices/
metadata";
List<XElement> entries = oDataXML.Descendants(atom + "entry")
.Elements(atom + "content")
.Elements(m + "properties")
.ToList();
var entryFieldValues = from entry in entries
select new
{
Title = entry.Element(d + "Title").Value,
AuthorId = entry.Element(d + "AuthorId").Value
};
// Bind data to the grid on the page.
GridView1.DataSource = entryFieldValues;
GridView1.DataBind();
}
- Microsoft.IdentityModel.dll
- Microsoft.IdentityModel.Extensions.dll
- Microsoft.SharePoint.Client.dll
- Microsoft.SharePoint.Client.Runtime.dll
- System.IdentityModel.dll (By default, this is set to False.)
The app has now been packaged and is ready for installation in the App Catalog. Installing an app to the App Catalog is a simple process for a tenant administrator:
SUMMARY
This chapter introduces developers to the new wide world of Apps for SharePoint. New development targets and deployment models combine to make this chapter more of a gentle introduction to the new technology landscape of apps development than a deep dive into any specific capability. The goal of this chapter is to accelerate you through the necessary plumbing of apps development and to allow you to concentrate on the development of business functionality. Be aware that additional research will be required to truly master any of the concepts introduced in this chapter.
The following chapter takes you deeper into the world of apps development. Next up are the critical topics of designing the user experience for apps and the management of deployments and upgrades.