Chapter 4
Application Lifecycle Management in SharePoint 2013
WHAT’S IN THIS CHAPTER?
- Getting started with Application Lifecycle Management
- Understanding SharePoint 2013 Solution Models
- Planning your Customization Model and Release Packaging Approach
- Planning your Key Development phases and Release Model
- Planning your Upgrade and Patching Approach
- Planning your SharePoint Team Environments
- Managing SharePoint 2013 Development Teams
- Managing SharePoint 2013 Testing Teams
Before you skip to the next chapter, consider this. SharePoint 2013 provides extensive capabilities to customize your new or existing production farms. This introduces many challenges in how to govern, monitor, operate, and introduce “change” to your production environment, in the shortest time possible, at the lowest risk, and in a manner that does not bring down your production environment.
Added to this challenge is that SharePoint 2013 provides a variety of powerful customization development and deployment models, features, and product capabilities. Coupled to this is that the complexity and solution key design decisions vary based on whether your target hosting location is on-premise or in a cloud-hosted environment.
Other important factors, including your application packaging model, your production application governance policies, and acceptance or “gate” criteria can affect your ability to deploy your customizations into your SharePoint 2013 production environment.
It doesn’t matter if you are part of a customer or Microsoft partner development team, or even an independent software vendor (ISV) developing an app for the Microsoft Office Store. Without a sturdy, well-thought-out, and consistent Application Management Lifecycle (ALM) process, your SharePoint team might struggle. This chapter provides detailed guidance to help you overcome these challenges.
GETTING STARTED WITH APPLICATION LIFECYCLE MANAGEMENT
Application Lifecycle Management (ALM), as defined by Wikipedia, is the continuous process of managing the life of an application through governance, development, operations, and maintenance.
David Chappell, a well-respected author and speaker of numerous ALM whitepapers and books, provides unique insights in his whitepaper titled “What is ALM?” He defines it as more than just the Software Development Lifecycle (SDLC), but the entire time during which an organization is spending money on the software asset, from the initial idea to the end of the application’s life. You can read Chappell’s full whitepaper at http://www.davidchappell.com/WhatIsALM--Chappell.pdf.
ALM facilitates and standardizes the process of developing customizations (from idea to working software), supports the transition through your SharePoint environments to your production environment, and supports standard operational activities such as maintenance, upgrade, and patching until the end of life occurs. A consistently applied ALM process improves the governability of applications and customizations introduced to your SharePoint 2013 production environment.
This section further describes the three core aspects of ALM, as well as the supporting tools required and processes to be followed within your particular SharePoint 2013 project.
Three Application Lifecycle Management Perspectives
Application Lifecycle Management can be looked at from three core perspectives. These are the governance, development, and operations perspectives. Figure 4-1 provides an overview of each of these perspectives.

The governance perspective largely deals with:
- Project management, planning, coordinating, managing changes, and improvements to applications, and solutions in your SharePoint 2013 environment.
- Key decision making during the life cycle of your customizations and the SharePoint 2013 environments, from inception to end of life.
- Development of the business case to justify and get approval for the investment.
- Standard application project management to manage the application over the course of its development.
- Application portfolio management of the suite of applications and solutions in your SharePoint 2013 environments, including deciding on new applications that are required, which should be improved or retired.
The development perspective is focused on the activities that make up the typical development and maintenance/patch life cycle, including:
- Following a software development methodology, most commonly based on Agile or waterfall-based approaches. Common methodologies and frameworks include SCRUM, MSF, RUP, and Kanban.
- Requirements definition, design, development, testing, quality assurance, and deployment and release packaging.
- Developing maintenance fixes to resolve defects and developing new features and enhancements to release to your production environments.
The operation perspective, in relation to customizations, is focused on:
- Understanding, learning, rehearsing, and preparing to deploy new customizations and maintenance releases through your successive SharePoint 2013 environments until they are safely released and deployed to your production environments.
- Monitoring customizations in your production environment and reporting issues to the governance and development teams.
- Improving and tweaking the configuration of applications and production environments.
As a developer, you may think, that’s interesting, but I am interested only in the development perspective. Well, the reality is that each of these perspectives is symbiotic, complementary, and dependent on each other. Poor performance in operations and governance teams and roles can cause problems for the development team and roles. Similarly poor development processes can cause headaches for operations and governance teams and roles.
A mature and well-defined application life cycle management process, which encompasses these three perspectives, can help your SharePoint team overcome these issues.
Application Lifecycle Management Tools
Microsoft Team Foundation Server (TFS) is the application life cycle management tool at the heart of most SharePoint projects. Microsoft Team Foundation Server 2012 provides the following “must-have” features for a team considering major development projects for the SharePoint 2013 platform:
- Methodology or process templates — Team Foundation Server 2012 supports various agile and waterfall methodologies through the use of process templates. TFS provides out-of-the-box process templates, including Microsoft Solutions Framework (MSF) for Agile Software Development (v6.0), MSF for CMMI Process Improvement (v6.0), and Visual Studio SCRUM (v2.0). In addition, you can use a number of third-party templates, such as Kanban. See the MSDN Article “Choose a Process Template” for more details at http://msdn.microsoft.com/en-us/library/ms400752.aspx.
- Source code management — Team Foundation Server enables development teams to work on the same code project at the same time. It includes features such as check-ins, code branching, merging, shelving, labeling, concurrent check-outs, check-in policies, and the association of check-ins to work items.
- Work item tracking — Work items consist of requirements, tasks, bugs, issues, and test cases. Team Foundation Server enables flexibility for how these work items are managed via an extensible work item tracking system. This tracking system controls the states a work item can be in and how the state transitions should occur. This results in better documentation, commenting, visibility of the history of issues, productivity, and discipline for the members of the project team.
- Build automation — Team Foundation Server provides great build management tools. Build management refers to the automatic creation and processing of new builds based on updates to code projects. Team Foundation Server supports manual builds, continuous integration, rolling builds, gated check-in, and scheduled builds. For example, you can schedule a nightly build, deploy this build to a virtual machine, and run a series of tests ready to be analyzed in the morning.
- Project management and reporting — Team Foundation Server 2012 provides reports and dashboards for you to use to assess and report on various aspects of your project’s progress. For example, if you have implemented the agile process templates, you can track the progress of the iteration backlog and plan items for the next sprint.
Your project manager and technical lead must be sufficiently skilled in the configuration, optimization, and use of Team Foundation Server 2012. For example, if the customer demands an update on your team’s progress, can your project manager instantly generate a report to provide an update? If your developers haven’t been updating their work items, or your testers haven’t been logging and tracking defects, you won’t have the data to show your customer. If you don’t have the data, you will struggle to report on any part of your team’s progress. Team Foundation Server won’t solve bad management, bad judgment, and bad developer habits or traits. Therefore, your project manager and technical lead must instill discipline and structure in your development, test, and release packaging team.
Understanding Key Development Tools
SharePoint 2013 has evolved, improved, and extended many of the existing development tools used by SharePoint developers today. New development tools have also been provided to develop SharePoint apps.
At the heart of the SharePoint 2013 solution development is Microsoft Visual Studio 2012. Microsoft Visual Studio 2012 is a powerful, integrated, and mature development environment that caters for the full development life cycle of customizations produced for your SharePoint 2013 farm. It provides a number of starting-point solution templates to begin development of SharePoint customizations, combined with deployment packaging tools to create Windows solution packages required by SharePoint to deploy fully and partially trusted assemblies and artifacts to your various environments.
Microsoft Visual Studio 2012 provides extensive support for the full application development life cycle. This includes features to plan and track your project, design functionality, code development tools (write, unit test, debug, analyze, and profile), build, testing (manual and automated tests, performance and stress tests), and deployment into virtual environments for further testing.
Visual Studio 2012 extensions are available to provide new SharePoint development tools, namely the Microsoft Office Developer Tools for Visual Studio 2012. See the Downloads section on the MSDN site at http://msdn.microsoft.com/en-us/office/apps/fp123627.
Based on my previous experience using the SharePoint toolset in Visual Studio, it provides a great starting point to learn about new types of customization options of SharePoint 2013. In larger projects and teams, depending on the type of customization, other approaches may be preferable. It depends on what customization you are developing.
SharePoint Designer 2013 is a WYSIWYG (what-you-see-is-what-you-get) tool that enables power users to configure elements of SharePoint sites. Although you could argue that this is not a true development tool, it does provide a deep level of support for customizing sites without requiring any code to be written. It’s great for small changes, tweaks, modifications, and extensions to existing site features. In addition, SharePoint Designer 2013 changes are scoped automatically to a single site collection and not your entire farm.
Finally, the new Office 365 development tool enables developers to start building apps for Office or SharePoint directly out of a browser window. To get access to these tools, Microsoft requires you to sign up for an Office 365 Development site. This site provides features to help you develop and publish apps to your corporate catalog or Office Store. For more information, see http://msdn.microsoft.com/en-us/library/jj220038(v=office.15).aspx.
UNDERSTANDING THE SHAREPOINT 2013 DEVELOPMENT MODELS
The SharePoint 2013 platform supports three solution models for the now bewildering number of customization opportunities on the SharePoint 2013 platform.
This section provides an overview of these three models along with real-world guidance that you should consider when deciding which model to use.
The three solution models can be summarized as follows:
- Farm solution model — The farm solution model, also known as the Fully Trusted Solution (FTS) Model, enables you to deploy customizations directly to global assembly cache (GAC) and web front end 15 hive or SharePoint Root folders. This option provides the greatest power and flexibility in developing solutions for your SharePoint 2013 environment. This model was introduced in SharePoint 2007.
- Sandboxed solution model — The sandboxed solution model, also known as Partially Trusted Solution (PTS) Model, enables you to deploy customizations directly to an individual site collection. Partially trusted assemblies are executed in a separate isolated process, called the user code service. This model was introduced in SharePoint 2010. Microsoft has indicated that the sandboxed solution model is available in SharePoint 2013, but has been deprecated. This means you can still develop and use sandboxed solutions, but that they may not be upgradeable to SharePoint Next. Microsoft recommends moving away from the sandboxed solution model wherever possible and using the new app model in conjunction with client object models and out-of-the-box web services.
- SharePoint app model — The SharePoint app model is a completely new model provided by SharePoint 2013. It enables you to develop solutions that can be hosted in a corporate catalog and on the Microsoft Office Store Catalog.
To help you decide on the most appropriate model, look at the over-arching considerations when deciding between each model, followed by a side-by-side comparison of these models.
The over-arching considerations are as follows:
- Factoring in cloud-hosted farms — The hosting location of your farm directly affects the solution models available to you. For most cloud-hosted shared environments, the partially trusted model and new SharePoint app model are your available options. For cloud-hosted environments that take advantage of Microsoft dedicated hosted offerings, all three models are available to you.
- Adhering to application governance policies — It’s a tough job balancing the risk of a site outage (and end users howling at you in frustration) versus allowing change to occur freely and spontaneously to your production sites. Over time, especially in large, mature SharePoint deployments, your SharePoint Application Managers develop an appreciation and risk profile (based on experience, wisdom, and pain) for the types of solutions and customizations they support. These form the basis for application governance policies that need to be adhered to.
- Supporting increased speed of change — In some process-laden business environments, getting new solutions to customers and end users deployed to your SharePoint 2013 farm can take a long time. The design and model you employ directly affects the length of time to get your customizations into production.
- Incorporating existing architectural approaches — Many SharePoint 2013 deployments are the result of an upgrade from a SharePoint 2010 environment. The upgraded customization and code base will most likely come from 2007 and 2010 environments, and may influence your approach to maintain existing solutions as fully trusted solutions, while developing some of the new solutions (where possible) using the new SharePoint app model.
A more detailed look at the strengths and weaknesses of each of these models are summarized in Table 4-1.
TABLE 4-1: Solution Models Side-by-Side Comparison in SharePoint 2013
Source: Microsoft TechNet Article - http://social.technet.microsoft.com/wiki/contents/articles/13373.sharepoint-2013-what-to-do-farm-solution-vs-sandbox-vs-app.aspx


In summary, Microsoft recommends, for the right reasons, that you brush up on your JavaScript skills and leave the beauty, cleanliness, and power of C# code in favor of the SP app model wherever it makes sense. For lovers of JavaScript, this is your time to jump for joy. Until the JavaScript development tools improve, and new toolsets (such as TypeScript) mature, some people will shed a tear or two.
The cold, hard reality is that many existing on-premise deployments have invested a significant amount of time, energy, and money, over many years, developing customizations that will still require server-side execution. There is also no getting around it that a vast number of customizations still require server-side code execution. Based on this, the most reasonable, balanced, and sensible approach is to slowly reduce your reliance and dependence on full-trust and sandboxed solutions over time, and cautiously introduce the new SP app model for new customizations where possible.
PLANNING YOUR CUSTOMIZATION MODEL AND RELEASE PACKAGING APPROACH
One of the key considerations for any SharePoint farm is the overall planning and design for the customizations and underlying components, and the solution packaging approach to deploying these customizations and components successfully through your environments into your production environment.
Customization Models
Now take a look at some of the common customization and component models available for SharePoint development.
Custom Component Development Model
During the planning of the SharePoint solution development, special attention should be given to the design of the customizations, and strategic design decisions related to the makeup of each of the solution packages. Unfortunately, relatively often, code architecture and structural planning in SharePoint projects is often an afterthought.
Your design defines the way your different components work, such as how web parts are developed, and how the overall code and Visual Studio project structure are created and developed. Your Visual Studio code projects structure, in turn, influences what is deployed in each solution package.
A lack of architectural and design planning can severely decrease the reusability of code inside of your project. The lack of proper design manifests itself later when it becomes difficult to test and later difficult to patch in your production.
As a rule of thumb, similar to any development work, code should be structured into different layers to provide flexibility and promote reusability of the code. Layering and structuring your code and code projects efficiently makes it easier to test, deploy, and maintain and update safely in your production environment.
You have numerous approaches to planning code architecture. The decision on the correct approach should be based partly on the skill of your development team and partly on maintainability and updatability considerations. The development skills at your disposable help guide your decision making as to whether advanced architectural patterns should be used, instead of simpler patterns.
Another key aspect to consider relates to the maintainability and future upgradeability of your code base. Will your maintenance developers be the original developers, or will they make up a slightly less-skilled team? Will new developers understand your code base when you or your original team is no longer on the project?
Most important and critically, and more often than you think, SharePoint development teams make the common mistake of putting all their customizations into one or two code projects (and solution packages). What starts as one or two web parts in one or two solution packages ends up with every customization ever built for their SharePoint deployment existing in a few solution packages.
Initially everything seems okay, but then after successive releases, each release takes longer and longer to get to production. As more and more code and customizations are added, the cost and risk profile for each production update goes up. What then occurs is the following:
- Quality assurance, using unit, regression, and integration testing become much bigger jobs than they need to be.
- Unnecessary complexity increases, and the frequency of trade-off type design decisions to keep all your components working goes up.
- Issues relating to your components in production take forever to be rectified.
- The customer or business gets annoyed and frustrated with the long time scales required, which in their eyes are simple changes that make a difference to their end-user experience.
These factors contribute to the long-term success of your code architecture, performance of your SharePoint environments, and, ultimately, the end-user experience.
If there is one lesson you take away from this section, it is always better to have a high number of relatively small solution packages in your production, as opposed to one or two massive solution packages. Now look at how you can achieve that.
Designing Reusable Frameworks in SharePoint
Reusable frameworks for SharePoint provide a cost-efficient way to reuse code for multiple projects without requiring recoding for each project. Common patterns and code classes will emerge during the creation of your initial release. These features can benefit your current and future SharePoint projects. Where possible, these should be included in separate framework-type code projects from the start.
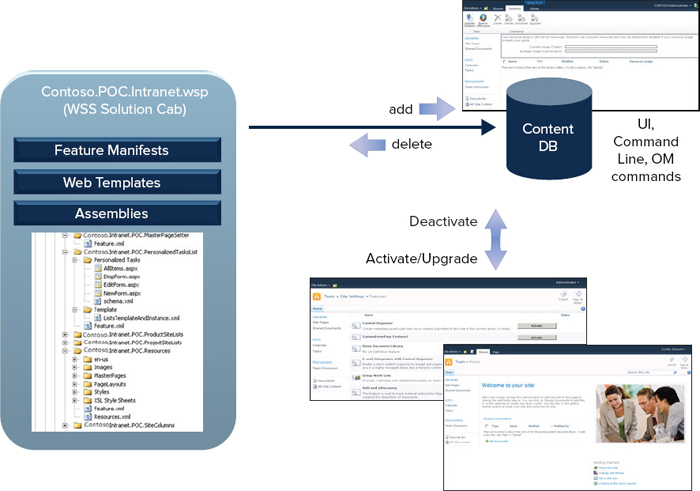
As shown in Figure 4-2, look at a real-world example of how it is possible to split up your code and components into a structure that is easy to maintain, update, and grow.

Now look at this example in more detail:
- Microsoft.Practices.SharePoint — Microsoft provides a number of common components, including logging, that can be used across all your code projects.
- WiredLight.Shared — To facilitate reuse, a shared code project (and component) houses all shared functionality. All changes to this code project are closely monitored.
- Numerous web part projects — Each web part is in its own code project, and, therefore, can be maintained and updated in an isolated fashion to the rest of the solutions.
- Publishing sites — Publishing sites, along with associated deployment and assembly artifacts, are deployed using isolated solution packages.
Using the preceding model and example, new solutions are easy to add to the overall portfolio of solutions. Defects are much easier to analyze, triage, maintain, and update in production.
Another good example of a reusable framework is Microsoft’s patterns and practices guidance package for SharePoint. This package contains a lot of reusable generic code, which would be beneficial for multiple projects. Commonly, this type of code can either be copied to the project or used directly from its own packages.
The usage also depends on the skill level of the developers involved in the project. Writing generic reusable code could be difficult for less-experienced developers and could increase the overall work required for the project. However, reusable frameworks can be created relatively easily by an experienced team of developers, and the code can be used for multiple projects.
Following are some examples of common features included in reusable SharePoint frameworks:
- Logging
- Configuration management
- Caching
- Service locator model
- Generic list management
- Content type management
- Site provisioning management
The packaging and dependency planning of this type of framework-level code is examined in more detail in the “Large Project Considerations” section later in the chapter.
Third-Party Component Considerations
One way to decrease the amount of custom code required for your SharePoint-based solutions is to use third-party components. Great components and apps are available that can help fulfill your project objectives without implementing customizations. Aim to use your development resources and focus your development effort on activities that are not available out-of-the-box, or where third-party solutions are not available. Remember, your goal is to deliver business value, not to develop features that can already be met by affordable third-party solutions.
Another reason to prefer third-party solutions is that the developers of these solutions provide continual support and enhancements over time to their products. They worry about the testing and development resources to maintain these products. This helps your development team focus on delivering business-specific customizations and value.
Key considerations with third-party components include ensuring that your project will have sufficient legal rights to the usage and source code to avoid any additional costs throughout the project. This is especially true for community code projects made available on sites such as CodePlex. For these types of projects, review the license and ensure that source code is acquired to enable you to maintain and enhance if the third-party component vendor closes, or the community code project is no longer available. Your SharePoint deployment should not be dependent on custom code that cannot be supported, or for which your business is not correctly licensed.
Release Packaging Approach
Solution and apps packages are used to deploy and release customizations to your SharePoint 2013 farms. You should always package your code and other customizations in solution or app packages, and use them to deploy your customizations. In SharePoint 2013, you have three different kinds of solution packaging types that can be used: fully trusted solutions, user (sandboxed) solutions, and as an app. Each type has specific behaviors and implications.
Fully Trusted Solutions
As in SharePoint 2007 and 2010, SharePoint 2013 supports fully trusted solutions that can be deployed at the farm level to provide any customizations required for your projects.
Fully trusted solutions are deployed by adding them to the farm solution store located in the configuration database using Windows PowerShell. When the solution is available, it can be deployed to your farm.
Fully trusted solution customizations are deployed to the filesystem of each server and can be considered to be deployed at the farm level, not simply for an individual web application. The web application choice in Central Administration affects only which web.config files are actually updated based on the configurations defined in the solution package. This also means that when the solution package contains features, these features are visible in multiple web applications, which can lead to confusion.
The biggest advantage to using fully trusted solutions compared to deploying customizations manually is the automation of customization deployment. You can ensure that each server in your farm is a completely identical set of deployed customizations. Another advantage is that if you reinstall one of your servers or add a new server to your SharePoint farm, all customizations are automatically deployed, without any manual intervention.
One of the most important things to consider is that deployment or upgrade of a fully trusted solution requires downtime, as shown in Figure 4-3. This service break may not be long, but it can have an impact on users accessing the portal at the time the new package is deployed. This downtime is required to refresh the assembly from the IIS worker process, and, in practice, requires either an IIS reset or application pool recycle.

User (Sandboxed) Solutions
Sandboxed solutions, initially made available in SharePoint 2010, deploy customizations at the site-collection scope and safely execute customizations in a dedicated worker process. This enables a greater degree of flexibility when deploying small customizations and does not require an administrator to perform deployment on the server side.
Sandboxed solutions are deployed to a sandboxed solution gallery located in each site collection, and their usage can be monitored and controlled using an out-of-the-box monitoring system.
As shown in Figure 4-4, SharePoint 2013 imposes limitations on the types of solutions that can be created. This is to avoid code causing issues in the farm. Common usage scenarios include simple web parts and feature-based deployment of artifacts (such as master pages and page layouts). Sandboxed solutions are a great way to provide either department-level customizations or customizations to cloud-based environments such as Microsoft Online.
SharePoint 2013 Apps
Apps created using the new SharePoint app models are packaged in a file called *.APP. This file is composed of many of the files you see in a solution package, including the app manifest, SharePoint solution packages, custom actions and/or app parts, localization resource files, data tier application packages, web deploy packages, and any app office manifests.
When the app is ready, as shown in Figure 4-5, it can be published to the Microsoft Office Store or alternatively to your organization’s corporate catalog of SharePoint apps.

Design Practices
Because all SharePoint customizations are deployed using either solution packages or apps, planning your deployment is extremely important. A well-planned deployment provides flexibility for testing and reduces the impact on the costs of subsequent maintenance phases.
As discussed earlier in this section, one of the key considerations for the deployment architecture is the granularity of your customizations in each of the solution packages. Strike a balance between having too many solution packages versus placing all your customizations in one or two solution packages. Unnecessary regression testing is a waste of your budget, pushes out your timelines, and can be avoided. As shown in the real-world example, it is possible to structure your customizations into multiple solution packages based on their usage and functionalities. This structuring makes them easier to update.
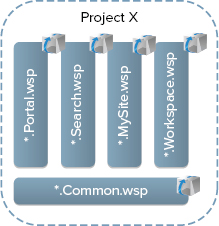
Figure 4-6 shows a commonly used model, where features are divided based on their usage. As you can see, all commonly used features are placed in a common or shared solution package, and each keyfeature area has a dedicated package. This way, individual features (such as search or My Site) can be developed and tested without affecting other customizations.
One challenge with solution packages relates to shared resources between multiple packages — for example, third-party assemblies, utility classes, common base classes, or business logic layers. If two different solution packages deploy the same resource, and the second package is retracted from the SharePoint farm, the shared resources are retracted. SharePoint doesn’t track dependencies on individual artifacts and solutions.
This can be mitigated by using common or shared resources in a specific solution package. This way, all shared resources (such as third-party assemblies) are deployed centrally for the different services in the SharePoint farm.
PLANNING YOUR KEY DEVELOPMENT PHASES AND RELEASE MODEL
One of the most important (and, unfortunately, often overlooked) areas to consider in SharePoint deployments is the detailed planning of your development phases and the release model required to support each of these key phases.
This section discusses the key development phases and takes an in-depth look into the common releases used in SharePoint projects.
Key Development Phases
Most, if not all, SharePoint projects can be divided into three key stages:
- Initial iterations — New code project, developed over a series of sprints or iterations, that culminates in working software ready to be released to quality assurance environments.
- Content creation starts — Working (quality-assured) software is released to production environments and is available to site owners and content authors to begin using. Site and content preparation can now begin.
- Release models after production use starts — Software has been configured by site owners and content authors have finished creating the initial content. End users are now using the site (and working software) in production. Any software updates must be carefully planned and tested against copies of production data.
Now look at each of these key development phases in more detail.
Initial Iterations
The development phase will be divided into a number of iterations or subphases, regardless of the development methodology used in the project. This way, you can more easily plan the tasks based on priorities and follow up on development progress.
New SharePoint projects tend to start with a proof of concept (POC) to ascertain the feasibility and suitability of using SharePoint 2013. When projects progress to the next stage, the POC is often used as a starting point and code for your project team. The quality of most POCs is not adequate to directly continue to development. You must start discussions with the customer to ensure that the development assumptions and requirements gathered to this point are correct. This can ensure that the implementation moves in the right direction.
Most project teams prefer detailed technical specifications to be in place before code is developed. This is a difficult challenge to tackle up front in complex developments and requires a waterfall approach to development. More often than not, especially if your customer is not familiar with SharePoint, the customer knows only what he or she wants when he or she sees it. Using an Agile-based development methodology and philosophy helps to balance the amount of documentation required in the initial iteration.
Another important consideration is the design of your Visual Studio project and code structure. Visual Studio structure defines solution names, features, and their behaviors. Take the time to design a proper Visual Studio structure because this can save rework and development effort later in the project.
Assuming that your Visual Studio code and project structure are planned and available, the developer can start implementation. This means that each of the web part classes and all feature definitions have been created based on the specification, but actual business code from the classes is missing. This way, you avoid issues in the structure deployment caused by changed feature associations or new solution packages.
Figure 4-7 demonstrates common development stages.

Content Creation Starts
One of the most important and critical milestones in a SharePoint project is when content creation starts. From this phase forward, daily or weekly builds cannot just re-create the site collection using scripts. You must start using an upgrade model to your environment because you don’t want to lose content that the content editors have already created.
An important consideration related to content creation is deciding on and finalizing the data structure (for example, site columns and content types) of your deployment. Although these can be changed after the initial release, their update requires additional work and potential content patching to ensure no content is lost.
Whenever content creation starts, the development model must be switched to a maintenance-and-upgrade model. For smaller projects with few customizations, this is not a difficult change. But if a solution consists of numerous site definitions or web templates, the change is much more dramatic and must be carefully planned.
Release Models After Production Use Starts
When production use starts, you have additional considerations. All changes to your code base must be evaluated so that they don’t cause any issues with the already deployed features. Therefore, your production upgrade model should be carefully planned.
Similar to SharePoint 2007 and 2010, downtime is required when new full-trust solutions are deployed to SharePoint 2013. If you use the rolling release life-cycle model, a service break is not required. User (sandboxed) solutions can be updated without requiring a service break, as long as the interfaces and features do not change too much. SharePoint apps do not require server downtime but are temporarily unavailable to end users while they are updated. See the MSDN app for SharePoint update process at http://msdn.microsoft.com/en-us/library/fp179904(v=office.15).aspx.
The most important consideration when releasing new customizations is to ensure that a proper rollback strategy is available. Although SharePoint 2013 does not provide built-in, rollback functionality for farm or sandboxed solution package deployment failures, the new app model does provide extensive update and rollback support. For more information on the app update process, see the MSDN app for SharePoint update process article at http://msdn.microsoft.com/en-us/library/fp179904.aspx.
In the case of failed farm and sandboxed solution deployments, depending on the issue encountered, either redeploying a previous version of the solution or restoring database backups are the only solutions to move forward.
Because there are many considerations for the maintenance phase deployments, a detailed road map and process for the upgrades should be created. This is quite common for larger projects that release new versions of your customizations after the initial release.
Figure 4-8 shows a deployment plan where, after the initial release, deployments are done on a quarterly basis.

Release Models
The release model can be described as the process and flow from development to your production environment and includes implementation and maintenance time. It also includes the planning of the processes for maintenance of the servers and software, not just the flow of the customizations, solution packages, and apps.
This section examines several release models, including the following:
- Direct release
- Phased release
- Rolling release
Direct Release Model
One of the models used to ensure flexible SharePoint usage is to use SharePoint Designer in the production environment to customize the portal behavior based on business requirements. The direct release model requires one client environment and your production environment. This approach carries a higher risk of causing issues to end users in your production environment because changes made may impact end-user productivity.
Even though SharePoint Designer provides the flexibility to customize your environment, it may still require some custom code or XML configurations. This would require separate environments to ensure that SharePoint Designer customizations don’t break anything in already-deployed customizations. There is no way of recording the SharePoint Designer customizations to enable you to apply them to multiple site collections. For example, if you have hundreds of different collaboration sites, this model is definitely not the most cost-efficient and is, therefore, not recommended.
Interestingly, sandboxed solutions and apps also fall under the direct release model. Site owners can upload a sandboxed solution to the User Solution gallery and can add an app from the corporate app catalog or, if it has been enabled, from the Microsoft Office Store catalog.
The risk of sandboxed solutions and apps causing catastrophic issues is greatly reduced. Speaking frankly and honestly, although it is highly unlike that these two solution models will result in downtime of your SharePoint 2013 farm, they may result in downtime of a critical site that is key and central to all users in your SharePoint 2013 farm. The key issue here is that a layer of governance is required to protect critical sites from apps and sandboxed solutions that have not been developed and tested to the same exacting standards of the core customizations in your SharePoint 2013 environments. Where feasible, do not directly release to a critical site. Always test your sandboxed solution or app in your quality assurance environments.
A final consideration, when consuming apps from the Microsoft Office App Store, is the dependence created on an external or third-party app developer to respond, in a timely manner, to produce updates for issues reported with their app. It is this loss of control to respond timely that degrade the end-user experience of carefully thought-out SharePoint 2013 deployments.
Phased or Gated Release Model
The phased release model (shown in Figure 4-9) uses separate environments for different phases of the project and incorporates clear decision criteria, which are essentially phases or “gates” that control how releases progress through your environments. Various criteria must be met before a release can proceed through a gate. This model is the most commonly used model in the SharePoint 2007 and 2010 environments because it provides the most opportunity for your operations and governance teams to pick up any issues before the release is installed in production environments.
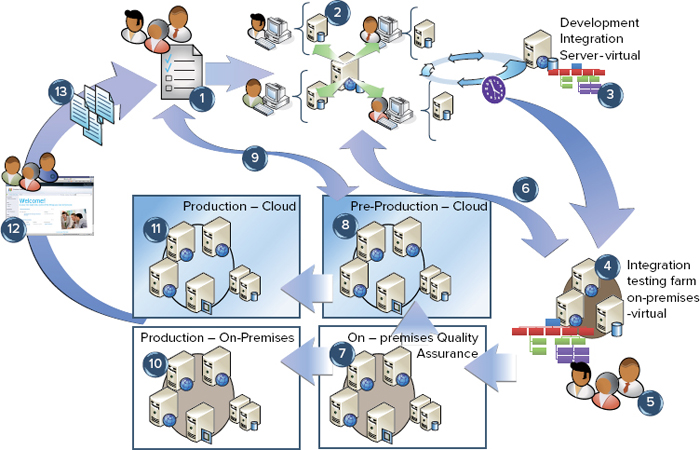
Figure 4-9 includes the following numbered tasks:
The biggest challenge in the phased or gated release model is to keep the preproduction environment up to date with the production environment updates. This model requires following a process as strictly as possible, and all configurations are first tested in preproduction.
Quite often the preproduction user acceptance test (UAT) and testing (QA) farm do not mimic the production environment infrastructure. This makes it difficult to truly verify the deployment actions against production configurations of existing sites and customizations. Although developers may have superhero powers, they still rely on integration, smoke testing, and user acceptance testing of their software release against existing sites that may be touched by the release. It doesn’t need to be all sites, but a good representative sample of sites that will be affected by the software release. This requires a well-maintained and regularly refreshed QA, UAT, and preproduction environment.
Rolling Release Model
The rolling release model (shown in Figure 4-10) uses two primary environments in turn for production and QA environments. This model provides extreme flexibility and increases the overall quality of the released iterations. Basically, the development is phased similarly as with a fully phased model, but the QA and production environments switch their roles during each release.

Figure 4-10 includes the following numbered tasks:
Before customizations are deployed to the preproduction environment, content databases are copied from the production environment so that initial deployment actions can be verified. Final acceptance testing (which optionally includes load testing) can be conducted in the preproduction environment before the decision is made to move to production. For most flexible deployments, these environments should be virtualized so that you can easily increase hardware if new customizations have some additional requirements.
The switch between the environments is done at the load-balancer or DNS level. Before it’s done, content databases in the current production environment are set to read-only mode, which disables all editing options from the SharePoint 2013 UI. (For example, Ribbon buttons are disabled and grayed out.) The portal behaves otherwise as planned, but there’s no way to add any new content. Afterward, the content databases of the currently used production environment are copied one more time to the preproduction environment. When all required databases are available, traffic is switched between the environments from the network load balancer, and the roles of the environments are switched.
The rolling release model decreases downtime required for the releases and ensures that there’s also a backup environment available if something critical happens on the farm (which is acting as the primary farm at the particular time). This not only improves the release model of the customizations, but also helps to minimize downtime during patching of the operating system and SharePoint 2013.
The rolling release model has obvious advantages with the SharePoint deployment. In many enterprise projects, there’s a specific dedicated preproduction or QA environment, which mimics the production environment. Using the rolling release model, this environment and the investments done for the deployment are utilized more efficiently. In cases in which the production environments are virtualized, you can more efficiently use the virtualization platform to provide flexibility between the environments, meaning that you can definitely scale down the hardware capacity of the current preproduction or QA environment and scale up just before the traffic is switched again.
The rolling release model increases the availability of the services because when using this model, no service breaks are required during customization deployment, SharePoint patching, or even operating system patching. Depending on the virtualization platform architecture, the patching of the virtualized hosts may not even cause service downtime. Using Windows PowerShell, you could relatively easily automate the whole process of getting databases between environments and deploying customizations to a farm.
PLANNING YOUR UPGRADE AND PATCHING APPROACH
After a customization has been deployed to your SharePoint 2013 deployment, upgrade and patching considerations come into effect. This section discusses strategies and recommendations to upgrade customizations, and update sites, content, and code in your SharePoint 2013 farms.
Upgrading Solutions and Features
SharePoint provides features for solution and feature upgrade models that should be utilized in customization projects. These make the versioning of the customizations easier and remove the complexity required to modify existing sites.
The solution package manifest supports applying assembly redirections to the web.config file of the web applications. This helps to make the required changes to the applications, if assembly versioning is used as the versioning model for code.
feature framework provides extensive support for versioning features. This provides a method to update existing sites. This can be used not only for updating customizations, but also to manipulate content. There are a number of declarative and imperative code options to upgrade features that are already activated in various sites of your SharePoint 2013 farm.
From a development perspective, you should start using the versioning option as soon as content creation starts, especially when you can no longer delete and re-create site collections and sites. After this key milestone, all new versions of the features must be specifically planned, especially if any changes are required to existing sites.
As previously mentioned, the new app model provides extensive support for updating apps. The update process facilitates two key scenarios. The first scenario is where you need to update an existing App to add new functionality to fix a defect or security issue. The second scenario relates to replacing and migrating from an old app to an entirely new one. The following MSDN article provides in-depth information on updating an app in SharePoint: http://msdn.microsoft.com/en-us/library/fp179904(v=office.15).aspx.
Patching Your SharePoint 2013 Environment
Patching your production environments can be complicated. From a code perspective, this is primarily limited to how you deploy bug fixes to existing customizations and how new customizations are deployed to your environment.
From a content and farm perspective, after your initial code release and when production use begins, users create content; set up and complete workflows; customize and configure sites, lists, and items; fill in meta data based on existing content types; create their own content types; and so forth. Your production environment takes on a life of its own.
Patching
Patching of the code in SharePoint is relatively easy and can be done by updating the solution package (which already exists in the farm). From a code perspective, the only major thing to remember in SharePoint 2013 is that if you have newer versions of features developed, you must remember to increase the feature version and provide the required definitions for the feature upgrade actions.
When new versions of the feature are deployed as part of a new solution package version, the features are not automatically upgraded to the newest version. The feature framework follows the same patching model as other SharePoint patching, in that you can add newer versions of the definitions, but the upgrade doesn’t have to be applied immediately.
The upgrade of feature definitions is performed either by using the PSConfig tool or by using SharePoint APIs, which provides more granular options for the upgrade. Running PSConfig results in downtime for the whole farm, so upgrading using that method is not always the best option. The SharePoint API can be used to upgrade individual features in a site collection or in the whole farm, and this approach doesn’t require any downtime.
Content
Patching SharePoint content means patching or changing already provisioned sites in a production environment. Changing content types of individual list items can be a complex task and requires detailed planning. A content type defines the data structure of an individual data object in SharePoint 2013 that is stored in a SharePoint content database. Modification to existing content types should be carefully considered. SharePoint 2013 supports adding new fields to existing content types as part of the feature framework upgrade functionality. But if you must change content types of existing items, this must be developed as custom code or a PowerShell extension.
Complicated scenarios exist in which code and content updates need to be deployed to your production environment at the same time. For example, an upgraded site definition may now include a new site collection scoped feature. For new sites, this isn’t a problem because the updated site definition activates the feature automatically. However, if the business requires the feature in existing sites, this requires code to activate the feature based on a specific site definition. These types of updates require careful planning to coordinate content or code changes across your farm.
Another example that may require an update to a content type is a base business document type, specifically developed for a business, which is already in use in all sites in production. If the update requires new fields, and moving content between fields, this requires code to update each item that uses the outdated field.
In these scenarios, IT professionals typically request a custom PowerShell extension or custom feature to perform these operations.
The recommended option is to use the new feature upgrade options, which can also provide support for feature versioning for existing sites. You can use this functionality to modify site structures and content in structured ways without any custom methodology, which would cause project-specific processes to be created. A feature framework versioning model can be also extended by using custom code to fulfill additional capabilities.
Other content considerations may also include the existence of different lists and web parts on sites. These can be relatively easily modified using the new feature framework upgrade functionality, which provides the capability to execute any custom code as part of the feature upgrade. This custom code can be then developed to do required changes for the existing structures based on new requirements.
In the following section you concentrate more on practical considerations for your development team planning.
PLANNING YOUR SHAREPOINT TEAM ENVIRONMENTS
The discussion in this section examines the environments required for SharePoint projects and how your solutions flow between these environments.
Environments for Large Projects
In large projects, more environments are required than your production environment. The main reason for additional environments is to provide a reliable QA process to avoid downtime and lost business productivity in your production environment. Figure 4-11 shows the common stages most large projects use to verify the quality of the solution.

Automated Build Environment
The automated build environment or daily build environment is used for daily automated integration testing. This environment is built automatically with the latest code from the source code system and, combined with virtual machine snapshots, can be used for daily testing and verification, depending on your environmental usage model.
The automated build environment is usually created from scratch on a daily or weekly basis using your customizations. Where your customizations include site definitions or web templates, these can be created relatively easily as large site hierarchies to mimic your future production environment. Therefore, you can smoke-test your project code and customizations before they are released to the next stage (for example, to your dedicated test environments).
Testing Environment
The testing environment is either the same environment used for automated builds, or, in larger projects, it is a large, dedicated SharePoint testing farm where specific release builds can be tested. For example, the test environment can be used for weekly builds to enable business and other stakeholders to keep track of development progress.
Similar to the automated build environment, you can start by re-creating the site hierarchy on each release. After your initial production release, your test environment would be used to mimic the upgrade of the customizations already in production.
Although separate testing environments are typically used in larger projects, a dedicated testing environment is highly recommended for all projects that use third-party solutions or development customizations.
Quality Assurance Environments
The quality assurance (QA) environment, the User Acceptance Testing (UAT) environment, and the preproduction environment should mimic the production environment from the point of view of a server layout and configuration so that each of these environments can be used to carry out the required testing. The environment should follow the same guidance for accounts and network-level configuration. This way, you can use this environment to ensure that, if customizations work in this environment, they should be fine for production usage as well.
Identifying the Environments Your Developers Require
There are various adaptations of setting up team development environments for SharePoint 2013 development. However, this depends heavily on the project size and requirements. Development environments should be standardized between the developers to avoid any issues with different versions of SharePoint 2013 or with any other third-party extensions. Standardization also helps to avoid unexplained issues occurring on a developer’s machine.
If virtualization is used, you can quite easily create new development environments for developers. These can be hosted on beefy servers, or alternatively, depending on your virtualization software, hosted on your developer’s machine. It is often more time-efficient to create a new environment (from an image), rather than trying to solve the issues caused by developer tinkering.
Generally, the setup of development environments should be automated as much as possible using scripting and other automation so that new environments can be created as fast as possible.
It is strongly recommended not to share a single SharePoint environment between developers. SharePoint development involves IIS application pool recycles, repeated WSP builds, and code debugging against SharePoint. These cannot be isolated in a shared SharePoint instance. Overall developer productivity will suffer.
Virtualized Dedicated Environments
This model is based on using virtualization software on the development computers to host an instance of the SharePoint and development environments.
Development environment isolation avoids any issues with developing multiple projects at the same time. You can use a native server operating system during the development phase, which minimizes any issues caused by the operating system platform. This increases the overall knowledge of developers about the native operating systems used in SharePoint production environments.
Windows 8 now supports client-side Hyper-V and can host a virtualized instance of your SharePoint 2013 development environment. For users using Windows 7 and Windows Vista (SP2) operating systems, other virtualization vendors provide software to virtualize and host the SharePoint development environment. In this scenario, a local instance of SQL Server, SharePoint 2013, Visual Studio, and any other tools are installed on the virtual machine and hosted on the developer’s computer.
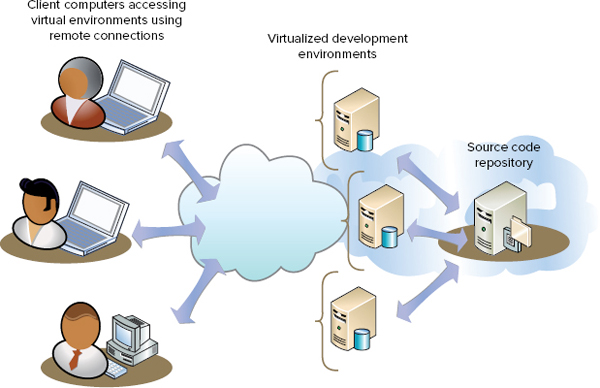
Figure 4-12 shows an example of a virtualized dedicated environment as described here:
- Each developer requires a powerful computer to host the virtualization environment. According to the Microsoft recommendation, at least 16 GB of RAM is required for your virtualized instance.
- A SharePoint development environment hosted on the developer computer can be accessed either by using remote connections and a desktop or by using Hyper-V. Virtual environments are either located directly in the corporate network to facilitate access to enterprise resources (such as Team Foundation Server) or environments that have two network cards (one for the internal domain and environment and another for accessing corporate resources).
- A centralized source code repository (such as Team Foundation Server) is used to store all developed source code.
- Physical servers (or set of virtualization host servers) host testing environments and other services.

From the developer’s point of view, this is a flexible model because all other applications used in daily work (for example, Office client applications) can be easily accessed and used, and the virtual instance of your development environment can be turned off when not required.
Another benefit of this model is the ability to snapshot your development instance after it has been configured. This enables the developers to roll back to a previous state or alternatively a clean state before starting a new project.
A key consideration is whether the development machine’s main purpose is for development associated with a single project, or if it will be used across a number of clients or projects. If the physical machine is based on an image and is solely for use on one project, the risk is reduced. With constant development, the quality of a SharePoint 2013 instance degrades and becomes “fragmented.” Even with a re-install, these problems may not be easy to eradicate (for example, Registry edit problems).
Dedicated computers require sufficient hardware to host the virtualized environments. Lack of sufficient hardware can impact the virtual SharePoint machine’s performance and may impact development productivity. If the virtualized development environment creation is automated, overall productivity will be better because developers can take new, clean development environments when needed. An automated, virtualized environment configuration can ensure that there’s a new, clean environment available (with the latest source code) within 15 minutes.
Numerous different virtualization techniques are available to choose from:
- Because SharePoint 2013 is 64-bit only, it must support hosting 64-bit operating systems. According to Microsoft, this model requires a minimum of 16 GB (24 GB is preferable) of memory to ensure that both client and host operating systems perform adequately. More memory equates to better productivity for each of your developers.
- Ensure that you provide hard disks that perform because these will host the virtual machines. If your organization still uses Windows 7, one option with Windows 7 is the Boot from VHD option, which enables the virtualization environment to be loaded as the primary operating system when the computer is started. With this option, the overall hardware requirements can be lower than mentioned previously. Nevertheless, the storage capacity must be sufficient to host multiple virtualization environments for different purposes.
One of the advantages of this kind of model is that individual developers don’t need to have connectivity to the corporate network during development. This model enables easier and more flexible development, regardless of the developer location.
Centralized, Virtualized Environments
A centralized, virtualized environment is a development environment model where development environments are hosted on the centralized virtualization platform, and developers use remote connections to access these environments.
This model provides numerous advantages compared to environments hosted in the computers used by developers because this model provides centralized management of the development environments. Individual computers used by the developers in their daily work do not require powerful hardware. These computers are only for hosting client-side applications (such as Office clients and other productivity applications).
Figure 4-13 shows an example of a centralized, virtualized environment. Note the following in the figure:
- Individual developers don’t have SharePoint installed on their local computers. They connect to the development environments using remote connections.
- Development environments are hosted in a centralized virtualization host.
- All active developers have their own development environment, which can be accessed using a remote connection. The environment is located either directly in the corporate network, or it has two network cards for having an internal domain and still can connect to the corporate network.
- Source code and other artifacts are stored in a centralized source code repository.

Because virtualized environments are centrally managed, they can be easily and efficiently used based on the current usage requirements. When they are not needed, this hardware can be dedicated to other environments. This results in cost-savings based on the efficient utilization of your available hardware. Similar models can be used to suspend development environments while spinning up testing environments and performing overnight tests. Ensure that individual developers are not blocked because of a lack of access to their centrally hosted virtualized SharePoint environment.
Individual virtualized development environments should still have at least 16 GB of memory dedicated to them. However, overall memory can be more efficiently used by the physical virtualization host machine.
In large projects, centralized virtualization platforms are often nevertheless used to enable integration testing and QA environments.
Hosting development machines requires expensive hardware for the centralized virtualization hosts. In many projects, these environments have been purchased as part of the project setup phase. After the primary development phase has ended, the same host can be used for hosting maintenance development environments, or, alternatively, for other projects.
Cloud Environments
In this model, development environments are placed and hosted in the cloud and accessed from developer computers using remote connections. The biggest advantage of this model is that there’s no requirement to invest in on-premise expensive hardware, but rather to rent and consume from cloud-based services for the duration of the project.
Depending on service provider, the costs may be based on usage (in other words, the actual time when the cloud services are accessed). This minimizes secondary costs because you pay only for the time you use your environments. Using this model, you can spin-up your testing environments in the cloud whenever required.
From cost-management perspective, the biggest advantage is quite simply that developers need to have only a computer with Internet access and use remote connections to access the cloud-hosted development environments.
Figure 4-14 shows an example of a cloud environment. Note the following in the figure:
- Developers work from a computer with Internet access.
- Development environments are hosted in the cloud and are assigned to the same network segment as the cloud-located source code system.
- Source code systems (such as Team Foundation Server) are hosted in the cloud.
Development environments set up based on this model are extremely interesting options because they provide the potential for endless hardware capacity for your project and can be easily scaled up and out.
Identifying the Environments Your Testers Require
Efficient testing and QA require consistent and stable testing environments. Multiple testers can conduct testing in a single test farm because all are accessing the environment as users of the SharePoint 2013 system.
Testing is critical to the success of your project. Testers shouldn’t need to worry about setting up environments or configuring preliminary settings as long as documentation and configuration of environments is not part of the quality assurances tasks to be taken.
All configurations required for the testing environment should be automated as much as possible. This way, the tester can concentrate on manual tests and verifying that your customizations work properly, rather than spending time on nonproductive actions.
Ensure that testers perform tests on machines that reflect the operating system, Office System Suite, and browser version of the business. For example, different defects will be picked up on a Windows Vista, Office 2007, Internet Explorer 8.0 browser build as compared to a Windows 7, Office 2010 and Internet Explorer 8.0/ 9.0/ Firefox or Windows 7/8, Office 2013, and Internet Explorer 8.0/ 9.0/ 10.0/ Chrome/ Firefox/ Safari.
Testers should be able to access the daily build environment to follow up on the progress of task and defect resolution so that all code is immediately available for testing. This way, developers can receive feedback on their enhancements and bug fixes. This enables issues to be resolved as soon as possible before a build is available to a wider audience.
MANAGING SHAREPOINT 2013 DEVELOPMENT TEAMS
Each SharePoint development project is made up of a unique team of talented individuals, each with their own preferences, code patterns, preferences, and style of working.
This section covers a number of important areas:
- Selecting software development methodology
- Setting development standards and best practices
- Managing, tracking, and recording key design decisions
- Planning for regular code reviews
- Large project considerations
- Large project life-cycle models
- Departmental teams
- Offshore teams
It is fundamental to set up the development team properly to ensure your SharePoint 2013 project will be successful.
Selecting Software Development Methodology
Usually, SharePoint projects are based on Agile development methodologies. Development occurs iteratively, and deliverables are divided into a smaller set of entities, which can then be delivered at different times. These methodologies are popular because they provide visible progress on the project. By splitting projects into smaller iterations, you can track the individual tasks more easily and follow up on the overall progress of your project.
The selection of a software development methodology may also be influenced by whether the project is in-house, offshore, or a partner lead delivery. In-house or partner-led deliveries will more than likely use a methodology the team has already adopted and can understand. Although offshore development and test teams may use an Agile or Scrum-orientated approach, they benefit greatly from an onshore waterfall process that require rock-solid requirements, technical specifications, and as little ambiguity to ensure the business or supplier receives the level of quality the first time around. Using the incorrect methodology with an offshore team may decrease the commercial viability of using an offshore team.
One of most well-known methodologies or frameworks for iterative projects is Scrum. Scrum can be a useful model for development but requires adequate resources to use effectively. The core plank of Scrum is to develop in iterations and have regular follow-up meetings on progress and next tasks. If the development team does not have good development leadership, or individual team members cannot plan their work adequately, this strict methodology can cause additional resource requirements and confusion for the project team members.
The software development methodology must include activities and processes that ensure and maintain the highest level of security. Retrofitting security into existing solutions is more costly to introduce, it increases the cost of ongoing maintenance, and it increases the likelihood of vulnerabilities being introduced when subsequent changes are made.
SharePoint solutions, in my experience, do not often start out as business critical solutions, but they always invariably end up as business critical. As a rule, never accept a portal deployment or custom development into a production that cannot show it has strived for and adheres to security best practices. This includes ensuring your team members have the training and support to produce code that is secure and is not vulnerable to standard attacks.
Regardless of the methodology employed, each member should always have clear responsibilities, estimate accurately, and report risks and issues early to the development lead and project manager. Development teams must be able to break their work into tasks that can be managed against a project schedule. Methodologies can help projects move forward, as long as project members realize that methodology is not the objective of the project, and they concentrate on the deliverables. Unfortunately, for some projects, intense focus is placed on following a methodology rigidly, which can be a detriment to the project delivery and real business value.
Lastly, using a methodology provides an industry-proven process and team structure, with clear guidelines, responsibilities, and activities. This is highly beneficial to managing scope, avoiding cost, and schedule overruns.
Setting Up Development Standards and Best Practices
It is vital that the SharePoint architect, technical architect, or development lead plan document and share a set of development team standards and best practices. As a Microsoft Gold Partner or supplier, always attempt to understand if the customer has existing policy documentation related to acceptable development standards, and make sure your team adheres to these standards.
Development standards include the following areas:
- Plan a consistent set of development environments for your development team.
- Develop a code project solution organization and management of the code project structure.
- Plan and set up your application life cycle management tools such as Team Foundation Services (TFS). This includes configuration of the source code control system to set up versioning (numbering), branching policies, and any add-on packs required to support your development methodology; for example, Scrum or Agile add-on packs.
- Plan your build process for development and integration builds on the build server.
- Configure TFS to kick off builds on the build server on check-in of any source code. In addition, ensure developers are alerted to any failed builds so that they can fix them as quickly as possible.
- Decide on the level of automation required for your project. For example, mature development teams deploy nightly builds to a snapshotted SharePoint 2013 environment and kick off a batch of tests for developers and testers to review in the morning.
- Plan and ensure quality of source code commenting and code style using source and style analysis tools available for Visual Studio and TFS.
- Set out a consistent set of patterns you want developers to follow relating to the development of common SharePoint 2013 customizations. Consistent code patterns drive high quality and reduce your bug count.
- Think about the level of code layering you require for your project. Do you plan to interface directly with the SharePoint object model or abstract some of the direct interaction to the manager and entity classes?
- Set out the types of unit tests, mocks, or coded UI tests you expect the development team to create.
- Plan up front what type of documentation is required by the customer and the deployment team to support, deploy, and maintain any code solutions in the production environment. This may include use cases, use case realizations or technical specifications, component maps, application architecture document, readme, and deployment configuration guides.
- Set out what coding standards should be adhered to. Examples include namespaces, exception handling (no empty try catches!), and user interface logic. Ensure the build process performs SPDisposeCheck!
Managing, Tracking, and Recording Key Design Decisions
Each key design decision should be tracked in a SharePoint list or Excel spreadsheet. The same applies to key software and infrastructure design decisions. Without a formal process, the same decision tends to get rehashed over and over again. When a key decision is made, it must be documented. This ensures traceability back to the original decision. When future projects occur and people ask why the architect designed the solution in a certain way, often the information and clear-headed reasoning is lost in the shifting sands of foggy memory.
Planning for Regular Code Reviews
Your development lead or SharePoint technical architect must plan time into the schedule to perform regular (weekly or sprint) code reviews to ensure code produced adheres to SharePoint 2013 development best practice.
- Code has been packaged for deployment so that it can be deployed to various development, testing, user acceptance testing, preproduction, and production environments.
- Code revisions have a revision history and appropriate comments in TFS.
- Code revisions have associated tasks, and the developer has not overridden your check-in requirements.
- Code has an appropriate level of logging and instrumentation.
- Using statements have been appropriately applied to release resources as early as possible.
- Code performs in run-time conditions when a component is hit; for example, 1,000 times a second. Does the code hit a shared component that will not cope under the load?
- Code profiling tools, such as ANTS Performance Profile, do not pick up badly performing code.
- Exception handling is present and appropriate. No empty “try catch” blocks, and preferably “try catch finally” code blocks exist.
- Security-related checks include any code that runs with elevated privileges and require elevated permissions. Ensure that sufficient defensive checks have been put in place to reduce the attack surface.
- Code is written once and reused as much as possible.
- Code is not overly complex. It should not require a genius to decipher and maintain. The ACID test for any code is, “Can someone else maintain the code after the individual is no longer on the project?”
- HTML code complies with validation tools and meets the accessibility requirements of the customer.
All code must be peer reviewed, and final code should be signed off by your development or team lead.
Large Project Considerations
Large SharePoint projects have challenges similar to any large project in which many people work on the same goals. For example, these challenges may include unclear (undefined) responsibilities, tasks, schedules, roles, and so on. Challenges must be addressed by proper planning of not just the project deliverables, but also the development, testing, and release process.
Large Project Life-Cycle Models
Especially with large projects, you must have clear responsibilities and development processes defined for the different features that are developed. The most common way to handle large development projects in SharePoint is to divide the features into multiple code projects and solution packages. That way, each feature project can consume common and shared services from one common framework. This means that, from a solution perspective, the design would be similar to the one shown in Figure 4-15.

Figure 4-15 demonstrates how code and features could be efficiently divided between multiple different Visual Studio projects and solution packages. Framework.wsp contains abstract code, which can be used in any SharePoint deployment. Good examples for this kind of code would be logging, caching, and configuration services. Copying this kind of general code to each Visual Studio project or code structure is a waste of resources because it could be deployed and versioned as an individual package and then used by different projects.
Individual projects (Project X and Project Y) are large projects that provide different features (refer to Figure 4-15). Having a general, common solution package or code layer, you can easily share project-dependent features between different individual features. A good example of this kind of functionality would be custom master pages, which are used in different site definitions or web templates. This way, you could easily maintain and update UI-dependent functionality without, for example, being forced to do changes on the new feature or solution package.
Individual features in projects are divided into individual Visual Studio projects and solution packages to maintain and upgrade them individually. This way, these features could be individually tested and verified, even if other functionality is not available.
Customization architecture and deployment architecture have a direct impact on the overall maintenance costs and processes. Therefore, your model should be carefully planned based on your requirements. The example in Figure 4-15 is suitable for independent software vendors (ISVs) that develop many services for multiple customers. By separating framework layer code at the deployment level, each project can take advantage of any new base services introduced. Possible fixes can be performed to multiple projects by updating an individual package. As a result, individual project developers can concentrate on solving business logic requirements.
Figure 4-16 demonstrates the flow of development in larger projects where the framework-level code is separated into its own layer.
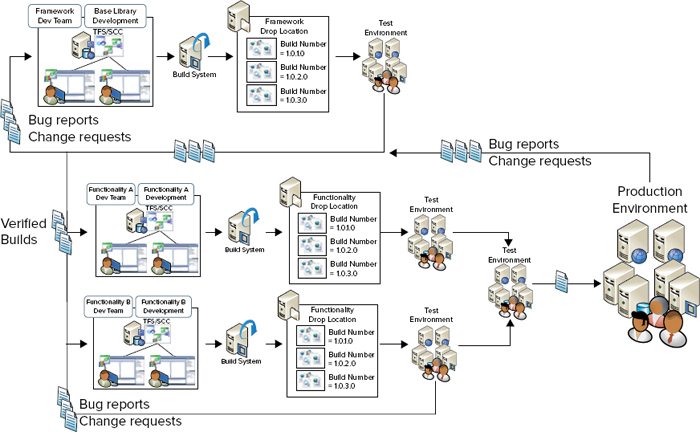
In this model, development teams are responsible for their own features, and dependencies are created for specific versions. For example, a framework-level development team has its own versioning model, and the team releases tested and verified versions on a weekly or monthly basis. Individual feature development or projects reference and use these stable and tested versions as their building blocks.
feature teams can use any suitable version of the framework that matches their requirements and schedule. This kind of approach provides flexibility for the individual feature teams when planning their development iterations and road map. If multiple features or projects are deployed to the same target environment (such as a SharePoint farm), projects must use the same platform-level version. But if the features are deployed to multiple targets (such as an intranet farm and Internet farm), features can use different versions of the platform-level services.
From a road map-level planning point of view, this kind of model requires a little bit more coordination to implement. But in the long term, it will definitely produce a return on investment by increasing productivity and decreasing time required in the maintenance model.
This model doesn’t require tens of developers on the team. This model is also suitable for smaller development teams, where developers are shared between framework- and feature-orientated projects.
Decentralized Development Teams
One of the growing development models is the decentralized development team-based model, where IT provides a centralized platform for the individual features, and departments or decentralized development teams are responsible for (or in charge of) individual features introduced for end users. These kinds of models are great and flexible as long as the platform and environment are carefully managed.
If the decentralized development teams require only small customizations (such as branding changes), Apps and sandboxed solutions in SharePoint 2013 provide an extremely flexible platform to introduce changes and customization at the site-collection level.
By providing a centralized IT-driven platform, organizations and departments can take full advantage of the flexibility of the platform. IT may also provide centralized services to be available to decentralized development team releases, such as fully trusted proxies for sandboxed solutions if there are requirements to access some secured resources (which normally are not available from the sandboxed solution code). Additionally, the apps model caters to many new scenarios that were previously only accomplished using the sandboxed model. Apps can be developed by the decentralized IT team and submitted to the central IT team for deployment and inclusion on the internal app Corporate Catalog.
Offshore Teams
If offshore models are utilized properly, they can provide significant cost-savings in the development stage. Often, however, organizations do not completely understand the implications and what is required to use an offshore team.
For example, what methodology is suitable, what level of technical specifications are required, what onshore and offshore resources are required, what subtle cultural issues must be understood, QA, onsite development leadership, offsite project management, and planning and guidance for the customizations to be implemented all must be considered.
Efficiently utilizing offshore development teams and enabling individual features to be developed unfortunately tends to require a waterfall-based approach, where a great deal of upfront planning, thinking, designing, and documenting is required. There must be little to no ambiguity in any documentation. Your user experience and portal brand design must be completed earlier on in the process to enable offshore developers to avoid delays and ambiguity during the development.
For example, this means good documentation of any platform-level services and details concerning individual styling of the customizations (such as web parts). If roles and responsibilities are defined properly, and there’s constant follow-up on the customizations, offshore development can be extremely cost-efficient. It requires extremely good project management and QA on the onshore end to ensure that features work is specified in the documentation.
Other considerations for offshore development are the customization ownership and how the source code is secured. If development occurs both onshore and offshore, access to the same centralized source code system must be provided. Figure 4-17 shows one model of having development synchronized between onshore and offshore teams. Note the following in reference to the figure:

- The onshore development team uses remote connections to access centrally deployed development environments.
- A centralized virtualization host is used for development and QA environments.
- Individual development environments are included.
- A source code system (such as Team Foundation Server) is included.
- A virtual private network (VPN) or other remote connection port provides access to corporate resources from external networks.
- Offshore developers have their own development environments connecting to Team Foundation Server from Visual Studio.
Optionally, you could also provide individual development environments for the offshore team, which would also be hosted in the centralized virtualization host. This could be possible as long as the offshore team could access the corporate network.
In this kind of model, the integration point of the onshore and offshore customization is the source code system from where actual builds can be then created.
MANAGING SHAREPOINT 2013 TESTING TEAMS
Testing practicalities depend on the project size and objectives. Unfortunately, projects quite often do not always concentrate on these topics enough during the development phase. A key indicator symptomatic of not understanding the value of testing is the time your project has reserved for it. This is a classic mistake in research and development, as well as in customer-oriented projects, which often delays the deployment to your production environments.
Setting Up a Testing Strategy
Set out a test strategy, or plan for your test manager to produce a test strategy that describes the approach that will be used to test the solution and the areas that will be tested. The test strategy should cover the following areas:
- Human Resource — How many resources are required to test the solution?
- Hardware requirements and environments — This covers the hardware requirements and environments required to adequately test your SharePoint 2013 platform and solution.
- Software requirements and specialist testing tools — This covers what software is required for the hardware and the software testing tools needed to adequately test the solution.
- Test case creation process — This covers what test cases will be written and the steps required for each test.
- Types of functional and nonfunctional tests — This covers how common SharePoint 2013 customizations will be tested, as well as the nonfunctional tests that will be performed. For example, this may include tests related to accessibility, localization, security, compatibility, performance, maintainability, and data migration.
- Testing stages — This should cover the unit, component, integration tests, system, regression, and user acceptance tests.
- Defect tracking — Defect tracking specifies what tool will be used to track defects. In Microsoft-orientated projects, Team Foundation Server (TFS) is often used as the tool to track defects.
- Defect classification strategy — The defect classification strategy ensures each defect is uniformly categorized and prioritized based on an agreed set of severity definitions. Examples include 1-Critical, 2-Major, 3-Minor, and 4-Trivial. This is important because customers often stipulate test exit criteria in the commercial contract that specify the maximum number of defects allowed for each severity definition.
- Triage strategy and triage process — This process is used to classify and prioritize defects. This meeting occurs regularly during the development stages of the project and daily during the stabilization phase near the end of a milestone.
One final area to plan is the test team roles and responsibilities; that is, the responsibilities of the test lead and the test team members.
Unit Testing
Unit testing is used to ensure that individual units of source code work as expected. Unit testing can be performed either manually or using automation by writing code-based tests to verify the code works properly.
For unit testing, one of the challenges in SharePoint development is the nature of SharePoint code and how developers implement logic in the user interface (UI) classes (such a web part or custom control). This makes it difficult to test business logic residing in the UI class, and this makes it even more difficult to ensure that your automated unit tests cover the majority of your code base.
If your customizations implement well-known patterns such as model-view-controller (MVC) or Model-View-ViewModel (MVVM) patterns, this can make it easier to test the logic of your UI classes.
Automated Builds and Integration Testing
Automated builds are used to automate integration testing of the customizations using a daily schedule, or whenever a developer checks in code. The objective is to ensure that code created by your development team integrates without any issues. This prevents large integration phases where overlapping code requires fixing and rework, and enables you to take a build at any time to deploy to other environments (such as your test environment).
Often, automated builds are extended to include other activities, such as unit testing or automated functional testing. By scheduling these to be actioned automatically, you can save on overall costs concerning quality assurance (QA). You can provide a new fully working version of the latest checked-in developer customizations in your test environment daily. When the customer or the tester arrives at work in the morning, results and indications of the expected test result will be available to analyze.
For example, say that you have already deployed a release of your solution to your customer (internal or external), and you want to ensure that the following iterations or maintenance builds could be easily deployed or actually upgraded over the existing environment.
In this kind of scenario, you can use the model defined in Figure 4-18. Here, you test the upgrade actions that must be performed as part of your automated build. Combining virtualization techniques, you mimic your production environment against your daily build. In a best-case scenario, you would have a legacy copy of your customer content databases from the production environment to perform this daily test.

Understandably, it is not always possible to have a copy of production data in your test environments. You can still complete the following steps in Figure 4-18:
Automated builds can provide much more than just integration testing of the customizations and code. You can use a similar model before the initial version is available to re-create the portal on a daily basis. For example, you could create Windows PowerShell scripts that would create the initial hierarchy for the future intranet. After developers update the web templates with the latest changes, you would test the latest features on a daily basis. However, the primary purpose for this kind of daily build environment is not to create content because all content would be deleted or re-created every day.
The overall life-cycle models are examined earlier in this chapter in the “Planning your Customization Model and Release Packaging Approach” section. However, if you have requirements in your projects to provide a long-term testing environment for your customer, a target server for your daily builds would not be it. Good practices for these kinds of requirements would be to have a separate weekly release cycle for the environment, which can then be used for functional testing by your customer.
Test Case Planning
Test cases should be documented based on the original business requirements to verify the features of the individual elements and customizations. Test case documentation should be written at a level that people who are not technical or part of the implementation phase can perform the testing by following the documented test cases.
Where possible, some of the test cases can be recorded as web tests using Visual Studio Team System. These can be automatically executed as part of your daily build. This way, you can decrease the amount of overall resources required for actual testing.
Test cases should always be created for your development customizations. At the highest priority, they should concentrate on verifying the customizations, not out-of-the-box features, which have already been tested and are supported by Microsoft. If customizations include highly customized master pages, it is good practice to verify the standard out-of-the-box features because heavily customized master pages may break out-of-the-box features.
A common mistake with test case creation is that they are written based on already developed customizations. This results in a low-quality test case that tests the current outcome, not the original business requirement. You should test based on the original business requirement!
Each test case should have a high coverage of main and alternative outcomes of the individual feature. Another common issue is overly automating the setting of properties (for example, web part properties) in your script. This may lead to false verification because each test is testing only success cases and does not verify issues related to wrong property values.
You should consider the following when planning test cases:
- Missing configurations in SharePoint for checking error handling of the web part
- Invalid entries as configuration values for the web part with expected error handling
- Using a web part in alternative places, not only in the planned location
Each test case should include a clear definition of what is and is not tested. This helps a tester focus on the relevant issues. For example, a separate test should be used to check UI consistency across a number of customizations, rather than in a specific test case focused on the features provided by the customization. Each test case should have clear passing or failing criteria. This requires the expected outcome to be defined in detail.
Because many of the SharePoint customizations are based on some out-of-the-box features or services, each test case should also include the prerequisites from an environment and resource point of view. For example, testing a custom search results web part requires the correct configuration in your testing environment.
Performance Testing
Performance testing can be considered from either the IT professional or development point of view. From the IT professional point of view, performance testing ensures that the hardware is adequate for the planned usage and identifies performance bottlenecks. From the development perspective, performance testing focuses on reducing the impact on server resources per page request, the page payload size reduction for first and subsequent requests, and, lastly, the efficiency of client-side code.
A common mistake made by many development teams is a failure to use .NET code-performance profiling tools to proactively analyze and optimize the efficiency of their code during the project development cycle, rather than reactively when an issue is reported by the IT professional team, or, even worse, in production.
Following are some other performance testing considerations:
- Mature test environments — To get repeatable results, the environment should be stabilized and documented so that in subsequent releases a similar setup can be created. Ensure that the environment does not have any other load so that results and metrics are comparable to previous test results.
- Population of test data set and information — Create scripts and tools to populate the required information, which mimics the production usage. There’s no point testing intranet performance if it actually doesn’t have any content or site structures.
- Deciding the adequate stress level for testing — Plan your stress test usage models based on available capabilities of the tools you use, such as how many concurrent users access the site.
Performance testing activities depend on the life-cycle stage of your project and deployment. You can conduct performance testing in this environment before the initial release or public release is done to your production environment. Because you most likely cannot repeat a performance test in your production environment in later releases, it’s beneficial to conduct a test also in an alternative environment, which can then be used in future phases as your baseline test environment. This means that if in the following phase performance decreases 10% in your reference environment, it will do the same in production.
Test results with this kind of baseline testing are not precise but can provide you a clear indication on the performance impact of the changes applied in a particular version.
Multiple simulated performance tests should be performed before the implementation phase of the project starts. Identify performance bottlenecks as early as possible to avoid development rework in later iterations. A good practice is to conduct performance testing as soon as you have a feature-ready release. Continue to repeat performance tests to demonstrate improvements against your initial performance benchmark. Continue repeating performance testing for maintenance releases done after the initial release of the customizations.
For example, say a previous intranet project follows the release cycle defined in Figure 4-19. As you can see from Figure 4-19, there were five iterative releases during development, and after that, development was changed to a quarterly release mode with optional bug-fix releases between quarterly releases.

Version 1.0 of the performance tests was created at the same time as the feature-ready release, meaning a release when all functionalities have at least high-level functionality available based on requirements, but when implementation has not yet been polished for actual production usage.
These tests were updated and performed three times before the actual production release to identify possible issues as early as possible and to ensure that any fixes do not degrade performance. Each new major release provided updated performance tests. More important, the original performance tests used against Version 1.0 are performed to compare previous and current results.
By including performance tests in the portal life-cycle model in the maintenance phase, you can test the implication of changes to your production environment (such as patches to an operating system, a SQL Server, SharePoint cumulative updates, and service packs) and your customizations.
Functional Testing
Functional testing should be performed in an environment that simulates your production environment to ensure that your features and customizations are working properly. Even though SharePoint 2013 can be deployed to a client operating system, do not use this as your testing platform because the behavior will differ from a server-side test environment.
For midsize or large deployments, you should use a separate QA environment that mimics the production environment. You must realize that a testing environment should be based on multiple servers and not one server. For example, multiple Web Front Ends (WFEs) and load balancing cause a user’s page request to behave differently than that of a single server.
Functional testing should be based on the test cases representing the business requirements to ensure features are properly verified before moving to the next stage in the deployment process. If automated tests are used in the project, manual functional testing should concentrate on areas and features that cannot be tested reliably using automation.
In SharePoint deployments, functional testing contains both solutions testing and UI styling verification. For example, issues related to UI rendering is a good example of a test that is quite often not precisely tested in projects.
User Acceptance Testing
User acceptance testing is the final verification of the version or deployment before it is deployed to the production environment. Quite often, business and key stakeholders are involved in the execution of the tests. This involves a combination of manual execution of “use cases” and test cases produced in previous steps of the project life cycle. User acceptance testing is a key milestone that helps the business and project stakeholders decide whether to move forward with your latest solution.
User acceptance testing should always be conducted for any solutions moving from preproduction to the production environment. It should also be conducted by the “customer” of the project and not by the developers. You must document the findings to enable project stakeholders to decide on the next actions. For example, these might include signoff or acceptance of your release and possible remaining issues to be fixed.
From a project management point of view, always remember that a completely bug-free solution is rare. In most projects, the project and business teams have decided on the maximum number of bugs at each severity level. Ensure that you provide enough time to respond to issues that may be picked up in user acceptance testing. Therefore, do not schedule user acceptance testing too close to your release date. Ensure that you have a buffer.
Defect Tracking
Numerous methods exist to manage defect tracking, and many different tools can be used. At a minimum, all relevant project team members should have access to enter and edit defects in one centralized location. In SharePoint projects, defects are usually tracked within SharePoint or using Team Foundation Server.
SharePoint provides issue tracking lists that can be further customized based on project need. The challenge with using a SharePoint-based tracking list is that developers would have two different tools to use. Team Foundation Server is the preferred approach, which provides nice centralized task lists directly in Visual Studio for developers. All other project team members could use the Team Foundation Server web access to manage issues and bugs.
When testing is planned, it’s also important to agree on the process of handling defects and how they should be documented. Following are some key considerations for the creation of defects:
- Priorities — Each defect should be prioritized so that bug fixing can start from the most-critical issues and move to less-important issues. Prioritization should be agreed on by team members for the project to avoid all defects being prioritized too high.
- Descriptions — Each defect should have a detailed description of the issue. There should always be some business requirement or specification pointer, which justifies why it is a defect. Defects shouldn’t be used to sneak enhancements into your project scope. Only use defects for existing features. The description should provide enough detail to reproduce the issue; otherwise, it will get lobbed back to the tester as Unable to Reproduce. If the issue cannot be reproduced, there’s no way to ensure that it’s fixed after code changes.
- Screen shots — Screen shots provide a simple and efficient way to provide more information on the encountered issues.
- Time — SharePoint has extensive logging, which provides additional information on an encountered error, or it can even be used directly to solve the root cause of the defect. If there’s no exact time on when the bug or issue was encountered, there’s no way to use this valuable information. Remember that your development team may work in different time zones.
Other Testing Considerations
Testing should be planned carefully to ensure that the required quality level is met. Testing should be a clear phase in the overall project plan and not considered as a buffer for development.
Because testing is based on requirements of the project, test planning can be started at the same time as the planning of the technical architecture or customization architecture.
When testing is conducted, ensure that user accounts with different levels of permissions are used to identify any permission issues in the code or configuration. Ensure that your developers verify that their code works in their development environment using different users and permissions before checking in their code.
SUMMARY
Many considerations that (unfortunately) are quite often overlooked in large SharePoint projects can help your project teams become more successful during the development, testing, and deployment phases of your project. This chapter discussed many of these considerations, and especially focused on a detailed look at what is required in large projects.
What does a large project actually mean? When should you follow this guidance? The answers to these questions are based on many factors, such as the size of your SharePoint farms; the degree of customization; the priority of your project to the business; the quality you require of the development, testing, and deployment deliverables; and your future road map. Many of the concepts discussed in this chapter apply to projects of all sizes and should be followed to improve the maturity and discipline of your development, testing, and deployment teams.
Future maintenance requirements should weigh heavily on your architecture patterns and key design decisions. Ensure key development through deployment processes are set up and followed. Consider that, after your initial version has been deployed, it is so much more expensive to fix than if you get these right in your initial version.
Unfortunately, there is no silver bullet to enable you to select the correct model for each project. Even though you may not plan processes and architecture in detail, you must make an informed choice, rather than making a decision with no understanding of the impact.
Throughout the rest of the book, you learn more details about these new features and learn how to program against these features to build robust and capable SharePoint 2013 applications.