
Chapter 17
Developing Excel Applications in SharePoint 2013
WHAT’S IN THIS CHAPTER?
- Building Office 2013 apps with Visual Studio
- Consuming Excel Services OData and REST APIs
- Using Excel Services Web Access JavaScript
- Adding and accessing rich data with Excel
- Creating Excel Services UDF functions
WROX.COM CODE DOWNLOADS FOR THIS CHAPTER
The wrox.com code downloads for this chapter are found at www.wrox.com/remtitle.cgi?isbn=1118495829 on the Download Code tab. The code is in the chapter 17 download and individually named according to the names throughout the chapter.
Excel is one of the most-used application platforms for constructing business applications. Excel provides the ability to have complex business logic along with displaying data and rich chart support. It is no surprise that Microsoft wanted to take those experiences a step further and enable these Excel applications for all users to consume and interact with. To accomplish this Microsoft introduced Excel Services with SharePoint 2007 and has been improving the experience with each version. Now in SharePoint 2013 the new features are more focused on the web-based technologies and enabling developers to take advantage of the rich set of APIs.
Excel Services can be thought of as the engine that drives Excel on the web. It is responsible for displaying workbook data, tables, and charts or content, making web-based calls to data, and running large calculations on an application server in your SharePoint Farm. Excel Services is much more than just Excel on the web. You can use it to build the same complex applications on the desk as you can on the web. Simply put, Excel Services lets you upload E spreadsheets and then access the data or display them on your SharePoint site or any other web page.
The introduction of Excel Services and having the ability to interact with Excel workbooks on the web was an amazing step forward, but Microsoft also wanted to make it easier to view, edit, and update Excel workbooks directly on the web. Excel Services did not provide all this functionality, but luckily Microsoft introduced Microsoft Office Web Apps. SharePoint 2010 introduced the Microsoft Office Web Applications, but they have become developer platforms with SharePoint 2013 and the new Office apps that can be built either in the client or within SharePoint. As you see in this chapter, you now have the ability to work with Excel workbooks using Excel Web Apps, but also have amazing options for programming solutions with the Excel Services API.
Some of the key features of Excel applications are
- The ability to upload workbooks and view them in the browser
- Web-based endpoints with REST, OData, and SOAP
- Scripting APIs for rich web-based apps
- Apps for Office for full enterprise experiences in the client and web
As you can see in Figure 17-1, the goal of displaying rich Excel data is still one of the primary scenarios of all the tools of Excel. Depending on your requirements, you might use only a few aspects of Excel applications or all the components together.

WHAT’S NEW
Excel applications related to SharePoint have become more than just Excel Services applications. The whole suite of tools now used to build these applications includes the rich client application with Apps for Office, Excel Web Apps, and Excel Services. There have been improvements in each area with a focus on allowing developers to create applications quickly that can be reused no matter what the viewing surface.
Updates to the Client
Many of the changes to the client are based on the general user and the user interaction of the client application of Excel. There are updates to the user interface of Excel as well as many of the wizards that you notice as soon as you start using the rich client.
Some of the new features include:
- Flash Fill
- Web service functions
Customization Enhancements
Excel and Excel Web Apps now enable a new type of development called Apps for Office that enables you to develop applications that can be rendered inside of the client application. These apps can be hosted either in the client or within SharePoint providing endless customization options.
New Enhancements to Excel Service APIs
Excel Services has added some exciting technologies in addition to the features that were already available in SharePoint 2010. These new features focus on the web scripting and interface APIs to get data.
The new features are:
- JavaScript UDFs
- Excel Interactive View
- OData in Excel Services
These new features will be covered in depth, so let’s take a look at the how to build these dynamic Excel business applications.
DASHBOARDS AND EXCEL MASHUPS
Creating powerful applications with Excel data starts with the Excel workbook and then ends by displaying that data in a meaningful way to end users. The visualizations have been known as Dashboards and are now introduced as Excel Mashups. To build a Dashboard you could use the REST services and Excel Web Access web part. These components are now further enhanced by the ability to bring in HTML table data directly from a web page. After the data is in Excel Services, you can generate the tables and charts, connect the components to work with each, and build business applications with Excel Mashups.
To build Excel Mashups you can use a number of APIs that are readily available. These APIs are used in both the web-based versions of Office Web Apps and within SharePoint. The REST and SOAP APIs built into Excel Services are only available within SharePoint, whereas the JavaScript API and Interactive view are both available using Excel Services on the web.
Microsoft has introduced these features on the web through its online tools such as SkyDrive using Office Web Apps with the Excel Services JavaScript API exposed to the client browser. There is even an online API browser tool located at http://www.excelmashup.com/APIBrowser that you can use to try out code before you deploy it, as shown in Figure 17-2.

Excel Interactive View (Excel Everywhere)
With the amount of data that has moved to the web, there is a need to use the data quickly in Excel, but also display it as a standard HTML table on the web. Many times users would copy and paste web pages with HTML data directly into Excel, but this was difficult with formatting issues and web page content being copied into the Excel workbook. To help build full dashboards on the web, Microsoft has introduced technology that can convert the HTML tables into an Excel workbook in either the Office Web Apps or full client. The idea that you could consume these standard HTML tables in Excel is called Excel Everywhere and is enabled by a new technology called Excel Interactive View. After you open the HTML data in Office Web Apps, you also have the ability to open it in the full Excel client application.
Users can now add a button to their website that opens the data in the Office Web App version of Excel without any software required for installation. This requires having an Internet connection to the service providing the application for rendering, but this should not be an issue because the web pages are hosted on the web. Also the HTML tables created need to have proper W3C formatting and not have broken formatting with the data. A header value is important for determining what the names of the columns are, but you can simply add the <thead> value in your HTML table. To generate a button for your page, Microsoft has provided a page located at http://www.excelmashup.com/eiv/addbutton where you can fill out the details and automatically generate the code needed for your HTML page, as shown in Figure 17-3.
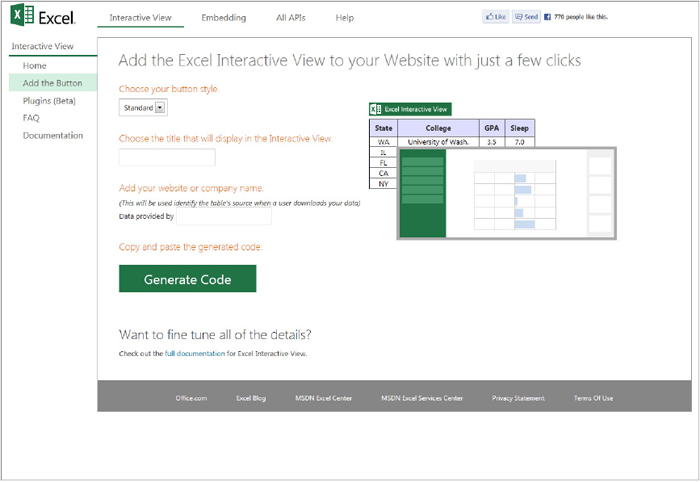
After you generate the code to put on your page, you can edit the values if needed and add the HTML to the correct location. There are two HTML tags that you need to add to the HTML page: one for the button to open Excel Interactive View and the other as the script tag for the required JavaScript libraries that are needed. The following code shows the required anchor tag with the attributes and the script tag. Make sure that the script tag references the correct protocol, or you get an error about displaying the button. This means if you use HTTPS, use https in the script tag reference such as https://r.office.microsoft.com/r/rlidExcelButton?v=1&kip=1. The reason the script tag is at the bottom of the code reference is because you don’t want the script to slow down the page from rendering. You should always put external references such as this one at the bottom of your HTML page if possible:
<a href="#" name="MicrosoftExcelButton" data-xl-tableTitle="First Table"
      data-xl-buttonStyle="Standard" data-xl-fileName="Book1"
      data-xl-attribution="Data provided by Brendon Schwartz" ></a>

<table>
      <thead>
<tr>
<td>Rank</td>
<td>Name</td>
<td>Number of Games</td>
<td>First Game</td>
<td>Last Game</td>
</tr>
</thead>
<tr>
<td>1</td>
<td>Cal Ripken, Jr.</td>
<td>2,632</td>
<td>05-30-1982</td>
<td>09-19-1998</td>
</tr>
<td>2</td>
<tr>Lou Gehrig</td>
<td>2,130</td>
<td>06-01-1925</td>
<td>04-30-1939</td>
</tr>
</table>
<script type="text/javascript"
       src="http://r.office.microsoft.com/r/rlidExcelButton?v=1&kip=1">
</script>
There are a few optional attributes that you could add to the embedded HTML. These attributes help Excel determine initial information and meta data about the data it displays. They are not required to make the functionality work, but it is highly recommended to use them when using the Interactive view. These attributes are listed in Table 17-1.
TABLE 17-1 Optional Attributes Used with Excel Interactive View
| ATTRIBUTE | DEFAULT VALUE | DESCRIPTION |
| data-xl-dataTableID | N/A | Enables each table on a web page to have a unique identifier. |
| data-xl-buttonStyle | Standard | There are two types of buttons that can be used: the Standard and Small options. |
| data-xl-fileName | Book1 | Enables you to set the name of the workbook when it is opened in Excel. |
| data-xl-tableTitle | Same as the web page title | Provides a name for the table that can be up to 255 characters long. |
| data-xl-attribution | Data provided by <web site domain> | Enables you to define who is providing the data that shows up in Excel and Excel Web Apps. This data can also be only up to 255 characters. |
EXCEL
Excel applications are built with the same concept of providing data, functions, and visualizations to the user. Excel still provides the one-stop shop for creating these workbooks to contain as many Worksheets as needed. The data is not as structured as some applications, which enable you to build robust applications, but you must understand some of the basics.
When understanding how to build an Excel application, there are a few concepts that can help you know how to navigate the landscape. As previously mentioned, the first is the application container called a workbook. This single file contains all the elements needed to store data and display charts, as well as complex business logic using a number of programming techniques. Each Excel workbook has at least a single worksheet, which is the canvas for adding the formulas and data. This data is organized into cells or a number of cells called a range. The importance of knowing each of the components is that you programmatically access this information and must know how to get to the data you want to display or work with.
Flash Fill
This new feature builds on the AutoComplete feature already used when typing in the same column. To get the Flash Fill to occur, Excel uses columns adjacent to the current column to create patterns that could provide useful information. For example, if you have the first name in a column and the last name in the next column, the flash fill would be able to create the Last Name, First Name pattern if it were used in the first cell of the next column.
Web Service Functions
The use of data on the web has become important for understanding real-time data. To assist with this, Microsoft Excel now has a set of functions built directly into the application that enable you to call anonymous web services. This is done directly from within Excel cells and formulas, and you are even provided functions to parse the data to display in the Excel sheet. This is a great way to consume REST and RSS services that do not require any authentication, but you are required to find other alternatives if you require authenticated sources. If you want to consume authenticated data sources, consider the data connections or user-defined functions (UDF) discussed in the chapter. Table 17-2 shows the new Web category functions added to Excel 2013.
TABLE 17-2: Excel Web Service Functions
| FUNCTION | DESCRIPTION |
| =WEBSERVICE(url) | Enables the call of anonymous web services. |
| =ENCODEURL() | Used to encode the values passed through a URL, usually used with the call to WEBSERVICE. |
| =FILTERXML() | Based on the XML source and XPath, this function returns the parsed XML from the requested path. |
WEBSERVICE Function
The WEBSERVICE function is designed to pull data into an Excel workbook from any REST endpoint. This works well for most RSS types of feeds and single post reads. If you want a more robust and customized solution, you can still build that out, but you now have the option of using a quick read to a web service without writing any code:
=WEBSERVICE(
       "http://rss.weather.com/weather/rss/local/30068?cm_ven=LWO&
       cm_cat=rss&par=LWO_rss")
ENCODEURL Function
Using the ENCODEURL function takes any values that are not safe for passing on the URL menu and automatically encodes them for the request. This helps prevent the accidental use of special characters or unknown values when using the WEBSERVICE requests. Always use this function if you pull data from somewhere on your Excel workbook. You can see the results provided when you use a set of special characters returned in the following example with %24pecial%20%26Charact%2Ars:
=ENCODEURL("$pecial &Charact*rs")
FILTERXML Function
The FILTERXML function enables you to take any XML in your workbook and return the XPath values that you have requested. The value is going to be returned as text and not HTML, so make sure the returned results are what you expect before parsing them. Although this function is not dependent on any of the other web category functions, you will most likely use it any time you use the WEBSERVICES function calls.
=FILTERXML(D11,"rss/channel/item[1]/title")
EXCEL WEB APPS
Excel Web Apps is an extension of the Excel rich client that enables users to view and edit workbooks in the browser. They provide the rich online experience for working with Excel workbooks. These tools are designed to extend the rich Excel client to the browser and create a seamless experience in working with the Excel workbooks, either on the desktop or online. Excel Web App has evolved into an application available in your Enterprise, hosted online with Office 365 and for personal use in Windows Live SkyDrive. The online experience provides the same look and feel as Excel and many of the same feature sets used in the client.
The advantages of using your Excel workbook in Excel Web Apps are that you can read and edit your data without installing a full client. This allows you to make quick changes to an Excel workbook or even create a new one. In addition to the working with the data, Excel Web App also provides a rich set of collaboration tools for working with other team members. You can see the team members working with the Excel workbook and reach out to them if you have an instant messaging application such as Lync installed. If you need to use the Excel client, the tool enables you to open the Excel workbook in the client with a single-click button.
EXCEL APPS FOR OFFICE
Apps for Office enables you to build rich web-based solutions inside the Office platform. For Excel this applies to building apps for Office that run both in the client and in SharePoint using Excel Web Apps. This topic is covered only briefly as it relates to Excel and SharePoint.
Apps for Office uses standard web-based technologies like HTML, CSS, JavaScript, REST, OData, and OAuth. This enables a developer to design a solution that can be deployed to the rich Excel client and used in the web browser. Excel provides two types of extension projects; these are the Excel Content apps and the Excel Task Pane apps. For a full understanding of apps, read Chapter 6. The app chapter has details on the anatomy of apps and architecture.
Excel 2013 has a new section on the Insert tab that enables end users to insert the Apps for Office that they would like to use. This also enables users to review items in the Office Store if they have a valid user they are logged into Excel with. To build these apps you need to make sure you have set up your development environment using the Microsoft Office Developer Tools for Visual Studio 2012 for more details, see Chapter 3, “Developer Tools for SharePoint 2013,” on tooling. In addition to the developer tools, you need to have Excel 2013 installed on the development machine for testing.
Apps for Office are just web-based components, which mean they can be easily reused in other Office applications. For example, you could create a Task Pane app for Excel but leave the option to also install it in Word and Project. You do not need to worry about selecting the right type of app ahead of time because you can change between the Task Pane app and the Content app easily. The full list of supported office applications and the type of apps for Office they support are listed at http://msdn.microsoft.com/en-us/library/office/apps/jj220082(v=office.15)#StartBuildingApps_TypesofApps.
The core difference between the two Excel apps for Office is an XML element in the package that specifies where the app will be hosted. The OfficeApp element has an attribute that will be defined as either TaskPaneApp or ContentApp. This type of attribute is the directive for Excel on where to load the app on the workbook surface. The same interaction using the API is available with the workbook using either type, but the Content app will not work in other Office applications like the Task Pane app.
Excel Task Pane Apps
The ability to build a Task Pane add-in to Excel is not a new experience, but the way that you can now create the task pane and also have it displayed in SharePoint is different. The task panes built with the managed code in the past had some areas that were difficult to manage such as deployment and portability. Excel 2013 has incorporated all the components of Excel, such as the rich client, Office Web Apps, Excel Services, and SharePoint 2013 together to create a powerful framework that eliminates some of these issues.
The Task Pane apps are designed to be hosted in their own container in Excel and provide contextual information or functionality to the worksheet. The task pane can respond to events, update the workbook, or even just provide relevant information. This type of app does not overlap or interfere with the workbook content that is on the page. To build a basic sample Task Pane app, use the following steps.
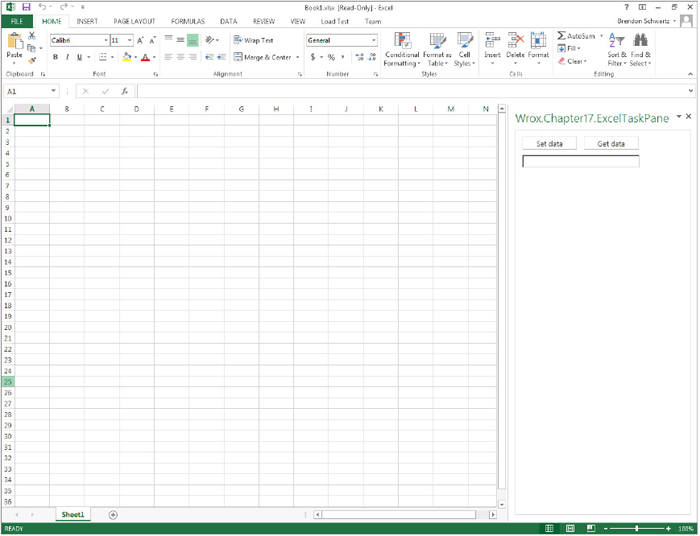
You must have script debugging turned on in Internet Explorer to debug directly from Visual Studio in the Office applications because they are web apps. If you do not have it turned on, you see an error, as shown in Figure 17-5.

Excel Content Apps
The Excel Content apps are web-based elements that can be embedded into the content of the Excel workbook. These apps can perform the same interaction with the workbook that Task Pane apps can and are built in the same way using the JavaScript API for Office. These apps for Office can provide rich content in your Excel workbooks and even media such as videos or pictures. Excel is the only Office application that provides that ability to have the Content app with this release. Now look at the difference between the two when creating the project with Visual Studio.

The Content app can be sized based on the needs of what you are building using the RequestedWidth and RequestedHeight XML elements located in the manifest.xml. You can see these attributes in the Properties window of the Manifest and can easily update them. The Content app can also be moved around inside of the Excel workbook by the end user to place it where it fits best for them.
EXCEL SERVICES
Excel Services was designed for scalability and is composed of three distinct components. The Excel Calculation Services component gathers data, performs calculations, and handles user sessions. The Excel Web Access (EWA) web part renders a server-based spreadsheet using only HTML and JavaScript, which enables users to access the spreadsheet from just about any browser and platform. The final piece of Excel Services is the Excel Web Services (EWS) service layer that enables developers to build custom applications that take advantage of Excel workbooks.
Excel Services Architecture
The Excel Services architecture is built using the SharePoint Service Application framework and can be scaled for load-balancing scenarios such as supporting a large number of Excel workbooks or concurrent requests. All the settings can be configured from Central Administration using the Excel Services service application settings. Excel Services uses the workbooks built in either the Excel client or Excel Web Apps and then deployed to Excel Services, which are stored and secured in the SharePoint content database.
The architecture enables multiple web applications to use the service, but many of the settings are based on specific locations that are considered trusted. On each web application the Excel workbooks can be rendered with the EWA web part. This web part provides the ability to have interactive code using the JavaScript Object Model (JSOM) that can automate tasks.
There is also a set of rich web service APIs provided to enable application access to the workbooks through the REST API, now including OData and the existing SOAP interface. These web services provide the ability to render and modify the Excel workbook data without have to use server-side code or JavaScript located on a page. Using all of the components together provides the ability to access the Excel workbook with any of the APIs depending on the application architecture and the business requirements.
Excel Services Data Access
Data access in Excel and specifically in Excel Services is a key component of building critical business applications. Usually, the data in the spreadsheet is only part of the business data and must be combined or measured against other values in the organization’s application set. There are two types of data connections you want to work with in SharePoint 2013. The first is making connections to external data sources such as SQL Server or web services. The second is the ability to have a data connection to the sources that are external to the Excel workbook. Both of these options are available using the data connections’ REST API and UDF functions with Excel Services.
Trusted Locations
Making Excel workbooks available requires having a trusted location to publish to. There are many configuration settings that can be applied to the Excel Services application and the site that hosts the published workbooks. Determine where you want to allow trusted Excel file locations and trusted connection document libraries in your SharePoint farm. Then use the settings in the Excel Services service application to configure those locations. The following steps walk you through defining these locations:

Office Data Connection
Excel and SharePoint 2013 provide the ability to connect to external data sources using predefined settings. These predefined settings are stored in an Office Data Connection (.odc) file and stored in a Data Connections Library. The Data Connections Library can be added to your sites but must be a trusted location to run the data connections designed for the Excel workbooks. You can see in Figure 17-8 that there are number of new data connections that Excel now allows directly from the Get External Data menu.
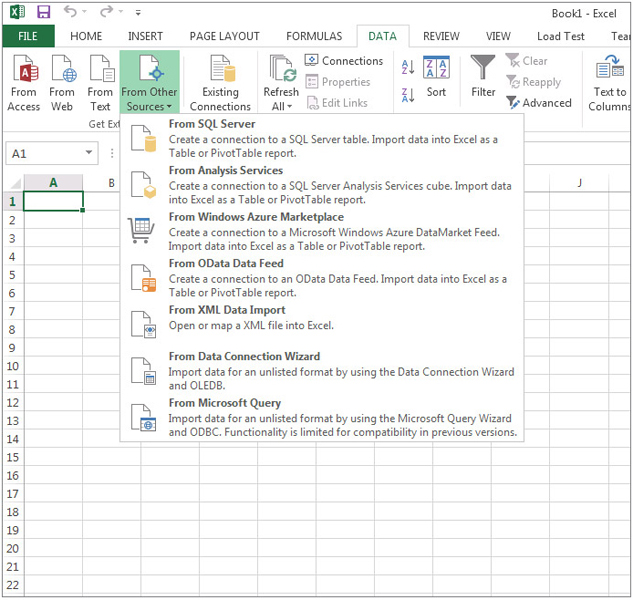
The following steps guide you through connecting to the new OData Data Feed connection, but any of the connection types such as SQL Server or Analysis Services could be used:
Creating the .odc files ensures that all users can view data to connections that are already defined, and they do not need to locate where the data is every time. The Office Data Connection files automatically have the security defined and define with credentials to send to the server. This also gives the site administrators the ability to manage the connections for their site and adjust them as needed when anything changes. After settings changes are made, they are immediately available for future connection requests.
Unattended Service Account
The Unattended Service Account is used as a way to provide a single account for all users when accessing back-end data sources. The Unattended Service account is used in the Excel Services Application but is not the same account as the application pool identity. Actually, the unattended service account is stored in the service application database and is not used with IIS. The unattended service account can be used in many service applications such as Excel Services, Visio Services, Business Connectivity Services, and PerformancePoint Services.
In Excel Services, each workbook can have its own unattended service account, or they can all share a global unattended service account. If the workbook connection’s authentication type is set to Secure Store Service (SSS), you need to reference a target application ID that stores the unattended service account credentials required for authenticating to the data source. This makes the service account reusable across applications and connections.
If the authentication type is set to None in the workbook connection settings, the global unattended service account is used. This account, along with many other Excel Services settings are configured in the Excel Services service application. If you use the global account but do not configure it, you get an error when trying to open a data source connection.
The process to create the unattended service account is straightforward. Before you start creating this account, you need to ensure that you are either the farm administrator or the service application administrator for the instance of the Secure Store Service.
To create this account, perform the following steps:
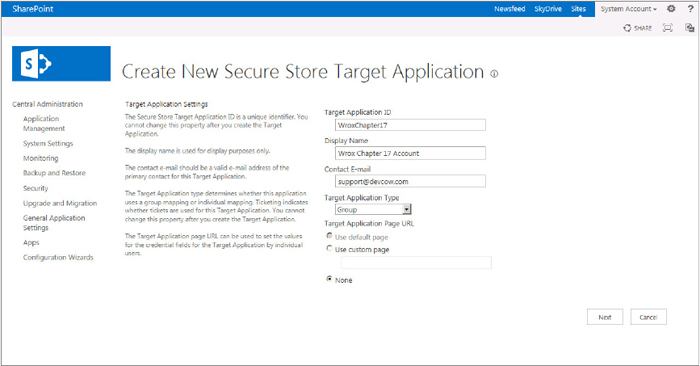
At this point you should see the new target application along with other target applications in the Manage Target Applications page, as shown in Figure 17-10.
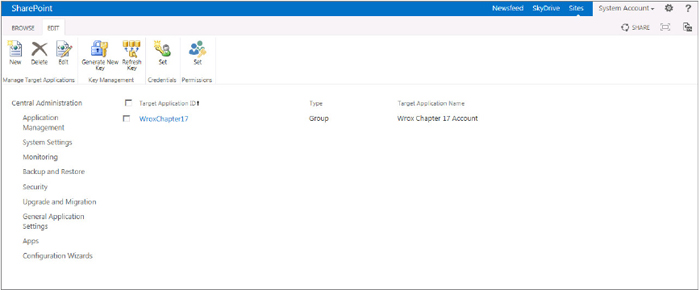
After creating the target application, you should set credentials for it. To set credentials for the target application you have just created, follow these steps:

Finally, the last action is to introduce the new target application to Excel Services. You can accomplish this by following these steps:

REST API
Providing access to data is important especially from web-based technologies such as JavaScript. Microsoft introduced a REST-based framework providing data from Excel Services in SharePoint 2010 to allow any client to make calls using REST calls. These REST calls were used to pull back HTML, Images, and ATOM results for Excel workbooks hosted with Excel Services. This functionality has now been extended to also include the use of OData as an option when using the REST endpoints.
The REST API now is allowed for use on SharePoint Online, which provides a new set of applications that can be built using the SharePoint Online platform. Also, there has been the introduction of the OData protocol into the REST API to all Excel Services calls, for a more structured format of data access of the tables in Excel workbooks.
The REST API is designed to allow easy discovery and access to the Excel Services workbook. To make calls to the Excel Services REST API, you need to know what the URI format will be. In Excel Services, the URI, as shown in Table 17-3, includes the SharePoint site, location of the document, and the element or object you would like to return. If you don’t know what the values are or the URI of the specific object, you can use Internet Explorer to provide the results of XML from a call to the service.
TABLE 17-3: REST API URI Format
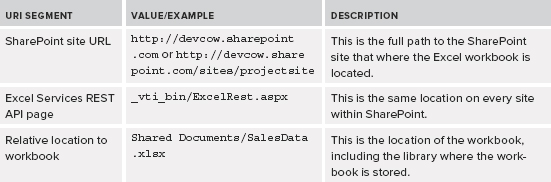
http://devcow.sharepoint.com/_vti_bin/ExcelRest.aspx/
      Shared%20Documents/SalesData.xlsx/Model/Charts('SalesByYear')?format=image

https://devcow.sharepoint.com/_vti_bin/ExcelRest.aspx/
       Shared%20Documents/SalesData.xlsx/OData/
       YearlySalesTable?$filter=RegionSales gt 5000
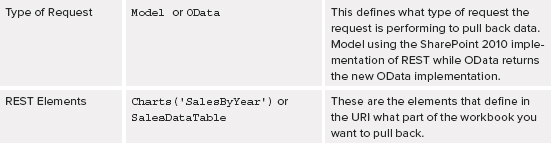
You will look at both the Model and OData implementation in detail, but if you want to see how the service works, you can open Internet Explorer and type in the URI into the address bar, as shown in Figure 17-13. Internet Explorer or any web browser makes a GET request using the URI and displays the results. The results will be formatted if you use Internet Explorer in the Feed Reading options. If you would like to see the raw output, you can right-click and use View Source or turn off the Feed Reading option to see the raw output. You can do this by clicking Tools ⇒ Internet Options ⇒ Content Tab ⇒ Settings in the Feeds and Web Slices section ⇒ Uncheck Turn on Feed Reading view.
Model REST Implementation
This implementation was introduced with SharePoint 2010 and provides live and up-to-date Excel data based on a call to the request location of /Model. The REST API provides the ability to make calls, update values, recalculate the workbook, and view the data as needed.
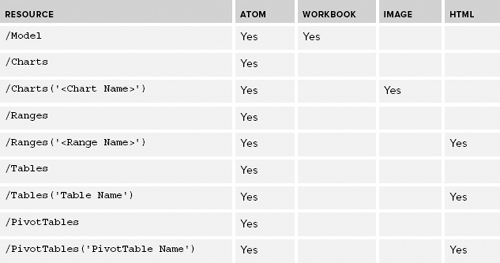
Many different types of output can be generated from the Model REST API calls. These are images, HTML, ATOM Feeds, and the actual Excel Workbook in binary format. Not all the formats are supported on each resource, and the default format for each element depends on the resource called. Table 17-4 lists the resources and formats supported. To select the wanted format option, add ?$format=<type> to the end of the URI.
TABLE 17-4: REST End Points for Excel Services
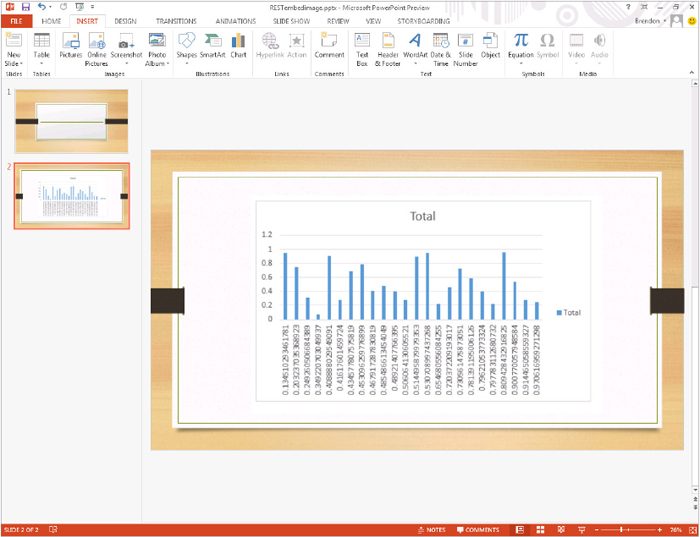
The REST service has many scenarios in which it can be used. This includes creating a dashboard that contains the images of charts and table HTML. Also, you can directly link Microsoft Word or PowerPoint to contain an image of the chart with a live link to data as it updates, so all users would see the most up-to-date data. To put this all together, follow these steps to insert a chart into PowerPoint:
OData Implementation
New to SharePoint 2013 is an implementation of an Open Data Protocol (OData) built on the foundation of the existing Excel Services REST API. This service adds another way to request data from Excel Services and also allows for a number of filters. To better understand how to make an OData call and what filters are provided, you must first know what OData is. The OData service enables you to query tables in the workbook because it is designed to work with data. This means you would still use the REST API for other elements such as charts.
OData is similar to the REST API and is built on web technologies used in REST such as HTTP, URIs, and ATOM. The primary goal for OData is to standardize these API calls and provide a way to have a uniform set of URIs. All the data, including the type of system, relationship, and structure of data, has guidance on how it is designed to allow multiple applications to work with the data. To help understand what OData is, look at an example of a call to the server. Notice that it is almost identical in structure to the REST API and that the major difference is the way to address each element.
Making a simple call to the root of the OData URI workbook displays the tables in the workbook as shown in the following code:
https://devcow.sharepoint.com/_vti_bin/ExcelRest.aspx/
      Shared%20Documents/SalesData.xlsx/odata/
The data returned from the calls to the OData service are in ATOM format. The following code shows the results of the root OData element being requested. There are only elements for the tables in a workbook, and the links to supporting calls are not provided like the REST API. Also when using a tool like Internet Explorer, the results from OData do not display like an RSS feed but display in the XML format. This call is the same as adding the query string in the URI with $metadata at the end:
<?xml version="1.0" encoding="utf-8" standalone="yes"?>
<service xml:base="https://devcow.sharepoint.com/_vti_bin/ExcelRest.aspx/
    Shared%20Documents/SalesData.xlsx/OData"
    xmlns:atom="http://www.w3.org/2005/Atom"
    xmlns:app="http://www.w3.org/2007/app"
    xmlns="http://www.w3.org/2007/app">
  <workspace>
    <atom:title>Default</atom:title>
    <collection href="SurveyData">
      <atom:title>SurveyData</atom:title>
    </collection>
    <collection href="SalesByYearTable">
      <atom:title>SalesByYearTable</atom:title>
    </collection>
  </workspace>
</service>
The advantage to use OData for rich applications is that the service treats the table data just as it would any other structured data, such as SQL Server or a CSV file. This means that you can use built-in data queries to refine what you are pulling back from the data and not just display the entire table. The query options available are listed in Table 17-5 and Table 17-6. The query options provided on the table can be combined together using the & URL element to make complex query statements.
TABLE 17-5: Query Options on the /OData Element
| QUERY OPTION | EXAMPLE | DESCRIPTION |
| $metadata | /OData/$metadata | Provides the list of tables in the workbook |
TABLE 17-6: Query Options on the /OData/<tablename> Element

Using REST API in SharePoint Online
All these REST APIs are now available with SharePoint online. This means that you can quickly build dashboards and Excel Mashups using this Excel Services data directly from SharePoint Online. To use the service on SharePoint Online, upload an Excel Services workbook to your SharePoint Online site. When the Excel workbook is on the site, you can test the functionality by using the REST commands with either the Model API or the OData API from Internet Explorer. If you pull the data remotely, you must provide the authentication to the URI before it displays correctly.
Excel Services Web Access
Excel Web Access provides the ability to view Excel workbooks using an Excel Services web part, also known as EWA. This is the component that generates the HTML for the workbook data and adds the JavaScript files to the page. Using the web part, you can also manipulate the published Excel workbook using the JavaScript library.
The EWA has no dependency on client-side scripts or Active X control to function properly. You can navigate through the sheets within the published workbook just as you do when using the Excel client. Not only can the entire workbook be hosted and rendered in a EWA web part, a section of the workbook can be as well. This is done based on named parameters within the workbook, which should be created when authoring it.
Interactivity in the EWA web parts is not the same as editing the Excel workbook in Excel Web Apps. In the Excel Web App, the changes users make to the workbook are written back to the original workbook. When interacting with EWA, users can see changes in calculations and visualization objects, but the original workbook remains the same.
The Excel Services Web Access web part is also available from the namespace Microsoft.Office.Excel.Server.WebUI that you can include in your application. This allows you to create the web part and render the wanted workbook dynamically. The class that is exposed for use is the ExcelWebRenderer class that inherits from the WebPart class. The following code shows how you can create the web part dynamically and set how the user interact with it:
ExcelWebRenderer ewa1 = new ExcelWebRenderer();
ewa1.WorkbookUri = "Shared%20Documents/SalesData.xlsx";
ewa1.AllowFiltering = true;
ewa1.ShowWorkbookParameters = true;
ewa1.TypingAndFormulaEntry = true;
JavaScript Object Model (JSOM)
The JavaScript Object Model (JSOM) provides the libraries needed to interact with the Excel Services Web Access web parts. The JSOM was added in SharePoint 2010 but has been improved with SharePoint 2013 by adding new events and methods. The JSOM library allows scripting to build rich Excel applications using spreadsheets in the Excel Services web part and requires having the Excel Web App web part on page with Excel workbook loaded before making any JavaScript calls. There are even additions to the JSOM to allow User-Defined functions (see the “User-Defined Functions (UDF)” section later in the chapter).
The JavaScript file is located in the Layouts directory and must be included on the page. When you add an Excel Web Access web part to the page, the script link to the JavaScript file is automatically added to the page. The file has been minified and provides only readability of variables exposed for public use. This is done to help make the file smaller so that it can be downloaded quickly. The file is located on the SharePoint server at the following location:
%ProgramFiles%Common FilesMicrosoft Shared
    web server extensions15TEMPLATELAYOUTSEwaMoss.js
All the code is JavaScript and must be placed on a SharePoint page to run. SharePoint 2013 adds a new web part called the Script Editor web part that makes it easy to add JavaScript to the page. The Content Editor web part was traditionally used for this purpose but would not always add the code to the page without modifying it. Now you can add the Script Editor web part to the web page when the JavaScript is ready and know that it will remain the same set of code that you have built.
The JavaScript language and browsers, like Internet Explorer, load files in a top-down manner. This means that variables and methods written in JavaScript are not accessible until they are processed by the DOM that is displaying them. To prevent issues with calling JavaScript that is not yet loaded, but that you know will be available, SharePoint provides a method called ExecuteOrDelayUntilScriptLoaded() that waits to use critical functions in script libraries such as sp.js and other foundational scripts.
Accessing the EWA Objects
The root class for all interaction with Excel Web Access web parts is the JavaScript class Ewa. This is a global class that can be called from your functions and allows access to the controls, workbooks, and elements of the workbook such as Sheets and Ranges. The most common use of the Ewa control is the use of the EwaControl class that provides methods to get the web part control. To create a variable and set it to the EWA control, use the following code:
ewa = Ewa.EwaControl.getInstances().getItem(0);
As it might appear from the code, this returns an object of type EwaControl using the static function on the class called getInstances(). As you can see the getInstances() returns all the EWA web parts on the page as a collection and requires using the getItem method to specify which one you want. In the previous example it returns the first EWA web part.
The web part instance will be returned only if the web part is fully loaded. This means that you must make the call to the Ewa control after the page and web part are loaded. With the ability to get an instance of the web part, you now need to create some standard JavaScript code that allows you to set up the calls at the correct time. As mentioned, this requires having the page load and EWA controls loaded. You can use the following format as a starting point for a standard framework for you to use in the calls to the EWAControls.
<script type="text/javascript">
if (window.attachEvent)
{
    window.attachEvent("onload", Wrox_PageLoad);
}

//Runs when the page is loaded and the EWA control should be set.
//Then adds a function to be called when the EWAControl is ready.
function Wrox_PageLoad()
{

       if (typeof (Ewa) != "undefined")

        {
            Ewa.EwaControl.add_applicationReady(Wrox_EwaControlsReady);
        }

        else

        {
            alert("The Ewa Control is not set or ready to be used yet.");
        }
}

//attach to the individual Excel Web Access (EWA) web parts
function Wrox_EwaControlsReady()
{
    ewa = Ewa.EwaControl.getInstances().getItem(0);

    //Perform code calls to the EWA Control
}
</script>
This code uses a call to the Window OnLoad event, which usually has other controls using the same event handler. Although it makes it clear to read what the intent of the code is, it would be better to use the _spBodyOnLoadFunctionNames function that allows multiple load events and allows SharePoint to process the event when it is ready. This also helps ensure that the required supporting libraries have been called from the page. The new code would replace the window.attachEvent block. This is also a better option than using the $(document).ready function if you use JQuery because the order of the calls to the JQuery function may not be in the expected order:
<script type="text/javascript">
_spBodyOnLoadFunctionNames.push("Wrox_PageLoad");

//Runs when the page is loaded and the EWA control should be set.
//Then adds a function to be called when the EWAControl is ready.
function Wrox_PageLoad()
{

       if (typeof (Ewa) != "undefined")

        {
            Ewa.EwaControl.add_applicationReady(Wrox_EwaControlsReady);
        }

        else

        {
            alert("The Ewa Control is not set or ready to be used yet.");
        }
}

//attach to the individual Excel Web Access (EWA) web parts
function Wrox_EwaControlsReady()
{
    ewa = Ewa.EwaControl.getInstances().getItem(0);

    //Perform code calls to the EWA Control
}
</script>
Now that you have access to the EWAControl, you can create code that uses the objects and events to work with the Excel workbook. There are some global functions that enable you to access objects from the global Ewa control, but most of the objects and events are accessible directly from the instance you have created.
EWA Objects
The primary objects provided by the EWA classes are the Workbook, Sheets, Ranges, and Charts. In SharePoint 2013 there is new support for Hidden Sheets as well as Chart Objects and embedded XML data called XmlParts. The classes built in with JSOM have the instance of the class and collection objects associated with each one. Table 17-7 shows the Ewa classes that can be used in your JavaScript. Keep in mind these references are to the Ewa object, but they are only the definitions of the class structure. The instance of these classes must be called from supporting methods like the getInstances() function on the EWAControl class.
TABLE 17-7: Ewa JavaScript Classes
| NAME | DESCRIPTION |
| Ewa.Workbook | Provides the methods and properties of the requested Excel workbook |
| Ewa.Sheet | Defines the Excel sheet and the data on the sheet |
| Ewa.Range | Provides a range of cells in the Excel Workbook and is returned from many of the functions using Workbook Cells |
| Ewa.NamedItem | Represents one of the NamedItems supported in Excel Services, such as NamedRange, Parameter, Table, PivotTable, and Chart |
To use these classes and get the instantiated objects, use the getActive methods for the object you work with. The following example shows how to get the active Excel workbook and then also in the same statement get the active sheet from that workbook. The same principals can be used with the other classes and getActive methods for those classes. Remember the code snippets are just examples of the code that would be run, and you should have the full set of code with the proper events to make calls to the Ewa objects.
 ewa = Ewa.EwaControl.getInstances().getItem(0);
var EwaSheet = ewa.getActiveWorkbook().getActiveSheet();
Having a firm understanding of the Ewa objects is important for modifying or working with an Excel workbook, but you need a way to trigger the actions. Most of the code you write will rely on the ability to know what the end user is doing to make the necessary changes.
EWA JavaScript Events
The EWA events enable you to write code that can run when the user clicks or changes the active Excel workbook. The most common events are when something occurs to the Cell, Sheet, or workbook. When these events occur they provide information to the function with objects like the RangeEventArgs and WorkbookEventArgs. The events can be subscribed to through the Ewa.EwaControl, as shown in the following code:
<script type="text/javascript">
_spBodyOnLoadFunctionNames.push("Wrox_PageLoad");

//Runs when the page is loaded and the EWA control should be set.
//Then adds a function to be called when the EWAControl is ready.
function Wrox_PageLoad()
{

       if (typeof (Ewa) != "undefined")

        {
            Ewa.EwaControl.add_applicationReady(Wrox_EwaControlsReady);
        }

        else

        {
            alert("The Ewa Control is not set or ready to be used yet.");
        }
}

//attach to the individual Excel Web Access (EWA) web parts
function Wrox_EwaControlsReady()
{
    ewa = Ewa.EwaControl.getInstances().getItem(0);
    ewa.add_activeCellChanged(Wrox_UpdateCellChanged);
}

function Wrox_UpdateCellChanged(rangeArgs)
{
    var column = rangeArgs.getRange().getColumn();
    var row = rangeArgs.getRange().getRow();
    var value = rangeArgs.getFormattedValues();
    alert("Value Changed In Cell (" + row + "," column + ") to " + value);
}

</script>
Support for SharePoint Online
One of the most powerful enhancements to the JSOM API is not within the script itself, but it is now supported in SharePoint online. This means that you can use the JSOM and REST APIs within SharePoint Online to work with the data inside the Excel workbooks being uploaded.
User Defined Functions (UDF)
User Defined Functions (UDFs) are developer-created custom functionality that extends the capabilities of Excel. UDFs are created in code, both managed .NET code and JavaScript code, and are used in workbooks just like the built-in Excel formulas, in a cell using the “MyUDF(A1:B2)” syntax.
The concept of UDF actions is incorporated into many applications as extension points for customizing. SQL Server has UDF actions added to also allow the running of managed code as inline functions. Even Excel has had UDF actions for years. Excel originally provided this capability using the Visual Basic Editor that allowed code to be attached to an Excel workbook. The server-side version of Excel Services UDFs allows users to reuse the business logic and functions as well as connect to resources in a secure and managed way.
A UDF function allows developers to create their own Excel functions to complement the existing functions that can be called in cells within Excel. This is a great way to extend Excel for combining data or calculations that cannot be done easily within Excel. Be careful not to overuse UDF functions when built-in functions with Excel can be used due to performance concerns.
One of the primary reasons UDFs have been built has been to retrieve data from data sources not supported in Excel. Even though Excel has added the web service functions, UDFs provide the ability to make connections to data sources that need authentication. UDFs also provide a great way to import data from sources that are not provided natively.
You could use an example such as finding geo-location information directly in Excel by building a Location UDF, as shown in the following example. This example shows what value you enter into the Excel cell to get the location back from a string value:
=Location("1 Microsoft Way");
To use UDFs you must enabled the UDF assemblies or registered JavaScript by setting the Allow UDFs flag per Excel Services’ trusted location. These settings can be set per location and need to be managed by the administrators of the SharePoint farm. These trusted locations can be set up at a granular level or more global depending on your needs.
In previous versions of Excel Services, there was a detailed process for creating managed code and deploying to the server to get the UDF features installed. Many users just wanted a way to pull back data quickly but didn’t want to have to build .NET assemblies for web-based calls. As the web has progressed and frameworks have made it easier to make calls in JavaScript, it now make sense to also have the UDF functionality in JavaScript that can be used on a specific page. With SharePoint 2013, Microsoft extended the UDF framework and created the JavaScript methods needed to register and call UDFs directly from JavaScript.
Managed Code UDF Development
Building managed .NET UDFs has been around since SharePoint 2007 and have provided this plug-in ability server-side for all applications. User Defined Function classes must be marked with the Microsoft.Office.Excel.Server.Udf.UdfClass attribute, and UDF methods must be marked with the Microsoft.Office.Excel.Server.Udf.UdfMethod attribute, or they will be ignored by Excel Calculation Services.
To build a UDF in managed code, you must create the Visual Studio project and add a reference to the following SharePoint DLL reference Microsoft.Office.Excel.Server.Udf.dll. This reference is located in the following path listed in the ISAPI folder with most of the common DLLs. After the DLL is added, you must add the attributes to the correct locations to make the UDF registered in Excel Services:
[drive:]Program FilesCommon FilesMicrosoft Shared
    web server extensions15ISAPI
Creating a UDF
Creating a Managed UDF can be quick and provide you powerful functions with a small amount of code. This example takes a bar code number and provides the price of the item:
    [UdfClass]
    public class UDFItemLookup
    {
        [UdfMethod]
        public string ItemLookup(string UPCcode)
        {
            //Calls mocked web service to find the price
            SalesEngineWS request = new SalesEngineWS();
            SalesEngineWS.SalesProduct product = request.GetProduct(UPCcode);
            return product.Price.ToString();

        }
    }
Deploying a UDF
The UDF you just built will not be loaded until you deploy it to a server with Excel Services. The following steps walk you through creating a trusted location on the server and deploying the managed assembly. Using the previous sample you can easily deploy the UDF class to the server because it is already packaged in a SharePoint solution.
Using the UDF in Excel
With the Managed .NET UDF function built, deployed, and configured on the server, you can start using it within Excel workbooks. There is nothing special that needs to be done to take advantage of the UDF, but you must make sure all the steps have been followed so that the UDF loads correctly. To make use of the new UDF you have just created, enter the formula into a cell, and upload the Excel document as detailed here:
After the function has been entered into the Excel workbook and the file has been published to the server, you can view the file in Excel Services to see the results of the UDF. If there are any issues with the UDF in Excel Services, the value of the cell will remain #NAME?. Make sure to check the ULS logs and that you did recycle the app pools after you installed the UDF into the configuration settings.
JavaScript UDF Development (ECMAScript)
The managed .NET assemblies have been the extension point for adding code-based solutions to Excel workbooks running inside of Excel Services. This allows for power server-side calculation and a load-balancing scenario, but there are times when you just want to make a quick call to a web service or pull back data already on the page. The addition of JavaScript UDF functions enables developers to quickly create or reuse JavaScript functions that can be reused in an Excel cell. This makes the extensions limitless on what can be done.
Creating a UDF
Creating a UDF with JavaScript is a great way to make client-side web requests or run code that can be done within the web browser. Any function defined on the page in JavaScript can be registered as a JavaScript UDF function using the Excel Web Access (EWA) JavaScript library. When creating a JavaScript UDF, if you use Visual Studio 2012, you can also have IntelliSense to help you build the necessary JavaScript functions.
The next steps show how to create a simple function to return the UPC value from a JavaScript UDF function:
//JavaScript UDF
function Wrox_UDF_UPCLength(upc)
{
    return upc.length;
}

                Ewa.BrowserUdfs().add(
                                  "UPCLength",
                                  Wrox_UDF_UPCLength,
                                  "Returns the length of the UPC",
                                  false,
                                  false
                                 );
Deploying a UDF
There are many ways that you can deploy a set of JavaScript UDF functions. The easiest way is to manually deploy it using the built-in Script Editor web part. You can copy the JavaScript required for the function and the registration code into the web part. This can be a good way to test your code while you are building it. The method used in the sample code is to create a JavaScript file that can be reused and deploy it to the Layouts folder. After you deploy the solution, either edit the web page and put a link directly to the JavaScript file, or add a content editor web part that calls the JavaScript file.
SOAP Web Services
The SOAP web services have been around since SharePoint 2007 and are still available for use especially if you use managed .NET code or build .NET custom applications. There is both an object model accessible on the server and a set of web services accessible from anywhere on the network. No major changes have been made to this API for SharePoint 2013.
This SOAP web service enables access to the components just as you have seen in the REST and JSOM object models but provides a true SOAP-based interface. The primary namespace that will be used for these objects is Microsoft.Office.Excel.Server.WebServices. This namespace has an object called ExcelService that provides the Get and Set methods for the workbooks as well as the ability to start calculations in the workbook. The following URL is the site-relative URL for creating a web reference to the service on your server:
http://<sharepointsite>/_vti_bin/ExcelService.asmx
SUMMARY
This chapter provides an overview to growing a number of tools and technologies that can be used to build Excel applications. You were introduced to Excel, Excel Web Apps, and Excel Services that now enable building rich online apps that can be hosted in SharePoint. You saw some of the changes in Excel and the new functions added to help with data access. One of the major changes to the Excel Applications is that you can now build your Apps for Office that allow Content and Task Pane apps for Excel. These new apps are built using standard web technologies and are designed to be portable now. Even the deployment from SharePoint 2013 makes them easier for Enterprises to use. Finally, the new additions to the JavaScript Object Model and JavaScript UDFs provide the ability to build dashboard and Excel Mashups creating powerful end-user experiences.