Chapter 12
Enterprise Document Management
WHAT’S IN THIS CHAPTER?
- Exploring document and records management features
- Managing a flexible taxonomy for your organization through managed meta data and centralized content type publishing
- Discovering new ECM features including standards-compliant eDiscovery across SharePoint, Exchange, and file servers
- Creating custom solutions that extend the ECM Framework via new CSOM APIs
WROX.COM CODE DOWNLOADS FOR THIS CHAPTER
The wrox.com code downloads for this chapter are found at www.wrox.com/remtitle.cgi?isbn=1118495829 on the Download Code tab. The code is in the chapter xx download and individually named according to names throughout the chapter.
Every organization leverages SharePoint’s ubiquitous file and data storage capabilities in innumerable team and department sites. This easy access to theoretically limitless web-based content storage poses a special problem for those responsible for organizing, categorizing, and securing that content, especially legally sensitive content. This chapter explores SharePoint’s content management capabilities targeted at the needs of the enterprise as opposed to the needs of the team. You explore content types, document sets, records management, eDiscovery, and the expanded Enterprise Content Management (ECM) object model designed to work programmatically with these capabilities.
SharePoint Server 2013 provides rich new features that enable organizations to define a flexible yet powerful information architecture. With proper planning of content types, libraries, and managed meta data, you can secure improved manageability as you accumulate content of all types, both structured and unstructured. You can use the ECM object model to extend this capability to existing applications and create custom solutions hosted in and outside of SharePoint.
Today, there is an explosion in the types of content that exist in organizations. Examples include documents, digital assets, reports, web content, and social content. ECM is the process of making sense of and bringing compliance to the massive amount of this electronic content that is stored on internal networks, external networks, the cloud, and SharePoint Server.
THE DOCUMENT MANAGEMENT MINDSET
The most frequently heard complaint about corporate content stores, regardless of whether those content repositories are intranets or file servers, is that relevant content is difficult if not impossible to find. Users are familiar with the powerful search experiences of the public Internet, but a corporate intranet’s mix of structured (database-like) and unstructured (document-like) content requires both rich search and contextual navigation. Allowing users to filter and navigate based on common terms and taxonomy provides an interface that is more suitable to hosting large numbers of corporate libraries and lists.
Companies are tasked with managing more content than ever before. Security, rules, and accountability requirements are becoming more complex. This pattern will continue for the foreseeable future. As you prepare for an explosion of content, the new developer tools and features in SharePoint Server should ease this transition.
ECM Features
SharePoint Server has a rich set of features to support document management. However, in addition to managing traditional document artifacts, you can manage social content, including tacit updates from users, microblogging, wikis, blogs, and discussion forums. What makes SharePoint different from most other ECM systems is how it layers social technologies on top of the ECM features, while enabling you to manage this social content.
SharePoint Server provides features to make managing large numbers of complex content types easier. Some of these features include unique document IDs, document sets, and a global taxonomy. In this chapter, you cover these welcome additions, while exploring how you can use new collaboration features in the context of document management. Table 12-1 identifies the existing baseline document management features from SharePoint 2010 that still exist in SharePoint 2013.
TABLE 12-1: Baseline ECM Features Carried Forward from SharePoint 2010
| FEATURE | DESCRIPTION |
| Managed Metadata Service Application | Features that enable global meta data to be shared and managed across farms, site collections, sites, and libraries. |
| Content Type syndication | A subset of the Managed Metadata Service that enables content types to be published to and then disseminated from a hub. |
| Unique Document ID Service | Creates a static URL for items. |
| Content Organizer | Provides document routing within any site. |
| Document Sets | Provide compound document support. |
| Meta-data navigation and filtering | Filter and navigate based on predefined tags and taxonomy. |
| Document libraries | List definitions with features added to support document management. |
| Document Center | Site definition with structures in place to manage large amounts of documents. |
| Recycle Bin | Two-stage recycle bin enables recovery of deleted documents without using backups. |
| Versioning | After versioning is enabled, drafts and major versions are stored as separate items in a library. The versions can be restored at any point in time. |
| Information policies | Farm, site-collection, site, content-type, and library-level information management policies. Built-in policy features include labels, bar codes, expiration, and auditing. |
| Records Center | Site definition used for retention and document routing. |
| Item-level permissions | Individual documents can be secured. |
| Content Types | An abstraction layer fostering manageability of content and meta data. Settings, properties, and functionality can be defined for types of content rather than individual items. |
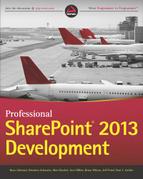
The bulk of Microsoft’s investment in the ECM space has gone to eDiscovery, but as noted in Table 12-2, new capabilities have been added for content managers in a number of places. Microsoft published a high-level list of new 2013 eDiscovery features online at http://technet.microsoft.com/en-us/library/fp161513.aspx.
TABLE 12-2: New ECM Features in SharePoint Server 2013


Microsoft keeps an updated list of deprecated SharePoint 2010 features online at http://technet.microsoft.com/en-us/library/ff607742, but Table 12-3 mentions those deprecated features most closely related to the topic of content management.
TABLE 12-3: Deprecated ECM Features in SharePoint Server 2013
| FEATURE | DESCRIPTION |
| Document Workspace site templates | Document collaboration scenarios are now answered by the team site, so Microsoft removed the Document Workspace template to simplify the list of templates available for new site collections. |
| Visio Process Repository site templates | Never a widely used template, the Visio Process site template has been removed from the list of available site collection templates. It will still be supported for 2013 sites (just not site collections). |
Expanded ECM Object Model
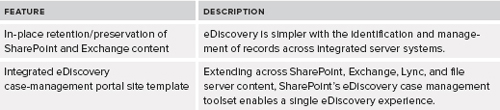
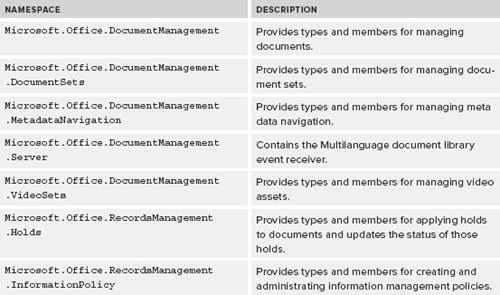
You can use the ECM programming model to extend the functionality of the new ECM features and create custom solutions. The programming model includes support for three types of programming: the server-side object model for server-side programming, a client object model, and RESTful web services for client-side programming. The number of namespaces and types is vast; however, Table 12-4 illustrates some of the primary namespaces and some prominent types that are commonly used. In this chapter, there is sample code showing how some of the members might be used. The actual assembly files are located in the SharePoint root in the ISAPI folder.
TABLE 12-4: The ECM Object Model
Source: SharePoint 2013 SDK - http://msdn.microsoft.com/en-us/library/sharepoint/jj193044.asp.
GETTING THE MOST FROM THE DOCUMENT CENTER
The Document Center in SharePoint Server is a site definition that can be used in combination with a content type hub to manage hundreds of millions of documents and act as a large archive. Of course, in a large system with hundreds of millions of items, many instances of a Document Center might be provisioned, each with its own content database supporting up to 1 terabyte of content. When millions of documents are involved, the ideal management scenario is to separate the collaboration from finalized storage. Scale is achieved by using a distributed architecture.
Although the constructs included in a Document Center are useful for large repositories, smaller teams can use a single Document Center instance to serve as a starting point for document management for smaller deployments. Therefore, the Document Center site template supports both the read-mainly and collaborative in-place authoring scenarios.
By design, the Document Center is meant to be easy to use, while also being easy to administer. Everyone can have access to its features, and everyone can see as much as they need to within the security defined by administrators and content stewards. It is worth noting that although the Document Center is easy to use because it is preconfigured with the constructs needed to manage large sets of documents, you can also turn these features on in any team site.
The new Document Center in SharePoint 2013, as shown in Figure 12-1, and has been enhanced to include:
- Meta-data navigation features and taxonomy capabilities
- A Document ID Service
- Integration with Office Client New, Open, and Save functions
- Multistage retention policies
- Folder-based information policies
- Location-based meta-data defaults and metadata–driven navigation
- Integration with the Records Center site definition
- A configuration to act as a template that enables organizations to quickly start managing documents
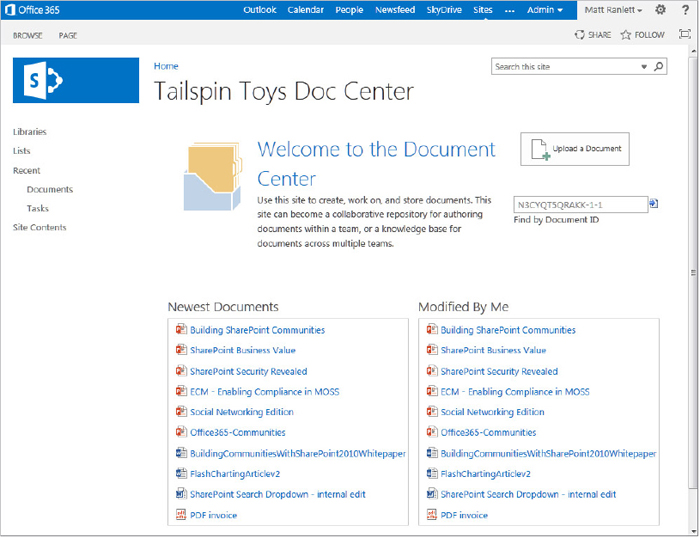
Note the Document ID search web part. Documents can be located using a unique ID that is assigned when they are created. As in SharePoint 2010, all documents in a Document Center template based site collection can automatically receive a unique ID. This feature can be enabled or disabled by the site administrator.
When designing a document management strategy using SharePoint 2013, it is helpful to acknowledge that users generally fall into three roles:
- Visitors are individuals who have read-only access to documents. Common tasks for visitors include browsing documents, searching, and reading documents.
- Contributors are individuals responsible for creating documents or document sets and participating in workflows.
- Content Stewards maintain document libraries and Document Centers and may be responsible for creating libraries, views, and subsites. They configure meta data, navigation, and security, and act as nontechnical administrators.
Visual Studio and the Document Center
Developers can use the SetupDocSiteFeatureReceiver class in the Microsoft.Office.DocumentManagement.DocSite namespace to customize how the Document Center is created. The feature receiver is inherited like any other feature receiver. The feature events can use the object model to customize new Document Centers as they are created.
CONTENT ROUTING
Architecting large document repositories requires advanced planning and possibly a team of content stewards. Uploading, navigating, and finding content become tricky when scaling for millions of items. SharePoint 2013 leverages capabilities introduced in the previous version to provide features that assist content stewards in managing large repositories, as well as making repositories easier to use. One of these site-level features is the Content Organizer (CO).
Often, when users are adding content to a large repository, there is this sense that they are handing the content off to the content stewards. Most of the time, the content found in these larger repositories is in a finished state and ready for storage and consumption. One use of the CO is to route documents to specific site collections or folders based on rules and meta data.
Managing the Content Organizer
The CO is activated using the Site Features list. After the feature is activated, you configure the CO using the Content Organizer Setting and Content Organizer Rules links under Site Administration. The CO is the evolution of the Routing Table web part and the related document routing features in the SharePoint 2007 Document Repositories site definition.
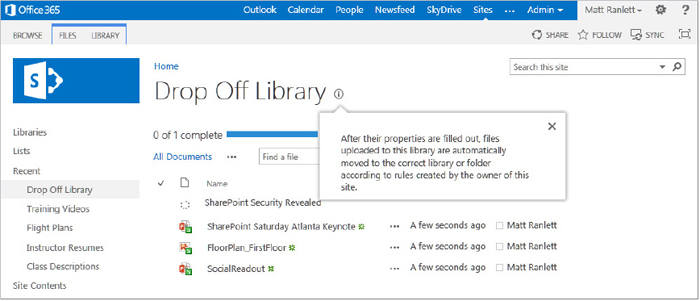
The Drop Off Library
When the Content Organizer (CO) feature is activated, a special document library—the Drop Off Library (see Figure 12-2)—is created and added to the Quick Launch navigation. Any content that derives from the Document content type and is received by the Drop Off Library can be routed to alternative locations without user intervention. The location that the content is routed to is determined by rules that the content stewards create. Content can be routed to other site collections, libraries, or folders within libraries. The CO can be configured to force all content to be uploaded to the Drop Off Library. After this is configured, it can act as a holding area for documents that do not have the required meta data needed for rule processing.
There are several scenarios for using the Content Organizer:
- Masking upload complexities from contributors
- Delivering content flagged as confidential to secure locations
- Submitting content to large repositories
- Moving content to folders with specific Document Information Policies
- Creating new folders as needed and then moving content to them
Documents may be sent to document libraries via different pipes. For example, you can use the context menu Send To pipe, manual uploads, workflows, and the object model. Because the Drop Off Library is a standard library, all of these submission pipes are supported.
Creating Rules
Typically, content stewards are responsible for adding rules to route content around the organization. Before creating rules, the CO should be configured using Site Settings. There are several useful options available during configuration:
- The Redirect Users to the Drop Off Library option redirects users’ content to the Drop Off Library if they try to upload content to a library that is associated with rules.
- When the Sending to Another Site option is enabled, content can be routed to other site collections. This is useful when the content stewards are responsible for lots of content that needs to be distributed across many site collections.
- Folder provisioning settings allow new folders to be created when certain thresholds are reached. This is another useful feature in repositories that contain a large number of documents. Folders can be provisioned, allowing you to maintain fewer than 5,000 items in a given folder.
NOTE The List View Threshold is a setting in SharePoint that represents the maximum number of items retrieved in one request. The default value is 5,000 and the minimum is 2,000.
- The Duplicate Submissions setting enables you to allow versioning or provide unique filenames so that files are not overwritten.
- Role managers will be notified if files have been submitted to the Drop Off Library but have not been routed for various reasons.
Rules List
The content stewards add rules using the Content Organizer Rules link (see Figure 12-3), which you can access using the link in the Site Administration section on the Site Settings page. When content is received by the CO, rules are processed by priority and can assist the content stewards in making sure that content is stored in the appropriate place.

To create a new rule, you must provide the following information:
- Rule name: A user-friendly name, which may be exposed in the File Plan report.
- Rule Status and Priority: Set a value between 1 and 9 with 1 having the highest priority. Having a higher priority means the rule executes before rules with a lower priority.
- Submission’s Content Type: The selected content type properties will be exposed to condition logic. If the rules are met, the content assumes this content type.
- Conditions: Enables configuration of up to six logical comparisons of content type properties.
- Target Location: The location the content will be moved to if it matches all of the conditions defined. This location can be another site or site collection.
In summary, the Content Organizer feature is available for any site template, not just Record or Document Centers. You create rules that help the CO decide where the various types of content should be stored. This enables you to enforce security and information policies. The CO can route content based on properties as well as content type.
USING DOCUMENT LIBRARIES IN THE DOCUMENT CENTER
Like the previous version of the Document Center, there is one default document library contained in any newly provisioned Document Center sites. Of course, it is possible to add libraries as needed. Many of the features explored in this chapter are managed at the document-library level. Although large organizations may require many site collections and Document Centers to manage hundreds of millions of documents, smaller teams may be able to achieve their document management goals using a single document library. A single library can contain large numbers of documents. However, generally speaking, if you need to manage many items, you should distribute the items across multiple libraries or sites for various reasons.
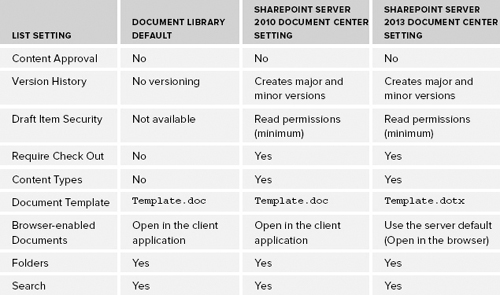
Folders in a document library can be based on business needs. With the release of SharePoint 2013, you must understand that the folders contained in libraries serve many purposes outside the traditional use, assisting with categorization. Because you can manage information policies at the folder level and these policies are inherited similarly to security policies, you can use folders as a means of maintaining and organizing retention policies. Document meta data can be automatically populated according to the location of the document, allowing folders to play a role in meta data as well. Table 12-5 is a list of the default settings for the document libraries provisioned using the Document Center site definition.
TABLE 12-5: Default Document Library Settings for the Document Center
Because the Document Center is designed to manage a large number of documents, the ability to quickly sort and filter, as well as navigate to, content is important. SharePoint 2013 provides three quick ways to find the content needed: column-level filters, meta-data navigation, and key filters.
Meta-Data Navigation and Filtering
Metadata–based navigation helps users find documents quickly and explore unstructured content that might span many folders in a library. Content stewards define navigation hierarchies based on content types, single-value choice fields, or managed meta-data fields. The selected fields appear on the Quick Launch toolbar when the user browses inside of a properly configured document library and can be used to assist in navigating large amounts of documents.
Key filters can be defined (see Figure 12-4), allowing users to filter documents by terms entered in the Key Filters section of the Quick Launch toolbar. Both the navigation hierarchy and key filters are defined at the library level using Library Settings.

Field types that are available for key filters include:
- Content type
- Choice fields
- Managed meta-data fields
- Date and time fields
- Number fields
To enable meta-data navigation and filtering in a document library, follow these simple steps:
The next section discusses this final meta-data navigation configuration choice in more detail, as shown in Figure 12-5.
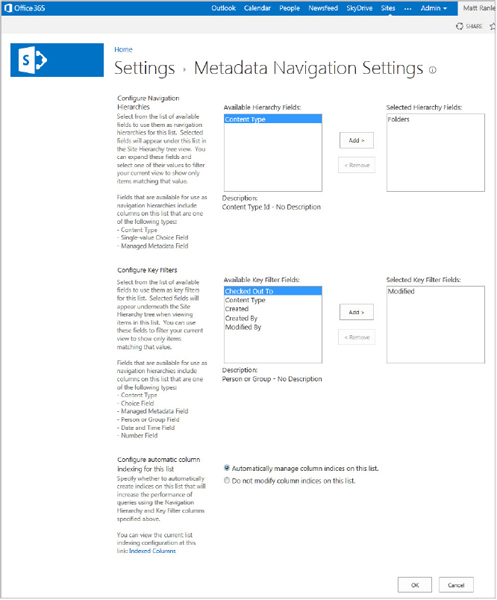
Queries and Indexes
When defining columns used for navigation, SharePoint defaults to automatically creating and managing the column indexes on the list. This setting, Configure Automatic Column Indexing for This List, can be seen in the meta data navigation settings screen above in Figure 12-5. The indexes are created using the data that will be used in queries as the tree is navigated and nodes are selected. As new nodes are selected, SharePoint decides if it can reuse an index from the last query. If the previous index can’t be used, a new query will be created using another available index. If the query fails because of too many results being returned, a fallback query will be used to return top items from the list.
Visual Studio and Document Libraries
Much of what developers learned about document library definitions and Visual Studio in the previous version of SharePoint is still relevant today. Custom document libraries can be created using list definition templates found in Visual Studio 2013. You can use the various flavors of the object model to send and retrieve items to and from the document library. Custom fields and views can be added as part of any list definition. Listing 12-1 uses the object model to set options such as list throttling and synchronization properties.
LISTING 12-1: Document Library Manipulation Using the SharePoint Object Model
using System;
using Microsoft.SharePoint.Client;

namespace ECMSampleThrottling_Console
{
    class Program
    {
        static void Main(string[] args)
        {
            // Starting with ClientContext, the constructor requires a URL to the
            // server running SharePoint.
            ClientContext context =
                            new ClientContext("http://www.tailspintoys.com/");

            // The SharePoint web at the URL.
            Web web = context.Web;

            // Execute the query to the server.
            context.ExecuteQuery();

            // Define the list to be created
            ListCreationInformation listParams = new ListCreationInformation();
            listParams.Title = "Stuffed Bear Fabrics";
            listParams.Description = "Available fabric options for plush animals";
            listParams.DocumentTemplateType =
                                  (int)ListTemplateType.DocumentLibrary;

            // add the list
            List classList = web.Lists.Add(listParams);

            // Execute the query to the server.
            context.Load(classList);
            context.ExecuteQuery();

            Console.WriteLine("Library added. . .");

            Console.ReadLine();
        }
    }
}
Create a Document Library List Definition in Visual Studio
You can create a list definition and list instance using the templates that are included in Visual Studio 2012. The list definitions are created using project templates included in Visual Studio.
To create a list definition and list instance, follow these steps:

After you click the Finish button, the new definition will be generated, and a new folder will be created under the Solution Explorer. After the list definition is generated, you can define custom fields as needed.
RECORDS MANAGEMENT
With the explosion of digital information and the requirements of keeping this information compliant with government and industry regulations, records management has become a critical component of any SharePoint deployment. If you haven’t heard of records management, you will. Records management is the process of classifying, securing, discovering, and managing your information from creation to destruction. SharePoint provides numerous features that allow end users, developers, and IT pros to make their applications and information compliant.
SharePoint provides records management using four key feature areas:
- Record identification
- eDiscovery and legal holds
- Auditing and reporting
- Retention and expiration
Record identification is the process of formally managing your information by making it an official record. As part of making it an official record, you specify a retention schedule, any auditing requirements, and how to dispose of the information.
eDiscovery and legal holds work together, enabling you to uncover your information assets using search no matter where they live, and legal holds enable you to create eDiscovery cases for legal requests and compliance. eDiscovery is tied to search, so if you are interested in eDiscovery, you should become familiar with Microsoft search services.
Auditing and reporting enable you to audit, down to an item level, the changes made to an item such as when and who modified the content. Combined with reporting, you can get a report out to Excel that shows you the details about your information across your site and also which content is following your information policies across your site.
Retention and expiration enable you to set policies for retention and expiration of your information. You can control this at the individual piece of content level or force policies based on the location the content lives in SharePoint. Expiration is the process of archiving or destroying your content when the content is no longer needed, or, for compliance reasons, when you want to remove the content from your system.
These four areas, when combined, provide you with a robust records management application and platform to control the flow of information assets in your organization.
Record Identification
Record identification is the process of turning information assets into declared records. Becoming a declared record has implications for activities such as managing the life cycle of the asset, making it discoverable, and archiving the record for longer term storage. SharePoint 2013 enables records management in either a staged process of moving records to a SharePoint Records Center or creating in-place records management. If you decide to use in-place records, you can leave the asset in place in the library and manage the information as a record. To get these features you need to make sure the In Place Records Management feature has been activated.
SharePoint provides the ability to declare many types of information as records. This means that you can create records for files, such as Microsoft Office documents, as well as social networking types, such as blogs and wikis. All content in SharePoint is considered content and can be used in records management.
Multistage disposition is a key feature in records management. You can have multiple stages based on different timeframes and criteria. This lets you set up policies, such as Check Legal Documents Every Year to See if They Have Expired or if the Conditions on the Contracts Have Been Met, while also having a policy that deletes a contract 7 years after the document is approved. This technology can work with nonrecords, so think about the scenarios in which you can use this technology even outside of records management.
Record Center Site Template
The Records Center template enables easier access for users submitting documents and records managers searching for documents based on document ID. The Records Center also uses some of the other Enterprise Content Management (ECM) features, such as meta data–driven navigation, to make it easier to browse the Records Center by meta data rather than by folder hierarchy. The last point about the Records Center template is that you can have multiple Records Centers in a single site collection. Rather than forcing you to use a single Records Center, SharePoint enables you to have multiple Records Centers to which you can point different sets of users or content.
You may be wondering when to use the Records Center versus in-place records management. The difference will be policy and preference. For example, if your company would rather manage active content separate from records content, using the Records Center makes sense. In addition, if you have a records manager for your organization and want centralized management of your records, rather than relying on individual groups to manage their policies, you will want to deploy the Records Center. If your users need access to their content after they declare it as a record, you will want to use in-place records management. Figure 12-7 shows the Records Center template.

Content Organizer
As part of organizing your records, SharePoint supports a Content Organizer and Content Organizer rules. These rules enable you to specify where content should go based on a number of criteria, including properties such as content type. By having these rules, end users or applications can submit their documents to the Records Center; and the Records Center, or any SharePoint site where the Content Organizer is running, can route the content to the right location. Using the Content Organizer settings, you can create customized content routing rules, both in the user interface and using the API.
The last feature in the records center is the hierarchical, meta data–driven file plan in the archive. Having the ability to set file plans through the meta data contained in the content makes administration easier. File plans enable different record actions according to location or content type.
Auditing and Reporting
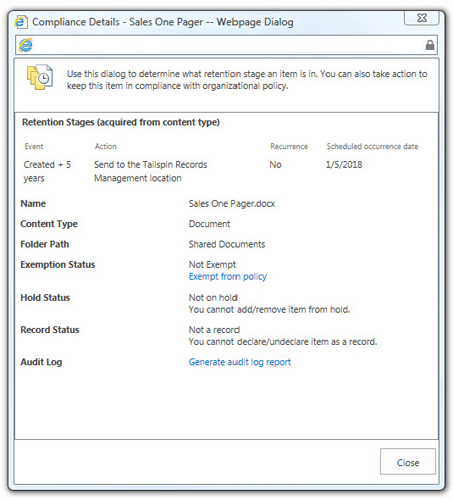
With any records management solution, good auditing and reporting are critical. Auditing allows you to track what users are doing with the content and whether they are accessing, deleting, or moving it. SharePoint supports per item reporting, so you can see the actions performed on content at an individual item level. SharePoint also supports reporting using the file plan, so you can understand the compliance details for your content. By providing a simple user interface similar to the Properties interface, SharePoint makes it easy to understand the compliance details for your documents. Figure 12-8 shows the Compliance Details dialog box.
Records Management API
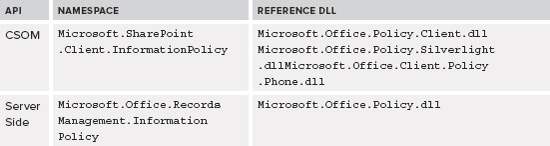
The SharePoint classes provide many methods for working with content that you will already be familiar with. These include accessing document libraries and sites to store and manage files. Most of SharePoint programming with records management involves accessing content, declaring records, creating new information management policies, performing discovery and holds, and generating reports. The following sections step you through performing actions using the different object models when working with records in SharePoint 2013. A full range of classes are in a number of namespaces and can be referenced from the following DLLs: Microsoft.Office.DocumentManagement and Microsoft.Office.Policy.
Declaring and Undeclaring Records
One of the most common operations in records management is declaring and undeclaring records. If you want to declare records in place, you need to turn on the in-place records management feature for your site collection, and then the Record Declaration Settings window appears in your site collection administration web page, as shown in Figure 12-9.

The classes needed for creating records are located in the Microsoft.Office.RecordsManagement.RecordsRepository namespace. The primary methods are DeclareItemAsRecord and UndeclareItemAsRecord. To perform an action on an item, these methods pass an SPListItem object to the static method. The method performs the entire action of declaring or undeclaring the item as a record, respectively.
The following code in Listing 12-2 uploads a file to a document library. It uses the IsInPlaceRecordsEnabled method to check to see if in-place records management is enabled. Then it calls DeclareItemAsRecord to declare the new document as a record. To make sure that the record is declared, you have two options. You can check the expiration time to make sure that it was set to the right date, or you can use the IsRecord method, which takes an SPListItem object and returns a boolean indicating whether the item is a record or not.
LISTING 12-2: Upload File to Document Library
            using (SPSite site = new SPSite(SharePointURL))
            {
                SPWeb web = site.RootWeb;
                SPList list = web.GetList(SharePointListURL);

                Stream fileStream = File.Open(filePath, FileMode.Open);
                SPFile file = list.RootFolder.Files.Add(
fileSharePointURL, fileStream);

                SPListItem item = file.Item;
                file.Update();

                Console.WriteLine("In Place Records enabled: " +
Records.IsInPlaceRecordsEnabled(site).ToString());

                //Declare the item as a record
                Records.DeclareItemAsRecord(item);

                bool currentStageRecurs = false;
                DateTime? ExpireDT =
Expiration.GetExpirationDateForItem(item, out currentStageRecurs);

                //Make sure it declared
                if (ExpireDT == null)
                {
                    Console.WriteLine("Not declared!");
                }
                else
                {
                    Console.WriteLine("Declared Expiration Date: " +
                                                ExpireDT.ToString());
                    //Also show if Record using IsRecord
                    Console.WriteLine("IsRecord: " + Records.IsRecord(item);
                }

                //Undeclare the object
                Records.UndeclareItemAsRecord(item);
            }
Creating Organizer Rules
The Content Organizer enables SharePoint to route documents based on the rules you specify. Although you can create these rules through the user interface, as shown in Figure 12-10, you can also create rules through the object model. The object model offers a class called Microsoft.Office.RecordsManagement.RecordsRepository.EcmDocumentRoutingWeb. This is the base class that you will start working with, using the object model (OM). From this class, you can access the rules contained in the Content Organizer feature. One thing to remember is that you must activate the Content Organizer feature in your site feature settings. If you do not, you won’t see the user interface for creating rules, and the object model won’t work.

From the routing web object, you can access the RoutingRuleCollection that contains your EcmDocumentRouterRule. With the rule object, you can access the properties of an existing rule. To create a new rule, you create a new ECMDocumentRouterRule and pass the SPWeb object, which represents the SharePoint location where you want to create the rule.
Because content rules require XML conditions, the easiest way to create a content rule is by using the user interface and then copying the XML from the rule. Table 12-6 lists the properties you need to set to create a rule, and Table 12-7 lists the operators.
TABLE 12-6: Properties to Create a Rule
| NAME | DESCRIPTION |
| Name | Name of the rule. |
| Description | Description for the rule. |
| Priority | String that is the priority of the rule compared to other rules; 1 is highest, and 9 is lowest. |
| ContentTypeString | Content type string used to specify your content type. The format must be ID|Name. |
| TargetPath | Relative path to the target folder such as /Shared Documents. |
| ConditionString | XML fragment that contains the conditions that you want met before the rule fires. Table 12-7 shows the different Operator options for this property, but the general format is <Conditions><Condition Column="Column ID|Column Internal Name|Column Title" Operator="Operator" Value="Value" /></Conditions>. |
| Enabled | Boolean that specifies whether the rule is enabled. |
TABLE 12-7: Operators for Content Organizer Rules
| NAME | DESCRIPTION |
| IsEqual | Checks to see if the value of the column is equal to the value specified. |
| IsNotEqual | Checks to see if the value of the column is not equal to the value specified. |
| GreaterThan | Checks to see if the value of the column is greater than the value specified. |
| LessThan | Checks to see if the value of the column is less than the value specified. |
| GreaterThanOrEqual | Checks to see if the value of the column is greater than or equal to the value specified. |
| LessThanOrEqual | Checks to see if the value of the column is less than or equal to the value specified. |
| BeginsWith | Checks to see if the value of the column begins with the value specified. |
| NotBeginsWith | Checks to see if the value of the column does not begin with the value specified. |
| EndsWith | Checks to see if the value of the column ends with the value specified. |
| NotEndsWith | Checks to see if the value of the column does not end with the value specified. |
| Contains | Checks to see if the value of the column contains the value specified. |
| NotContains | Checks to see if the value of the column does not contain the value specified. |
| IsEmpty | Checks to see if the value of the column is empty. You specify a blank string for the value. |
| IsNotEmpty | Checks to see if the value of the column is not empty. You specify a blank string for the value. |
If you want to enable autofoldering based on a unique property, use the DocumentRouterAutoFolderSettings class. This class contains a number of properties you need to set to make autofoldering work. Table 12-8 shows the properties for the DocumentRouterAutoFolderSettings class. The code in Listing 12-3 following the table shows how to set these properties and use them in your code.
TABLE 12-8: DocumentRouterAutoFolderSettings Properties
| NAME | DESCRIPTION |
| Enabled | Boolean that specifies whether these settings are enabled. |
| AutoFolderPropertyInternalName | The internal name of the field to use for autofoldering. |
| AutoFolderPropertyId | The property ID of the field to use for autofoldering. |
| AutoFolderPropertyName | The property name of the field to use for autofoldering. |
| AutoFolderPropertyTypeAsString | The property type as a string of the field to use for autofoldering. |
| AutoFolderFolderNameFormat | The name format to use for the folder. By default, this will be %1 to %2. %1 will be replaced by the name of the property. %2 will be replaced with the unique value for the property. |
LISTING 12-3: Using Content Organizer Methods in API
EcmDocumentRoutingWeb router = new EcmDocumentRoutingWeb(web);

//Output the values to the Console of each Rule and Settings
foreach (EcmDocumentRouterRule rule in router.RoutingRuleCollection)
{
Console.WriteLine("Name:" + rule.Name);
Console.WriteLine("Rule Info:" + rule.ConditionsString);

try
{
DocumentRouterAutoFolderSettings autoFolder = rule.AutoFolderSettings;

Console.WriteLine("AutoFolder Name: " + autoFolder.AutoFolderPropertyName);
Console.WriteLine("Internal Name: " + autoFolder.AutoFolderPropertyInternalName);
}
catch { }
}

//Create a new rule
SPContentType contentType = web.ContentTypes["ProductDocument"];
string contentTypeString =
            String.Format("{0}|{1}", contentType.Id, contentType.Name);

EcmDocumentRouterRule newRule = new EcmDocumentRouterRule(web);
newRule.Name = "Tailspin Document Route ";
newRule.Description = "Created by  Wrox Chapter 12 Samples";
newRule.Priority = "5";
newRule.ContentTypeString = contentTypeString;
newRule.TargetPath = "/ToySpecifications";
newRule.ConditionsString = @"<Conditions>
<Condition
Column=""8553196d-ec8d-4564-9861-3dbe931050c8|FileLeafRef|Name""
Operator=""Contains""
Value=""Specification"" />
</Conditions>";

//Create autofolder settings
//Get Field Properties (must be required and single value property
SPField customField = contentType.Fields["ProductName"];

DocumentRouterAutoFolderSettings aFolder =  newRule.AutoFolderSettings;
aFolder.Enabled = true;
aFolder.AutoFolderPropertyInternalName = customField.InternalName;
aFolder.AutoFolderPropertyId = customField.Id;
aFolder.AutoFolderPropertyName = customField.Title;
aFolder.AutoFolderPropertyTypeAsString = customField.TypeAsString;
aFolder.AutoFolderFolderNameFormat = "%1 - %2";

newRule.Enabled = true;
router.RoutingRuleCollection.Add(newRule);
eDISCOVERY AND COMPLIANCE
The entire Document and Records Management Systems in SharePoint 2013 have been improved with the capabilities in eDiscovery that are used for compliance teams. The new site template and eDiscovery features provide a platform that you can develop and extend. The platform and API is designed to allow companies to meet compliance and legal regulation requests by gathering information from multiple sources such as desktops, servers, and e-mail. When the information is collected and reviewed, the legal teams can act upon the content based on the legal needs.
The foundation for eDiscovery was introduced in SharePoint 2010 by allowing records managers to place a hold on SharePoint sites. There were some drawbacks around the Hold feature in sites that did not allow users to continue to use the files. And it was difficult to search across multiple platforms such as e-mail. There are many new improvements with Exchange 2013, but only the topics related to SharePoint 2013 will be discussed. If you are interested in a full review of Exchange 2013 features, you should review the material on for Microsoft TechNet.
eDiscovery Center Site Template
The new eDiscovery template is designed to be the central location for legal teams to manage the content and documents required for case management. This includes creating the set of content that will be held or used for preservation, providing quick visibility of all content surfaced through search and exporting the content as needed. The eDiscovery Center can be connected to both the SharePoint Farm and the Exchange Servers. To reduce the complexity of managing these two locations, SharePoint 2013 provides the same user interface and APIs used to manage SharePoint content as well as Exchange content. Figure 12-11 shows what the new eDiscovery Center looks like.

The new eDiscovery Center is easy to use and provides the steps a user should use to get started. Keep in mind that eDiscovery is powered by a SharePoint Search Service Application (SSA) and that the content is preserved using the Search Service Application proxy. This technique of using the Search Service also allows for the new feature called In-Place Holds. (In-Place Holds will be discussed further in the “eDiscovery in SharePoint 2013” section.) If you have multiple Search Service Applications, you need to create an eDiscovery Center for each one. To plan your Search and eDiscovery infrastructure as well as permissions, use the TechNet guidance and worksheets located at http://technet.microsoft.com/en-us/library/fp161512(office.15).
eDiscovery in SharePoint 2013
With the growing push toward compliance, eDiscovery continues to be a critical component of SharePoint deployments. eDiscovery enables you to discover information and capture content for use at a later date based on legal, compliance, or policies at your company.
Case Management for Discovery Sets, Queries, Sources, and Exports
Creating a SharePoint 2013 eDiscovery Case is the first step of the request for content in the eDiscovery process. All of the cases are stored in the eDiscovery Center where they can be managed and created as needed. The eDiscovery Case is a SharePoint 2013 subsite that will contain the sources and filters for request. The elements that make up the eDiscovery Case are as follows.
- Sources
- Filters
- Exports
To use these elements you need to create a Discovery set and query. These list items provide the needed configuration for the eDiscovery system to pull the right sources for the eDiscovery request. The eDiscovery set provides the details on the location of the records (source) and limits which records are returned from that source (filter). In addition to the settings for the documents, the eDiscovery set enables you to select if the set needs to mark the documents as held using the new In-Place Hold feature. You can see each of these in the following Figure 12-12.
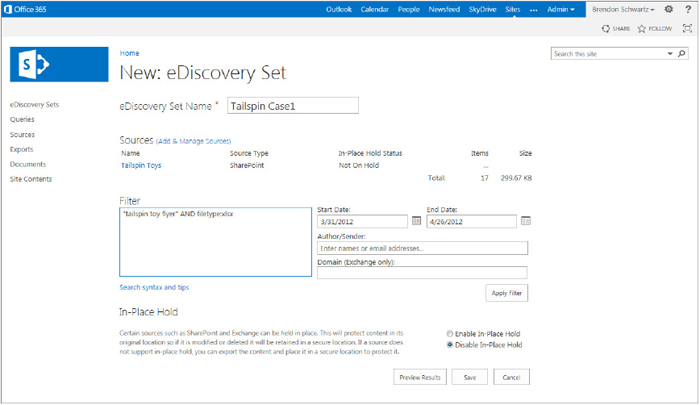
The major element of the eDiscovery set is the source configuration that defines where the content under review is being held. The sources can be defined from within the eDiscovery set and are the connections to the contents’ In-Place Hold status. There are two types of content that can be scanned when performing the eDiscovery process, namely mailboxes and locations. The mailbox is a reference to a single mailbox set up in Exchange using the name of the user or the e-mail address. The locations refer to SharePoint sites or filesystems that are in the search index. Using the location for SharePoint sites and file shares, you will get all content at the root of the location and all subcontent.
No action is taken on the content unless you select In-Place Hold; until then, the system uses only the search results to show real-time metrics of the content. The In-Place Hold feature has been added to SharePoint 2013 to improve the Hold feature added in SharePoint 2010. Previously, when you set a Hold with the feature introduced in SharePoint 2010, users could not continue to work with the files that were in the Hold. This made it difficult to work with large eDiscovery cases and files on systems that needed to continue working, especially if the case took a long time to complete. The In-Place Hold resolves this issue by creating a snapshot of the content and allowing users to continue to work with the content by making changes or deleting files.
The way this works is through a document library that is created at the site that is marked for the In-Place Hold. A library called the Preservation Hold Library is created with security permissions set up for the site administrator to access the content. This library is hidden from all other users, who will not know if one of their files is currently under review in an eDiscovery case. There will be only one library created for all of the eDiscovery cases for that site that all files will be placed into. To allow the content to surface back to the eDiscovery case site, the library is set up to allow the search crawler to have special permissions to crawl the content. After the files are modified or deleted, they will be placed into the Preservation Hold Library if an In-Place Hold was requested. This allows the team to manage the content for the case, but also allows users to continue working with documents needed for business. The preservation hold library holds only files that have been modified, so you need to verify the file is in the Preservation Hold Library if you are programmatically accessing the library.
Using the eDiscovery sets you can create queries of relevant content as well as define the additional filters on content in the sources already defined. The query page provides the ability to see the content with details about the author and date created as well as a link to view or download the file. After the query has been completed, the set of files can be exported using the export file and Export Wizard.
The Export Wizard provides the steps needed to create a package that contains the items specified in the queries. SharePoint provides an option to remove duplicate exchange content (such as the same e-mail in two locations) as well as the option to include versions of the SharePoint documents in your packages. If there are files that are encrypted or have file formats that are unrecognized such as log files, they can still be added to the list of files added to the export. After you begin the export, a .NET application opens and performs the download to your desktop.
When you finish performing the export using the eDiscovery Download Manager, you see a folder with the name of the query that is configured as well as the files requested in the download. You also notice that there is a reports folder with some basic reports about the case and a summary of the export that has been performed. SharePoint 2013 has also provided a manifest.xml file, which is a load file for the export in an open standard format called the Electronic Discovery Reference Model (EDRM). The content is formatted according the EDRM format to allow it to be imported to any other review tool that also supports that format. Listing 12-4 shows an example of part of a manifest.xml file.
LISTING 12-4: Manifest.xml file from eDiscovery Export
<?xml version="1.0" encoding="utf-8"?>
<Root MajorVersion="1"
MinorVersion="1"
Description="Tailspin Budget Reports"
DataInterchangeType="Update"
CaseId="50437b7d-1b8c-45c5-a4a0-b724a7aee95a"
xmlns:xsi="http://www.w3.org/2001/XMLSchema-instance"
xmlns:xsd="http://www.w3.org/2001/XMLSchema">
<Batch>
<Documents>
<Document DocID="34959672" DocType="File" MimeType=
"application/vnd.openxmlformats-officedocument.wordprocessingml.document">
<Tags>
<Tag TagName="#Title" TagDataType="Text"
TagValue="Toy Flying Car Budget" />
<Tag TagName="#Filename" TagDataType="Text"
TagValue="Toy Flying Car Budget.docx" />
<Tag TagName="#FileExtension" TagDataType="Text" TagValue="docx" />
<Tag TagName="#Author" TagDataType="Text" TagValue="Brendon Schwartz" />
<Tag TagName="#DateCreated" TagDataType="DateTime"
TagValue="2013-01-05T23:21:20" />
<Tag TagName="#DateModified" TagDataType="DateTime"
TagValue="2012-08-07T09:44:00" />
<Tag TagName="ModifiedBy" TagDataType="Text"
TagValue="Brendon Schwartz" />
<Tag TagName="#FileSize" TagDataType="LongInteger" TagValue="19505" />
<Tag TagName="ContentType" TagDataType="Text" TagValue="application/vnd.openxmlformats-officedocument .wordprocessingml.document

Document" />
</Tags>
<Files>
<File FileType="Native">
<ExternalFile FilePath="Tailspin Toys
ewtoysShared Documents"
FileName="Toy Flying Car Budget.docx" FileSize="19505"
Hash="SHA256:1eb0009cbe3f778b10ea3d2d10d2d1527fa581bae033883f8dc92daa9a899d8f" />
</File>
</Files>
<Locations>
<Location>
<Custodian>Tailspin Toys</Custodian>
<LocationURI>https://tailspin.sharepoint.com/sites/newtoys/
Shared Documents/Toy Flying Car Budget.docx</LocationURI>
<Description>None</Description>
</Location>
</Locations>
</Document>
Create Compliance with SharePoint 2013
Compliance features have become critical for many companies, especially with the amount of content they try to manage today. SharePoint 2013 continues to improve on the capabilities of compliance with a focus on the entire site. In previous versions of SharePoint, you could create policies on documents and content types, but you could not manage an entire site as a container for compliance of all the content inside of that site. The compliance features of records management still contain the ability to audit based on set documents and creates information management policies in addition to the new site level compliance.
Information Management Policies
Managing content can be difficult without some set of policies applied to the content. The policies help comply with any procedures in an organization, as well as allow you to comply with legally mandated requirements. These policies focus on three major areas: auditing, retention, and printing. The policy features can be accessed either through the user interface or API for automating your compliance. When using information management policies, you have the ability to set the policy at the site collection, list and library, or content-type level.
Site Compliance
Microsoft has provided many compliance options since SharePoint 2007, but many of the options were designed for individual documents. This meant that a company either could not force compliance on an entire site or had to purchase a third-party tool for compliance and archiving. SharePoint 2013 introduces features to provide the site-level compliance with the enhancement of site polices, closure, and deletion.
To use the closure and deletion features, you first need to set up a site policy. You can have as many named site policies within a site, but only one can be applied to the site at a time. Using the API you can change the policies based on changes in content, such as highly confidential information being added to a site. The site policy enables you to select the actions to perform on the site closure and deletion, as well as the ability to make the entire site collection read-only when an entire site collection is closed. Figure 12-13 shows the settings page for creating a new site policy.

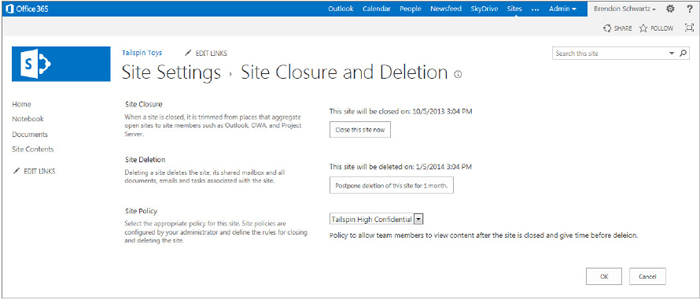
After at least one site policy has been created, you can apply that policy to the site. When this is done using the user interface, the site settings page for site closure and deletion will be updated with the date on which the closure will occur as well as the deletion. From the site closure and deletion page you can close the site now as well as postpone the deletion of the site based on the set policy. The dates provided are based on the site creation date and the date that the site is closed. Figure 12-14 shows the site settings page with the policy applied.
The addition of the new site policy, closure, and deletion feature helps maintain compliance around projects that have a set start and end date. To adhere to specific usage policies for users on projects, SharePoint can use the site closer and deletion options. The feature is not limited to projects but can specifically address this need in your sites used for projects. The internal name used in the API reflects this and uses the word Project instead of Site. When explaining the following class and code, the word Project is used to refer to a SharePoint site; although, the user interface uses the word Site.
The Microsoft framework has added the new ProjectPolicy class to manage the Site Policies and the site closure and deletion times. The class also provides static methods that enable you to perform Site Compliance programmatically on the site. The methods can be divided into two major categories: the methods that provide information about the Project and the actions you can perform on the Project. There is no way to create a new policy from code. The methods are provided to only perform actions on the Project (that is, Site) or update values of the current policies. Table 12-9 and 12-10 show the methods of the ProjectPolicy class separated into the two categories.
TABLE 12-9: Methods to Return Information About the Project

TABLE 12-10: Actions on the Project
| METHOD | DESCRIPTION |
| ApplyProjectPolicy | Allows you to apply a site policy to the site based on one of the predefined site policies defined in the GetProjectPolices list |
| CloseProject | Marks the site as closed immediately |
| OpenProject | Marks the site as open again with the site policy still applied |
| PostponeProject | Uses the site policy to change the close date the specified amount of time that is listed |
Using the methods is straightforward with a limited number of parameters. The key parameter is that you need the SPWeb object related to the Project Policy or Project. There is no constructor on the class, so if you want to create a Project Policy, you must do it through the user interface on the site first. Listings 12-5 and 12-6 show how you can use the methods to review the policies, apply them to the Project, check the status of the Project, and change the state of the Project. The API is available from both the server-side object model and the client-side object model using the proper DLL showing in Table 12-11.
TABLE 12-11: References Required to Use the ProjectPolicy Class
LISTING 12-5: Code to Apply a ProjectPolicy if One Has Been Created
if (ProjectPolicy.DoesProjectHavePolicy(web))
{
Console.WriteLine("Project already has a policy");
Console.WriteLine("ProjectPolicy::" +
            ProjectPolicy.GetCurrentlyAppliedProjectPolicyOnWeb(web).Name);
}
else
{
//The site must have at least one policy.
ProjectPolicy firstpolicy = ProjectPolicy.GetProjectPolicies(web).First();
ProjectPolicy.ApplyProjectPolicy(web,firstpolicy);
}
LISTING 12-6: Code to Postpone or Close Project Based on Policy Dates
if (       web.CurrentUser.IsSiteAuditor
     && ProjectPolicy.GetProjectExpirationDate(web).
                  AddDays(10).CompareTo(DateTime.Now) < 1)
{
Console.WriteLine("PostPone the project for the auditor");
ProjectPolicy.PostponeProject(web);
}
else if(        web.CurrentUser.IsSiteAdmin
  && ProjectPolicy.GetProjectCloseDate(web).AddDays(5).CompareTo(DateTime.Now) > 1)
{
Console.WriteLine("Closing the project for the site admin");
ProjectPolicy.CloseProject(web);
}
Retention Schedules
Retention schedules are created by generating XML to describe the configuration of the schedule. After you understand the pattern of the XML, generating and applying retention is merely a few lines of code. To see what the XML of the retention schedule looks like, see Listing 12-7 that deletes content after 6 years. The retention schedule XML scheme will be discussed in detail after Listing 12-7, so just use it as a starting point to understand what the structure looks like.
LISTING 12-7: XML Retention Schedule
<Schedules nextStageId="2">
   <Schedule type="Default">
      <stages>
         <data stageId="1">
            <formula id="Microsoft.Office.RecordsManagement.PolicyFeatures                       .Expiration.Formula.BuiltIn">
               <number>6</number>
               <property>Created</property>
               <period>years</period>
            </formula>
            <action type="action" id="Microsoft.Office.RecordsManagement                       .PolicyFeatures.Expiration.Action.Delete" />
         </data>
      </stages>
   </Schedule>
</Schedules>
Understanding Retention Schedule XML Scheme
In the XML, there is a top-level Schedules node that contains a property that is the ID of the next stage, even if that next stage does not exist. Below that, the Schedule node contains the multiple stages you want to occur on your content. To have multiple stages, you add multiple data nodes, each with a unique, incrementing integer in your stageID property. You can specify the type, which can be Default or Record. Default enables you specify custom actions to occur on any items, whereas Record performs the actions only on declared records.
From the data node, you see the formula node. The id of the formula node is the ID of one of the built-in formulas in SharePoint. You could point at your own custom class to implement your own formulas by specifying the class name in the id attribute. The built-in formulas enable you to add days, months, or years to the column you specify in the property node. In the example, the formula is calculated from the Created property, and 6 years are added to that property for the action to be triggered. The possible values for the period node are days, weeks, and years.
Next is the action you want to perform if the formula’s criterion is met. In the sample, this means 6 years from the creation date has expired. To specify the action you want to perform, you specify the action in the id attribute for the action node. Again, you can use a custom action here by specifying your custom action class implementation for the id value. In the example, Microsoft.Office.RecordsManagement.PolicyFeatures.Expiration.Action.Delete is specified, which is a delete action. Table 12-12 gives you the possible built-in action values. For brevity, Microsoft.Office .RecordsManagement.PolicyFeatures.Expiration.Action has been removed from all of them, so make sure to add this back before using the actions in your XML.
TABLE 12-12: Records Management Actions
| NAME | DESCRIPTION |
| Custom | Specifies the use of a custom action. |
| Delete | Deletes the content. |
| DeletePreviousDrafts | Deletes all drafts of the content except for the most recent. |
| DeletePreviousVersions | Deletes all previous versions except for the most recent. |
| MoveToRecycleBin | Moves the content to the recycle bin. |
| Record | Declares the content an in-place record. |
| Skip | Skips the step. |
| SubmitFileCopy | Submits the content to the records repository as a copy. |
| SubmitFileLink | Submits the content to the records repository and retains a link in the library. |
| SubmitFileMove | Submits the content to the records repository as a move that deletes the content from its current location. |
| Workflow | Triggers a workflow. You need to specify the GUID for the workflow in the id attribute for this action node. This action node does not need to be prefaced with Microsoft.* but instead should just be <action type="workflow" id="GUID of workflow"/>. |
Creating and Applying Retention Schedules
With a good understanding of the XML scheme, you can create any retention schedules needed by simply building new XML nodes onto the previous simple example. To demonstrate a more complex retention schedule, the following XML sets three stages in Listing 12-8. The first stage recurs every 6 months and deletes the previous versions of the content. The second occurs 6 months from the modified date of the content and declares the content as a record. The last occurs 5 years from the created date and deletes the content.
LISTING 12-8: Complex Retention Schedule
<Schedules nextStageId="4" default="false">
  <Schedule type="Default">
    <stages>
      <data stageId="1" recur="True" offset="6" unit="months">
        <formula id="Microsoft.Office.RecordsManagement.PolicyFeatures
                       .Expiration.Formula.BuiltIn">
          <number>6</number>
          <property>
            Created</property><period>months</period>
        </formula>
        <action type="action" id="Microsoft.Office.RecordsManagement.
                    PolicyFeatures.Expiration.Action.DeletePreviousVersions" />
      </data>
      <data stageId="2">
        <formula id="Microsoft.Office.RecordsManagement.PolicyFeatures
                       .Expiration.Formula.BuiltIn">
          <number>6</number>
          <property>Modified</property>
          <period>months</period>
        </formula>
        <action type="action" id="Microsoft.Office.RecordsManagement.
                     PolicyFeatures.Expiration.Action.Record" />      </data>
    </stages>
  </Schedule>
  <Schedule type="Record">
    <stages>
      <data stageId="3">
        <formula id="Microsoft.Office.RecordsManagement.PolicyFeatures
                       .Expiration.Formula.BuiltIn">
          <number>5</number>
          <property>
            Created</property><period>years</period>
        </formula>
        <action type="action" id="Microsoft.Office.RecordsManagement
                       .PolicyFeatures.Expiration.Action.Delete" />
      </data>
    </stages>
  </Schedule>
</Schedules>
To use the retention schedule, you can apply it to your site in one of two methods. You can attach the retention schedule to the content type, or you can attach it to the list. When attached to the content type, the retention schedule is followed regardless of where the content type is created. With the content type syndication functionality, your retention schedule can travel wherever a content type travels. If you associate the retention schedule with a list, the schedule works on content in only that list. With portability in mind you want to use the content type option so that your retention schedule works everywhere.
Programmatically checking and applying retention schedules can be done with built-in API classes. To check to see if you have a custom list policy, you can use the ListHasPolicy property on the Microsoft.Office.RecordsManagement.InformationPolicy.ListPolicySettings object. This boolean property returns whether the list has a custom policy or not. To set the list to use a custom policy, set the UseListPolicy boolean to True and then call Update on your ListPolicySettings object. Set this to False to use the content type retention policy. The constructor for your ListPolicySettings object takes an SPList object, which is the list you want to investigate. Listing 12-9 and Listing 12-10 show how to use these objects and properties.
LISTING 12-9: Change the List Policy Setting on a List
SPWeb web = site.RootWeb;
SPList list = web.GetList(SharePointListURL);

ListPolicySettings policy =  new ListPolicySettings(list);

if (!policy.ListHasPolicy)
{
//make the list use a custom list policy
policy.UseListPolicy = true;
policy.Update();
}

//Check to see if setting was successful
Console.WriteLine("List Policy Set: " + policy.ListHasPolicy.ToString());
LISTING 12-10: Set a Custom Retention Policy on the List
using (SPSite site = new SPSite(SharePointURL))
{
SPWeb web = site.RootWeb;
SPList list = web.GetList(SharePointListURL);
SPFolder folder = web.Folders[SharePointListURL];
SPWeb parentWeb = list.ParentWeb;

SPList parentList = parentWeb.Lists[folder.ParentListId];
ListPolicySettings listPolicySettings = ListPolicySettings(parentList);

if (!listPolicySettings.UseListPolicy)
{
//Enable Location Based Policy if it isn't enabled
listPolicySettings.UseListPolicy = true;
listPolicySettings.Update();

//Refresh to get the updated ListPolicySettings
listPolicySettings = new ListPolicySettings(parentList);
}

listPolicySettings.SetRetentionSchedule(folder.ServerRelativeUrl,
policyXml, "My Custom Retention");
listPolicySettings.Update();

Console.WriteLine(listPolicySettings.
              GetRetentionSchedule(folder.ServerRelativeUrl));
}
To create the same policy on a content type requires a bit more code, but the process is similar. The code in Listing 12-11 is the same as the previous sample, but instead of getting the list policies, the code retrieves the content types in SharePoint, in particular the document content type. The code then uses the GetPolicy method to retrieve the expiration policy for the content type. If that policy does not exist, it creates the policy. Then, it sets the CustomData property for that policy and calls the Update method to set the retention policy for the content type.
LISTING 12-11: Create a Retention Policy on a Content Type
using (SPSite site = new SPSite(SharePointURL))
{
SPWeb web = site.RootWeb;
SPList list = web.GetList(SharePointListURL);
SPFolder folder = web.Folders[SharePointListURL];
SPWeb parentWeb = list.ParentWeb;

SPList parentList = parentWeb.Lists[folder.ParentListId];
ListPolicySettings listPolicySettings = new ListPolicySettings(parentList);

SPContentType contentType = web.ContentTypes["Document"];
Policy policy = Policy.GetPolicy(contentType);

//Check to see if it exists, if not create it
if (policy == null)
{
Policy.CreatePolicy(contentType, null);
policy = Policy.GetPolicy(contentType);
}

PolicyItem retentionPolicy = policy.Items[Expiration.PolicyId];
//See if a policy already exists, if not create one
if (retentionPolicy == null)
{
policy.Items.Add(Expiration.PolicyId, policyXml);
policy.Update();
}
else
{
retentionPolicy.CustomData = policyXml;
retentionPolicy.Update();
}

//Display policy XML to validate it worked
retentionPolicy = policy.Items[Expiration.PolicyId];
Console.WriteLine("Policy XML: " + retentionPolicy.CustomData.ToString());
CONTENT MANAGEMENT INTEROPERABILITY SERVICES (CMIS)
The Content Management Interoperability Services (CMIS) is an open source standard used for interoperability with any ECM system that supports the standard. SharePoint has implemented and supported this standard since the SharePoint 2010 Administrative ToolKit. SharePoint 2013 redesigned the implementation and enhanced the interfaces to provide a more powerful experience. As of the writing of this book, SharePoint supported the released version of the standard, which is CMIS 1.0.
One of the biggest challenges using an open standard is authentication since multiple types of platforms can implement the standard. Each platform might have their own type of authentication for accessing the content, and to seamlessly integrate with those systems, they must communicate using the same types of authentication. SharePoint 2013 provides the ability to use multiple types of authentication both native to Windows as well as open standards such as claims environments.
SUMMARY
In this chapter, you learned to use SharePoint to manage documents and artifacts for small teams, as well as hundreds of millions of documents for large organizations. You discovered the importance of using the SharePoint API to manage content and information architecture. Using SharePoint helps you eliminate information silos by using constant meta data and terms across site collections and farms.
You also have seen how you can use records management in SharePoint 2013. Declaring records and creating Content Organizer rules can be done directly in the user interface, but more importantly you can use the API to also manage the records. With the new eDiscovery Center, you can easily manage your compliance without affecting the document management of your sites. Combine the new records management features with the new document management features, and SharePoint becomes a capable information management system for handling large amounts of data. This combination also enables you to build powerful information management solutions with SharePoint.