
Chapter 19
Developing Applications with Access
WHAT’S IN THIS CHAPTER?
- Learning about Access Services 2013’s new approach to web applications
- Automating business logic with macros
- Building a fully functional Access Services 2013 web application
- Delivering familiar Access reporting capabilities on top of new web application interfaces
WROX.COM CODE DOWNLOADS FOR THIS CHAPTER
The wrox.com code downloads for this chapter are found at www.wrox.com/remtitle.cgi?isbn=1118495829 on the Download Code tab. The code is in the chapter 19 download and individually named according to the names throughout the chapter.
Microsoft Access is the premier integrated desktop developer tool, currently in its tenth release as Microsoft Access 2013. Access 2013 is ready to speed business users through complex data management and reporting tasks with a number of packaged database templates and a wide array of organizational and data access capabilities. Databases and data access concepts are certainly not new concepts, especially considering that this chapter immediately follows the PerformancePoint chapter, at the end of a book focused on Microsoft SharePoint 2013. Nevertheless, Microsoft Access 2013 brings a lot of problem-solving potential to the intermediate and advanced business user. This potential is worth understanding to help the SharePoint architect and developer know when to use an out-of-the-box approach such as the use of Microsoft Access instead of a customization or extension of SharePoint.
The new version of Access rebuilds the entire approach to database and application development by leveraging an extensive library of table templates; a vastly improved application experience that natively leverages HTML5, CSS, and JavaScript; and instant deployment of developed database applications to SharePoint for rapid collaboration. Microsoft made this investment in re-creating Access for a singular purpose: to enable business users to create data-centric web applications. Previous versions of Access enabled business users to rapidly create line-of-business (LOB) desktop applications. With the new 2013 version of Access, Microsoft acknowledges that the need for enablement of subject matter experts (SMEs) persists, while at the same time recognizing the need for broad access and greater IT control.
Before diving into the updated client application, it makes sense to pause and review some fundamental vocabulary and concepts related to databases and how they pertain to Microsoft Access 2013.
A database consists of one or more database tables, the relationships between the tables, and the functional and business logic enforced by the tables and relationships. A table is a logical representation of the database structure that groups a set of attributes together for the purpose of describing data. Conceptually, a table can be thought of as having rows and columns. All data in the table shares the same set of attributes, also known as columns or fields. A record, also called a row or a tuple, is a single entry or data item in a table. Because of this row-and-column concept, data in a table is thought of as being structured data. Structured data is easy to discover and understand in a table because of the rigid table concept. This is distinct from the unstructured data contained in Word documents and PowerPoint slide decks, which may be rich in detail but difficult for a computer to discover and interpret.
Because a database can contain a large number of tables, systematically understanding the relationship between the tables becomes important. Consider the following example: A small sporting equipment storefront wants to track sales of its products in a database for easy monthly and quarterly reporting. When considering the database tables in a simplistic data modeling exercise, the following entities are identified as requiring five independent database tables due to the unique set of attributes: customers, employees, orders, order details, and products. The relationships between these tables can be leveraged to keep the attributes of each table concise, as shown in Figure 19-1, which illustrates these various tables and their relationships. For example, an order may consist of a dozen or more items, but there is no need to track the order date for each item in the order. However, it is important to be able to relate the sale of an item back to the customer making the purchase. This separation of the order’s header details and the order’s line item details in the respective order and OrderDetails tables can be overcome through table relationships leveraging primary key and foreign key fields.

The practice of leveraging field values from other tables as foreign keys contributes to the easy retrieval of records from the database through a standard query language known as Structured Query Language (SQL). SQL enables operators to read, insert, delete, and update records in existing tables, as well as the ability to create, alter, and delete database structural elements such as tables and relationships.
A deep discussion of SQL and relational databases is beyond the scope of this book. Indeed, Microsoft’s relational database, SQL Server, is a foundational component of SharePoint and is the subject of hundreds of technical books. Although SQL Server is beyond the scope of this chapter, you must understand that SQL Server is the back-end database system to which Access connects. The significance of this change is that Access is now faster and more stable than ever before! Even better, with SQL Server as the back end to your Microsoft Access applications, other SQL Server tools such as Excel, SQL Server Reporting Services, and even Crystal Reports can easily connect and report on application data.
ACCESS 2013
Access 2013 offers a significant level of empowerment to business users and SMEs without requiring the services of a developer. With Access 2013 an end user can:
- Create new web applications using predeveloped templates.
- Download existing web applications from the public or corporate app store.
- Develop custom web applications from scratch.
- Rely on desktop database applications that require all other users to have Microsoft Access installed as well.
To add an app to any SharePoint 2013 site from the public app store or the private corporate store, simply click the settings icon in the top-right corner of the screen, and click Add an App from the drop-down menu, as shown in Figure 19-2. The list of available apps includes a number of prebuilt apps, built-in customizable templates, and customizable templates available on Microsoft.com, such as the Customer Billing and Time Tracking app shown in Figure 19-3. After an app has been installed to a SharePoint site, that particular instance of the template web app can be easily customized and extended with the Access 2013 client.


Creating Access web apps requires either Office 365 (Small Business Premium or Enterprise editions) or SharePoint 2013. If neither is available to act as a web app host, the desktop database application is the only option available. One benefit unique to desktop database applications is that these are the only Access applications that leverage Visual Basic for Applications (VBA) to extend functionality. Web applications instead leverage a pair of macro types to extend functionality, which is discussed more in the “Database Components” section later in this chapter.
Exploring Access 2013
Opening Access 2013 is your first exposure to the revolutionary new approach to web and desktop databases. Fully three-quarters of the opening page, the Backstage view, is dedicated to easily discoverable application templates in an eye-catching, tiled screenshot interface. This instant application template discovery engine is a big improvement over Access 2010, which offered similar choices in a small, horizontally scrolling strip of categorized templates. Where Access 2010 required numerous clicks to find an application template, Access 2013 focuses on speeding the user to the task.
This task focus extends to the integrated application template search experience. The top of the screen sports a search box and a handful of suggested searches that queries installed templates and Microsoft Online. Search results can be filtered by category to instantly enhance relevance.
Searching for a template in any new Office 2013 application is instantly a cross-application experience. When a search returns, the bottom of the search results includes instant access to valid templates for other Office applications. For example, a search in Access for Employee yields 10 results for Access and 46 results for Word. Expanding the options for Word reveals a tiled list of Word template screenshots, each of which offers the opportunity to instantly jump to the more task-relevant Office application. Figure 19-4 shows the initial template selection screen, with easy access to other Office applications based on search results.

Immediately worth pointing out is the new emphasis on Access web applications. Default templates such as the Issue Tracker, Task Management, and Contacts default to web interfaces and offer desktop experiences as an explicitly alternative option. This is not a huge change from the previous version; Access 2010 did offer a web database option but that option was offered after the desktop experience, which implies a selection preference. The explicit reversal of that implied selection preference is just one indication as to the continuing significance of Microsoft Access to the business application developer.
Microsoft uses the vocabulary word noun to represent the template entities available from the search box. For example, should a user want to track Issues, the search experience represents Issues as a noun, but the web application has tables for Issues, Customers, Employees, and Comments. The noun is actually one of hundreds of publicly available database schema templates hosted by Microsoft.
Clicking any of the application templates provides a functional business application in 60 seconds or less. For example, the Issue Tracker application instantly creates data storage tables and data management forms for contacts and issues. The web application and desktop application offer near-feature parity, with the only major difference being the user interface for the web app is inside the browser. Otherwise, access to forms, views, tables, and automated functionality are all available in online applications and desktop applications. The most important difference between Access and other Office applications is that when a new Access application is created, a unique intermediate step requires the user to define the web application’s deployment destination as a local server or an Office 365 environment. Business and consumer users without access to SharePoint or Office 365 can leverage SkyDrive for desktop database applications but cannot create web applications.
The Access 2013 Client Application
The Access client application sports the new touch-friendly interface with design inspirations taken from Windows 8 and the Windows Phone. The Ribbon interface, the backstage view of database information and application options, trusted documents and the associated security warnings, navigation panes, and the tabbed single-document interface (SDI) for form and table manipulation were all carried forward from the 2010 application version with little more than cosmetic changes. Another change carried forward from the 2010 version is the use of the ACCDB file format for desktop applications.
One change from previous versions is that there is now a concept of a user profile in Office applications, including Access. The user profile allows Access to persist credentials for services such as SkyDrive and Office 365. The profile either pulls from the corporate Active Directory, from Office 365’s user profile system, or from the user’s Windows Live account. Office applications, including Access, offer the ability to manage multiple accounts, although only one can be active at a time. The active user account is identified by name and photo in the top-right corner of the Office application.
When starting with a preconfigured application template such as the desktop task management application, the navigation pane is one of the most important user interaction points for Access application developers. This filterable pane organizes all the application elements for easy access. Although this chapter dives deeper into the contained elements in the “Database Components” section later in this chapter, you must understand that the navigation pane supports instant access to tables, queries, forms, reports, macros, and code modules, as seen in Figure 19-5.

Two of the most useful navigation pane configurations, holdovers from Access 2010, are to set the Navigate To option to the Object Type and [Custom] Navigation. The Object Type view groups Access objects together by type, whereas the [Custom] Navigation view groups Access objects together by related user activities. [Custom] Navigation in a Tasks application is called Tasks Navigation, and in an Issues application, the navigation option is called Issues Navigation. You can rename the [Custom] Navigation group inside of the Navigation Options dialog and explicitly control which Access objects appear on the Navigation pane.
The Access client application experience for desktop applications has not significantly changed. Most if not all of the investment by Microsoft in Access 2013 has been focused on a new web application model, which has been explicitly designed to simplify web development. Given the focus of Microsoft’s investment, it makes sense for the rest of this chapter to similarly focus on Access web apps and the development of such apps.
Access 2013 Web Applications
Microsoft Access 2013 has gone through a near ground-up rebuild for the user interface. The emphasis of the Access changes has been on the web experience, which now features a web application or web app front end driven by HTML, CSS, and JavaScript. This new front end enables the same rich cross-platform accessibility experience in the core SharePoint 2013 application.
In addition to the new front end, the back end for Access web apps has been replaced entirely by SQL Server. Where the previous version of Access leveraged SharePoint lists as the actual data storage mechanism for Access 2010 tables, Access 2013 automatically creates a full-blown SQL Server database housed either on SQL Server or on SQL Azure. SQL Server enables dramatic improvements in scalability and eliminates many of the problems of user contention and locked tables. Because of the SQL back end, Access can now store and rapidly calculate across millions of records. Furthermore, the move to leverage SQL Server as the back end enables IT to inventory and manage enterprise Access applications because all the data is stored in SQL Server.
The Access 2013 client application can also be considered the designer of web applications. Creating a web application using Access leverages a built-in forms generation engine, which applies a default layout and CSS-based formatting to the on-screen elements. This form-template engine ensures that business and IT users can rapidly create eye-pleasing interfaces that offer a consistent user experience across apps, regardless of the actual application author. This web form generation engine automatically creates a consistent interface from Microsoft’s schema templates, existing data imports, and custom schemas created in Access. Access can read the data schema, and generate direct table editing interfaces, which perform like Excel grids, individual record views, record search interfaces, and navigation buttons. Should the schema enforce a relationship between tables, Access automatically creates linked and drill-down enabled views of this relationship. Should the out-of-the-box interface not correctly prioritize data elements or navigation experiences, it is a simple matter to use the Access form designer to reposition or reformat elements. It is worth noting that the Access form designer does not offer an HTML or code-editing experience.
Similar to end-user experiences with new SharePoint sites, the approach Microsoft took with Access was to create a call to action when a new blank application is created. Access 2010 starts users with a blank screen, which frequently causes confusion in novice users. Access 2013 immediately asks users to add tables to the application and supports that call to action with both a search interface and a selection of existing data source connection options.
Power users of Access 2010 and earlier may have invested energy into automating repetitive tasks and business processes with VBA. Although VBA does continue to function in the Access desktop client, web forms cannot leverage VBA. Instead, Access web forms support a pair of macro designers that can react to user interface and data changes. These macro designers are explored in more depth later in the “Database Components” section.
Exploring a Sample Access Web Application
Figure 19-3 (shown earlier in this chapter) illustrates the basic makeup of an Access web app with Microsoft’s freely available Customer Billing and Time Tracking application. This application shares a number of characteristics with all Access web apps:
- Trimmed down hierarchical breadcrumb navigation bar across the top of the screen.
- Tables representing business entities organized vertically along the left side of the screen. This list of tables is called the Tile Pane. When designing applications with Access, every table is added to the Tile Pane, but each table can be independently hidden.
- Task-oriented views organized horizontally along the top of the screen. Selecting different nouns changes the available views across the top of the screen.
The Microsoft application serves as a model of an Access web app’s capabilities with the inclusion of several YouTube videos through the clever use of web browser controls on the various views. Beyond the eye-catching video, this business application does an excellent job of showcasing the four different view types and macros. The section “Creating an Access Web App” later in this chapter is an exercise that walks you through the creation of a similar Access web app where you can explore all these possible building blocks in detail.
Navigating to the Site Contents page reveals that the Customer Billing and Time Tracking app is treated by SharePoint like any other SharePoint app. It can be secured and removed. The app can also be opened in Access 2013 from the browser where it can be modified and republished. Should the app be treated as a template and get published to a number of different sites, the data in each instance of the app is private to that single site.
ACCESS SERVICES
As mentioned previously, Microsoft heavily invested in the new Microsoft Access 2013 application model to reduce barriers that may otherwise prevent SMEs from creating business applications. By leveraging the on-premise model of SharePoint 2013 and SQL Server for respective front- and back-end hosting, Access 2013 dramatically increases application manageability and scalability for Access-based business applications. By leveraging the hosted app model and relying on Office 365 to host the front end of the app and SQL Azure to store the data, the reach and scalability of Access applications increases significantly.
On-Premise Architecture
When leveraging a local SharePoint 2013 installation for publication and sharing of Access web apps, SQL Server 2012 provides the back-end functionality, whereas SharePoint and its Access Services service application provide the user interface and security. Figure 19-6 describes the Access Services architecture.

Although the Microsoft Access Office 2013 client communicates via SOAP protocols, the web front end relies entirely on RESTful services. Both web and desktop clients communicate to the load balanced SharePoint web front ends that host the Access Services data and design APIs.
Access Data Services (ADS) contains the session, cache, and data access layer responsible for extracting data from the SQL Server back end. The Access Services design APIs, responsible for retrieving only visual elements, bypass the ADS and directly connect to the SQL Server back end.
For each Access Services application, a new application database is created on the Access Services Application Database Server. This new database contains the new app’s data, views (forms), queries, and macros. By default, the Access Services Application Database Server is the same SQL Server that is used by SharePoint, but a new database server can easily be configured on Central Administration’s Manage Service Applications page to enforce a distinct separation of concerns. Only one Access Services Application Database Server is available per Access Services service application at a time.
Hosted Architecture
The hosted architecture for Access Services leverages Office 365 Small Business Premium or Enterprise editions and SQL Azure to scale upward to a theoretically infinite number of users and to contain a theoretically infinite amount of data. Beyond the changes to an Access web app’s reach, there are no functional differences in the architecture (refer to Figure 19-6 in the previous section) and that of an Office 365 hosted app beyond the potential difficulty in connecting reporting tools to the hosted database.
Upgrade Considerations
As mentioned previously, Access 2013 desktop applications have not changed — existing ACCDB database applications continue to function. However, Access Data Projects (ADPs) are no longer supported due to incompatibilities with SQL Azure. ADPs have been replaced with the new web-based Access app. Microsoft’s guidance for ADP developers is as follows:
- Convert the ADP to an Access app by importing existing tables into a new Access app. This causes new forms to be automatically generated.
- Convert to a linked desktop database by converting the ADP application to an .accdb format.
- Create a hybrid application by importing data into an Access app (hosted on SQL Server/SQL Azure) and link to the newly stored back-end data via a .accdb client application.
- Upgrade to a .NET application and leave Microsoft Access as a platform behind.
Database Components
Databases can contain several types of components, including tables, queries, views, reports, and macros. This section will examine all of them in more detail.
Tables and Queries
As previously mentioned several times in this chapter, Access 2013 web apps leverage the entirely new back end of SQL Server or SQL Azure. This is new compared to the Access 2010 model for Access Services, where all data was stored in SharePoint lists. Now pause for a moment to consider a few of the implications of this change, as shown in Table 19-1.
TABLE 19-1: Access 2013 Versus Access 2010
| ACCESS 2013 WEB APP BENEFITS | ACCESS 2010 WEB APP BENEFITS |
| SQL Server and SQL Azure are both much faster and more scalable than SharePoint lists. | All data is stored in a SharePoint site’s lists (provisioned by Access 2010 automatically when the application is created). |
| Data in dedicated SQL databases is accessible by a wide array of self-service BI tools, such as Excel and Crystal Reports. | Data hosted by a single site reduces the total number of databases created/required. |
Although the management overhead for the number of databases definitely increases with the new model, Access 2013, complete with its dedicated web app databases, is more flexible than the previous version.
A level of translation is required to understand how Access objects are stored in SQL Server. Table 19-2 identifies a number of key vocabulary terms in each database environment.
TABLE 19-2: Access 2013/SQL Server 2012 Vocabulary Map
| ACCESS OBJECT | SQL SERVER OBJECT |
| Table | Table |
| Query | View |
| Parameter Query | Table-Valued Function |
| Standalone Data Macro | Stored Procedure |
| Table Event Data Macro | Trigger |
| Validation Rule | Check Constraint |
Any table created in Access will be stored in the SQL Server database with the same name as in Access. Similarly, a table’s fields will be identically named in Access and SQL Server. The data types leveraged by Access do not match those of SQL Server exactly, so Table 19-3 has been provided as a reference.
TABLE 19-3: Access/SQL Data Type Map
| ACCESS DATA TYPE | SQL SERVER DATA TYPE |
| Single line of text | nvarchar(1−4000, MAX) |
| Multiple lines of text | nvarchar(1−4000, MAX) |
| Number | Float |
| Number | Int |
| Currency | Float |
| Date | Date |
| Date/Time | datetime2(6) |
| Time | Time |
| True/False | Bit |
| Image | varbinary(MAX) |
Each table created in an Access web app is available in the Tile Pane on the left side of the browsing user’s page (refer to Figure 19-3 in the beginning of the “Access 2013” section at the beginning of this chapter). Figure 19-3 displays Invoices, Projects, Employees, and Clients as navigation options representing the source tables and the views associated with each. However, opening the application with the Access desktop client reveals that several tables are not displayed in the web browser. Tables in the Tile Pane can be hidden or moved up and down, but if a tile in the Tile Pane is deleted, the table and all associated views are also deleted. If a tile is hidden, the backing table schema and associated views can still be modified. This is typically done to enable macro-based access to views which would otherwise be hidden.
Access leverages queries to join multiple tables together for purposes of targeted data discovery or data aggregation. Access leverages a SME-friendly visual query builder to develop a persisted mechanism to access the wanted data. This query is stored in SQL Server as a view or a table-valued function, depending on whether the query requires any parameters. The name of the SQL Server object matches the names in Access. Figure 19-7 shows an Access query from the Microsoft sample Customer Billing and Time Tracking application.

To access the SQL Server instance behind an Access web app, navigate to the Access client’s Backstage, and click the Info option to view the server name and database name associated with the published web app. In the event of an Office 365 published Access web app, the database will be hosted on a SQL Azure instance. To connect to this instance, use the management tools available in the Azure management portal. Be sure to follow Microsoft’s How To article titled “Guidelines for Connecting to Windows Azure SQL Database” available online at http://msdn.microsoft.com/en-us/library/ee336282.aspx. The SQL Server view for the previously referenced Access Query is:
CREATE VIEW [Access].[AmountOutstanding]
AS
SELECT
       SUM[Total Invoice Amount].[ExpenseCost],
       [Total Invoice Amount].[HoursCost],
       [Invoices].[Misc Other Cost]
FROM
       [Access].[Invoices]
LEFT JOIN
       [Access].[Total Invoice Amount]
ON
       [Invoices].[ID] = [Total Invoice Amount].[ID]
WHERE
       [Invoices].[Status] <>"Paid"
SQL Server Schemas
Within the dedicated SQL Server database, Access leverages three separate SQL Server schemas: Access, AccessSystem, and AccessRuntime. The AccessSystem and AccessRuntime schemas store the system information used by Access Services and the ADS to allow the web app to function properly. These schemas are used both by the Access web app at run time and the Access client during design-time activities.
The Access schema contains all the application’s end user-created tables, queries, and macros. This is where advanced users connect SQL Server reporting services or other external self-service BI applications for advanced integration and extension scenarios.
As mentioned previously, SQL Server login details are available in the application’s Backstage Info section. In addition to the server and database details, the Manage connections button enables the creation of new logins with read or read/write permissions. This enables explicit control of who can access back-end data without requiring advanced knowledge of SQL Server permissions management techniques.
Applications: Views and Reports
In an Access web application, a view is the main interactive page for browsing users to use the app. The Access 2013 client app refers to these same constructs as forms. Views in an Access 2013 application are automatically generated to accelerate the developer through the UI layout tasks and to ensure a level of consistency across interfaces. Each view is available for customization inside of the Access design surface. Like tables and queries, views are stored in the SQL Server database. However, because they are HTML and JavaScript rather than native SQL objects, such as tables or table-value functions, views are stored as text in the Access system tables.
Access web apps offer four distinct types of views for data-centric business application developers:
- List Details — A single scrolling column of records with an editable details interface for each record on the right of the records list. The list of records is searchable and filterable.
- Datasheet — An editable Excel-like grid. Each column in the datasheet grid is sortable and filterable.
- Summary — A view used to group records.
- Blank — Entirely customizable views capable of hosting any of the twelve available Access controls.
A view must be based on a table. The act of creating a new table automatically generates the List Details and Datasheet views. The views are organized by the tables they’re associated with. The views for each table can be moved. In addition, views can be edited, duplicated, renamed, and deleted.
Customizing Views
Access 2013 shipped with a built-in design surface, but the designer for web apps is less precise than the designer for desktop database applications. The view designer and the 12 controls available to Access developers are intended to keep web applications designed by business-savvy Access developers from requiring web design skills.
The view designer works on a grid system that automatically ensures components line up and are spaced properly. After a control has been added to a view, selecting the control allows access to the relevant properties in a pop-up, as shown in Figure 19-8. Note that the available properties are divided into Data, Formatting, and Actions categories, and each is accessed by distinct buttons in the view designer.

Also visible in Figure 19-8 is the Action Bar, which contains icons for actions such as New, Delete, Edit, Save, and Cancel. The green plus sign allows the addition of custom actions. Access offers web app developers 20 different custom actions to choose from. These actions will be explored in the “Applications: Macros section.” In addition to the ability to add custom actions, web app developers can opt to delete buttons or even hide the Action Bar as the business process dictates.
Applications: Macros
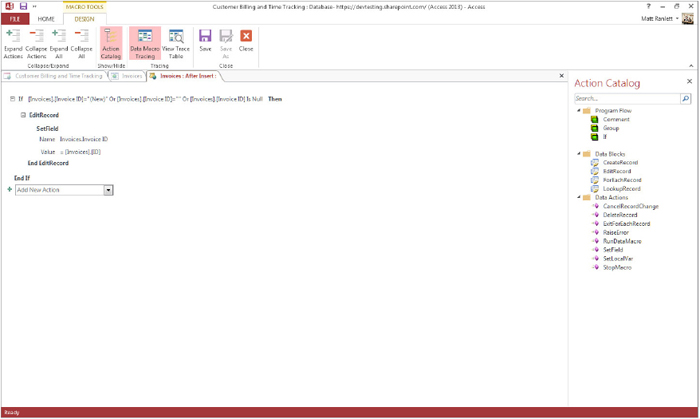
Where previous versions of Access leverage VBA to add automation and business logic to an application, Access 2013 web apps rely on data macros. Users familiar with SharePoint Designer’s If-Then-Else workflow designer will be at home with Access 2013’s data macro designer, as shown in Figure 19-9.
Macros come in three main varieties, as described by the Access 2013 user interface:
- Data macros
- User Interface macros
- On-Start macros
Data Macros
Data macros are the business logic workhorses of Access web apps, capable of adding, editing, or deleting data records. Data macros come in two flavors, embedded or stand alone. Embedded macros are stored in SQL Server as AFTER triggers on the tables that they are attached to, where they react to the types of data events shown in Table 19-4.
TABLE 19-4: Data Macro Events
| EVENT TYPE | TRIGGER |
| On Insert | Fires when a new record is added to the table |
| On Update | Fires when an existing record is modified |
| On Delete | Fires when an existing record is deleted |
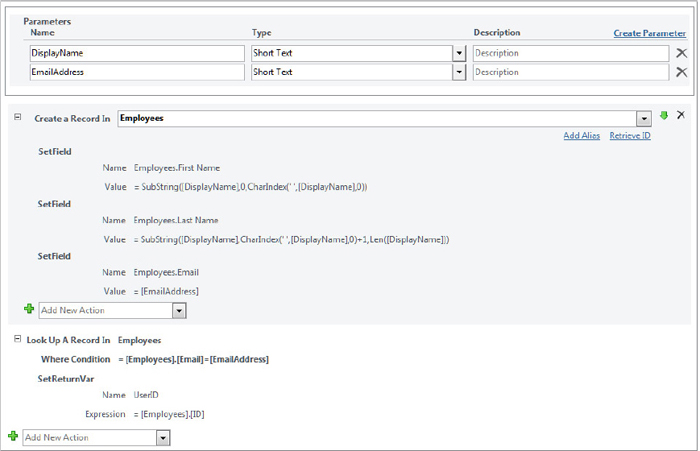
To add or edit a table-bound data macro, open the relevant table in Access, and click one of the Events on the Design tab on the Ribbon. Events that are highlighted already have a macro applied. Figure 19-10 shows an embedded Data macro used by the Invoices table to display the internal ID of a record on the Invoice view’s read-only ID field.
Data macros also support a stand-alone version of a macro that is designed to promote code reuse. A stand-alone macro is visible in the Access navigation pane but is not directly executable by an Access web app’s end users. Stand-alone data macros are stored in SQL Server as stored procedures and can be invoked by other UI or data macros using the RunDataMacro action. To create a stand-alone macro, click the Advanced button in the Create section of the Home tab on the Ribbon, and select Data Macro. Notice that this type of macro can accept parameters.
User Interface Macros
A User Interface macro is embedded in UI elements such as buttons and other web controls and is used to react to application events like On Click. Figure 19-8 in the “Customizing Views” section shows the control Actions button as a pop-up lightning bolt. Table 19-5 lists the available UI events.
TABLE 19-5: User Interface Macro Events
| EVENT TYPE | TRIGGER |
| After Update | Fires after data has been entered or selected by the control |
| On Click | Fires when the control is selected |
| On Current | Fires when the user changes records in the view |
| On Load | Fires when a view is opened |
Not all UI controls expose all the supported events. For example, a Button exposes an On Click event, but a Combo Box exposes only the After Update event.
UI macros also support a stand-alone type of macro that is stored in the SQL Server database as a stored procedure to define reusable logic. Similar to stand-alone data macros, stand-alone UI macros are visible in the Navigation pane in the Access client but are not directly executable. Stand-alone UI macros can be executed only by calling them from an embedded UI macro with the RunMacro command.
On Start Macros
On Start macros are used to set up an application, including the setting of default values for variables, navigating to default views, or creating targeted messages. To create a stand-alone macro, click the Advanced button in the Create section of the Home tab on the Ribbon, and select On Start Macro.
BUILDING AN APPLICATION WITH ACCESS SERVICES
Microsoft Access 2013 is a rapid application development platform for business-focused web applications. However, although it may take only a minute to start, Access works well with SharePoint to enable iterative app development. This iterative development process enables continual testing and refinement of apps.
Prerequisites
Working with Access 2013 web apps requires one of the two following combinations:
- Microsoft Office Access 2013 desktop client and an Office 365 account
- Microsoft Office Access 2013 desktop client and a SharePoint 2013 development environment.
Regardless of whether an on-premise or hosted development environment is chosen, a download and installation of Office 2013 is required to gain access to Microsoft Access 2013.
Configuring for Hosted Access Web Application Development
If you are interested in building applications for Office 365 environments, applications that do not require full trust solutions, or just want to get started with Access web apps as quickly as possible, sign up for a free trial of Office 365 Small Business Premium or Enterprise. Other license levels of Office 365 such as Pro Plus and Home Premium do not include SharePoint online and do not work with Access 2013 web apps.
After a copy of Access 2013 has been installed and an account with Office 365 has been created, test the connection by opening Access and creating your first web app based on a template. Give your test application a name and place the URL for your SharePoint Online site in the Web Location text box. Your Office 365 URL will be something like this:
http://[company].onmicrosoft.com/sites/[myteamsite]
Click the Create button, and Access will create your application on the server and take you directly into the application designer in the Access Client. Click the Launch App button to experience your basic application in the browser. Access web apps work in every major browser, including IE, Firefox, Chrome, and Safari.
Configuring an On-premise Development Environment
Although an Office 365 account will certainly speed up the process of building Access web apps, there are certain capabilities that have not yet been implemented in Office 365 that may force you to turn to an on-premise development environment. Configuring an on-premise environment for Access Services requires a few steps beyond the default installation of SharePoint 2013 itself. These steps include:
Configuring an Isolated Application Domain
SharePoint 2013 requires a general wildcard host header domain to provision SharePoint-hosted apps. This domain will likely derive from your corporate domain such that if your company domain is www.mycompany.com then an ideal SharePoint app domain is app.mycompany.com. If this domain is reserved via the isolated app domain process described next, SharePoint can automatically manage the URL.
The first step in a stand-alone development environment that does not have access to an actual DNS reserved URL is to modify the hosts file to fool your computer into thinking that the URL is valid.
Microsoft has created a detailed seven-step guide for creating an isolated app domain on MSDN at http://msdn.microsoft.com/en-us/library/fp179923(v=office.15).aspx#SP15appdevonprem_bk_configure, but a premier field engineer at Microsoft, Tom Van Gaever, has created a comprehensive PowerShell script that is easier to execute. Tom Van Gaever posted the original script online at his blog: http://tomvangaever.be/blogv2/2012/08/prepare-sharepoint-2013-server-for-app-development-create-an-isolated-app-domain/. The PowerShell script, which must be run as an administrator, has been reproduced here for completeness:
# Check if the execution policy is set to Unrestricted
$policy = Get-ExecutionPolicy
if($policy -ne "Unrestricted"){
    Set-ExecutionPolicy "Unrestricted"
}

# Check if current script is running under administrator credentials
$currentPrincipal = New-Object Security.Principal.WindowsPrincipal
    ( [Security.Principal.WindowsIdentity]::GetCurrent() )
if ($currentPrincipal.IsInRole( [Security.Principal.WindowsBuiltInRole]::
    Administrator ) -eq $false) {
    (get-host).UI.RawUI.Backgroundcolor="DarkRed"
    clear-host
    write-host "Warning: PowerShell is not running as an Administrator.'n"
    exit
}

# Load SharePoint powershell commands
Add-PSSnapin "microsoft.sharepoint.powershell" -ErrorAction SilentlyContinue

cls

# Ensure that the spadmin and sptimer services are running
Write-Host
Write-Host "Ensure that the spadmin and sptimer services are running"
    -ForegroundColor Yellow
net start spadminv4
net start sptimerv4

# Create your isolated app domain by running the SharePoint Management Shell as
    an administrator and typing the following command.
Write-Host
Write-Host "Create your isolated app domain by running the SharePoint Management
    Shell as an administrator and typing the following command."
    -ForegroundColor Yellow
$appdomain = Read-Host "Your App Domain Name"
Set-SPAppDomain $appdomain

# Ensure that the SPSubscriptionSettingsService and AppManagementServiceInstance
    services are running
Write-Host
Write-Host "Ensure that the SPSubscriptionSettingsService and
    AppManagementServiceInstance services are running." -ForegroundColor Yellow
Get-SPServiceInstance | where{$_.GetType().Name -eq "AppManagementServiceInstance"
    -or $_.GetType().Name -eq "SPSubscriptionSettingsServiceInstance"} |
    Start-SPServiceInstance

# Verify that the SPSubscriptionSettingsService and AppManagementServiceInstance
    services are running
Write-Host
Write-Host "Verify that the SPSubscriptionSettingsService and
    AppManagementServiceInstance services are running." -ForegroundColor Yellow
Get-SPServiceInstance | where{$_.GetType().Name -eq "AppManagementServiceInstance"
    -or $_.GetType().Name -eq "SPSubscriptionSettingsServiceInstance"}

# Specify an account, application pool, and database settings for the
    SPSubscriptionService and AppManagementServiceInstance services
Write-Host
Write-Host "Specify an account, application pool, and database settings for the
    SPSubscriptionService and AppManagementServiceInstance services."
    -ForegroundColor Yellow
$login = Read-Host "The login of a managed account"
$account = Get-SPManagedAccount $login
$appPoolSubSvc = New-SPServiceApplicationPool -Name SettingsServiceAppPool
    -Account $account
Write-Host "SettingsServiceAppPool created (1/6)" -ForegroundColor Green
$appPoolAppSvc = New-SPServiceApplicationPool -Name AppServiceAppPool -Account
    $account
Write-Host "AppServiceAppPool created  (2/6)" -ForegroundColor Green
$appSubSvc = New-SPSubscriptionSettingsServiceApplication –ApplicationPool
    $appPoolSubSvc –Name SettingsServiceApp –DatabaseName SettingsServiceDB
Write-Host "SubscriptionSettingsServiceApplication created  (3/6)"
    -ForegroundColor Green
$proxySubSvc = New-SPSubscriptionSettingsServiceApplicationProxy
    –ServiceApplication $appSubSvc
Write-Host "SubscriptionSettingsServiceApplicationProxy created  (4/6)"
    -ForegroundColor Green
$appAppSvc = New-SPAppManagementServiceApplication -ApplicationPool
    $appPoolAppSvc -Name AppServiceApp -DatabaseName AppServiceDB
Write-Host "AppManagementServiceApplication created  (5/6)" -ForegroundColor Green
$proxyAppSvc = New-SPAppManagementServiceApplicationProxy -ServiceApplication
    $appAppSvc
Write-Host "AppManagementServiceApplicationProxy created  (6/6)" -ForegroundColor
    Green

# Specify your tenant name
write-host
Write-Host "Set AppSiteSubscriptionName to 'app'" -ForegroundColor Yellow
Set-SPAppSiteSubscriptionName -Name "app" -Confirm:$false
Write-Host "AppSiteSubscriptionName set" -ForegroundColor Green

# Disable the loopbackcheck in the registry
Write-Host "Disable the loopbackcheck in the registry" -ForegroundColor Yellow
New-ItemProperty -Path "HKLM:SYSTEMCurrentControlSetControlLsa" -Name
    "DisableLoopbackCheck" -PropertyType DWord -Value 1

Write-Host "Completed"
The modification of the development computer’s hosts file (if necessary) and the successful execution of this PowerShell script completes all necessary networking configuration for Access Services 2013.
Configuring SQL Server 2012
SQL Server must be correctly configured to support the demands of Access Services 2013. The first of the following required steps requires the installation media to be available.
Adding Required SQL Server Features
Run the setup (or rerun the setup to adjust an existing installation), and ensure that the following features are enabled in the development environment:
- Database Engine Services
- Full-Test and Semantic Extractions for Search
- SQL Management Tools (Basic and Advanced)
- Client Tools Connectivity
This step requires the original installation media and may require the reinstallation of service packs. Follow proper protocols when updating production machines!
Enabling Contained Databases
SQL Server 2012 helps to isolate databases from other databases via the concept of contained databases. The containment of databases in SQL Server 2012 is required by Access Services to not only protect each database but also the SQL Server instance. SQL Server implements database isolation from the instance in four ways:
- Meta data describing the database is maintained in the database rather than in the master database.
- All meta data is stored with the same collation.
- User authentication is performed by the database rather than by SQL Server.
- SQL Server support reporting on containment information.
Activating containment is as simple as setting the Enable Contained Databases flag to True in the SQL Server’s Advanced Properties dialog. Open SQL Server Management Studio, right-click the server, and choose Properties. On the Advanced page is the option to Enable Contained Databases. Set this to True.
Enabling the Mixed Authentication Security Mode
Access Services 2013 supports both Windows and SQL Server authentication, so SQL Server must be configured to support both as well. In SQL Server Management Studio, right-click the server and choose Properties. On the Security page is the option to allow SQL Server and Windows Authentication Mode.
Ensuring Appropriate Service Account Permissions
SharePoint 2013 continues the long tradition of service accounts available previously in SharePoint 2010 and 2007. When an Access Services 2013 service application is created, a service account must be either assigned or created. This service account must be a pre-existing Active Directory account and must have been granted the dbcreator, public, and securityadmin roles for the server. Open SQL Server Management Studio and locate the service account in the Security ⇒ Logins section. Right-click the account, and select the Server Roles page to ensure the required server roles have been granted.
Enabling Required Networking Protocols
Open the SQL Server Configuration Manager tool, and expand the SQL Server Network Configuration group to select Protocols for MSSQLSERVER. By default, only Shared Memory is enabled. Right-click Named Pipes and select Enabled. Right-click TCP/IP and select Enabled. At this point, all available network protocols should be enabled.
Configuring the Windows Development Environment Firewall
Now that SQL Server has been properly configured, the Windows environment hosting SQL Server must be prepared to receive HTTP traffic on ports 1433 and 1434 for TCP and UDP.
Repeat the previous steps with the following changes for the UDP incoming rule:
- On the Protocols and Ports screen, select UDP and type 1433, 1434 into the Specific Ports field; then click Next.
- On the Name screen, type SQL UDP into the Name field, and click Finish.
Configuring SharePoint 2013
At this point, SQL Server is fully configured, the firewall is ready to accept inbound traffic on the SQL Server environment, and an isolated app domain has been created. The final prerequisite step is to create and configure the Access Services 2013 service application.
Starting Required Services
In Central Administration, go to Manage Services on Server to ensure the following services are started. Start them if they are not already running:
- Access Services 2013
- Access Services (Access Database Service 2010 for viewing and modifying existing 2010 Access web databases)
- App Management Service
- Microsoft SharePoint Foundation Subscription Settings Service
- Secure Store Service
Creating a Secure Store Service Application
Open Central Administration and go to Manage Services on Server. In the Service Applications Ribbon tab, click the New drop down, and select to create a new Secure Store Service Application. The default settings are all valid, so click OK to create the new service application. After the new application has been created, run an IISRESET to ensure enough memory is available for the next step. Click the Generate New Key button on the Ribbon to fully activate the Secure Store Service. This last step takes a while; don’t be alarmed if nothing happens for a few minutes.
Creating the Access Services 2013 Service Application
The final step is to create the actual Access Services 2013 service application. Open Central Administration, and go to Manage Services on Server. On the Service Applications Ribbon tab, click the New drop-down, and select the Access Services option (not the Access Services 2010 option, which is used to support legacy Access Services 2010 instances).
The Create New Access Services Application dialog opens and asks for the Application Database Server. This server is used to create new application databases and is expected not to be the same SQL Server instance that SharePoint is using; although that configuration is supported. If a new SQL Server is brought online for Access Services databases in the future, opening the Access Services Application configuration offers an opportunity to change the database server.
Creating an Access Web App
Creating Access web applications should now be possible given the properly configured Office 365 or on-premise environment. Consider the following scenario for the first Access web app: The consulting arm of the TailSpin Toy company needs to track its various employees for their physical locations and client consulting engagements. Naturally this application should be available via the company’s intranet, which is hosted by Office 365. To create an application that meets the TailSpin Toys requirements, follow the following steps:
Creating the Basic Application
The first thing to do is to create the initial shell of the application and test it to make sure that the application can be deployed successfully and that it possesses the expected user experience. The following six steps walk you through the creation of an app up to the point of data entry and should take approximately 60 seconds to complete.

Adding, Removing, and Editing Tables
The basic tables added by the Employees, Clients, and Projects nouns are close to the application’s requirements, but the current configuration offers no mechanism to track a consultant’s location. The Tasks table is extraneous and should be removed to prevent end user confusion. The following steps walk you through the process to remove the Tasks table and to add two completely custom tables. After the database contains the tables necessary to meet the requirements to track consultants on projects and consultants at locations, you need to configure the relationships between tables. Figure 19-12 demonstrates the relationships necessary for the application to function properly.

Defining a relation between tables in an Access web app is managed through the Lookup data type. A Lookup can work either as a choice column or as a link to data from a table or query. In addition to the linking of tables, some of the column names in the Projects table need to change to keep a consistent application vocabulary for the end users. The necessary column changes are reflected as underlined columns (refer to Figure 19-12). Follow these steps to create the new lookup and edit the existing column names:
LOCATIONS
| FIELD NAME | DATA TYPE |
| LocationID | AutoNumber |
| Street | Short Text |
| Neighborhood | Short Text |
| City | Short Text |
| State | Lookup |
The LocationID functions as the primary key. When you enter Lookup as the Data Type for State, a Lookup Wizard automatically pops up. Select I Will Type in the Values that I Want, and type in several codes, as shown in Figure 19-13.

PROJECT LOCATIONS
| FIELD NAME | DATA TYPE | NOTES |
| ID | AutoNumber | Functions as the primary key. |
| LocationID | Lookup | As shown in Figure 19-13, a Lookup Wizard automatically pops up. Set this field to retrieve data from the Locations table, neighborhood column. Figure 19-14 demonstrates the proper wizard settings. |
| ProjectID | Lookup | Create a lookup to the Projects table. |

Modifying Application Views
The next steps involve creating a mechanism for end users to interact with the new relationship between Projects and Locations. Both the List view and the Datasheet view must be edited. The following steps detail the process required to edit the automatically generated List and Datasheet views:

Creating a Query
Referring to Figure 19-12 in the “Adding, Removing, and Editing Tables” section, Employees are related to Locations through the Projects and Project Locations tables. Users of the consultant tracking application may want to understand which consultants work in which locations. Building a query to link these data elements more closely together allows the app to use the query as a data source in later tasks. Follow these steps to create a new query, which will be stored in SQL Server as a table-value function:

Creating a New View
Now that you can identify which locations an employee has visited, it is time to expose that information to end users. Follow these steps to create an Employees by Location view on the Locations tab in the Tile Pane:
Adding a Macro
Recall from the previous macros discussion that there are two distinct types of macros that can be added to an Access web application: Data macros, which impact the data in an app as an automatic reaction to data changes, and UI macros, which add user experience options as a result of user behavior in the application. For example, you could use a Data macro to automatically copy contact details from the Consultant record to the Project table after a Consultant has been assigned to the Project. User Interface macros add interactivity elements to the application. Follow these steps to add a pop-up to the app that enables an end user to see the employee details of an employee assigned to a Project in the Datasheet view.
Coding for Access Web Applications
Unfortunately, there is simply no way to write code to extend or change an Access web app. There are no APIs published by Microsoft for Access Services or the ADS, and Microsoft strongly recommends against attempting to modify the HTML, CSS, or JavaScript emitted on the page of an Access web app.
Reporting and External Data
Data managed via an Access web app is actually stored in a dedicated SQL Server database. The connection details for the Access database are available in Backstage. In addition to identifying the database’s connection path, the Access Backstage view enables the creation of read-only and read/write user accounts. In addition, the Info tab of the Backstage view allows for the creation of client-side reporting databases. The Access reporting database cannot currently exist as a cloud-based web application, so Access will automatically create the required connections for reporting, as seen in Figure 19-17.

In addition to Access web apps allowing for external applications to access data, Access can leverage the data in other data stores such as SharePoint and SQL Server to create linked tables. In this manner, Access web apps can be leveraged to provide complex business logic, whereas SharePoint offers easy data access and management. When a SharePoint list is connected inside of Access apps as linked tables, the connection is a read-only connection. Data changes to the source list must be done inside of SharePoint.
Deploying Access Applications
Access 2013 has no deployment story because an Access web app is online from the moment the application designer supplies a location during the creation of the app. When the app has been created and uploaded to the site, it becomes available for other appropriately permitted users. Access apps can also be deployed to the private corporate store and the Microsoft online Office.com public store. Deploying an Access application online requires a code submission to Microsoft Online where the code is packaged, reviewed, and accepted to or rejected from the Office Store.
SUMMARY
Access 2013 is a powerful new tool in the arsenal of a savvy business user. Freed from the traditional web development requirements of managing the user experience and data access layer, a subject matter expert can quickly produce a business-focused application that leverages the scalability and power of SQL Server. Access web apps support cascading delete restrictions, queries, triggers, and stored procedures in the form of macros. Although Access does not offer the developer an opportunity for code-based customization, that is not the intent for this tool. Instead Access provides the opportunity to continue SharePoint’s mission of empowering the end user to create important business-focused applications without dependencies on software developers and expensive-to-maintain customizations.