Chapter 2
What’s New in SharePoint 2013
WHAT’S IN THIS CHAPTER?
- Discovering changes in the packaging and deployment model
- Taking advantage of the new programming model
- Uncovering OData investments in the client-side object model
- Understanding OAuth and the app security model
- Discovering remote notifications
- Integrating with the Windows Azure Workflow
- Making the most of ECM and WCM workloads
- Unleashing the power of the unified and extensible search platform
- Taking advantage of improvements in Business Connectivity Services
INTRODUCTION TO SHAREPOINT 2013
The year 2012 was definitely a revolution in Microsoft history. If you look at the list of Microsoft deliverables in this year, the list is incredible. Beside all the enhanced and new features targeting end users, development in SharePoint 2013 is different than in previous versions. In SharePoint 2013, the emphasis is more on standard web technologies such as JavaScript and HTML, client-side programming, and remote calls. To accomplish this, SharePoint 2013 offers developers various options for extending the out-of-the-box capabilities of the product and building business solutions with no or minimal use of server-side code.
Each of the new features and development options in SharePoint 2013 depends on many factors that a developer needs to know up front. That’s what you should take away after reading this chapter.
DEPLOYMENT SCENARIOS
In SharePoint 2013, the physical location of the SharePoint server farm plays an important role in the development pattern you should follow and the options available to you. As the developer the first question you should ask yourself is which deployment scenario you are building your custom solutions for. SharePoint 2013 offers four different types of deployment scenarios: on-premise, Office 365, hosted, and hybrid deployment.
On-Premise Deployment
In this deployment scenario, SharePoint sits behind the corporate firewall and is maintained by your IT department. Just like previous versions of SharePoint, this scenario offers you a lot of flexibility for development options and the tools you use.
Office 365 Deployment
In this deployment scenario, your SharePoint farm is kept in Office 365 and managed by Microsoft. You can use all the development options and tools available in on-premise deployment (scenario 1), except for running server-side code in apps. Apps are a new mechanism for packaging and deploying your code in SharePoint 2013 and are discussed throughout this chapter.
Hosted Deployment
Similar to an Office 365 deployment scenario, in hosted deployments your SharePoint server farm is installed and hosted by third-party providers, which may or may not be Microsoft. For example, you can deploy your fully virtualized SharePoint farm to CloudShare, Amazon EC2, or on Windows Azure virtual machines owned by Microsoft. Depending on the vendor hosting your SharePoint farm, your mileage may vary, and your development pattern and options could differ. Some third-party hosting providers offer your own dedicated cloud without sharing it with anyone else, which gives you more options.
Hybrid Deployment
This is the only deployment scenario that spans across your corporate firewall and the cloud. In this scenario, part of the installation is managed internally by corporate IT, and some applications are deployed to another SharePoint farm in the cloud in Office 365 or a third-party hosting provider.
PACKAGING SCENARIOS
Where and how SharePoint is installed and deployed dictates your options in how you can package and deploy your custom code. There are three deployment options: full-trust farm solutions, partial-trust farm solutions, and apps.
Full-Trust Farm Solution
Farm solutions were introduced in SharePoint 2007, and they are only available in on-premise deployments in SharePoint 2013 and some dedicated cloud-based deployments. These types of solutions can contain customizations used across an entire farm. Custom code in full-trust solutions is deployed to the SharePoint web application’s BIN directory or global assembly cache (GAC). Code can be secured using .NET’s Code Access Security (CAS) but typically is run in full trust. These types of solutions are added to the farm in SharePoint by an IT pro with console access and deployed by someone with farm administrator rights.
Partial-Trust Sandboxed Solution
This option, introduced in SharePoint 2010, is available in all types of deployment scenarios. Sandboxed solutions are available to all sites across an entire site collection where they were deployed. These types of solutions can be uploaded and deployed by site collection administrators. Sandboxed solutions impose quite a few restrictions on the developer, which are covered in more detail throughout this chapter.
Apps for SharePoint
There is a new way of packaging and deploying your code in SharePoint 2013. This approach is heavily dependent on the notion of isolation and small widgets called apps. If you own a smartphone, you are already familiar with the notion of apps. Apps are built and deployed to target specific business needs, and they are transactional in nature. Apps for SharePoint are different than those built for smartphones because they do not live in SharePoint, and the actual execution doesn’t happen in SharePoint. Apps execute in the browser client or on a remote web server; they’re granted permission into SharePoint sites via OAuth and communicate over the newly improved SharePoint 2013 CSOM APIs.
Apps, OAuth, and new improvements in CSOM will be covered in more detail shortly. Keep reading!
THE PROGRAMMING MODEL
SharePoint 2013 ships with one fundamental difference in its programming model. In the new programming model, the emphasis is more on cloud computing, standard web technologies such as JavaScript and HTML, and remote access. All new changes are aligned with the company’s overall strategy of “Everything has to be available in the cloud.”
Before you dive too much into the new changes, first go back a few years in time to refresh your memory about the evolution of customization and coding in SharePoint.
The Evolution of SharePoint Programming
At a high level, Figure 2-1 shows the programming models in SharePoint 2007 and 2010.

In SharePoint 2007, your custom code either ran server side in SharePoint or hosted in your own service layer (IIS, Apache, others) working with some areas of the SharePoint object model remotely via built-in web services located in the _vti_bin folder (%COMMONPROGRAMFILES%Microsoft Sharedweb server extensions12ISAPI). SharePoint 2007 had a limited client-side object model, which was implemented in the Core.js JavaScript file (which was OWS.js in Windows SharePoint Services 2003). The JavaScript file was referenced from most SharePoint pages and contained limited logic necessary to handle various events on the client without having to modify the out-of-the-box Core.js file. For example, Core.js provided a hook through which additional menu items could be shown in the context menu (ECB), as demonstrated in the following code snippet:
function AddDocLibMenuItems(m, ctx)
{
    if (typeof(Custom_AddDocLibMenuItems) != "undefined")
    {
        if (Custom_AddDocLibMenuItems(m, ctx)) return;
    }
    . . . // build the rest of OOTB ECB menu items
 }
By using SharePoint Designer (or Microsoft Office FrontPage in Windows SharePoint Services 2003), developers injected their implementation of Custom_AddDocLibMenuItems function into a SharePoint page, or they could use the Content Editor Web Part (CEWP) to inject the custom JavaScript function into web part pages. Either way, Core.js was calling its function in run time. The problem with this extensibility model was that it was limited and not flexible. For example, if for any reason Core.js is not loaded, your custom function won’t work either.
In SharePoint 2010, the Client Side Object Model (CSOM) was substantially improved to address the challenges with client-side programming in the earlier versions of SharePoint. SharePoint 2010 CSOM fundamentally was a Windows Communication Foundation (WCF) service called Client.svc and shipped with three different proxies to enable Silverlight, JavaScript, and .NET managed clients (C# or VB.NET) to call into the product remotely. The following code snippet shows how a developer can use the supported proxy for JavaScript (sp.js) to execute an asynchronous query against CSOM in SharePoint 2010:
           ExecuteOrDelayUntilScriptLoaded(GetTitle, "sp.js");
// Code omitted for brevity
function GetTitle() {
    //Retrieve current client context
    context = SP.ClientContext.get_current();

    //Load the site
    site = context.get_web();
    context.load(site);

    //Execute asynchronously with callbacks for successful or failed calls
    context.executeQueryAsync(onQuerySucceeded, onQueryFailed);
  }
Challenges with CSOM in SharePoint 2010
Developers had two major issues using CSOM in SharePoint 2010.
First, direct calls to Client.svc were not supported, and all the calls had to go through the supported entry points (for example, sp.js). Proxies were only available for .NET managed, Silverlight, and JavaScript clients, so platforms or devices that didn’t understand either of these technologies could not call SharePoint remotely.
Second, CSOM covered only APIs in the Microsoft.SharePoint.dll and limited workloads in the product. To overcome this limitation, developers had no option but to rely on ListData.svc, jQuery against built-in ASMX Web Services, or server-side code to get better coverage of the product’s object model.
Developers preferred to use CSOM from managed code (for example, C# and VB.NET) more than from JavaScript. That’s because they could program against strongly typed objects and experience compile-time type IntelliSense and easier debugging. JavaScript development against CSOM was not easy. The code was harder to write and debug because the calls had to be asynchronous with no compile-time type checking and IntelliSense.
The next section discusses why you should think twice before writing server-side code in SharePoint 2013.
Challenges with Server-Side Code
Microsoft has several reasons to push client-side programming and remote access in SharePoint 2013. The most candid reason is that the root cause of most SharePoint performance and security issues has been the server-side code included in farm or sandboxed solutions. Now play the role of devil’s advocate for a second. If you were a software company building a platform for others to host their products in it, and potentially make money, how would you feel if someone writes a web part that brings your baby to its knees? How would you feel if someone says your product is slow, but in reality it’s someone else’s code or misconfiguration that has made you look bad?
Another problem with the SharePoint server-side object model is that it’s difficult to learn and it lacks cross-technology interoperability with other non-Microsoft technologies. In many cases, SharePoint had problems catching up with the newer Microsoft technologies, too. How many times as a developer have you suffered from the SharePoint object model being tightly coupled with a specific version of the .NET Framework or Windows Workflow Foundation? How many times did you wish that your PHP buddy could give you a hand in your SharePoint projects?
The new programming model in SharePoint 2013 introduces a much quicker ramp-up time for developers who may not know SharePoint APIs and enables those developers who use other technologies to be productive. Now, you can build solutions that are a lot more technology-agnostic and loosely coupled from the product. This means you can choose your preferred scripting language (PHP, JavaScript, LAMP, and so on) or any version of ASP.NET (ASP.NET Web Forms, MVC, and Web Pages), build apps for SharePoint, and use remote calls to accomplish various tasks that were previously only possible through the server-side object model.
In addition to perception and tactical challenges, server-side solutions often had lots to deploy and required direct access to the server. This is fine in on-premise deployment scenarios, but it is not an option in the cloud unless you have your own private server. You could get around this limitation by using sandboxed solutions, but sandboxed solutions had their own issues. First, there are limited sets of operations you can do in the sandboxed because only a subset of the server-side SharePoint APIs is available in sandboxed solutions. Sandboxed solutions can’t execute for longer than 30 seconds, and they cannot exceed a certain amount of resource usage per day. In addition, server-side code cannot make calls/requests to externally hosted web services. However, developers can use client-side based solutions (using JavaScript or Silverlight) to call external services and even make cross-domain calls using techniques such as HTTP post messages.
Another common developer challenge pre-SharePoint 2013 was solution upgrading. WSP versioning, feature upgrading, assembly versioning, and redirections, you name it, were all there, but it is fair to say that it was not easy to manage the life cycle of complex solutions and their features in enterprise-scale projects where developers had to upgrade the solutions over time to meet the ever-changing business requirements. So, unless the developer put a lot of forethought into it, upgrading and uninstalling solutions was not a great story in the earlier versions of SharePoint. SharePoint 2013 changes that with a robust infrastructure to support the upgrade and uninstallation of apps, and to ensure that if an app upgrade fails, it is rolled back, so the hosting SharePoint website isn’t left in an undesirable state without any burden on the side of the developer.
Now that you understand the challenges, it’s time to discuss the improvements.
The New Programming Model
If you have been reading this chapter from the beginning, you may wonder what makes the new programming model so special and different in SharePoint 2013 compared to its predecessors. Couldn’t you write client-side code and use standard web technologies in previous versions of the product?
Figure 2-2 shows the new programming model.

In SharePoint 2013 the server-side code runs off the SharePoint server farm via declarative hooks such as apps, declarative workflow, and remote events, which then communicate back to SharePoint using CSOM or REST. In other words, in the new programming model, the emphasis is on client-side code and remote access. Depending on your deployment scenarios (which were discussed earlier in this chapter), you can still use sandboxed and farm solutions to push server-side code to SharePoint 2013; however, Microsoft recommends that developers follow the new app model as the preferred way of building their custom applications for SharePoint 2013. The message is, “don’t make any new sandboxed solutions” and “build new farm solutions only if you absolutely have to” (and, of course, if your deployment scenario allows you to deploy farm solutions).
In SharePoint 2013, _vti_bin/client.svc is now aliased with _api, which makes it easier to reach out to the service endpoint. Microsoft also made the client.svc and made it a full-blown OData-compliant service.
If you have been working with SharePoint long enough, you probably remember that in SharePoint 2003 you could use Windows SharePoint Services Remote Procedure Call (RPC) protocol to make HTTP GET requests (only HTTP GET) to the OWSSVR.dll ISAPI extension. For example, if you type in the following URL, it exports the schema of a list specified by the GUID and renders it in CAML format:
http://Tailspintoys/sites/marketing/_vti_bin/owssvr.dll?Cmd=ExportList&List=
e6a9bb54-da25-102b-9a03-2db401e887ec
URLs play an important role in SharePoint. Microsoft has been attempting to make it easier for users to get to SharePoint data for a long time; some of those attempts are still there in the new version (for example, Export to Excel in a list). However, due to restrictions in the design patterns and infamous protocols used in such patterns, the attempts have not been successful. The basic promise behind OData (as the protocol and enabler) and REST (as the design pattern) is to make SharePoint data accessible to just about any other platform and any type of device via URL and standard HTTP verbs.
Figure 2-3 shows an architectural diagram representing the remote API changes in SharePoint 2013 discussed in this section.

To use the new client-side OData service in SharePoint 2013, you construct a RESTful HTTP request against client.svc, which maps to an HTTP verb and corresponds to the CSOM API you want to use. In response, you get an Atom XML (default type) or JavaScript Object Notation (JSON) that can be easily converted to a nested object. The following example demonstrates how you can use REST to query the Contacts list and retrieve an item where the ID equals 1:
http://Tailspintoys.com/_api/web/lists/getByTitle('Contacts')/
getItemByStringId('1')
The following code snippet demonstrates an example of how you can use JavaScript and REST to delete an item from the Contacts list. First, you build a REST URL by concatenating the id parameter passed to the JavaScript function with _spPageContextInfo.webServerRelativeUrl that’s available to you when you use CSOM in JavaScript. Then, you send a request to the SharePoint web server using the jQuery $.ajax function using the HTTP DELETE verb. Finally, you register the callback handlers for success and error operations, and the call is executed asynchronously.
removeItem = function (id) {
        $.ajax(
                {
                    url: _spPageContextInfo.webServerRelativeUrl +
                        "/_api/web/lists/getByTitle('Contacts')/
                        getItemByStringId('" +
                        id + "')",
                    type: "DELETE",
                    headers: {
                        "accept": "application/json",
                        "X-RequestDigest": $("#__REQUESTDIGEST").val(),
                        "IF-MATCH": "*"
                    },
                    success: function (data) {
                        readAll();
                    },
                    error: function (err) {
                        alert(JSON.stringify(err));
                    }
                }
            );
    }
Note in the code snippet how the request headers for the HTTP request were created. The code queries the value of the form digest control on the page with the standard name of __REQUESTDIGEST and adds the value to the X-RequestDigest header. This is important to ensure the HTTP requests that modify the content database can pass the form digest, which is SharePoint’s inherent security check.
Microsoft also extended CSOM to user profiles, workflow, and search, to name a few, and many other workloads that were only available through server-side APIs in SharePoint 2010. But, that’s not all. Microsoft further improved CSOM, so they can support bulk or synchronized operations without causing a significant burden on server performance when SharePoint is used in a production environment with a large user base.
That’s enough abstract talking about apps without discussing what they actually are. In the following section you will enter a new world of extensibility in SharePoint 2013 with apps.
THE APP MODEL
The new app model enables you to build applications that act like they are part of SharePoint, but they are not. As mentioned previously, apps run 100 percent outside of the SharePoint server within the context of the client browser (via client-side scripts, REST, and CSOM) or in remote servers hosted in the cloud or your own infrastructure.
When considering apps, you are dealing with two domains: Office 2013 and SharePoint 2013. You can build apps for both products; however, the focus of this chapter, and the rest of this book, is on the apps for SharePoint. There are three types of apps you can build for SharePoint 2013: SharePoint-hosted apps, provider-hosted apps, and Azure auto-hosted apps.
SharePoint-Hosted Apps
SharePoint-hosted apps are available in all deployment scenarios. These types of apps are deployed to SharePoint, and their business logic executes within the client browser. These types of apps cannot interact with other apps because they run in isolation.
Provider-Hosted Apps
Provider-hosted apps are available in all deployment scenarios. These types of apps are deployed to SharePoint, and the bulk of their business logic executes as server-side code external to SharePoint, such as on another web server in the corporate network or in the cloud.
A provider-hosted app (also sometimes referred to as a developer-hosted app or self-hosted app) cannot interact with other apps.
Azure Auto-Hosted Apps
Azure auto-hosted apps are available only in the Office 365 deployment scenario. These types of apps are similar to the provider-hosted apps except the external components, which consist of a Windows Azure website and optionally an Azure SQL database, are invisibly provisioned by Office 365. An Azure auto-hosted app cannot interact with other apps. Figure 2-4 shows an end-to-end platform support and tooling experience (Visual Studio, SharePoint Designer, Access, or Napa) across Office 365 and Windows Azure to enable an Azure auto-hosted app model.

As a developer or Office 365 customer, you do not need to set up anything to integrate Windows Azure with Office 365. You don’t even need to have a Windows Azure account. The integration is already there and provided automatically when you sign up for tenancy in Office 365. When an end user decides to install an Azure auto-hosted app, Office 365 automatically deploys and provisions a copy of the app as a Windows Azure website, and Office 365 can then manage it on behalf of the end user who installed it. This new type of app provides a compelling way to create and distribute your apps in an auto-provisioning way.
Apps or Solutions — Which Way to Go?
The answer to this simple question can become surprisingly difficult. When developers start coding a solution, they have no idea how big the solution may grow over time. There are several factors that impact the way solutions evolve, such as requirement changes, timeline pressures, and budget cuts. To overcome this up-front uncertainty, you always must make assumptions and build and deliver your solutions based off those assumptions. Remember, shipping is a feature. After your product is shipped, you can always monitor the usage pattern and user adoption, and come back and iteratively improve your solutions. To make assumptions you need to ask yourself questions and compare the answers to find your preferred options.
Apps provide the highest level of isolation in three levels: process, users, and content levels. Apps also provide the most flexibility for standard web technologies and infrastructure choices because they will not run on the same machines that SharePoint 2013 is installed on.
When deciding between SharePoint apps and SharePoint solutions, there are several factors that can help you decide whether you should develop an app or a solution:
- Server-side object model — A server-side object model is not allowed in apps. Use the restricted server-side code of sandboxed solutions or the unrestricted server-side code of farm solutions.
- Access to external resources — Apps can be granted permission, when installed, to content outside the hosting SharePoint website scope (SPWeb); for example, the entire site collection. It’s obvious that all types of apps can access web services and other sources that are not hosted in SharePoint if they have access to them.
- Target user — This one is easy; for example, if you build an extension that allows farm administrators or web application administrators to do some maintenance or cleanup work, it’s probably not a good idea to do it in an app. Farm solutions would not be a good candidate for a SharePoint app.
- Complexity — There are still tasks you can do using either apps or solutions, and the level of complexity is the same or a bit more complex if you do the tasks in apps. For example, you can deploy custom field controls, site columns, content types, or branding artifacts using apps or sandboxed solutions. It’s probably more difficult to do these tasks in apps. If you ever get stuck in such scenarios, lean toward apps because you know they are the future that SharePoint and many other products are moving toward.
- Dependency — If you build a custom extension tightly coupled with another custom extension and it requires the dependent extension to be present prior to the installation, building it as an app is probably not a good idea. Again, apps are isolated and self-contained containers that should easily install, upgrade, and uninstall. Similarly, you should not use an app to install resources that other apps or solutions depend on because this would either block the clean uninstallation of the app or break the other extension when the app is uninstalled.
- Scope — SharePoint-hosted apps should not be full applications, such as case management or payroll. A SharePoint-hosted app should do only a few closely related tasks that surround only a few primary resources. Unlike previous versions where you used to build mega business solutions to target various use cases, your SharePoint-hosted apps are isolated, transactional in nature, and built to satisfy specific business needs. If you need full applications, either use SharePoint solutions or use cloud-hosted apps.
Table 2-1 summarizes the decision factors that you should consider when deciding between SharePoint solutions (farm or sandboxed) and apps.
TABLE 2-1: SharePoint Solutions and Apps Head-to-Head

Table 2-2 summarizes the decision factors that you should consider when deciding between types of apps.
TABLE 2-2: Apps for SharePoint
| SHAREPOINT-HOSTED APPS | CLOUD-HOSTED APPS |
| Good for smaller use cases targeting specific business needs | Good for small or big use cases |
| Some web technologies ( HTML, JavaScript, jQuery, and so on) | Full power of web; choose your preferred technology |
| Automatically hosted | May require your own infrastructure |
| Inherent Multitenancy support and isolation | May require your own logic for handling tenancy and isolation |
| Inherent semantic for install/upgrade/upgrade | May require your own logic for install/upgrade/upgrade |
If you put together everything you’ve learned so far, it should look like Figure 2-5. Packaging options in hosted or hybrid deployments depend on the hosting provider or how SharePoint is deployed and therefore are not included in Figure 2-5.

The App Security Model
Unless you have turned on anonymous access for a SharePoint site, every incoming request that lands in SharePoint must identify itself, which is the process known as authentication. The authentication is essential because if SharePoint doesn’t know who you are, it doesn’t know to authorize your access level to its resources.
Due to the changes in its programming model, the SharePoint 2013 authorization pipeline must deal with two different types of identities: user identity and app identity. The latter is new in SharePoint 2013.
To understand the need for app identity in SharePoint 2013, here’s an example: Think about a scenario in which you want a remote app to access some product pictures in your site and tweet them to a Twitter feed owned by the Marketing Department. Obviously, the Twitter app needs to log in to SharePoint first before it can access and tweet those pictures. One way to do this is to give the app a set of credentials (username and password) so that it can sign in as you or someone else and complete its work. This is not a good option for a number of obvious reasons. First, everything in SharePoint is tied to a user identity, and the SharePoint authorization pipeline must distinguish the Twitter app and its actions from you and your actions — that’s just how SharePoint works. Second, the Twitter app can do anything you can do such as deleting content or posting a comment to the CEO’s blog on behalf of you. You don’t want that either. Furthermore, what if you decided not to use the Twitter app anymore? What happens to your credentials? What if you use many apps like the Twitter app? How do you manage the credentials for many apps?
SharePoint tracks user identities using SharePoint security groups and Access Control List (ACL) entries stored in the content databases. For authenticating and authorizing app identities, however, SharePoint takes a different route.
First, consider authentication. An app is a first-class principal in SharePoint 2013; therefore, it needs its own identity. App identity is provided to SharePoint by Azure Access Control Service (ACS) via a widely adopted Internet security protocol called OAuth. OAuth 2.0 is the next release of OAuth that requires HTTPS.
The new architecture enables SharePoint 2013 users to approve an app to act on their behalf without sharing their credentials. To enable this, a number of different types of security tokens are issued, and there are back-and-forth communications between user, SharePoint, ACS, and the app itself, all done to ensure an app can transparently authenticate to SharePoint.
When SharePoint 2013 receives an incoming request, the process starts with examining the request to see if it contains a sign-in token representing a user identity. If the user identity is found, SharePoint assumes that the request was initiated by an authenticated user and not an app. SharePoint then inspects the target URL of the incoming request to see whether it references a standard SharePoint site or a subsite associated with an app. (It’s called AppWeb.) If the incoming request targets a standard site, SharePoint 2013 follows its typical authorization process identically to how things worked in SharePoint 2010. If the incoming request targets an AppWeb, however, SharePoint 2013 initializes the context with both a user identity and an app identity.
When an incoming request does not contain a sign-in token, SharePoint 2013 knows that it was not a user who initiated the request. In this scenario, SharePoint looks for an OAuth token to identify the remote app (provider-hosted). When SharePoint 2013 finds this security token, it sets up the context with the app identity and optionally the user identity.
Now, consider authorization.
After a provider-hosted app authenticates to SharePoint and the right context is created, SharePoint determines what actions the app is authorized to perform in the calling context. It’s worth mentioning that SharePoint 2013 does not leverage ACS or OAuth protocol in any way to track or pass app permissions. Instead, SharePoint relies on its own internal content databases to track authorization just as it does with user permissions.
Each app has a manifest.xml file where the developer can define a list of resources that the app needs access to using the AppPermissionRequests element. The following code snippet shows an example of this element used in a provider-hosted app:
<AppPermissionRequests AllowAppOnlyPolicy="true">
  <AppPermissionRequest Scope="http://sharepoint/content/sitecollection"
  Right="Read"/>
  <AppPermissionRequest Scope="http://sharepoint/content/sitecollection/web/list"
  Right="Write">
    <Property Name="BaseTemplateId" Value="101"/>
  </AppPermissionRequest>
  <AppPermissionRequest Scope="http://sharepoint/userprofilestore/feed"
  Right="Post"/>
  <AppPermissionRequest Scope="http://exchange/calendars" Right="Schedule"/>

</AppPermissionRequests>
Note the highlighted line in the code snippet. The app permission requests enable the app-only policy, which means that only the app, and not the current user, requires the needed permissions. If an app-only policy is not used, both the app and the current user require the necessary permissions to complete a task such as accessing the entire site collection or writing to a list. The result would be a context that contains both the app and the user identities.
An important aspect of an app-only policy is that it can elevate the permissions of the app so that it can do more than the current user. It also makes it possible for an app to call back to SharePoint and access the app web (the SharePoint website associated with the app) and parent web (for example, a SharePoint website that is hosting the app) when there is no current user. When an app with AppPermissionRequest entries is installed by a user, the user must grant permissions to those placed in the manifest.xml file and requested by the app at the time of installation.
As mentioned previously, when creating a provider-hosted app that needs to communicate back to SharePoint, there are several types of security tokens needed for back-and-forth communications such as a context token and an OAuth token. Thankfully, Visual Studio automatically adds a helper class named TokenHelper.cs to help you access and work with the security tokens.
ACS cannot be used in on-premise deployments without involving an Office 365 tenancy. That means there is no OAuth token either. Apps need to use a different security token created using the Server-to-Server (S2S) configuration. For more information, see the product documentation at MSDN http://msdn.microsoft.com/en-us/library/fp179901(v=office.15).aspx.
Just because apps run in their own domain (to prevent cross-site scripting attacks) and they are written using JavaScript, it doesn’t mean they are secure. As a developer, you are still on the hook to think about the security breaches and sensitive information disclosure caused by how you have designed your apps. Here are some examples of SharePoint security considerations:
- SharePoint-hosted apps are not authorized at a specific list or web level. In other words, if a SharePoint-hosted app is authorized to write to one list, it can also write to another list.
- When a user grants permission to a provider-hosted app. Granting permission is a one-time only process, so if the app’s logic and its code behind change later, SharePoint won’t detect this.
- When the app uses its OAuth token to perform some tasks, another app on the same page can use this token to perform actions on behalf of the app identity, the user identity, or both. It’s also possible for a hacker to hijack the OAuth token in an unsecure communication channel (HTTP).
As you can see, there are many security considerations in app development you need to be aware of. To make apps secure and to protect sensitive information, you need to design with security in mind and to use HTTPS to secure the communication channel.
REMOTE EVENTS
With SharePoint becoming the main collaboration hub in many organizations, two-way integration with external systems (meaning external to SharePoint) has become a popular requirement over the past couple years.
Tight integration with Business Intelligence technologies such as Reporting Services, PerformancePoint, and Excel, and workloads such as Search and Business Connectivity Services have been used for surfacing external data inside SharePoint. Reversibly, SharePoint web services and CSOM have offered a set of options for surfacing SharePoint data in external systems, although in limited ways. SharePoint, however, has not provided a robust notification infrastructure for informing external systems of SharePoint events or getting notified when changes are made in the underlying data in the external systems.
Consider this scenario: The Tailspin Toys management team has issued a new mandate that the sales force in the field must provide the quickest response possible to sales leads created in its CRM system. In the past, its salespeople had to go to CRM to see the sales leads. However, with a proper notification system in place, the salespeople can be notified via SharePoint via e-mail that a sales lead has been received. The contact information for a sales lead is attached so that, when in the field, the sales representative can call the customer immediately and provide that personal touch that the senior manager wants them to have.
In the earlier versions of SharePoint, it was not easy to build an efficient solution to implement a scenario like the one for Tailspin Toys, except through some complex, full-trust farm solutions that used several custom event receivers and web service calls into CRM. One way to do this was to use pluggable workflow services in SharePoint 2010 to create custom workflow activities to implement remote event receivers. Figure 2-6 shows how pluggable workflow services can be utilized in SharePoint 2010 using callExternalExternalMethodActivitiy1 and hanldeExternalEventActivity1 activities. For more information on pluggable workflow services, see Chapter 13 of Professional SharePoint 2010 Development.

Given that full-trust farm solutions are not allowed in Office 365 and hosted deployments, and pluggable workflow services were poorly documented and not well received by developers, Microsoft had to come up with inherent semantics and the supporting infrastructure to enable remote events in SharePoint 2013.
To address challenges associated with cross-platform notifications, Microsoft has introduced three new options: Reporting Services data alerts, events in external lists, and remote event receivers. Now quickly review each option.
Reporting Services 2012 Data Alerts
Introduced in SQL Server 2012 and only available in SharePoint integrated mode, this new feature of Reporting Services enables you to set up alerts in reports that use stored credentials in their data source. When the underlying data in the report is changed, some recipients are notified. Because in data alerts you can specify recipient e-mail addresses (see Figure 2-7), a recipient can be an e-mail enabled document library where you have already registered an event receiver of type SPEmailReceiver to listen to incoming e-mails and then parse and take actions based on the information included in the From, To, Subject, Body, and Sent properties of the e-mail.

Events in External Lists
External lists in Business Connectivity Services in SharePoint 2013 support events. Two new stereotypes (Subscribe and Unsubscribe) have been added to the BCS object model to support notifications in external lists. ItemAdded, ItemUpdated, and ItemDeleted events are supported for setting up subscriptions. External lists will be covered in Chapters 13 and 14.
Remote Event Receivers
New in SharePoint 2013, developers can register remote event receivers with SharePoint similar to the way that local event receivers are registered in SharePoint 2010. The only major difference is that the developer provides a web service URL rather than an assembly and class name in that web service that needs to be called when registering the event receiver. When the event in question occurs, SharePoint sends the event properties to the web service, and it expects information about the result of the event receiver in response.
The following code snippet shows the Element XML of a remote event receiver specified for a list deployed as part of a SharePoint-hosted App. Note how in the URL and Type elements the web service URL and type of event is specified:
<?xml version="1.0" encoding="utf-8"?>
<Elements xmlns="http://schemas.microsoft.com/sharepoint/">
  <Receivers ListTemplateId="10000">
      <Receiver>
        <Name>AnnouncementsReceiverItemAdded</Name>
        <Type>ItemAdded</Type>
        <SequenceNumber>10000</SequenceNumber>
        <Url> http://tailspintoys.com/AnnouncementsReceiver.svc</Url>
      </Receiver>
  </Receivers>
</Elements>
The web service is just a public class that implements the IRemoteEventService interface and ProcessEvent for -ing events (that is, ItemAdding) before an event happens and ProcessOneWayEvent for –ed events (that is, ItemAdded) after an event happens:
public class AnnouncementsReceiver : IRemoteEventService
    {
        public SPRemoteEventResult ProcessEvent(RemoteEventProperties properties)
        {
            SPRemoteEventResult result = new SPRemoteEventResult();

            switch (properties.EventType)
            {
                case RemoteEventType.ItemAdding:
                    //Code to handle ItemAdding
                    break;

                case RemoteEventType.ItemDeleting:
                    //Code Omitted for brevity
break;
            }

            return result;
        }

        public void ProcessOneWayEvent(RemoteEventProperties properties)
        {
            if (properties.EventType == RemoteEventType.ItemAdded)
            {
                    //Code Omitted for brevity
            }

        }
The Security Model in Remote Events
When it comes to remote events and the ability of systems to work and notify each other, a major concern is always security. Figure 2-8 shows how different players of a remote event scenario work together in SharePoint 2013.

Here are the basic steps as shown in Figure 2-8:
The following code snippet shows how a web service in the remote event receiver can obtain a context token from ACS and build a SharePoint context and the remote client context to perform a task in SharePoint:
HttpRequestMessageProperty requestPro =
(HttpRequestMessageProperty)OperationContext.
Current.IncomingMessageProperties[HttpRequestMessageProperty.Name];
string ctxTokenString = requestPro.Headers["X-SP-AccessToken"];
SharePointctxToken ctxToken = TokenHelper.ReadAndValidatectxToken(ctxTokenString,
requestPro.Headers[HttpRequestHeader.Host]);
Uri spUrl = new Uri(properties.ItemEventProperties.WebUrl);
string accessToken = TokenHelper.GetAccessToken(ctxToken,
spUrl.Authority).AccessToken;
ClientContext clientContext =
TokenHelper.GetClientContextWithAccessToken(spUrl.ToString(), accessToken))
You can use the TokenHelper class to create the security token and authenticate to SharePoint just like provider-hosted apps covered earlier in this chapter.
In Office 365 deployments, the security token for the web service to be able to call into SharePoint can be created using OAuth, and ACS needs to be involved. For on-premise deployments, this security token should be created using an S2S configuration. For more information, see the product documentation at http://msdn.microsoft.com/en-us/library/fp179901(v=office.15).aspx.
The next section will cover the new changes in workflow.
WORKFLOWS
You have been learning about the tight integration between Office 365 and Windows Azure-based services such as ACS since the beginning of this chapter. So far, you have learned about this integration in the context of apps and remote events.
Using the same behind-the-scenes plumbing, you can now easily author and upload a declarative workflow to Office 365, and the workflow runs in the Windows Azure Workflow execution host completely outside of the SharePoint server farm. The workflow running in Windows Azure can then communicate back to SharePoint via the same core remote access technologies you saw in cloud-based apps such as CSOM, REST, and OAuth.
Following the same approach in this chapter, take a look at the challenges with workflows in the earlier versions of SharePoint.
Challenges with Workflows in SharePoint 2010
If you remember, workflow was first introduced to the platform in SharePoint 2007 via Workflow Foundation 3.0. From an architectural perspective, workflows weren’t much different in SharePoint 2010 because the platform leveraged Workflow Foundation based on the .NET Framework 3.5 SP1.
Think of workflow in SharePoint 2010 in four primary scenarios:
- Scenario 1 — A power user builds a declarative workflow in SharePoint Designer 2010 and deploys it to SharePoint 2010. Declarative workflows contain no custom code and are strictly serial in nature (no support for state machine workflows).
- Scenario 2 — A power user builds a declarative workflow in SharePoint Designer 2010 and engages a developer to extend the workflow programmatically in Visual Studio 2010. This could be because of one of the following limitations in SharePoint Designer Workflows:
- Implementation of custom business logic
- Calling of SharePoint APIs
- Calling of external systems (web services, feeds, and databases)
- Scenario 3 — A developer builds custom activities in Visual Studio 2010 and wraps them in actions for use in SharePoint Designer 2010. Those actions can then be used by power users who own the workflow business logic to be used in their declarative workflows.
- Scenario 4 — A developer builds a programmatic workflow in Visual Studio 2010 and packages it for deployment. In this scenario, all development is done in Visual Studio 2010.
Although the preceding scenarios cover most customer needs and fulfills their requirements, the workflow technology had some limitations. Now look at them:
- Scalability — Unlike many workloads that followed the SharePoint 2010 service application model for better scalability and tenancy support, workflow was not a true service in SharePoint 2010. As a result, customers can have only one workflow execution host per SharePoint 2010 farm, shared between all web applications and tenants.
- Stability and performance — SharePoint 2010 workflows are frequently hydrated and dehydrated between different tiers of the farm. An unhappy workflow or too many running instances can considerably impact the farm performance and its availability.
- High-privileged context — Workflows execute under the security context of the site’s application pool as a super user. This is not preferable in many use cases in which the security context of the user who initiated the workflow is needed. For example, Created By and Modified By fields on a workflow payload are always shown as a System Account. For more information on workflow security context, see the TechNet article at http://technet.microsoft.com/library/dd365119.aspx.
- On-premise deployments — Because workflows run as a super user in SharePoint 2010, sandboxed solutions cannot be used to host a programmatic workflow. Your only option in sandboxed solutions is to deploy a workflow action that later can be used in SharePoint Designer 2010.
- Flexibility — SharePoint 2010 is tightly coupled with a specific version of .NET Framework and Windows Workflow Foundation, so workflow developers cannot harness the latest workflow technologies from Microsoft. Again, that’s an expected result when you tightly couple a product to a specific version of a given technology.
Workflow Architecture in SharePoint 2013
SharePoint 2013 takes a different approach to workflow than its predecessor. In SharePoint 2013, workflow (the technology) is now treated as a true service. This means SharePoint workflows no longer run in SharePoint servers; instead, the execution is handled by Windows Azure Workflow on a separate server.
Windows Workflow Foundation 4.0 and .NET Framework 4.5 are the base to empower this new architecture. They both have been substantially redesigned from earlier versions. Figure 2-9 illustrates the workflow platform technology stack in SharePoint 2013.

The focus in SharePoint 2013 workflows is to build workflows declaratively. This is different from SharePoint 2010 where power users use SharePoint Designer to build declarative workflows and developers use Visual Studio to build programmatic workflows.
All out-of-the-box SharePoint 2013 workflows are now declarative, and the new workflows you build either by using SharePoint Designer 2013 or Visual Studio 2013 will also be declarative.
By making all SharePoint 2013 workflows declarative, you can use sandboxed solutions to deploy your workflow in its entirety. This is different than SharePoint 2010 where you could deploy workflow actions only using sandboxed solutions.
Microsoft recommends that you build new workflows using the SharePoint 2013 workflow model and push the custom code to web services. Building a programmatic workflow all from scratch is still possible, but for two reasons it may not be a preferable option:
- Given the new features in the platform, you don’t need to build programmatic workflows. These new features are covered shortly.
- SharePoint can’t host a programmatic workflow, and it has to be deployed to Windows Azure Workflow as a non-SharePoint 2013 workflow. The developer is then on the hook to implement the communication channel between the workflow and SharePoint 2013.
From a backward-compatibility and legacy standpoint, existing SharePoint 2010 workflows can migrate to SharePoint 2013 without any problems. In addition, SharePoint 2013 workflows can call SharePoint 2010 workflows. This is a welcome feature because it allows customers to carry on with their investments in SharePoint 2010 workflows to SharePoint 2013.
Another interesting aspect of the new architecture is that Windows Azure Workflow and Service Bus are available in on-premise and in Office 365 deployments. You can use this to build your own workflow development environment. The next section covers the steps to do this.
Building Your Workflow Development Environment
Introduced as a separate download, the Windows Azure Workflow product enables customers to set up and configure a workflow farm in their on-premise deployments. You can benefit from this and build your workflow development environment the same way.
One thing to keep in mind is that you can’t install SharePoint 2013 and Windows Azure Workflow on a domain controller without some hacks. Therefore, at a minimum you need a separate server to serve as a domain controller and one server that hosts both SharePoint 2013 and Windows Azure Workflow and Service Bus.
At a high level, here are the required steps to build your workflow development environment:


Register-SPWorkflowService –SPSite "http://Tailspintoys.com/sites/workflow" –
WorkflowHostUri "http://mydevserv:12291" –AllowOAuthHttp
At this point Windows Azure Workflow and Service Bus have been successfully installed, and the SharePoint 2013 farm and workflow farm have been successfully paired. Now, you should crack open SharePoint Designer to create a new SharePoint 2013 workflow, as shown in Figure 2-12.

SharePoint Designer 2013 Workflows
SharePoint Designer 2013 offers two authoring and customization experiences for developers and power users:
- Text-based designer — This is the improved version of the designer canvas. For example, you select multiple objects in the workflow design canvas and copy and paste them within the same workflow or across workflows. Interestingly enough, this was the #1 requested feature by SharePoint Designer customers.
- Visual designer — This is a new design canvas available when Visio 2013 is installed alongside SharePoint Designer 2013.
You can switch between the designers by clicking on the Views button on the Ribbon. Figure 2-13 shows the new visual designer.

In Figure 2-13, note the Visio shapes in the left pane. Also, note how you can modify the properties of workflow actions (for example, Log to History List) directly within the visual designer. You can set all the properties by selecting the shape and then clicking the action tag that appears on the left-bottom corner of the shape. If you click Properties on the action tag, the property grid for conditions and actions appears in the visual designer just as they do in the text-based designer.
Aside from the design canvas improvements, SharePoint Designer 2013 now supports new top-level containers and actions. Here are a few important ones:
- Loops — A new top-level container; as its name implies, a loop is a container that groups together actions, conditions, and steps that you want to process repeatedly. The iteration logic in a loop can be fixed (n times) or dynamic (based on a condition or expression).
- Stages — As discussed earlier, declarative workflows have been notoriously serial in nature in the previous versions of SharePoint. They have a starting point and endpoint, everything runs sequentially, and everything processes forward. In SharePoint Designer 2013, a new top-level container called stage lets you group together actions, conditions, or steps to have them executed in the listed order. After the control reaches to the end of the stage (the gate), it transitions via a Go To action to any other stage in the workflow.
NOTE You can insert a condition in the Go To transition gate and move the control from one stage to another until the logic concludes that the workflow has completed. That means declarative workflows in SharePoint 2013 no longer need to be sequential and can be used to model state machine workflows as well.
- Calling SharePoint 2010 list and site workflows — SharePoint Designer 2013 enables SharePoint 2013 workflows to call SharePoint 2010 list and site workflows. There are two new coordination actions called Start a List Workflow and Start a Site Workflow to support this. This is important for the customers who have existing investments in SharePoint 2010 workflows and want to migrate to SharePoint 2013 while keeping their workflow investments until fully migrating them at a later time. You can also use this technique to call on workflow activities not integrated into SharePoint 2013.
- Call HTTP Web Service — Calling SOAP, WCF and OData-compliant services is now supported within declarative workflows. There is a new action named Call HTTP Web Service to support this. The calls to the remote services are originated from where the workflow runs (Windows Azure Workflow) and the returned data is stored in workflow variables, which can be accessed by other actions in the workflow. The recommended approach to embedding custom logic and code in SharePoint 2013 workflows is to create a custom web service and use the new Call HTTP Web Service action to consume the service.
Figure 2-14 illustrates the new Stage concept in a SharePoint Designer 2013 workflow and how you can conditionally transition (jump) from Wait for Approval stage to Approved or Rejected stages.

Another compelling use of SharePoint 2013 workflows is in apps, which is covered in the next section.
Using Workflows in Apps
The new workflow model in SharePoint 2013 enables an interesting type of development scenario. You can now use workflows as the middle-tier host for business logic in apps.
Similar to the pluggable workflow service discussed earlier, this technique is useful for protecting the intellectual property (IP) of your business logic in an app or for handling long-running business logic that the developer wants to offload from the app. For example, if your app needs to integrate with CRM sales leads, the business logic can be encapsulated in a workflow and executed in the Windows Azure Workflow execution host.
Apps can initiate and interact with declarative workflows using a new workflow JavaScript Object Model (JSOM). JSOM enables an app to deploy workflow definitions to both an App Web and a Parent Web.
ENTERPRISE CONTENT MANAGEMENT
Enterprise Content Management (ECM) was first introduced to the platform in SharePoint 2007 by adding two site templates (Records Center and Document Center) and capabilities such as check-in, check-out, versioning, information management policies, holds, and many other features tied to SharePoint content.
SharePoint 2010 expanded on these capabilities by wrapping the base ECM capabilities to Features. SharePoint 2010 also introduced many other core and compliance capabilities to ECM, such as in-place records management, the document ID service, the document set, and the content organizer.
In SharePoint 2013, although Microsoft has introduced several new ECM features and enhancements such as eDiscovery and site mailboxes, there are two areas that matter the most to developers: site policies and managed meta data.
Now look at site policies.
Site Policies
Information management policy is a set of rules that define certain behaviors or restrictions on the content kept in SharePoint. For example, auditing sensitive information is a common requirement for many departments such as HR. Questions like, “Who has changed the permissions of the HR site in the past 10 days?” or “Did someone move the content in the Payroll document library to another site?” are among many other auditing questions that may arise during the life cycle of a SharePoint site.
In SharePoint 2010, you could create only policies attached to content types or at the site collection level. SharePoint 2013 has a new set of policies. If you browse to Site Settings ⇒ Site Collection Administration, there is a new link called Site Policies, which enables you to control the life cycle of a site.
Figure 2-15 illustrates some of the options available in a site policy.

As shown in Figure 2-15, you can choose how a site should expire and what should happen when it expires. For example, a site can be deleted automatically seven months after it was created, and a workflow executes to handle some custom business logic before deletion. Conveniently, if the site collection in which you define the policy is a content type hub, you can push your policies down to all subscribed site collections.
After a site policy is defined at the site collection level, the site owner can browse to the Site Closure and Deletion page on a subsite’s settings page, and select the site policy. This can also be done programmatically through improved CSOM interfaces in SharePoint 2013.
The next section discusses managed meta-data improvements in SharePoint 2013.
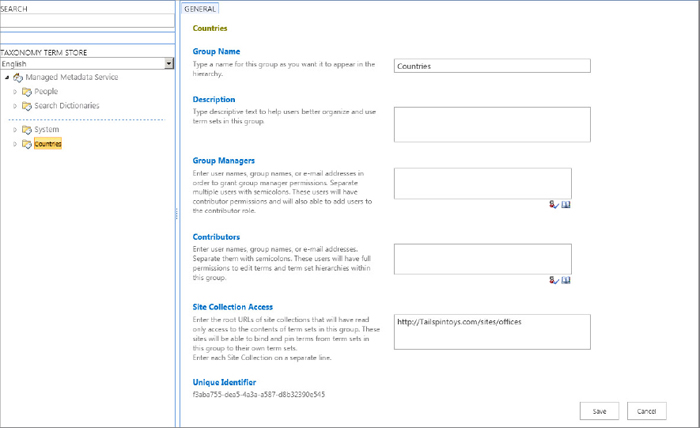
Managed Meta Data
Managed meta data plays a more prominent role in SharePoint 2013 than in SharePoint 2010. However, from an architectural standpoint, the core capabilities are the same.
To use managed meta data in your site, you still need a managed meta-data service (MMS) application and a tool called Term Store. The tool enables you to work with one instance of the managed meta-data service application at a time. Terms are categorized in groups (top-level container) and then in term sets within each group. The term hierarchy is stored in MMS application databases along with syndicated content types. If social tags are enabled, the MMS application also uses a social tag database created by a user profile service application.
Just like SharePoint 2010, SharePoint 2013 managed meta-data groups can be local or global. A global group is the one that can be used by any site collection connected to the same instance of the MMS application. A local group is one that although stored in the MMS application database is only available to a specific site collection. What is different in SharePoint 2013 is the ability to make a local group available to other site collections (in read-only mode) by specifying the URL of the consumer site collection.
Figure 2-16 shows cross-site collection term access in the improved term store tool in SharePoint 2013.
In SharePoint 2010, users could reuse terms in the term hierarchy. After these terms were reused, they could be updated and deleted in both the source and the referenced term sets. Updating on any ends would have been applied to the entire term hierarchy, but deleting was slightly different. Deleting a reused term from the source was not deleting the term from the referenced term sets. So, reused terms were supposed to be pointers, but in reality they were not pointers — kind of confusing.
Reusing terms is still there in SharePoint 2013 and functions exactly as in SharePoint 2010. SharePoint 2013 introduced a new operation for terms: term pinning. A pinned term is just like a reused term except it is read-only and cannot be modified (updated or deleted) in the referenced term sets. In addition, if you delete a pinned term from the source, it will be deleted from all the referenced term sets. Now, you have the real pointers.
Another major improvement is custom properties for terms. In SharePoint 2010, terms had property bags that could be accessed only via taxonomy server-side APIs. SharePoint 2013 now includes the ability to work with custom properties in terms and term sets through the browser, and CSOM APIs are added for remote clients. Custom properties are either shared or local. Those available in all reused and pinned instances of the term are called shared custom properties. Local properties are only accessible for the term within the source term set.
Great news for bilingual customers and businesses is the ability to add working languages in an MMS application without having to install the language packs, as shown in Figure 2-17.

This is definitely a welcome change for those customers who want to have their taxonomy in multiple languages, but their content is primarily authored and consumed in English. This also is handy for developers who don’t like to install and manage multiple language packs just to work with multilingual taxonomies.
After new working languages are added to the MMS application, a new tab becomes available for each term set that enables you to choose three options for term translation. The options are Machine Translate, which is powered by a new machine translation service application in SharePoint 2013; Create Translation Package to export the term sets into a XLIFF package for professional translation; or Upload Translation, which basically imports the translation package back to the MMS application.
You briefly looked at new features in ECM; the next workload to explore is Web Content Management.
WEB CONTENT MANAGEMENT
In SharePoint 2013, Microsoft paid special attention to the Web Content Management (WCM) workload. With the new search and managed meta-data improvements in the product, SharePoint 2013 takes two different approaches toward publishing content: structural and dynamic publishing models.
Now consider each model in more detail.
The Structural Publishing Model
This is how publishing sites work in SharePoint 2010. Content authors create content pages individually and make them available in publishing sites. For example, if you need to create a detail page for a product called foo, you browse to the products site at http://www.tailspintoys.com/products and you create a publishing page based on a predefined template (Page Layout) to showcase foo as a product. After the page is checked in and published, it serves as a detail page, and visitors can see that page by typing the following URL in their browsers: http://www.tailspintoys.com/products/pages/foo.aspx.
This approach is useful for the content that needs to live in SharePoint and is static in nature. After authoring content pages, you need to somehow roll them up onto another page, often referred to as the roll-up page. You can use a Content by Query Web Part (CBQ) or other custom aggregation techniques to show your products in a master/detail manner.
In a structural model, publishing content can be moved and localized to variation sites using content deployment. Alternatively, you can use content deployment to move the content across your authoring and publishing farms and across the network boundary between your intranet sites, extranet sites, and Internet sites.
The Dynamic Publishing Model
New in SharePoint 2013, roll-up and detail pages can be automatically generated from the indexed content. For example, your product catalogue, which in most organizations is kept in non-SharePoint external systems, can be indexed by search and automatically be included in SharePoint 2013 publishing sites.
Using the new managed meta-data feature, the product pages can be accessed using much cleaner and more SEO-friendly URLs such as http://www.tailspintoys.com/foo.aspx.
In dynamic publishing, content can then be made available to other sites using a new feature in SharePoint 2013 called cross-site publishing. Now look at how the dynamic publishing model works under the hood.
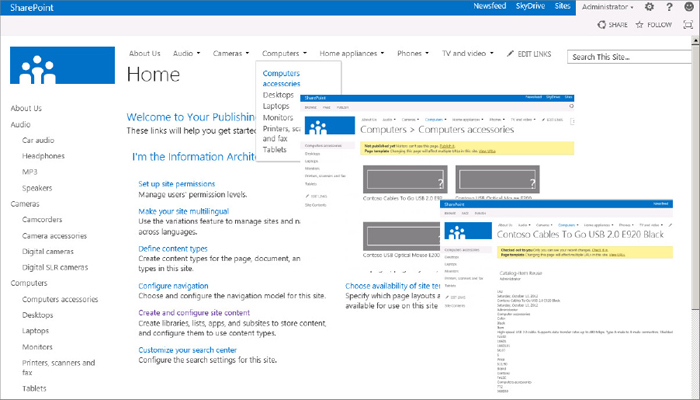
Taxonomy-Driven Navigation
Navigation infrastructure in SharePoint 2013 leverages taxonomy to generate SEO-friendly URLs and paths to publishing pages. If you look at the navigation settings in a publishing site, you should see that there are two ways you can design your site navigation: structural and managed.
Structural navigation is what exists in SharePoint 2010. Managed navigation is new and is driven by site taxonomy. This is an important concept because now you can abstract site navigation from how your business operates without changing the underlying structure of your sites. This also enables site owners to easily reorganize the navigation by modifying the term sets.
Figure 2-18 shows the new managed navigation option in the Navigation Settings of a publishing site in SharePoint 2013.

It’s not just the navigation that can be based off taxonomy. The next section discusses taxonomy-driven pages in SharePoint 2013 WCM.
Term-Driven Publishing Pages
When a publishing page is created in SharePoint 2013 using either structural or dynamic models, SharePoint automatically adds a new term to the Site Navigation term set that points to the new page. In addition, SharePoint automatically generates a home page for that term just like social tag profiles.
The term’s home page is simply a Page Layout (.aspx) that displays the content of the page. As always, developers and designers have the opportunity to customize this template to meet specific rendition requirements.
Through a new tab in the term store called Intended Use, term sets can opt in to participate in taxonomy-driven navigation and then further be customized. Selecting this option enables the Navigation and Term-Driven Pages tabs, which enables you to customize features such as friendly URLs, SEO options, target page settings, and many others.
Cross-Site Publishing
If you have been programming for SharePoint even for a short period of time, you probably know that getting out of a site collection boundary and aggregating content across multiple site collections is not an easy task. There are several patterns and techniques to enable cross-site collection aggregation, but they all require extra development effort and each one comes with its own limitations.
SharePoint 2013 enables developers to make content in lists and document libraries available for consumption on other site collections. The idea is simple and involves a few high-level steps:
Figure 2-19 shows an example of product catalog implementation in a consuming site collection.
When you click on an item on the roll-up page, the page is created dynamically and directly from the search index. There is no timer job involved in this process.
The notation of the catalog is so important in SharePoint 2013 that Microsoft decided to ship an out-of-the-box template called Product Catalog. This template already has a designated list as a catalog named Products. The idea is to give you a starting point to hit the ground running toward building your own corporate product catalog system.
Before moving on to the next section, there are two important things that need to be highlighted: First, the new cross-site publishing feature in WCM is not meant to replace traditional content deployment. There are still many scenarios where you should prefer content deployment over cross-site publishing. For more information, see the product documentation at http://msdn.microsoft.com/en-us/library/jj163225(v=office.15).aspx.
Second, structural and dynamic publishing and the techniques used in each model are not mutually exclusive. They can co-exist or be mixed together to enable complex publishing requirements. For example, you can combine cross-site publishing with a variation to enable authoring multilingual sites from a common authoring site collection.
Hostname Site Collections
SharePoint 2007 supported extending a web application to multiple zones and giving each zone a unique hostname (host header). Because SharePoint has a limit in the number of web applications hosted in a single farm, SharePoint 2010 introduced Host Name Site Collections (HNSC) to address this scalability issue. The problem was that HNSCs in SharePoint 2010 had to be in the Default zone and couldn’t use alternative access mapping. In addition, there was only one hostname per site collection.
SharePoint 2013 took HNSC to the next level by supporting an unlimited number of hostnames per site collection and by mapping each hostname to a zone at the web application level. You still need to extend the web application, and there is a limit of five zones per web application: Default, Intranet, Internet, Extranet, and Custom. The difference, however, is how SharePoint 2013 enables hostnames to be in different zones.
The following code snippet creates an HNSC with the URL http://www.bar.com in a web application with the URL http://foo. This web application has two zones: Default and Internet.
The code then adds additional URLs to the new HNSC; http://foo.bar.com to the Default zone and https://foo.bar.com to the Internet zone of the web application.
#Create a new HNSC
New-SPSite "http://www.bar.com" -HostHeaderWebApplication "http://foo" -Name "Bar
Portal" -Description "Bar Portal" -OwnerAlias "Tailspintoysadministrator"
-language 1033 -Template "STS#0"

# Get a reference to the new HNSC
$site = Get-SPSite 'http://www.bar.com'

# Add an alternative URL and map to Default zone
Set-SPSiteURL -Identity $site -Url http://foo.bar.com -Zone 0

# Add an alternative URL and map to Internet zone
Set-SPSiteURL -Identity $site -Url https://foo.bar.com -Zone 2
You can specify which zone to use (0 = Default zone and 2 = Internet zone) when creating the alternative names. If you list all zones created for the new HSNC using the following code, you can see what’s shown in Figure 2-20:

Get-SPSiteUrl -Identity http://www.bar.com
If the Internet zone of the web application supports anonymous access, so does the alternative URL used in HNSC.
Multilingual Features
If you live in a multilingual country such as Canada, you probably know how important it is to enable users to vary the presentation of their content in another language. If you read this chapter from the beginning, you have already seen some of the multilingual support in SharePoint 2013 in cross-site publishing and managed meta data, but there is more.
Variation has been always the primary feature in SharePoint to satisfy multilingual requirements. Variation works based on the following four principles to replicate content from a source to a variation label (destination):
- URLs
- Language redirection
- Translation
- Content deployment
Variation is still constrained to one site collection; however, it is a faster and much more reliable process in SharePoint 2013. You get smaller export packages, and there is a replication list that allows for easy start and stop of the replication content. That means the content deployment is no longer a monstrous all-or-nothing process; instead, you can select to replicate the entire list or one or more variation labels at once.
Similar to terms in managed meta data, variations in SharePoint 2013 support the ability to send site content to the Machine Translation Service application. Alternatively, you can export or import site content for translation by a third party in the industry standard XLIFF format. When exporting content you can include the entire variation label, one page, or just a document. In case you need to develop your own custom translation solutions, the Machine Translation Service object model is similar to the Word Automation Services object model, and is available in server-side as well as CSOM and REST.
By using Host-Named Site Collections (HNSC) and friendly URLs in term-driven publishing pages, a multilingual resource can be mapped to a URL that’s much easier to understand for search engines and end users. For example, a publishing page called foo in a French site can be mapped to http://bar.fr/foo instead of http://www.bar.com/fr-fr/Pages/foo.aspx.
Another big change in Variation involves SEO optimization. Page meta data emits the page locale for search engines. In addition, SharePoint now uses HTTP 301 code instead of HTTP 302 for homepage redirection, which is preferable for search engines.
The Content by Search Web Part
The Content by Query (CBQ) Web Part has always been a powerful tool in publishing sites to fulfill content aggregation and rollup requirements. Because publishing sites now heavily rely on search to function, there is this new web part called the Content by Search (CBS) Web Part.
As its name implies, CBS enables users to aggregate content directly from the search index. If you look in the cross-publishing section earlier in this chapter, CBS was used in roll-up pages in the product catalog example.
Unlike CBQ, CBS is not constrained to one site collection. It’s based on search, so it must to go beyond the site collection boundary. For the same reason, the query results in CBS may not be up to date. Aside from lag time, CBS renders only major versions and cannot query content from site collections marked to be excluded from the search. The simplest way to prove CBS queries are directly served from the index is to reset the index and see how results are instantaneously gone. You don’t want to prove this in production.
A query in CBS can be configured to aggregate content based on values on the page or within the URL. Before the results are rendered, you have the option to style them.
Using display templates, it’s much easier to customize CBS results than CBQ because you work with pure HTML and JavaScript. Display templates are also used in search-related web parts, which are covered later in this chapter.
Design Manager
With the advent of SharePoint 2013, Design View in SharePoint Designer is officially removed from the product. Whether this was the best decision and whether it makes sense to carry the word “Designer” as part of the product name are both beyond the scope of this book; however, what’s obvious is that there should be an easier option for power users to customize SharePoint.
Microsoft recommends customers use SharePoint to customize the product. To help do so, Microsoft has introduced another tool called Design Manager, which helps customers customize SharePoint sites in a wizard-like approach.
Developers work with a designer or a design agency to brand SharePoint. First, the developer receives the non-SharePoint branding assets (HTML, CSS, images, and so on) from the design agency. The design agency can create these files using any web design tool such as Dreamweaver or Microsoft Expression. The developer uploads the received files to SharePoint. Then, with a behind-the-scenes automatic process, SharePoint-specific assets (*.master & *.aspx) are generated. This process repeats until the branding task is complete. Then the developer exports the branding assets and creates a package (*.wsp) to deploy the custom brand to the production farm.
Figure 2-21 shows new Design Manager that replaces SharePoint Designer to customize SharePoint.

Design Manager provides a snippet gallery, so SharePoint controls can be quickly added to the design (refer to Figure 2-21). The Ribbon on the top helps you find and add other SharePoint components. When a new control is added, only HTML representation of the control is generated, so the design agency can see how the control looks in SharePoint, even if its toolsets don’t understand SharePoint. When it sends the branding assets back, SharePoint ignores the HTML representations and renders ASP.NET and SharePoint controls.
Design Manager is not perfect, but then again, this is the first iteration of the tool.
Mobile Support
SharePoint 2010 had support for mobile devices, but it was rather limited and difficult to customize. New to SharePoint 2013 are device channels. A device channel can be targeted at specific mobile devices and associated with a master page allowing for specific custom branding implementations for each targeted device. In addition, site designers can decide which sections of the Page Layouts should be included in a channel. This makes it easy to manage the user experience on mobile devices.
You can configure device channels by browsing to Site Settings ⇒ Look and Feel ⇒ Device Channels. This setting is only available in publishing sites.
Image Rendition
SharePoint 2013 enables site owners to optimize the user experience by creating different rendition formats for media files used in their sites. This new feature is called image rendition but can be used for both images and videos.
When image rendition is properly configured, SharePoint dynamically transforms an image to the settings specified in its rendition and then it caches it on the web front end to serve future requests. Because dynamic transformation to the appropriate rendition setting is a costly operation, SharePoint 2013 relies on disk-based BLOB caching to improve performance.
The process starts with site owners defining the right renditions by browsing to Site Settings ⇒ Look and Feel ⇒ Image Renditions on their sites. Simply, an image rendition has three elements: name, height, and width.
After image renditions are defined, content authors can upload an image, and then click the image hover panel to see the different renditions in effect or click the Click to Change link to further crop the image to ensure the important details in the image are still focused after being resized by a specific rendition. At this point, image rendition for the uploaded image is complete.
The next step would be for the content authors to pick the wanted image rendition when adding a media file to a page. Figure 2-22 demonstrates how a content owner is about to pick a rendition for the uploaded image optimized for viewing on Windows Phone 7.

Images with renditions can be referenced by any combination of rendition ID, width, or height. Here are two examples:
<img src="/sites/tp/PublishingImages/ppl.jpg?RenditionID=2"/>
<img src="/sites/tp/PublishingImages/ppl.jpg?Width=60"/>
When used with device channels, image renditions can provide a great user experience on mobile devices. Image rendition also helps reduce the bandwidth consumption on mobile devices for remote users with bandwidth-constrained connections.
App-Driven Publishing Sites
The majority of public-facing websites on the Internet are built using a SharePoint publishing template. As you saw in this chapter, there are many new capabilities and improvements in WCM for building powerful public-facing websites. In addition to those improvements, the new SharePoint apps can be leveraged within public-facing sites to extend the user experience. For example, a provider-hosted app can be used to inject a shopping card application to the site, or a SharePoint-hosted app can be used to render a stock ticker on the homepage of the site.
In summary, apps can be used to take some of the functionality commonly developed for public-facing sites away from the site and put it in the context of some companion apps that ship on the side or in future iterations of the site.
SEARCH
Search in SharePoint knows no boundaries. It can surface physically living content in a SharePoint farm or external content outside of the farm.
With the advent of the service application model in SharePoint 2010, search became a first-class service that could scale beyond just one farm. You could publish a search service application from Farm A and consume it in Farm B. Search in SharePoint 2010 came in two flavors: enterprise search and FAST search. In enterprise search you had SharePoint Foundation search, SharePoint Server search, and Search server. FAST search, sold as a separate SKU, was added to the product when Microsoft acquired FAST. Each of the search products in SharePoint 2010 had their own focus (and cost) and demonstrated unique strengths and limitations.
With the current wave of Office 2013 products, Microsoft decided to unify search under one product and to extend it so that it can support the new programming model and architectural changes made to the platform. With the new unified product came many changes, which are highlighted next.
Search Schema
Search schema is a new name for search meta-data properties. Links to search schema, where you make meta-data property mapping, are now available in both site settings and site collection settings. That said, site owners no longer must be given access to or go to the search service application to work with meta-data properties.
Search Navigation
In SharePoint 2010, the only way to let users quickly jump between different search experiences was to create new scopes and new results pages, and bind them together. That way, new scopes would show up in the scope drop down in the top navigation, enabling users to perform a vertical search.
In SharePoint 2013, you can configure search navigation per site by browsing to Site Settings ⇒ Search Settings. This enables you to create different search experiences for users and includes them directly in the search box without using an additional scope drop down.
Figure 2-23 shows the new search navigation on the Search Settings page.

Search settings performed at the site level can be overridden at the site collection level by going to the Search Settings under the Site Collection Administration group. For example, you can configure all sites in a given site collection to use a search center and totally ignore the search navigation settings at the site levels.
Result Sources
Result source is the new name for scopes and federated locations in SharePoint 2010 with three major changes.
First, result sources can be accessed from the search service application and in Search Settings at each site.
Second, FAST is no longer an information source protocol; instead there are two new protocols: Exchange and Remote SharePoint. Select Exchange protocol for results from Exchange and Remote SharePoint for results from a search service application hosted in a separate farm.
Third, you can specify a filter that will be applied to your queries using new Query Transformation settings. This replaces Search Scope Rules in SharePoint 2010 and is handy when performing vertical search against something specific such as a Customers list or broad list such as a Sales statistics database. There is also a nice query builder that enables you to build your query transformations using a designer and sort and see the returned results in real time.
For example, using query transformation you can restrict the queries to information with a specific value for a managed property. The query transformation {searchTerms} author="Andy Au" returns only documents that have the user’s search terms (contained in the {searchTerms} token), and authored by "Andy Au". You can also prefix the queries. The query transformation Hockey{searchTerms} always adds the prefix Hockey and concatenates (AND) it with the user’s search terms.
The inclusion of result sources in SharePoint 2013 search provides a powerful mechanism to perform vertical searches against various information sources across your organization, such as sales data or knowledge-base articles.
Display Templates
As mentioned previously, SharePoint 2013 takes a different approach than SharePoint 2010 to customize the search results. Now, search-related web parts (that is, Search Result Web Part) heavily rely on display templates to control the appearance and behavior of results served from the index.
Display templates are snippets of HTML and JavaScript. There are many preconfigured display templates that ship with the product, but you can also create your own. Similar to customizing other templates in SharePoint, just copy an existing one that’s similar to what you want, and start from there. To do so, you can use any HTML editor you want.
Display templates can be found in Master Page Gallery ⇒ Display Templates ⇒ Search. As you can see, there are other types of display templates in the Master Page gallery used in other workloads such as WCM.
Result Types
Result types tie everything together. You use a result type to bind a result source or a type of search result to a display template that the search engine should use to render the search result.
Just like display templates, there are many out-of-the-box result types, and you can create your own. Each result type must have one or more conditions to compare search results against and an action that specifies what display template to use for the search result. For example, a custom result type named Knowledge Base specifies that if a search result is served from the result source KbRs, then use the display template KbDispTemplate.aspx to render the results.
Result types along with many other search configurations can be configured at the site collection level and at the site level.
Query Rules
A query rule is the last stop to modify and enhance the search experience before the core results are shown to the end user. A query rule has one or more conditions that must be met to make the rule fire. You can also define a query rule that fires for any search (which in turn means there is no rule).
A query rule is where you decide if you want to do one or more of the following:
Figure 2-24 illustrates a query rule that has been configured against the local SharePoint result source (used in Everything vertical) and is triggered when the user’s search term contains the word SharePoint.

After the rule triggers, it adds a promoted link (http://sharepoint.microsoft.com/iusesharepoint/landing.aspx) as a banner (it could also be a link) and then renders a result block that contains results from another result source pointing to an external website (http://blogs.devhorizon.com/reza). The rule puts everything above the core ranked results.
Conceptually, some of the things you can do by using query rules are similar to search keywords and best bets in SharePoint 2010. However, query rules are more powerful and highly dynamic, conditional, and customizable.
Continuous Crawl
SharePoint search plows through content using either full or incremental crawls. Full crawl focuses on almost everything about the content, whereas incremental crawls focus on picking up the changes in content or pushing the updated ACLs down to the affected items within the index. Because SharePoint 2013 relies heavily on search in some of the workloads such as WCM and Social, Microsoft introduced a new type of crawl: continuous crawl.
To provide maximum freshness, continuous crawls focus on smaller changes and use the change logs to pick up those changes faster and in more efficient ways. Continuous crawls overlap each other, which means one continuous crawl doesn’t hold up the other one in picking up the changes.
Two important tips about continuous crawls: First, they are only available for SharePoint content sources, where the choice is between continuous or incremental. Second, continuous crawl can’t be paused or stopped. Your only option is to disable it.
Putting It All Together
If you put together everything you have learned so far, you should realize how drastically search has been changed in SharePoint 2013. Figure 2-25 shows a high-level architectural overview of the new architecture side by side with the enterprise search in SharePoint 2010. You can see the difference.

To recap everything, here are the high-level steps you need to take to perform a vertical search in SharePoint 2013:
Query Languages
For developers, search has been always a great way to access content across site collections when the content freshness was not a deal breaker. In SharePoint 2013, continuous crawl resolves this issue to an extent. Another new change for developers is the query language they would use.
Let’s start with the bad news for many of you who know and love T-SQL style queries. SQL Query Language (SQL) using the FullTextSqlQuery class is no longer supported in SharePoint 2013. Start changing your SQL queries today if you plan to migrate to SharePoint 2013.
FAST Query Language (FQL) is still available, but developers are advised to use Keyword Query Language (KQL) and syntax to build their queries against a search engine. KQL has received some enhancements and is used almost everywhere you need to build a search query, such as those in query transformation and query rules. Table 2-3 includes a few examples of KQL queries:
TABLE 2-3: KQL Queries
| KQL QUERY | EXECUTION RESULT |
| Hockey | Returns items containing Hockey or hockey |
| Hockey Soccer | Returns items containing hockey AND soccer |
| Hockey OR Soccer | Returns items containing hockey OR soccer |
| Hockey* | Returns items like “Hockey” and “Hockey Jersey” |
| “Hockey Jersey” | Returns items with exact phrase “Hockey Jersey” |
| Firstname:A | Returns all people whose first name starts with “A” |
| Title:Hockey IsDocument:1 | Returns all documents with “Hockey” in the title |
| Author:Andy IsDocument:1 | Returns all documents authored by “Andy” |
| Hockey FileExtension:pdf | Returns PDF documents containing “Hockey” |
| contentClass:STS_ListItem_Events | Returns all events from all calendars |
| contentClass:STS_ListItem_Tasks | Returns all task items |
Exporting and Importing Search Settings
If you have configured search or developed SharePoint applications that use search as the data access mechanism, you probably know that migrating your search configurations and settings across DEV, QA, and PROD environments was not an easy task. To target deployment scenarios, you had to write PowerShell scripts and XML configuration files to ensure your settings were applied consistently across your server farms.
In SharePoint 2013, you can export search settings or import them at the site level. This process handles query rules, result sources, and managed properties that you have created for a site, but you need to move the branding artifacts such as search master pages, display templates, and web parts. Any customization to the search result pages won’t be handled by the new search export and import feature.
You can export or important your search settings by browsing to Site Settings ⇒ Search ⇒ Configuration Export or Configuration Import.
Search-Driven Solutions
Because of the new improvements in search, you can build custom solutions that execute search queries using CSOM and REST. For example, the following REST query returns all the results containing the term “hockey”:
http://server/sites/sc/_api/search/query?querytext='hockey'
The following REST query returns all the results containing the term “hockey” sorted by last modified date and time, and in an ascending rank order:
http://server/site/_api/search/query?querytext='hockey'&sortlist='LastModifiedTime:descending,Rank:ascending'
The code snippet shown here demonstrates how to perform the same REST search call using CSOM within your apps:
ClientContext ctx = new ClientContext("http://Tailspintoys.com/sites/sc");
var query = new KeywordQuery(ctx, ctx.Site);
query.QueryText = "hockey";
query.ResultTypes = ResultType.RelevantResults;
query.Id = Guid.NewGuid();
var queries = new KeywordQuery[1];
queries[0] = query;
SearchExecutor searchExecutor = new SearchExecutor(ctx);
var rcc = searchExecutor.ExecuteQueries(queries);
ctx.ExecuteQuery();
No matter what approach you take to execute a KQL query in your apps or workflow, the results are always in the raw XML that you need to parse and extract what you want. You don’t get JSON objects in search queries.
BCS
Business Connectivity Services (BCS) makes it easy to integrate SharePoint with external systems. To do so, BCS maps external systems capabilities to standardized interfaces to define how to interact with them. At the core, there are four concepts in BCS that you must understand:
- External system — Any supported source of data that BCS can access using out-of-the-box or custom connectors. Examples of external systems are a web service, a database, a Line of Business (LOB) system, Web 2.0 service, or even a .NET object that contains data.
- External content type (ECT) — An external content type defines the schema and data access capabilities of an external system and its behavior. External content types are often referred to as the building blocks of BCS.
NOTE Conceptually, you can think of an external content type as a business entity. An entity is an abstraction of something real such as a customer, sales order, and so on. An entity is an entity whether used in BCS, C# class, Entity Framework, or database schema. Each entity has a name, meta data, associations, and stereotyped operations — such as create, read, update, and delete — that enables access to external data. Each entity can have multiple instances such as rows in a database table, SharePoint list items, or instances of an object.
- BDC model (BDCM) — The XML representation of one or more external content types along with resources, such as localized strings, meta data, permissions, and connectivity information. With a BDC model, developers do not need to learn the nuances of each external system.
- External list — External lists enable users to present LOB data as if they are native SharePoint lists. In external lists the data does not actually reside within SharePoint; instead it is pulled directly from the backend external system each time the list is accessed.
Thankfully, BCS core concepts have not changed in SharePoint 2013. However, there are a few enhancements. Now review the changes.
OData Connector
SharePoint 2013 ships with an OData connector for BCS. This enables developers to consume data from OData-compliant services in their BCS solutions. In the Windows Azure marketplace, Microsoft exposes many free or paid OData data sources that you can consume in your BCS solutions. For example, you can consume the free Northwind OData source at http://services.odata.org/Northwind/Northwind.svc/. The following code snippet shows a portion of a BDCM built around the Northwind OData source:
<LobSystem Name="ODataNWModel" Type="OData">
  <Properties>
    <Property Name="ODataServiceMetadataUrl" Type="System.String">
      http://services.odata.org/Northwind/Northwind.svc/$metadata</Property>
    <Property Name="ODataMetadataAuthenticationMode"
    Type="System.String">PassThrough</Property>
    <Property Name="ODataServicesVersion" Type="System.String">2.0</Property>
  </Properties>
  <LobSystemInstances>
    <LobSystemInstance Name="http://services.odata.org/Northwind/Northwind.svc">
      <Properties>
        <Property Name="ODataServiceUrl" Type="System.String">
         http://services.odata.org/Northwind/Northwind.svc
        </Property>
        <Property Name="ODataServiceAuthenticationMode"
        Type="System.String">PassThrough</Property>
        <Property Name="ODataFormat"
        Type="System.String">application/atom+xml</Property>
      </Properties>
  </LobSystemInstance>
</LobSystemInstances>

<!-- Code Omitted for brevity -->

</LobSystem>
As discussed earlier, SharePoint list data is already exposed as an OData source. When you put everything together, it’s fair to say SharePoint can be a producer and a consumer of OData sources.
BCS Powered Apps
One of the issues with ECTs in SharePoint 2010 was that they had to be configured at the farm level and required farm administrators to be involved. With the new programming model introduced in SharePoint 2013 and the emphasis on cloud computing and granular isolation, this is not possible anymore.
In SharePoint 2013, developers can include ECTs in their apps and access external data from any external system such as Netflix or Windows Azure directly from their apps without involving the tenant administrator.
The following code snippet demonstrates how an external list can be defined in an app:
<ListInstance Url="$Resources:core,lists_Folder;/BCSEmpoweredList"
Description=" A BCS Empowered External List"
OnQuickLaunch="TRUE" Title="BCS-ECT" Id="BCSEmpoweredList">
    <DataSource>
      <Property Value="" Name="LobSystemInstance"/>
      <Property Value="" Name="EntityNamespace"/>
      <Property Value="" Name="Entity"/>
      <Property Value="" Name="SpecificFinder"/>
      <Property Name="MetadataCatalogFileName"
                        Value="BDCMetadata.bdcm" />
    </DataSource>
</ListInstance>
As you can see the code snippet has a few elements, each representing a property for the external list. For example, the Entity property should contain the name of the business entity that this external list points to in the backend system.
CSOM and REST Interface
Just like other workloads discussed so far, BCS has a new JavaScript object model to support remote calls.
For example, the following REST query returns all customers from an external list called Customers. This list is deployed by an app:
http://server/sites/sc/_api/lists/getbytitle('Customers')/items
The following code snippet shows how to make the same REST call, but uses JavaScript against CSOM and then binds the results to a grid:
BCSEmpoweredList.Grid.prototype = {
        init: function () {
            $.ajax({
                url: this.surlWeb + "_api/lists/getbytitle('Customers')/
                items?$select=BdcIdentity,CustomerID,ContactName",
                headers: {
                    "accept": "application/json",
                    "X-RequestDigest": $("#__REQUESTDIGEST").val()
                },
                success: this.showItems
            });
        }
The following code snippet shows how to use a BCS object model in C# code against CSOM:
var ctx = new SP.ClientContext();
var web = ctx.get_web();
entity = web.getAppBdcCatalog().getEntity(entityNameSpace, entityName);
ctx.load(entity);
lobSystem = entity.getLobSystem();
ctx.load(lobSystem);
lobSystemInstances = lobSystem.getLobSystemInstances();
ctx.load(lobSystemInstances);
ctx.executeQueryAsync(success, failure);
The code starts with establishing the context and referencing the business entity. Once the entity is referenced, the content is loaded and two event handlers are registered for call backs. In the success event handler, you will write code to deal with the returned result.
SUMMARY
If you have made it this far, congratulations!
In this chapter you were introduced to many new features and enhancements that accompany SharePoint 2013 and the changes to the SharePoint programming model. All these new features were introduced to help you understand what is needed at a high level for a SharePoint developer to build applications in SharePoint 2013. You saw how many times you can use the same CSOM and REST code pattern and just change the endpoints to target different workloads in the product. That’s how you can code in SharePoint 2013.
You will find more detailed coverage of each workload discussed in this chapter throughout the book. Keep reading!