Chapter 7
Further Developing Apps in SharePoint 2013
WHAT’S IN THIS CHAPTER?
- Extending the user experience into remotely hosted apps
- Understanding the packaging and deployment process, including deployment to the public SharePoint Store
- Choosing between Provisioner-Hosted and Autohosted apps
WROX.COM CODE DOWNLOADS FOR THIS CHAPTER
The wrox.com code downloads for this chapter are found at www.wrox.com/remtitle.cgi?isbn=1118495829 on the Download Code tab. The code is in the chapter 07 download and individually named according to the names throughout the chapter.
DEVELOPING YOUR APP USER EXPERIENCE
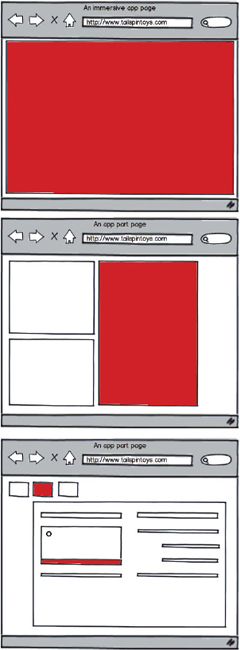
When considering SharePoint 2013 apps, there are three main options for exposing app functionality to users. These options include the immersive app, which offers a full screen experience, and a partial screen option, which behaves much in the same manner as a web part does. The final option is for an app to embed itself into the SharePoint UI as a custom action, which kicks off a process that has no significant user interface. Figure 7-1 illustrates the different options.
The intention of the three different interaction options is to grant developers flexibility in integration options coupled with flexibility in the look-and-feel user experience department. One of the core questions for the three design options has to do with the type of chrome and branding that the developer wants SharePoint to provide versus what the developer provides:
- Full-screen apps are ASPX pages hosted in SharePoint. These apps should leverage the app template.
- HTML pages are hosted in SharePoint or outside of SharePoint. These apps should use the chrome control.
- Completely custom pages are offered as an option for developers to completely control their own branding experience.
Planning for an app’s UX is a complex set of decision points and options based on the number of different deployment options. Building the UX for a full-screen app may be different if that app is cloud-hosted versus a SharePoint-hosted app. If the app is run in an isolated subweb, how does the developer connect an app to the host web’s UX?
Cloud-hosted apps can leverage the chrome control to incorporate the host web’s navigation header and branding. This control requires the presence of a SharePoint JavaScript library and a placeholder <div> tag. When the chrome control is available in the app, it can be customized by developers.
When an app is deployed to its own isolated subweb, SharePoint leverages an HTTP handler to merge the CSS in place on the main site with the CSS inside of the app’s isolated subweb. If the IE toolbar is opened on an app site and the CSS tab is clicked, notice that the first CSS file entry is a reference from the developer site and then the _layouts/15/defaultcss.ashx. This file is the ASP.Net HTTP handler, which ensures that app sites retain the same look and feel as the rest of the SharePoint site. This is inclusive of site images and CSS for HTML structures, such as the H1 tag used in the SharePoint-hosted Hello World app created in Chapter 6, “Getting Started with Developing Apps in SharePoint 2013.”
{StandardTokens}&SPHostTitle={HostTitle}<head>
<title>Chrome control host page</title>
<script
src="//ajax.aspnetcdn.com/ajax/4.0/1/MicrosoftAjax.js"
type="text/javascript">
</script>
<script
type="text/javascript"
src="//ajax.aspnetcdn.com/ajax/jQuery/jquery-1.7.2.min.js">
</script>
<script
type="text/javascript"
src="ChromeLoader.js">
</script>
<script type="text/javascript">
"use strict";
var hostweburl;
//load the SharePoint resources
$(document).ready(function () {
//Get the URI decoded URL.
hostweburl =
decodeURIComponent(
getQueryStringParameter("SPHostUrl")
);
// The SharePoint js files URL are in the form:
// web_url/_layouts/15/resource
var scriptbase = hostweburl + "/_layouts/15/";
// Load the js file and continue to the
// success handler
$.getScript(scriptbase + "SP.UI.Controls.js")
});
// Function to retrieve a query string value.
// For production purposes you may want to use
// a library to handle the query string.
function getQueryStringParameter(paramToRetrieve) {
var params =
document.URL.split("?")[1].split("&");
var strParams = "";
for (var i = 0; i < params.length; i = i + 1) {
var singleParam = params[i].split("=");
if (singleParam[0] == paramToRetrieve)
return singleParam[1];
}
}
</script>
</head><body style="font-family:'Segoe UI'">
<form id="form1" runat="server">
<!-- Chrome control placeholder -->
<div
id="chrome_ctrl_container"
data-ms-control="SP.UI.Controls.Navigation"
data-ms-options='{
"appHelpPageUrl" : "Help.html",
"appIconUrl" : "siteIcon.png",
"appTitle" : "Wrox Press Sample chrome control app",
"settingsLinks" : [
{
"linkUrl" : "Account.html",
"displayName" : "Account settings"
},
{
"linkUrl" : "Contact.html",
"displayName" : "Contact us"
}
]
}'>
</div>
<div>
<!-- The chrome control also allows access to the
host web's stylesheets -->
<h2 class="ms-accentText">Available Themes</h2>
</div>
<asp:Button ID="Button1"
runat ="server"
OnClick="Button1_Click"
. . ..
Now that the control is in place, modifying the behavior of the chrome is a matter of explicitly defining the behavior of the chrome control in the placeholder <div> previously added.
Now that the chrome control grants insight into how to design a full screen app, it is time to turn your attention to the cases of app parts and custom actions.
Developing an Embeddable App or App Part
An app part is similar in terms of user experience to a web part in that users can experience the app inside of the host web. The app part actually leverages an iFrame to display remote content and provide the same level of isolated subweb runtime protection. End users have access to custom property settings, which are passed to the app part via the query string.
The following steps walk you through the important distinctions that must be taken into account when developing an app part instead of a full-screen app experience.

    <Properties>
      <Property
          Name="strProp"
          Type="string"
          RequiresDesignerPermission="true"
          DefaultValue="String default value"
          WebCategory="Tailspin Toys Custom Apps"
          WebDisplayName="A property of type string.">
      </Property>
      <Property
          Name="intProp"
          Type="int"
          RequiresDesignerPermission="true"
          DefaultValue="0"
          WebCategory="Tailspin Toys Custom Apps"
          WebDisplayName="A property of type integer.">
      </Property>
      <Property
          Name="boolProp"
          Type="boolean"
          RequiresDesignerPermission="true"
          DefaultValue="false"
          WebCategory="Tailspin Toys Custom Apps"
          WebDisplayName="A property of type boolean.">
      </Property>
      <Property
          Name="enumProp"
          Type="enum"
          RequiresDesignerPermission="true"
          DefaultValue="1st"
          WebCategory="Tailspin Toys Custom Apps"
          WebDisplayName="A property of type enum.">
        <EnumItems>
          <EnumItem WebDisplayName="First option" Value="1st"/>
          <EnumItem WebDisplayName="Second option" Value="2nd"/>
          <EnumItem WebDisplayName="Third option" Value="3rd"/>
        </EnumItems>
      </Property>
</Properties><Content Type="html" Src="~remoteAppUrl/Pages/SampleAppPart.aspx?{StandardTokens}
_&strProp=_strProp_&intProp=_intProp_&boolProp=_boolProp_&
enumProp=_enumProp_&editmode=_editMode_" /><asp:Literal ID="Literal1" runat="server" Text="Hello to the world from an app part"></asp:Literal>
protected void Page_Load(object sender, EventArgs e)
{
var intParam = Request.QueryString["intProp"];
var strParam = Request.QueryString["strProp"];
var boolParam = Request.QueryString["boolProp"];
var enumParam = Request.QueryString["enumProp"];
var editMode = Request.QueryString["editMode"];
if ("true" == editMode)
{
Literal1.Text = "App Part is in edit mode";
}
else
{
Literal1.Text = "intProp = " + intParam + "<br>" +
"strProp = " + strParam + "<br>" +
"boolProp = " + boolParam + "<br>" +
"enumProp = " + enumParam;
}
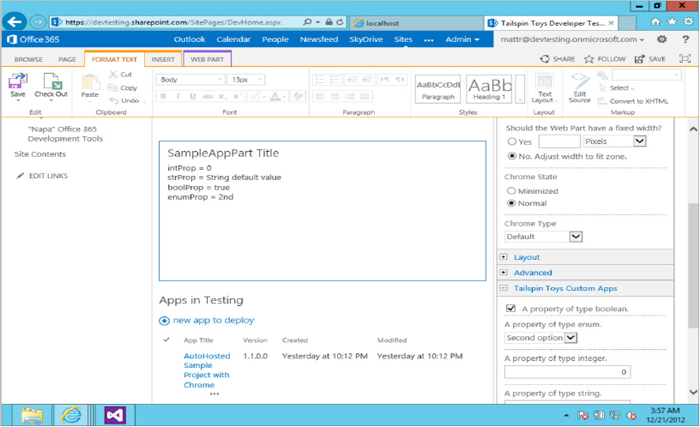
}This is a relatively trivial example of functionality, as shown in Figure 7-4, but it effectively demonstrates how the app part framework leverages the query string to exchange configuration information. Armed with this and access to SharePoint’s client object model, a savvy developer should now understand how similar the traditional web page development experience is to the new app part development experience.
. . .
    <system.webServer>
       <handlers>
          <add name="AspNetStaticFileHandler" path="*" verb="*"
          type="System.Web.StaticFileHandler" />
       </handlers>
    <system.webServer>
</configuration>
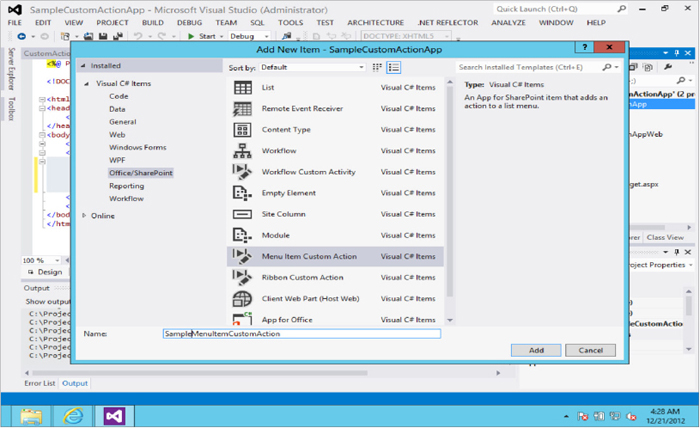
Developing a Custom Action App
Custom actions are the SharePoint Ribbon buttons and edit control block (ECB) actions available from an item’s context menu (seen as three dots in SharePoint 2013). Apps of this type are usually designed to interact with list items. Beyond a few configuration elements described in more detail next, developing a custom action app is substantively the same experience as developing an app part. List item details are passed via the query string to an externally hosted page, which performs whatever actions might be relevant.
        <asp:Literal ID="Literal1"
            runat="server"
            Text="Hello to the world from a custom action app">
</asp:Literal>protected void Page_Load(object sender, EventArgs e)
{
Literal1.Text = string.Empty;
foreach (string queryStringParam in Request.QueryString)
{
Literal1.Text = Literal1.Text + "<br>" + queryStringParam +
" = " + Request.QueryString[queryStringParam];
}
}

This is again a relatively trivial demonstration of functionality, but it does effectively demonstrate how the Custom Actions approach leverages the query string to exchange configuration information, as shown in Figure 7-7. Armed with this and access to SharePoint’s client object model, a savvy developer should now understand how similar the traditional web page development experience is to the new app part development experience.

App Design Guidelines
Apps that are developed for use on the public market place must go through approval by Microsoft in much the same way an app approval process for a phone store works, such as the iPhone or Windows Phone app stores. The apps that are submitted to the approval process must adhere to the SharePoint UX design guidelines, available in full at http://msdn.microsoft.com/en-us/library/jj220046(v=office.15).aspx in an MSDN article titled “Apps for SharePoint UX Design Guidelines.”
The crux of the design guidelines includes instructions for consistent styling and a review of CSS styling guidelines. SharePoint 2013 takes a number of visual cues from the design language formerly known as Metro, and Microsoft wants apps created by its partners and customers to mesh well with that design paradigm.
The details in this article are important but are not specifically developer activities as opposed to designer activities, so this chapter won’t dwell on visual styling guidance.
DEVELOPING YOUR APP PACKAGING
As shown in the previous Azure auto-hosted example, publishing a solution with Visual Studio results in the project’s bin directory containing an app package in the form of an .app file. This .app file is actually a .zip format and can be investigated by renaming the extension to .zip, as shown in Figure 7-8.

Notice the presence of the app.manifest inside of the .app deployment package. This manifest describes where the app is hosted and the start page of the website being rendered:
<?xml version="1.0" encoding="utf-8"?>
<!--Published:a2ba41A2-b704-4a9d-a9ed-aecacc1d43ed-->
<!--Created:cb85b80c-f585-40ff-8bfc-12ff4d0e34a9-->
<App xmlns="http://schemas.microsoft.com/sharepoint/2012/app/manifest"
Name="AutoHostedSampleProjectWithChrome"
ProductID="{42580491-4e33-4f6c-8d4b-4cbd939fe65f}"
Version="1.1.0.0" SharePointMinVersion="15.0.0.0">
<Properties>
<Title>AutoHosted Sample Project with Chrome</Title>
<StartPage>~remoteAppUrl/Pages/Default.aspx?{StandardTokens}&SPHostTitle=
{HostTitle}</StartPage>
</Properties>
<AppPrincipal>
<AutoDeployedWebApplication />
</AppPrincipal>
<AppPrerequisites>
<AppPrerequisite Type="AutoProvisioning" ID="RemoteWebHost" />
</AppPrerequisites>
</App>
Beyond this simple set of details are the included permission requests that the app requires to successfully be installed. It is this simple collection of data elements that make up the extent of SharePoint’s knowledge of the app. This separation of concerns enables developers to leverage any language they prefer, including node.JS or Ruby, as well as any application design paradigm such as MVC.
An app for SharePoint can either be uploaded to an organization’s private App Catalog or submitted for review and inclusion in the public SharePoint app marketplace. If the app is submitted to the public app marketplace, Microsoft runs some validation checks on it to ensure that all elements meet certain design criteria. For example, app manifest markup must be valid XML, and no delivered feature can be targeted above the Web scope. After the code package passes all of the requisite testing stages, the package is signed by Microsoft and made available within the app store.
DEVELOPING YOUR APP DEPLOYMENT
The app code has been developed and tested. Now you need to deploy the code package to production. The deployment conversation now diverges based on the hosting option selected.
- SharePoint-hosted apps may simply be files that can be uploaded to the server. No server-side code means there’s no need to manage app packaging unless that app packaging is wanted for code reuse.
- Auto-hosted and SharePoint-hosted apps are self-contained solutions published in the manner described next.
- Provisioner-hosted apps not only include the SharePoint component that must be deployed and maintained, but also the web project that must be deployed to its own infrastructure. This chapter assumes that any organization electing to build on top of its provisioner infrastructure does not need advice on how to deploy web applications. This chapter addresses only the SharePoint components.
In addition to diverging based on the selected hosting option, another deployment decision point is the choice of app stores: the public Office Store or the private app catalog.
Publishing to the Office Store
Before attempting to publish an app to the Office Store for broad availability, you must have a Microsoft Seller account and have access to the Microsoft Seller Dashboard. For references on how to accomplish this prerequisite step, refer online to Microsoft’s How To article titled “Create or edit your seller account in the Microsoft Seller Dashboard,” found online at http://msdn.microsoft.com/en-us/library/jj220034.aspx.
Apps being submitted to the Office Store for publication are uploaded via the Microsoft Seller Dashboard. Microsoft then runs the verification process to ensure the app adheres to the content and behavior guidance previously identified. After the app is clear of all validation hurdles (a process that may take more than one iteration of the review process) Microsoft digitally signs the app package and places it into the public Office Store.
Part of the public app publishing process includes the ability to specify an app licensing scheme. The publisher can determine the price of the app (free, trial, or for purchase) and whether a license is per user or per site. SharePoint doesn’t actually enforce the licensing terms; this code is up to you. However, SharePoint does provide a licensing framework leveraging callbacks that you can take advantage of with custom code in your app to enforce your wanted licensing scheme.
Publishing to an App Catalog
As shown in the “Developing an Azure Auto-hosted App” section of Chapter 6, creating and publishing to an internal App Catalog is a trivial task for a SharePoint administrator (on premise or as a cloud tenant). Microsoft takes no responsibility for the quality of the code delivered to the internal app store. Code quality procedures are left up to the individual organization.
Table 7-1 compares the attributes of the Office Store and the App Catalog in a way that may help you decide which way to go. Microsoft’s recommendation is to understand the publishing direction before coding begins so that capabilities such as the licensing framework can be baked in versus ignored.
TABLE 7-1: Office Store and App Catalog Comparison
Table source http://msdn.microsoft.com/en-us/library/office/apps/jj164070.asp.
| OFFICE STORE | APP CATALOG |
| App is publically available. | App is available to users with access to this SharePoint deployment. |
| Licensing framework available. | Licensing framework is not available for use. |
| App package verified by Microsoft for technical and content adherence to policies. | App package verification performed by SharePoint when app is uploaded. |
| You must be signed up with Microsoft Seller Dashboard to upload apps. | No registration with Microsoft is required. |
DEVELOPING FOR APP UPGRADEABILITY
Microsoft applied a great deal of its experiences in mobile application stores when the app experience was designed. Chief among those lessons learned was the recognition of the need for a robust application update system. App designers need the ability to update an app, regardless of whether that update is to add new capabilities or to fix problems in existing capabilities. The centralized hosting model for apps makes app updates a much easier process than the distributed nature of web parts seen in past versions. Updates are essentially redeployments of existing apps, but the app update process ensures that app data hosted in SharePoint is preserved even if the app update fails.
Updating SharePoint Apps
SharePoint app manifests contain two important identifiers, a product ID and a version number. To update an app, ensure that the product ID remains constant and the version number increments. Adjust the functionality as wanted, and deploy the app package to the public or private app store it previously was deployed to.
After an app update is delivered to the app store, an update notification appears with the app in the Site Contents page of any site where the app is installed. In addition, tenant and farm administrators are notified of app updates in their respective administration UIs.
When a user clicks on a link to update an app, the app is installed again. The user is prompted to approve the changes along with approval of permissions required by the app (even if they do not change between versions). While the app is being upgraded, it is temporarily rendered inaccessible. Auto-hosted apps have the entire infrastructure (Azure websites and SQL Azure databases) locked for upgrade.
For custom upgrade logic, four hooks are available in the event that an upgrade must make changes to computed fields or other customizations:
- A data script may be added to an app package.
- PostDeployment scripts may be added to a DACPAC (a data-tier application schema package) that is run as part of a data application component upgrade.
- The upgrade process calls out to a PostUpdate web service, which is available for the developer to create and register inside of the app manifest.
- The app could contain some staging logic to ensure the proper changes have been made before normal execution of the app commences.
If an app leverages provider-hosted components, those components are not managed by SharePoint. It is easy to envision the upgrade process for those web components being kicked off by the PostUpdate web service.
App Migration
One scenario not directly supported by Microsoft is the app migration scenario, where the “update” of an app is actually the wholesale replacement of that app with entirely new components. In this case, a new Product ID must be specified inside of the app manifest, and any required data migrations must be handled by the app’s first run or by a remote service monitoring the feature installed event receiver via SharePoint’s remove event receiver framework.
ADDITIONAL CONSIDERATIONS FOR APPS DEVELOPERS
The following considerations can be important when developing apps:
- Recall that the CSOM grants access to the Site Collection and below; farm solutions are required for access to farm capabilities.
- Apps cannot directly communicate with each other because they are completely isolated from each other. This is similar to the way apps work on tablets and phones. An approach is to have the app have a footprint outside of SharePoint, such as in Azure. This external footprint could expose a web service such as a WCF service endpoint that could be the communication mechanism for one app to talk to another app. This is effectively like a proxy mechanism that gets around app isolation.
- Silverlight has not been officially deprecated and still works complete with access to the client object model. However, even Microsoft recognizes that JavaScript and HTML 5 reach the widest audience.
- DNS entries per app are not required. The recommendation is to create a wildcard DNS entry for a target app’s domain. Visual Studio can handle this for you.
- Apps can support their own authentication, meaning that they support windows auth or forms auth/claims auth based on the development targets.
- One consideration for app development that must be recognized is that no custom server-side code can be delivered to SharePoint, including custom server controls. All custom server-side code must be hosted outside of the SharePoint environment for apps. Server-side code is, of course, still a development target for on-premise developers. Web parts, timer jobs, and more are still valid approaches for SharePoint developers. The apps infrastructure was created to widen the field for developing business functionality, but Microsoft openly recognizes that the app framework will not meet every need.
- A remote event receiver is similar to standard event receivers, but the code runs in an external service. Remote event receivers can be tricky to develop, but they are available to apps, whereas normal event receivers are not.
KEY RECOMMENDATIONS
As this chapter draws to a close, several questions may arise:
- SharePoint developers with experience in previous versions will want to know when should traditional server-based solutions be used, if ever?
- What drives the choice for a SharePoint-hosted app versus a cloud-hosted app?
- What drives the choice for a provider-hosted app versus an Azure auto-hosted app?
The following sections answers these questions.
Decision Criteria for Cloud-hosted Apps Versus SharePoint-hosted Apps
Apps are clearly Microsoft’s definition of the future of SharePoint code. Sandboxed solutions have been deprecated in SharePoint 2013. With this deprecation, apps are the only option for users to add functionality in a self-service manner. The prevalence of the SharePoint Store and the corporate App Catalog will blur the lines between native capabilities and customizations in a way SharePoint hasn’t seen before.
When considering app hosting options, Table 7-2 defines some design recommendations to help developers choose between cloud versus SharePoint-hosted apps.
TABLE 7-2: Cloud and SharePoint Hosted Apps Comparison
| CLOUD-HOSTED APPS | SHAREPOINT-HOSTED APPS |
| The most flexible option, capable of supporting any type of app code | Best suited for smaller apps based on inline JavaScript code requirements |
| Offers developers the option to create their own infrastructure and to use any development technology | SharePoint-based JavaScript code, no server-side code of any sort |
| May require handling of Multitenancy and explicit permissions management | Inherits the Multitenancy capabilities and permissions of the page or site |
Decision Criteria for Developing Apps Versus Farm Solutions
The goal of this incredible investment and shift in approach to SharePoint development by Microsoft is clear. Microsoft wants developers to focus on apps as the preferred default choice in development approaches. The question then becomes, when should a developer turn to alternative, legacy development approaches such as farm solutions?
The generic advice from Microsoft is to develop an app whenever possible because apps offer a number of advantages over farm solutions:
- End users:
- Because of the SharePoint Store and Corporate Catalog, end users can find apps to be the easiest to discover, purchase, and install.
- Apps offer the write once, run almost everywhere promise of running equally well in on-premise environments, Office 365 environments, and possibly even Office client tools (as Agave apps).
- Administrators:
- Apps go beyond sandbox solutions in giving SharePoint administrators the safest way to extend SharePoint.
- Developers:
- Apps lower the bar for developer skills requirements and learning curves because they enable non-SharePoint programming skills.
- Apps are easier than farm solutions to build on top of cloud-based flexibility and scalability.
- Unlike farm solutions that tend to be written to either use the permissions of the logged in user or elevate to system-level permissions, apps can leverage the permissions of the installer because of the explicit OAuth permissions request approach.
- Apps enable developers to leverage cross-platform standards, including HTML, REST, OData, JavaScript, and OAuth.
- Companies:
- Compared to setting up a business to market and sell a SharePoint solution, apps are extremely easy to market and sell to the public via the Microsoft SharePoint Store. They maximize your flexibility in developing future upgrades.
Despite these advantages, there are also times when a business problem can be solved only with code executing on the server. When deciding between SharePoint Apps and SharePoint Solutions, there are several factors that can help you decide whether you should develop and app or a solution:
- Does the code require the server-side object model because of incomplete coverage by the CSOM? If so, farm solutions are the only option because sandbox solutions have been deprecated.
- Does the code require access to SharePoint objects outside of the site collection (SPSite) hosting the site (SPWeb) in which the app is running? If so, farm solutions are the only option.
- Is the code designed to assist an end user or an administrator? Administrative tasks are not available in the CSOM API and therefore must leverage the server-side OM in farm solutions.
- Is the code a standalone application or does it have inherent dependencies that require careful management of the platform, such as how the SharePoint Publishing Infrastructure requires content types, workflows, page elements, and other functional components to all be present for the entire business solution to work? If a complex set of interconnected functionality is required, farm solutions are the best choice because apps are by design isolated and independent.
Farm solutions are still the only answer to adding functionality to the SharePoint farm that must live inside of SharePoint. Service applications and timer jobs are clear examples of SharePoint functionality that does not belong in an app. Although, the technique of offloading work to a scalable cloud infrastructure works with the more traditional remote procedure calls of a server-side application. There are many reasons to turn to farm solutions only as a last resort, including:
- Farm solutions are available to all web applications on a server. (There’s no such thing as Multitenancy here!)
- Farm solutions are almost always deployed with full trust and as such offer no protections to stop bad code from overwhelming a server. A single misplaced while loop can bring a server to its knees.
- Farm solutions require administrative access to the server for installation and upgrade, requiring IT participation and outages. Enterprise IT shops take a dim view of this type of infrastructure management when more elegant options are available.
Sandbox solutions offer some improvements to these aforementioned problems, but they are not without issues of their own. Sandbox solutions are an attempt to create a self-service user management model for deployed code. Sandbox solutions even offer to protect the server from bad code with a built-in resource management capability. It is true that sandboxed solutions have been deprecated, but existing solutions may still be installed in SharePoint 2013. The deprecation status indicates that Microsoft recommends that new development efforts be directed toward apps instead of sandbox solutions. The reason for ending the life of sandbox solutions as a valid development target is related to a number of issues that cramp a sandbox solution’s capability to deliver true business value, including the following:
- No access to SharePoint.WebControls, which means that developers do not have access to native controls, including the SharePoint Ribbon. This significantly constrains a developer’s ability to create consistent user interfaces.
- Code can do only what the executing user can do. Unlike apps that require the installation user to have the requisite permissions, sandbox solutions operate as the current browsing user. This limits the capability for sandboxed code to hide back-end data stores.
- Sandboxed code can’t interact with SharePoint’s notification and messaging capabilities, including a complete inability to send e-mail with the configured SMTP server that works for all other SharePoint e-mail functionality.
- Sandbox solutions lack access to a number of core capabilities, such as access to SharePoint’s mapped folders (_layout), programmatic workflows, timer jobs, ADO.Net, and more.
SharePoint apps offer to solve a significant number of the problems previously listed.
- Where farm solutions are installed farmwide and are thus available to all web applications, apps are multitenant.
- App code cannot be installed on a SharePoint server farm; therefore, the full-trust scenarios are simply not a factor for apps.
- Apps are deployed to the corporate app store by IT, but after that registration process has been accomplished, IT is no longer a bottleneck in the installation and use of an app inside of a site.
- Apps enable access to a consistent SharePoint user experience because of the general shift to HTML-, CSS-, and JavaScript-powered user experiences.
- As previously mentioned, apps get past the sandbox solution’s inability to elevate privileges by leveraging the permissions available to the installing user, not the executing user. The use of OData permissions defined in an AppManifest.xml allows for an explicit definition of required permissions, which are acknowledged at the time of installation.
Unfortunately, there are some scenarios that will likely cause developers to ignore apps as the preferred development scenario. The first and foremost of these is that the CSOM is not as feature rich or as easy to work with as the server-side object model. SharePoint MVP Doug Ware has done an in-depth analysis of the available CSOM classes and compared these with the server-side OM. In Doug’s analysis, more than 6,800 properties and methods across 96 core classes were examined and found that the CSOM is missing approximately 4,000 members of the server-side OM. Doug is quick to point out that some of the difference is due to equivalent functionalities in the CSOM with different naming conventions, but the impression that the CSOM has less than full parity with the server-side OM is the obvious and correct deduction. Find the results of Doug’s investigation along with a downloadable Excel comparison of classes on his Elumenotion blog at http://www.elumenotion.com/Blog/Lists/Posts/Post.aspx?ID=159.
Table 7-3 describes approaches for developing apps first and farm solutions second.
TABLE 7-3: Overall Development Design Criteria
| FUNCTIONALITY NEED | SUGGESTED APPROACH |
| Custom web parts | Apps support remote pages with embedded web parts or the exposure of remote web applications in an app part. |
| Event receivers and feature receivers | Apps for SharePoint support the equivalent remote event receivers through CSOM. |
| Custom field types or list columns | Apps can create lists with columns based on existing fields, including the calculated and computed field types. Furthermore, creating an entirely custom grid or remote page gives developers even more explicit control. |
| Custom web services for SharePoint built on the service application framework | It is possible to create custom web services as remote services. |
| Application pages | Remote web pages are the way to go here. Expose remote pages through apps. |
| Custom site definitions | Farm solution only: No app approach is available. |
| Delegate controls | Farm solution only: No app approach is available. |
| Custom themes | Farm solution only: No app approach is available. |
| Custom action groups and custom action hiding (modifying the SharePoint Ribbon) | Farm solution only: No app approach is available. |
Decision Criteria for Developing Provider-hosted Versus Azure-hosted Apps
When approaching cloud-hosted apps’ development options, what exactly is the difference between developing for Azure and determining your own infrastructure in a provider-hosted app? The difference is the level of control you have in designing and defining the scalability of the solution. Azure abstracts all of this away from the developer, which is freeing at small scale but may be a problem at extremely large scales. At an extremely large scale, things such as CDNs, geographic distributions, and edge nodes become important to meet performance requirements. As a developer, you may not trust Azure’s auto-hosting to handle your specific needs as you scale past small-and-medium to web-and-super-web scales (50,000,000+ users).
SUMMARY
Where Chapter 6 introduces the major concepts of hosted apps, this chapter has focused on the surrounding development activities beyond the functionality of the app itself. Building a powerfully functional app is not very compelling to users if it doesn’t look attractive and easy to use. A powerful, attractive, and easy-to-use app is not very effective if it can’t be delivered to a SharePoint server for use. Finally, this chapter provides the reader with a number of decision-making criteria that help guide developers to the right hosting approach for their app.
The following chapters dive into the specialty capabilities of SharePoint, such as workflow, search, and web content management. Some truly exciting changes have occurred in each of these workloads, so keep reading!