Chapter 6
Sharing Documents for Fun and Profit
In This Chapter
![]() Taking advantage of multiuser sharing
Taking advantage of multiuser sharing
![]() Setting and changing permissions
Setting and changing permissions
![]() Sharing documents in Microsoft Office 2011 for the Mac
Sharing documents in Microsoft Office 2011 for the Mac
Now here’s a topic that any OS X power user can sink his teeth into — the idea that a document on a multiuser system can be everyone’s property, allowing anyone in your family, workgroup, or highly competitive mob to make whatever changes are necessary, whenever they like.
Of course, potential pitfalls lurk — even in the Apple world, there’s no such thing as an operating system that’s both powerful and perfectly simple. However, I think you’ll find that our dear friends from Cupertino have done just about as well as can be expected and that the settings that you use to share documents are fairly easy to understand.
Prepare to share!
Sharing over a Network versus Sharing on a Single Mac
First, allow me to clear up what I’ve found to be a common misconception by using another of Mark’s Maxims.
 Sharing documents on a single computer is fundamentally different from the file sharing you’ve used on a network.
True, multiple users can share a document over a network, which is a topic that I cover in Book VI. But although the results are the same, the way you share that same document on a single machine betwixt multiple users is a completely different turn of the screw. In this section, I discuss the factoids behind the matter.
 I’d be remiss if I didn’t mention the AirDrop feature in Yosemite, which allows many folks with Macs running Lion (or later) to transfer files wirelessly between their computers. AirDrop is easy and convenient to use, and I cover it in Book VI, Chapter 2. Likewise, you can also use Yosemite’s iCloud Drive feature to share files between Macs and iOS devices anywhere you have an Internet connection – Book V, Chapter 4, has all the details.
No network is required
Although reiterating that no network is required is seemingly the most obvious of statements, many otherwise knowledgeable OS X power users seem to forget that sharing a document over a network requires an active network connection. (Note the word active there.) Unless you physically copy the document to your hard drive — which defeats the purpose of document sharing — any loss of network connectivity or any problem with your network account results in a brick wall and a brightly painted (or flashing neon) sign reading, “No luck, Jack.”
On the other hand, a document shared on a multiuser Mac in the home or classroom is available whenever you need it. As long as the file is located in the Shared folder, the file privileges are set correctly, and you know the password (if one is required by the application, such as a password-protected Word document), you’re set to go, regardless of whether your network connection is active.
Relying on a guaranteed lock
Sharing documents over a network can get a tad hairy when multiple users open and edit a document simultaneously. Applications, such as Office 2011 for the Mac, have methods of locking a document (giving one person exclusive access) when someone opens it or saves it. However, you always face the possibility that what you’re seeing in a shared network document isn’t exactly what’s in the document at that moment.
A multiuser system doesn’t need such exquisite complexity. You’re the one sitting at the keyboard, and you have control: This is what network administrators call a guaranteed lock on that document file. Refreshing, isn’t it?
But wait! OS X Yosemite includes a feature called Fast User Switching — I discuss it in Book I, Chapter 2 — that allows other users to remain logged in behind the scenes while another user is at the keyboard. Therefore, if you enable Fast User Switching, two users could have the same document open at the same time on a single Mac. To prevent this, you can simply turn off Fast User Switching from the Users & Groups pane in System Preferences. (Click Users & Groups, click Login Options, and clear the Enable Fast User Switching check box.)
It’s also possible for someone to use Yosemite’s Remote Login feature to log in to his or her account across the Internet. You can disable this feature by opening the System Preferences window, clicking the Share icon, and deselecting the Remote Login check box.
Most places are off-limits
Network users are often confident that they can blithely copy and move a document from one place to another with the greatest of ease, and that’s true. Most shared network documents created by an application — such as a project outline created in Word, for example — carry their own sharing information and document settings internally. Thus, you can move that same file to another folder on your hard drive, and the rest of the network team can still open it — if they have the network rights to access the new folder, of course.
This isn’t the case when it comes to multiuser documents. As you can read in Chapters 4 and 5 of this minibook, OS X places a tight fence around a standard-level user, allowing that person to access only the contents of certain folders. In this case, your document must be placed in the Shared folder for every standard-level user to be able to open it. If everyone using the document has administrator access, you can store the file in other spots on your system; as long as the permissions are set, you’re set. And speaking of permissions … .
Permissions: Law Enforcement for Your Files
Files are shared in OS X according to a set of rules called permissions, the ownership of a file (typically the person who saved the document the first time), and an access level shared by multiple users who are specified as a group. The combination of privileges, ownership, and group determines who can do what with a file.
When you (or the person with the administrator account on your Mac) created your user account, you were automatically granted ownership of your Home folder (which appears in the Sidebar of every Finder window) and everything that it contains, as well as any files or folders that you store in the Shared folder or another user’s Public folder.
Four possible actions are allowed through permissions:
- Read Only: The user can open and read the file, which includes copying it to another location.
- Read & Write: This permission grants full access to the file, including opening, reading, editing, saving, and deleting. Read & Write permission also allows the user to copy or move the file to another location.
- Write Only (Drop Box): This tight permission setting appears only with a folder, allowing access to copy an item to the folder but not to see any files it contains. Hence the informal name Drop Box and the + (plus sign) icon added to the folder’s icon to identify it. For example, a Drop Box is made to order for teachers: Students can submit homework by dragging their work to the teacher’s Drop Box.
- No Access: This action is just what it sounds like: The user can’t open the file, copy it, or move it.
These permissions are set in the Info dialog or Inspector window for a file or folder (always accessible by pressing ![]() +I). If you’re setting the permissions for a folder, you can also elect to apply those same settings to all the enclosed items in the folder.
+I). If you’re setting the permissions for a folder, you can also elect to apply those same settings to all the enclosed items in the folder.
To set permissions, follow these steps:
- Click the item to select it, press
 +I (or choose Finder⇒File), and choose the Get Info menu item.
You can right-click the item and choose Get Info instead. Either way, OS X displays the Info dialog.
- Click the right-facing arrow next to the Sharing & Permissions heading to expand it, as shown in Figure 6-1.
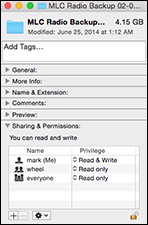
Figure 6-1: The Info dialog, expanded to show Sharing & Permissions.
- To change your own permissions on the item, click the Privilege list next to your name — handily marked “(Me)” as well — and choose a new Ownership permissions level.
This is likely set to Read & Write, and it’s a good idea to leave it alone. If you’re the file’s owner, you’re likely not a security risk.
 Perhaps I should be a little less tactful here: Never choose an access level for yourself other than Read & Write without being absolutely sure of what you’re doing because you could prevent yourself from accessing or deleting the file in the future! For example, if you simply want to lock an item to prevent changes being made, don’t set your Ownership permission to Read Only. Instead, select the Locked check box in the General section of the Info dialog instead. You can easily clear the Locked check box later to make changes to the item. If the Permissions fields in your Info dialog are disabled (they’re dimmed and can’t be clicked), the dialog is locked to prevent accidental changes. To unlock the dialog and make changes, click the tiny padlock icon at the lower-right corner of the Info dialog, type your user password, and then click OK. You can lock an Info dialog also by clicking the padlock icon again.
 - To change permissions for someone else or a group, click the Privilege value for that user or group and choose the appropriate value from the pop-up menu.
Assigning permissions for an entire group is a good idea for limiting specific files and folders to only administrator access. (Note, however, that Yosemite reserves the group name wheel — a term from the Unix world that encompasses all administrator accounts — for internal tasks, so never alter any permissions for a group originally created by OS X.)
- If necessary, set the permission for the Everyone pop-up menu (otherwise known as “I’m going to lump everyone else into this category”).
If a user isn’t the owner of an item and doesn’t fit into any group that you selected, this access permission setting for this file applies to that user.
Need to apply the same permissions to all the contents of a folder — including subfolders within it? Select a folder, click the Action button at the bottom of the Info dialog (which carries a gear icon), and choose Apply to Enclosed Items from the pop-up menu that appears. After you confirm the action, Yosemite automatically changes the permissions for all the items in the folder to the same settings. Generally, do not override the permissions for all the items in a folder, so use the Apply to Enclosed Items action only when necessary. - After all the permissions are correct, click the Close button to save your changes and return to your friendly Finder.
If a specific user or group doesn’t appear already in the Privilege list, click the Add button (bearing the plus sign), and you can add a specific privilege level for that user or group. You can also delete a privilege level: Click the desired entry to select it and click the Delete button (which bears a minus sign).
Permission and Sharing Do’s and Don’ts
After you get the basics of sharing files and assigning permissions under your belt, you need to master when to change permissions and why you should (and shouldn’t) modify them. Follow these commonsense guidelines when saving documents, assigning permissions, and choosing access levels:
- Do use the Shared folder. The Shared folder is the center of proper document sharing. I know there’s a strong urge to create a new document in your Home folder, but you’re just making more work for yourself because you’ll end up copying that document from your Home folder to the Shared folder. Instead of an extra step, store a document that’s intended to be shared in the Shared folder — where it belongs in the first place.
- Do review the contents of a folder before changing permissions for enclosed items. That confirmation dialog doesn’t appear just for kicks. For example, if you set a highly sensitive, private document with permissions of No Access for everyone but yourself and then you apply less-restrictive permissions globally to the folder that contains the document, you’ve just removed the No Access permissions, and anyone can open your dirty laundry hamper. (Ouch.) Therefore, make sure you open the folder and double-check its contents first before applying global permissions to the items it contains.
- Don’t assign permissions just to protect a file from deletion. If all you need to do is prevent anyone (including yourself) from deleting an item, you don’t need to go to all the trouble of changing permissions. Instead, just display the Info dialog for the item and select the Locked check box, which prevents the item from being deleted from the Trash until the Lock status is turned off (or you specifically click Remove All Items when emptying the Trash).
- Don’t change permissions in the Applications or Utilities folders. If you have administrator-level access, you can change the permissions for important applications such as Mail, Contacts, iTunes, and Safari, as well as their support files. This spells havoc for all users assigned to the standard-access level. Be polite and leave the permissions for these files alone.
- Definitely don’t change System ownership. OS X is stable and reliable. Part of that stability comes from the protected state of the System folder, as well as a number of other folders on your hard drive. If you display the Info dialog for the System folder, you’ll see that the Owner is set to system, and the Group is set to wheel. Now, promptly close that Info dialog, without making any changes!
- Never, never, never change any permissions for any files owned by the System (including items with wheel group permissions) unless specifically told to do so by an Apple support technician. Do not monkey with System-owned items.
This last one is quite striking for a reason, so heed the warning.
Sharing Stuff in Office 2011
Many OS X applications offer their own built-in document-sharing features. For example, Microsoft Office 2011 for the Mac includes both file-level and document-sharing features. Because Office 2011 is the most popular productivity suite available for OS X, I discuss these commands in this final section.
Document-sharing features
You’ll find a number of commands that help multiple users keep track of changes that have been made in a shared Office document. Probably the most familiar is the Word revision-tracking feature (heavily used during the development of this book), but there are others as well:
- Revision marks: If several users edit a document, you can tell who did what by using revision marks, which apply different colors to changes made by different editors. Later, those additions and deletions can be accepted or rejected individually. If Johnson in Marketing adds incorrect material, you can easily remove just his changes. In a worst-case scenario, you can reject all changes and return the document to its pristine condition.
- Compare Documents: Using this feature allows you to compare a revised document with the original (if, of course, you still have the original file handy). I use Compare Documents only if revision marks weren’t turned on before editing began.
- Comments: Editors can also converse in a document by using embedded Comments. These don’t change the contents of the Word file the way revision marks do, but store commentary and notes in a behind-the-scenes kind of way. (Think of an OS X sticky that appears in a document.) Again, the author of each comment is listed, allowing for (sometimes heated) communication in the body of a document.
- Highlighting: You’ve heard the old joke about … Well, anyway, a traditional highlighter marker is useless on a computer monitor (leaving a nasty mess for the next user to clean), but Word allows multiple highlighting colors for identifying text. (And for the occasional practical joke — nothing like adding eight different highlighting colors to that important proposal. Just make sure that your résumé is up to date.)
File-level sharing features
Along with the document-level sharing commands, you’ll find that Office 2011 applications also offer sharing features that control access to the document file itself.
Password protection
You can add password protection to any Office 2011 document. Follow these steps with a document created in Word, Excel, or PowerPoint:
- In the Office application, choose File⇒Save As.
- In the Save As dialog that appears, click Options to display the Save Preferences pane.
- Click the Show All toolbar button.
- Click Security to display the Preferences pane.
- To password-protect the document, enter a password in the Password to Open field.
 This password must be provided when opening the document.
If you like, you can enter another password in the Password to Modify field. This second password would then also be required to modify the document.
Both passwords are case-sensitive. - Click OK to save the preference changes and return to your document.
Document protection
Think of the Protect Document dialog in Word, from which you can effectively write-protect certain elements, as an extra level of security in a multiuser environment. In this Office application, you can protect revision marks, comments, and sections of a document containing forms. A password can be added if desired. To display the Protect Document dialog, click Tools in any of the Office 2011 applications and choose Protect Document from the menu.