
Chapter 2
Navigating and Running Programs
In This Chapter
![]() Restarting, sleeping, and shutting down OS X
Restarting, sleeping, and shutting down OS X
![]() Using windows
Using windows
![]() Using menus
Using menus
![]() Recognizing and selecting icons
Recognizing and selecting icons
![]() Using the keyboard
Using the keyboard
![]() Running applications
Running applications
![]() Switching between programs
Switching between programs
![]() Opening, saving, and quitting an application
Opening, saving, and quitting an application
As the folks in Cupertino will tell you, “It’s all about the graphics.” And they’re right, of course. OS X is a highly visual operating system, and using it without a mouse, trackball, or trackpad is like building Hoover Dam with a pocketknife. (And not a particularly sharp pocketknife, either.) Therefore, most of this chapter requires you to firmly grasp the little rodent, roll the ball, or finesse a trackpad. I introduce you to little graphical bits such as icons and menus, and you discover how to open windows that can display anything from the contents of a document to the contents of your hard drive.
On the other hand, any true Macintosh power user will tell you that the keyboard is still a useful piece of hardware. Because I want you to be a bona fide, well-rounded OS X power user, I also demonstrate the key combinations that can save you time, effort, and possible tennis elbow from all that mouse-wrangling.
Finally, I lead you through the basic training that you need to run your programs: how to start them, how to open and save documents, and how to quit an application as gracefully as Fred Astaire on his best day.
Restarting, Sleeping, and Shutting Down
First things first. As the guy on the rocket sled probably yelled, “This is neat, but how do you stop it?” Call ’em The Big Four — Sleep, Restart, Shut Down, and Log Out are the OS X commands that you use when you need to take care of business away from your computer. All four appear on the friendly Apple menu (![]() ) at the top-left corner of your Desktop (as shown in friendly Figure 2-1).
) at the top-left corner of your Desktop (as shown in friendly Figure 2-1).
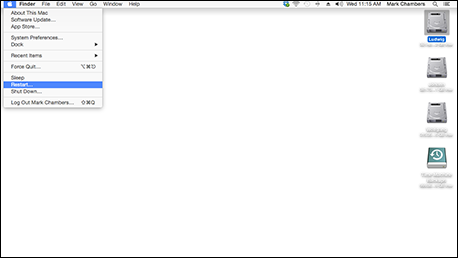
Figure 2-1: Choose your path from the Apple menu.
Each option produces a different reaction from your Mac:
- Sleep: You don’t need a glass of water or a bedtime story when you put OS X to Sleep, which is a power-saving mode that allows you to quickly return to your work later. (Waking your computer up from Sleep mode is much faster than booting or restarting it, and Sleep mode can conserve battery power on laptops.) Depending on the settings that you choose in System Preferences — which I discuss in Book II, Chapter 3 — your Mac can power-down the monitor and spin-down the hard drives to save wear and tear on your hardware. You can set OS X to automatically enter Sleep mode after a certain amount of mouse and keyboard inactivity.
To awaken your slumbering supercomputer, just click the mouse or press any key on the keyboard. MacBook owners can put their laptops to sleep by simply closing the computer; they can wake the beast by opening it back up again.
The Power Nap feature in Yosemite allows your recent-model Mac to take care of business, even while it’s in Sleep mode, because system updates are downloaded, iCloud Drive data and documents are synchronized, and Time Machine continues to back up your hard drive.
- Restart: Use Restart if your Mac has suddenly decided to work “outside the box” and begins acting strangely — for instance, if your Universal Serial Bus (USB) ports suddenly lock up, or your Thunderbolt external hard drive no longer responds. First save any work that’s open (unless your computer has locked up altogether). You also elect to restart OS X when you switch startup volumes or switch your Mac to a Windows partition using Boot Camp. (Some applications and Apple software updates require a restart after you install them.)
- Log Out: Choose the Log Out command (which you can find under the Apple menu,
 ) when you’re running your Mac with multiple users and you want to completely pass control over to another person. All your programs quit, and the other person can take over by logging in with his or her account. OS X then reconfigures with the other user’s preferences.
 - Shut Down: When you’re ready to return to the humdrum real world and you’re finished with your Mac for the time being, use the Shut Down option. Many Mac applications automatically prompt you to save any changes that you’ve made to open documents before the computer turns itself off. You can shut down OS X from the login screen as well.
 Besides the Apple menu (
![]() ) options, MacBook laptops have a Power key on the keyboard that you can press to display a dialog with Sleep, Restart, and Shut Down buttons. If you change your mind and decide to tie up loose ends before you leave, click the Cancel button to return to OS X.
) options, MacBook laptops have a Power key on the keyboard that you can press to display a dialog with Sleep, Restart, and Shut Down buttons. If you change your mind and decide to tie up loose ends before you leave, click the Cancel button to return to OS X.
The Resume feature comes into play when you log out, restart, or shut down your Mac. Select the Reopen Windows When Logging Back In check box (as shown in Figure 2-2), and Yosemite automatically restores the state of your Desktop the next time you turn on your Mac, including all your open windows and selections! Resume also works with individual applications. For example, when you quit Preview, Yosemite saves the current state of that application’s workspace. When you launch Preview again, it displays the windows you were viewing, documents and all. (Note that an application has to be written specifically to support Resume.)
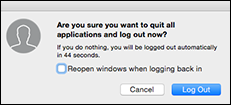
Figure 2-2: Yosemite can reopen your windows for you.
If your keyboard includes a Drive Eject key (which you use to load and eject discs), you can press it while holding down the Control key to display the same options.
A Window Is Much More Than a Frame: Navigating Windows
“And in the beginning, there was the window.” Like with older Mac OSes, most of what you’ll do in OS X occurs within these fancy frames. And, as you might imagine, a number of controls are at your disposal, which you can use to control the size, shape, and appearance of these potent portals. In this section, I — well, to be blunt, I do windows. (No squeegee jokes, if you please.)
Opening and closing windows
Windows are generally opened automatically by an application when you first run it, or it needs to display a document, or by OS X itself, such as when Finder opens a window to display the contents of your hard drive. Finder, by the way, is the “foundation” application that OS X Yosemite runs to display the OS X menus and windows.
Some programs even let you open new windows on the fly; for example, Figure 2-3 shows a window in its purest form: a new Finder window. To display this window on your own Mac, choose File⇒New Finder Window, click the Finder icon in the Dock, or press ![]() +N. From here, you can reach your files on your Mac or even venture to the Internet.
+N. From here, you can reach your files on your Mac or even venture to the Internet.
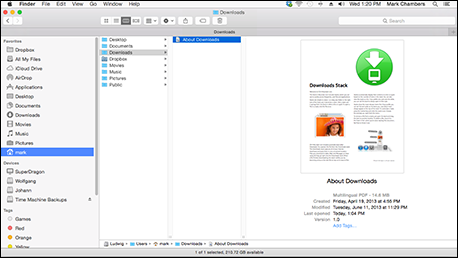
Figure 2-3: You’re ready to navigate with this Finder window.
The Command (![]() ) key usually has both an Apple (
) key usually has both an Apple (![]() ) and a rather strange-looking symbol on it that I often call the Spirograph. (I’m told others have called it rather Celtic, but it’s actually a Scandinavian character.)
) and a rather strange-looking symbol on it that I often call the Spirograph. (I’m told others have called it rather Celtic, but it’s actually a Scandinavian character.)
When you’re finished with a document or you no longer need a window open, close it to free that space on your Desktop. To close a window in OS X, move your pointer over the Close button; it’s the first of the three circular buttons at the top-left corner of the window (refer to Figure 2-3). An X appears on the button when you’re in the zone. When the X appears, just click.
 If you’ve been living the life of a hermit for the last two decades or so, pressing the left mouse button is called clicking. In the modern Apple universe, a Magic Mouse has no visible buttons, and neither do current MacBook trackpads (nor the Magic Trackpad)! (You tap the top of the mouse or the trackpad surface with one finger to click.)
 If your Mac is equipped with a Magic Trackpad (like mine), never use any object other than your finger on the trackpad! That means no pencils (no, not even the eraser end), pens, or chopsticks; they can damage your trackpad in no time at all. And no, that doesn’t bode well for ladies with long fingernails.
Most Mac applications don’t want you closing a window willy-nilly if you’ve changed the contents without saving them. For example, try to close a document window in Word without saving the file first. The program asks you for confirmation before it closes the window containing your Great American Novel. Most programs also have a Close command on their File menu. (Here’s another indicator: Most programs display a black dot in the center of the program’s Close button to indicate that there are unsaved changes.)
To close all windows displayed by a particular program, hold down the Option key while you click the Close button on one of the windows. Whoosh! They’re all gone.
Scrolling windows
Often, more stuff is in a document or more files are on your hard drive than you can see in the space available for a window. Guess that means it’s time to delete stuff. No, no, just joking! You don’t have to take such drastic measures to see more in a window.
Just use the scroll bars that you see in Figure 2-4 to move through the contents of the window. By default, scroll bars don’t appear until you move your pointer close to them. You click the scroll box and drag it. For the uninitiated, that means clicking the darker portion of the bar and holding down the mouse button while you move the mouse in the desired direction. (Or, with a trackpad, drag two fingers in the desired direction.) Alternatively, you can click in the empty area above or below the scroll box to scroll pages one at a time.
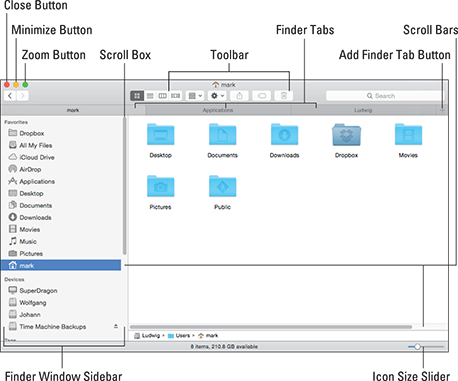
Figure 2-4: You can use the scroll bars to boldly go — well — anywhere in a window.
Depending on the type of application that you’re using, you might be able to scroll a window with your arrow keys as well — or perhaps use the Page Up and Page Down keys to move through a window.
Minimizing and restoring windows
The multitalented Figure 2-4 also displays another control that you can use with a window: the Minimize button. When you minimize a window, you eliminate it from your Desktop and store it safely on the Dock — that strip of icons that appears along the bottom (or the side) of your OS X Desktop. A minimized window appears as a miniature icon on the Dock by default, so you can keep an eye on it (so to speak). Figure 2-5 illustrates a minimized window from Safari, which is displaying my website at www.mlcbooks.com. To minimize a window, move your mouse pointer over the second of the three buttons at the top-left corner of the window — a minus sign appears on the Minimize button — and click.

Figure 2-5: A minimized web page on the Dock.
You’re gonna love this “Easter egg” hidden in OS X. If you hold down the Shift key while you minimize, the window shrinks in cool slow motion. (Who says operating systems have to be totally serious, anyway?)
When you’re ready to display the window again on your Desktop — restoring the window — simply click the thumbnail icon representing the window on the Dock, and OS X automagically returns it to its former size and location.
By the way, some — note that I said some — applications continue to run when minimized, whereas others simply stop or pause until you return them to the Desktop. Such is the crazy world we live in.
Zooming windows
Zooming windows has a kind of Flash Gordon sound to it, don’t you think? It’s nothing quite that exciting — no red tights or laser guns — still, when you’re trying to view a larger portion of a document, zooming is a good thing because it does one of these things:
- It switches the application to full-screen mode.
- It expands the window to the maximum practical size for the application you’re using (and the content being displayed). The application expands to the window to show as much content as possible (without any unnecessary white space).
The Zoom/Full-Screen button can even be disabled by an application that doesn’t want you to muck about with the window; for example, I own some games that don’t allow zooming, and the System Preferences window has a disabled Zoom/Full-Screen button.
To zoom a window, move your pointer over the third button at the top-left corner of the window. Again, refer to Figure 2-4 (in the preceding section), which struts its stuff and illustrates the position. (Man, that is one versatile figure.) A double-arrow icon appears on the Zoom/Full-Screen button. Click to expand your horizons to full-screen, or hold down the Option key while clicking to zoom the window to maximum size.
After you finish with a zoomed window, return it to its previous dimensions by clicking the Zoom button again. To exit full-screen mode, press Esc.
Those hard-working toolbars
If you’re wondering what those tiny icons are at the top of many OS X application windows, I won’t leave you in suspense: They’re called toolbar buttons. A toolbar is a strip of icons in a window (usually across the top) that you click to perform common commands, such as changing the display format or printing the current document. (The Finder window toolbar in Figure 2-4, for example, features icons to move Back and Forward, among others.) You encounter more toolbar technology throughout the book.
Most windows that include a toolbar also include some method of hiding the toolbar (to save screen real estate for your document). For example, you can toggle the display of the toolbar on and off in a Finder window from the View menu, or you can use the convenient ![]() +Option+T key shortcut to toggle the toolbar display on and off.
+Option+T key shortcut to toggle the toolbar display on and off.
Moving windows
In contrast to the rather permanent windows in your home, you can cart a window to another portion of the Desktop. Typically, you do this when you’re using more than one application and you need to see the contents of multiple windows. To grab a window and make off with it, click the window’s title bar — the strip at the top of the window that usually bears a document or application name — and drag the window to the new location. Then release the mouse button to plant the window firmly in the new location.
By the way, some applications allow you to arrange multiple windows in a graceful swoop with a single click of a menu. Open the Window menu, and choose Arrange All to perform this magic.
I talk about Mission Control and Spaces later, in the section “Switching ’Twixt Programs with Aplomb.” Mission Control helps you organize a large number of open windows on your Desktop. You can use it to display all open application windows so you can pick the one you want or display all the windows opened by a specific application. Another Mission Control feature — Spaces — allows you to create custom virtual desktops. (Truly cool.) Each of your Spaces desktops can contain a different set of application windows that you use for different tasks!
Resizing windows
Next, consider how to change the width or height of your window. To change the dimensions of a window to your exact specifications, move your pointer over any edge of the window and then click and hold down the button to drag until the window is the size that you prefer.
Switching windows
Before I move on to other graphical wonders of OS X, it’s important that you master how to switch between windows on your Desktop. First, remember this old Norwegian saying (or is it one of Mark’s Maxims?):
 Only one can be active at one time.
What our Oslo friends are communicating is that only one window can be active at any time. The active window appears on top of other windows, and it’s the one that you can edit by typing or by moving your mouse. (It also sports colored/darkened Close, Minimize, and Zoom/Full-Screen buttons, or it fills the entire screen if you’re working in full-screen mode.) Other windows you have opened might be minimized, as I describe earlier in the section, “Minimizing and restoring windows,” or they can be inactive (mere ghosts of themselves) and remain on your Desktop. OS X dims the controls for inactive windows so you can tell they’re hanging around but can’t be used at the moment. (Note that both active and inactive windows can contain Finder Tabs, which I discuss in the upcoming sidebar.) Figure 2-6 illustrates a number of open windows, with the iTunes window active.

Figure 2-6: Many are open, but only one is active.
I know you’re going to get tired of hearing me say this, but here I go again: Certain applications, such as iTunes and File Transfer Protocol (FTP) clients, continue to run while their windows are inactive. Some programs, however, stop or pause until you make their window active.
And how do you switch to — activate — a different window in OS X? Again, Mission Control allows you to activate another window, but if the window is currently visible, you can simply click any part of that window. I generally click the window’s title bar if it’s visible, but any part of the inactive window will do. (You can also right-click the application’s icon on the Dock and choose the desired window from the menu.) The window you click leaps like a proud stallion to the fore, and the previously active window now skulks in the background.
You can still use a window’s Close, Minimize, and Zoom buttons even when the window is inactive.
Menu Mysteries Explained
Next, I move on to menu control in OS X. Menus are handy drop-down controls that allow you to select commands that are grouped logically. For example, an application’s File menu usually allows you to create or open a document, save a document to disk, or print a document. To open a menu, click the desired menu group name on the bar at the top of the screen and then click the desired menu option from the extended menu.
Figure 2-7 illustrates the Safari menu. Submenus are designated by right-arrow icons. When you move your mouse pointer over a submenu command, you get another set of even more specific menu commands. In this case, the Services submenu command displays commands, such as Make New Sticky Note and Look Up in Dictionary.
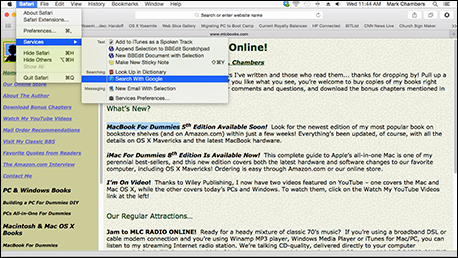
Figure 2-7: Drilling deeper into Safari’s Services menu.
Some applications allow you to create your own custom menus. Although configuring a new menu system takes some time to figure out, imagine the productivity gains you’ll enjoy! Custom menus are sleeker and easier to navigate. (However, you have to stop short of claiming that you wrote the application. Software developers get downright snippy about it.)
OS X also provides another type of menu: contextual. A contextual (or right-click, or shortcut) menu appears when you right-click certain items, revealing commands that relate specifically to those items. (Unfortunately, the items that sport contextual menus vary from application to application, so check the program’s documentation before you spend countless hours right-clicking everything onscreen.) The same items in the right-click menu appear when you select an item and then click the Action pop-up menu, which looks like a mechanical gear. You can also hold down the Control key while clicking an item to display the contextual menu (or tap it with two fingers, if you’re using a trackpad).
Most manufacturers sell mice, trackballs, and other pointing things that include a secondary mouse button. And Button Number 2 is oft-called the “right-click button.” Generally, if you have a pointing device with multiple buttons, the device displays contextual menus when you click the secondary button. Then again, you might launch Aunt Harriet into a geosynchronous orbit, so double-check the manual for your pointing thing on the default button assignment (and how to change it, if necessary). Note that you can set the behavior of the right button in the corresponding System Preferences pane (usually Mouse or Trackpad).
Many commands in menus have keyboard shortcuts. Because I hold forth on this subject in the upcoming section, “Keyboard Shortcuts for the True Power User,” I hold off describing those shortcuts here.
Icons ’R Us
Icons are more than little pictures. They’re, well, … I guess they’re little pictures. However, these graphical WUDs (that’s short for Wonderful User Devices) are really representations of the components of your OS X system, and therefore they deserve a section of their own.
For complete details on any icon, click it once to highlight it and press ![]() +I. This displays an Info window like that in Figure 2-8, which tells you what kind of icon it is, where the item it represents is located, and how big it is. You also see a version number for applications — a handy way of quickly checking the version of a program you’re running — and when the file was created and last modified. The Info window also offers other settings and options that you can display by clicking in the General section. (I cover them in other parts of the book.)
+I. This displays an Info window like that in Figure 2-8, which tells you what kind of icon it is, where the item it represents is located, and how big it is. You also see a version number for applications — a handy way of quickly checking the version of a program you’re running — and when the file was created and last modified. The Info window also offers other settings and options that you can display by clicking in the General section. (I cover them in other parts of the book.)

Figure 2-8: The Info window provides the complete lowdown on a Mac application.
Hardware
OS X uses icons to represent the various hardware devices of your computer, including the following:
- Hard drive
- External hard drive
- DVD drive (if a disc is loaded)
- iPod
You get the idea. Just double-click a hardware icon to display the folders and files that it contains, as you do with your hard drive and a disc loaded in your DVD drive.
Generally, you encounter hardware icons only on your Desktop, in Finder windows, or in a device list or source list in applications such as iTunes and iPhoto. Figure 2-9 illustrates some of the hardware icons that live in my system.
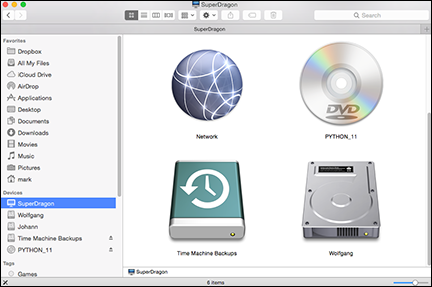
Figure 2-9: A wealth of different hardware icons.
Programs and applications
Program and application icons are the fancy ones, folks. Most applications have their own custom icons, and double-clicking one typically whisks you on your way. OS X also includes a generic icon or two for applications that don’t include their own custom icon. Figure 2-10 illustrates a number of my favorite program icons from all sorts of OS X applications.
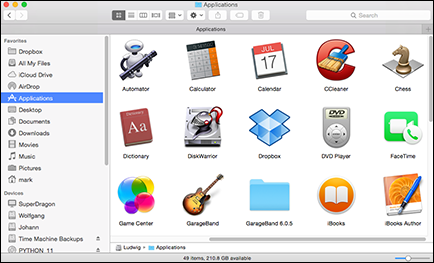
Figure 2-10: Most Yosemite applications are represented by custom icons.
Running a program in OS X can be as simple as double-clicking the application icon — more on this later, in the section “Houston, We’re Go to Launch Programs.”
Files
Your internal, external, and iCloud drives contain many thousands of individual files, and the Big X tries to make it as easy as possible to visually identify which application owns which file. Therefore, most applications use a special icon to indicate their data files. For example, Figure 2-11 illustrates several documents and data files created by a range of applications. Some cheeky applications even use more than one icon to differentiate among different file types, such as documents and templates in Microsoft Word.
A number of generic file icons indicate text files, including RTF (Rich Text Format) documents and PDF (Portable Document Format) documents, which use the Adobe Acrobat format.
You can open most documents and data files by double-clicking them, which automatically launches the proper application and loads the document.
I also recommend using the Quick Look feature for a lightning-fast peek at the contents of a file. Click the file once in a Finder window (or even an application’s Open File dialog) to select it; then press the spacebar to view the document — all without opening any applications!
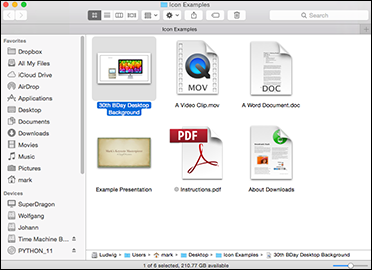
Figure 2-11: File icons generally give you a visual clue about their origin.
Folders
Folders have a 3D look in OS X — some applications even customize their folder icon.
Major system folders — including Applications, Library, System, Users, Downloads, and Utilities — sport distinctive folder icons in Yosemite that help identify their contents.
To open a folder in OS X, just double-click the folder. (Alternatively, you can click it once to select it and press ![]() +O.) Discover more about how to control the look of folder icons in Book II, Chapter 1.
+O.) Discover more about how to control the look of folder icons in Book II, Chapter 1.
Aliases
Essentially, an alias is a link to something else on your system. For example, an Adobe Photoshop alias can run Photoshop just as the program icon can, but the alias takes up only a scant few bytes on your hard drive. (If you’re a switcher who’s just crossed over from the Windows Wilderness, think shortcut.) The alias file yells at OS X: “Hey, the human wants you to run this or open that thing over there!”
An alias is a strange beast. Although it might look like a standard icon, upon closer examination, you’ll notice that an alias icon sports a tiny curved arrow at the base. (In addition, the word alias often appears at the end of the icon name.) Figure 2-12 has roped in a variety of aliases for your enjoyment.
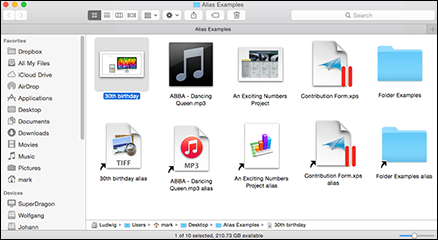
Figure 2-12: An alias is a pointer to another application, file, or folder.
Aliases come in handy for a number of reasons:
- They allow you to launch applications and open files and folders from anywhere in your system. For example, you might want an alias icon in your MP3 folder that runs the DVD-burning application Toast. With an alias icon, you can launch Toast and burn a data DVD without using Launchpad.
- They can be easily deleted when no longer needed without wreaking havoc on the original application, file, or folder. If you decide that you’d rather use iTunes to burn audio CDs, you can simply delete the Toast alias without trashing Toast itself.
- Their tiny size allows you to add multiple aliases (and mucho convenience) for a single application without gulping down hard drive space.
 You might be wondering, “Why use aliases when I can just copy the actual application, file, or folder to the desired spot?” Well, indeed you can do that. However, the application might not work in its new location because you didn’t copy the supporting files that most applications need to run. (An alias runs the original application or opens the original file or folder, so things should work just as if you’d double-clicked the original icon.) Additionally, remember that copying applications willy-nilly throughout your hard drive eats up territory like a horde of angry Vikings. (Oh, and if the developer releases an update to the application, you’d have to manually track down and individually update all those copies. No, thank you!)
If you dislike the word alias hanging off the end of the icon name, feel free to rename it (as I show you in Chapter 3 of this minibook). The alias continues to function nicely no matter what moniker you give it. (If you create an alias by holding down ![]() +Option whilst dragging the original icon to a new location, the alias name won’t include the alias appendage.)
+Option whilst dragging the original icon to a new location, the alias name won’t include the alias appendage.)
If the original file no longer exists, its alias no longer works either. However, OS X is sharp enough to automatically “fix” an alias if you rename or move the original file, pointing the alias to the new location (as long as the original file remains on the same volume). Slick!
Selecting Icons for Fun and Profit
You’ll often find yourself performing different actions on one icon — or a number of icons at one time. For example, you can copy or move files from one location on your hard drive to another or delete a group of files that you no longer need. (The idea of drag-and-drop file management using icons originated on the Mac, but I wait until Chapter 3 of this minibook to describe these operations in detail.) In this section, I focus on the basics of selecting one or more icons to specify the files and folders you want to use for whatever you’re going to do next.
Selecting a single icon
First, here are the various ways that you can select a single icon for an impending action:
- Place your pointer over the file, and click once. OS X darkens the icon to indicate that it’s selected — a mysterious process called highlighting.
- Type the first few letters of the icon’s name. After you type a letter, OS X highlights the first icon that matches that character.
- If an icon in a window is already highlighted, you can move the highlight to the next icon across by pressing the right-arrow key. Likewise, the other three directional arrow keys move the highlight in the other directions. To move through the icons alphabetically, press Tab to go forward and Shift+Tab to go backward.
Selecting multiple icons
To select a gaggle of icons for an action, use one of these methods:
- Contiguous: If the icons are next to each other, click and drag in a window (and not directly on a specific item) to highlight them all. As you drag, OS X displays a selection box, and any icons you touch with that box are highlighted when you release the button (as shown in Figure 2-13). Think “lasso,” and you’ll get the picture.
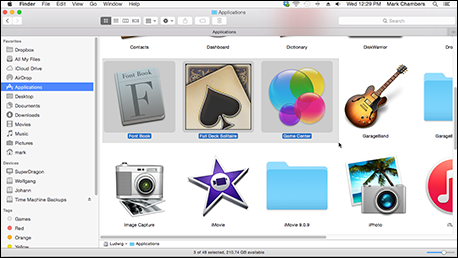
Figure 2-13: Dragging a selection box in OS X.
You can also select multiple adjacent icons by clicking the first item to highlight it and holding down the Shift key while clicking the last icon in the series that you want to select.
- Noncontiguous: If the icons are not next to each other, you can hold down the
 key while you click each item that you want to select.
Just selecting an icon doesn’t launch or do anything. You’re just marking your territory.
Keyboard Shortcuts for the True Power User
Virtually all OS X applications have their own keyboard shortcuts — a ten-cent term for a key combination that performs the same operation as a menu command or a toolbar button. Although the mouse or trackpad might seem the easier path when controlling your Mac, it’s not always the fastest. Those hardy souls who venture to learn common keyboard shortcuts can zip through a spreadsheet or warp through a complex outline at speeds that no mere rodent-wrangler could ever hope to attain.
With that in mind — and with the goal of “pumping you up” into a power user — I hereby present the most common keyboard shortcuts for the Big X in Table 2-1. I’ve also sprinkled other keyboard shortcuts liberally through the book when I discuss other applications, but these combinations are the classics that appear virtually everywhere.
Table 2-1 Common OS X Keyboard Shortcuts
|
Combination Key |
Location |
Action |
|
|
Edit menu |
Selects all (works in Finder, too) |
|
|
Edit menu |
Copies the highlighted item to the Clipboard |
|
|
Application menu |
Hides the application |
|
|
Window menu |
Minimizes the active window to the Dock (works in Finder, too) |
|
|
File menu |
Opens an existing document, file, or folder (works in Finder, too) |
|
|
File menu |
Prints the current document |
|
|
Application menu |
Exits the application |
|
|
File menu |
Opens a new Finder Tab with the currently selected location |
|
|
Edit menu |
Pastes the contents of the Clipboard at the current cursor position |
|
|
Edit menu |
Cuts the highlighted item to the Clipboard |
|
|
Edit menu |
Reverses the effect of the last action you took |
|
|
Help menu |
Displays the Help system (works in Finder, too) |
|
|
Finder |
Switches between open applications |
|
|
Finder |
Switches between open windows in the current application |
|
|
Finder |
Minimizes all Finder windows to the Dock |
|
|
Finder |
Closes all Finder windows |
By the way, I should mention that many keyboard combinations use three keys instead of just two (and a few even use four). When these shortcuts appear in a menu, they look something akin to Egyptian hieroglyphics, but you need hold down only the first two keys simultaneously and press the third key. Common “strange” key symbols that you’ll see in both Finder and most applications are shown in Table 2-2.
Table 2-2 Arcane Key Symbols
|
Key |
Symbol |
|
Control |
|
|
Command |
|
|
Del |
|
|
Option |
|
|
Shift |
|
Houston, We’re Go to Launch Programs
The next stop on your introductory tour of OS X is the starting point for your applications. Although Finder is useful, you’ll likely want to actually do something with your Mac as well.
Starting applications from your drives
You can launch an application from your internal or external drives by doing any of the following:
- Click the Launchpad icon on the Dock (it’s the second one by default, just to the right of the Finder icon) to display all your application icons in a full-screen display. If you have more than one screen (or page) worth of applications, press the arrow keys to move between Launchpad pages. With a Magic Trackpad or Magic Mouse, swipe two fingers to the left or right. To launch an application, just click the icon. Figure 2-14 illustrates Launchpad in action. (If you’re a proud owner of an iPhone, iPad, or iPod touch, you’ll be familiar with Launchpad already because it corresponds directly to the Home screen on those devices.)
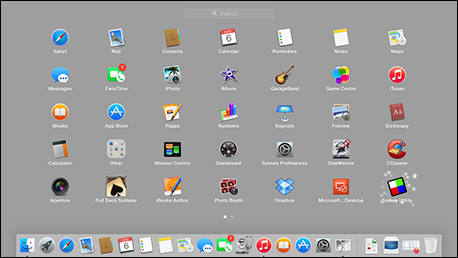
Figure 2-14: Launchpad is my favorite method of launching applications in Yosemite.
- Navigate to the corresponding application folder — by either clicking or double-clicking drive and folder icons — and double-click the application icon.
- Double-click a document or data file that’s owned by the application. For example, double-clicking an MP3 audio file runs iTunes.
- Double-click an alias you’ve created for the application. (Get the skinny on aliases in the earlier section, “Aliases.” I’ll wait.)
- Click the application’s icon on the Dock (more on adding items to the Dock in Book II, Chapter 2).
- Select the application icon, and press the +O keyboard shortcut.
- Add the application to your Login Items list. (I cover the Login Items list in more detail in Book II, Chapter 3.)
You can open documents directly from Yosemite’s new Internet-based iCloud Drive as well — naturally, you need an active Internet connection to access iCloud Drive. To display the contents of your iCloud Drive, open a Finder window and click the iCloud Drive entry in the Sidebar at the left of the window. Figure 2-15 illustrates the contents of my iCloud Drive. To open a document or an application, just double-click it as usual.
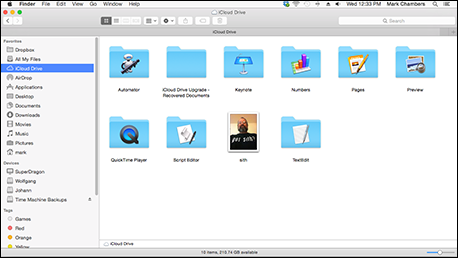
Figure 2-15: The Finder window can display your iCloud Drive.
Running applications from a CD-ROM or DVD-ROM
After you load a CD-ROM or DVD-ROM, you can display its contents by double-clicking the disc icon that appears on your Desktop. A Finder window opens and shows the files that reside on the disc.
After you locate the application you want to run on the disc (or the document you want to load), you can launch it by double-clicking it, or by selecting it and pressing ![]() +O.
+O.
Switching ’Twixt Programs with Aplomb
You might think that juggling multiple applications leads to confusion, fatigue, and dry mouth, but luckily OS X includes a number of features that make it easy to jump between programs that are running on your Mac. Use any of these methods to move from open application to application:
- Click anywhere in the desired window to make it the active window.
- Click the application icon on the Dock. All applications that are running have an icon on the Dock. Depending on the Dock settings in System Preferences, the icon may also have a shiny dot below it to indicate that the application is open.
- Press +Tab to switch between applications. Yosemite’s application switcher is convenient, but if you have a dozen windows open, this method can get a bit tedious.
For those power users who often work with a passel of applications, allow me to turn your attention to one of the sassiest features in Yosemite: Mission Control. Figure 2-16 shows off the Mission Control screen.

Figure 2-16: Mission Control is the desktop manager in Yosemite.
- Press F3 (or Control+↑, depending on your keyboard) to show all open windows using Mission Control, grouped by application; then click the one you want. Figure 2-16 illustrates the tiled All Windows display on my Mac after I press F3. Move the pointer on top of the window you want to activate — the window turns blue when it’s selected — and click once to switch to that window. You can specify which keys you want to use in the Mission Control pane in System Preferences.
- Press Ctrl+F3 (or Control+↓, depending on your keyboard) to show all open windows from the application that you’re currently using; click the one you want to activate. This Mission Control function is great for choosing from all the images you’ve opened in Photoshop or all the Safari web pages populating your Desktop!
Astute observers will notice that the application menu bar also changes to match the now-active application.
Besides the F3 and Control+F3 hot keys that I just discussed, Mission Control provides one more nifty function: Press ![]() +F3, and all your open windows scurry to the side of the screen. Now you can work with drives, files, and aliases on your Desktop — and when you’re ready to confront those dozen application windows again, just press the keyboard shortcut a second time.
+F3, and all your open windows scurry to the side of the screen. Now you can work with drives, files, and aliases on your Desktop — and when you’re ready to confront those dozen application windows again, just press the keyboard shortcut a second time.
Although the Mission Control screen appears automatically when necessary, you can launch it at any time from your Mac’s Launchpad display or by pressing the Mission Control key on your keyboard. If you’re using a trackpad, display the Mission Control screen by swiping up with three fingers.
Ah, but what if you want to switch to a different set of applications? For example, suppose that you’re slaving away at your pixel-pushing job — say, designing a magazine cover with Pages. Your page design desktop also includes Photoshop and Aperture, which you switch between often using one of the techniques I just described. Suddenly, however, you realize you need to schedule a meeting with others in your office, using Calendar, and you want to check your email in Apple Mail. What to do?
Well, you could certainly open Launchpad and launch those two applications on top of your graphics applications and then minimize or close them. But with Mission Control’s Spaces feature, you can press the Control+← or Control+→ sequences to switch to a different “communications” Desktop, with Calendar and Apple Mail windows already open and in your favorite positions! Figure 2-16 illustrates multiple Spaces Desktops at the top of the Mission Control screen.
When you’ve finished setting up your meeting and answering any important email, simply press Control+← or Control+→ again to switch back to your “graphics” Desktop, where all your work is exactly as you left it! (And yes, Virginia, Spaces does indeed work with full-screen applications.)
Now imagine that you’ve also created a custom “music” Desktop for GarageBand and iTunes, or perhaps you paired Photoshop Elements and iPhoto together as a “graphics” Desktop. See why everyone’s so thrilled with Yosemite? (Let’s see Windows 8 do that out of the box.)
To create a new Desktop for use in Spaces, click the Launchpad icon on the Dock and then click the Mission Control icon. Now you can set up new Spaces Desktops. Move your pointer to the top right of the Mission Control screen, and click the Add button (with the plus sign) that appears. (If you’ve relocated your Dock to the right side of the screen, the Add button shows up in the upper-left corner instead.) Spaces creates a new empty Desktop thumbnail. Switch to the new Desktop by clicking the thumbnail at the top of the Mission Control screen, and then open those applications you want to include. (Alternatively, you can drag the applications from Mission Control onto the desired Desktop thumbnail.) That’s all there is to it!
To switch an application window between Spaces Desktops, drag the window to the edge of the Desktop and hold it there. Spaces automatically moves the window to the next Desktop. (Applications can also be dragged between Desktops within the Mission Control screen.) You can also delete a Desktop from the Mission Control screen. Just hover your pointer over the offending Spaces thumbnail, and click the Delete button (with the X) that appears.
You can jump directly to a specific Spaces Desktop by clicking its thumbnail in your Mission Control screen or by holding down the Control key and pressing the number corresponding to that desktop. Finally, you can always use the Control+← or Control+→ shortcuts to move between Desktops and full-screen applications.
Opening and Saving Your Stuff in an Application
Almost all OS X applications open and save documents in the same way, whether you’re creating a presentation with Keynote or expressing your cinematic side with iMovie. Therefore, I take a moment to outline the common procedures for opening and saving documents. Believe me, you’ll perform these two rituals dozens of times a week, so no nodding off.
Opening a document
First, the simple way to load a document: Double-click that document in a Finder window, and … well, that’s it. (This is my preferred method because I’m an ALT — short for Admitted Lazy Techno-wizard — who would rather use complex hand movements to pour myself another Diet Coke.)
To open a document the hard way — from inside an application — here’s the plan:
- Choose File⇒Open, or press that handy +O key combination.
Your OS X program is likely to display the attractive Open dialog that you see in Figure 2-17.
You can also open files that have been saved to your iCloud Drive directly from the Open dialog; click the iCloud Drive heading in the Sidebar at the left side of the Open dialog to display documents in your Drive that you can open in this application. (Many applications also include a named folder in your iCloud Drive, making it easier to work with files under both Yosemite and iOS 8 devices.) Figure 2-17 illustrates the iCloud Drive face of the Open dialog. - Navigate to the location of the document you want to open.
The pop-up menu allows you to jump directly to common locations — such as the Desktop, your Home folder, and your Documents folder — as well as places that you’ve recently accessed (Recent Places).
If the target folder isn’t in your pop-up menu, it’s time to use the Open dialog Sidebar, where your hard drives, DVD drives, and network locations hang out.
You can quickly locate a document by clicking in the Search box at the upper right of the Open dialog and typing a portion of the filename or a phrase contained in the document.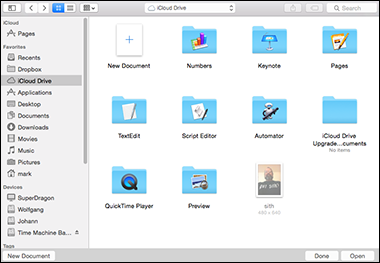
Figure 2-17: The soon-to-be-quite-familiar Open dialog.
- Click the habitat where the file will be found.
If you’re using Column view, you’ll note that the right column(s) changes to show you the contents of the item you just clicked. In this way, you can cruise through successive folders to find that elusive document. (This time-consuming process is derisively called “drilling,” hence, the importance of using Recent Items, or dragging files, locations, and applications into the Sidebar at the left of Finder.)
- When you sight the document you want to load, either double-click it or click once to highlight the filename and then click Open.
“Hey, the Open dialog can be resized!” That’s right, good buddy. You can expand the Open dialog to show more columns and find things more easily, just like a window. Click and drag any side or corner of the Open dialog to resize it. (You can also switch from Column view to List view or Icon view or Flow view, just as you can in a Finder window, using the buttons to the left of the pop-up location menu. I discuss setting view modes in a Finder window in Book II, Chapter 1.)
Saving a document
To save a document, follow these steps:
- Choose File⇒Save.
If you’ve previously saved this document, your application should immediately overwrite the existing document with the new copy, and you get to return to work … end of story. If you haven’t saved this document, the program displays a Save dialog that’s usually similar to the Open dialog; it generally has a few more options, however, so stay frosty.
- Navigate to the location where you’d like to save the document, and type a filename.
Often, you can use a default name provided by the thoughtful folks who developed the software. Note that you might be given the chance to save the document in one of several formats. For example, a word-processing application might allow you to save a document in RTF, Hypertext Markup Language (HTML), and even bargain-basement text format. (Typically, I don’t change the format unless I specifically need to change it.)
- Click Save (or OK, depending on the application).
If an application offers a Save As menu option in the File menu, you can (in effect) copy the document by saving a new version of the document under another name. If it’s available, Save As comes in handy when you want to retain the original version of a document. You can also choose File⇒Duplicate to create a new copy of the open document in a new window. Alternatively, use the Save menu option (in applications that support this Yosemite feature), and you can open different versions of the same document instead.
Quitting Applications
If I had a twisted and warped sense of humor, I’d simply tell you to quit applications by pulling your Mac’s power cord from the wall socket. (Luckily, I don’t.) For a safer and saner way to exit an application, use one of these methods:
- Press the +Q keyboard shortcut.
- Choose the Application’s named menu, and click Quit.
- Control-click (or right-click) the application icon on the Dock, and choose Quit from the contextual menu that appears.
You can also click the Close button on the application window. Note, however, that this method doesn’t always completely close down the application. For example, Safari stays running even if you close the browser window. In general, if the application works in a single window (such as System Preferences), closing the window also quits the application.
As I mention earlier in the chapter, if the application supports the Resume feature in Yosemite, the document you were working on is automatically displayed when you launch the application again.