
Chapter 3
Delving under the Hood with System Preferences
In This Chapter
![]() Displaying and customizing settings in System Preferences
Displaying and customizing settings in System Preferences
![]() Saving your changes
Saving your changes
![]() Changing settings
Changing settings
The System Preferences application is the place to practice behavior modification in OS X. The settings that you specify in System Preferences affect the majority of the applications you use as well as the hardware that you connect to your Mac; your Internet and network traffic; your iCloud Drive and storage; the appearance and activity on your Desktop; and how Yosemite handles money, dates, and languages. Oh, and don’t forget your screen saver — important stuff!
In this chapter, I discuss the many settings in System Preferences. You discover what does what and how you can customize the appearance and operation of OS X.
The Preferred Way to Display the Preferences
Apple has made it easy to open the System Preferences application. Just click the System Preferences icon (which looks like a number of gears) on the Dock, and the window shown in Figure 3-1 appears. You can also open the window by clicking the Apple menu (![]() ) and choosing the System Preferences item, or by clicking the System Preferences icon in Launchpad.
) and choosing the System Preferences item, or by clicking the System Preferences icon in Launchpad.
To display all the System Preferences icons at any time, click the Show All button. You can also use the View⇒Back and View⇒Forward commands on the System Preferences menu to move backward and forward through the different panes you’ve accessed in System Preferences, just as you use the similar buttons in a web browser (yes, just like Safari!). From the keyboard, press ![]() +[ (the left bracket) to move Back, and press
+[ (the left bracket) to move Back, and press ![]() +] (the right bracket) to move Forward.
+] (the right bracket) to move Forward.
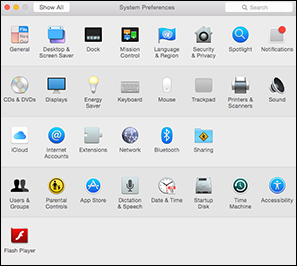
Figure 3-1: The System Preferences application window is a familiar face to any Yosemite user.
Although the System Preference panes are arranged by category (in rows) when you first install Yosemite, you can also display the panes in alphabetical order, which makes it easier to choose a pane if you’re unsure what row it’s in. To do so, choose View⇒Organize Alphabetically. Note that you can also select any pane directly from the View menu. Choose View⇒Customize, and you can hide specific icons from the System Preferences window. Just disable the check box next to each icon that you want hidden, and click Done. You can still reach hidden icons from the System Preferences View menu, so they’re not banished forever.
You can right-click the System Preferences icon on the Dock to jump to any pane from the contextual menu. Wowzers!
If a System Preference pane is locked, you won’t be able to modify any of the settings on that pane unless you unlock the pane. Click the padlock icon, and type your admin-level account password to unlock the pane. After you finish your tweaking, protect the settings from inadvertent changes by clicking the padlock icon again to close it.
Saving Your Preferences
The System Preferences window has no Save or Apply button. Illustrating the elegant design of OS X, simply quitting System Preferences automatically saves all the changes you make. As with any other OS X application, you can quit the System Preferences window by clicking the Close button, pressing ![]() +Q or by choosing System Preferences⇒Quit System Preferences.
+Q or by choosing System Preferences⇒Quit System Preferences.
Searching for Specific Settings
Searching for a single button or check box amidst all the settings in System Preferences might seem like hunting for the proverbial needle in the proverbial haystack, but our friends at Apple have added a Search box to the upper right of the window toolbar. Click in this Search box, and type the setting name, such as screen saver (or even a word that’s generally associated with a setting, such as power for the Energy Saver settings). Yosemite highlights all the icons in System Preferences that have anything to do with the search keywords you entered, as shown in Figure 3-2. You don’t even have to press Return!
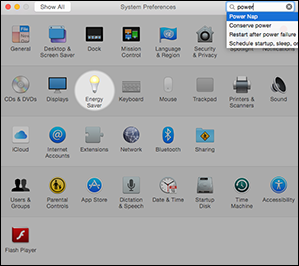
Figure 3-2: System Preferences highlights the panes that contain your search keywords.
To reset the Search box for a different keyword, click the X button that appears at the right of the Search box.
Getting Personal
The first section within System Preferences is devoted to settings that you make to customize the appearance and operation of your Desktop and login account.
General preferences
The General pane appears in Figure 3-3.
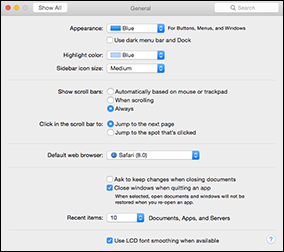
Figure 3-3: The General pane.
You can set these preferences in the General pane:
- Appearance: Choose a color scheme to use for buttons, menus, and windows. Select the Use Dark Menu Bar and Dock check box to switch to a dark scheme for your Finder menu bar and Dock.
- Highlight Color: Choose a color to highlight selected text in fields and pop-up menus.
- Sidebar Icon Size: Select the size of the icons in the Finder window Sidebar, which is the strip to the left of the Finder window that displays your devices and favorite locations on your system. If you have a large number of drives or you’ve added several folders to the Sidebar, reducing the size of the icons allows you to display more of them without scrolling.
- Show Scroll Bars: Specify when Yosemite should display scroll bars in a window. By default, they’re placed automatically when necessary, but you can choose to display scroll bars always, or only when you’re scrolling through a document. (If you used OS X before Lion, note that the familiar scroll arrows from those past versions of the operating system no longer appear in Yosemite.)
- Click in the Scroll Bar to: By default, OS X jumps to the next or previous page when you click on an empty portion of the scroll bar. Select the Jump to the Spot That’s Clicked radio button to scroll the document to the approximate position in relation to where you click.
- Default Web Browser: Click this pop-up menu to specify which application Yosemite should use to display web pages. By default, OS X uses the Safari web browser.
- Ask to Keep Changes When Closing Documents: If you select this check box, Yosemite prompts you for confirmation if you attempt to close a document with unsaved changes. If the check box is deselected, Yosemite allows the unsaved document to be closed without saving a new version.
- Close Windows When Quitting an Application: If this check box is deselected, Yosemite’s Resume feature automatically saves the state of an application when you quit. When you launch the application again, Yosemite restores all application windows and opens the documents you were working on when you quit. In effect, you can continue using the application just as if you had never quit. If you select the check box, Yosemite does not restore your work, and you have to load your document again; this is the same action taken by earlier versions of OS X.
- Recent Items: The default number of recent applications, documents, and servers (available from the Recent Items item in the Apple menu [
 ], which you can read more about in Book I, Chapter 3) is 10. To change the default, open the pop-up menus here and choose up to 50. (I like 20 or 30.)
 - Allow Handoff Between this Mac and Your iCloud Devices: If this check box appears within the General pane, you can enable it to turn on Handoff functionality within Yosemite. (I discuss Handoff in detail within the confines of Book V, Chapter 4.)
- Use LCD Font Smoothing When Available: By default, this check box is selected, making the text on your LCD or LED flat-panel monitor appear more like the printed page. If you’re using an older CRT monitor, you can turn off this feature to speed up text display slightly.
Desktop and screen saver preferences
Figure 3-4 illustrates the settings in the Desktop & Screen Saver pane.
You can set these preferences on the Desktop tab:
- Current Desktop picture: You can click a picture in the thumbnail list at the right half of the screen to use it as your Desktop background. The Desktop is immediately updated, and the thumbnail appears in the well (the upper-left box in Figure 3-4). To display a different image collection or open a folder of your own images, click the Add Folder button at the lower left of the window (a plus sign) and browse for your heart’s desire; then click Choose to select a folder and display the images it contains.

Figure 3-4: The Desktop & Screen Saver pane.
- Layout: As I explain in Chapter 2 of this minibook, you can tile your background image, center it, fill the screen with it (cropping the edges if necessary), and stretch it to fill the screen (without cropping). (Note that filling the screen [in either case] may distort the image.) The layout pop-up menu appears only when you’re using your own pictures, so you don’t see it if you’re using a Desktop image supplied by Apple.
- Change Picture: Change the Desktop background automatically after the delay period that you set, including each time you log in and each time your Mac wakes up from sleep mode.
- Random Order: To display screens randomly, enable the Random Order check box. Otherwise, the backgrounds are displayed in the sequence in which they appear in the thumbnail list.
- Translucent Menu Bar: When enabled, this feature turns your Finder and application menu bars semi-opaque, allowing them to blend in somewhat with your Desktop background. If you’d rather have a solid-color menu bar, deselect this check box.
Click the Screen Saver tab to see the following settings:
- Screen Savers: In the Screen Savers list at the left, click any screen saver to preview (on the right). To try out the screen saver in full-screen mode, click the Test button. (You can end the test by moving your pointer.) If the screen saver module that you select has any configurable settings, you can set them from the pane on the right (or, depending on the screen saver, you can also click the Screen Saver Options button to display them). Choose the Random screen saver to display a different screen saver module each time the screen saver is activated.
- Start After: Specify the period of inactivity that triggers the screen saver. To disable the screen saver, choose the Never setting at the top of the list. (Note: Your Start After delay should be a shorter time than the Display Sleep delay you set in the System Preferences Energy Saver pane. Otherwise, you won’t see the great screen saver at all. I describe the Energy Saver pane in detail later in this chapter.)
- Show with Clock: If you want your selected screen saver to display the time as well, select this check box.
- Hot Corners: Click any of the four pop-up menus at the four corners of the screen to specify that corner as an activation hot corner (immediately activates the screen saver) or as a disabling hot corner (prevents the screen saver from activating). As long as the pointer stays in the disabling hot corner, the screen saver doesn’t kick in, no matter how long a period of inactivity passes. Note that you can also set the Sleep, Mission Control, Launchpad, Notification Center, and Dashboard activation corners from here. (For the scoop on these features, see the upcoming section, “Mission Control preferences.”)
Dock preferences
The Dock pane is shown in Figure 3-5.
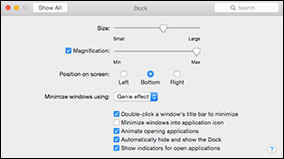
Figure 3-5: The Dock preferences pane.
You can set these preferences in the Dock pane:
- Size: Move this slider to change the overall size of the Dock.
- Magnification: With this check box selected, a Dock icon magically expands (like the national deficit) when you move your pointer over it. You can move the Magnification slider to specify just how much magnification is right for you.
This feature is useful for helping you click a particular Dock icon if you’ve resized the Dock smaller than its default dimensions or if you have a large number of items on the Dock.
- Position on Screen: Choose from three radio buttons to make that crazy Dock appear at the left, bottom, or right edge of your Desktop.
- Minimize Windows Using: By default, OS X animates a window when it’s shrunk into the Dock (and when it’s expanded back into a full window). From the Minimize Windows Using pop-up menu, you can choose from a genie-in-a-bottle effect or a scale-up-or-down-incrementally effect. To demonstrate, choose an effect and click the Minimize button (the yellow button in the upper-left corner) on the System Preferences window.
- Double-Click a Window’s Title Bar to Minimize: Select this check box to minimize a Finder or application window by simply double-clicking the window’s title bar.
- Minimize Windows into Application Icon: If this check box is not selected, minimized application windows appear as thumbnail icons on the Dock. To minimize application windows into the application icon on the Dock — which can save space on your Dock — select this check box. (To restore a window that’s been minimized into the application icon, right-click the icon on the Dock and choose Restore from the menu that appears.)
- Animate Opening Applications: By default, OS X has that happy, slam-dancing feeling when you launch an application: The application’s icon bounces up and down on the Dock two or three times to draw your attention and indicate that the application is loading. If you find this effervescence overly buoyant or distracting, deselect this check box.
- Automatically Hide and Show the Dock: If you like, the Dock can stay hidden until you need it, thus reclaiming a significant amount of Desktop space for your application windows. Select this check box to hide the Dock whenever you’re not using it.
To display a hidden Dock, move your pointer over the edge of the Desktop where it’s hiding.
- Show Indicators for Open Applications: OS X indicates which applications are running on the Dock with a small black dot in front of the icon. To disable these indicators, deselect this check box.
You can also change most of these Dock preference settings from the Apple menu (![]() ).
).
Mission Control preferences
Figure 3-6 illustrates the Mission Control, Spaces, and Dashboard settings that you can configure in this pane. You can use Mission Control to view all the application windows you’re using at one time so you can select a new active window. Or you can move all windows aside so you can see your Desktop. Dashboard presents a number of mini-applications (or widgets), which you can summon and hide with a single key.

Figure 3-6: Set your Mission Control preferences here.
You can set these preferences in Mission Control:
- Automatically Rearrange Spaces Based on Most Recent Use: If this check box is selected, Mission Control presents your most recently used Spaces first in the thumbnails at the top of the screen.
- When Switching to an Application: When selected, this check box allows you to switch applications between Spaces desktops by using the
 +Tab shortcut. Yosemite jumps to the Desktop that has an open window for the application you choose, even if that Desktop is not currently active.
 - Group Windows by Application: When selected, this check box automatically arranges windows in the Mission Control screen by the application that created them.
- Displays Have Separate Spaces: If you have multiple monitors connected to your Mac, you can select this check box to create a separate Spaces display for each monitor.
To display your Dashboard as a Space (a virtual desktop) in the Mission Control screen, click the Dashboard pop-up menu and as Space. If you prefer your Dashboard widgets to appear as an overlay over your Desktop, select as Overlay from the pop-up menu.
- Keyboard and Mouse Shortcuts: From each pop-up menu, set the key sequences (and mouse button settings) for Mission Control, Application Windows, Show Desktop, and Show Dashboard.
You’re not limited to the keyboard and mouse shortcuts in the pop-up menus. Press Shift, Control, Option, and
keys while a pop-up menu is open, and you see these modifiers appear as menu choices! (Heck, you can even combine modifiers, such as +Shift+F9 instead of just F9.) - Hot Corners: Click the button at the lower left to specify your hot corner settings. These four pop-up menus operate just like the Hot Corners/Active Screen Corners in the Desktop & Screen Savers pane, but they control the operation of Yosemite’s screen management features. Click one to specify that corner as a Mission Control corner (which displays the Mission Control screen), an Application Windows corner (which displays only the windows from the active application), a Desktop corner (which moves all windows to the outside of the screen to uncover your Desktop), a Dashboard corner (which displays your Dashboard widgets), or a Notification Center corner (which displays the Notification Center strip at the right side of your desktop). Choose Launchpad to activate the Launchpad screen. Note that you can also set the Screen Saver Start and Disable corners from here, as well as put your display to sleep.
Language & Region preferences
The Language & Region pane appears in Figure 3-7, and you can set these preferences in this pane:
- Preferred Languages: Choose the preferred order for language use in menus, sheets, and dialogs as well as the standards that OS X uses for sorted lists.
- Region: You can select your region of the world and specify the first day of your calendar week. Yosemite supports a number of different calendars, as well as the 12- and 24-hour (military) time format.
Click the Advanced button to change additional language and region settings using these three tabs:
- Dates: Select a region and use its date conventions (month-day-year versus day-month-year), or click the Customize button to build a custom format for the full date (Saturday, September 21, 2013), long date (September 21, 2013), medium date (Sep 21, 2013), and short date (9/24/2013) used throughout OS X.
- Times: You can configure the appearance of the full time (7:18:30 PM Central Standard), long time (7:18:30 PM CST), medium time (7:18:30 PM), and short time (7:18 PM) displayed in Yosemite. You can also specify different suffixes for morning (a.m.) and evening (p.m.).
- General: These convention settings determine the separators used for large numbers or numbers with decimals, as well as the currency symbol you want to use and where it appears in a number. You can also choose between standard (U.S.) and metric measurement systems.
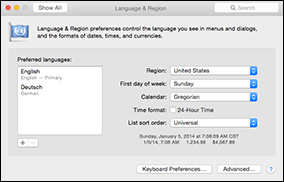
Figure 3-7: The Language & Region pane in System Preferences.
Security & Privacy preferences
The Security & Privacy pane is shown in Figure 3-8.

Figure 3-8: Set Security preferences here.
Settings here are divided into four tabs:
- General: You can change your existing account password by clicking the Change Password button. To add an extra layer of password security to a laptop (or a Mac in a public area), select the Require Password After Sleep or Screen Saver Begins check box, and click the pop-up delay menu to specify when the password requirement kicks in (it’s Immediately by default). OS X then requires you to enter your login password before the system returns from a sleep state or exits a screen saver. If you’re an admin-level user, you can turn off automatic login and display a message when the screen is locked.
The Gatekeeper feature allows you to specify whether Yosemite runs only applications downloaded from the App Store or whether applications from Apple-approved developers can also be launched. Choose the Anywhere radio button, and Yosemite launches any application you choose, no matter where it originated.
- FileVault: These controls allow you to turn on FileVault drive encryption, which makes it virtually impossible for others to access files from your drive on your Mac. Click the Turn On FileVault button to start the ball rolling. Yosemite allows you to enter your iCloud account information to unlock the drive, or you can generate a more secure recovery key that must be entered instead. If you choose the Create a Recovery Key option, click Continue to display the recovery key — go ahead and write that key down and store it in a very safe place.
If you have multiple accounts, Yosemite prompts you to enter the passwords for each user. Even if you’re using an admin account, each user on your Mac must enter his password to enable his account for use with FileVault, which allows him access to data on the encrypted drive.
Click Continue to enable FileVault encryption for the user who’s currently logged in — the user’s Login password becomes his FileVault password as well.
If you forget both your login password and either the recovery key or your iCloud account information, not even the technical experts at Apple can retrieve your data!
- Firewall: As I discuss in Book V, Chapter 6, OS X includes a built-in firewall, which you can enable from this pane.
To turn the firewall off entirely, simply click the Turn Off Firewall button. This is the very definition of Not a Good Thing, and I always recommend that any Mac hooked up to a network or the Internet have the system firewall turned on. (The only exception is if you’re using a network that you know to be secure and your access to the Internet is through a router or sharing device with its own built-in firewall.)
When the firewall is enabled, click the Firewall Options button to set firewall options.
- To turn on the firewall with only OS X application exclusions: Click Block All Incoming Connections, and only the sharing services you select from the Sharing pane in System Preferences are allowed through your firewall. This is a good choice for the most security-conscious Mac owner, but your firewall blocks third-party applications that try to access your network or the Internet.
- To turn on the firewall with exclusions: Click Automatically Allow Signed Software to Receive Incoming Connections. (Yep, this is the correct option for just about every Mac owner.) Any connection to a service (such as Web Sharing) or an application (such as Messages) that isn’t listed is blocked, but you can enable access for third-party applications on an as-needed basis.
In firewall-speak, these entries are rules because they determine what’s allowed to pass through to your Mac.
Enabling communications with an OS X service is easy: Just use the Sharing pane in System Preferences to turn on a service, and Yosemite automatically configures your firewall to allow communications. I describe the Sharing pane in detail later in this chapter.
To add a third-party application, click the Firewall Options button on the Firewall pane and then click the button with the plus sign. Navigate to the application that needs to communicate with the outside world. Click the application to select it, and then click Add. To delete an application, select it in the list and click the button with the minus sign.
You don’t have to add any of the applications provided by Apple with Yosemite, such as Apple Mail, Messages, or Safari; only third-party applications that you install yourself need a firewall rule.
You can edit the rule for a specific service or application by clicking the rule at the right side of the entry. By default, the rule reads Allow Incoming Connections (including both your local network and the Internet); however, when you click the rule, you can also choose Block Incoming Connections to temporarily deny access to that application.
For heightened security, select the Enable Stealth Mode check box, which prevents your Mac from responding to attempts to identify it across your network and the Internet.
If you suddenly can’t connect to other computers or share files that you originally could share, review the rules that you’ve enabled from this pane. You can also verify that everything’s shipshape in the Sharing pane in System Preferences, which I cover later in this chapter.
- Privacy: From this pane, you can elect to send anonymous diagnostic and usage data behind the scenes to Apple to help squash bugs in OS X Yosemite and determine which features Mac owners use the most. You can also mark the Enable Location Services check box to activate the Location Services feature, allowing applications to request your Mac’s current physical location. Click any of the entries in the list at the left, and System Preferences displays the applications you’ve used on your Mac that have requested access to that type of data (or online service). You can disable access for a specific application by clearing the corresponding check box.
Spotlight preferences
The Spotlight pane is shown in Figure 3-9. You can set these preferences in the Spotlight pane:
- Search Results tab: You can select or deselect the check boxes next to each of the categories to display or hide each category in the Spotlight search dialog. Click and drag the categories to the order that you prefer. For example, I like to see matching documents before matching applications in the Spotlight box, so I dragged Documents to the first position in the list. You can also specify a different keyboard shortcut for both the Spotlight box and window.
- Privacy tab: If you don’t want to display the contents of certain folders in Spotlight — for instance, if you work in a hospital setting and you can’t allow access to patient information and medical records — click the Add button (carries a plus sign) and specify the folder or disk you want to exclude from Spotlight searches. Alternatively, just drag the folders or disks to exclude into the list from a Finder window.
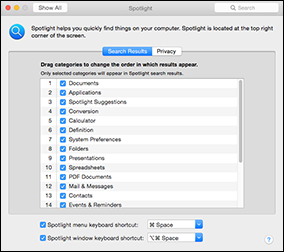
Figure 3-9: Fine-tune your Spotlight search results here.
Notifications preferences
Yosemite’s Notifications pane is shown in Figure 3-10.
Click the Do Not Disturb entry in the list at the left to set Do Not Disturb mode, where Notification banners, alerts, and sounds are disabled. You can specify a time period, turn on Do Not Disturb when your monitor is in sleep mode, or turn on Do Not Disturb when you’re mirroring (or sending) the video from your Mac to a TV or projector. You can also optionally allow FaceTime calls from anyone while Do Not Disturb is active or just from those you’ve marked as Favorites in FaceTime. If you select Allow Repeated Calls, a FaceTime caller can call a second time within three minutes without being disabled.
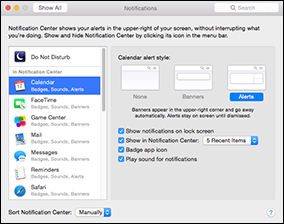
Figure 3-10: Each application that uses notifications can be individually configured.
Each application that can display notifications appears in the list at the left of the pane — click an application to configure its notifications. Different applications display different options in the settings pane, but the settings can include the following:
- Alert Style: These three buttons specify which type of alert should appear under the Notification Center icon in the Finder menu bar. You do not need to display Notification Center to see alerts, which appear on your Desktop. Choose None to disable alerts for this application. Choose Banners to display alert messages that will automatically disappear after a delay. Choose Alerts to display alert messages that remain onscreen until you click the confirmation button in the Alert box.
- Show Notifications on Lock Screen: Select this check box to allow notifications even if your Mac is displaying the Lock screen.
- Show in Notification Center: To display notification messages from this application in Notification Center, select this check box. You can also specify how many recent messages from this application are displayed.
- Show Message Preview: Both Messages and Mail can display a preview of a message as it’s received.
- Badge App Icon: This check box toggles the display of this application’s icon on and off in alert boxes and Notification Center, as well as activating the numeric display of pending items on the icon itself (for example, unread mail and messages).
- Play Sound: To play a sound when alerts appear, enable this check box.
It’s All about the Hardware
The next row of icons allows you to specify settings that affect your Macintosh hardware.
CDs and DVDs preferences
The CDs & DVDs pane is shown in Figure 3-11.

Figure 3-11: The CDs & DVDs preferences.
You have these choices in this pane:
- When You Insert a Blank CD: From this pop-up menu, specify the action that OS X takes when you load a blank CD-R or CD-RW. You can choose to be prompted or to open Finder, iTunes, or Disk Utility. Additionally, you can open another application that you select, run an AppleScript that you select, or ignore the disc.
- When You Insert a Blank DVD: Use this feature to specify the action that your Mac takes when you load a recordable DVD.
- When You Insert a Music CD: Choices from this pop-up menu specify what action OS X takes when you load an audio CD. By default, iTunes launches.
- When You Insert a Picture CD: Choices from this pop-up menu specify what action OS X takes when you load a picture CD. By default, iPhoto launches.
- When You Insert a Video DVD: Choices from this pop-up menu specify what action OS X takes when you load a DVD movie. By default, DVD Player launches.
Displays preferences
The Displays pane is shown in Figure 3-12.
These two tabs are available here:
- Display: To allow Yosemite to choose the best resolution for your display, select the Best for Display radio button. To manually select a resolution, select the Scaled radio button and then click the resolution that you want to use from the Resolutions list on the left. (In most cases, you want to use the highest resolution.) Depending on your monitor, you may also be able to choose a degree of rotation (for monitors that can rotate between landscape and portrait mode). Depending on the monitor your Mac is using, you may also be able to choose a refresh rate from the Refresh Rate pop-up menu. (Generally, the higher the refresh rate, the better.) Move the Brightness slider to adjust the brightness level of your display. These settings differ depending on what type of display you’re using. For example, a Mac mini with a CRT monitor has more settings to choose from than a flat-panel iMac with an LED screen.
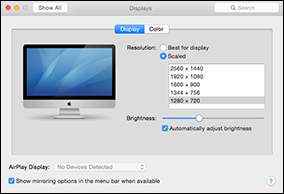
Figure 3-12: Configure your Mac’s display settings from this pane.
Ready to stream content to your TV directly from your Mac — without cables? You can use Yosemite’s AirPlay Mirroring feature to send the display from your Mac to your HDTV. AirPlay Mirroring requires an Apple TV unit to support this feature. You can also send the audio from your Mac directly to an AirPlay-enabled receiver or speaker system. To make it easier to control AirPlay mirroring, select the Show Mirroring Options in the Menu Bar When Available check box. (Note that the icon will only appear in your menu bar if you have an Apple TV unit within range.)
- Color: Click a display color profile to control the colors on your monitor. To load a profile, click the Open Profile button. To create a custom ColorSync profile and calibrate the colors that you see on your monitor, click the Calibrate button to launch the Display Calibrator. This easy-to-use assistant walks you step by step through creating a ColorSync profile matched to your monitor’s gamma and white-point values.
Energy Saver preferences
The Energy Saver pane for a desktop Mac is shown in Figure 3-13. A MacBook shows two panes — Battery and Power Adapter — to provide separate controls for when running on battery power.
Move the Computer Sleep slider to specify when OS X should switch to sleep mode. The Never setting here disables sleep mode entirely. To choose a separate delay period for blanking your monitor, drag the Display Sleep delay slider to the desired period. You can also power-down your Mac’s internal drive to conserve energy and prevent wear and tear (an especially good feature for Macs with hard drives and for MacBook owners).
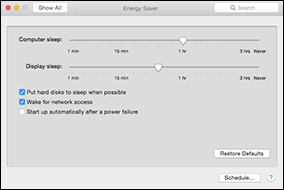
Figure 3-13: The Energy Saver pane for a desktop Mac.
If you want to start or shut down your Mac at a scheduled time, click the Schedule button. Mark the desired schedule (the Start Up or Wake check box and the Shut Down/Sleep check box) to enable them; then click the up and down arrows next to the time display to set the trigger time. Click OK to return to the Energy Saver pane.
MacBook owners can set two separate Energy Saver configurations by clicking the tabs at the top of the pane:
- Battery: Applies when a MacBook is running on battery power
- Power Adapter: Kicks in when a MacBook is connected to an AC outlet
Some of the settings can toggle events that control Yosemite’s sleep mode, including a network connection by the network administrator (Wake for Network Access). You can also set OS X to restart automatically after a power failure. If you’re running a MacBook, select the Show Battery Status in the Menu Bar check box to show or hide the Battery Status icon.
Click the Enable Power Nap While on Battery Power check box to allow your MacBook to download important stuff like software updates and new email (along with synchronizing your iCloud Drive) when you close the laptop.
Keyboard preferences
The Keyboard group is shown in Figure 3-14.
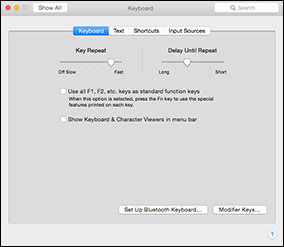
Figure 3-14: The Keyboard preferences pane.
Four tabs are available here:
- Keyboard: Move the Key Repeat slider to alter the rate at which a keystroke repeats. You can also adjust the Delay until Repeat slider to alter how long a key must be held down before it repeats. Enable the Show Keyboard & Character Viewers in Menu Bar check box to add the Viewer icon to your Finder menu bar. You can also set up a wireless Bluetooth keyboard from this pane. Click the Modifier Keys button to assign different actions to your Caps Lock, Control, Option, and keys.
MacBook owners (as well as Mac owners with newer Apple keyboards) can set the F1 through F12 keys for applications by enabling the Use All F1–F12 Keys as Standard Function Keys check box. If you enable this feature, you must hold down the Function (Fn) key while pressing the F1 through F12 keys to use the regular hardware keys. MacBook owners can also enable automatic brightness adjustment and timed shutoff for illuminated keyboards.
- Text: Specify character combinations that are automatically replaced with special characters. For example, Yosemite automatically replaces the combination TM with the special character ™. You can also toggle automatic spelling correction on and off, choose a language for spell-checking, and turn on “smart” quotes (where Yosemite chooses double or single quotation marks for you). Note that these settings can be overridden by preferences set in applications — for example, Microsoft Word.
- Shortcuts: If you’re a power user who appreciates the lure of the keyboard shortcut, you can edit your shortcuts here. Click the key group you want to change in the list at the left, click the key combination to change, and type the new shortcut.
Looking for even more keyboard customizing possibilities? Select the All Controls radio button on the Keyboard Shortcuts pane to see additional keys to use.
- Input Sources: Each entry here allows you to select a specific keyboard layout from the Input menu. (To display the Input menu on the Finder menu bar, select the Show Input Menu in Menu Bar check box.)
Mouse preferences
Figure 3-15 illustrates the Mouse preferences pane for a standard mouse.
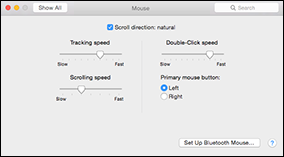
Figure 3-15: The Mouse preferences pane for a basic mouse.
The tabs you see on this pane depend on what type of mouse you have connected:
- Mouse: These settings appear if you’re using a standard mouse with your Mac (instead of Apple’s Magic Mouse). To reverse the scroll direction for your mouse wheel, select the Scroll Direction: Natural check box. Drag the Tracking Speed slider to determine how fast the mouse tracks across your Desktop. You can also drag the Double-Click Speed slider to determine how fast you must click your mouse to cause a double-click. Drag the Scrolling Speed slider to specify the rate at which the contents of windows scroll. Lefties might want to change the primary mouse button for their pointing device. To install a wireless Bluetooth mouse, click the Set Up Bluetooth Mouse button, which runs the Bluetooth device Set Up assistant.
- Point & Click/More Gestures: If you’re using an Apple Magic Mouse, you can click each gesture in the Point & Click list to display a short video clip demonstrating the gesture using the options you select. To display the additional gestures available on your Magic Mouse, click the More Gestures tab.
Trackpad preferences
The Trackpad pane was once a prime spot reserved for MacBook owners. However, now any Mac that can run Yosemite can use a Magic Trackpad. The settings on this pane allow the elite trackpad crowd to customize their tracking speed and the gestures recognized by Yosemite (see Figure 3-16); the settings you see here depend on the specific type of trackpad you’re using. You can also monitor the battery level on a Magic Trackpad from this pane.
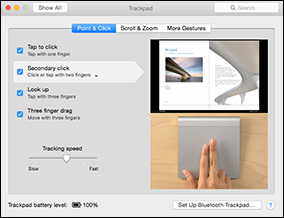
Figure 3-16: The Point & Click gesture settings in the Trackpad pane.
Each gesture is illustrated with a short video clip, demonstrating both the finger positions you’ve chosen for the selected gesture and the onscreen action it performs. Click each tab (Point & Click, Scroll & Zoom, and More Gestures) to display the gestures in that group. Each gesture can be individually toggled on or off, and many gestures allow you to configure the number of fingers or physical area on the trackpad that triggers the action. If you’re using a desktop Mac, the settings on this pane are available only if you’re using a Bluetooth trackpad.
Printers & Scanners preferences
Figure 3-17 illustrates the Printers & Scanners preferences.
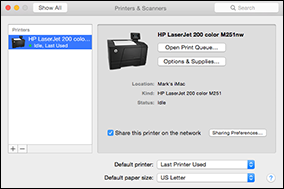
Figure 3-17: Configure scanning and printing with these settings.
Click the Options & Supplies button to configure the selected printer’s features, and click the Open Print Queue button to display the Print Queue window (no great shockers there). To add a new printer or scanner connection, click the Add button, which bears a plus sign — Yosemite launches the Add dialog. You can read more about printer and scanner setup in Book VII, Chapter 4.
These are the other settings here:
- Share This Printer/Scanner on the Network: Select this check box to share the selected device with other computers on your network. To specify who can use your shared device, click the Sharing Preferences button. System Preferences switches to the Sharing pane, where you can add or remove users from the permission list.
- Default Printer: Open this pop-up menu to select the installed printer that acts as the default printer throughout your system. If you choose Last Printer Used, OS X uses the printer that received the last print job.
- Default Paper Size: Will that be U.S. Letter or Tabloid? From this pop-up menu, specify the default paper size for future print jobs.
Sound preferences
The Sound pane is shown in Figure 3-18. To set the overall system audio volume, drag the Output Volume slider. To mute all sound from your Mac, select the Mute check box. I recommend that you select the Show Volume in Menu Bar check box, which displays a convenient volume slider menu bar icon.
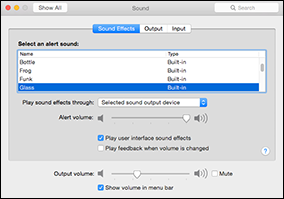
Figure 3-18: The Sound preferences pane.
These are the three tabs here:
- Sound Effects: From this pane, you can choose the system alert sound and the volume for alerts. You can also choose to mute user interface (application and Finder menu) sound effects as well as toggle the sample sound effect when the volume keys are pressed on your Mac’s keyboard (or from the Volume slider).
- Output: Use these settings to choose which audio controller your Mac uses for playing sound. Unless you’ve installed additional audio hardware, this remains set to Built-in Audio or Internal Speakers. You can adjust the balance between the left and right channels for the selected output controller.
- Input: These settings allow you to specify an input source. Unless your Mac includes a Line In input source, leave this set to your Internal Microphone. Drag the Input Volume slider to increase or decrease the input signal volume; the input level display provides you with real-time sound levels.
Sharing the Joy: Internet and Wireless
Your Internet and wireless connections are controlled from these settings.
iCloud preferences
From Yosemite’s iCloud Preference pane, you can specify which types of data are automatically pushed among your Mac and iOS devices (see Figure 3-19). If you haven’t created an iCloud account yet — or if you signed out of an existing account earlier — System Preferences prompts you to enter your Apple ID and password (which I discuss in Book I, Chapter 3). Click Sign In to display the contents of the iCloud pane.
Yosemite allows you to set up Family Sharing, where up to six accounts can share photos, iTunes media and apps, and a common calendar — group members can even display the current location of other members who are carrying MacBooks or iOS devices! Click the Set Up Family button, and then click Continue to launch the Family Sharing setup assistant.

Figure 3-19: Control and configure your iCloud activity with these settings.
Whether you enable Family Sharing, use the iCloud pane of System Preferences to enable or disable syncing for each category:
- Photos: Push the latest photos and video clips you’ve added in iPhoto to other devices, and update your Photos/iPhoto library with photos and video clips pushed from your iOS devices.
- Mail: Synchronize your Mail messages between devices.
- Contacts: Push your Contacts cards between devices.
- Calendars: Push your calendar events to and from your iOS devices and other Macs.
- Reminders: Push your reminders between iOS devices and other Macs.
- Notes: Synchronize your notes between devices.
- iCloud Drive: Enable and disable iCloud Drive access for specific applications.
- Keychain: Push your website passwords and credit card/payment information between devices.
- Safari: Synchronize your Safari bookmarks and iCloud tabs.
- Back to My Mac: Control file and screen sharing across all the Macs sharing this iCloud account. Back to My Mac must be enabled on all computers that will use this feature.
- Find My Mac: Locate your Mac from a web browser or your iOS device, and you can also choose to remotely lock your computer — or even wipe your Mac’s hard drive completely to prevent someone from stealing your data!
Wiping your Mac remotely prevents it from being located in the future. These are drastic steps, indeed!
To display the storage currently being used by your mail, backups, documents, and application data, click the Manage button at the lower right of the pane. Apple provides each iCloud account 5GB of space for free, but you can also elect to buy additional storage from this sheet.
Internet Accounts preferences
The Internet Accounts pane is shown in Figure 3-20.

Figure 3-20: Keep track of all your personal accounts from this pane.
This pane is a central location for adding, editing, and configuring your Internet, social networking, iCloud, and other accounts for email, Contacts, Messages, and Calendar information. Accounts appear automatically in this pane when you create them in many applications. For example, creating a mail account in Apple Mail also automatically adds that account to the list in the Internet Accounts pane.
To add a new account, click the account type in the list at the right side of the pane. (If necessary, click the Add button, a plus sign, to display the list of account types.) System Preferences displays a custom sheet that leads you through the setup process for that specific account.
After you configure an account, it appears in the list at the left. Click an account in the list, and you can specify whether that account is used with — and syncs data with — Apple Mail, Calendar, FaceTime, Messages, and other Internet-savvy applications. You can also change account information — click the Details button, click in the desired field, and type the new information. To delete the selected account entirely, click the Delete Account button (a minus sign).
Extensions preferences
The Extensions pane is shown in Figure 3-21.

Figure 3-21: The Extensions pane.
Yosemite is designed to accept extensions, which are software modules that expand the functionality of different features within both Finder and applications. Click in the list at the left to choose a category of extensions, and the corresponding extensions that you’ve installed are displayed at the right side of the pane. (OS X comes with more than a dozen extensions pre-installed.)
By default, these are the categories:
- All (all extensions not provided by Apple)
- Actions (such as the Markup function in Mail)
- Share Menu (determining what destinations can appear)
- Today View in Notification Center
To disable an extension (which may be required if you’re troubleshooting a problem with Yosemite), clear the check box next to that extension in the list.
To download additional extensions from the App Store, click the Get Extensions button.
Network preferences
The Network pane is shown in Figure 3-22.
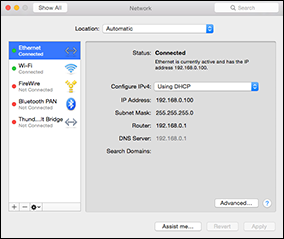
Figure 3-22: The Network pane, showing the Ethernet status information.
You can choose an existing network location from the Location pop-up menu at the top of the dialog, or you can create and edit your network locations by choosing Edit Locations from this pop-up menu. (The default is Automatic, and it does a pretty good job of figuring out what settings you need.) As I mention in Book I, Chapter 3, creating a network location makes it easy to completely reconfigure your Network preferences when you connect your computer to other networks — for example, when you take your MacBook to a branch office. You can also set up locations to accommodate different ISP dial-up telephone numbers in different towns.
If you need to create a new location that’s similar to an existing location, open the Location pop-up menu and choose Edit Locations. Then select the location you want to copy, click the Action button (the gear symbol), and choose Duplicate Location from the pop-up menu. The new location you create contains all the same settings (without several minutes of retyping), so you can easily edit it and make minor changes quickly.
Ethernet network settings
When you select Ethernet from the list of connection types, the Status pane shows your connection information. Because most networks have a DHCP server to provide automatic settings, you probably don’t have to change anything; Yosemite does a good job at making introductions automatic between your Mac and both a local network and the Internet.
Notice the very attractive Assist Me button at the bottom of the Network pane? It’s there for a very good reason: Click it, and Yosemite launches a network connection and troubleshooting assistant that guides you step by step. If your ISP doesn’t provide you with instructions on setting up your Internet connection, use both this book and the network assistant to do the job yourself!
Need to make manual changes to your network settings? Click the Advanced button (it’s like opening the hood on your car). These are the tabs on the Advanced sheet:
- TCP/IP: These settings are provided either automatically (by using DHCP) or manually (by using settings provided by your network administrator). For more details on TCP/IP settings, see Book V, Chapter 1, and Book VI, Chapter 2.
- DNS: The settings you enter here specify the DNS servers and search domains used by your ISP. Typically, any changes you make here are requested by your ISP or your network administrator. Click the Add buttons (with the plus signs) to add a new DNS server address or search domain.
- WINS: Dating back quite a few years, WINS is a name server required for computers running NetBIOS (practically dinosaurs in the computer timeline), and likely only those computers running a version of Windows older than Windows 2000. If that sounds like gobbledygook to you, you need to enter something on this tab only if instructed to do so by your network administrator.
- 802.1X: This tab displays any network security authentication protocols that you may need to connect to a third-party wireless base station or access point. Select the Enable Automatic Connection check box when making a connection with an Apple Airport Extreme base station, Time Capsule backup unit, or most other routers.
- Proxies: Network proxy servers are used as part of a firewall configuration to help keep your network secure, but in most cases, changing them can cause you to lose Internet functionality if you enter the wrong settings.
Most folks using a telephone modem, cable modem, or DSL connection should leave these settings alone. Enable and change these settings only at the request of your network administrator, who should supply you with the location of a PAC file to automate the process.
If you’ve enabled your OS X firewall and you use FTP from the Terminal window to transfer files, enable the Passive FTP Mode check box on the Proxies pane. I recommend that you enable this setting to allow downloading from some web pages as well.
- Hardware: From this pane, you can configure the settings for your Ethernet network interface card. I strongly recommend that you leave the Configure pop-up menu set to Automatically (unless specifically told to set things manually by your system administrator or that nice person from Apple tech support).
Modem network settings
When you select Modem from the list of connection types, you can enter the dial-up telephone number, account name, and password provided by your ISP. In most cases, that’s all the information you need. If you need to make a manual change, though, click the Advanced button to display these tabs:
- Modem: From the Modem pop-up menu, choose the brand and model of your modem.
I strongly recommend that you enable the Enable Error Correction and Compression in Modem check box; also choose Wait for Dial Tone before Dialing, from the Dial Mode pop-up menu. These settings provide you with the best performance and the fastest speeds.
You can also select tone or pulse dialing and whether you want to hear the two modems conversing. (If the caterwauling bothers you, turn off the Sound option.)
- DNS: These settings are the same as those I cover earlier, in the section “Ethernet network settings.”
- WINS: Again, you’re likely to never need these WINS settings, so make changes on this tab only if instructed to do so by your network administrator.
- Proxies: Some ISPs use proxy servers for their dial-up accounts to maintain security, but changing these settings willy-nilly is inviting disaster. Leave them disabled unless given specific instructions on what to set by your ISP.
- PPP: These settings are used for a Point-to-Point Protocol connection over a telephone modem. Again, your ISP provides you with the correct values to enter here.
If you’re concerned about who’s using your Internet connection — or you want to add an extra layer of security when you dial out — select the Prompt for Password after Dialing check box on the PPP tab, and OS X prompts you each time for your Internet account password.
I recommend that you select the Show Modem Status in Menu Bar check box on the Modem status pane, which gives you a visual reference on your connection status.
FireWire, Thunderbolt, and Wi-Fi network settings
The FireWire, Thunderbolt, and Wi-Fi settings are the same as those for Ethernet that I cover earlier in this chapter — naturally, they use a different cable in the case of FireWire and Thunderbolt and no cable at all in the case of Wi-Fi. In this section, I cover the following four settings on the Wi-Fi status pane:
- Network Name: Yosemite handles wireless connections automatically in most cases; if possible, it connects to the last wireless network you joined. If that network isn’t available or there are others to choose from, Yosemite displays a dialog asking you which available network you want to join. If you want to join only one or more preferred networks (for security or convenience reasons), click the Advanced button and click the Add button (a plus sign) to enter the wireless network name and password.
- Ask to Join New Networks: Yosemite always automatically joins known networks in range — a network you’ve connected to in the past. This check box, however, controls what happens if no networks in range are known. If disabled, you must click the Wi-Fi icon in the Finder menu bar and select a network to use. If the check box is enabled, Yosemite automatically prompts you for confirmation before attempting to join a new network.
- Turn Wi-Fi Off: Okay, here’s the honest truth — wireless networking is a significant drain on a laptop battery! If you’re sure you’re not going to use your MacBook’s wireless network hardware in the near future, you can click this button to activate and deactivate your Mac’s network hardware. (Alternatively, just click the Wi-Fi icon in the Finder menu bar and choose Turn Wi-Fi Off.) Turn off Wi-Fi if you don’t need it, and your MacBook will thank you. (Just turn it back on using this same button when you need it or use the Wi-Fi status menu in the Finder menu bar. Naturally, without your Wi-Fi turned on, any application that accesses the Internet will likely experience problems.)
- Show Wi-Fi Status in Menu Bar: Hey, speaking of the Wi-Fi status menu in the Finder menu bar, select this check box to display it! You can immediately see the relative signal strength of your connection, switch between available wireless networks, and turn off your Wi-Fi hardware to conserve your battery power (without digging this deep in System Preferences).
Bluetooth preferences
The Bluetooth pane is shown in Figure 3-23.
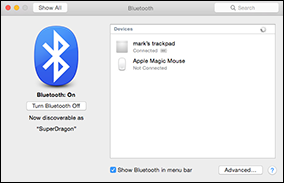
Figure 3-23: The Bluetooth pane.
These are your choices on this pane:
- On/Off: Click the Turn Bluetooth On/Off button to enable or disable your Bluetooth hardware. All recognized Bluetooth devices in range appear in the list, and you can disconnect them individually. Also, if you like, Yosemite can display a Bluetooth status menu in the Finder menu bar.
MacBook owners who want to conserve power can disable Bluetooth entirely. Just click the Turn Bluetooth Off button to save a significant amount of battery time!
- Advanced sheet: Click the Advanced button to display another group of settings. The two Open Bluetooth Setup Assistant check boxes determine whether Yosemite automatically launches the Bluetooth Setup Assistant when no Bluetooth keyboard, trackpad, or mouse are recognized. If you’re using a Bluetooth mouse, keyboard, or trackpad, you can wake your Mac using these devices.
Sharing preferences
Figure 3-24 illustrates the Sharing preferences.
Click the Edit button to change the default network name assigned to your Mac during the installation process. Your current network name is listed in the Computer Name text field.
Each entry in the services list controls a specific type of sharing, including DVD or CD Sharing, Screen Sharing, File Sharing (with other Macs and PCs running Windows), Printer Sharing, Scanner Sharing, Remote Login, Remote Management (using Apple Remote Desktop), Remote Apple Events, Internet Sharing, and Bluetooth Sharing. To turn on any of these services, select the On check box for that service. To turn off a service, click the corresponding On check box to deselect it. Options specific to the selected service appear to the right.
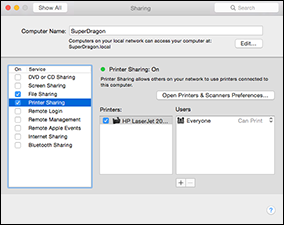
Figure 3-24: The Sharing preference settings.
From a security standpoint, I highly recommend that you enable only those services that you use. Each service you enable automatically opens your Yosemite firewall for that service. A Mark’s Maxim to remember:
 Poking too many holes in your firewall is not A Good Thing.
When you click one of the services in the list, the right side of the Sharing pane changes to display the settings you can specify for that particular service.
Tweaking the System
The last row of the System Preferences window covers system-wide settings that affect all users and the overall operation of OS X.
Users & Groups preferences
The Users & Groups pane is illustrated in Figure 3-25.

Figure 3-25: Configuring user accounts is easy from System Preferences.
Each user on your system has an entry in this list. The panes and settings here change, depending on the access level of the selected account:
- Password tab: You can edit the account’s full name. Click the Change Password button to enter a new password and password hint for the selected user.
Click the Contacts Card Open button to edit the card that you mark in the Contacts application as My Card. OS X launches Contacts, and you can edit your card to your heart’s content. (For the complete scoop on the OS X Contacts application, see Book I, Chapter 7.)
Enable the Allow User to Reset Password Using Apple ID check box to authorize the selected user to reset their password using their Apple ID. This is useful in case the selected user is locked out of System Preferences by Parental Controls.
If you have administrator access, you can in turn assign administrator access to the selected user account. An administrator account can edit other accounts and make global settings changes in System Preferences.
If you have administrator access, you can enable Parental Controls for the selected user account or open the Parental Controls pane. (More on Parental Controls earlier in this section as well as in Chapter 5 of this minibook.)
From the Picture well — the circular image under the Password tab — you can choose one of the thumbnail images provided by Apple to represent the selected user, or drag a photo in from Photos, iPhoto, or a Finder window. Click the well to display the thumbnails. Click Recents to view account images you’ve used recently, or click Camera to take a photo using your Mac’s FaceTime HD camera. Click My Photo Stream to select an image from your iCloud Photo Stream. Click Faces to choose from photos with faces you’ve identified in iPhoto. Click Linked to choose from photos that are linked with Facebook, Twitter, and LinkedIn.
- Login Items tab: The applications and documents that you add to this list launch automatically each time that the current user logs in to OS X. To add an application or document, click the Add button (a plus sign), navigate to the desired item and select it, and click the Add button. (Alternatively, you can simply drag an item from a Finder window into the Login Items list.) To remove an application from the list, click to select it and then click the Remove button (a minus sign). Each application can be launched in a hidden state — that is, its window doesn’t appear on the Desktop. To toggle an item as hidden or visible, enable the Hide check box next to the desired application. The order that Login Items are launched can be changed by dragging entries in the list into the desired sequence.
Note that a user must be logged in to view and change the items on the Login Items pane. Even an administrator-level user can’t access another user account’s Login items!
You can even set up Login Items directly from the Dock. Right-click the desired Dock icon to display the Options pop-up menu and choose Open at Login from the contextual menu.
- Login Options button: Look for the button with the little house icon at the lower left. Click it to set a number of global options that control how users log in. For example, you can choose to display either a Name and Password field on the Login screen (which means that the user must type in the correct username) or a list of users, from which a person can select a user ID. (If security is a consideration, use the Name and Password option.) The Password Hints feature can be enabled or disabled from this pane, and you can also add VoiceOver spoken interface support at the Login screen (making it easier for those with limited vision to log in to this Mac). Select the Show Input Menu in Login Window check box if you have multiple keyboards or assistive input devices connected to your Mac. If your office network provides a Network Account Server, you can join an Open Directory server or Active Directory domain by clicking the Join button.
If you choose, you can log in automatically as the selected user by opening the Automatic Login <Username> pop-up menu and choosing your account. This is not a particularly secure feature — especially for MacBook owners — but it’s convenient as all get-out.
The Login Options tab also allows you to enable or disable Fast User Switching (which I discuss in Chapter 5 of this minibook), and you can prevent anyone from restarting or shutting down the Mac from the Login screen by deselecting the Show the Sleep, Restart, and Shut Down Buttons check box.
Parental Controls preferences
Click a standard-level user account in the list to enable or configure Parental Controls for that user. Figure 3-26 shows the Parental Controls settings. (Parental Controls are disabled for administrator accounts and the Guest account.)
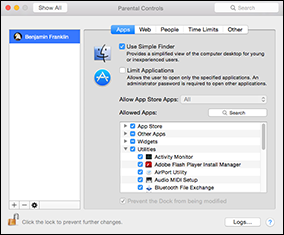
Figure 3-26: You can assign Parental Controls to any standard-level user account.
I discuss the Parental Control settings in detail in Chapter 5 of this minibook. You can use these settings to restrict a user’s access to certain applications or to limit Mail and Messages communications to specific individuals. An administrator can also switch a user account to the Simple Finder, making Yosemite much easier to navigate (and limiting the amount of damage a mischievous or malicious user can inflict on your system).
You can create a new managed account directly from the Parental Controls pane by clicking the Add button (a plus sign) at the bottom of the account list. This saves you a trip to the Users & Groups pane.
App Store preferences
The App Store settings are shown in Figure 3-27. (Oh, and don’t forget that you need an active Internet connection.)
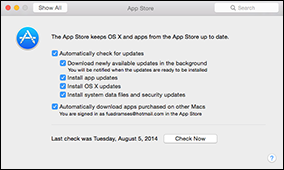
Figure 3-27: Keep Yosemite up to date with the controls in the App Store pane.
These settings are available:
- Automatically Check for Updates: I strongly recommend selecting the Automatically Check for Updates, the Install App Updates, the Install OS X Updates, and the Install System Data Files and Security Updates check boxes. These settings provide you with the critical updates every Mac owner should apply, as well as updates to the applications you’ve downloaded. You can also elect to download new updates in the background automatically while you continue working.
- Automatically Download Apps Purchased on Other Macs: Select this check box to allow the App Store to automatically download all applications you’ve already installed on other Macintosh computers using the same Apple ID. (Consider this nifty feature as sharing the applications you’ve already bought and installed on other Macs.) The Apple ID you’re using on this Mac for the App Store is displayed for convenience.
To manually search for updates, click Check Now.
Dictation and speech preferences
Figure 3-28 illustrates the Dictation & Speech settings. For a discussion of how these settings are used, visit Book VIII, Chapter 4.

Figure 3-28: Yosemite includes highly configurable dictation and speech features.
There are two tabs here:
- Dictation: With Dictation toggled on, you can use your voice to dictate to your Mac whenever you would normally type. To start Dictation mode, you can either press the keyboard shortcut you assign from the Shortcut pop-up menu or choose Edit⇒Start Dictation from the application’s menu. Open the Language pop-up menu to select the language that Yosemite will recognize for Dictation mode.
If you decide to download and install the free Enhanced Dictation functionality from Apple, you can control your Mac using spoken commands (even when you don’t have an Internet connection)! Again, Book VIII, Chapter 4, provides all the details.
The Dictation icon at the left of the pane is more than just a pretty face. It also indicates the relative audio level of your voice, which can help you position your microphone (or adjust its sensitivity) for the best results. If you have more than one microphone, you can select which one you want to use by clicking the button under the Dictation icon.
- Text to Speech: Here’s a fun pane. Choose a voice from the System Voice pop-up menu, and OS X uses that voice to speak to you from dialogs and applications. You can set the Speaking Rate (from Slow to Fast) and play a sample by clicking the Play button. (Ready for something different? Click the Customize menu option and check a foreign language voice, or try novelty voices such as Zarvox, Bubbles, and Pipe Organ. Note that your Mac can download free custom voice modules from Apple; to view what’s available, choose Customize in the System Voice pop-up menu.)
The Announce When Alerts Are Displayed feature speaks the text in alert dialogs; to configure spoken alerts, click the Set Alert Options button. You can optionally add a phrase before the text, which you can choose from the Phrase pop-up menu. To add a phrase to the list, such as Don’t Panic!, choose Edit Phrase List from the Phrase pop-up menu. Move the Delay slider to specify how much time your Mac waits before reading the text to you.
Enable the Speak Selected Text check box, and Yosemite speaks the text that’s selected in an application when you press a key that you specify.
This pane also provides a couple of convenient shortcut buttons that take you to other speech centers in System Preferences — specifically, the Date & Time and Accessibility panes.
Date and time preferences
Click the System Preferences Date & Time icon to display the settings that you see in Figure 3-29.
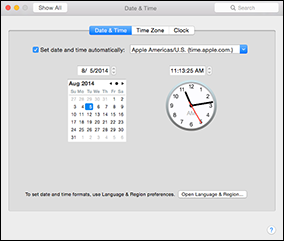
Figure 3-29: The Date & Time preferences pane.
There are three tabs here:
- Date & Time: To set the current date, click the date in the minicalendar; to set the system time, click in the field above the clock and type the current time.
You can’t set these values manually if you use a network time server. To automatically set your Mac’s system time and date from a network time server, select the Set Date and Time Automatically check box and choose a server from the pop-up menu that corresponds to your location. (Of course, you need an Internet connection to use a network time server.)
- Time Zone: Click your approximate location on the world map to choose a time zone, or click the Closest City pop-up menu and choose the city that’s closest to you (and shares your same time zone).
- Clock: If you select the Show the Date and Time in Menu Bar check box, you can choose to view the time in text or icon format. You can also optionally display seconds, the date, AM/PM, and the day of the week; have the time separator characters flash; or use a clock based on 24 hours.
I get a big kick out of my Mac announcing the time on the hour … plus, it helps pull me back into the real world. (You have to eat sooner or later.) Anyway, if you’d like this helpful reminder as well, select the Announce the Time check box on the Clock pane, and click the pop-up menu to select an hour, half-hour, or quarter-hour announcement.
Startup Disk preferences
Figure 3-30 illustrates the Startup Disk pane.
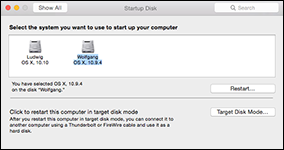
Figure 3-30: The Startup Disk pane in System Preferences.
To select a start-up disk, click the desired start-up drive from the scrolling icon list.
OS X displays the version numbers of each system and the physical drives where each system resides. Select the Network Startup icon if you want to boot from a System folder on your local network; typically, such a folder is created by your network administrator. If you’ve set up a Windows partition on your hard drive using Boot Camp, the folder appears with a Windows logo.
If you’re planning on rebooting with an external Universal Serial Bus (USB), Thunderbolt, eSATA, or FireWire startup disk, that disk must be connected, powered on, and recognized by the system before you display these settings.
Click the Target Disk Mode button to restart your Mac as a FireWire or Thunderbolt external hard drive connected to another computer. (This feature comes in especially handy when you’re upgrading to a new Mac and you need to move files between the two computers. I’ve also used it when the video card in one of my Macs decided to stop working. This option allowed me to make an updated backup copy of the ailing Mac’s hard drive before I sent it off for repair.)
You can also restart your Mac and hold down the T key to invoke Target Disk Mode.
After you click a disk to select it, click the Restart button. OS X confirms your choice, and your Mac reboots.
Time Machine preferences
The preferences pane shown in Figure 3-31 controls the automatic backups performed by Yosemite’s Time Machine feature.

Figure 3-31: Configure your backups with these Time Machine settings.
To enable Time Machine, click the On toggle switch and then click the Select Disk button to choose the drive that will hold your Time Machine backup data; click Use Disk to confirm your choice. If you choose an external Time Capsule wireless unit, click Set Up instead.
By default, Time Machine backs up all the internal and external drives on your system (except the Time Machine backup files themselves and your Boot Camp partition); however, you may not need to back up some drives or folders on your Mac. To save time and space on your backup hard drive, Time Machine allows you to exclude specific drives and folders from the backup process. Click the Options button, and then click the Add button (with the plus sign) to select the drives or folders you want to exclude, and they’ll appear in the Exclude These Items list.
To remove an exclusion, select it in the list and click the Delete button (with the minus sign). Note the Estimated Size of Full Backup counter increases, and Time Machine adds the item you deleted from the list to the next backup.
By default, Yosemite warns you when deleting older backup files, but you can turn this off from the Options sheet as well.
If you enable the Show Time Machine in Menu Bar check box, you can elect to back up your Mac immediately by clicking the Time Machine icon in the Finder menu bar and choosing Back Up Now.
Accessibility preferences
The Accessibility preferences pane is shown in Figure 3-32. These settings modify the display, input, and sound functions in OS X to make them friendlier to physically challenged users. Note that if you click the VoiceOver entry in the list and select the Enable VoiceOver check box, OS X speaks the text for all text and buttons onscreen.
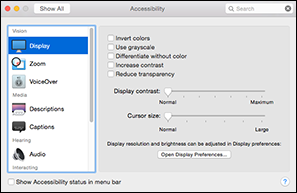
Figure 3-32: The Accessibility pane.
You can elect to display the Accessibility status icon in the Finder menu bar.
These are the categories in the list at the left:
- Vision: These settings make it easier for those with limited vision to use OS X. You can toggle VoiceOver on and off from here; I discuss more on this feature and these settings in Book VIII, Chapter 4.
To turn on the display Zoom feature, click the Zoom item in the list and select the Zoom On radio button or press
+Option+8. From the keyboard, use +Option+= (equal sign) to zoom in and +Option+- (hyphen) to zoom out. You can specify a modifier key to activate the Zoom feature using your mouse or trackpad’s scroll gesture.To specify how much magnification is used, click the More Options button. From the sheet that appears, you can set the minimum and maximum Zoom magnification increments. Optionally, you can display a preview rectangle of the area that’s included when you zoom. OS X can smooth images to make them look better when zoomed; select the Smooth Images check box to enable this feature.
You can also determine how the screen moves in relation to the pointer from the More Options sheet: By default, the zoomed screen moves with the pointer, but you can set it to move only when the pointer reaches the edge of the screen or maintain the pointer near the center of the zoomed image automatically.
Click the Display item in the list to configure Accessibility graphics options. If you prefer white text on a black background, select the Invert Colors check box. Note that depending on your display settings, it’ll probably be easier on the eyes to use grayscale display mode by selecting the Use Grayscale check box. Drag the Enhance Contrast slider to increase the contrast between text and background, and enlarge your pointer to make it easier to see using the Cursor Size slider.
- Hearing: If you need additional visual cues to supplement the spoken and audio alerts in OS X, click the Audio item in the list and select the Flash the Screen When an Alert Occurs check box. Two-channel stereo audio can be combined to single-channel mono audio with the Play Stereo Audio as Mono check box. To raise the overall sound volume in OS X, you can click the Open Sound Preferences button to display the Sound System Preferences settings, where you can drag the Volume slider to the right.
- Media: The Captions item allows you to set the style for subtitles in the DVD Player — you can also specify that closed captioning and subtitles for the deaf and hard of hearing be used instead of standard subtitles (when they are available). Click the Descriptions item to provide audio descriptions of video content (if the video format supports this feature).
- Interacting: The Keyboard item settings help those who have trouble pressing keyboard shortcuts or those who often trigger keyboard repeats (repetition of the same character) accidentally. If you select the Enable Sticky Keys check box, you can use modifier keys individually that are grouped together automatically as a single keyboard shortcut. In other words, you can press the modifier keys in a key sequence one after another instead of all together.
Click the Sticky Keys Options button to display additional settings. For example, Sticky Keys can be toggled on and off from the keyboard by pressing the Shift key five times. You can optionally specify that OS X sound a beep tone when a modifier key is pressed and whether the modifier keys are displayed onscreen.
Select the Enable Slow Keys check box to add a pause between when a key is pressed and when it’s acted upon in OS X. Click the Slow Keys Options button to add a key-click sound each time you press a key; you can also specify the delay period from this sheet. To turn keyboard repeat off, click the Open Keyboard Preferences button, which opens the Keyboard preference settings that I discuss earlier in this chapter.
Click the Mouse & Trackpad item in the list to configure Accessibility input settings. With Mouse Keys active, you can use the numeric keypad to move the pointer across your screen. Drag the Double-Click Speed slider to specify the required delay between clicks to activate a double-click for your mouse or trackpad. Click the Mouse Keys Options button to display additional options. From this sheet, Mouse Keys can be toggled on and off by pressing the Option key five times, and you can drag the Initial Delay and Maximum Speed sliders to specify how long you must hold down a keypad key before the pointer starts to move as well as how fast the pointer should move across the screen. You can also disable the trackpad on a MacBook when using Mouse Keys.
You can also click the Trackpad Options or Mouse Options buttons to select a scrolling speed. Trackpad owners can optionally fine-tune scrolling and dragging gestures as well.
If you’d prefer to use an input device that’s more comfortable to hold for navigating through Yosemite (as well as for selecting and using items), click the Switch Control entry in the list. From here, you can assign switches to functions, customize the functionality of the pointer, and set timings for switch recognition.
Click the Dictation entry in the list, and then click Dictation Commands to configure spoken commands provided by Apple, as well as to add new spoken commands of your own. You’ll find a discussion of Dictation Commands and how to use them in Book VIII, Chapter 4.