
Chapter 7
Content Builder
IN THIS CHAPTER
![]() Centralizing your marketing assets
Centralizing your marketing assets
![]() Creating content blocks for email messages
Creating content blocks for email messages
![]() Implementing approval workflow
Implementing approval workflow
In this chapter, we discuss the tools for creating and approving content. Content Builder is the central library of all the parts and pieces that go into your online marketing messages. It is the app in Salesforce Marketing Cloud where you store and create all your online marketing assets, such as the following:
- Images
- Videos
- Audio clips
- Code
- Documents
- Text
- Content blocks
- Email templates
- Emails
The Approvals app gives you the option to require approvals for the content that you store in Content Builder. By using this app, you can make sure that your content receives the okay from the right person in your company before subscribers receive it in email.
Currently, email is the only channel of content that can use Content Builder and Approvals. Marketing Cloud plans for all marketing channel apps to store content in Content Builder and process it through the Approvals app.
Using Content Builder
Figure 7-1 shows the Content Builder app. You can get to Content Builder in two ways. One, you can pause your mouse pointer on Content Builder on the app switcher and then click Content Builder. Two, you can click Content on the toolbar in the Email app. Once Marketing Cloud configures Content Builder to work with content from other channels, you'll probably be able to launch it from those apps as well.

FIGURE 7-1: Content Builder is like a library for all your marketing assets.
Changing the display
You have some options about how you display assets in Content Builder. The light gray toolbar near the top of the app, shown in Figure 7-2, offers the following options:
- Sort By drop-down list: Choose whether you see content in order by Name, Type, Customer Key, ID, Modified Date, or Added Date.
 Ascending/Descending button: Click the button next to the Sort By drop-down menu to toggle the display order between ascending and descending.
 List/Grid View button: The next button has horizontal lines, indicating list view. Click it and the assets in your Content Builder library appear in a tidy, traditional list. Beside that is a button with a matrix of little squares that represent grid view. Click it to see a larger thumbnail of each asset in a more modern tiled display.
  Settings button: The last button on the toolbar controls what information you see for each asset. Click the button and select or deselect Type, Customer Key, ID, Modified Date, and Added Date.

FIGURE 7-2: Control what you see and how you see it in Content Builder.
 If you access Content Builder from the Email app, a Use Classic Content link appears next to the app name. This link takes you back to the Email app's original content creation tools. Unless you've been using the Email app for a while and have become accustomed to those tools, there's no reason to go backward!
Finding content in Content Builder
The longer you work in Marketing Cloud, the more content you accumulate. It might not take long at all before you need help to find a particular piece of content. Fortunately, Content Builder contains several tools you can use to find what you're looking for. These tools are on the Content tab, the Filter tab, and the search bar, as shown in Figure 7-3.

FIGURE 7-3: This is where you access the tools that help you find content in Content Builder.
Navigation under Content tab
The Content Builder dashboard has a navigation pane on the left. The default view is the Content tab. In that tab, you choose which pieces of content to show in the canvas on the right. You can choose from these options:
- All Content: Every piece of content to which you have access.
- Shared with Us: Only pieces of content that other business units shared with you.
- Folders: Your folder structure, which you can use to navigate to your desired piece of content. Click a folder to see the content in the canvas.
Filters
Next to the Content tab in the navigation pane is a tab called Filters. Click this tab to set criteria for the filter. The content objects that appear in the canvas on the right are those that match the criteria you set up in the filter. For example, the filter in Figure 7-4 causes the system to display all templates and template-based emails in Content Builder.

FIGURE 7-4: This filter surfaces all your email templates and the emails you created using those templates.
You can filter with the following categories:
- Content Types: The following content types are available as filters. If an arrow appears next to the name of a content type, click it to expand the category.
- Source File: Choose what kind of file was the source for the content items that you want to find. Examples include Image and Text.
- Content Block: Choose the kind of content block you're looking for. Examples include Free Form and Dynamic Content. See more information about content blocks later in this chapter, in the “Creating reusable content blocks” section.
- Template: Select the template that is the basis of the email you're looking for. Note that this filter returns not templates but emails based on the template you choose. More information about how you create emails from templates appears later in this chapter, in the “Templates” section.
- Email: Narrow the list to emails that are template based, HTML based, or text only.
- Code Snippet: Limit your content items to only code snippets. More information about code snippets is available later in this chapter, in the “Creating reusable code snippets” section.
- Tags: Select the check box next to a tag to limit the content items you see to only those with that tag.
- Owners: Select the check boxes next to one or more usernames to see only items with those users listed as the owner.
Search bar
A search bar appears in the toolbar above the canvas. To search for a term, enter it in the field and click the magnifying glass icon.
Unfortunately, the search tool looks for your term in only the file names of the content items. If you generally like to use search to find assets, make sure to choose meaningful file names with rich keywords so that the search will work for you down the road.
Organizing content in folders
One of the ways that you can find content in Content Builder is by navigating the folder structure. You collect a lot of content as you use Marketing Cloud, so having a good organizational strategy early can save you a lot of time and headaches later.
Use the following steps to create a folder:
- From the Content Builder app, click the Content tab in the left navigation pane.
-
Right-click the Content Builder folder and choose Create Folder from the menu that appears.
A dialog box appears, prompting you to enter a name for your folder.
- Enter a name for your folder and click OK.
The system creates a folder that is a child folder (subfolder) of the Content Builder folder. You can also right-click another folder and the system will make your new folder a child of it. Regardless of where you create the folder, you can always move it to a new location.
When you create a folder inside another folder, the folder you create is called the child folder. The folder that contains the child is called the parent.
To move a folder, use these steps:
- From the Content Builder app, click the Content tab in the left navigation pane.
-
Right-click the folder you want to move and choose Move Folder from the menu that appears.
A window appears, prompting you to choose a new location for your folder.
- Select the folder that you want to be the new parent and click OK.
Importing content from Classic Content
This section is relevant if you began storing content in the Classic Content tool in the Email app and now want to move it to Content Builder. If you don't have content in the old tool that you want to move, you can skip this section.
Any content you already have organized in the Classic Content tool of the Email app does not appear in Content Builder automatically. You have to import that content.
You don't have to import all the content at once, which is a helpful option if you've accumulated old folders in your content libraries that you don't want cluttering up Content Builder. In addition, you don't have to keep the previous organization structure when you import. You can map the folders from the Classic Content tool to new folders that you've already created in Content Builder.
The Content Builder folders to which you import must already exist, so be sure to follow the steps in the preceding section to create folders before you begin the import. After you begin the import, you can't stop or undo it; so it's worth your effort to put up-front time into the design of your folder structure.
To import content from the Classic Content tool, use these steps:
-
From the Content Builder app, click the Import button, above the toolbar on the right side of the screen.
An Import Assistant window appears to walk you through the steps of importing content.
- Follow the instructions in each step of the Import Assistant:
- Introduction: Simply welcomes you to the Import Assistant. Read the content and click Next.
- Select Method: Asks whether you want to import your old folder structure along with your assets. Either way, you have the opportunity to select the particular assets to import. Choose an option and click Next.
-
Select Content: Offers check boxes next to each folder in your Classic Content tool. Select the check boxes next to the folders that contain the content you want to import. If you selected Content Only in the Select Method step, this step also offers the ability to choose the destination folder. When you're ready, click Import.
The system moves everything you import to the same folder, so if you want to import to multiple folders in Content Builder, you must execute the Import Assistant once for each folder. - Import Progress: Shows the progress of the import process. Depending on how many assets you chose to import, this process could take quite a while. You don't need to keep the Import Assistant open during the entire import. It will finish the import in the background and notify you when it is complete.
Uploading content outside Marketing Cloud
You create many kinds of content directly in Content Builder, as described in later sections of this chapter. But some kinds of content — especially images, videos, audio clips, and documents that you send as attachments — you create in other tools outside Marketing Cloud and then upload to Content Builder.
To upload a file, use these steps:
-
From the Content Builder app, navigate to the folder that will contain the uploaded file.
You can move the file later if you need to.
-
Click the Create button (above the toolbar on the right side of the screen) and choose Upload from the menu that appears.
A window appears to allow you to navigate your computer to find the files you want to import.
-
Select the file that you want to upload and click Open.
As shown in Figure 7-5, a box appears as a preview of the file to upload. The box contains a Pending Upload and Publish message. Not coincidentally, an Upload and Publish button appears above the preview box.
- Click Upload and Publish.

FIGURE 7-5: Clicking Upload and Publish is the only action you can take at this point.
 Salesforce Marketing Cloud uses a third-party content delivery service that specializes in delivering your assets quickly and reliably when your subscriber's email client requests them from the server. By clicking Upload and Publish, you're instructing Marketing Cloud to send your assets to that content delivery service.
Managing content in Content Builder
Content Builder enables you to perform several actions on a piece of content. One method is to use the Actions menu, which appears on the far right of the Content Builder toolbar, as shown in Figure 7-6. You use this menu when you want to move or delete multiple pieces of content at once. Select the check box on each item you want to move or delete, and then click Move or Delete on the Actions menu.

FIGURE 7-6: Select the check box next to multiple pieces of content to move or delete them at the same time.
You can also use the down-arrow button on each piece of content to display a drop-down menu. This menu provides the Move and Delete actions plus a lot more. In the grid view of the content (see Figure 7-7, left), the button appears near the bottom of the icon for the piece of content. In the list view (see Figure 7-7, right), the button appears on the far right of the row.
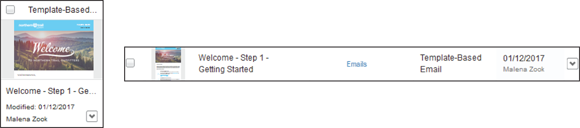
FIGURE 7-7: The button where you can find the actions menu in both the grid and the list view.
The drop-down menu on a piece of content has the following options: Edit, View Properties, Share, Replace, Duplicate, and Delete.
Edit
The Edit option opens the piece of content in the editing tools for you to edit. This option is only for content you build in the builder, such as emails, templates, and content blocks. It is not available for files you upload, such as images.
View Properties
The View Properties option displays a window that shows you the following details about the content:
- The file name of the content. You can change the file name here by clicking the current name and typing a new name in its place.
- The folder where the content resides. From this screen, you can move the piece of content to a different folder by clicking the current location and selecting a new location.
- Whether the content has been shared with other business units. You can also share the content from this screen by clicking the Share link.
- The ID number Marketing Cloud assigned to the content.
- The customer key. You assign this unique value to the piece of content, and then use the key to refer to the content from API scripts that you write. You can edit the customer key value here by clicking the current value and changing it.
- Tags, which are keywords that you assign to a piece of content. You can filter or search for content based on tags. You can also add tags to a piece of content from this screen by clicking the Add Item link.
- The content owner. This value defaults to the user who created or uploaded the piece of content. You can change this value by clicking the current owner and selecting a different one.
- The date and time the piece of content was last modified and by whom.
- The date and time the piece of content was created and by whom.
- The description you entered when you created or uploaded the piece of content.
- The static URL of the piece of content. You can click the Copy button to copy the URL to your clipboard so you can reference the piece of content in HTML.
Share
If your Marketing Cloud account has multiple business units, you can use the Share option to share a piece of content with other business units. Select the Shared radio button to display the tool you use for sharing, as shown in Figure 7-8.

FIGURE 7-8: Use sharing to make your most awesome content available for other business units to use.
To share the piece of content, follow these steps:
- In the box on the left, click the business unit with which you want to share the piece of content.
-
In the Permissions drop-down menu, choose a value.
You can choose All, Edit, Share, or View Only. The value you choose determines what the people in the business unit can do with this piece of content.
-
If you want to make the piece of content available to other business units for only a set period, select the Set Date Restrictions check box.
A panel appears where you can choose the start date and time and the end date and time of the period when you want the content to be available to the business unit.
- Click Add.
The business unit appears in the box on the right. The box on the right contains panels for All, Edit, Share, and View Only so you can see which business units have each level of permission with this piece of content.
Move
Select the Move option to change where you store this content in the Content Builder folder structure.
Replace
The Replace option is only for content you upload to Content Builder, such as images and video. Using this option, you can replace the file with an updated version of the same file. Any email or template that contains this content automatically displays the updated version. This option is not available for content items that you build in the builder, such as emails, templates, and content areas.
Duplicate
Use the Duplicate option to create a copy of the piece of content in the same folder.
Delete
Choose the Delete option to delete the piece of content permanently. Beware! If the piece of content appears in any of your emails, it will disappear from those emails.
Images and More
Images are simple in Content Builder because the hard work of creating excellent images happens well before you upload them to Marketing Cloud. The same is true for videos, audio clips, and other kinds of documents you might want to upload, such as PDFs. You just upload your finished files to Content Builder, and they are available for you to use when you're creating your email templates and messages.
To upload files to Content Builder, use the steps in the previous section “Uploading Content outside Marketing Cloud.” After uploading the files, you can use any of the procedures discussed in the preceding section, “Managing content in Content Builder.”
Templates
Content Builder takes the place of the old template creation tools that were available via the Email app. The template editor screen in Content Builder is shown in Figure 7-9.

FIGURE 7-9: A template ensures that a series of related emails look related.
An email template is a starting point for your email messages. The template contains multiple content areas where you can drag and drop images, content blocks, or other kinds of content. You can save time and ensure consistency across email messages by filling in some of those content areas on the template with boilerplate options.
Use these steps to create a template:
-
From the Content Builder app, navigate to the folder that will contain the template.
You can move the template later if you need to.
- Click the Create button (above the toolbar on the right side of the screen) and point to Template. Choose one of the following options from the flyout menu that appears:
- Paste HTML: If you're skilled with HTML and become accustomed to the conventions used in Marketing Cloud, you can paste HTML into an editor window to create customized templates.
- From Existing Template: Beginners should choose this option. Marketing Cloud offers numerous layouts that you can use as the basis of your template. The following steps in this procedure assume that you chose this option.
-
From the list of layouts that appears, click the one that you want to use, and then click Select.
The template appears for you to edit.
-
Create boilerplates, those sections of the template that you want to be the same for every email message that uses this template.
For example, you might choose the image that appears at the top and add a button to share the email on Twitter somewhere near the bottom, but leave the middle section to populate when you create the individual emails.
See Chapter 11 for information on how to create an email from a template.
Messages
Email is the only message type currently available to create and manage in Content Builder. Sending an email message is a multistep process. You might jump right into creating an email, but you'll probably create a template and reusable content — content blocks and code snippets — to go inside that template before you even start the email itself. Beyond that, sending the email is a separate process.
The following sections describe how to create the content blocks and code snippets that you can reuse across multiple templates and emails. See Chapter 11 for information on creating emails.
Creating reusable content blocks
Email and email templates are comprised of content areas arranged in different layouts, depending on the template. You can drag content blocks to those content areas, as shown in Figure 7-10. Reusable content blocks store content that you want to use in multiple emails and email templates.

FIGURE 7-10: Dragging a reusable content block in to a content area makes creating an email the easiest part of the process.
To create a reusable content block, use these steps:
-
From the Content Builder app, navigate to the folder that will contain the content block.
You can move the content block later if you need to.
- Click the Create button (above the toolbar on the right side of the screen) and point to Content Block.
- Click the type of content block you want to create from the flyout menu that appears:
- Free Form: Enter anything you want. This is a blank slate where you can feel free to include all kinds of content, such as text, HTML, or images.
- Text: Type text only.
- HTML: Paste HTML that you created in an outside tool.
- Image: Choose an image. Using an image-only content block in an email or a template is similar to using an image, but you have more control. For example, you can add a hyperlink to the image in the content block.
- A/B Test: Select two pieces of content to compare and determine which performs better. Marketing Cloud tracks the number of subscriber clicks for each piece of content.
- Dynamic Content: Create rules to show a different piece of content based on information you have about the subscriber. For example, you could set up a dynamic content block to show an image from the subscriber's state of residence.
- Social Share: Invite the subscriber to share the email on social media.
- Social Follow: Encourage the subscriber to follow you on social media.
- Button: Create a hyperlink that looks like a button.
- Layout: Choose a mini template within the content block. For example, you can create a have a two- or three-column layout for the content block, and then enter text or images in those columns.
- External Content: Pull information from your website or other external source. For example, you could create a web page that always has the latest headlines about your company. Then you can pull the content from that web page into your content area when you send the email.
-
Use the editing tools to create the content in your content block.
See more information about the editing tools in Chapter 11.
- Click Save, on the right side of the toolbar.
Creating reusable code snippets
When you're using the HTML editor tools to create an entire email, populate a content area within an email, or develop an email template, you have an option on the toolbar to Insert Code Snippet. When you choose this toolbar option, a drop-down list appears with several code snippets that were delivered with your Marketing Cloud account. The drop-down list also contains code snippets that you've created in your account.
Follow these steps to create a reusable code snippet that you can later insert using the Insert Code Snippet toolbar option:
-
From the Content Builder app, navigate to the folder that will contain the code snippet.
You can move the code snippet later if you need to.
- Click the Create button (above the toolbar on the right side of the screen) and point to Code Snippet.
- Paste the code into the editor window or upload the code.
- Click Save, on the right side of the toolbar.
Approvals
This Approvals app lets you create an approval workflow, a simple review and approval process for your content. You can get to the Approvals app from the Content Builder category on the app switcher, as shown in Figure 7-11. You can also get to Approvals from any screen where you create an email or from the Content Builder grid.
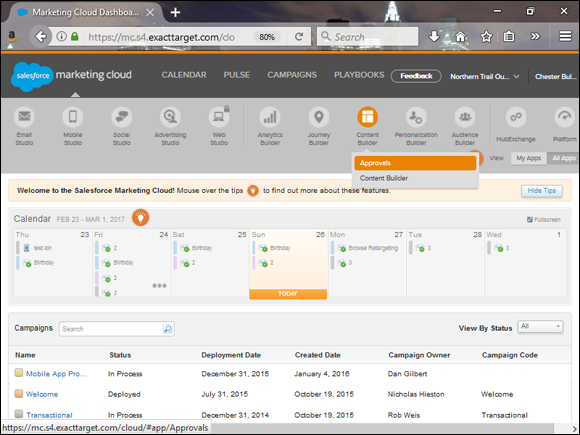
FIGURE 7-11: Getting to the Approvals app dashboard.
As of this writing, the Approvals app works only with email-related content, though the plan is to make it work with content related to other communication channels in the future. The Approvals app is not available in your account by default: You have to contact your account executive to have it turned on. There may be an additional charge for using this app.
How the Approvals app works
The Approvals app is a relatively uncomplicated tool. You can choose to create one of two kinds of workflow:
- A standard workflow incorporates three kinds of roles:
- A submitter, who creates the content and submits it for approval. A submitter can perform test sends of emails before approval but not actual live sends.
- One or more reviewers, who look over the content and then give it the okay or send it back with annotations to the submitter.
- An approver, who looks over reviewed content and provides the final approval.
- A two-step workflow combines the reviewer and the approver functions so that the person doing the reviewing is also the one to give the final okay.
Throughout this process, the system generates notifications that pass back and forth among the submitter, reviewers, and approver. If approved content is edited, it goes back to submitted status, at which point the approval process starts again.
When you turn on this functionality in your account, every message must receive approval before it is sent. You cannot choose which emails are subject to the approval process.
After you turn on your approval workflow, you see the progress of your emails through the workflow on the Approvals dashboard. Emails that have been submitted but not approved appear on the In Progress tab, and approved emails appear on the Approved tab.
Setting up an approval workflow
After you contact your Marketing Cloud representatives to enable the Approvals app in your account, you have to set up the users, set up the workflow, and turn it on. Figure 7-12 shows an example workflow setup.

FIGURE 7-12: In this two-step approval workflow, many people can submit content but only Chester can approve it.
 Don't forget to warn all your Marketing Cloud users before you turn on your approvals workflow. After you turn it on, it affects every single email in your account.
Use the following steps to set up your approval workflow:
- From anywhere in Marketing Cloud, pause your mouse pointer over your name on the right side of the toolbar and click Administration.
-
On the Applications menu in the toolbar, select Approvals.
The Approvals screen appears.
- Click the Create a Team button.
-
Choose your approval process type.
Decide whether you want a standard approval process (the one with separate reviewers and approvers) or a two-step approval process (the one where the approver does the reviewing as well).
-
Enter a team name.
After you enter a team name and move on to the next field, the system saves the team and you can no longer change the type of approval process that you selected in Step 4.
-
Add members to the team.
- In the Assign a Workflow Role field, begin entering the name of a user. Then click the correct name in the list of suggestions that appears.
- Select one or more check boxes next to the role or roles you want to assign that user.
- Click these steps for each user involved in the workflow.
The name of the user appears in the grid on the right side of the screen so you can see which users you've already assigned.
-
(Optional) After assigning roles, click the On button (on the right side of the screen) to make the workflow process effective for all emails in the account.
You might want to wait to turn on the workflow if you need to update the user's permissions.
- Click Close.
As you can see, the meat of the work to set up your approval workflow is assigning users to roles. A user must have certain user permissions to participate in the approval workflow. Use the procedures for editing users in Chapter 3 to make sure all users mentioned in your workflow have the following permissions:
- Approval ⇒ Approval Items ⇒ Add/Remove Users
- Approval ⇒ Approval Items ⇒ Create and Edit
- Approval ⇒ Approval Items ⇒ Delete
Who should use the Approvals app?
One of our clients is a national restaurant chain with hundreds of locations, most of them corporate-owned but many franchised. The chain hired a separate agency to design content for the franchised locations when they did local promotions.
The designs of the separate agency had to be approved by corporate before the emails were sent to subscribers. The Approvals app made it easy for the agency to submit its designs for approval and helped the restaurant chain keep an eye on all its messaging and make sure it reflected well on the brand.
The Approvals apps is helpful for large, dispersed companies that need technology to enforce rules about who has to see content before it arrives in subscribers' email inboxes. Approvals is not a tool for everyone, though, and it doesn't completely address the need for approval processes.
Shortly after the Approvals tool was introduced, we tried turning it on for a smaller client and quickly discovered that it can create an unnecessary bottleneck. You probably don't need the Approvals app if the following two items apply to you:
- Your marketing effort is small and centralized
- Just dropping someone a note to look over your message content before you send it has been working so far
 Very importantly, the workflow in Approvals reviews only content. During the process of submitting content for review, the submitter does choose an audience, but the email is not limited to that audience after approval. The Approvals app does not have steps to ensure that the audience, the send date, or the send time are what you want.
Even if you decide to use the Approvals app, you'll still need a separate process to make sure your emails are going to the right people at the right time.