
Chapter 17
Creating Your Customer Journeys
IN THIS CHAPTER
![]() Choosing contacts to enter a journey
Choosing contacts to enter a journey
![]() Splitting the journey at decision points
Splitting the journey at decision points
![]() Assembling components into a journey
Assembling components into a journey
In Chapter 16, you identify an opportunity to automate a series of email messages (or SMS messages or ads), figure out what data the system needs to run the automation, and build the component parts. After you complete that preparation work, you need to put it all together in Salesforce Marketing Cloud so that it can start saving you time and bringing value to your subscribers.
Journey Builder is the app in Marketing Cloud for automating communications. In this chapter, we talk about how you can use the tools in Journey Builder to create dynamic and sophisticated paths along which subscribers can travel. The system determines which path a subscriber takes based on how you configure the journey and may send different messages to different subscribers depending on which path they're following.
The strength of Journey Builder comes from its capability to use filter logic to split the journey into different branches. The branches are parallel paths that segments of your audience follow so that each subscriber receives the most relevant messages.
Revisiting the Basics of a Customer Journey
As you learn in Chapter 16, a customer journey consists of an audience of subscribers who move through a series of activities. You define entry sources that start subscribers on the journey: audiences, API events (code on your website or mobile app), or a form on a landing page you create in CloudPages. (See Chapter 15 for more information about CloudPages.)
 We're playing fast and loose with the term audience here. Strictly speaking, an audience is a special kind of sendable data extension that comes from Audience Builder (see Chapter 8). However, in the context of journeys, the common vernacular is to use audience to refer to any sendable data extension (see Chapter 6).
When the subscribers reach a decision point, or a split, the system uses your configuration logic to choose a correct branch of the journey for each subscriber. You can define the split based on the following:
- A piece of data that you have about the subscriber, such as the state where the subscriber lives
- Whether the subscriber engaged with a particular message, for example, whether the subscriber clicked a link in your newsletter
- Random chance, such as when you set up your split to choose branch A for 40 percent of the subscribers and branch B for the remaining 60 percent
After a subscriber is following a particular branch, the activities of that branch may include sending email messages, updating your customer data, or just waiting. A subscriber can exit the journey if he or she meets the exit criteria that you configured.
The Journey Builder Dashboard
You open Journey Builder by pausing your mouse pointer on the Journey Builder category on the app switcher and then clicking Journey Builder on the menu that appears. When the app appears, the dashboard shown in Figure 17-1 is the first screen that you see.

FIGURE 17-1: The Journey Builder dashboard.
You can get back to this screen by clicking Journeys in the gray toolbar at the top of the screen. That toolbar also contains Entry Sources and History options. The Entry Sources option is a legacy feature; you don't need to click that option. The History option, on the other hand, is particularly useful considering some of Marketing Cloud's most recent changes. We discuss the History screen later in this chapter.
Journeys menu option
On the left side of the dashboard is an overview of the status of all your journeys and their performance. You see the following columns of information about each journey:
- Title: The first column contains the name of the journey, the current version number, and the description if you added one when you made the journey. Click the name to open the journey.
- Status: The second column shows whether the current version of the journey is available for subscribers to enter. Valid values in this field follow:
- Running: The journey is available for subscribers to enter.
- Draft: The journey is still available for you to edit. Subscribers can't enter a journey with this status.
- Finishing: The journey was previously running but now is no longer available for subscribers to enter. Subscribers already in the journey are flowing through to activity completion.
- Stopped: The journey was previously running but now is no longer available to subscribers. The activities in the journey have stopped.
- Total Entries: The third column displays the number of contact records that have entered the current version of the journey.
- Goal Attainment: The fourth column displays the percentage of contacts that have met the goal criteria for the journey, if you have a target goal set. (We discuss target goals later in this chapter.)
- Last Modified: The final column shows the date and time that the journey was last modified.
You can sort the journeys in the list by the values in any of the columns. Click the column header to sort the list by that value.
On the right side of the screen is the Analytics panel and the following three buttons:
- Tag: Use this button to associate your journey with an existing campaign or add new keyword descriptors. See Chapter 4 for more information about campaigns and campaign tags. You must select the check box next to one or more journey names before you can click this button.
- Filter: By default, the right side of the dashboard is the Analytics section. You can click the funnel icon that appears above the Analytics section to change it to the Filters section, as shown in Figure 17-2. On this part of the screen, you can search for a particular journey by name, filter the list of journeys by status, or filter them by tags.
- Click the pie chart icon above the Filters section to return to the Analytics section. This part of the screen shows which journeys are achieving their goals. It also lists which journeys are the highest and lowest performing against their goal targets. Refer to Figure 17-1 for an example of this part of the screen.
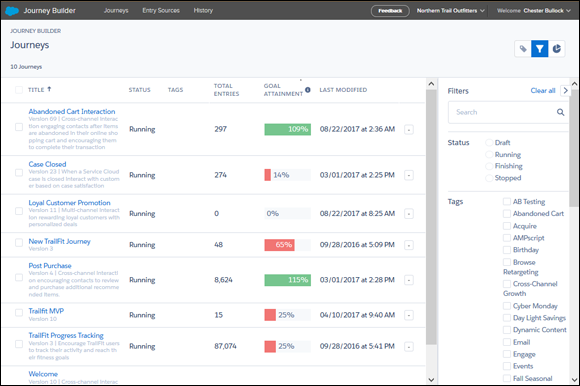
FIGURE 17-2: The dashboard with the Filters panel enabled.
History menu option
The Journey Builder History menu maintains all the journey-related activity for the last 30 days. Every time a subscriber completes a step, receives an email, or exits a journey, a row appears in the History menu. Because the History menu records every step in every journey for every subscriber, the history can contain an exceptional amount of data. Your history might have millions or tens of millions of actions.
To view the history, click History in the top navigation bar. The records in the history appear, as shown in Figure 17-3. Note the panel on the right side of the screen, where you can search for the records for a particular subscriber or filter the records based on other criteria.

FIGURE 17-3: The Journey Builder History menu, with the search/filter panel on the right.
The first field of the search/filter panel lets you search by contact key, which is an email address for most accounts. If you search for a particular email address in this field, you can see exactly where the subscriber is in a journey and what steps he or she has completed in the last 30 days.
Regardless of whether you search for a particular email address, you can also use this panel to filter the results. You can filter the results to show only those
- For a particular journey: If you choose this option, you can further filter by the versions of the journey.
- Related to a particular kind of activity: Examples include wait step, decision split, or email send.
- Within a particular date range: You can choose 12 hours, 24 hours, 7 days, 30 days, or a custom range within the last 30 days.
Figure 17-4 shows the search/filter panel.

FIGURE 17-4: Search by email address and configure filters to limit the results.
Journey Builder does not include a feature to export history data. However, we have had success highlighting the rows on the History screen and then copying and pasting them in a spreadsheet program, such as Microsoft Excel.
Journey Canvas
To create a journey, click the New Journey button on the right side of the screen. The journey canvas appears, as you see in Figure 17-5. Enter the journey name and optional description at the top of this screen.

FIGURE 17-5: The journey canvas where you create a new journey.
The primary action you take on the journey canvas is dragging entry sources or activities from the Builder on the left side of the screen to where you want them to appear in the flow of the journey on the right side of the screen. After you have the entry source in the place you want, you click the entry source or the activity on the right side of the screen to configure it.
We discuss the parts of the journey canvas next, in the following sections:
- Version
- Undo, redo, copy, and delete icon buttons
- Goals
- Settings
- Save, Test, and Activate buttons
- Tags
- Builder
Version
Near the top of the screen, between the name and description, is a version indicator. If a journey has multiple versions, you can click the down arrow next to the version number and choose which version you want to view.
Journey Builder freezes a version of the journey when it becomes active — because you clicked the Activate button or because the scheduled activation time has arrived. When you create a journey, the version indicator says Version 1. After Version 1 is active, you can't change the decision points, wait times, or other activities of the journey without creating another version.
You can update email send activities to, for example, swap in different images or update the subject lines without having to publish a new version of the journey.
The option to create a new draft appears on active journeys. Click this option to create a copy of the journey as Version 2. You can make changes to this draft version, and then activate the new version or schedule it to become active later.
After the new version becomes active, all new contacts entering the journey would start Version 2. Version 1 continues running for the contacts who had already begun the journey. Version 1 appears with the status of Finishing. When you're sure that all contacts in Version 1 have exited the journey, you can stop it.
The next time you want to make updates to the journey, you create another draft (Version 3) and continue to iterate in this fashion.
 It's possible to stop the current version of a journey without having a new draft version activated or to stop all versions of a journey at the same time. We don't recommend doing this unless it's an emergency. In both cases, all contacts in the journey would immediately exit, which could result in a poor experience for your customers.
Undo, redo, copy, and delete buttons
Above the canvas appear three useful icons buttons: undo, redo, and copy. You're probably familiar with buttons like these from other applications, but just in case, here's what they do:
 Undo button: Undo the most recent action you performed. For example, click this button to retrieve an activity that you accidentally deleted.
 Redo button: Redo the action that you undid with the undo button. You can't click this button until you've clicked the undo button at least once.
 Copy button: Create a draft copy of the entire journey. If you click this button, a window appears where you type a new name and description for the copy of the journey. Note: You might expect this button to create a copy of an individual activity, but it creates a copy of the entire journey.
- Delete button (trash can): Delete the journey or the version of the journey. Like the copy button, the delete button doesn't delete individual activities.
If you want to delete the entry source or an activity from the journey, pause your mouse pointer over the thing you want to delete. A window appears that contains a trash can icon. Click that icon to delete the item.
Goals
![]() Goals provide a quick, visual way to see whether the subscribers who are passing through a journey are meeting your marketing objective for the journey. You set a goal for a journey by clicking the trophy button above the canvas (and shown in the margin).
Goals provide a quick, visual way to see whether the subscribers who are passing through a journey are meeting your marketing objective for the journey. You set a goal for a journey by clicking the trophy button above the canvas (and shown in the margin).
When you set up a goal, you choose a data extension field and set the value that you want that field to contain. As Journey Builder finds subscribers whose data extension field matches the value you set, it updates the percentage of the whole that has met the goal.
For example, you could create a goal of 50 percent of people who abandon their carts then going on to make a purchase, as shown in Figure 17-6. Journey Builder will update the statistics to show the goal as met. (For this example to work, you would need to set up some code to update a field in a data extension to record whether this subscriber completed the purchase.)

FIGURE 17-6: This journey has a goal of getting people who left items in their online shopping cart to finish the transaction.
Setting a goal is optional. If you set a goal, you can also configure the journey so that subscribers exit the journey as soon as they meet the goal.
You can choose a data extension field as your goal field only if you have defined the data extension as a contact data type of data extension. To do this, include it in an attribute group defined in the Contact Builder app (see Chapter 8). If you haven't included the data extension that you want to use in an attribute group, you won't be able to choose the fields from that data extension from the drop-down menu when you define the goal criteria.
After you choose the data extension, field, and field value, you set the number of people or percentage of people that you want to meet that goal. Journey Builder uses this information to determine which journeys are the most successful.
The system checks whether a subscriber has met the goal at the following times:
- When the subscriber enters the journey
- When a subscriber gets to the end of a wait activity
- Each day at midnight, Central Standard Time
Settings
The next button above the canvas has the gear icon. Click this button to open the journey settings.
The first setting you can manage is Contact Entry. This setting controls whether a subscriber can enter a journey more than once. Valid values follow:
- No re-entry: Choose this value if a subscriber can enter this journey only once.
- Re-entry anytime: Choose this value if a subscriber can enter this journey multiple times, even if he or she hasn't exited it.
- Re-entry only after existing: Choose this value if a subscriber can re-enter the journey, but only after the subscriber has finished it.
The other setting you can manage is Default Channel Addresses. As of the time of this writing, this setting was slated to be deprecated; if you still see it, you should probably just leave it set to the default value.
When you've finished managing the settings for the journey, click the Done button to return to the journey canvas.
Save, Test, and Activate buttons
The last items on the toolbar are the Save, Test, and Activate buttons.
-
Save button: Save the draft version of the journey that you're working on.
Journey Builder does not automatically save as you make changes, so make sure to save often, especially if you are building a complex journey. - Test button: Verify that all paths in the journey are set up correctly. The system checks that you have configured the filters for all split activities and associated all message activities with messages.
- Activate button: Set the current draft version of the journey to active, meaning that all new contacts entering the journey will flow into that active version of the journey.
We strongly recommend that you perform a begin-to-end test with the journey set to active to verify that sends are working as expected. You should set up special testing contacts and email addresses for this purpose. If necessary to facilitate testing, you can reduce the wait periods to minutes instead of hours or days. After you've completed the testing and verified that it's working as you expected, you could create a new draft version with the correct wait times. Make sure to set that version to active before allowing your audience to begin to flow into the journey.
Builder
Builder is the panel on the left side of the screen that contains the components of your journey. You click an item in Builder and drag it to the workspace on the right. You can choose the following categories of items:
- Entry sources
- Activities
We discuss the types of entry sources and activities in the following sections.
Journey Entry Sources
The first step in configuring a customer journey is to define where the subscribers who go through the journey come from. Journey Builder offers the following methods to get subscribers into your journey:
- The most commonly used method is an audience (read: sendable data extension). You can refresh your memory of sendable data extensions in Chapter 6.
- Another relatively straightforward way to get subscribers into your journey is to use a Smart Capture form that you set up on a CloudPages site. You can read all about CloudPages and Smart Capture in Chapter 15.
- Using the API is a powerful and flexible way to start subscribers in a journey. However, it does require you to write code to use the Marketing Cloud API and incorporate that code into your website or mobile applications. Because of the complexity and advanced technical knowledge required to use it, the API is out of the scope of this book.
- If you use the Salesforce Sales and Services Cloud and have integrated it with Marketing Cloud, you can also bring in subscribers from the Sales and Services Cloud to your journey.
In this chapter, we assume that you're using an audience as your journey's entry source. Not only is it the easiest entry method, but it's also the method that Salesforce recommends. Several Marketing Cloud apps can produce audiences. In this section, we discuss the audiences that come from Email Studio, Automation Studio, and Mobile Studio.
Depending on the nature of the journey, the audience that you use might already have all the subscribers in it when you start the journey. You can configure the journey to start only new subscribers in the journey to avoid starting the same subscribers over when you run the same journey again in the future.
On the other hand, you could also import new subscribers into the audience even while the journey is running. You can set up the journey to check the audience periodically for new records.
Another entry source — events — is available for adding subscribers to a journey. An event entry source is a date, such as the subscriber's birthdate. Journey Builder looks for subscribers in a list whose birthdate is the current day and adds those subscribers to the journey. At the time of this writing, Marketing Cloud announced plans to deprecate this feature.
The event entry source was previously the most common method and is the most heavily documented. Even after the feature is gone, you might find references to the event entry source. Fortunately, you can achieve the same functionality using the audience method.
Email Studio audiences
Email Studio can send email messages to subscribers who are on a list or on a sendable data extension (refer to Chapter 11). You can configure Email Studio to evaluate and insert records from a sendable data extension into the journey at the time you activate the journey or on a schedule. If you set up a schedule, you can indicate whether to evaluate all records in the data extension or only those that are new to the data extension since the last time you did the evaluation.
Starting a journey with an Email Studio audience
Use the following steps to start a journey with an Email Studio audience:
-
From the journey canvas in Journey Builder, click the Audience icon in the Entry Sources panel on the left and drag it to the Start with an Entry Source area on the canvas.
The Start with an Entry Source icon is replaced with an Audience icon.
-
Pause your mouse pointer on the Audience icon and click the Configure button that appears.
The Select Audience window appears.
-
Select Email Studio Audience, and then click Next.
The Select Audience Wizard appears open to the first step: Properties.
- On the Properties step, enter a name for the audience.
- (Optional) Add a description and select a different icon to represent the audience.
- Click Next to move to the Select Audience step.
- In the Folders pane on the left, navigate to the location of the Email Studio audience, and select the audience from the list on the right.
-
Click Next to move to the Contact Filter step.
If you select a data extension that no other journeys are using, a green banner appears. But if you choose a data extension that another journey is using, a warning appears. Journey Builder will let you proceed, but you should try to keep separate data extensions for each journey entry point. -
(Optional) Click an attribute from the Attributes pane on the left and drag it to the canvas on the right.
The attribute appears on a line where you can set a value as a criterion. You use this step to determine a subscriber's eligibility to enter a journey based on attribute data.
- Click Next to proceed to the Entry Schedule step.
- Select one of the following values:
- Run Once When the Journey Is Activated: The journey gets the subscribers out of the audience when you activate the journey. Any subscribers that you add to the audience after that time will not enter the journey unless you run the journey again.
- Run Using the Following Schedule: You must indicate when you want the journey to retrieve the subscribers from the audience. Optionally, you can configure the journey to repeat the subscriber retrieval periodically. In that case, you must also indicate whether to evaluate the entire audience or only new subscribers. See the note at the end of this procedure for more information.
- Click Next to move to the Summary step.
- Review the summary details on this screen and then click Done.
Special note about the Entry Schedule step: You can feel as if you're going down a rabbit hole when you reach the Entry Schedule step of this wizard. If you choose Run Once When the Journey Is Activated, you simply select a single radio button and get on with the wizard. If you go the more common route of choosing Run Using the Following Schedule, however, it's a different story. Figure 17-7 shows the Entry Schedule step as it looks when you first reach it.

FIGURE 17-7: The initial view of the Entry Schedule step in the wizard is deceptively simple.
When you click this second option, the following additional fields appear:
- Start date
- Start time
- Time zone
- Repeat
The Repeat field is where you can choose how frequently the system should run the process to retrieve subscribers from the audience and start them in the journey. The default value is None (Run Once), and if you leave it set that way, no more fields appear on this screen and you can move on. Running the retrieval only once on a scheduled date is basically the same as choosing Run Once When the Journey Is Activated; the only difference is that you're choosing a different time to retrieve the subscribers from the audience.
When you choose a different value in the Repeat field, things start getting complicated. For example, if you choose Hourly in that field, another field appears where you indicate how many hours between retrievals and yet another field appears where you indicate when the recurrence should end.
In addition, a gray box appears and you have to indicate how the system should evaluate the records when the scheduled retrieval runs. The options are as follows:
-
Evaluate new records only: This option is faster because the system considers only the subscribers who have joined the audience since the last scheduled run. You should use this method when you expect to add new subscribers to the audience while the journey is running and you want to make sure that you don't miss adding those new subscribers to the journey.
If you choose this option, you're telling the system to look at only new subscribers. However, because you're still creating the journey, the definition of what is a new subscriber could be confusing when you first activate the journey and the system does the initial retrieval of the subscribers.
That's why this gray box also requires you to make yet another selection to indicate how you want the system to deal with the initial run. The Entry Schedule step in the wizard, completely expanded to show the most possible fields, appears in Figure 17-8.
- Evaluate all records: The second option is slower because the system looks at every subscriber in the audience every time it runs. If your journey uses attribute data to make decisions and that attribute data might change between the time you activate the journey and the time the subscriber reaches that decision point, this is the option for you. Choosing this value ensures that the journey gets the most recent subscriber attribute value before making a decision.

FIGURE 17-8: As far down the Entry Schedule rabbit hole as you can go.
Automation Studio audience
As we discuss in Chapter 10, you can use the Automation Studio app to automate simple, linear processes. Automation Studio does not offer the sophistication that Journey Builder does. For example, Journey Builder enables you to create parallel branches of a program, but Automation Studio doesn't.
However, Automation Studio is much simpler to use than Journey Builder, and many people — even people who know and use Journey Builder — prefer to use Automation Studio when its functionality suits the task they want to automate. To support people using both Automation Studio and Journey Builder, Marketing Cloud has made it possible to use an Automation Studio program to add subscribers to a journey.
Automation Studio programs can include activities that import subscriber data into a data extension, filter subscriber data already in a data extension, or query a data extension of subscriber data to return only subscribers who match certain criteria. A data extension that results from one of these activities can be the entry source for your journey.
For example, you might use Automation Studio to import a file of customer data into a master data extension. The data that you load might contain both new records that need to enter the journey as well as data updates for records that already exist. After the import runs, you would need to run a query to select the new records from that master data extension that would be entering the journey.
When you create your Automation Studio program to generate an audience, you set up the schedule for when it should run and when it should repeat. When you use that audience as the entry source for your journey, the journey just uses the same schedule that you set on the program, so you don't have to set all that information again.
Use the following steps to start a journey with an Automation Studio audience:
-
From the journey canvas in Journey Builder, drag the Audience icon from the Entry Sources panel on the left to the Start with an Entry Source area on the canvas.
The Start with an Entry Source icon disappears and an Audience icon appears in its place.
-
Pause your mouse pointer on the Audience icon and click the Configure button that appears.
The Select Audience window appears.
-
Select Automation Studio Audience, and then click Next.
The Select Audience Wizard appears open to the first step: Properties.
- On the Properties step, enter a name for the audience.
- (Optional) Add a description and select a different icon to represent the audience.
- Click Next to move to the Select Automation step.
- In the Folders pane on the left, navigate to the location of the Automation Studio automation. Choose the automation that contains an activity associated with the data extension you’ll use for journey entry.
-
Click Next.
The Select Data Extension step of the wizard appears.
You can see a list of all data extensions associated with the automation in the Associated Data Extensions column on the right side of the screen. -
Select the data extension that you want to use as your journey entry data extension, and then click Next.
The Summary step appears.
- Review your selections on the summary page, and then click Done.
MobileConnect audience
Chapter 12 discusses mobile marketing and the MobileConnect app. The MobileConnect app lets you send and receive SMS/MMS messages with subscribers who have given you their mobile phone number.
A common kind of mobile campaign to set up is an email opt-in campaign. In this kind of campaign, you publish a keyword that people can text to you to join your email list. For example, you could print fliers that you hang up in your store to tell people to text DEALS and their email address to your short code to start receiving coupons by email.
MobileConnect collects the email addresses from an email opt-in campaign in a data extension that you can use as the entry source of your journey.
Use the following steps to start a journey with a MobileConnect audience:
-
From the journey canvas in Journey Builder, drag the Audience icon from the Entry Sources panel on the left to the Start with an Entry Source area of the canvas.
The Start with an Entry Source icon is replaced with an Audience icon.
-
Pause your mouse pointer on the Audience icon and click the Configure button that appears.
The Select Audience window appears.
-
Select MobileConnect Audience, and then click Next.
The Select Audience Wizard appears open to the first step: Properties.
- On the Properties step, enter a name for the audience.
- (Optional) Add a description and select a different icon to represent the audience.
- Click Next to move to the Select List step.
-
Select a list from the options, and then click Next.
You can use the Search field to find a particular list if you don't immediately see the one that you want. The Entry Schedule step appears.
- Select one of the following values:
- Run Once When the Journey Is Activated: The journey gets subscribers out of the audience when you activate the journey. Any subscribers that you add to the audience after that time will not enter the journey unless you run the journey again.
- Run Using the Following Schedule: You must indicate when you want the journey to retrieve the subscribers from the audience. Optionally, you can configure the journey to repeat the subscriber retrieval periodically. In that case, you must also indicate whether to evaluate the entire audience or only the new subscribers.
- Click Next to move to the Summary step.
- Review the summary details on this screen, and then click Done.
Understanding Activities
Activities are the things that happen after a subscriber enters a journey and travels down its paths. When you're creating your journey in Journey Builder, a list of activities appears in Builder. You can click these activities and drag them to the canvas on the right.
As you can see in Figure 17-9, the Activities section of the left panel has four sections:
- Messages: Send messages, such as email or SMS.
- Flow Control: Split the journey into branches or join the branches back together. This is also the section where the wait activity appears.
- Customer Updates: Update your database of subscriber information with data you received as part of the journey.
- Sales and Service Cloud: If you use Salesforce Sales and Service Cloud and have integrated it with your Marketing Cloud account, you'll see this section in the Activities panel. The activities in this section let you update information in Sales and Service Cloud, and they open up lots of opportunities to use journeys in powerful ways. However, this section of the panel is outside the scope of this book.

FIGURE 17-9: Activities in the Builder pane on the left of the screen.
Messages
To add a message to your journey, you simply click the message type from the left panel, drag it to the place in the journey where you want it, and then configure it. To configure the message, pause your mouse pointer over the icon and click the Configure button that appears, as you see in Figure 17-10.

FIGURE 17-10: The Configure button appears when you pause your mouse pointer on the message icon in the journey.
For email messages, you see a wizard similar to other email send wizards in Marketing Cloud apps. You choose the email and then have the option to override properties, such as the subject line and the from name. Because you probably set these properties as you wanted them when you created the email, it's unlikely that you'll want to change them now.
For SMS messages, you must choose a message that you created in Mobile Studio using an Outbound template and configured to send as an interaction. See Chapter 12 for more information on Mobile Studio.
In this wizard, you choose a message that already exists, not to create one, so make sure you create all your messages before you begin assembling your journey.
Flow Controls
The Flow Controls section contains five activities that you can use to move your subscribers through their journey:
- Decision Split: Probably the most commonly used way to split paths along a journey, a decision split chooses the right path for a subscriber based on a piece of subscriber data you have in the data extension.
- Random Split: Random splits allow you to create up to ten branches, with a random selection of subscribers passing down each path. You can choose the percentage of subscribers that you want to proceed down each branch.
-
Engagement Split: An engagement split allows you to create Yes or No paths based on whether the subscriber opened or clicked an email that you sent earlier in the journey.
Engagement splits currently do not support links containing dynamically generated variables from AMPscript or query strings, which are commonly used for things such as analytics tagging. Therefore, if you include variables in your links for analytics purposes, it won't count as a click when a subscriber clicks it. - Join: Inserting a join step after the last activity on a branch allows you to merge subscribers from that branch onto another branch in the journey.
-
Wait: The wait activity holds subscribers on the current activity for the amount of time you specify before letting them proceed to the next activity in the journey. A wait can be as a little as a minute or as much as months. You might use a wait when you want to give the subscriber time to engage with an email before you use an engagement split. You might also use a wait to put some time between email messages in a series to prevent them all showing up in the subscriber's inbox at once.
Journey Builder automatically adds a one-day wait after most activity types when you drag them to the canvas. You can delete the wait, but we have found that it's better to leave it there. You can reduce the wait time if necessary.
Similar to messages, to add a flow control activity to your journey, you can click it from the panel on the left and drag it to the canvas on the right. Pause your mouse pointer on the activity icon and click the Configure button.
Decision split
When you configure a decision split, the Decision Split window appears, as shown in Figure 17-11.

FIGURE 17-11: Create and reorder paths in the Decision Split window.
The window defaults to containing two paths: The first is for subscribers who meet the criteria you configure, and the second is for everyone else. You can add more criteria-based paths by clicking the Add New Path button. Subscribers who don't meet the criteria for any of the paths will follow the Remainder path.
You can enter a name for the path, and then you click the Create Filter Expression link or the pencil icon to define the criteria. Figure 17-12 shows the Decision Split window that appears.

FIGURE 17-12: Define the criteria for this path.
Navigate to the attribute upon which you want to base the criteria. Click the attribute from the panel on the left and drag it to the workspace on the right. Depending on the data type of the attribute you chose, fields appear where you define the attribute value that a subscriber must have to qualify for this path.
The criteria that you use for your paths need not be mutually exclusive. For example, you could configure the first path to take everyone who lives in Indiana, but configure the next path to take subscribers who have birthdays in June. When a subscriber matches both criteria, how does the system decide which path to use?
This is where the order of steps in the workspace matters. The system evaluates the paths in order and sends the subscribers along the first one they match. You can change the order of paths in this workspace by dragging a path to the place in the order where you want it.
Random split
When you drag a Random Split activity on to the workspace, the Random Split window appears, as shown in Figure 17-13.

FIGURE 17-13: Choose the number of branches and what percentage of subscribers to send down each path.
When you click the number of paths you want, sliders appear on the Distribution line below. You drag the sliders until you have the desired percentage of subscribers going into each path.
Engagement split
You can't drag an Engagement Split activity onto your workspace until you include at least one email send activity. That's because this kind of split chooses the subscriber's path based on whether he or she clicked or opened an email that you sent.
When you configure an Engagement Split, the Engagement Decision window shown in Figure 17-14 appears.

FIGURE 17-14: The Engagement Decision window.
In the Message to Monitor drop-down menu, select the message that is the basis for the path decision. Then choose Open or Click to indicate what a subscriber must do with that message to qualify for the path.
Join
You must have at least two paths defined in your journey before you can use the Join activity. The Join activity brings two paths together.
When you drag a Join activity onto a path in your journey, two icons appear on the path: a Join icon and a Drag to Join icon.

FIGURE 17-15: Joining two paths in your journey.
Click the Drag to Join icon and drag it to the path with which you want to join. The paths of the journey appear connected after you join them as shown in Figure 17-15.
Wait
When you add a Wait activity to a path, the Wait window appears, as shown in Figure 17-16.

FIGURE 17-16: Configuring the Wait activity.
First, you choose whether you want the wait period to be a duration (for example, two days) or a particular hour of the day after a duration (for example, 8 a.m. after two days have passed).
Next, you enter the length of the wait duration. If you chose Duration + Time, you also enter the time of day when you want the wait to end.
Updating contacts
The third section is Customer Updates. This section contains the Update Contact activity, which updates your customer database with information about subscribers as they pass through this point in the journey.
You might use the Update Contact activity to make a note that the subscriber completed the previous activity. Later in your journey, you can set up a decision split to look at that note and choose a branch based on that information. You might also have a “journey completed” field in your data extension where you set a yes-or-no value based on whether the subscriber completed the journey.
Use the following steps to add and configure an Update Contact activity:
- Click the Update Contact activity in Builder on the left side of the screen and drag it to the position where you want it on a journey path on the right side of the screen.
-
Pause your mouse pointer over the Update Contact icon on the path, and click the Configure button that appears.
The Update Contact Wizard appears, open to the first step: Choose Data Extension.
- Choose the data extension that contains the field you want to update with this activity.
-
Click Next.
You move to the Set Attribute/Value step of the wizard.
- In the Attribute drop-down menu, select the field that you want to update.
- In the Value field, enter the value that you want to insert, and then click Done.
You can update up to five fields in the same data extension using a single Update Contact activity.
Real-time metrics
After you have completed your journey and activated it, Journey Builder begins to collect metrics about how the journey is performing.
As subscribers pass through activities, an on-screen mouse-over on the canvas increments the total number of subscribers that have passed through that point. For example, pause your mouse pointer over an email activity to display sent, open, and click counts and rates for the message. If applicable, these metrics also show the percentage of a goal achieved.
Figure 17-17 shows the real-time metrics for an activity.

FIGURE 17-17: Watch your success unfold with real-time metrics.
Journey Builder reporting
Reporting for emails sent from Journey Builder can be found in the Tracking menu in the Email Studio app. Look for a folder labeled Journey Builder Sends. A new subfolder is automatically generated for each version of a journey. More comprehensive reporting for Journey Builder can be generated through the Reports app by selecting the Journey Builder Email Send Summary or Journey Builder Email Send Summary By Day reports (see Chapter 9 for more information on using reports).